Android Application Development: A Beginner's Tutorial (2015)
Chapter 8. ListView
A ListView is a view for showing a scrollable list of items, which may come from a list adapter or an array adapter. Selecting an item in a ListView triggers an event for which you can write a listener.
If an activity contains only one view that is a ListView, you can extend ListActivity instead of Activity as your activity class. Using ListActivity is convenient as it comes with a number of useful features.
This chapter shows how you can use the ListView and ListActivity as well as create a custom ListAdapter and style a ListView in three sample applications.
Overview
Technically, android.widget.ListView, the template for creating a ListView, is a descendant of the View class. You can use it the same way you would other views. What makes ListView a bit tricky to use is the fact that you have to obtain a data source for it in the form of a ListAdapter. The ListAdapter also supply the layout for each item on the ListView, so the ListAdapter really plays a very important role in the life of a ListView.
The android.widget.ListAdapter interface is a subinterface of android.widget.Adapter. The close relatives of this interface are shown in Figure 8.1.
Creating a ListAdapter is explained in the next section, “Creating a ListAdapter.” Once you have a ListAdapter, you can pass it to a ListView’s setAdapter method:
listView.setAdapter(listAdapter);
You can also write a listener that implements AdapterView.OnItemClickListener and pass it to the ListView’s setOnItemClickListener method. The listener will be notified every time a list item is selected and you can write code to handle it, like so.
listView.setOnItemClickListener(new
AdapterView.OnItemClickListener() {
@Override
public void onItemClick(AdapterView<?> parent, final View view,
int position, long id) {
// handle item
});
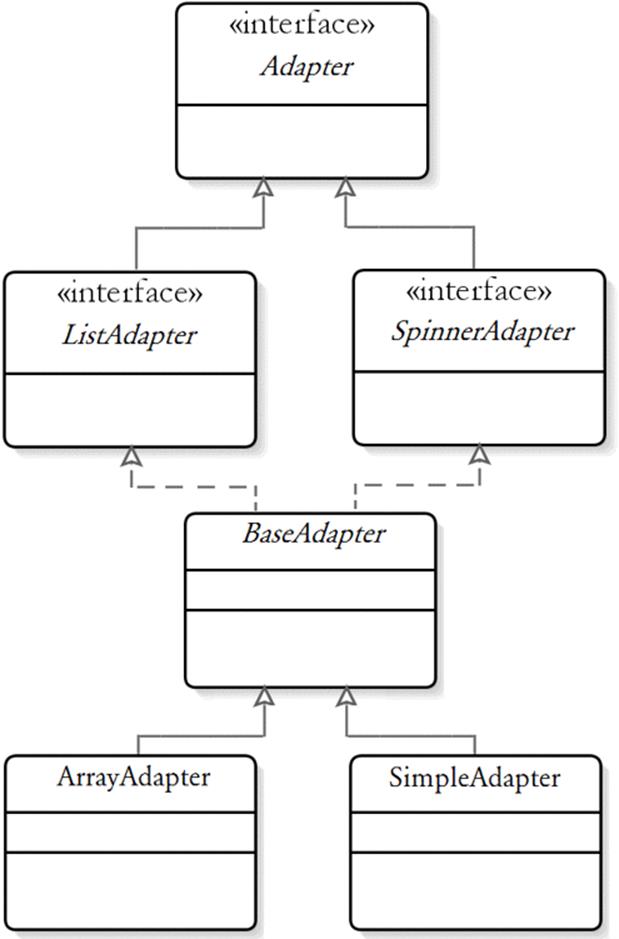
Figure 8.1: The parents and implementations of ListAdapter
Creating A ListAdapter
As mentioned in the previous section, the trickiest part of using a ListView is creating a data source for it. You need a ListAdapter and as you can see in Figure 8.1 you have at least two implementations of ListAdapter that you can use.
One of the concrete implementations of ListAdapter is the ArrayAdapter class. An ArrayAdapter is backed by an array of objects. The string returned by the toString method of each object is used to populate each item in the ListView.
The ArrayAdapter class offers several constructors. All of them require that you pass a Context and a resource identifier that points to a layout that contains a TextView. This is because each item in a ListView is a TextView. These are some of the constructors in the ArrayAdapterclass.
public ArrayAdapter(android.content.Context context, int resourceId)
public ArrayAdapter(android.content.Context context, int resourceId,
T[] objects)
If you do not pass an object array to a constructor, you will have to pass one later. As for the resource identifier, Android provides some pre-defined layouts for a ListAdapter. The identifiers to these layouts can be found in the android.R.layout class. For example, you can create anArrayAdapter using this code snippet in your activity.
ArrayAdapter<String> adapter = new ArrayAdapter<String>(this,
android.R.layout.simple_list_item_1, objects);
Using android.R.layout.simple_list_item_1 will create a ListView with the simplest layout where the text for each item is printed in black. Alternatively, you can use android.R.layout.simple_expandable_list_item_1. However, you probably want to create your own layout and pass it to the constructor, instead. This way you would have more control over the look and feel of your ListView.
Most of the time you can use a string array as the data source for your ListView. You can create a string array programmatically or declaratively. Doing it programmatically is simple and you do not have to deal with an external resource:
String[] objects = { "item1", "item2","item-n" };
The disadvantage of this approach is that updating the array would require you to recompile your class. Creating a string array declaratively, on the other hand, gives you more flexibility as you can easily edit the elements.
To create a string array declaratively, start by creating a string-array element in your strings.xml file under res/values. For example, the following is a string-array named players.
<string-array name="players">
<item>Player 1</item>
<item>Player 2</item>
<item>Player 3</item>
<item>Player 4</item>
</string-array>
When you save the strings.xml file, Android Studio will update your R generated class and add a static final class named array, if none exists, as well as add a resource identifier for the string-array element to the array class. As a result, you now have this resource identifier to access your string array from your code:
R.array.players
To convert the user-defined string array to a Java string array, use this code.
String[] values = getResources().getStringArray(R.array.players);
You can then use this string array to create an ArrayAdapter.
Using A ListView
The ListViewDemo1 application shows how to use a ListView that is backed by an ArrayAdapter. The array that supplies values to the ArrayAdapter is a string array defined in the strings.xml file. Listing 8.1 shows the strings.xml file.
Listing 8.1: The res/values/strings.xml file for ListViewDemo1
<?xml version="1.0" encoding="utf-8"?>
<resources>
<string name="app_name">ListViewDemo1</string>
<string name="action_settings">Settings</string>
<string-array name="players">
<item>Player 1</item>
<item>Player 2</item>
<item>Player 3</item>
<item>Player 4</item>
<item>Player 5</item>
</string-array>
</resources>
The layout for the ArrayAdapter is defined in the list_item.xml file presented in Listing 8.2. It is located under res/layout and contains a TextView element. This layout will be used as the layout for each item in the ListView.
Listing 8.2: The list_item.xml file
<?xml version="1.0" encoding="utf-8"?>
<TextView xmlns:android="http://schemas.android.com/apk/res/android"
android:id="@+id/list_item"
android:layout_width="fill_parent"
android:layout_height="fill_parent"
android:padding="7dip"
android:textSize="16sp"
android:textColor="@android:color/holo_green_dark"
android:textStyle="bold" >
</TextView>
The application consists of only one activity, MainActivity. The layout file (activity_main.xml) for the activity is given in Listing 8.3 and the MainActivity class in Listing 8.4.
Listing 8.3: The activity_main.xml file for ListViewDemo1
<LinearLayout
xmlns:android="http://schemas.android.com/apk/res/android"
android:orientation="vertical"
android:layout_width="fill_parent"
android:layout_height="fill_parent">
<ListView
android:id="@+id/listView1"
android:layout_width="wrap_content"
android:layout_height="wrap_content" />
</LinearLayout>
Listing 8.4: The MainActivity class for ListViewDemo1
package com.example.listviewdemo1;
import android.app.Activity;
import android.app.AlertDialog;
import android.os.Bundle;
import android.util.Log;
import android.view.Menu;
import android.view.View;
import android.widget.AdapterView;
import android.widget.ArrayAdapter;
import android.widget.ListView;
public class MainActivity extends Activity {
@Override
protected void onCreate(Bundle savedInstanceState) {
super.onCreate(savedInstanceState);
setContentView(R.layout.activity_main);
String[] values = getResources().getStringArray(
R.array.players);
ArrayAdapter<String> adapter = new ArrayAdapter<String>(
this, R.layout.list_item, values);
ListView listView = (ListView) findViewById(R.id.listView1);
listView.setAdapter(adapter);
listView.setOnItemClickListener(new
AdapterView.OnItemClickListener() {
@Override
public void onItemClick(AdapterView<?> parent,
final View view, int position, long id) {
String item = (String)
parent.getItemAtPosition(position);
AlertDialog.Builder builder = new
AlertDialog.Builder(MainActivity.this);
builder.setMessage("Selected item: "
+ item).setTitle("ListView");
builder.create().show();
Log.d("ListView", "Selected item : " + item);
}
});
}
@Override
public boolean onCreateOptionsMenu(Menu menu) {
getMenuInflater().inflate(R.menu.menu_main, menu);
return true;
}
}
Figure 8.2 shows the application.
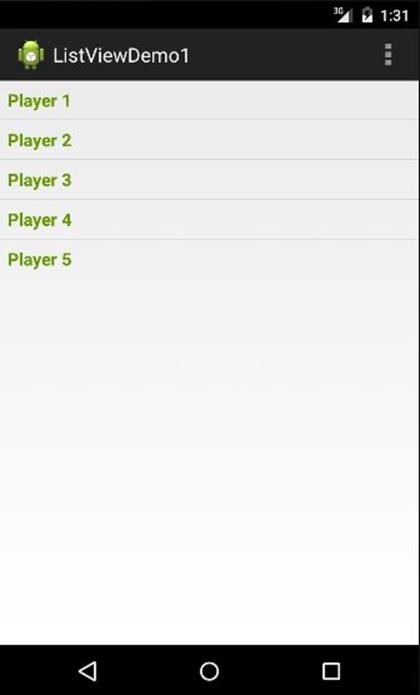
Figure 8.2: A simple ListView
Extending ListActivity and Writing A Custom Adapter
If your activity will only have one component that is a ListView, you should consider extending the ListActivity class instead of Activity. With ListActivity, you do not need a layout file for your activity. ListActivity already contains a ListView and you do not need to attach a listener to it. On top of that, the ListActivity class already defines a setListAdapter method, so you just need to call it in your onCreate method. In addition, instead of creating an AdapterView.OnItemClickListener, you just need to override the ListActivity’s onListItemClick method, which will be called when an item on the ListView gets selected.
The ListViewDemo2 application shows how to use ListActivity. The application also demonstrates how to create a custom ListAdapter by extending the ArrayAdapter class and creating a layout file for the custom ListAdapter.
The layout file for the custom ListAdapter in ListViewDemo2 is presented in Listing 8.5. It is named pretty_adapter.xml file and is located under res/layout.
Listing 8.5: The pretty_adapter.xml file
<?xml version="1.0" encoding="utf-8"?>
<LinearLayout
xmlns:android="http://schemas.android.com/apk/res/android"
android:layout_width="match_parent"
android:layout_height="match_parent">
<ImageView
android:id="@+id/icon"
android:layout_width="36dp"
android:layout_height="fill_parent"/>
<TextView
android:id="@+id/label"
android:layout_width="fill_parent"
android:layout_height="fill_parent"
android:gravity="center_vertical"
android:padding="12dp"
android:textSize="18sp"
android:textColor="@android:color/holo_blue_bright"/>
</LinearLayout>
Listing 8.6 shows the custom adapter class, called PrettyAdapter.
Listing 8.6: The PrettyAdapter class
package com.example.listviewdemo2;
import android.content.Context;
import android.graphics.drawable.Drawable;
import android.view.LayoutInflater;
import android.view.View;
import android.view.ViewGroup;
import android.widget.ArrayAdapter;
import android.widget.ImageView;
import android.widget.TextView;
public class PrettyAdapter extends ArrayAdapter<String> {
private LayoutInflater inflater;
private String[] items;
private Drawable icon;
private int viewResourceId;
public PrettyAdapter(Context context,
int viewResourceId, String[] items, Drawable icon) {
super(context, viewResourceId, items);
inflater = (LayoutInflater) context
.getSystemService(Context.LAYOUT_INFLATER_SERVICE);
this.items = items;
this.icon = icon;
this.viewResourceId = viewResourceId;
}
@Override
public int getCount() {
return items.length;
}
@Override
public String getItem(int position) {
return items[position];
}
@Override
public long getItemId(int position) {
return 0;
}
@Override
public View getView(int position, View convertView,
ViewGroup parent) {
convertView = inflater.inflate(viewResourceId, null);
ImageView imageView = (ImageView)
convertView.findViewById(R.id.icon);
imageView.setImageDrawable(icon);
TextView textView = (TextView)
convertView.findViewById(R.id.label);
textView.setText(items[position]);
return convertView;
}
}
The custom adapter must override several methods, notably the getView method, which must return a View that will be used for each item on the ListView. In this example, the view contains an ImageView and a TextView. The text for the TextView is taken from the array passed to thePrettyAdapter instance.
The last piece of the application is the MainActivity class in Listing 8.7. It extends ListActivity and is the only activity in the application.
Listing 8.7: The MainActivity class for ListViewDemo2
package com.example.listviewdemo2;
import android.app.ListActivity;
import android.content.Context;
import android.content.res.Resources;
import android.graphics.drawable.Drawable;
import android.os.Bundle;
import android.util.Log;
import android.view.View;
import android.widget.ListView;
public class MainActivity extends ListActivity {
@Override
public void onCreate(Bundle savedInstanceState) {
super.onCreate(savedInstanceState);
// Since we're extending ListActivity, we do
// not need to call setContentView();
Context context = getApplicationContext();
Resources resources = context.getResources();
String[] items = resources.getStringArray(
R.array.players);
Drawable drawable = resources.getDrawable(
R.drawable.pretty);
setListAdapter(new PrettyAdapter(context,
R.layout.pretty_adapter, items, drawable));
}
@Override
public void onListItemClick(ListView listView,
View view, int position, long id) {
Log.d("listView2", "listView:" + listView +
", view:" + view.getClass() +
", position:" + position );
}
}
If you run the application, you will see an activity like that in Figure 8.3.
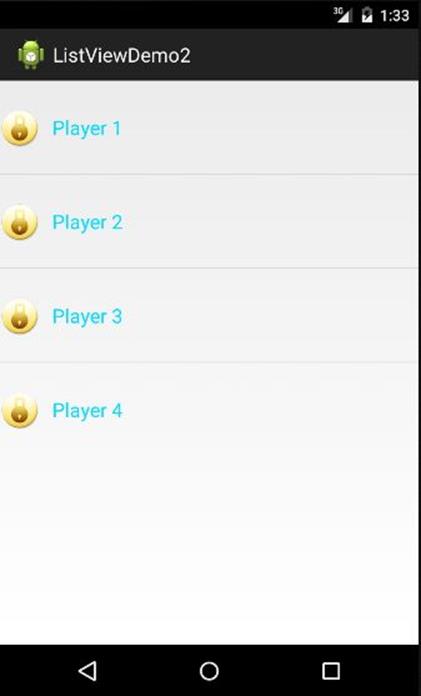
Figure 8.3: Using custom adapter in ListActivity
Styling the Selected Item
It is often desirable that the user be able to see clearly the currently selected item in a ListView. To make the selected item look differently than the rest of the items, set the ListView’s choice mode to CHOICE_MODE_SINGLE, like so.
listView.setChoiceMode(ListView.CHOICE_MODE_SINGLE);
Then, when constructing the underlying ListAdapter, use a layout with an appropriate style. The easiest is to pass the simple_list_item_activated_1 field. For example, when used in a ListView, the following ArrayAdapter will cause the selected item to have a blue background.
ArrayAdapter<String> adapter = new ArrayAdapter<String>(
context, android.R.layout.simple_list_item_activated_1,
array);
If the default style does not appeal to you, you can create your own style by creating a selector. A selector is a drawable that can be used as a background drawable in a TextView. Here is an example of a selector file that must be saved in the res/drawable directory.
<selector
xmlns:android="http://schemas.android.com/apk/res/android">
<item android:state_activated="true"
android:drawable="@drawable/activated"/>
</selector>
The selector must have an item whose state_activated attribute is set to true and whose drawable attribute refers to another drawable.
The ListViewDemo3 application contains an activity that employs two ListViews that are placed side by side. The first ListView on the left is given the default style whereas the second ListView is decorated using a custom style. Figure 8.4 shows the application.
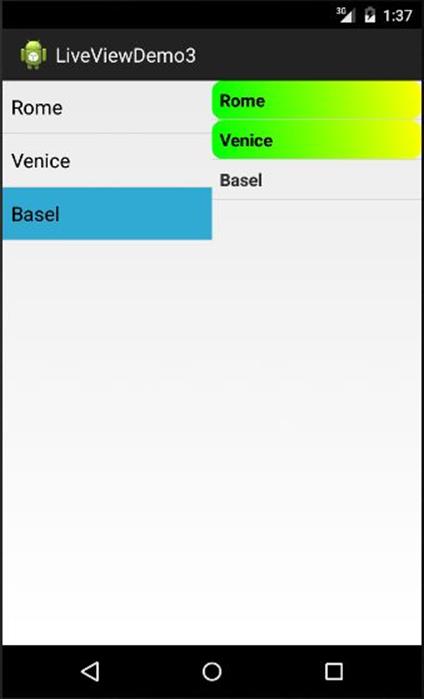
Figure 8.4: Styling the selected item of a ListView
Now, let’s look at the code.
Let’s start with the activity layout file in Listing 8.8.
Listing 8.8: The layout file for the main activity (activity_main.xml)
<LinearLayout
xmlns:android="http://schemas.android.com/apk/res/android"
android:layout_width="match_parent"
android:layout_height="match_parent"
android:orientation="horizontal">
<ListView
android:id="@+id/listView1"
android:layout_weight="1"
android:layout_width="0dp"
android:layout_height="match_parent"/>
<ListView
android:id="@+id/listView2"
android:layout_weight="1"
android:layout_width="0dp"
android:layout_height="match_parent"/>
</LinearLayout>
The layout uses a horizontal LinearLayout that contains two ListViews, named listView1 and listView2, respectively. Both ListViews receive the same value for their layout_weight attribute, so they will have the same width when rendered.
The MainActivity class in Listing 8.9 represents the activity for the application. It’s onCreate method loads both ListViews and pass them a ListAdapter. In additon, the first ListView’s choice mode is set to CHOICE_MODE_SINGLE, making a single item selectable at a time. The second ListView’s choice mode is set to CHOICE_MODE_MULTIPLE, which makes multiple items selectable at a time.
Listing 8.9: The MainActivity class
package com.example.listviewdemo3;
import android.app.Activity;
import android.os.Bundle;
import android.widget.ArrayAdapter;
import android.widget.ListView;
public class MainActivity extends Activity {
@Override
protected void onCreate(Bundle savedInstanceState) {
super.onCreate(savedInstanceState);
setContentView(R.layout.activity_main);
String[] cities = {"Rome", "Venice", "Basel"};
ArrayAdapter<String> adapter1 = new
ArrayAdapter<String>(this,
android.R.layout.simple_list_item_activated_1,
cities);
ListView listView1 = (ListView)
findViewById(R.id.listView1);
listView1.setAdapter(adapter1);
listView1.setChoiceMode(ListView.CHOICE_MODE_SINGLE);
ArrayAdapter<String> adapter2 = new
ArrayAdapter<String>(this,
R.layout.list_item, cities);
ListView listView2 = (ListView)
findViewById(R.id.listView2);
listView2.setAdapter(adapter2);
listView2.setChoiceMode(ListView.CHOICE_MODE_MULTIPLE);
}
}
The first ListView’s ListAdapter is given the default layout (simple_list_item_activated_1). The second ListView’s ListAdapter, on the other hand, is set to use a layout that is pointed by R.layout.list_item. This refers to the res/layout/list_item.xml file shown in Listing 8.10.
Listing 8.10: The list_item.xml file
<?xml version="1.0" encoding="utf-8"?>
<TextView xmlns:android="http://schemas.android.com/apk/res/android"
android:id="@+id/list_item"
android:layout_width="fill_parent"
android:layout_height="fill_parent"
android:padding="7dip"
android:textSize="16sp"
android:textStyle="bold"
android:background="@drawable/listelector"
/>
A layout file for a ListView must contain a TextView, as the list_item.xml file does. Note that its background attribute is given the value drawable/listelector, which references the listelector.xml file in Listing 8.11. This is a selector file that will be used to style the selected item onlistView2. The selector element contains an item whose state_activated attribute is set to true, which means it will be used to style the selected item. Its drawable attribute is set to drawable/activated, referring to the drawable/activated.xml file in Listing 8.12.
Listing 8.11: The drawable/listelector.xml file
<?xml version="1.0" encoding="utf-8"?>
<selector
xmlns:android="http://schemas.android.com/apk/res/android">
<item android:state_activated="true"
android:drawable="@drawable/activated"/>
</selector>
Listing 8.12: The drawable/activated.xml file
<shape xmlns:android="http://schemas.android.com/apk/res/android"
android:shape="rectangle">
<corners android:radius="8dp"/>
<gradient
android:startColor="#FFFF0000"
android:endColor="#FFFF00"
android:angle="45"/>
</shape>
The drawable in Listing 8.12 is based on an XML file that contains a shape with a given gradient color.
Running the application will give you an activity like that in Figure 8.4.
Summary
A ListView is a view that contains a list of scrollable items and gets its data source and layout from a ListAdapter, which in turn can be created from an ArrayAdapter. In this chapter you learned how to use the ListView. You also learned how to use the ListActivity and style the selected item on a ListView.
All materials on the site are licensed Creative Commons Attribution-Sharealike 3.0 Unported CC BY-SA 3.0 & GNU Free Documentation License (GFDL)
If you are the copyright holder of any material contained on our site and intend to remove it, please contact our site administrator for approval.
© 2016-2026 All site design rights belong to S.Y.A.