Introduction to Android Application Development, Fourth Edition (2014)
Part III. Android User Interface Design Essentials
Chapter 9. Partitioning the User Interface with Fragments
Traditionally, each screen within an Android application was tied to a specific Activity class. However, in Android 3.0 (Honeycomb), the concept of a user interface component called a Fragment was introduced. Fragments were then included in the Android Support Library for use with Android 1.6 (API Level 4) and up. Fragments decouple user interface behavior from a specific Activity lifecycle. Instead, Activity classes can mix and match user interface components to create more flexible user interfaces for the Android devices of the future. This chapter explains what fragments are and how you can use them. In this chapter, we also introduce the concept of nested fragments, which have been added to Android 4.2.
Understanding Fragments
Fragments were added to the Android SDK at a crucial time when consumers were experiencing an explosion in the variety of Android devices coming to market. We now see not just smartphones but other larger-screen devices such as tablets and televisions that run the platform. These larger devices come with substantially more screen real estate for developers to take advantage of. Your typical streamlined and elegant smartphone user interface often looks oversimplified on a tablet, for example. By incorporating Fragment components into your user interface design, you can write one application that can be tailored to these different screen characteristics and orientations instead of different applications tailored for different types of devices. This greatly improves code reuse, simplifies application testing needs, and makes publication and application package management much less cumbersome.
As we stated in the introduction to this chapter, the basic rule of thumb for developing Android applications used to be to have one Activity per screen of an application. This ties the underlying “task” functionality of an Activity class very directly to the user interface. However, as bigger device screens came along, this technique faced some issues. When you had more room on a single screen to do more, you had to implement separate Activity classes, with very similar functionality, to handle the cases where you wanted to provide more functionality on a given screen. Fragments help manage this problem by encapsulating screen functionality into reusable components that can be mixed and matched within Activity classes.
Let’s look at a theoretical example. Let’s say you have a traditional smartphone application with two screens. Perhaps it’s an online news journal application. The first screen contains a ListActivity with a ListView control. Each item in the ListView represents an article available from the journal that you might want to read. When you click a specific article, since this is an online news journal application, you are sent to a new screen that displays the article contents in a WebView control. This traditional screen workflow is illustrated in Figure 9.1.
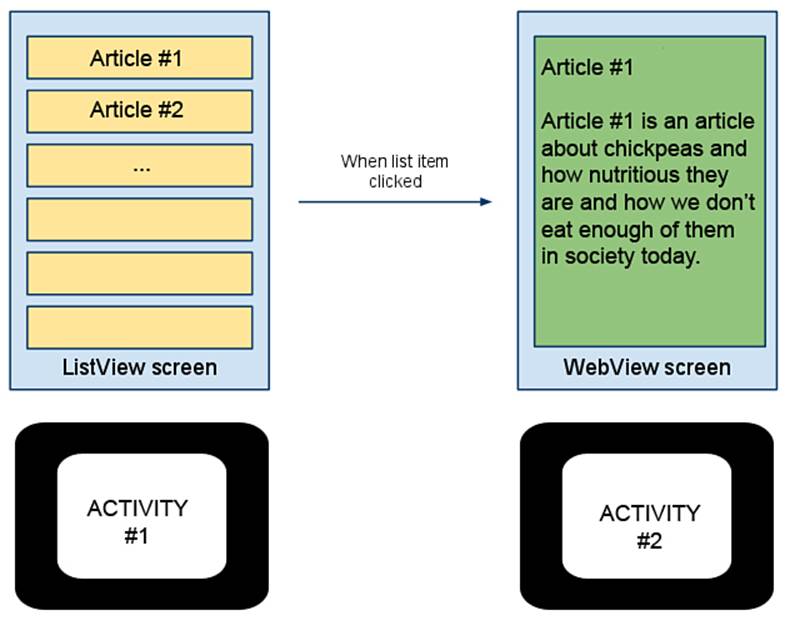
Figure 9.1 Traditional screen workflow without fragments.
This workflow works fine for small-screen smartphones, but it’s a waste of all the space on a tablet or a television. Here, you might want to be able to peruse the article list and preview or read the article on the same screen. If we organize the ListView and the WebView screen functionality into two standalone Fragment components, we can easily create a layout that includes both on the same screen when screen real estate allows, as shown in Figure 9.2.
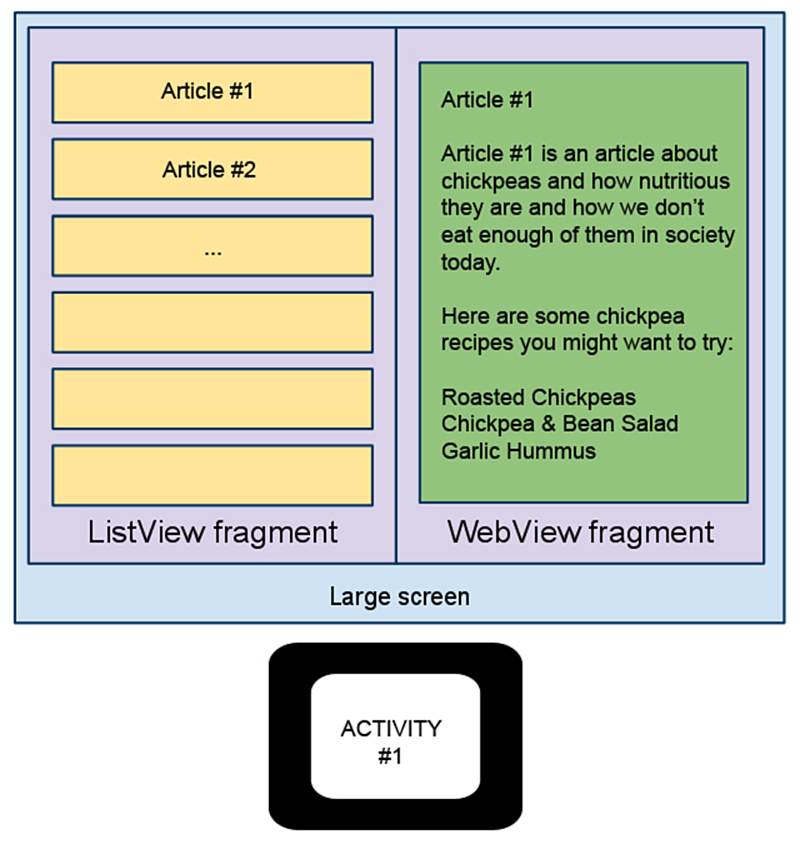
Figure 9.2 Improved screen workflow with fragments.
Understanding the Fragment Lifecycle
We discussed the Activity lifecycle back in Chapter 4, “Understanding the Anatomy of an Android Application.” Now let’s look at how a Fragment fits into the mix. First of all, a Fragment must be hosted within an Activity class. It has its own lifecycle, but it is not a standalone component that can exist outside the context of an Activity.
The responsibilities of Activity class management are greatly simplified when the entire user interface state is moved off into individual fragments. Activity classes with only fragments in their layouts no longer need to spend a lot of time saving and restoring their state because theActivity object now keeps track of any Fragment that is currently attached automatically. The Fragment components themselves keep track of their own state using their own lifecycle. Naturally, you can mix fragments with View controls directly in an Activity class. The Activity class will be responsible for managing the View controls, as normal.
Instead, the Activity must focus on managing its Fragment classes. Coordination between an Activity and its Fragment components is facilitated by the FragmentManager (android.app.FragmentManager). The FragmentManager is acquired from the getFragmentManager() method, which is available within the Activity and Fragment classes.
Defining Fragments
Fragment implementations that have been defined as regular classes within your application can be added to your layout resource files by using the <fragment> XML tag and then loaded into your Activity using the standard setContentView() method, which is normally called in the onCreate()method of your Activity.
When you reference a Fragment class that you have defined in your application package in an XML layout file, use the <fragment> tag. This tag has a few important attributes. Specifically, you will need to set the android:name attribute of the fragment to the fully qualified Fragment class name. You will also need to give the item a unique identifier using the android:id attribute so that you can access that component programmatically, if needed. You still need to set the component’s layout_width and layout_height attributes as you would for any other control in your layout. Here is a simple example of a <fragment> layout reference that refers to a class called FieldNoteListFragment, which is defined as a .java class in the package:
<fragment
android:name="com.introtoandroid.simplefragments.FieldNoteListFragment"
android:id="@+id/list"
android:layout_width="match_parent"
android:layout_height="match_parent" />
Managing Fragment Modifications
As you can see, when you have multiple Fragment components on a single screen, within a single Activity, user interaction on one Fragment (such as our news ListView Fragment) often causes the Activity to update another Fragment (such as our article WebView Fragment). An update or modification to a Fragment is performed using a FragmentTransaction (android.app.FragmentTransaction). A number of different actions can be applied to a Fragment using a FragmentTransaction operation, such as the following:
![]() A Fragment can be attached or reattached to the parent Activity.
A Fragment can be attached or reattached to the parent Activity.
![]() A Fragment can be hidden and unhidden from view.
A Fragment can be hidden and unhidden from view.
Perhaps at this point you are wondering how the Back button fits into the Fragment-based user interface design. Well, now the parent Activity class has its own back stack. As the developer, you can decide which FragmentTransaction operations are worth storing in the back stack and which are not by using the addToBackStack() method of the FragmentTransaction object. For example, in our news application example, we might want each of the articles displayed in the WebView Fragment to be added to the parent Activity class’s back stack so that if the user hits the Back button, he or she traverses the articles already read before backing out of the Activity entirely.
Attaching and Detaching Fragments with Activities
After you have a Fragment that you want to include within your Activity class, the lifecycle of the Fragment comes into play. The following callback methods are important to managing the lifecycle of a Fragment, as it is created and then destroyed when it is no longer used. Many of these lifecycle events mirror those in the Activity lifecycle:
![]() The onAttach() callback method is called when a Fragment is first attached to a specific Activity class.
The onAttach() callback method is called when a Fragment is first attached to a specific Activity class.
![]() The onCreate() callback method is called when a Fragment is first being created.
The onCreate() callback method is called when a Fragment is first being created.
![]() The onCreateView() callback method is called when the user interface layout, or View hierarchy, associated with the Fragment should be created.
The onCreateView() callback method is called when the user interface layout, or View hierarchy, associated with the Fragment should be created.
![]() The onActivityCreated() callback method will inform the Fragment when its parent Activity class’s onCreate() method has completed.
The onActivityCreated() callback method will inform the Fragment when its parent Activity class’s onCreate() method has completed.
![]() The onStart() callback method is called when the Fragment’s user interface becomes visible but is not yet active.
The onStart() callback method is called when the Fragment’s user interface becomes visible but is not yet active.
![]() The onResume() callback method makes the Fragment’s user interface active for interaction after the Activity has resumed or the Fragment was updated using a FragmentTransaction.
The onResume() callback method makes the Fragment’s user interface active for interaction after the Activity has resumed or the Fragment was updated using a FragmentTransaction.
![]() The onPause() callback method is called when the parent Activity is paused, or the Fragment is being updated by a FragmentTransaction. It indicates that the Fragment is no longer active or in the foreground.
The onPause() callback method is called when the parent Activity is paused, or the Fragment is being updated by a FragmentTransaction. It indicates that the Fragment is no longer active or in the foreground.
![]() The onStop() callback method is called when the parent Activity is stopped, or the Fragment is being updated by a FragmentTransaction. It indicates the Fragment is no longer visible.
The onStop() callback method is called when the parent Activity is stopped, or the Fragment is being updated by a FragmentTransaction. It indicates the Fragment is no longer visible.
![]() The onDestroyView() callback method is called to clean up any user interface layout, or View hierarchy resources, associated with the Fragment.
The onDestroyView() callback method is called to clean up any user interface layout, or View hierarchy resources, associated with the Fragment.
![]() The onDestroy() callback method is called to clean up any other resources associated with the Fragment.
The onDestroy() callback method is called to clean up any other resources associated with the Fragment.
![]() The onDetach() callback method is called just before the Fragment is detached from the Activity class.
The onDetach() callback method is called just before the Fragment is detached from the Activity class.
Working with Special Types of Fragments
Recall from Chapter 8, “Designing with Layouts,” that there are a number of special Activity classes for managing certain common types of user interfaces. For example, the ListActivity class simplifies the creation of an Activity that manages a ListView control. Similarly, thePreferenceActivity class simplifies the creation of an Activity to manage shared preferences. And as we saw in our news reader application example, we often want to use user interface controls such as ListView and WebView within our Fragment components.
Because fragments are meant to decouple this user interface functionality from the Activity class, you’ll now find equivalent Fragment subclasses that perform this functionality instead. Some of the specialty Fragment classes you’ll want to familiarize yourself with include the following:
![]() ListFragment (android.app.ListFragment): Much like a ListActivity, this Fragment class hosts a ListView control.
ListFragment (android.app.ListFragment): Much like a ListActivity, this Fragment class hosts a ListView control.
![]() PreferenceFragment (android.preference.PreferenceFragment): Much like a PreferenceActivity, this Fragment class lets you easily manage user preferences.
PreferenceFragment (android.preference.PreferenceFragment): Much like a PreferenceActivity, this Fragment class lets you easily manage user preferences.
![]() WebViewFragment (android.webkit.WebViewFragment): This type of Fragment hosts a WebView control to easily render Web content. Your application will still need the android.permission.INTERNET permission to access the Internet.
WebViewFragment (android.webkit.WebViewFragment): This type of Fragment hosts a WebView control to easily render Web content. Your application will still need the android.permission.INTERNET permission to access the Internet.
![]() DialogFragment (android.app.DialogFragment): Decoupling user interface functionality from your Activity classes means you won’t want your dialogs managed by the Activity either. Instead, you can use this class to host and manage Dialog controls as fragments. Dialogs can be traditional pop-ups or embedded. We discuss dialogs in detail in Chapter 10, “Displaying Dialogs.”
DialogFragment (android.app.DialogFragment): Decoupling user interface functionality from your Activity classes means you won’t want your dialogs managed by the Activity either. Instead, you can use this class to host and manage Dialog controls as fragments. Dialogs can be traditional pop-ups or embedded. We discuss dialogs in detail in Chapter 10, “Displaying Dialogs.”
 Note
Note
You may have noticed that TabActivity, the helper class for working with the TabHost control, is not listed as a Fragment class. If you are simply using TabHost without the TabActivity helper class, you can easily move this into a Fragment. However, if you are usingTabActivity, when you move to a Fragment-based application design, you’ll want to look over how the action bars work, which allow you to add tabs. For more information, see the Android SDK documentation for the TabActivity (android.app.TabActivity), ActionBar(android.app.ActionBar), and ActionBar.Tab (android.app.ActionBar.Tab) classes.
Designing Fragment-Based Applications
At the end of the day, Fragment-based applications are best learned by example. Therefore, let’s work through a fairly straightforward example to help nail down the many concepts we have discussed thus far in the chapter. To keep things simple, we will target a specific version of the Android platform: Android 4.3. However, you will soon find that you can also create Fragment-based applications for almost any device by using the Android Support Package.
 Tip
Tip
Many of the code examples provided in this section are taken from the SimpleFragments application. The source code for the SimpleFragments application is provided for download on the book’s website.
Shane and Lauren (two of the authors) are big travelers. When they went to Africa, they took tons of pictures and wrote up a bunch of information about the different animals they saw in the wild on their blog. They called it their “African Field Notes” (http://www.perlgurl.org/archives/photography/special_assignments/african_field_notes/). Let’s make a simple application with a ListView of wild animal names. Clicking a ListView item will load a WebView control and display the specific blog post associated with that animal. To keep things simple, we’ll store our list of animals and blog URLs in string array resources. (See the sample code for a complete implementation.)
So how will our fragments work? We will use a ListFragment for the list of animals and a WebViewFragment to display each blog post. In portrait mode, we will display one fragment per screen, requiring two Activity classes, as shown in Figure 9.3.
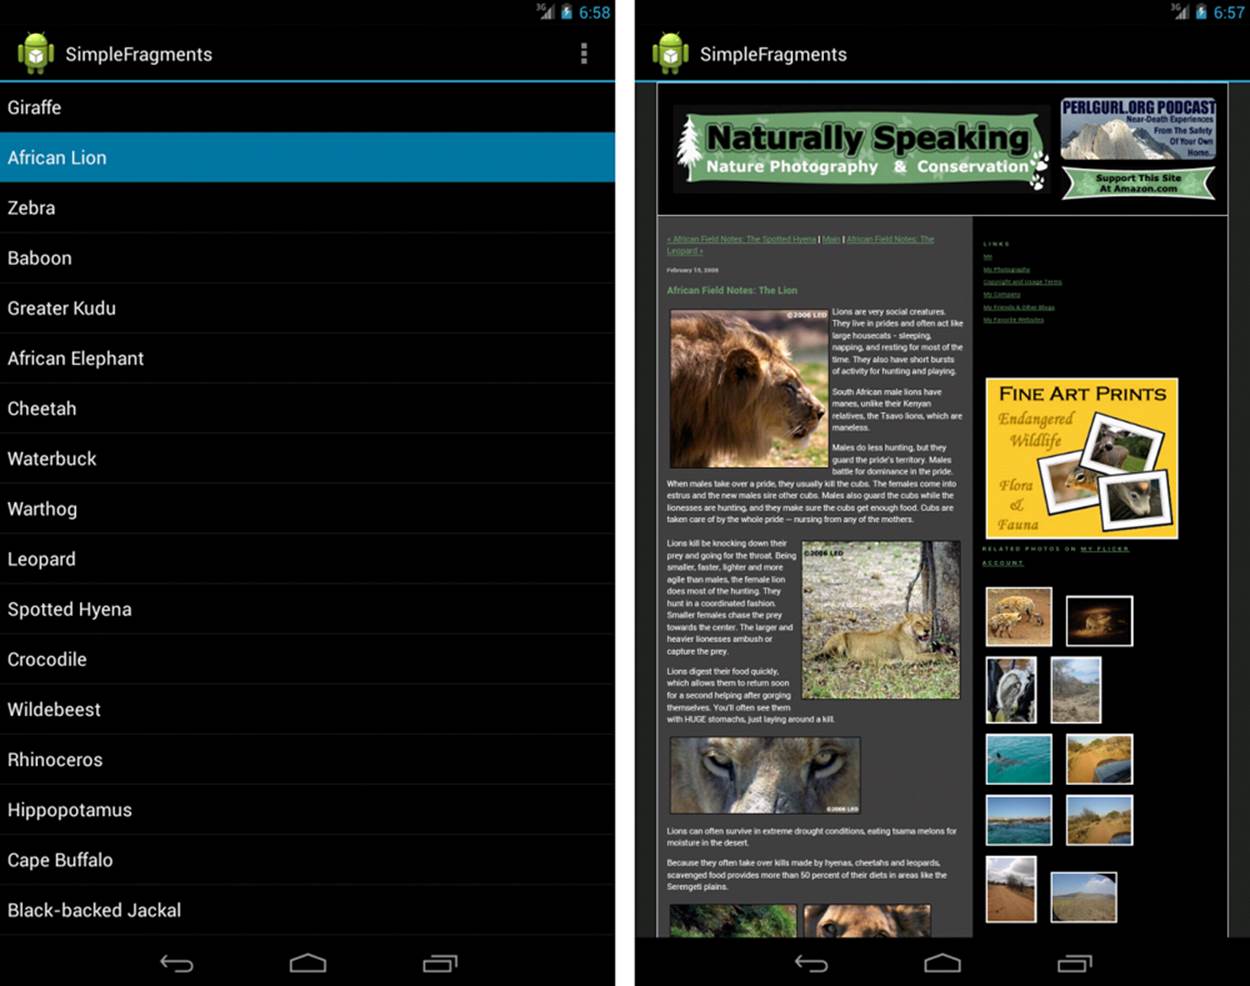
Figure 9.3 One fragment per Activity/screen.
In landscape mode, we will display both fragments on the same screen within the same Activity class, as shown in Figure 9.4.
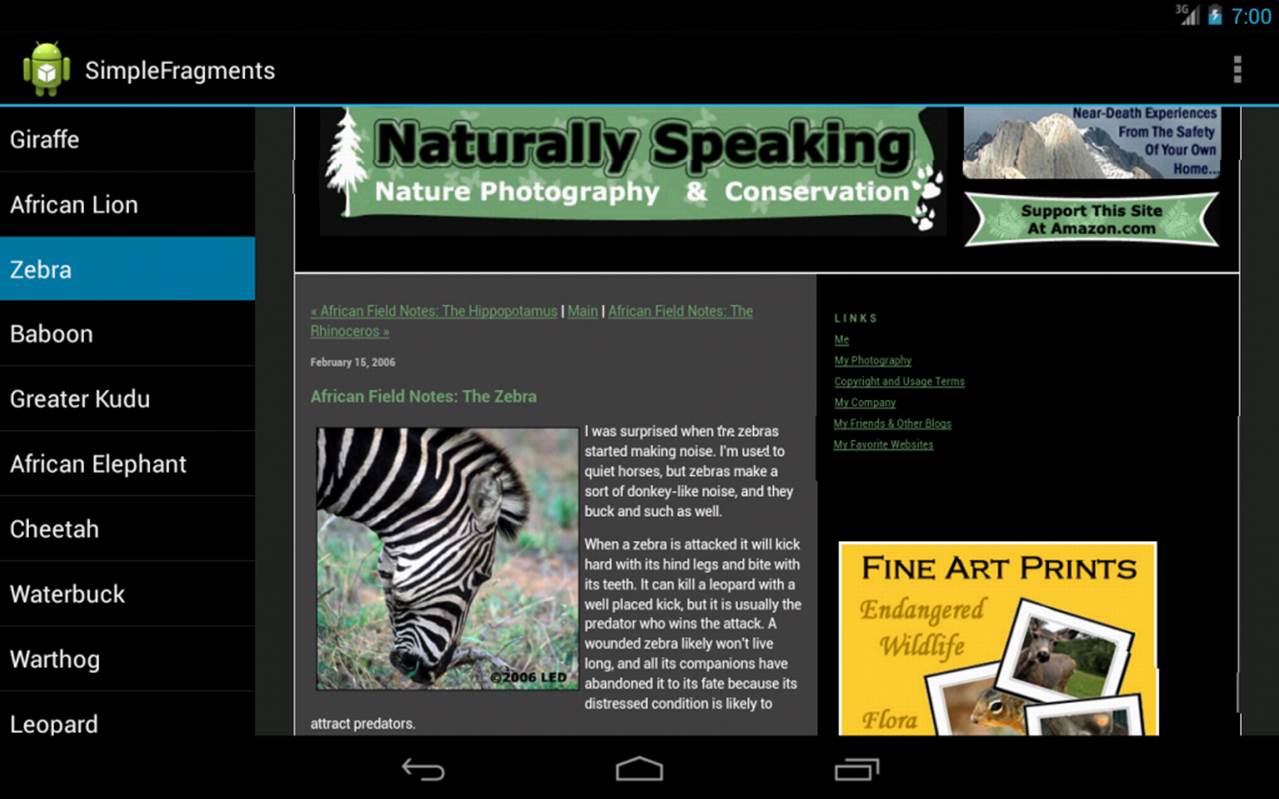
Figure 9.4 Both fragments in a single Activity/screen.
Implementing a ListFragment
Let’s begin by defining a custom ListFragment class called FieldNoteListFragment to host our wild animal names. This class will need to determine whether the second Fragment, the FieldNoteWebViewFragment, should be loaded or if ListView clicks should simply cause theFieldNoteViewActivity to be launched:
public class FieldNoteListFragment extends ListFragment implements
FragmentManager.OnBackStackChangedListener {
private static final String DEBUG_TAG = "FieldNoteListFragment";
int mCurPosition = -1;
boolean mShowTwoFragments;
@Override
public void onActivityCreated(Bundle savedInstanceState) {
super.onActivityCreated(savedInstanceState);
getListView().setChoiceMode(ListView.CHOICE_MODE_SINGLE);
String[] fieldNotes = getResources().getStringArray(
R.array.fieldnotes_array);
setListAdapter(new ArrayAdapter<String>(getActivity(),
android.R.layout.simple_list_item_activated_1, fieldNotes));
View detailsFrame = getActivity().findViewById(R.id.fieldentry);
mShowTwoFragments = detailsFrame != null
&& detailsFrame.getVisibility() == View.VISIBLE;
if (savedInstanceState != null) {
mCurPosition = savedInstanceState.getInt("curChoice", 0);
}
if (mShowTwoFragments == true || mCurPosition != -1) {
viewAnimalInfo(mCurPosition);
}
getFragmentManager().addOnBackStackChangedListener(this);
}
@Override
public void onBackStackChanged() {
FieldNoteWebViewFragment details =
(FieldNoteWebViewFragment) getFragmentManager()
.findFragmentById(R.id.fieldentry);
if (details != null) {
mCurPosition = details.getShownIndex();
getListView().setItemChecked(mCurPosition, true);
if (!mShowTwoFragments) {
viewAnimalInfo(mCurPosition);
}
}
}
@Override
public void onSaveInstanceState(Bundle outState) {
super.onSaveInstanceState(outState);
outState.putInt("curChoice", mCurPosition);
}
@Override
public void onListItemClick(ListView l, View v, int position, long id) {
viewAnimalInfo(position);
}
void viewAnimalInfo(int index) {
mCurPosition = index;
if (mShowTwoFragments == true) {
// Check what fragment is currently shown, replace if needed.
FieldNoteWebViewFragment details =
(FieldNoteWebViewFragment) getFragmentManager()
.findFragmentById(R.id.fieldentry);
if (details == null || details.getShownIndex() != index) {
FieldNoteWebViewFragment newDetails = FieldNoteWebViewFragment
.newInstance(index);
FragmentManager fm = getFragmentManager();
FragmentTransaction ft = fm.beginTransaction();
ft.replace(R.id.fieldentry, newDetails);
if (index != -1) {
String[] fieldNotes = getResources().getStringArray(
R.array.fieldnotes_array);
String strBackStackTagName = fieldNotes[index];
ft.addToBackStack(strBackStackTagName);
}
ft.setTransition(FragmentTransaction.TRANSIT_FRAGMENT_FADE);
ft.commit();
}
} else {
Intent intent = new Intent();
intent.setClass(getActivity(), FieldNoteViewActivity.class);
intent.putExtra("index", index);
startActivity(intent);
}
}
}
Most of the Fragment control’s initialization happens in the onActivityCreated() callback method so that we initialize the ListView only once. We then check to see which display mode we want to be in by checking to see if our second component is defined in the layout. Finally, we leave the display details to the helper method called viewAnimalInfo(), which is also called whenever an item in the ListView control is clicked.
The logic for the viewAnimalInfo() method takes into account both display modes. If the device is in portrait mode, the FieldNoteViewActivity is launched via an Intent. However, if the device is in landscape mode, we have some Fragment finagling to do.
Specifically, the FragmentManager is used to find the existing FieldNoteWebViewFragment by its unique identifier (R.id.fieldentry, as defined in the layout resource file). Then, a new FieldNoteWebViewFragment instance is created for the new animal blog post being requested. Next, aFragmentTransaction is started, in which the existing FieldNoteWebViewFragment is replaced with the new one. We put the old one on the back stack so that the Back button works nicely, set the transition animation to fade between the blog entries, and commit the transaction, thus causing the screen to update asynchronously.
Finally, we can monitor the back stack with a call to the addOnBackStackChangedListener() method. The callback onBackStackChanged() updates the list to the current selected item. This provides a robust way to keep the ListView item selection synchronized with the currently displayedFragment both when adding a new Fragment to the back stack and when removing one, such as when the user presses the Back button.
Implementing a WebViewFragment
Next, we create a custom WebViewFragment class called FieldNoteWebViewFragment to host the blog entries related to each wild animal. This Fragment class does little more than determine which blog entry URL to load and then load it in the WebView control.
public class FieldNoteWebViewFragment extends WebViewFragment {
private static final String DEBUG_TAG = "FieldNoteWebViewFragment";
public static FieldNoteWebViewFragment newInstance(int index) {
Log.v(DEBUG_TAG, "Creating new instance: " + index);
FieldNoteWebViewFragment fragment =
new FieldNoteWebViewFragment();
Bundle args = new Bundle();
args.putInt("index", index);
fragment.setArguments(args);
return fragment;
}
public int getShownIndex() {
int index = -1;
Bundle args = getArguments();
if (args != null) {
index = args.getInt("index", -1);
}
if (index == -1) {
Log.e(DEBUG_TAG, "Not an array index.");
}
return index;
}
@Override
public void onActivityCreated(Bundle savedInstanceState) {
super.onActivityCreated(savedInstanceState);
String[] fieldNoteUrls = getResources().getStringArray(
R.array.fieldnoteurls_array);
int fieldNoteUrlIndex = getShownIndex();
WebView webview = getWebView();
webview.setPadding(0, 0, 0, 0);
webview.getSettings().setLoadWithOverviewMode(true);
webview.getSettings().setUseWideViewPort(true);
if (fieldNoteUrlIndex != -1) {
String fieldNoteUrl = fieldNoteUrls[fieldNoteUrlIndex];
webview.loadUrl(fieldNoteUrl);
}
else
{
String fieldNoteUrl = "http://www.perlgurl.org/archives/" +
"photography/special_assignments/" +
"african_field_notes/";
webview.loadUrl(fieldNoteUrl);
}
}
}
Most of the Fragment control’s initialization happens in the onActivityCreated() callback method so that we initialize the WebView only once. The default configuration of the WebView control doesn’t look so pretty, so we make some configuration changes, remove the padding around the control, and set some settings to make the browser fit nicely in the screen area provided. If we’ve received a request for a specific animal to load, we look up the URL and load it; otherwise, we load the “default” front page of the field notes blog.
Defining the Layout Files
Now that you’ve implemented your Fragment classes, you can place them in the appropriate layout resource files. You’ll need to create two layout files. In landscape mode, you’ll want a single simple_fragments_layout.xml layout file to host both Fragment components. In portrait mode, you’ll want a comparable layout file that hosts only the ListFragment you implemented. The user interface of the WebViewFragment you implemented will be generated at runtime.
Let’s start with the landscape mode layout resource, called /res/layout-land/simple_fragments_layout.xml. Note that we store this simple_fragments_layout.xml resource file in a special resource directory for landscape mode use only. We discuss how to store alternative resources in this way in depth in Chapter 14, “Designing Compatible Applications.” For now, suffice it to say that this layout will be automatically loaded whenever the device is in landscape mode.
<?xml version="1.0" encoding="utf-8"?>
<LinearLayout
xmlns:android="http://schemas.android.com/apk/res/android"
android:orientation="horizontal"
android:layout_width="match_parent"
android:layout_height="match_parent">
<fragment
android:name="com.introtoandroid.simplefragments.FieldNoteListFragment"
android:id="@+id/list"
android:layout_weight="1"
android:layout_width="0dp"
android:layout_height="match_parent" />
<FrameLayout
android:id="@+id/fieldentry"
android:layout_weight="4"
android:layout_width="0dp"
android:layout_height="match_parent" />
</LinearLayout>
Here, we have a fairly straightforward LinearLayout control with two child controls. One is a static Fragment component that references the custom ListFragment class you implemented. For the second region where we want to put the WebViewFragment, we include a FrameLayout region that we will replace with our specific FieldNoteWebViewFragment instance programmatically at runtime.
Tip
When dealing with Fragment components that will be updated via add or replace (dynamic), do not mix them with Fragment components instantiated via the layout (static). Instead, use a placeholder element such as a FrameLayout, as in the sample code. Dynamic Fragmentcomponents and the static ones defined using <fragment> from the layout do not mix well with the fragment transaction manager or with the back stack.
The resources stored in the normal layout directory will be used whenever the device is not in landscape mode (in other words, portrait mode). Here, we need to define two layout files. First, let’s define our static ListFragment in its own /res/layout/simple_fragments_layout.xml file. It looks much like the previous version, without the second FrameLayout control:
<?xml version="1.0" encoding="utf-8"?>
<LinearLayout
xmlns:android="http://schemas.android.com/apk/res/android"
android:orientation="horizontal"
android:layout_width="match_parent"
android:layout_height="match_parent">
<fragment
android:name="com.introtoandroid.simplefragments.FieldNoteListFragment"
android:id="@+id/list"
android:layout_weight="1"
android:layout_width="0dp"
android:layout_height="match_parent" />
</LinearLayout>
Defining the Activity Classes
You’re almost done. Now you need to define your Activity classes to host your Fragment components. You’ll need two Activity classes: a primary class and a secondary one that is used only to display the FieldNoteWebViewFragment when in portrait mode. Let’s call the primary Activity classSimpleFragmentsActivity and the secondary Activity class FieldNoteViewActivity.
As mentioned earlier, moving all your user interface logic to Fragment components greatly simplifies your Activity class implementation. For example, here is the complete implementation for the SimpleFragmentsActivity class:
public class SimpleFragmentsActivity extends Activity {
@Override
public void onCreate(Bundle savedInstanceState) {
super.onCreate(savedInstanceState);
setContentView(R.layout.simple_fragments_layout);
}
}
Yup. That’s it. The FieldNoteViewActivity class is only slightly more interesting:
public class FieldNoteViewActivity extends Activity {
@Override
public void onCreate(Bundle savedInstanceState) {
super.onCreate(savedInstanceState);
if (getResources().getConfiguration().orientation ==
Configuration.ORIENTATION_LANDSCAPE) {
finish();
return;
}
if (savedInstanceState == null) {
FieldNoteWebViewFragment details = new FieldNoteWebViewFragment();
details.setArguments(getIntent().getExtras());
FragmentManager fm = getFragmentManager();
FragmentTransaction ft = fm.beginTransaction();
ft.add(android.R.id.content, details);
ft.commit();
}
}
}
Here, we check that we’re in the appropriate orientation to be using this Activity. Then we create an instance of the FieldNoteWebViewFragment and programmatically add it to the Activity, generating its user interface at runtime by adding it to the android.R.id.content view, which is the root view of any Activity class. That’s all that’s needed to implement this simple sample application with Fragment components.
Using the Android Support Package
Fragments are so important to the future of the Android platform that the Android team provided a compatibility library so that developers can update their legacy applications as far back as Android 1.6, if they so choose. This library was originally called the Compatibility Package and is now called the Android Support Package.
Adding Fragment Support to Legacy Applications
The choice of whether or not to update older applications is a personal one for the development team. Non-Fragment applications should continue to function for the foreseeable future without error, mostly due to the Android team’s continued policy of supporting legacy applications as much as possible when new platform versions are released. Here are some considerations for developers with legacy applications who are considering whether or not to revise their existing code:
![]() Leave your legacy application as is, and the ramifications are not catastrophic. Your application will not be using the latest and greatest features that the Android platform has to offer (and users will notice this), but it should continue to run as well as it always has without any additional work on your part. If you have no plans to update or upgrade your old applications, this may very well be a reasonable choice. The potentially inefficient use of screen space may be problematic but should not create new errors.
Leave your legacy application as is, and the ramifications are not catastrophic. Your application will not be using the latest and greatest features that the Android platform has to offer (and users will notice this), but it should continue to run as well as it always has without any additional work on your part. If you have no plans to update or upgrade your old applications, this may very well be a reasonable choice. The potentially inefficient use of screen space may be problematic but should not create new errors.
![]() If your application has a lot of market traction and you’ve continued to update it as the Android platform has matured, you’re more likely to want to consider the Android Support Package. Your users may demand it. You can certainly continue to support your legacy application and create a separate new-and-improved version that uses the new platform features, but this means organizing and managing different source code branches and different application packages, and it complicates application publication and reporting, not to mention maintenance. Better to revise your existing application to use the Android Support Package and do your best to keep your single code base manageable. The size and resources of your organization may be contributing factors to the decision here.
If your application has a lot of market traction and you’ve continued to update it as the Android platform has matured, you’re more likely to want to consider the Android Support Package. Your users may demand it. You can certainly continue to support your legacy application and create a separate new-and-improved version that uses the new platform features, but this means organizing and managing different source code branches and different application packages, and it complicates application publication and reporting, not to mention maintenance. Better to revise your existing application to use the Android Support Package and do your best to keep your single code base manageable. The size and resources of your organization may be contributing factors to the decision here.
![]() Just because you start using the Android Support Package in your applications does not mean you have to implement every new feature (fragments, loaders, and so on) immediately. You can simply pick and choose the features that make the most sense for your application and add others over time via application updates when your team has the resources and inclination.
Just because you start using the Android Support Package in your applications does not mean you have to implement every new feature (fragments, loaders, and so on) immediately. You can simply pick and choose the features that make the most sense for your application and add others over time via application updates when your team has the resources and inclination.
![]() Choosing to not update your code to new controls could leave your legacy application looking dated compared to other applications. If your application is already completely customized and isn’t using stock controls—often the case with games and other highly graphical apps—it may not need updating. If, however, you conform to stock system controls, look, and feel, it may be more important for your application to get a fresh look.
Choosing to not update your code to new controls could leave your legacy application looking dated compared to other applications. If your application is already completely customized and isn’t using stock controls—often the case with games and other highly graphical apps—it may not need updating. If, however, you conform to stock system controls, look, and feel, it may be more important for your application to get a fresh look.
Using Fragments in New Applications Targeting Older Platforms
If you’re just starting to develop a new application and plan to target some of the older platform versions, incorporating fragments into your design is a much easier decision. If you’re just starting a project, there’s little reason not to use them and quite a few reasons why you should:
![]() Regardless of what devices and platforms you are targeting now, there will be new ones in the future that you cannot foresee. Fragments give you the flexibility to easily adjust your user interface screen workflows without rewriting or retesting all your application code.
Regardless of what devices and platforms you are targeting now, there will be new ones in the future that you cannot foresee. Fragments give you the flexibility to easily adjust your user interface screen workflows without rewriting or retesting all your application code.
![]() Incorporating the Android Support Package into your applications early means that if other important platform features are added later, you’ll easily be able to update the libraries and start using them.
Incorporating the Android Support Package into your applications early means that if other important platform features are added later, you’ll easily be able to update the libraries and start using them.
![]() By using the Android Support Package, your application will not show its age nearly as quickly since you will be incorporating the newer features of the platform and providing them to users on older platforms.
By using the Android Support Package, your application will not show its age nearly as quickly since you will be incorporating the newer features of the platform and providing them to users on older platforms.
Linking the Android Support Package to Your Project
The Android Support Package is simply a set of static support libraries (available as a .jar file) that you can link to your Android application and use. You can download the Android Support Package using the Android SDK Manager and then add it to the projects of your choice. It is an optional package and not linked by default. Android Support Packages are versioned like everything else, and they are updated occasionally with new features—and more important, bug fixes.
Tip
You can find out more about the latest version package at the Android Developer website: http://d.android.com/tools/extras/support-library.html.
There are actually three Android Support Packages: v4, v7, and v13. The v4 package aims to provide new classes introduced in Honeycomb and beyond to platform versions as far back as API Level 4 (Android 1.6). This is the package you want to use when supporting your legacy applications. The v7 package provides additional APIs that are not found within the v4 package and is for supporting newer features all the way back to API Level 7 (Android 2.1). The v13 package provides more efficient implementations of some items, such as the FragmentPagerAdapter, when running on API Level 13 and later. If you’re targeting API Level 13 or later, use this package instead. Be aware that parts of the package that are part of the platform are not available in this package; they aren’t needed.
To use the Android Support Package with your application, take the following steps:
1. Use the Android SDK Manager to download the Android Support Package.
2. Find your project in the Package Explorer or Project Explorer.
3. Right-click the project and choose Android Tools, Add Compatibility Library.... The most updated library will be downloaded, and your project settings will be modified to use the newest library.
4. Begin using the APIs available as part of the Android Support Package. For example, to create a class extending FragmentActivity, you need to import android.support.v4.app.FragmentActivity.
Note
A few differences exist between the APIs used by the Android Support Package and those found in the later versions of the Android SDK. However, there are some renamed classes to avoid name collisions, and not all classes and features are currently incorporated into the Android Support Package.
Exploring Nested Fragments
A recent addition to Android 4.2 (API Level 17) is the ability to nest fragments within fragments. Nested fragments have also been added to the Android Support Library, making this API capability available all the way back to Android 1.6 (API Level 4). In order to add a Fragment within another Fragment, you must invoke the Fragment method getChildFragmentManager(), which returns a FragmentManager. Once you have the FragmentManager, you can start a FragmentTransaction by calling beginTransaction() and then invoking the add() method, including the Fragment to add and its layout, followed by the commit() method. You can even use the getParentFragment() method from within a child Fragment to get the parent Fragment for manipulation.
This opens many possibilities for creating dynamic and reusable nested components. Some examples include tabbed fragments within tabbed fragments, paging from one Fragment item/Fragment detail screen to the next Fragment item/Fragment detail screen with ViewPager, paging fragments with ViewPager within tabbed fragments, along with a host of many other use cases.
Summary
Fragments were introduced into the Android SDK to help address the different types of device screens that application developers need to target now and in the future. A Fragment is simply a self-contained chunk of a user interface, with its own lifecycle, that can be independent of a specificActivity class. Fragments must be hosted within Activity classes, but they give the developer a lot more flexibility when it comes to breaking screen workflow into components that can be mixed and matched in different ways, depending on the screen real estate available on the device. Fragments were introduced in Android 3.0, but legacy applications can use them if they take advantage of the Android Support Package, which allows applications that target API Level 4 (Android 1.6) and higher to use these more recent additions to the Android SDK. In addition, the nested fragments APIs provide even greater flexibility for creating reusable components for your applications.
Quiz Questions
1. What class facilitates coordination between an Activity and its Fragment components?
2. What method call is used for acquiring the class that facilitates coordination between an Activity and its Fragment components?
3. To what value should the android:name attribute of the <fragment> XML tag be set?
4. True or false: The onActivityAttach() callback method is called when a Fragment is first attached to a specific Activity class.
5. What are the subclasses of the Fragment (android.app.Fragment) class?
6. What type of control does a ListFragment (android.app.ListFragment) host?
7. Fragments were introduced in API Level 11 (Android 3.0). How would you add Fragment support to your application to support devices running versions of Android older than API Level 11?
Exercises
1. Using the Android documentation, review how to add a Fragment to the back stack. Create a simple application with a layout consisting of one Fragment for inserting a number (start with 1 in the first Fragment) and a button below it. Upon clicking the button, replace the first Fragmentwith a second Fragment and insert the number 2 in that Fragment. Continue this capability all the way up to 10, and while doing so, add each Fragment to the back stack to support back navigation.
2. Using the Android IDE, create a new Android Application Project, and on the Create Activity page, select the Master/Detail Flow option, then select Finish. Launch this application on both a handset and a tablet-size screen to see what it does, and then analyze the code to get a feel for how fragments have been used.
3. Create a two-pane Fragment layout where both fragments are generated and inserted into a layout programmatically at runtime. Have each Fragment take up 50% of the screen space, and use different colors for each Fragment.
References and More Information
Android SDK Reference regarding the application Fragment class:
http://d.android.com/reference/android/app/Fragment.html
Android SDK Reference regarding the application ListFragment class:
http://d.android.com/reference/android/app/ListFragment.html
Android SDK Reference regarding the application PreferenceFragment class:
http://d.android.com/reference/android/preference/PreferenceFragment.html
Android SDK Reference regarding the application WebViewFragment class:
http://d.android.com/reference/android/webkit/WebViewFragment.html
Android SDK Reference regarding the application DialogFragment class:
http://d.android.com/reference/android/app/DialogFragment.html
Android API Guides: “Fragments”:
http://d.android.com/guide/components/fragments.html
Android Developers Blog: “The Android 3.0 Fragments API”:
http://android-developers.blogspot.com/2011/02/android-30-fragments-api.html
All materials on the site are licensed Creative Commons Attribution-Sharealike 3.0 Unported CC BY-SA 3.0 & GNU Free Documentation License (GFDL)
If you are the copyright holder of any material contained on our site and intend to remove it, please contact our site administrator for approval.
© 2016-2026 All site design rights belong to S.Y.A.