Android Programming: Pushing the Limits (2014)
Part III. Pushing the Limits
Chapter 17. Networking, Web Service, and Remote APIs
A majority of all Android applications perform some kind of network communication over the Internet. Even
single-player games today provide social integration with an online web service. So, the data an application
generates should be stored online so that users will have access to the same data from other devices.
As a developer of Android applications, you need to consider all aspects of networking. If your application
wastes networking resources, it will consume more power and possibly increase the cost to users because of
mobile data charges.
In this chapter, I cover how to perform network calls as efficiently as possible. I introduce my favorite APIs for
HTTP-based communication. Then I move on to describe three different types of web services and how you can
integrate them into your application. If you’ll be using a web service in your application, you can likely integrate
it by using a technique very similar to one of the three I describe.
I complete this chapter with guidelines for reducing the power your application consumes in regard to network
operations. All network calls come with an additional drain on the battery, and you want to reduce this drain as
much as possible.
Android Networking
Although Android supports both TCP and UDP communication, most of the network calls for applications are
done over HTTP, which is built on top of TCP. In this section, I write mostly about HTTP communication and
related topics. I briefly cover connectionless protocols, like mDNS, in Chapter 18.
The first and most important rule to remember when it comes to networking on Android is: Never perform
network calls on the main thread. Starting with Android version 3.0 (Honeycomb), the main thread is protected
by the system, and your application will crash if it tries to do a network call from the main thread.
Second, and almost as important: Always do networking on Android from a Service and avoid performing
network calls from within an Activity . There are several reasons for doing so, but the most important one is
that you need to consider the fast changes in the Activity state if you perform network operations there.
The user might press Home in the middle of a network call, just to return to your application a second later. By
moving all network operations to a Service, you can avoid this issue. It also makes for a better overall design
because with this approach, you reduce the amount of code in your Activities, making it less complicated.
However, in many cases you will be forced to perform network operations directly from an Activity,
as I show later in this chapter in the section “Foursquare API Using OAuth2” Please consider these cases as
exceptions to the rule. As much as possible, try to perform the network calls from a Service.
I recommend using either a callback interface or the LocalBroadcastManager to communicate network
results between the Activity and the Service. Another way is to store the results from a network call
directly into a ContentProvider and let the provider notify registered clients about the changes to any
data, as shown in Figure 17-1.
4. ContentProvider
1. User triggers a
Activity
notifies all connected
network refresh
clients
Content
3. Service insert data to
Service
Provider
ContentProvider
2. Service fetches data
from the Internet
Internet
Figure 17-1 Network calls from a Service inserting data into a ContentProvider
that notifies an Activity
HttpUrlConnection
The Android API has two APIs for HTTP communication, the Apache HttpClient and HttpUrlConnection.
Both have the same level of support in regard to features, but only HttpUrlConnection is recommended
because it’s the one being actively maintained by Google. Google has also implemented a number of useful
features that you otherwise would have to implement yourself, such as transparent response compression and
response cache.
private void enableHttpResponseCache() {
try {
long httpCacheSize = 10 * 1024 * 1024; // 10 MiB
File httpCacheDir = new File(getCacheDir(), “http”);
Class.forName(“android.net.http.HttpResponseCache”)
.getMethod(“install”, File.class, long.class)
.invoke(null, httpCacheDir, httpCacheSize);
} catch (Exception httpResponseCacheNotAvailable) {
}
}
The response cache is available from Android 4.0 (ICS) on, so if your application will also run on an earlier
version of Android, use the preceding approach to initiate the cache using Reflections. If your application will
target Android 4.0 at the minimum, you can use the following code to install the response cache:
try {
HttpResponseCache httpResponseCache = HttpResponseCache.
install(new File(getCacheDir(), “http”), CACHE_SIZE);
} catch (IOException e) {
Log.e(TAG, “Error installing response cache!”, e);
}
Choose a suitable cache size for your application. If you’re retrieving only small amounts of data, pick a cache
of only a few megabytes. The cache is application-private, so you don’t have to worry about leaking cached
responses to other applications on the device.
A Simple HTTP GET
Most network calls from applications will be in the form of simple HTTP GET requests. Here is an example of
how to perform such a request:
public JSONObject getJsonFromServer(URL url,
long lastModifiedTimestamp) {
try {
HttpURLConnection urlConnection = url.openConnection();
urlConnection.setRequestMethod(“GET”);
urlConnection.setInstanceFollowRedirects(true);
urlConnection.setIfModifiedBecause(lastModifiedTimestamp);
urlConnection.setUseCaches(true);
urlConnection.connect();
if (urlConnection.getResponseCode()
== HttpURLConnection.HTTP_OK) {
if (urlConnection.getContentType().
contains(“application/json”)) {
int length =
(HttpURLConnection) urlConnection.
getContentLength();
InputStream inputStream = urlConnection.
getInputStream();
String jsonString = readStreamToString(inputStream, length);
return new JSONObject(jsonString);
}
} else {
// TODO: Error handling...
}
} catch (IOException e) {
Log.e(TAG, “Error perform HTTP call!”, e);
} catch (JSONException e) {
Log.e(TAG, “Error parsing JSON!”, e);
}
return null;
}
private String readStreamToString(InputStream inputStream, int length)
throws IOException {
try {
BufferedReader bufferedReader =
new BufferedReader(new InputStreamReader(inputStream));
StringBuilder stringBuilder = new StringBuilder(length);
char[] buffer = new char[length];
int charsRead;
while ((charsRead = bufferedReader.read(buffer)) != -1) {
stringBuilder.append(buffer, 0, charsRead);
}
return stringBuilder.toString();
} finally {
inputStream.close();
}
}
This example is a typical one for using HttpUrlConnection to make an HTTP GET and parse the response to
a JSONObject. The important thing to note here is the readStreamToString() method. Although you
may find code examples for how to read an InputStream to a String online, the preceding shows the
correct way of reading from a stream. Without any exception, you should always exhaust an InputStream
when reading. If you don’t, you leave data waiting in the lower layers of the platform that could waste resources
and keep your device from going to power saver mode, which is one of the most common mistakes when doing
network calls, so keep this in mind whenever you’re reading from an InputStream.
Uploading Files to a Server
Many applications will send data, like images or other files, to an online server. This has turned out to be one of
the more complex issues for developers because the standard Java APIs (including Android) doesn’t provide an
obvious, straightforward method for this issue. Sending data using HTTP involves doing an HTTP POST request
with the data in the body. However, the body requires some special formatting, and a number of header fields
must be set correctly.
The following example shows the necessary steps for posting a file to a server using HTTP POST.
public int postFileToURL(File file, String mimeType, URL url)
throws IOException {
DataOutputStream requestData = null;
try {
long size = file.length();
String fileName = file.getName();
// Create a random boundary string
Random random = new Random();
byte[] randomBytes = new byte[16];
random.nextBytes(randomBytes);
String boundary = Base64.
encodeToString(randomBytes, Base64.NO_WRAP);
HttpURLConnection urlConnection
= (HttpURLConnection) url.openConnection();
urlConnection.setUseCaches(false);
urlConnection.setDoOutput(true);
urlConnection.setRequestMethod(“POST”);
// Set the HTTP headers
urlConnection.setRequestProperty(“Connection”, “Keep-Alive”);
urlConnection.setRequestProperty(“Cache-Control”, “no-cache”);
urlConnection.setRequestProperty(“Content-Type”,
“multipart/form-data;boundary=” + boundary);
// If larger than MAX_FIXED_SIZE - use chunked streaming
if (size > MAX_FIXED_SIZE) {
urlConnection.setChunkedStreamingMode(0);
} else {
urlConnection.setFixedLengthStreamingMode((int) size);
}
// Open file for reading...
FileInputStream fileInput = new FileInputStream(file);
// Open connection to server...
OutputStream outputStream = urlConnection.getOutputStream();
requestData = new DataOutputStream(outputStream);
// Write first boundary for this file
requestData.writeBytes(“--” + boundary + CRLF);
// Let the server know the filename
requestData.writeBytes(“Content-Disposition: form-data; name=\””
+ fileName + “\”;filename=\”” + fileName + CRLF);
// ...and the MIME type of the file
requestData.writeBytes(“Content-Type: “ + mimeType + CRLF);
// Read the local file and write to the server in one loop
int bytesRead;
byte[] buffer = new byte[8192];
while ((bytesRead = fileInput.read(buffer)) != -1) {
requestData.write(buffer, 0, bytesRead);
}
// Write boundary indicating end of this file
requestData.writeBytes(CRLF);
requestData.writeBytes(“--” + boundary + “--” + CRLF);
requestData.flush();
return urlConnection.getResponseCode();
} finally {
if (requestData != null) {
requestData.close();
}
}
}
The important part here is to understand the boundary that is used to tell the server where the file data
starts and ends in the request body. Also, notice the check on whether the file size is larger than MAX_
FIXED_SIZE (in bytes), where chunked streaming or fixed-length streaming mode is used. For chunked
streaming, the parameter 0 means “system default” for the chunk size, which is what most clients should use
in this mode. Chunking basically means that the data is sent to the server in parts, with each part prepended
with the size. Chunked streaming can be more efficient for memory use and reduces the risk of getting an
OutOfMemoryException. However, using fixed-length streaming mode is usually faster, although it requires
more memory while performing the streaming.
Volley
The standard HttpUrlConnection works well for most occasions, but it easily becomes quite complex
when you’re doing a lot of different HTTP requests. You still need to perform the requests on a background
thread and to ensure that everything is closed and shut down properly when your application is done. To make
things a bit easier, Google has started working on a new HTTP library that intends to make networking for
Android applications easier and faster. You can retrieve the latest version of the Volley library by cloning the
Git repository.
$ git clone https://android.googlesource.com/platform/frameworks/volley
The Volley library is currently under development but is already stable enough for use in applications. It
provides a very easy-to-use API for doing the typical network calls, and it handles all background threading and
other low-level things for you.
The following example shows how you can use Volley in a Service that makes HTTP GET calls and treats the
response as JSON data:
public class VolleyExample extends Service {
private LocalBinder mLocalBinder = new LocalBinder();
private RequestQueue mResponseQueue;
@Override
public void onCreate() {
super.onCreate();
mResponseQueue = Volley.newRequestQueue(this);
mResponseQueue.start();
}
@Override
public void onDestroy() {
super.onDestroy();
mResponseQueue.stop();
mResponseQueue = null;
}
public void doJsonRequest(String url,
Response.Listener<JSONObject> response,
Response.ErrorListener error) {
JsonObjectRequest jsonObjectRequest
= new JsonObjectRequest(Request.Method.GET,
url, null, response, error);
mResponseQueue.add(jsonObjectRequest);
}
@Override
public IBinder onBind(Intent intent) {
return mLocalBinder;
}
public class LocalBinder extends Binder {
public VolleyExample getService() {
return VolleyExample.this;
}
}
}
You pass in two callbacks, one for a successful response and one for error. You don’t need to worry about
starting a new background thread for the network call or initiating the connection yourself; this is all taken
care of by the Volley library. All you need to do is add the new request to the RequestQueue so that it gets
processed.
public void doJsonUpdateRequest() {
Response.Listener<JSONObject> responseListener
= new Response.Listener<JSONObject>() {
@Override
public void onResponse(JSONObject response) {
handleJsonResponse(response);
}
};
Response.ErrorListener errorListener
= new Response.ErrorListener() {
@Override
public void onErrorResponse(VolleyError error) {
handleError(error);
}
};
mService.doJsonRequest(API_URL, responseListener, errorListener);
}
In the preceding example, you define a callback for a successful response and an error callback. Both of these
will run on a thread other than the main thread, so if you intend to modify your UI, be sure to post that update
using a Handler or an AsyncTask.
Currently, the Volley library doesn’t support uploading arbitrary binary files. If you need to do
uploading, use the method described in the earlier section, “Uploading Files to a Server.” However,
continue to use Volley for other requests if possible.
If you’re doing lots of different HTTP requests, I highly recommend using the Volley library. Because it’s also
hosted as a part of the Android Open Source Project, it’s likely to become a central part of the Android platform
in the future.
OkHttp and SPDY
A big problem with HTTP is that it allows only one request and response at a time per connection, which forces
browsers and other clients to spawn multiple sockets in order to perform requests in parallel. This issue is less
problematic for clients because there will be relatively few connections from one application at any given time;
however, it makes a huge difference for servers. In 2009, Google started working on an updated HTTP protocol
to address these issues. The result was a new wire protocol named SPDY (pronounced speedy) that allows
multiple HTTP requests to be multiplexed over a single socket connection. This protocol has become a de facto
open standard for the next generation of HTTP. This protocol doesn’t replace HTTP; instead, it modifies how
requests and responses are sent over the wire. The IETF working group for HTTP has announced that it will start
the work on HTTP 2.0 and use the SPDY protocol as a starting point.
If you have full control of both the clients and the server, it may be worth investigating the use of SPDY as an
alternative to regular HTTP/1.1—doing so will greatly reduce the network’s load and increase the performance.
SPDY is already seeing good support in the major web browsers, and there are several implementations for
different platforms available, including Android.
If you choose to use SPDY as your communication protocol, I recommend that you choose the third-party
library called OkHttp, which is developed by Square, Inc., and available as open source on GitHub (http://
square.github.io/okhttp). The library is available as a Maven dependency by including the following
line in your Gradle script:
compile ‘com.squareup.okhttp:okhttp:1.1.1’
This library is simply a new and improved HTTP client with support for the SPDY protocol. It uses the
HttpUrlConnection interface, so switching to this in your existing code should require little work.
The following code shows how you can use the OkHttp library in Android:
public class OkHttpExample {
private final OkHttpClient mOkHttpClient;
public OkHttpExample() {
mOkHttpClient = new OkHttpClient();
}
public String okHttpDemo(URL url) throws IOException {
HttpURLConnection urlConnection = mOkHttpClient.open(url);
InputStream inputStream = null;
urlConnection.setRequestMethod(“GET”);
urlConnection.connect();
if (urlConnection.getResponseCode()
== HttpURLConnection.HTTP_OK) {
inputStream = urlConnection.getInputStream();
return readStreamToString(inputStream,
urlConnection.getContentLength());
}
return null;
}
private String readStreamToString(InputStream inputStream,
int length)
throws IOException {
try {
BufferedReader bufferedReader =
new BufferedReader(new InputStreamReader(inputStre
am));
StringBuilder stringBuilder = new StringBuilder(length);
char[] buffer = new char[length];
int charsRead;
while ((charsRead = bufferedReader.read(buffer)) != -1) {
stringBuilder.append(buffer, 0, charsRead);
}
return stringBuilder.toString();
} finally {
inputStream.close();
}
}
}
When you create a new instance of the OkHttpClient, it will set up everything you need, such as connection
polling and response cache. This implementation is extremely fast even on regular HTTP requests, so using
it may it be a good idea in general. When using OkHttp for SPDY communication, you’ll notice a huge
improvement in performance for your network calls.
Web Sockets
Web Sockets is the latest darling of the web and is an extension running on top of standard HTTP. It allows for
asynchronous message-based communication between a client and a server. It starts with a regular HTTP GET
request that contains special HTTP headers indicating that the client wants to upgrade the connection to a Web
Socket connection.
Here is an example of the clients GET request for initiating a Web Socket connection:
GET /websocket HTTP/1.1
Host: myserver.com
Upgrade: websocket
Connection: Upgrade
Sec-WebSocket-Key: MjExMjM0MTI0MTI0MTI0MTIzCg==
Sec-WebSocket-Protocol: chat
Sec-WebSocket-Version: 13
Origin: http://myserver.com
If the client request is accepted, the server responds with the following:
HTTP/1.1 101 Switching Protocols
Upgrade: websocket
Connection: Upgrade
Sec-WebSocket-Accept: HSmrc0sMlYUkAGmm5OPpG2HaGWk=
Sec-WebSocket-Protocol: chat
The values in the preceding headers aren’t valid for every case but should be calculated according to
the Web Socket protocol specification. Normally, you don’t need to bother about these details when
using a readymade library for Web Socket communication.
When a Web Socket is established, both sides (client and server) can send messages to each other asynchronously.
More importantly, you now have a way to quickly notify the client from your server. Messages can be either text
or binary and are usually quite small. If you need to transmit a large file between the client and server, stick to
standard HTTP instead. Web Sockets is intended for sending notifications with a relatively small payload.
I recommend that you choose a suitable data format when communicating over Web Sockets. In most cases,
JSON is sufficient and allows for a simple implementation. JSON messages should be sent as text-messages over
Web Sockets. For more advanced scenarios with mixed-type data, I recommend using Google Protocol Buffers,
as I describe in Chapter 9.
Although you can implement your own Web Sockets client using the standard Socket class in Android, I highly
recommend that you use one of the many third-party libraries available. You can choose from several; the one I
show here is the one I consider most stable at the moment, the Web Socket implementation for Java by Nathan
Rajlich (also known as TooTallNate), which you can find at http://java-websocket.org. In addition,
it contains a server implementation for Web Sockets, which is useful in Chapter 18. To use this library, simply
include the following dependency in your Gradle file:
compile ‘org.java-websocket:Java-WebSocket:1.3.0’
When using Web Sockets through this library, you don’t use the HttpUrlConnection: instead, you create a
WebSocketClient and connect to a URI.
The following code is a complete example of using this library to connect to a Web Socket online:
public class ChatService extends Service {
private static final String TAG = “ChatService”;
private ChatWebSocketClient mChatWebSocketClient;
private ChatClient mChatClient;
private LocalBinder mLocalBinder = new LocalBinder();
public IBinder onBind(Intent intent) {
return mLocalBinder;
}
public IBinder onBind(Intent intent) {
return null;
}
public void connectToChatServer(URI serverUri) {
new ChatWebSocketClient(serverUri).connect();
}
public void disconnect() {
if (mChatWebSocketClient != null) {
mChatWebSocketClient.close();
}
}
public void setChatClient(ChatClient chatClient) {
mChatClient = chatClient;
}
public void sendMessage(String message) {
if(mChatWebSocketClient != null) {
mChatWebSocketClient.send(message);
}
}
public boolean isConnected() {
return mChatWebSocketClient != null;
public interface ChatClient {
void onConnected();
void onMessageReceived(String from, String body, Date timestamp);
void onDisconnected();
}
private class ChatWebSocketClient extends WebSocketClient {
public ChatWebSocketClient(URI serverURI) {
super(serverURI);
}
@Override
public void onOpen(ServerHandshake serverHandshake) {
// Called when the Web Socket is connected
mChatWebSocketClient = this;
if(mChatClient != null) {
mChatClient.onConnected();
}
Notification notification = buildNotification();
startForeground(1001, notification);
}
@Override
public void onMessage(String message) {
// Called when a text message is received
if(mChatClient != null) {
try {
JSONObject chatMessage = new JSONObject(message);
String from = chatMessage.getString(“from”);
String body = chatMessage.getString(“body”);
Date timestamp =
new Date(chatMessage.getLong(“timestamp”));
mChatClient.onMessageReceived(from, body, timestamp);
} catch (JSONException e) {
Log.e(TAG, “Malformed message!”, e);
}
}
}
@Override
public void onMessage(ByteBuffer bytes) {
// Called when a binary message is received
}
@Override
public void onClose(int code, String reason, boolean remote) {
// Called when the connection is closed
mChatWebSocketClient = null;
if(mChatClient != null) {
mChatClient.onDisconnected();
}
stopForeground(true);
}
@Override
public void onError(Exception e) {
// Called on in case of communication error
}
}
private class LocalBinder extends Binder {
public ChatService getService() {
return ChatService.this;
}
}
}
This is a guide for implementing Web Socket support in your code. In a real-life application, you should add
additional security and error checks. The important thing here is that when you call WebSocketClient.
connect(), it spawns a new thread on which this Web Socket will live, which means you don’t have to do the
background thread yourself when using this library.
The ChatClient extends the WebSocketClient class and implements the different event callbacks. All
these callbacks occur on the thread that the Web Socket is running on, so never block these calls because doing
so will stall any other traffic on the same Web Socket.
It’s good practice to use the onOpen() and onClose() callbacks for determining when the you can start
communicating over the Web Socket. In the preceding example, the mChatClient member is set and reset
(to null) in the respective method, allowing for a simple null check when sending a message.
I return to the topic of Web Sockets in Chapter 18, where I describe how you can communicate directly between
two devices.
Integrating Web Services
Most web services that you will use in your Android app usually fit into one of three categories: those that
don’t require authentication for a user, those that do require authentication for a user but lack a native SDK for
Android, and those that require user authentication and provide an SDK for Android. In this section, I provide
three examples that illustrate each of these categories.
Google Static Maps v2
In Chapter 13, I cover the use of the new and powerful Location API for Android. Although it’s fairly easy to use,
it may sometimes be more than you need. If your application needs to show only a static map that the user
won’t interact with, you can use Google Static Maps v2 API instead, which is a web service from Google that
allows you to fetch a piece of Google Maps as a bitmap image (PNG, GIF, or JPEG).
Here is a simple static method for retrieving a static map:
public class StaticMapsFetcher {
public static final String BASE_URL
= “http://maps.googleapis.com/maps/api/staticmap”;
// TOOD Create this before release!
public static final String API_KEY = null;
public static final String UTF8 = “UTF-8”;
private static final String TAG = “StaticMapsFetcher”;
public static Bitmap fetchMapWithMarkers(String address,
int width,
int height,
String maptype,
List<String> markers) {
HttpURLConnection urlConnection = null;
try {
StringBuilder queryString = new StringBuilder(“?”);
if (address != null) {
queryString.append(“center=”).
append(URLEncoder.encode(address, UTF8)).
append(“&”);
}
if (width > 0 && height > 0) {
queryString.append(“size=”).
append(String.format(“%dx%d”, width, height)).
append(“&”);
}
if (maptype != null) {
queryString.append(“maptype=”).
append(maptype).append(“&”);
}
if (markers != null) {
for (String marker : markers) {
queryString.append(“markers=”).
append(URLEncoder.encode(marker, UTF8));
}
}
if (API_KEY != null) {
queryString.append(“key=”).append(API_KEY).append(“&”;
}
queryString.append(“sensor=false”);
URL url = new URL(BASE_URL + queryString.toString());
urlConnection = url.openConnection();
urlConnection.connect();
if (urlConnection.getResponseCode()
== HttpURLConnection.HTTP_OK) {
BufferedInputStream bufferedInputStream
= new BufferedInputStream(urlConnection.
getInputStream());
return BitmapFactory.decodeStream(bufferedInputStream);
} else {
return null;
}
} catch (IOException e) {
Log.e(TAG, “Error fetching map!”, e);
} finally {
if (urlConnection != null) {
urlConnection.disconnect();
}
}
}
}
Note that the API_KEY is left as null; this is allowed, but not recommended, for the Google Static Maps API.
Before you release an application that uses this API, you should create a new API key using the Google API
Developer Console.
Also note how the use of URLEncoder.encode() for the values of each parameter. This guarantees that
whatever the value is, it will be encoded properly in the URL. When a web service is called, an error stating a bad
request is common because the server cannot parse the request parameters properly.
This example shows how the simplest web services can be integrated into an Android application. They
are one-way, don’t require authentication, and have only a few parameters. You can find more information
about the parameters for Google Static Maps API API at https://developers.google.com/maps/
documentation/staticmaps.
Foursquare API Using OAuth2
When you use a web service that requires a user account, you need to authenticate the user in some way.
However, because your application will be a third-party client for this service, you need some way to provide
authentication that doesn’t compromise the user’s credentials, meaning the username and password shouldn’t
pass through your code. To solve this issue, a standard named OAuth was developed. This standard is now on
its second version and is called OAuth2. It was designed so that web applications can allow one website to
integrate with a second one on behalf of a user. To use it on Android, you route the authentication through a
WebView that displays the service authentication web page for the user.
Although it’s possible to implement all of the steps for OAuth2 yourself, I recommend using a third-party library
that hides away some of the complexity. The one I recommend is called Scribe and can be found at https://
github.com/fernandezpablo85/scribe-java. Scribe provides a simple wrapper on top of the
HttpUrlConnection class for OAuth2-enabled services, so it’s an excellent use for Android.
In this OAuth2 example, the user’s friends are displayed on Foursquare. Although many of the API calls for
Foursquare don’t require authentication (like searching for venues), getting a list of Foursquare friends will
obviously require authentication by the user.
The following code shows an Activity that you can use to get authorization for a user’s Foursquare account
using OAuth2:
public class OAuthActivity extends Activity {
public static final String CLIENT_ID
= “<Client ID from foursquare.com/developer>”;
public static final String CLIENT_SECRET
= “<Client SECRET from foursquare.com/developer>”;
public static final Token EMPTY_TOKEN = null;
public static final String ACCESS_TOKEN = “foursquare.access_token”;
private static final String TAG = “FoursquareOAuth2”;
private OAuthService mOAuthService;
@Override
protected void onCreate(Bundle savedInstanceState) {
super.onCreate(savedInstanceState);
setContentView(R.layout.activity_main);
}
@Override
protected void onResume() {
super.onResume();
mOAuthService = new ServiceBuilder()
.provider(Foursquare2Api.class)
.apiKey(CLIENT_ID)
.apiSecret(CLIENT_SECRET)
.callback(“oauth://foursquare”)
.build();
String authorizationUrl =
mOAuthService.getAuthorizationUrl(EMPTY_TOKEN);
WebView webView = (WebView) findViewById(R.id.oauth_view);
WebViewClient webViewClient = new WebViewClient() {
@Override
public boolean shouldOverrideUrlLoading(WebView view,
String url) {
if (url.startsWith(“oauth”)) {
Uri uri = Uri.parse(url);
String oauthCode = uri.getQueryParameter(“code”);
Verifier verifier = new Verifier(oauthCode);
new GetTokenAccess().execute(verifier);
return true;
}
return super.shouldOverrideUrlLoading(view, url);
}
};
webView.setWebViewClient(webViewClient);
webView.getSettings().setJavaScriptEnabled(true);
webView.loadUrl(authorizationUrl);
}
class GetTokenAccess extends AsyncTask<Verifier, Void, Token> {
@Override
protected Token doInBackground(Verifier... verifiers) {
Token accessToken = mOAuthService.
getAccessToken(EMPTY_TOKEN, verifiers[0]);
return accessToken;
}
@Override
protected void onPostExecute(Token token) {
if (token != null) {
Intent intent = new Intent();
intent.putExtra(ACCESS_TOKEN, token.getToken());
setResult(RESULT_OK, intent);
} else {
setResult(RESULT_CANCELED);
}
finish();
}
}
}
The actual authentication and authorization toward Foursquare goes through a custom WebViewClient. The
custom WebViewClient overrides the method shouldOverrideUrlLoading(), which allows you to
capture all calls to a URL that this WebView will do. In this case, you monitor for all calls that match the callback
URL, which will contain the access token needed for signing API requests.
The example needs to use an AsyncTask because you cannot do direct network calls on the main thread.
OAuthService.getAccessToken() will perform a network call to retrieve the access token used for the
API calls that require a signed-in user.
The following code uses the Activity from the previous example:
public class FoursquareActivity extends Activity {
public static final String TAG = “FoursquareActivity”;
public static final int OAUTH_REQUEST_CODE = 1001;
public static final String FRIENDS_URI =
“https://api.foursquare.com/v2/users/self/friends”;
private SharedPreferences mPreferences;
@Override
protected void onCreate(Bundle savedInstanceState) {
super.onCreate(savedInstanceState);
setContentView(R.layout.foursquare_main);
mPreferences = PreferenceManager.
getDefaultSharedPreferences(this);
}
@Override
protected void onResume() {
super.onResume();
if (mPreferences.contains(OAuthActivity.ACCESS_TOKEN)) {
new GetFoursquareFriends().execute(“55.59612590”, “12.98140870”);
} else {
startActivityForResult(new Intent(this, OAuthActivity.class),
OAUTH_REQUEST_CODE);
}
}
@Override
protected void onActivityResult(int requestCode,
int resultCode,
Intent data) {
if (requestCode == OAUTH_REQUEST_CODE) {
if (resultCode == RESULT_OK) {
String accesToken = data.
getStringExtra(OAuthActivity.ACCESS_TOKEN);
mPreferences.edit().
putString(OAuthActivity.ACCESS_TOKEN,
accesToken).apply();
} else {
mPreferences.edit().
remove(OAuthActivity.ACCESS_TOKEN).apply();
}
}
}
class GetFoursquareFriends extends AsyncTask<String, Void, JSONObject> {
@Override
protected JSONObject doInBackground(String... lngLat) {
OAuthService service = new ServiceBuilder()
.provider(Foursquare2Api.class)
.apiKey(OAuthActivity.CLIENT_ID)
.apiSecret(OAuthActivity.CLIENT_SECRET)
.callback(“oauth://foursquare”)
.build();
String accessToken = mPreferences.
getString(OAuthActivity.ACCESS_TOKEN, null);
OAuthRequest request = new OAuthRequest(Verb.GET,
FRIENDS_URI);
request.addQuerystringParameter(“oauth_token”,
accessToken);
Token token = new Token(accessToken,
OAuthActivity.CLIENT_SECRET);
service.signRequest(token, request);
Response response = request.send();
if (response.isSuccessful()) {
try {
return new JSONObject(response.getBody());
} catch (JSONException e) {
Log.e(TAG, “Error building JSONObjet!”, e);
}
} else {
Log.d(TAG, “Bad request: “
+ response.getCode()
+ “ “
+ response.getMessage());
}
return null;
}
@Override
protected void onPostExecute(JSONObject response) {
if (response != null) {
try {
JSONArray friends = response.
getJSONObject(“response”).
getJSONObject(“friends”).
getJSONArray(“items”);
Log.d(TAG, “Friends: “ + friends);
} catch (JSONException e) {
Log.e(TAG, “JSON Exception”, e);
}
}
}
}
}
You start by checking whether an access token is already stored; if not, the OAuth2 Activity is started with
Activity.startActivityForResult(). When the OAuth2 process is completed, successful or not,
onActivityResult() from the preceding example is called with the results.
Using the AsyncTask from the preceding example, you can set up an OAuthRequest with the new access
token. In this case, an array of all the user’s friends on Foursquare is retrieved.
I use the preceding code only to illustrate how to use Scribe and OAuth2 in your application. Because
OAuth2 requires user interaction, this is one of the few cases where you must perform network
operations from an Activity.
You can use the Scribe library for any API that supports OAuth2 for authorization. Check the documentation of
the library for officially supported services.
Facebook SDK for Android
Because OAuth2 was designed for the web, it’s not a perfect match for a native Android application. Many
services have solved this problem in a similar way using a native Android app instead. For instance, Facebook
has a great web service that allows you to integrate its Graph API and other Facebook APIs into your Android
application. Because users who want to use the Facebook integration in your application most likely will have the
Facebook app installed as well, they perform a similar authorization process by using Android Activities.
The Facebook SDK for Android (version 3.0 and later) allows you to easily integrate Facebook authorization and
authentication for your application using its library project. You can then use this API to simply track users in
your application or integrate with Facebook services and send messages and photos. The Facebook SDK for
Android is available at https://developers.facebook.com/android.
First, you need to register your application on the Facebook Developer site (https://developers.
facebook.com/apps). Click Create New App and enter the name of your app while leaving the rest of the
fields empty or in their default. Next, open the Native Android app section and fill in the details related to your
app, as shown in Figure 17-2.
The key hash for your application is generated with the following command in your terminal:
$ keytool -exportcert -alias androiddebugkey –keystore ~/.android/debug.
keystore | openssl sha1 -binary | openssl base64
When the online registration is complete, copy the app ID and add it as a String resource in your application’s
resources. Then you add a metadata element that points to this value as well as a reference to the Facebook
LoginActivity.
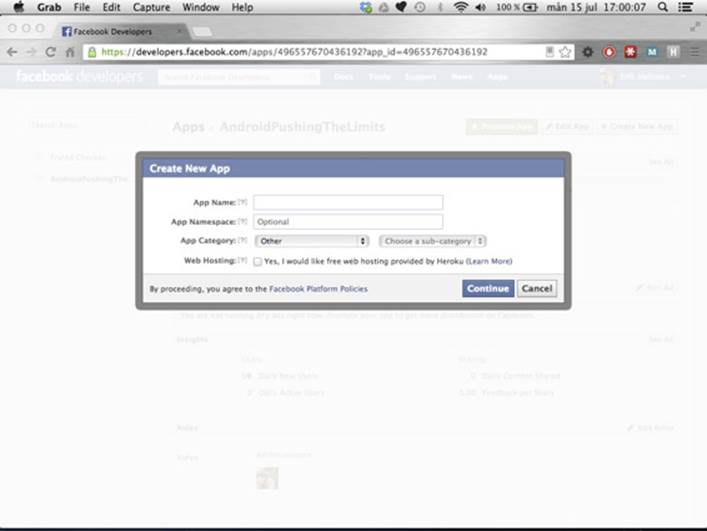
Figure 17-2 Creating a new Facebook app with Android support using the Facebook Developer console
Here is a snippet from the AndroidManifest.xml where the necessary components and metadata for
Facebook integration (marked in bold) are added:
<application
android:allowBackup=”true”
android:icon=”@drawable/ic_launcher”
android:label=”@string/app_name”
android:theme=”@style/AppTheme” >
<uses-permission android:name=”android.permission.INTERNET” />
<activity
android:name=”com.aptl.myfacebookdemo.MainActivity”
android:label=”@string/app_name” >
<intent-filter>
<action android:name=”android.intent.action.MAIN” />
<category android:name=”android.intent.category.LAUNCHER” />
</intent-filter>
</activity>
<activity android:name=”com.facebook.LoginActivity”/>
<meta-data android:name=”com.facebook.sdk.ApplicationId”
android:value=”@string/facebook_app_id” />
</application>
Next, you need to implement the Facebook callbacks in MainActivity. Also, don’t forget to add the
INTERNET permission as just shown.
The UiLifecycleHelper class takes care of all the state changes related to your Activity states. All
you need to do is override the onCreate(), onResume(), onActivityResult(), onPause(), and
onDestroy() and do the equivalent callback on the helper class, as shown here:
public class MainActivity extends Activity
implements Session.StatusCallback {
private UiLifecycleHelper mUiLifecycleHelper;
@Override
protected void onCreate(Bundle savedInstanceState) {
super.onCreate(savedInstanceState);
setContentView(R.layout.activity_main);
LoginButton authButton =
(LoginButton) findViewById(R.id.authButton);
authButton.setReadPermissions(Arrays.asList(“user_birthday”,
“friends_birthday”));
mUiLifecycleHelper = new UiLifecycleHelper(this, this);
mUiLifecycleHelper.onCreate(savedInstanceState);
}
@Override
protected void onResume() {
super.onResume();
mUiLifecycleHelper.onResume();
}
@Override
protected void onPause() {
super.onPause();
mUiLifecycleHelper.onPause();
}
@Override
protected void onDestroy() {
super.onDestroy();
mUiLifecycleHelper.onDestroy();
}
@Override
protected void onSaveInstanceState(Bundle outState) {
super.onSaveInstanceState(outState);
mUiLifecycleHelper.onSaveInstanceState(outState);
}
@Override
protected void onActivityResult(int requestCode, int resultCode,
Intent data) {
super.onActivityResult(requestCode, resultCode, data);
mUiLifecycleHelper.onActivityResult(requestCode, resultCode,
data);
}
@Override
public void call(Session session, SessionState state,
Exception exception) {
// Callback for session state changes...
}
}
Note the LoginButton that’s added to the layout for this Activity. You can use it to provide a default
Facebook Login button to your application. It’s also possible to pass extra parameters, such as necessary
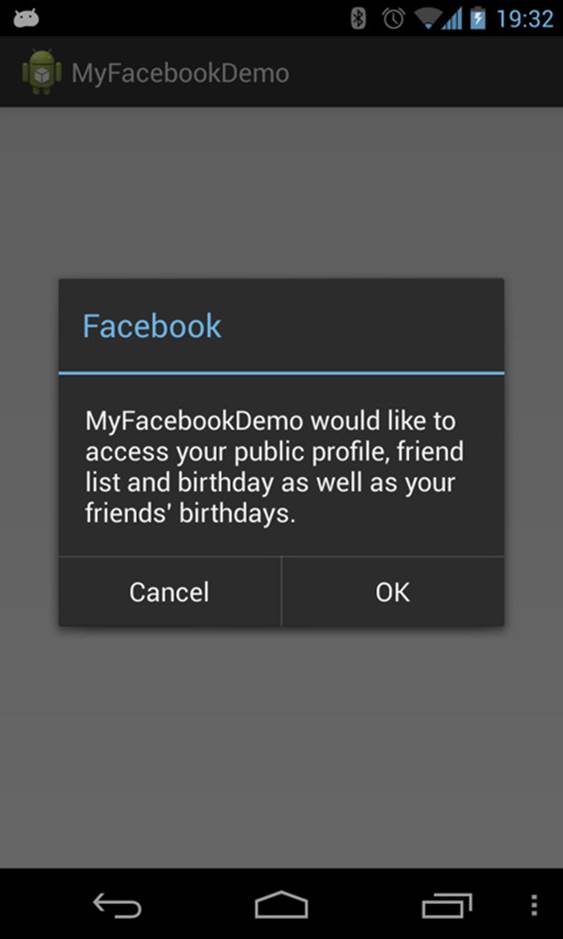
permissions and such, which will then be passed on to the authentication process. When the user taps the Login
button, a dialog box appears asking the user if she wants to allow your application to get the permissions it has
requested, as shown in Figure 17-3.
Figure 17-3 Dialog box asking the user for permissions
to access her specific Facebook data
You can add the Facebook Login button in the XML layout for your Activity as shown in the following. This
way, you can control where the button should appear while at the same time provide a familiar entry point for
the user to log in to Facebook.
<com.facebook.widget.LoginButton
android:id=”@+id/authButton”
android:layout_width=”wrap_content”
android:layout_height=”wrap_content”
android:layout_gravity=”center_horizontal”
android:layout_marginTop=”5dp” />
Once you have a valid authentication toward Facebook, you can use the Request class from the Facebook
SDK to perform requests. The methods provided by this class come in many different versions, some are
asynchronous and perform the network call on a separate background thread, while others are synchronous
and allow you to control the background threading yourself. In the following code example you can see a
request for the user’s friends made using the asynchronous method.
public void doLoadFriendList(View view) {
if(SessionState.OPENED_TOKEN_UPDATED.
equals(mSessionState)
|| SessionState.OPENED.equals(mSessionState)) {
Request.executeMyFriendsRequestAsync(mSession,
new Request.GraphUserListCallback() {
@Override
public void onCompleted(List<GraphUser> friends,
Response response) {
Log.d(TAG, “Friends loaded: “ + friends.size());
mFriendListAdatper.clear();
mFriendListAdatper.addAll(friends);
mFriendListAdatper.notifyDataSetChanged();
}
});
}
}
Using the Facebook SDK for Android to add Facebook integration to your application is significantly simpler
than using the web-based OAuth2 approach shown in the previous section. Facebook SDK for Android allows
you to provide a secure method for authorization without having to break the Android UI paradigm.
Finding Online Web Services and APIs
It’s impossible to provide a complete list for all the available web services online, mostly because that list
changes every day. However, a number of useful resources are online where you can find web services for
different things. A good place to start is at www.programmableweb.com, which provides an online directory
for many different web services and APIs. Two other very good directory resources for online web services and
APIs are www.apis.io and www.mashape.com.
If you need an online service, rest assured that you’ll be able to find some exiting web services or online APIs.
Although most of these services provide a free tier, several require you either to pay a fee (usually based on
usage or a monthly fee) or to contact the provider in order to set up a contract for their use. Often, it may be
cheaper to pay for an existing service than try to implement one from scratch, unless that’s your core business.
Network and Power Consumption
When it comes to power consumption, the second biggest cause of battery drain is often related to network
traffic (the display usually comes first). Users who disable mobile data will see an immediate decrease in battery
drain, but will also lose all features requiring online connectivity. Smartphone manufacturers, chipset vendors,
and Google have all implemented a number of ways to reduce the amount of network traffic and battery drain
in order to increase the battery’s life. However, unless application developers follow the guidelines and use the
tools at their disposal, these improvements are all in vain.
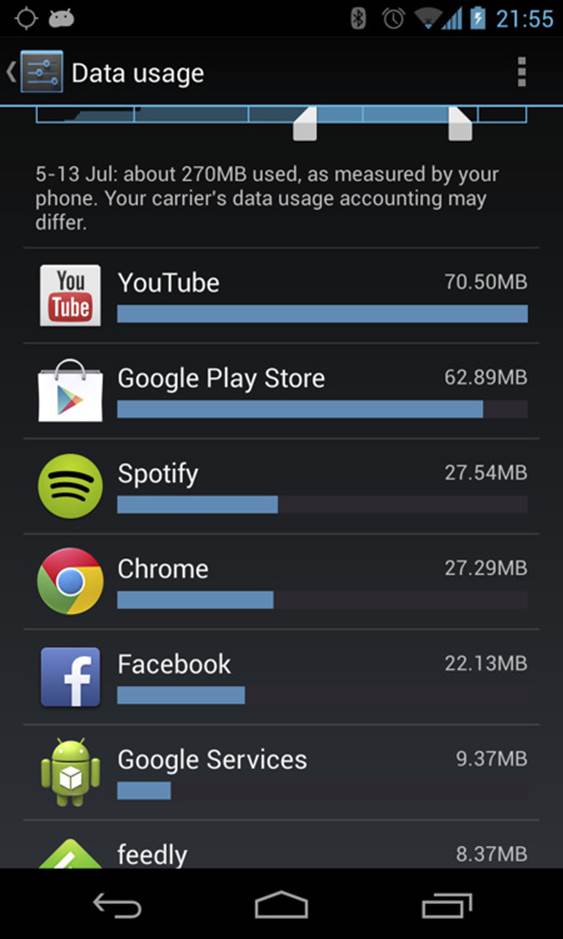
Because of the openness of the Android platform, a single application can keep the mobile radio in high-drive
mode more than needed, thus draining the battery faster. In later versions of Android, users can track the
network usage for each application (see Figure 17-4). Although network traffic from your app will not cost
you anything, excessive use will cost the user through battery loss and data traffic charges, probably resulting
in a very bad review rating. It’s in your best interest to make sure you don’t use more data than is absolutely
necessary.
Figure 17-4 Data Usage from the Settings application
shows how much data each application used during a
certain period
The radio hardware on a smartphone, that is the Wi-Fi and the cellular chip, has built-in power-saving features
on the hardware level that automatically kicks in when no network traffic is active (that is, no incoming or
outgoing data packages) and reduces the consumption of power to a very low level. When an application
wants to send data or when an application is waiting for incoming data and a package is received, the network
hardware will disable the power saving in order to be able to send data as fast and efficiently as possible.
If only one application on a device is making network calls, there’s no problem with consumption of power. The
problem occurs when many applications want to access the network, and they’re doing so in random order.
General Guidelines
Before performing a network call, first consider whether the user really needs this data right now. For instance,
if the data your application fetches is quite small, it’s probably okay to fetch it when the user launches the
application instead of continuously updating the data at regular intervals or when your app gets a notification
(either through Google Cloud Messaging or some other push notification service). Unnecessary network
requests is the most common mistake for applications that fetch data online. In many situations, you can wait
until the user explicitly requests the data (for instance, when the application is launched).
Second, consider how much data you need to retrieve. For example, in an e-mail application, it’s usually
enough to fetch only the ten latest e-mail headers, which could be more difficult to implement, especially on
the server-side, but will save data traffic and reduce the time required for the network call to complete. Using
different types of caches (like the response cache introduced for HttpUrlConnection in Android 4/ICS) and
retrieving smaller pages of data from the service will greatly reduce your application’s network traffic.
Also, because the HttpUrlConnection class now supports transparent compressions, make sure that the
data retrieved from the server is gzip-compressed if possible—this compress/decompress feature is enabled by
default by most major public web services. Another way to optimize the amount of data is to choose a better
data format, which usually involves a balance between size optimization and how dynamic the format is. If you
can, choose a format that allows you to extend your data definition without losing backward-compatibility.
Although JSON is good enough for most situations, and also allows you to use the same backend for web
clients, the best choice in terms of size is probably Google Protocol Buffers.
Finally, my third tip is related to the first one. If you need to notify the user about a new message or some other
online information that requires the user’s attention, you cannot wait until the user starts the application to
perform the network call. In such cases, you have two choices: polling the service at regular intervals or letting
the server push the information down to the client.
Power Efficient Network Polling
Network polling has several drawbacks but is sometimes the only viable way for you to check whether there’s
something new to fetch from an online service. Fortunately, Android provides a convenient API for doing
recurring polling through the AlarmManager API.
Following is an example of a method for scheduling a recurring polling at 15-minute intervals. Note the use of
ELAPSED_REALTIME as the type of alarm:
public void scheduleNetworkPolling() {
AlarmManager alarmManager = (AlarmManager)
getSystemService(ALARM_SERVICE);
int alarmType = AlarmManager.ELAPSED_REALTIME;
long interval = AlarmManager.INTERVAL_FIFTEEN_MINUTES;
long start = System.currentTimeMillis() + interval;
Intent pollIntent
= new Intent(MyNetworkService.ACTION_PERFORM_POLL);
PendingIntent pendingIntent
= PendingIntent.getService(this, 0, pollIntent, 0);
alarmManager.setInexactRepeating(alarmType,
start, interval, pendingIntent);
}
If you need to awaken the device from a suspended mode, change ELAPSED_REALTIME to ELAPSED_
REALTIME_WAKEUP. Doing so, however, causes the device to consume more battery because it will go out of
suspend mode every 15 minutes.
The way the setInexactRepeating() works is that all applications that register for a wakeup using this
service with the same interval will be awakened at the same time. Regardless of when an application registered
for a 15-minute wakeup interval, it will receive its PendingIntent at the same time the other registered
applications do.
Although this approach doesn’t consume less battery, it will reduce the device’s overall consumption of power
if all applications that need a recurring polling interval use it. This will then ensure that no network polling
happens between the 15-minute intervals.
Server-Side Push
The best solution for reducing the number of network calls is to use a server-side push. This technique allows
the server to actively notify a client that there is new data to retrieve. The server-side push notification can
come in many forms. It can be an out-of-bounds message that comes through a messaging service not directly
connected to the Internet, like SMS, or it can be a regular TCP socket with a long keep-alive.
The most obvious choice for server-side push notifications is Google Cloud Messaging, which I explain in detail
in Chapter 19. However, two other solutions are available for server-side push.
SMS Push Notifications
As I explain in Chapter 15, you can register a BroadcastReceiver to receive incoming SMS as part of the
hidden Android APIs. This solution can work as an out-of-bounds server-side push notification that wakes up
the device and notifies it that there is new data to fetch online. Although this solution has a certain monetary
cost for the service provider, it can be used for notifications that happen less frequently or when you’re able to
send SMS for free (for instance, if you’re writing an application for a telecom operator).
The following code is a slightly modified version of the example in Chapter 15. In this case, the
method processSms() will return true or false depending on whether it’s a push notification
SMS you’re expecting. If true, the network service starts and you call abortBroadcast() and
setResultData(null); to ensure that the SMS is not propagated to the other receivers.
public class MySmsPushNotifier extends BroadcastReceiver {
// Copied from Telephony.java
public static final String SMS_RECEIVED_ACTION
= “android.provider.Telephony.SMS_RECEIVED”;
public static final String MESSAGE_SERVICE_NUMBER = “+461234567890”;
private static final String MESSAGE_SERVICE_PREFIX = “MYSERVICE”;
public void onReceive(Context context, Intent intent) {
String action = intent.getAction();
if (SMS_RECEIVED_ACTION.equals(action)) {
Object[] messages =
(Object[]) intent.getSerializableExtra(“pdus”);
for (Object message : messages) {
byte[] messageData = (byte[]) message;
SmsMessage smsMessage =
SmsMessage.createFromPdu(messageData);
if (processSms(smsMessage)) {
Intent networkIntent
= new Intent(MyNetworkService.
ACTION_PERFORM_NETWORK_CALL);
context.startService(networkIntent);
abortBroadcast();
setResultData(null);
}
}
}
}
private boolean processSms(SmsMessage smsMessage) {
String from = smsMessage.getOriginatingAddress();
if (MESSAGE_SERVICE_NUMBER.equals(from)) {
String messageBody = smsMessage.getMessageBody();
if (messageBody.startsWith(MESSAGE_SERVICE_PREFIX)) {
return true;
}
}
return false;
}
}
In order for your receiver to take priority over the default SMS receiver, you also need to modify the priority of
the intent-filter as shown here:
<receiver android:name=”.MySmsPushNotifier”>
<intent-filter android:priority=”9999”>
<action android:name=”android.provider.Telephony.SMS_RECEIVED” />
</intent-filter>
</receiver>
Web Sockets for Server-Side Push
I describe how to use Web Sockets earlier in this chapter. You can create a light-weight server-side push
notification service using Web Sockets. This method is not foolproof, and you need to adjust the timeout on the
socket on both the server and the client for this method to be efficient.
In the following example, the callbacks signal which state the push-notification socket is in:
class PushNotificationSocket extends WebSocketClient {
public PushNotificationSocket(URI serverURI) {
super(serverURI);
}
@Override
public void onOpen(ServerHandshake serverHandshake) {
// Web Socket opened - now registered for notifications
}
@Override
public void onMessage(String message) {
try {
JSONObject jsonObject = new JSONObject(message);
parseNotification(jsonObject);
} catch (JSONException e) {
Log.e(TAG, “Error parsing notification message!”, e);
}
}
@Override
public void onClose(int code, String reason, boolean remote) {
// Socket closed - reopen if this was unintentional
// due to a network timeout or similar
}
@Override
public void onError(Exception e) {
// Error, possibly due to timeout.
// Reconnect if possible.
}
}
This code is only partially complete but illustrates how Web Sockets can be used for a light-weight server-side
push notification. You also need a server that can respond to Web Socket requests. In Chapter 18, I provide an
example of such a server using the same Web Socket library used in this chapter. You can also use this library on
a server-side Java application.
Summary
In this chapter, I explained the best way to use a number of different APIs and libraries for doing networking
communication over HTTP. The standard HttpUrlConnection is sufficient for most situations, but if you will
do a lot of networking calls, you should take a look at the alternatives covered in this chapter.
I also discussed how to integrate three different types of web services, from the simplest ones that don’t require
any authentication to the more complicated ones that require OAuth2 or a native Android SDK. Most of the web
services you’ll encounter can fit into one of these three categories.
In the final part of this chapter, I provided some guidelines on what to consider when it comes to power
consumption and network operations. If possible, try to use Google Cloud Messaging from a server to notify
your application when new data is available. However, when server-side push is not possible, you should use
the periodic scheduling from the AlarmManager, which will help applications perform their network polling
at the same time, thus keeping the device in a suspended mode longer.
Networking is a complicated topic, and this chapter’s space doesn’t allow coverage of all options. Before
performing network calls, make sure that the network is available and listen for changes in the connectivity
using a BroadcastReceiver, as I describe in Chapter 8. If your application transmits large amounts of data,
like high-resolution photos, consider having an option to disable network communication for your application
when on a mobile network and only allow the traffic to occur over Wi-Fi. This is best done through some settings
UI, as I describe in Chapter 9. Finally, always assume that any network operation you initiate could fail and
produce a faulty or abnormal response. Implementing proper and thorough error-handling in your network
calls is very important. I highly recommend that you write automated unit tests, as I describe in Chapter 10, to
verify your code as much as possible.
Further Resources Documentation
For the HTTP protocol: http://www.w3.org/Protocols/
Websites
SPDY specification and whitepaper: http://dev.chromium.org/spdy/spdy-whitepaper
The latest draft for HTTP/2.0, based on SPDY: http://http2.github.io/http2-spec
The OAuth Bible from Mashape: https://github.com/Mashape/mashape-oauth/blob/master/FLOWS.md
How OAuth2 works by Aaron Parecki: http://aaronparecki.com/articles/2012/07/29/1/oauth2-simplified
How to perform regular updates without draining the battery: http://developer.android.com/training/efficient-downloads/regular_updates.html
How to make more energy and network efficient apps: http://developer.sonymobile.com/
knowledge-base/tutorials/android_tutorial/how-to-develop-energy-and-network-efficient-apps-tutorial
All materials on the site are licensed Creative Commons Attribution-Sharealike 3.0 Unported CC BY-SA 3.0 & GNU Free Documentation License (GFDL)
If you are the copyright holder of any material contained on our site and intend to remove it, please contact our site administrator for approval.
© 2016-2026 All site design rights belong to S.Y.A.