Android Programming: Pushing the Limits (2014)
Part II. Getting the Most Out of Components
Chapter 4. Android User Experience and Interface Design
Android’s user interface has changed quite a bit over the years. One of the biggest changes came with Android
3.0 (Honeycomb) where the new Holo theme was introduced. Since then, we’ve seen Android’s UI become a
polished and sleek experience that easily appeals to users of all backgrounds.
The team at Google behind the Android UI design has done some great work at explaining how to apply the
same design into your own applications. This is covered in great detail at http://developer.android.
com/design/index.html. I strongly recommend all Android developers to go through these guidelines to fully understand how to work with the different aspects of Android UI design.
In this chapter I’m going to cover UI design for Android applications at a more theoretical level. While the Android
design site I just recommended does cover many things a developer and UI designer need to know, there are still
things I believe you need to have a better understanding of when designing state-of-the-art user interfaces.
I start this chapter with a description of a process for identifying the different parts of your application UI and
how they work together. I then move on to describe Android specific UI concepts like navigation, sizes and
colors. I’ve also written a section covering usability and what you should consider when you do the detailed
design of your user interface. The final part of this chapter covers the concept of gamification and explains how
you can use this to increase the use of your application.
User Stories
The first thing you should do when you start to design your application is to write down the user stories
that describe what a user can do with your application. A user story is commonly used in agile software
development as the basis for defining product requirements. Typically, a user story uses the following form
(sometimes with a slight variation):
As a <role>, I want <goal/desire> so that <benefit>.
For instance, if you’re designing a sketching application, one of the user stories could be:
As a user, I want to change the color used by the current drawing tool so that it only affects the next use of that tool.
The final part that describes the benefit can sometimes be left out when it is obvious.
Your user stories should be brief and concrete. Each story should focus on one thing. It is better to use two
similar stories than a long and complicated one. Start with the obvious user stories, split them up, and add
more as you see fit. You will probably end up with a lot of stories once you’re done. But this process will help
you when you start to design your user interface as each story should be easily mapped to an action in the user
interface. Although not every user story might start with a user interaction, they will most certainly affect the
user interface in some way. For instance, a user story about an alarm is one such example:
As a user, I want the screen to display the current time when a preset alarm goes off.
User stories can then also be used to track the progress of your development work. Try to focus on completing
one story at a time and once the entire story is implemented and tested, you can move that story to a
“completed” state.
There are a few things to keep in mind when writing user stories. First of all, different stories can be
implemented using a common software component. However, this might not be obvious when you first write
a user story, but becomes apparent when you start writing your code. For instance, if your application will list
items in different categories and provide a search interface, the list of items for categories and search result can
probably use the same Activity and View layout. This is why it is a good idea to categorize your user stories
early in the process, so that you can more easily identify the places where a common Activity or View can
be used for different stories.
Understanding the User with Personas
When you’re writing the user stories, it is easy to make assumptions of how things should work based on
your own experiences and perspective. The problem is that real users lack the same knowledge about your
application that you do. The way to deal with this is to create personas which are made-up users who each
represent a typical user. For instance, if you’re designing a newsreader you can make up a number of personas
that represent who you believe are the most common users.
A persona should have a full name, description, age, sex, education and other relevant information. Also,
you should list a number of goals that the user has when using your application (for instance, catching up
on the news while commuting). Finally, you should define a priority for each persona based on their relative
importance compared to every other persona. The following is an example of a persona that you can define
when designing a newsreader application:
Name: John Smith
Sex: Male
Age: 31
Description:
◾ Commutes to work by bus where he reads news
◾ Works in an office
◾ Uses his smartphone as his primary source for reading news
Priority: High
You should define a number of personas that define the users you want to target. Try to imagine how each
persona would use your application and what their needs are.
When you have the personas for your most important users, it’s easier to define the user stories that fulfill the
most important requirements for your application. You can now easily prioritize each user story for your project.
Android UI Design
When planning and designing the user interface for your Android application, there are a few basic principles
you should follow. First, you should think in terms of screens when you plan the user interface. Model your
applications so that you have multiple screens, each focusing on a small set of actions that the user can
perform. For instance, a typical newsreader application would have one screen for listing news items, one for
adding news sources, one for reading news, and probably one for searching.
When defining the different screens you don’t need to focus on the details of the user interface. Simply try to
figure out what kind of information you want to display on each screen and leave the details about how to
display them for later.
Navigation
Once you have the different screens figured out you should start to think about how navigation works between
them. The navigation should be simple and straightforward so that the user will never be lost. Android provides
a number of navigational concepts that makes this process easier. When you start designing the navigational
structure you might also add additional screens to your application as needed.
Navigation in Android applications can be divided into four different categories: temporal, ancestral,
descendant, and lateral.
Temporal navigation is usually done with the Android back button, moving to the previous screen. This
navigation is usually handled automatically by the Android framework and doesn’t require any special code
by a developer. However, there can be situations where you wish to override the default handling of the back
button. For instance, when embedding a WebView for displaying web pages, you might wish to use the back
button in Android as a back navigation for the web pages.
Ancestral navigation refers to the navigation where the user moves up through the hierarchy to a parent screen, like
moving back to the start screen for the application. Ancestral navigation is solved in Android 4.1 and later through
the use of the android:parentActivityName attribute for each Activity in the application manifest.
For earlier versions of Android you need to use the Android support library together with a meta-data tag (see
http://developer.android.com/training/implementing-navigation/ancestral.html).
Descendant navigation is when the user navigates down through a hierarchy, for instance clicking on an item in
a list. Descendant navigation is the most common form in Android applications. It is typically handled through a
combination of Fragments and Activity instances where the user triggers actions that change the screen.
This kind of navigation will usually move down through the information hierarchy, but can also be used to
display additional information about the current object.
Lateral navigation is when the user moves to a sibling screen, for instance moving from one tab to another
sideways. This type of navigation is useful when your application will contain multiple lists of similar types,
but divided into different categories. One of the most common examples of this is the list of different types of
applications in the Google Play Store application.
Prototyping User Interfaces
When you get your screens and navigation completed, you can start prototyping the user interfaces. The
best way to start prototyping is with a paper and pencil. It is cheap, fast, and since users will interact with the
application using their fingers, it is easy to get a feel for how easy it is to use. Make a paper sketch for each
screen and add notes to clarify the UI. You can now “navigate” between your prototype screens in a way that’s
similar to how a real user would navigate in your application on a real device.
The paper prototype can start out simple with very little detail and evolve into a complete sketch of what the
user interface will look like. The important thing is to try several designs and not just stick to the first that comes
to mind. You should compare all your sketches to each other to find the best approach for each screen.
Once you feel you’ve got a good paper prototype, you can move on to create a more advanced prototype of the
user interface using Android Studio, as described in the next section.
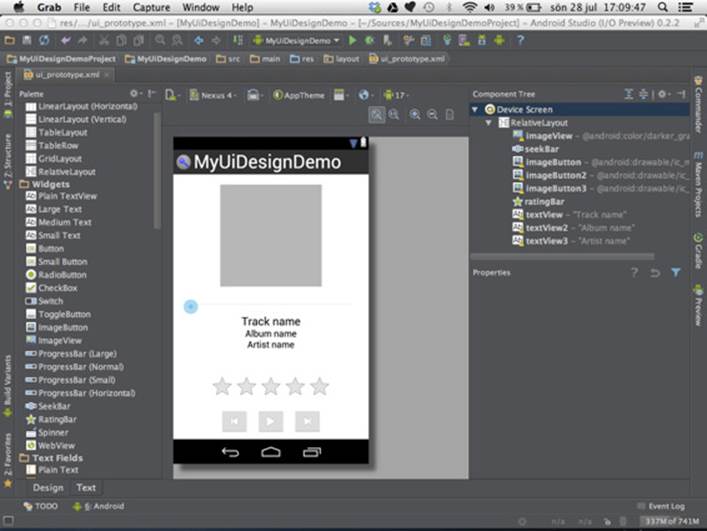
Android Studio UI Designer
One of the best UI prototyping tools for Android applications is probably something that you’ve already
installed. Android Studio comes with a great UI designer toolkit that lets you work directly with XML layouts for
different screen sizes (see Figure 4-1). You can easily create a quick mockup that you can try out on your device
or an emulator.
Figure 4-1 Android Studio as a UI prototyping tool
One advantage with Android Studio UI designer is the tight integration with your code. You can easily switch
between different screen sizes, locale settings, and screen orientations and see the result immediately on the
screen.
By using Android Studio and its UI Designer tool you can create a working mockup of your user interface that
you can try out on a real device. You might have to add a minimal amount of code to fill the mockup with fake
data, but with only minor effort you can have a working mockup of your application in no time.
Android UI Elements
When developing Android applications you have a large set of ready-made UI elements, called widgets, in the
Android SDK that you can use. These widgets can be found in the android.widget package of the Android
APIs. You should try to use the existing widgets as much as possible. However, if your View hierarchy gets very
complicated you should consider creating a custom View, as described in Chapter 5, instead.
The main reason why you should use existing widgets as much as possible is because they are easily
recognizable by the user. In many cases, you want to create an application that will be distributed on multiple
platforms. When doing so, it can be tempting to re-use the same user interface design for all platforms. While
the concept of designing once and running the app “everywhere” might seem tempting at first, you will likely
create inconsistent user experiences that will have a very negative impact and alienate users.
This is also the reason why you should avoid creating your own look and feel for existing widgets. A user can
become confused if buttons suddenly change their appearance when they start your application. This concept
of “Pure Android” is described in further detail here: http://developer.android.com/design/
patterns/pure-android.html.
Text in Android Applications
One of the most important aspects of any application is the text. While placement of UI components are
important, it is the text together with images that is used to relay information to the user. Badly written text, the
wrong font or a text size that is too small can lead to an overall bad user experience.
Also, how you express your message in text matters, which is described in detail in the Writing Style section
found here: http://developer.android.com/design/style/writing.html.
Font Matters
There’s been a lot of debate over the years about fonts, particularly about whether using serif or sans serif is
better, even though studies have shown that neither appreciably affects how easy or fast people can read text.
What does matter is how easily a font can be recognized. The human brain uses pattern recognition to identify
letters in a text, so logic says that you should use an easily recognizable font. So, limit your use of highly
decorative fonts and use them only for logos and such.
Google has designed a default font for Android called Roboto (see Figure 4-2), which I recommend you use
unless you have a well-designed font that is part of your brand. This font was designed with all the modern
aspects of Android devices in mind, such as high-resolution screens.
Figure 4-2 Example of the Roboto font for Android
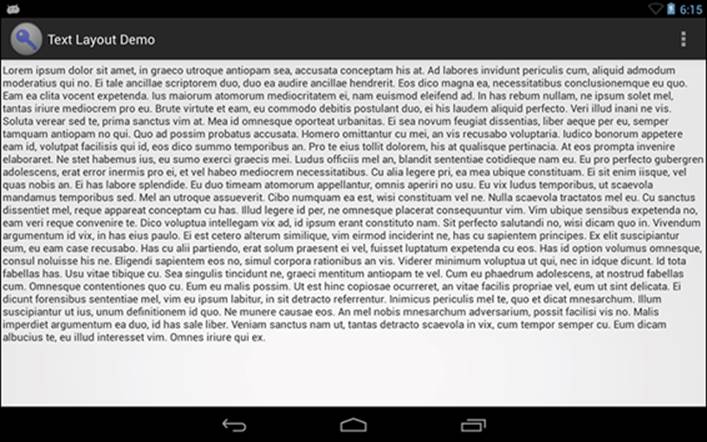
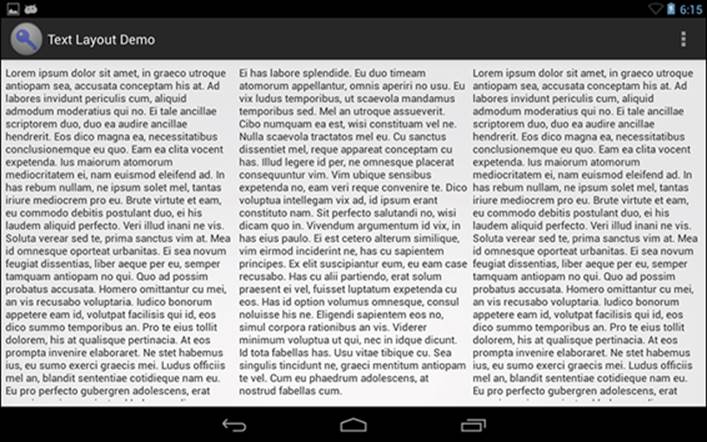
Text Layout
Another interesting aspect of readability is the fact that people read faster when lines are long but they prefer
to read short lines, which is one reason newspapers often use narrow columns for articles. So, consider what’s
of the most importance in the text you present. Use longer lines only if reading speed is important, although
text in applications is usually short, so this shouldn’t be much of a problem. The point is to keep lines of text
between 45 and 72 characters.
Length is less of a concern when you’re writing applications that will run on phones in portrait mode. The lines
will rarely be too long in those cases. However, when building applications for tablets or for landscape mode on
smartphones, keep this issue in mind. When the UI is wide, try to limit text to columns with between 45 to 72
characters within a given line. Figure 4-3 shows two examples of using long and short text lines.
Figure 4-3 Two layouts showing the differences between long and short text lines
Dimensions and Sizes
If you’ve already written Android applications, you know that you’re supposed to specify the sizes of your UI
elements using the dp (density-independent pixel) unit. The basic reason is to allow an Android application
to scale across different screen sizes, resolutions, and pixel densities without losing quality. When using dp,
the goal is to draw a View so that it has the same physical size on all screens. One dp is roughly equal to one
physical pixel on a 160 dpi screen.
You should specify all dimensions in your UI using the dp unit, with one exception: When specifying font sizes,
use the unit sp, which is based on the dp unit but also scaled according to the users’ preferences for font sizes.
Thus, by using sp for fonts, you can be sure that the text is printed with the size chosen by the user.
The other dimension units supported by Android are pt (points), px (pixel), mm (millimeter), and in
(inches). You should use these only in very specific cases and, as far as possible, provide all the default
sizes in dp or sp.
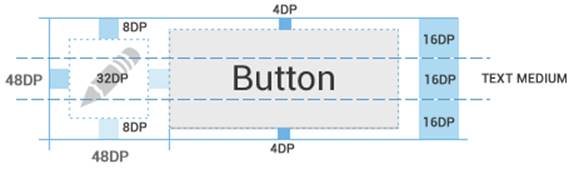
Recommended Dimensions
How large does a button need to be in an Android application? How much margin and padding do I need to
apply? How big should my icons be? If not for the dp unit, this question would have a very complicated answer.
The short answer is “the 48-dp rhythm.” Basically, 48 dp translates to about 9 mm on the screen, which is within
the suitable range for objects on a touchscreen that users need to interact with using their fingers.
This doesn’t mean that everything should be 48 dp, but that the UI components the user will interact with
should be at least that size. If a UI component needs to be larger than 48 dp, try to make it an even multiplier
of 48 dp if possible to keep your UI layout consistent. (See Figure 4-4; from http://developer.android.
com/design/style/metrics-grids.html.)
Figure 4-4 An illustration of the 48 dp rhythm for UI objects on Android
Icon Sizes
Outside the world of Android, the dp unit doesn’t exist, and you have to create a version of each icon for every
resolution you need to support. Android Studio will help you create the launcher icon for your application, and
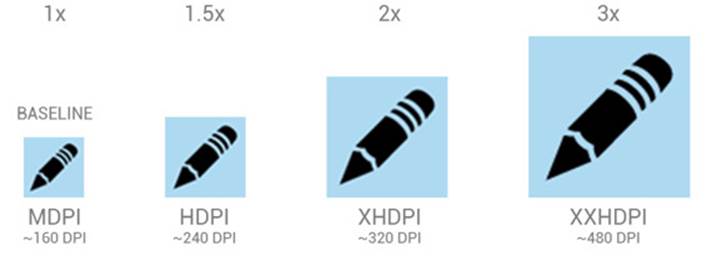
you can use these sizes as a template for the other icons in your application. The resolutions you need are 48
pixels for MDPI, 72 pixels for HDPI, 96 pixels for XHDPI, and 144 pixels for XXHDPI—this is called the 2:3:4:6 ratio,
and you can use it as a guideline for other pixel sizes as well. You can see an example of the relative icon sizes in
Figure 4-5 (from http://developer.android.com/design/style/iconography.html).
Figure 4-5: The relative sizes of icons in Android for different screen sizes
When you display a bitmap as an icon in Android, don’t use px as the size for the View. Instead, use dp. A regular
icon, like the launcher icon on the Home screen, should be 48 dp by 48 dp, whereas icons in the action bar should
be 32 dp by 32 dp. Icons in the notification bar should be 24 dp by 24 dp. Smaller icons should use the size 16 dp
by 16 dp. Avoid icon sizes below 16 dp because some users may have trouble distinguishing them.
Text Size
Google created the font Roboto, which is used in all the standard Android applications. Although you can use a
different font in your application, using Roboto is recommended in order to be consistent with the standard UI
paradigm.
The size of a font is very important when it comes to ease of reading. Figure 4-6 shows how the size of a font is
measured. Different fonts with the same point size can seem to have different visual sizes. This comes from the
measurement called x-height, which is literally the size of the lowercase letter x in the font. A large X-height
makes a font look bigger and is easier to read. Other fonts that have large X-heights that we commonly use are
Arial and Verdana.
Figure 4-6 An illustration with the Roboto font showing how a
font size is measured
Google has also defined four standard font sizes for Android. These are micro (12 sp), small (14 sp), medium
(18 sp), and large (22 sp). By using the same size in your application, you’ll stay consistent with the rest of the
Android framework. Note that the sizes should be in the unit sp, not dp, to allow users to apply the scaling
factor they prefer in the Settings application.
Colors
I am actually the last person who should write about colors, given that I’m severely colorblind and need my wife
to help me whenever I buy clothes. Choosing colors for a UI is very difficult for people with normal color sight,
and being colorblind makes things even more complicated. Luckily, there are some general guidelines that even
I can understand and follow.
First of all, black and white are great colors. They have very good contrast, especially on the screens of Android
devices. If you’re uncertain about which colors to choose, start with these two and add other colors later only to
emphasize certain details.
When it comes to the color to use for text and its background, there are some governing rules. The LCD screens
usually found on Android devices are very different from paper. First, they emit light, which can cause eye strain
and make reading for a long time more difficult. Second, because the screen is refreshed continuously, the
image on the screen is not stable, even if the device is still. The refresh rate for most LCD screens is usually 60 Hz,
but some devices have a higher frequency.
Studies have shown that when reading text on a LCD screen, you should have as much contrast between the
text and the background as possible. This is why black and white are great colors to use when displaying text.
The best choice is to use black for the text color and white as the background—the opposite has proven to be
harder to read (see Figure 4-7).
Figure 4-7 An example of how contrast affects readability .
How the user may interpret a color is another reason to avoid using too many colors in your application. Colors
have different cultural meanings all over the world. For instance, the color green represents luck in Western
Europe, North America, and many Muslim countries, whereas Africa, Eastern Europe, and China use the color
red instead. Picking the wrong color could affect a significant part of your user-base in a negative way. A great
resource for interpreting what different colors mean in different cultures is the color wheel by David McCandles,
which you can find at http://www.informationisbeautiful.net/visualizations/colours-
in-cultures.
Google recommends that you use primary colors for emphasis. The Android Design Guidelines (see http://
developer.android.com/design/style/color.html) contain a number of standard color swatches to use in your application. Pick the color scheme that matches your brand.
Color Blindness
There are different types of color blindness, and in most cases they all refer to an inability to distinguish
the difference between certain colors. The most common type of color blindness involves the inability to
distinguish between red and green, which can actually be difficult to do even when you’re not color blind.
About 9% of the male population and 1% of the female population are color blind.
A great tool for checking how your image looks to someone who is color blind is Vischeck, which you can find at
http://www.vischeck.com. This tool also lets you correct an image with regard to color blindness.
Images and Icons
All applications will contain at least one image; the image used as the launcher icon for your application. Your
application will most likely contain many other icons and images as well, and the way you design these can
have a big impact on how users perceive your application.
An icon consisting of many different and complex objects can have a negative impact on the perception of your
application. You should carefully design the launcher icon for your application so that it is easily recognized and
can be shown on both light and dark backgrounds, as you cannot be sure what kind of background the user will
have on her device.
Canonical Perspective
When told to draw an object from memory, most people will draw it as though looking at it from above at a
slight angle. This is called the canonical perspective, and it is also how we remember objects. For example, take a
piece of paper and draw a cup. Chances are it will look very much like Figure 4-8.
Figure 4-8 A teacup drawn from the canonical perspective
If you’re going to provide an icon of a real-world object, do users a big favor by designing it from a canonical
perspective; they’ll be able to quickly recognize and match the icon to the real-world object it represents.
Geons
Another interesting thing about objects is how we construct them in our memory. Studies have shown that we
are able to recognize objects by separating them into their component parts, or geons, and then using those
parts to build up more complex shapes. In Figure 4-9, you can see some geons and how our memories can
reconstruct them as real-world objects.
Figure 4-9 Objects and the geons they are constructed of
When you design an icon for your application, it is a good idea to construct it from simple geometric figures,
and keep in mind that the fewer geons you use for your icon, the faster the user will recognize what it
represents.
Recognizing Faces
As humans, we are very good at recognizing faces. Most people can easily pick out a friend’s face in a
crowd of people. We are actually faster at recognizing faces than other objects. Also, we are much slower at
understanding text that we read than recognizing a person’s face. By using this knowledge you can greatly
improve the user interface of your application.
If your application will integrate with a social network such as Twitter or Facebook, use this to your advantage.
Instead of having a long list of names with all the user’s friends, show a grid of profile photos. This way you can
fit more information on the screen at once, while making it easier to find the person the user is looking for.
Usability
According to Steve Krug in his book Don’t Make Me Think, the first law of usability is simply that: “Don’t make
me think!” A user shouldn’t have to spend a significant amount of time trying to figure out how to use your
application. Steve argues that users seeing your application’s UI for the first time shouldn’t have to question
what to do next; rather, the next step should be obvious.
This principle applies from overall UI navigation all the way down to single UI components. For example, users
can immediately recognize standard buttons; on the other hand, buttons with unfamiliar designs will require
conscious processing. Although you may favor a particular design over the standard button in Android, your
best bet is to use the standard button—because that’s what users will expect to see on their devices.
So, it’s important to follow the Android design principles. Of course, you can provide your own unique look
and feel to the user interface, but if you do so, make sure that you still provide a user-friendly interface that is
obvious to any user. Basically, break the rules only if you know how to break them effectively.
Visual Cues
In order to make your application user friendly, you should consider the visual cues of the UI elements that a
user will interact with. Visual cues are the “message” that an object signals to a user about how it is supposed to
be interacted with. A visual cue that is hard to understand, because it is unclear or complicated, might cause the
user to make mistakes or use the object in the wrong way.
An Android application is full of visual cues. The Home and Back buttons on Android devices are easily
recognizable and have clear visual cues on what they do and how to use them. The same goes for many of the
common actions, like the “share” action which is built-in in many Android applications.
Because people understand text slower than they understand a simple icon, you can make things much easier
for the user by providing a suitable icon for all buttons in your application. If your buttons will only contain text,
the visual cue that signals the action the button represents is harder to interpret and will require more time for
the user to understand.
For instance, consider a typical file browser application. When listing files, you provide two buttons, Send and
Delete. If the buttons will only contain text, it is much easier for the user to press the wrong button by mistake
than it would be if you also added an icon to each button. If you can’t fit both an icon and text, you should first
provide an icon.
The Android Design site contains a set of freely available icons that you can use in your application. You can find
these icons here: http://developer.android.com/design/style/iconography.html. By using these you will provide the same easily recognizable icons that many other applications use. This will reduce the
time required for a user to understand your application, as well as minimize the risk of a user performing the
wrong action.
Rewarding the User
Whatever the purpose of your application, the user will expect some sort of outcome. You can consider the
outcome as a kind of reward for the work they perform. Studies in this area have given us a number of tools that
we can apply when designing an application. In the world of Internet-connected apps and websites, the term
gamification has emerged as a way of describing how to apply rewards in an efficient way.
Gamification
The term gamification was coined in 2002 by a British computer programmer named Nick Pelling, but although
it was applied successfully at the time, the term didn’t gain popularity until around 2010.
The theory behind gamification is that game elements and mechanics outside the world of games (real-world
or computer-based) can improve the user’s engagement. People will naturally strive to compete, reach new
achievements, and achieve higher status. For example, when users are rewarded for using your application
frequently, they will feel and become more deeply engaged. If you provide some sort of immediate satisfaction
reward for every task completed, the users will respond at a faster rate than they would have without this
element of gamification. If you also introduce a concept of competing with other users, such as a high-score list
showing the “best players,” you can further increase their engagement. This in turn improves learning, increases
usage (and thus the profit), and provides you with more data for further improvements. When applied to
websites or applications, gamification can be a very powerful tool.
One of the best-known examples of gamification in the world of mobile applications is Foursquare, the location-
based social network service that lets users “check in” to locations. Foursquare badges are awarded to users
when they check in to new locations, when they have frequently checked in to the same location over a period
of time or when they manage to score the most number of check ins for a certain location. The result is that
Foursquare gained an immense database of places of interest around the world. The use of the application
shows Foursquare the places that are of most interest and how people move between these venues. This data
can then be licensed to third-party services that want to provide information about relevant locations.
Virtually any application can use gamification to increase the use and engagement of its users. I once used the
example of a notebook application for this purpose. If you want users to use your notebook application as much
as possible, you can introduce the achievements that are rewarded after they’ve written a certain number of
words, notes, or pages (see Figure 4-10). If you also provide a public high-score list that the users can see, you
will further improve the engagement.
Using a gamification element in your application can certainly drive user engagement and quickly increase your
user base. However, there are also risks involved. If it gets too easy, people will stop using it because there’s no
challenge. If it’s too hard, you’ll lose users who simply give up. Also, you have to be aware that some users might
turn to cheating, and if it’s easy to cheat, you’ll end up with a ruined game element.
Avoid building the entire user experience around the game element. For instance, Foursquare lets users
compete according to the amount of times they check in to a certain place and how many places they visit, but
the app also provides a very good set of features for finding points of interest and giving reviews.
You can also use the element of gamification to teach the user how to use your application. This can be
especially useful if you have a complicated app that requires some training.
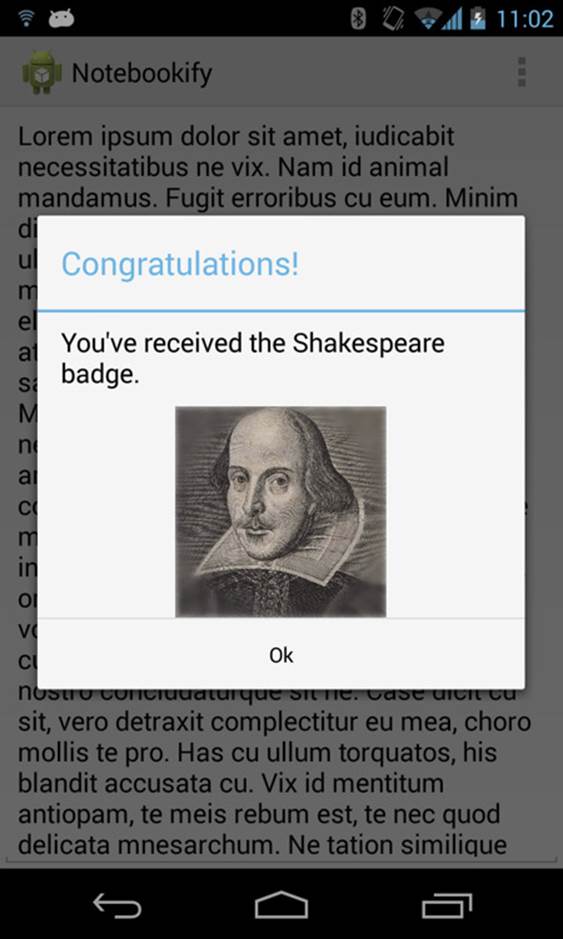
Figure 4-10 An example of adding gamification elements
to a notebook application
Summary
In this chapter, I focused on the theory behind some of the concepts of interface design. You can learn much
more about this topic than I could ever cover by going through all the guidelines and tips on the Android
Design site. Also, I strongly recommend the books and other references found in the upcoming “Further
Resources” section.
Being a great developer doesn’t automatically mean that you’re also a great UI designer. But by understanding
the basics of how and why people react as they do to your user interface, you can avoid most design pitfalls.
That said, nothing beats a good professional interaction and UI designer. If possible, make sure that you have
one on your team and that she has an understanding of the Android Design guidelines.
Further Resources Books
Weinschenk, Susan M., Ph.D. 100 Things Every Designer Needs to Know About People. New Riders, 2012.
Krug, Steve. Don’t Make Me Think: A Common Sense Approach to Web Usability, 2nd Edition . New Riders, 2005.
Lehtimäki, Juhani. Juhani Lehtimäki. Smashing Android UI. Wiley, 2012
Websites
Android Design at http://developer.android.com/design/index.html
The Easy Way to Writing Good User Stories at http://codesqueeze.com/the-easy-way-to-writing-good-user-stories/
Susan M. Weinschenks blog on how people think and behave: http://www.blog.theteamw.com
The Android Developers YouTube channel, specifically the Android Design in Action episodes: http://www.youtube.com/user/androiddevelopers
All materials on the site are licensed Creative Commons Attribution-Sharealike 3.0 Unported CC BY-SA 3.0 & GNU Free Documentation License (GFDL)
If you are the copyright holder of any material contained on our site and intend to remove it, please contact our site administrator for approval.
© 2016-2026 All site design rights belong to S.Y.A.