The Android Developer’s Cookbook: Building Applications with the Android SDK, Second Edition (2013)
A. Using the OpenIntents Sensor Simulator
The OpenIntents Sensor Simulator is a tool that can be used with the Android emulator to help with testing applications. It allows simulation of GPS coordinates, compass directions, orientation, pressure, acceleration, and other factors. It runs as a stand-alone Java application but requires some programming to interact with a project.
Setting Up the Sensor Simulator
To get started, first download the OpenIntents Sensor Simulator from http://code.google.com/p/openintents/downloads/list?q=sensorsimulator. Once the file is downloaded (this appendix uses the file sensorsimulator-2.0-rc1.zip), uncompress it and run the sensorsimulator.jar file from thebin directory.
Figure A.1 shows what the Sensor Simulator looks like when run.
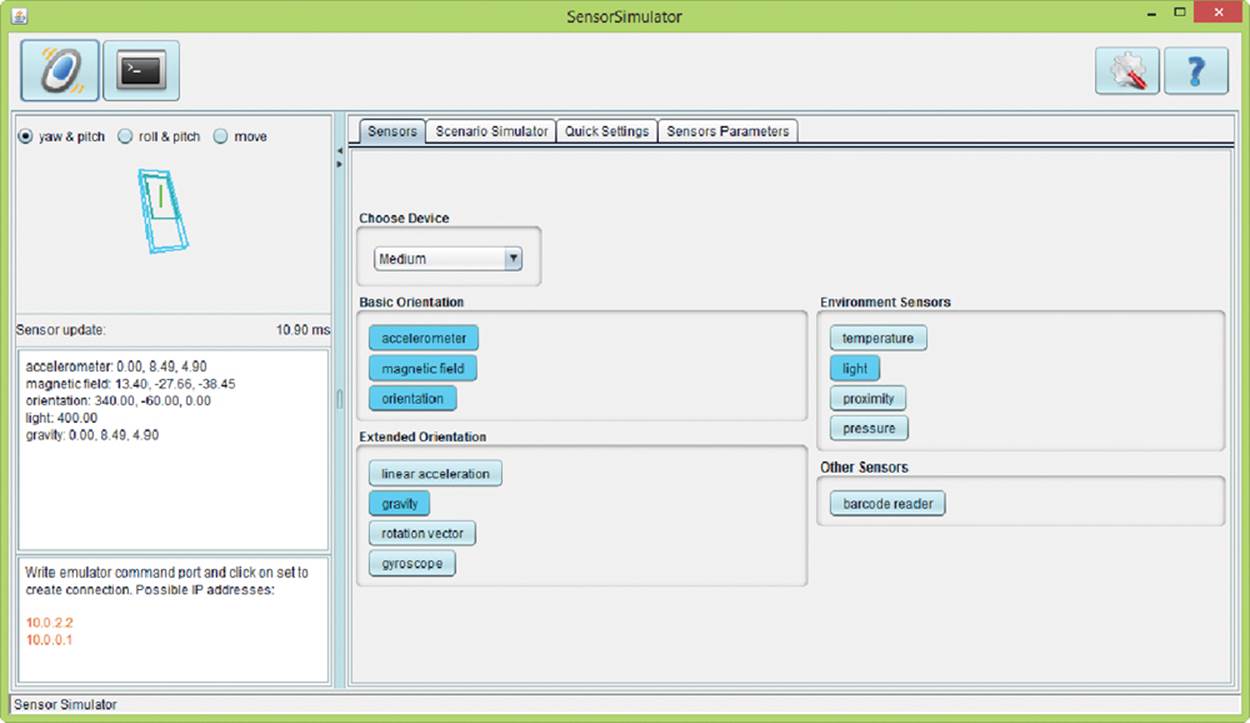
Figure A.1. Version 2.0 RC1 of OpenIntents Sensor Simulator
The next step is to start the emulator, either by launching the AVD Manager from the console or by launching it from Eclipse. When it has been opened, launch the desired emulator and wait for it to boot.
Once the emulator has finished booting, an .apk file needs to be installed. This is done by using the adb command. In the same bin directory that was used to launch the sensorsimulator.jar file, there will be two .apk files: SensorRecordFrom Device-2.0-rc1.apk andSensorSimulatorSettings-2.0-rc1.apk. Copy the SensorSimulatorSettings-2.0-rc1.apk folder to the platform-tools directory inside the Android SDK installation folder. Once the file has been copied, open a terminal or command prompt and change directories until the platform-toolsdirectory is reached. A sample path may be as follows:
/users/cookbook/Android/sdk/platform-tools/
Once in the correct directory, run the following command:
adb install SensorSimulatorSettings-2.0-rc1.apk
Note that Linux and Mac users will need to execute the command by adding ./ in front of adb.
The console or command window should roll a few lines of information by but should end with a success message. If a success message is not received, make sure that the emulator is running and try again. When the app has been successfully installed, it will show up as an installed application.
When the Android application is launched, the settings for the IP address and socket used for communication will be shown. The IP address can be found in the desktop application in the lower left corner. It is normal to have more than one IP address available and listed. Figure A.2 shows the initial settings screen on the Android application when launched.

Figure A.2. Initial settings screen of the Sensor Simulator
To test the connection, click on the Testing tab in the Android application. Next, click on the Connect button and wait while a connection is established to the desktop application. When the connection has been made, the settings on the desktop can be changed, which will change the values in the Android application. Figure A.3 shows changes made in the desktop application, and Figure A.4 shows the corresponding values in the Android application.
Figure A.3. Changing the rotation vector of the emulator

Figure A.4. Changed sensor data taken from values sent by the desktop application
Adding the Sensor Simulator to an Application
The Sensor Simulator can also be included in an application to help test applications when a physical device is not available. To do this, include sensorsimulator-lib-2.0-rc1.jar in the project. This file is found in the lib folder in the downloaded sensorsimulator-2.0-rc1.zip file. Copy the file to the libs folder of the project. If Eclipse is being used, refresh the folder and it should appear. Right-clicking on the sensorsimulator-lib-2.0-rc1.jar file and choosing Build Path → Add to Build Path will cause the Sensor Simulator .jar to be automatically referenced and added to the build path of the project.
Because of the communication needed between the Android application and the desktop application, the following permission needs to be added to the application manifest XML:
<uses-permission android:name="android.permission.INTERNET"/>
Next, set up the following imports into the class file:
import org.openintents.sensorsimulator.hardware.Sensor;
import org.openintents.sensorsimulator.hardware.SensorEvent;
import org.openintents.sensorsimulator.hardware.SensorEventListener;
import org.openintents.sensorsimulator.hardware.SensorManagerSimulator;
To access the sensors, instead of using SensorManager in the onCreate() method, use SensorManagerSimulator. While both use a method of getSystemService(), the method in SensorManagerSimulator has been modified to take an extra parameter. Use the following call:
mSensorManager = SensorManagerSimulator.getSystemService(this, SENSOR_SERVICE);
Now that SensorManagerSimulator is being used, connect it by using the connectSimulator() method:
mSensorManager.connectSimulator();
The application is now bound to take input from the Sensor Simulator. Please note that if the application is running on a physical device, input from it will be ignored while the application is wired to the Sensor Simulator.
The following lists the sensors that can be mapped and used with the Sensor Simulator:
![]() TYPE_ACCELERATOR—The values of movement in an x (right-side), y (top-side), and z axis (out of the screen) direction
TYPE_ACCELERATOR—The values of movement in an x (right-side), y (top-side), and z axis (out of the screen) direction
![]() TYPE_LINEAR_ACCELERATION—The values of movement along the x, y, and z axes without the effects of gravity
TYPE_LINEAR_ACCELERATION—The values of movement along the x, y, and z axes without the effects of gravity
![]() TYPE_GRAVITY—The direction and magnitude of gravity based on the device acceleration
TYPE_GRAVITY—The direction and magnitude of gravity based on the device acceleration
![]() TYPE_MAGNETIC_FIELD—Magnetic field output in microteslas (uT)
TYPE_MAGNETIC_FIELD—Magnetic field output in microteslas (uT)
![]() TYPE_ORIENTATION—The values of yaw (0 to 360 degrees), pitch (-90 to 90), and roll (-180 to 180)
TYPE_ORIENTATION—The values of yaw (0 to 360 degrees), pitch (-90 to 90), and roll (-180 to 180)
![]() TYPE_TEMPERATURE—The ambient temperature
TYPE_TEMPERATURE—The ambient temperature
![]() TYPE_LIGHT—The amount of light in SI lux units
TYPE_LIGHT—The amount of light in SI lux units
![]() TYPE_PRESSURE—The average sea-level pressure in hectopascals
TYPE_PRESSURE—The average sea-level pressure in hectopascals
![]() TYPE_ROTATION_VECTOR—The combined orientation based on both angle and axis
TYPE_ROTATION_VECTOR—The combined orientation based on both angle and axis
All materials on the site are licensed Creative Commons Attribution-Sharealike 3.0 Unported CC BY-SA 3.0 & GNU Free Documentation License (GFDL)
If you are the copyright holder of any material contained on our site and intend to remove it, please contact our site administrator for approval.
© 2016-2026 All site design rights belong to S.Y.A.