Professional Android 4 Application Development (2012)
Chapter 10. Expanding the User Experience
What's in this Chapter?
Customizing the Action Bar
Using the Action Bar for application navigation
Using the Android menu system
Choosing Action Bar actions
Creating immersive applications
Creating and displaying Dialogs
Displaying Toasts
Using the Notification Manager to notify users of application events
Creating insistent and ongoing Notifications
In Chapter 4, “Building User Interfaces,” you learned how to use Activities, Fragments, layouts, and Views to construct a user interface (UI). To ensure that your UI is stylish, easy to use, and provides a user experience consistent with the underlying platform and other applications running in it, this chapter looks at ways to expand the user experience beyond the UI elements you design.
You'll start with the Action Bar, introduced in Android 3.0, a system UI component used to provide a consistent pattern for branding, navigation, and displaying common actions within your Activities. You'll learn how to customize the look of the Action Bar, as well as how to use it to provide navigation with tabs and drop-down lists.
Action Bar actions, application Menus, and Popup Menus use a new approach to menus, optimized for modern touch screen devices. As part of an examination of the Android UI model, this chapter looks at how to create and use them within your applications. In particular, you'll learn how to identify which Menu Items should be displayed as actions on your Action Bar.
Android offers several techniques for applications to communicate with users without an Activity. You'll learn how to use Notifications and Toasts to alert and update users without interrupting the active application.
A Toast is a transient, nonmodal dialog-box mechanism used to display information to users without stealing focus from the active application. You'll learn to display Toasts from any application component to send unobtrusive on-screen messages to your users.
Whereas a Toast is silent and transient, a Notification represents a more robust mechanism for alerting users. In many cases, when the user isn't actively using the mobile phone, it sits silent and unwatched in a pocket or on a desk until it rings, vibrates, or flashes. If a user misses these alerts, status bar icons are used to indicate that an event has occurred. All these attention-grabbing antics are available to your Android application through Notifications.
You'll also learn how to customize the appearance and functionality of your Notification when it appears in the notification tray—providing a mechanism for users to interact with your application without needing to open it first.
Introducing the Action Bar
The Action Bar component, shown in Figure 10.1, was introduced in Android 3.0 (API level 11). It's a navigation panel that replaces the title bar at the top of every Activity and that formalizes a common Android design pattern.
Figure 10.1
![]()
It's possible to hide the Action Bar, but best practice is to keep it and customize it to suit the style and navigation requirements of your application.
The Action Bar can be added to each Activity within your application and is designed to provide a consistent UI between applications and within a particular application's Activities.
The Action Bar provides a consistent framework for providing branding, navigation, and surfacing the key actions to be performed within an Activity. Although the Action Bar provides a framework for presenting this functionality consistently across applications, the following sections describe how you can select which options are suitable for your application—and how they can be implemented.
The Action Bar is enabled by default in any Activity that uses the (default) Theme.Holo theme and whose application has a target (or minimum) SDK version of 11 or higher.
Listing 10.1 shows how to enable the Action Bar by setting the target SDK to Android 4.0.3 (API level 15) and not modifying the default theme.

Listing 10.1: Enabling the Action Bar
<uses-sdk android:targetSdkVersion="15" />
code snippet PA4AD_Ch10_ActionBar/AndroidManifest.java
To toggle the visibility of the Action Bar at run time, you can use its show and hide methods:
ActionBar actionBar = getActionBar();
// Hide the Action Bar
actionBar.hide();
// Show the Action Bar
actionBar.show();
Alternatively, you can apply a theme that doesn't include the Action Bar, such as the Theme.Holo.NoActionBar theme, as shown in Listing 10.2.
Listing 10.2: Disabling the Action Bar
<activity
android:name=".MyNonActionBarActivity"
android:theme="@android:style/Theme.Holo.NoActionBar">
code snippet PA4AD_Ch10_ActionBar/AndroidManifest.java
You can create or customize your own theme that removes the Action Bar by setting the android:windowActionBar style property to false:
<?xml version="1.0" encoding="utf-8"?>
<resources>
<style name="NoActionBar" parent="@style/ActivityTheme">
<item name="android:windowActionBar">false</item>
</style>
</resources>
When you apply a theme that excludes the Action Bar from an Activity, you can't programmatically display it at run time. A call to getActionBar will return null.
![]()
The Action Bar was introduced in Android 3.0 (API level 11) and is not currently included in the support library. As a result, you can only use the Action Bar when running on a host platform with at least Android 3.0. One alternative is to create a different layout for platforms running pre-Android 3.0. The alternative layout would need to implement its own custom Action Bar—typically in the form of a Fragment—to offer similar functionality.
Customizing the Action Bar
In addition to controlling the implementation of this standard functionality, each application can modify the appearance of the Action Bar while maintaining the same consistent behavior and general layout.
One of the primary purposes of the Action Bar is to provide a consistent UI between applications. As such, the customization options are purposefully limited, though you can customize the Action Bar to provide your own application branding and identity.
You can control your branding by specifying the image to appear (if any) at the far left, the application title to display, and the background Drawable to use. Figure 10.2 shows a customized Action Bar that uses a logo bitmap to identify the application and a Gradient Drawable as a background image.
Figure 10.2
![]()
Modifying the Icon and Title Text
By default, the Action Bar displays the Drawable you specify using your application or Activity's android:icon attribute, alongside the corresponding android:label attribute on a black background.
You can specify an alternative graphic using the android:logo attribute. Unlike the square icon, there is no limit to the width of the logo graphic—though it's good practice to limit it to approximately double the width of the icon image.
The logo image typically is used to provide the top-level branding for your application, so it's good practice to hide the title label when using a logo image. You can do this at run time by setting the Action Bar's setDisplayShowTitleEnabled method to false:
ActionBar actionBar = getActionBar();
actionBar.setDisplayShowTitleEnabled(false);
Where both an icon and logo image are supplied, you can switch between them at run time by using the setDisplayUseLogoEnabled method:
actionBar.setDisplayUseLogoEnabled(displayLogo);
If you choose to hide the icon and logo, you can do so by setting the setDisplayShowHomeEnabled method to false:
actionBar.setDisplayShowHomeEnabled(false);
![]()
The application icon/logo is typically used as a navigation shortcut to the application's main Activity, so it's good practice to always have it visible.
You also can use the icon and title text to provide navigation and context cues. Use the setTitle and setSubTitle methods at run time to modify the text displayed alongside the icon, as demonstrated in Listing 10.3 and shown in Figure 10.3.
Listing 10.3: Customizing the Action Bar titles
actionBar.setSubtitle("Inbox");
actionBar.setTitle("Label:important");
code snippet PA4AD_Ch10_ActionBar/src/ActionBarActivity.java
Figure 10.3
![]()
These text strings can be used to describe the users' location within the application and the context within which they're working. This is particularly useful when using Fragments to change context rather than the traditional Activity stack. The followings sections provide more details regarding navigation options.
Customizing the Background
The default background color of the Action Bar depends on the underlying theme. The native Android Action Bar background is transparent, with the Holo theme background set to black.
You can specify any Drawable as the background image for your Action Bar by using the setBackgroundDrawable method, as shown in Listing 10.4.
Listing 10.4: Customizing the Action Bar background
ActionBar actionBar = getActionBar();
Resources r = getResources();
Drawable myDrawable = r.getDrawable(R.drawable.gradient_header);
actionBar.setBackgroundDrawable(myDrawable);
code snippet PA4AD_Ch10_ActionBar/src/ActionBarActivity.java
The Action Bar will scale your image, so it's best practice to create a scalable Drawable, typically using either a 9-patch or XML defined Drawable. Both alternatives are explored in more detail in Chapter 11, “Advanced User Experience.”
Under normal circumstances the Action Bar will reserve space at the top of your Activity, with your layout being inflated into the remaining space. Alternatively, you can choose to overlay the Action Bar above your Activity layout by requesting the FEATURE_ACTION_BAR_OVERLAY window feature.
@Override
public void onCreate(Bundle savedInstanceState) {
super.onCreate(savedInstanceState);
getWindow().requestFeature(Window.FEATURE_ACTION_BAR_OVERLAY);
setContentView(R.layout.main);
}
When the overlay mode is enabled, the Action Bar will float above your Activity, potentially obscuring content at the top of your layout.
Enabling the Split Action Bar Mode
The Action Bar was initially introduced in Android 3.0—a platform release that was focused on providing the best user experience possible for tablet devices. Android 4.0 (API level 14) sought to optimize many of the features initially designed for tablets for use on smaller, smartphone devices.
For the Action Bar, this meant the introduction of the split Action Bar. You can enable the split Action Bar by setting the android:uiOptions attribute within your application or Activity manifest nodes to splitActionBarWhenNarrow, as shown in Listing 10.5.
Listing 10.5: Enabling the split Action Bar
<activity
android:label="My Activity"
android:name=".ActionBarActivity"
android:logo="@drawable/ic_launcher"
android:uiOptions="splitActionBarWhenNarrow">
code snippet PA4AD_Ch10_ActionBar/AndroidManifest.xml
On supported devices with narrow screens (such as a smartphone in portrait mode), enabling the split Action Bar mode will allow the system to split the Action Bar into separate sections. Figure 10.4 shows an example of an Action Bar that has been laid out with the branding and navigation sections layered at the top of the screen, with the action sections aligned to the bottom of the screen.
Figure 10.4
The layout is calculated and performed by the run time and may change depending on the orientation of the host device and any Action Bar configuration changes you make at run time.
Customizing the Action Bar to Control Application Navigation Behavior
The Action Bar introduces a several options for providing consistent and predictable navigation within your application. Broadly speaking, those options can be divided into two categories:
· Application icons—The application icon or logo is used to provide a consistent navigation path, typically by resetting the application to its home Activity. You can also configure the icon to represent moving “up” one level of context.
· Tabs and drop-downs—The Action Bar supports built-in tabs or drop-down lists that can be used to replace the visible Fragments within an Activity.
Icon navigation can be considered a way to navigate the Activity stack, whereas tabs and drop-downs are used for Fragment transitions within an Activity. In practice, the actions you perform when the application icon is clicked or a tab is changed will depend on the way you've implemented your UI.
Selecting the application icon should change the overall context of your UI in the same way that an Activity switch might do, whereas changing a tab or selecting a drop-down should change the data being displayed.
Configuring Action Bar Icon Navigation Behavior
In most cases, the application icon should act as a shortcut to return to the “home” Activity, typically the root of your Activity stack. To make the application icon clickable, you must call the Action Bar's setHomeButtonEnabled method:
actionBar.setHomeButtonEnabled(true);
Clicking the application icon/logo is broadcast by the system as a special Menu Item click. Menu Item selections are handled within the onOptionsItemSelected handler of your Activity, with the ID of the Menu Item parameter set to android.R.id.home, as shown in Listing 10.6.
The process of creating and handling Menu Item selections is described in more detail later in this chapter.
Listing 10.6: Handling application icon clicks
@Override
public boolean onOptionsItemSelected(MenuItem item) {
switch (item.getItemId()) {
case (android.R.id.home) :
Intent intent = new Intent(this, ActionBarActivity.class);
intent.addFlags(Intent.FLAG_ACTIVITY_CLEAR_TOP);
startActivity(intent);
return true;
default:
return super.onOptionsItemSelected(item);
}
}
code snippet PA4AD_Ch10_ActionBar/src/ActionBarActivity.java
Traditionally, Android applications have started a new Activity to transition between different contexts. In turn, pressing the back button closes the active Activity and returns to the previous one.
To supplement this behavior, you can configure the application icon to offer “up” navigation.
The back button should always move the user back through contexts (typically in the form of Activities) that they have already seen, effectively reversing the navigation path they followed to arrive at the current Activity or screen. This might result in navigation between “siblings” in your application structure.
In contrast, “up” navigation should always move users to the parent of the current Activity. As a result, it can move users to a screen they have not previously visited. This is particularly useful for applications with multiple entry points, allowing users to navigate within an application without having to return to the application that spawned it.
To enable up navigation for your application icon, call the Action Bar's setDisplayHomeAsUpEnabled method:
actionBar.setDisplayUseLogoEnabled(false);
actionBar.setDisplayHomeAsUpEnabled(true);
This has the effect of overlaying an “up” graphic over your application icon, as shown in Figure 10.5. Note that it's good practice to use the icon rather than the logo when enabling up navigation.
Figure 10.5
![]()
Handling the navigation is left to you to implement. The Action Bar will still trigger the onOptionsItemSelected handler with a Menu Item that uses android.R.id.home as its identifier, as shown in Listing 10.6.
Such behavior introduces certain risks, particularly if there are multiple ways a user may have navigated to a particular Activity. If in doubt, the up behavior should mirror the back button. In all cases, the navigation behavior should be predictable.
Using Navigation Tabs
In addition to the application icon navigation, the Action Bar also offers navigation tabs and drop-down lists. Note that only one of these forms of navigation can be enabled at once. These navigation options are designed to work closely with Fragments, providing a mechanism for altering the context of the current Activity by replacing the visible Fragments.
Navigation tabs (shown in Figure 10.6) can be considered a replacement for the TabWidget control.
Figure 10.6
![]()
To configure your Action Bar to display tabs, call its setNavigationMode method, specifying ActionBar.NAVIGATION_MODE_TABS. The tabs should provide the application context, so it's good practice to disable the title text as well, as shown in Listing 10.7.
Listing 10.7: Enabling Action Bar navigation tabs
actionBar.setNavigationMode(ActionBar.NAVIGATION_MODE_TABS);
actionBar.setDisplayShowTitleEnabled(false);
code snippet PA4AD_Ch10_ActionBar/src/ActionBarTabActivity.java
Tabs are added to the Action Bar using its addTab method, as shown in Listing 10.8. Start by creating a new Tab and using its setText and setIcon methods to determine the title and image to be displayed, respectively. Alternatively, you can use the setCustomView method to replace the standard text and image layout with your own custom View.
Listing 10.8: Adding Action Bar navigation tabs
Tab tabOne = actionBar.newTab();
tabOne.setText("First Tab")
.setIcon(R.drawable.ic_launcher)
.setContentDescription("Tab the First")
.setTabListener(
new TabListener<MyFragment>
(this, R.id.fragmentContainer, MyFragment.class));
actionBar.addTab(tabOne);
code snippet PA4AD_Ch10_ActionBar/src/ActionBarTabActivity.java
![]()
Android 4.0 (API level 14) introduced the setContentDescription method, which allows you include a more detailed content description to better support accessibility.
The tab switching is handled using a TabListener, allowing you to create Fragment Transactions in response to tabs being selected, unselected, and reselected, as shown in Listing 10.9. Note that you are not required to execute the Fragment Transaction created in each handler—the Action Bar will execute it for you when necessary.
Listing 10.9: Handling Action Bar tab switching
public static class TabListener<T extends Fragment>
implements ActionBar.TabListener {
private MyFragment fragment;
private Activity activity;
private Class<T> fragmentClass;
private int fragmentContainer;
public TabListener(Activity activity, int fragmentContainer,
Class<T> fragmentClass) {
this.activity = activity;
this.fragmentContainer = fragmentContainer;
this.fragmentClass = fragmentClass;
}
// Called when a new tab has been selected
public void onTabSelected(Tab tab, FragmentTransaction ft) {
if (fragment == null) {
String fragmentName = fragmentClass.getName();
fragment =
(MyFragment)Fragment.instantiate(activity, fragmentName);
ft.add(fragmentContainer, fragment, null);
fragment.setFragmentText(tab.getText());
} else {
ft.attach(fragment);
}
}
// Called on the currently selected tab when a different tag is
// selected.
public void onTabUnselected(Tab tab, FragmentTransaction ft) {
if (fragment != null) {
ft.detach(fragment);
}
}
// Called when the selected tab is selected.
public void onTabReselected(Tab tab, FragmentTransaction ft) {
// TODO React to a selected tab being selected again.
}
}
code snippet PA4AD_Ch10_ActionBar/src/ActionBarTabActivity.java
The basic workflow used within this Tab Listener is to instantiate, configure, and then add a new Fragment to your layout within the onTabSelected handler. The Fragment associated with the unselected tab should be detached from your layout and recycled if its tab is reselected.
Using Drop-Down Lists for Navigation
You can use an Action Bar drop-down list, as shown in Figure 10.7, as an alternative to the navigation tabs or as ideal solutions for applying in-place filters to content being displayed within your Activity.
Figure 10.7
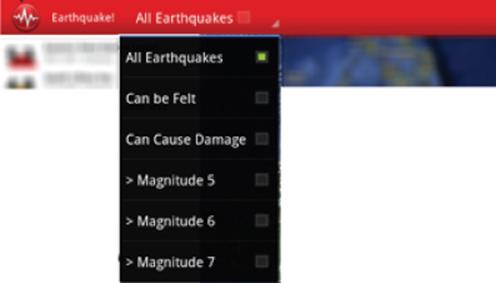
To configure your Action Bar to display a drop-down list, call its setNavigationMode method, specifying ActionBar.NAVIGATION_MODE_LIST:
actionBar.setNavigationMode(ActionBar.NAVIGATION_MODE_LIST);
The drop-down list is implemented much like a Spinner—a view that displays one child at a time and lets the user pick from among them. Populate the drop-down list by creating a new Adapter that implements the SpinnerAdapter interface, such as an Array Adapter or Simple Cursor Adapter:
ArrayList<CharSequence> al = new ArrayList<CharSequence>();
al.add("Item 1");
al.add("Item 2");
ArrayAdapter<CharSequence> dropDownAdapter =
new ArrayAdapter<CharSequence>(this,
android.R.layout.simple_list_item_1,
al);
To assign the Adapter to your Action Bar, and handle selections, call the Action Bar's setListNavigationCallbacks, passing in your adapter and an OnNavigationListener, as shown in Listing 10.10.
Listing 10.10: Creating an Action Bar drop-down list
// Select the drop-down navigation mode.
actionBar.setNavigationMode(ActionBar.NAVIGATION_MODE_LIST);
// Create a new Spinner Adapter that contains the values to
// be displayed in the drop down.
ArrayAdapter dropDownAdapter =
ArrayAdapter.createFromResource(this,
R.array.my_dropdown_values,
android.R.layout.simple_list_item_1);
// Assign the callbacks to handle drop-down selections.
actionBar.setListNavigationCallbacks(dropDownAdapter,
new OnNavigationListener() {
public boolean onNavigationItemSelected(int itemPosition,
long itemId) {
// TODO Modify your UI based on the position
// of the drop down item selected.
return true;
}
});
code snippet PA4AD_Ch10_ActionBar/src/ActionBarDropDownActivity.java
When a user selects an item from the drop-down list, the onNavigationItemSelected handler will be triggered. Use the itemPosition and itemId parameters to determine how your UI should be adapted based on the new selection.
Drop-down list selections typically are used to refine existing content, such as to select a particular account or label within an email client.
Using Custom Navigation Views
For situations where neither tabs nor drop-down lists are appropriate, the Action Bar allows you to add your own custom View (including layouts) using the setCustomView method:
actionBar.setDisplayShowCustomEnabled(true);
actionBar.setCustomView(R.layout.my_custom_navigation);
Custom Views will appear in the same place as the tabs or drop-down lists—to the right of the application icon but to the left of any actions. To ensure consistency between applications, it's generally good form to use the standard navigation modes.
Introducing Action Bar Actions
The right side of the Action Bar is used to display “actions” and the associated overflow menu, as shown in Figure 10.8.
Figure 10.8

Action Bar actions and the overflow menu were introduced, along with the Action Bar itself, in Android 3.0 (API level 11) as an alternative to the hardware menu button and its associated options menu. As such, they are populated using the same APIs that were previously used to create and manage the options menu. This process is described in detail later in this chapter.
Actions, then, are Menu Items that are important enough to make them visible and easily available to users at all times. Action items should be menu options that are either most frequently used, most important for users to discover, or most expected based on the actions available in similar applications. Generic and seldom used options, such as settings, help, or “about this app” options, should never be presented as action items.
Generally speaking, action items should be global actions that don't depend on the current context. Navigating within an Activity—for example, changing tabs or selecting an item from a navigation drop-down—should not alter the available action items.
Adding an Action Bar to the Earthquake Monitor
In the following example, the earthquake-monitoring application, whose processing you moved to the background in Chapter 9, “Working in the Background,” will be enhanced to include an Action Bar.
In Chapter 13, “Maps, Geocoding, and Location-Based Services,” you will add a map to the earthquake monitor, so take this opportunity to add some navigation elements to the application to support a map.
1. Start by modifying the manifest. Add a uses-sdk node that specifies the target SDK as API level 15 and the minimum SDK level as 11—the first platform release to support the Action Bar:
<?xml version="1.0" encoding="utf-8"?>
<manifest xmlns:android="http://schemas.android.com/apk/res/android"
package="com.paad.earthquake"
android:versionCode="1"
android:versionName="1.0">
<uses-sdk android:targetSdkVersion="15"
android:minSdkVersion="11" />
[... Existing Manifest nodes ...]
</manifest>
2. You can take this opportunity to create custom branding by adding a logo and Action Bar background. Creating the artwork is left as an exercise for you. Enable the split Action Bar for handset screens by updating the Earthquake Activity node in the manifest:
<activity
android:name=".Earthquake"
android:label="@string/app_name"
android:uiOptions="splitActionBarWhenNarrow">
<intent-filter>
<action android:name="android.intent.action.MAIN" />
<category android:name="android.intent.category.LAUNCHER" />
</intent-filter>
</activity>
3. The map will be displayed within its own Fragment. Start by creating a new map_fragment.xml layout in the res/layout folder. You will update this in Chapter 13 with a Map View, but for now use a Text View as a placeholder.
<?xml version="1.0" encoding="utf-8"?>
<FrameLayout xmlns:android="http://schemas.android.com/apk/res/android"
android:layout_width="match_parent"
android:layout_height="match_parent">
<TextView
android:id="@+id/textView1"
android:layout_width="match_parent"
android:layout_height="match_parent"
android:text="Map Goes Here!"
/>
</FrameLayout>
4. Create the Map Fragment. Create a new EarthquakeMapFragment class that extends Fragment and then override the onCreateView handler to inflate the map_fragment layout.
import android.app.Fragment;
import android.os.Bundle;
import android.view.LayoutInflater;
import android.view.View;
import android.view.ViewGroup;
public class EarthquakeMapFragment extends Fragment {
@Override
public View onCreateView(LayoutInflater inflater, ViewGroup container,
Bundle savedInstanceState) {
View view = inflater.inflate(R.layout.map_fragment, container, false);
return view;
}
}
5. Now consider the layouts to use. On handset devices it makes sense to display only the list or the map at any given time. On tablet devices a multipanel approach that displays both side by side would create a more engaging UI. Create a variation of the main.xml layout in the res/layout-sw720dp folder. This folder decoration requires a display to have at least 720 device independent pixels (dp) of screen width available in order to be displayed. The new layout should display the Earthquake List Fragment and Earthquake Map Fragment side by side. Limit the width of the list Fragment to half the minimum width for this layout (360dp).
<?xml version="1.0" encoding="utf-8"?>
<LinearLayout xmlns:android="http://schemas.android.com/apk/res/android"
android:orientation="horizontal"
android:layout_width="match_parent"
android:layout_height="match_parent">
<SearchView
android:id="@+id/searchView"
android:iconifiedByDefault="false"
android:background="#FFF"
android:layout_width="wrap_content"
android:layout_height="wrap_content">
</SearchView>
<fragment
android:name="com.paad.earthquake.EarthquakeListFragment"
android:id="@+id/EarthquakeListFragment"
android:layout_width="360dp"
android:layout_height="match_parent"
/>
<fragment android:name="com.paad.earthquake.EarthquakeMapFragment"
android:id="@+id/EarthquakeMapFragment"
android:layout_width="fill_parent"
android:layout_height="match_parent"
/>
</LinearLayout>
6. To support earlier platform releases, copy the new tablet layout into the res/layout-xlarge folder.
7. For smaller screens, you'll be switching between the list and map fragments based on Action Bar tabs. Start by modifying the main.xml layout in the res/layout folder. Replace the fragment node that contains the Earthquake List Fragment, replacing it with a Frame Layout that will act as a container for either the list or map Fragments:
<?xml version="1.0" encoding="utf-8"?>
<LinearLayout xmlns:android="http://schemas.android.com/apk/res/android"
android:orientation="vertical"
android:layout_width="match_parent"
android:layout_height="match_parent">
<SearchView
android:id="@+id/searchView"
android:iconifiedByDefault="false"
android:background="#FFF"
android:layout_width="wrap_content"
android:layout_height="wrap_content">
</SearchView>
<FrameLayout
android:id="@+id/EarthquakeFragmentContainer"
android:layout_width="match_parent"
android:layout_height="match_parent">
</FrameLayout>
</LinearLayout>
8. Your new layout means that the Earthquake List Fragment won't always be available, so return to the Earthquake Activity and update the onActivityResult handler to update the earthquakes by using the Service directly:
@Override
public void onActivityResult(int requestCode, int resultCode, Intent data) {
super.onActivityResult(requestCode, resultCode, data);
if (requestCode == SHOW_PREFERENCES) {
updateFromPreferences();
startService(new Intent(this, EarthquakeUpdateService.class));
}
}
9. Now add navigation support for switching between the list and map when only one is visible at a time. Start by creating a new TabListener that extends the ActionBar.TabListener. It should take a container and a Fragment class, expanding the latter into the former when the tab is selected and detaching it from the UI when the tab is unselected.
public static class TabListener<T extends Fragment>
implements ActionBar.TabListener {
private Fragment fragment;
private Activity activity;
private Class<T> fragmentClass;
private int fragmentContainer;
public TabListener(Activity activity, int fragmentContainer,
Class<T> fragmentClass) {
this.activity = activity;
this.fragmentContainer = fragmentContainer;
this.fragmentClass = fragmentClass;
}
// Called when a new tab has been selected
public void onTabSelected(Tab tab, FragmentTransaction ft) {
if (fragment == null) {
String fragmentName = fragmentClass.getName();
fragment = Fragment.instantiate(activity, fragmentName);
ft.add(fragmentContainer, fragment, fragmentName);
} else
ft.attach(fragment);
}
// Called on the currently selected tab when a different tag is
// selected.
public void onTabUnselected(Tab tab, FragmentTransaction ft) {
if (fragment != null)
ft.detach(fragment);
}
// Called when the selected tab is selected.
public void onTabReselected(Tab tab, FragmentTransaction ft) {
if (fragment != null)
ft.attach(fragment);
}
}
10. Still within the Earthquake Activity, modify the onCreate handler to detect if tab navigation is required; if so, enable tab mode and create new tabs for the list and map Fragments, using the TabListener created in step 8 to handle the navigation:
TabListener<EarthquakeListFragment> listTabListener;
TabListener<EarthquakeMapFragment> mapTabListener;
@Override
public void onCreate(Bundle savedInstanceState) {
[... Existing onCreate ...]
ActionBar actionBar = getActionBar();
View fragmentContainer = findViewById(R.id.EarthquakeFragmentContainer);
// Use tablet navigation if the list and map fragments are both available.
boolean tabletLayout = fragmentContainer == null;
// If it's not a tablet, use the tab Action Bar navigation.
if (!tabletLayout) {
actionBar.setNavigationMode(ActionBar.NAVIGATION_MODE_TABS);
actionBar.setDisplayShowTitleEnabled(false);
// Create and add the list tab.
Tab listTab = actionBar.newTab();
listTabListener = new TabListener<EarthquakeListFragment>
(this, R.id.EarthquakeFragmentContainer, EarthquakeListFragment.class);
listTab.setText("List")
.setContentDescription("List of earthquakes")
.setTabListener(listTabListener);
actionBar.addTab(listTab);
// Create and add the map tab.
Tab mapTab = actionBar.newTab();
mapTabListener = new TabListener<EarthquakeMapFragment>
(this, R.id.EarthquakeFragmentContainer, EarthquakeMapFragment.class);
mapTab.setText("Map")
.setContentDescription("Map of earthquakes")
.setTabListener(mapTabListener);
actionBar.addTab(mapTab);
}
}
11. The Fragment Manager will attempt to restore the Fragments displayed within an Activity when the Activity is restarted due to a configuration change. Ensure that the Action Bar tabs and related tab listeners are synchronized with the visible tabs by overriding the onSaveInstanceState,onRestoreInstanceState, and onResume handlers.
11.1 Start by overriding the onSaveInstanceState handler to save the current Action Bar tab selection and detach each of the Fragments from the current view:
private static String ACTION_BAR_INDEX = "ACTION_BAR_INDEX";
@Override
public void onSaveInstanceState(Bundle outState) {
View fragmentContainer = findViewById(R.id.EarthquakeFragmentContainer);
boolean tabletLayout = fragmentContainer == null;
if (!tabletLayout) {
// Save the current Action Bar tab selection
int actionBarIndex = getActionBar().getSelectedTab().getPosition();
SharedPreferences.Editor editor = getPreferences(Activity.MODE_PRIVATE).edit();
editor.putInt(ACTION_BAR_INDEX, actionBarIndex);
editor.apply();
// Detach each of the Fragments
FragmentTransaction ft = getFragmentManager().beginTransaction();
if (mapTabListener.fragment != null)
ft.detach(mapTabListener.fragment);
if (listTabListener.fragment != null)
ft.detach(listTabListener.fragment);
ft.commit();
}
super.onSaveInstanceState(outState);
}
11.2 Override the onRestoreInstanceState handler to find any Fragments that have been created and assign them to their associated Tab Listeners:
@Override
public void onRestoreInstanceState(Bundle savedInstanceState) {
super.onRestoreInstanceState(savedInstanceState);
View fragmentContainer = findViewById(R.id.EarthquakeFragmentContainer);
boolean tabletLayout = fragmentContainer == null;
if (!tabletLayout) {
// Find the recreated Fragments and assign them to their associated Tab Listeners.
listTabListener.fragment =
getFragmentManager().findFragmentByTag(EarthquakeListFragment.class.getName());
mapTabListener.fragment =
getFragmentManager().findFragmentByTag(EarthquakeMapFragment.class.getName());
// Restore the previous Action Bar tab selection.
SharedPreferences sp = getPreferences(Activity.MODE_PRIVATE);
int actionBarIndex = sp.getInt(ACTION_BAR_INDEX, 0);
getActionBar().setSelectedNavigationItem(actionBarIndex);
}
}
11.3 Finally, override the onResume handler to restore the previous Action Bar tab selection:
@Override
public void onResume() {
super.onResume();
View fragmentContainer = findViewById(R.id.EarthquakeFragmentContainer);
boolean tabletLayout = fragmentContainer == null;
if (!tabletLayout) {
SharedPreferences sp = getPreferences(Activity.MODE_PRIVATE);
int actionBarIndex = sp.getInt(ACTION_BAR_INDEX, 0);
getActionBar().setSelectedNavigationItem(actionBarIndex);
}
}
![]()
All code snippets in this example are part of the Chapter 10 Earthquake Part 1 project, available for download at www.wrox.com.
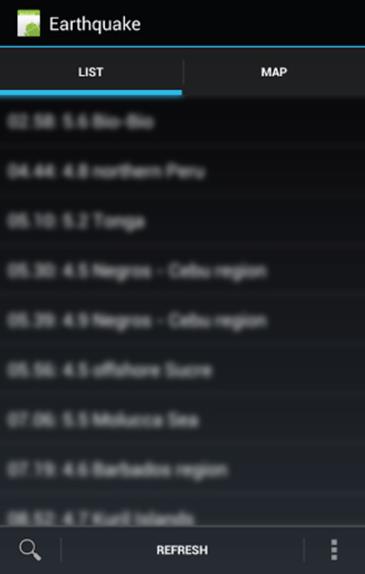
Running the application on a phone should display the Action Bar with two tabs—one to display the list of earthquakes, the other a map. On a tablet device it should display two fragments side-by-side. We'll return to this example in Chapter 13 to add the Map View itself.
Creating and Using Menus and Action Bar Action Items
Menus offer a way to expose application functions without sacrificing valuable screen space. Each Activity can specify its own menu that's displayed when the device's hardware menu button is pressed.
In Android 3.0 (API level 11) the hardware menu button was made optional, and the Activity menu was deprecated. To replace them, Action Bar actions and the overflow menu were introduced.
Android also supports Context Menus and Popup Menus that can be assigned to any View. Context Menus are normally triggered when a user holds the middle D-pad button, depresses the trackball, or long-presses the touch screen for approximately 3 seconds when the View has focus.
Actions, Activity Menus, and Context Menus each support a number of different options, including a subset of submenus, check boxes, radio buttons, shortcut keys, and icons.
Introducing the Android Menu System
If you've ever tried to navigate a mobile phone menu system using a stylus or trackball, you know that traditional menu systems are awkward to use on mobile devices. To improve the usability of application menus, Android uses a three-stage menu system optimized for small screens. Android 3.0 (API level 11) further refined this concept.
· The icon menu and Action Bar actions—The icon menu is a compact display (shown in Figure 10.9) that appears along the bottom of the screen when the menu button is pressed on Android devices earlier than Android 3.0. It displays the icons and text for a limited number of Menu Items (typically six), selected based on the order in which they were added to the menu.
Figure 10.9
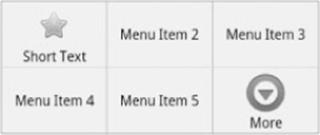
The icon menu has been deprecated in Android 3.0, effectively replaced with Action Bar actions (refer to Figure 10.8). Rather than displaying a subset of all the Menu Items based on order, you explicitly select which Menu Items should be displayed as Action Bar actions.
This icon menu and Action Bar actions display icons and, optionally, their associated text (using the condensed text if it has been specified). By convention, menu icons are flat, pictured face on, and are generally grayscale—they should not look three-dimensional.
Menu Items in the icon menu and Action Bar do not display check boxes, radio buttons, or shortcut keys, so it's generally good practice not to depend on check boxes or radio buttons in icon Menu Items or actions because they will not be visible.
If the Activity menu contains more than the maximum number of visible Menu Items, a More Menu Item is displayed. When selected, it displays the expanded menu. Pressing the back button closes the icon menu.
In Android 3.0 and above, any actions that could not fit into the Action Bar—along with any Menu Items not flagged as actions—will be displayed in the overflow menu.
· The expanded menu and overflow menu—Prior to Android 3.0, the expanded menu was triggered when a user selected the More Menu Item from the icon menu. The expanded menu (shown in Figure 10.10) displays a scrollable list of only the Menu Items that weren't visible in the icon menu.
Figure 10.10
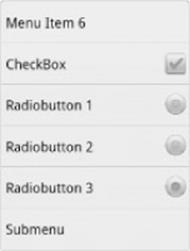
In Android 3.0 the expanded menu is represented by the overflow menu (see Figure 10.11). The overflow menu contains any Menu Item not flagged as an action and any action that was moved to the overflow menu due to a lack of room on the Action Bar.
Figure 10.11
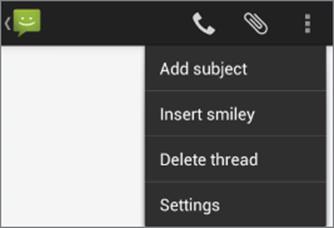
The extended and overflow menus display the full Menu Item text, along with any associated check boxes and radio buttons. They do not, however, display icons. Pressing back from the expanded menu returns you to the icon menu. Pressing back when the overflow menu is displayed closes it.
![]()
You cannot force the expanded menu to be displayed instead of the icon menu. Special care must be taken with Menu Items that feature check boxes or radio buttons to ensure they aren't displayed within the icon menu. The maximum number of icon Menu Items can vary by device, so it's good practice to ensure that their state information is also indicated by an icon or a change in text.
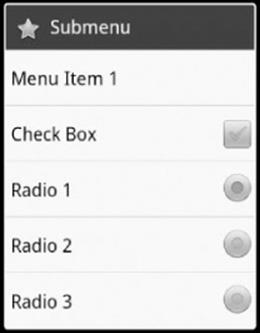
· Submenus—A traditional expanding hierarchical tree can be awkward to navigate using a mouse, so it's no surprise that this metaphor is particularly ill-suited for use on mobile devices. The Android alternative is to display each submenu in a floating window. For example, when a user selects a submenu, its items are displayed in a floating menu dialog box, as shown in Figure 10.12.
Note that the name of the submenu is shown in the header bar and that each Menu Item is displayed with its full text, checkbox (if any) and shortcut key. As with the extended menu, icons are not displayed in the submenu, so it's good practice to avoid assigning icons to submenu items.
Because Android does not support nested submenus, you can't add a submenu to a submenu (trying to do so will result in an exception), nor can you specify a submenu to be an action. Pressing the back button closes the floating window/menu.
Figure 10.12
Creating a Menu
To add a menu to an Activity, override its onCreateOptionsMenu handler. Prior to Android 3.0 this handler is triggered the first time an Activity's menu is displayed; in Android 3.0 and above it's triggered as part of creating the Action Bar each time the Activity is laid out.
The onCreateOptionsMenu receives a Menu object as a parameter. You can store a reference to, and continue to use, the Menu reference elsewhere in your code until the next time onCreateOptionsMenu is called.
You should always call through to the superclass implementation because it can add additional system menu options where appropriate.
Use the add method on the Menu object to populate your menu. For each new Menu Item, you must specify the following:
· A group value to separate Menu Items for batch processing and ordering.
· A unique identifier for each Menu Item. For efficiency reasons, Menu Item selections normally are handled using the onOptionsItemSelected event handler, so this unique identifier makes it possible for you to determine which Menu Item was selected. It is conventional to declare each menu ID as a private static variable within the Activity class. You can use the Menu.FIRST static constant and simply increment that value for each subsequent item.
· An order value that defines the order in which the Menu Items are displayed.
· The Menu Item display text, either as a character string or as a string resource.
When you have finished populating the Menu, return true to indicate that you have handled the Menu creation.
Listing 10.11 shows how to add a single Menu Item to an Activity Menu.
Listing 10.11: Adding a Menu Item
static final private int MENU_ITEM = Menu.FIRST;
@Override
public boolean onCreateOptionsMenu(Menu menu) {
super.onCreateOptionsMenu(menu);
// Group ID
int groupId = 0;
// Unique Menu Item identifier. Used for event handling
int menuItemId = MENU_ITEM;
// The order position of the item
int menuItemOrder = Menu.NONE;
// Text to be displayed for this Menu Item
int menuItemText = R.string.menu_item;
// Create the Menu Item and keep a reference to it
MenuItem menuItem = menu.add(groupId, menuItemId,
menuItemOrder, menuItemText);
return true;
}
code snippet PA4AD_Ch10_ActionBar/src/ActionBarActivity.java
Like the Menu object, each MenuItem returned by an add call is valid until the next call to onCreateOptionsMenu. Rather than maintaining a reference to each item, you can find a particular Menu Item by passing its ID into the Menu's findItem method:
MenuItem menuItem = menu.findItem(MENU_ITEM);
Specifying Action Bar Actions
To specify a Menu Item as an Action Bar action, use its setShowAsActionFlags method, passing in one of the following options:
· SHOW_AS_ACTION—Forces the Menu Item to always be displayed as an action.
· SHOW_AS_IF_SPACE—Specifies that the Menu Item should be available as an action provided there is enough space in the Action Bar to display it. It is good practice to always use this option to provide the system with maximum flexibility on how to layout the available actions.
By default, actions display only their associated icon. You can optionally OR either of the preceding flags with SHOW_AS_ACTION_WITH_TEXT to make the Menu Item's text visible as well, as shown in Listing 10.12.
Listing 10.12: Making a Menu Item an action
menuItem.setShowAsAction(MenuItem.SHOW_AS_ACTION_IF_ROOM |
MenuItem.SHOW_AS_ACTION_WITH_TEXT);
code snippet PA4AD_Ch10_ActionBar/src/ActionBarActivity.java
Menu Item Options
Android supports most of the traditional Menu Item options you're probably familiar with, including icons, shortcuts, check boxes, and radio buttons, as listed here:
· Check boxes—Check boxes on Menu Items are visible in the overflow and expanded menus, as well as within submenus. To set a Menu Item as a check box, use the setCheckable method. The state of that check box is controlled via setChecked.
// Create a new check box item.
menu.add(0, CHECKBOX_ITEM, Menu.NONE, "CheckBox").setCheckable(true);
· Radio buttons—A radio button group is a group of items displaying circular buttons, in which only one item can be selected at any given time. Checking one of these items will automatically uncheck any checked item in the same group.
· To create a radio button group, assign the same group identifier to each item and then call Menu.setGroupCheckable, passing in that group identifier and setting the exclusive parameter to true:
// Create a radio button group.
menu.add(RB_GROUP, RADIOBUTTON_1, Menu.NONE, "Radiobutton 1");
menu.add(RB_GROUP, RADIOBUTTON_2, Menu.NONE, "Radiobutton 2");
menu.add(RB_GROUP, RADIOBUTTON_3, Menu.NONE,
"Radiobutton 3").setChecked(true);
menu.setGroupCheckable(RB_GROUP, true, true);
· Shortcut keys—You can specify a keyboard shortcut for a Menu Item by using the setShortcut method. Each call to setShortcut requires two shortcut keys—one for use with the numeric keypad and another to support a full keyboard. Neither key is case-sensitive.
// Add a shortcut to this Menu Item, ‘0’ if using the numeric keypad
// or ‘b' if using the full keyboard.
menuItem.setShortcut('0', ‘b');
· Condensed titles—The setTitleCondensed method lets you specify text to be displayed only in the icon menu or as Action Bar actions. The normal title will only be used when the Menu Item is displayed in the overflow or extended menu.
menuItem.setTitleCondensed("Short Title");
· Icons—Icons are displayed only in the icon menu or as an action; they are not visible in the extended menu or submenus. You can specify any Drawable resource as a menu icon.
menuItem.setIcon(R.drawable.menu_item_icon);
· Menu item click listener—An event handler that will execute when the Menu Item is selected. For efficiency, the use of such an event handler is discouraged; instead, Menu Item selections should be handled by the onOptionsItemSelected handler, as shown in the “Handling Menu Selections” section later in this chapter.
menuItem.setOnMenuItemClickListener(new OnMenuItemClickListener() {
public boolean onMenuItemClick(MenuItem _menuItem) {
[ ... execute click handling, return true if handled ... ]
return true;
}
});
· Intents—An Intent assigned to a Menu Item is triggered when a Menu Item click isn't handled by a MenuItemClickListener or the Activity's onOptionsItemSelected handler. When the Intent is triggered, Android will execute startActivity, passing in the specified Intent.
menuItem.setIntent(new Intent(this, MyOtherActivity.class));
Adding Action Views and Action Providers
The introduction of actions and the Action Bar in Android 3.0 (API level 11) made it possible to add richer interaction modes to the menu system. In particular, it's now possible to add interactive Views to your Action Bar actions in the form of action Views and Action Providers.
You can replace the icon/text used to represent an action with any View or layout using the Menu Item's setActionView method, passing in either a View instance or a layout resource, as shown in Listing 10.13.
Listing 10.13: Adding an action View
menuItem.setActionView(R.layout.my_action_view)
.setShowAsActionFlags(MenuItem.SHOW_AS_ACTION_IF_ROOM|
MenuItem.SHOW_AS_ACTION_COLLAPSE_ACTION_VIEW);
code snippet PA4AD_Ch10_ActionBar/src/ActionBarActivity.java
Once added, the action View will be displayed whenever the associated Menu Item is displayed as an action in the Action Bar, but will never be displayed if the Menu Item is relegated to the overflow menu.
A better alternative, introduced in Android 4.0 (API level 14), is to add the MenuItem.SHOW_AS_ACTION_COLLAPSE_ACTION_VIEW flag. When this flag is set, the Menu Item will be represented using its standard icon and/or text properties until it's pressed. At that point, it will be expanded to fill the Action Bar, as shown in Figure 10.13.
Figure 10.13

In either case, it's up to you to wire the View's interaction handlers. Typically, this is done within the onCreateMenuOptions handler:
View myView = menuItem.getActionView();
Button button = (Button)myView.findViewById(R.id.goButton);
button.setOnClickListener(new OnClickListener() {
public void onClick(View v) {
// TODO React to the button press.
}
});
Android 4.0 (API level 14) introduced a new alternative to manually creating and configuring action Views within each Activity. Instead, you can create Action Providers by extending the ActionProvider class. Action Providers are similar to action Views but encapsulate both the appearance and interaction models associated with the View. For example, Android 4.0 includes the ShareActionProvider to encapsulate the “share” action.
To assign an Action Provider to a Menu Item, use the setActionProvider method, assigning it an Intent to use to perform the sharing action, as shown in Listing 10.14.
Listing 10.14: Adding a Share Action Provider to a menu
// Create the sharing Intent
Intent shareIntent = new Intent(Intent.ACTION_SEND);
shareIntent.setType("image/*");
Uri uri = Uri.fromFile(new File(getFilesDir(), "test_1.jpg"));
shareIntent.putExtra(Intent.EXTRA_STREAM, uri.toString());
ShareActionProvider shareProvider = new ShareActionProvider(this);
shareProvider.setShareIntent(shareIntent);
menuItem.setActionProvider(shareProvider)
.setShowAsActionFlags(MenuItem.SHOW_AS_ACTION_ALWAYS);
code snippet PA4AD_Ch10_ActionBar/src/ActionBarActivity.java
Adding Menu Items from Fragments
With most of your UI encapsulated within Fragments, it makes sense to encapsulate any related Activity Menu Items and Action Bar actions within those Fragments.
To register your Fragment as a contributor to the options Menu, call setHasOptionsMenu within its onCreate hander:
@Override
public void onCreate(Bundle savedInstanceState) {
super.onCreate(savedInstanceState);
setHasOptionsMenu(true);
}
You can then override the onCreateOptionsMenu handler, as described in the previous section, to populate the menu and Action Bar. At run time, the system will aggregate the Menu Items supplied by the Activity and each of its component Fragments.
Defining Menu Hierarchies in XML
Rather than constructing your Menus in code, it's best practice to define your Menu hierarchies as XML resources. As with layouts and other resources, this gives you the ability to create different Menus for alternative hardware configurations, languages, or locations.
Menu resources are stored as XML files in the res/menu folder of your project. Each menu hierarchy must be created as a separate file, for which the lowercase filename becomes the resource identifier.
Create your Menu hierarchy using the menu tag as the root node and a series of item tags to specify each Menu Item. Each item node supports attributes to specify each of the available Menu Item options. This includes the text, icon, shortcut, and check box options, as well as collapsible action Views and Action Providers.
To create a submenu, place a new menu tag as a subnode within an item. Listing 10.15 shows how to create a simple Menu hierarchy as an XML resource.
Listing 10.15: Defining a Menu Hierarchy in XML
<menu xmlns:android="http://schemas.android.com/apk/res/android">
<item
android:id="@+id/action_item"
android:icon="@drawable/action_item_icon"
android:title="@string/action_item_title"
android:showAsAction="ifRoom">
</item>
<item
android:id="@+id/action_view_item"
android:icon="@drawable/action_view_icon"
android:title="@string/action_view_title"
android:showAsAction="ifRoom|collapseActionView"
android:actionLayout="@layout/my_action_view">
</item>
<item
android:id="@+id/action_provider_item"
android:title="Share"
android:showAsAction="always"
android:actionProviderClass="android.widget.ShareActionProvider">
</item>
<item
android:id="@+id/item02"
android:checkable="true"
android:title="@string/menu_item_two">
</item>
<item
android:id="@+id/item03"
android:numericShortcut="3"
android:alphabeticShortcut="3"
android:title="@string/menu_item_three">
</item>
<item
android:id="@+id/item04"
android:title="@string/submenu_title">
<menu>
<item
android:id="@+id/item05"
android:title="@string/submenu_item">
</item>
</menu>
</item>
</menu>
code snippet PA4AD_Ch10_ActionBar/res/menu/my_menu.xml
To use your Menu resource, use the MenuInflater class within your onCreateOptionsMenu or onCreateContextMenu event handlers, as shown in Listing 10.16.
Listing 10.16: Inflating an XML menu resource
public boolean onCreateOptionsMenu(Menu menu) {
super.onCreateOptionsMenu(menu);
MenuInflater inflater = getMenuInflater();
inflater.inflate(R.menu.my_menu, menu);
return true;
}
code snippet PA4AD_Ch10_ActionBar/src/ActionBarActivity.java
Updating Menu Items Dynamically
By overriding your Activity's onPrepareOptionsMenu method, you can modify a Menu based on an application's current state immediately before the Menu is displayed. This lets you dynamically disable/enable Menu Items, set visibility, and modify text.
Note that the onPrepareOptionsMenu method is triggered whenever the menu button is clicked, the overflow menu displayed, or the Action Bar is created.
To modify Menu Items dynamically, you can either record a reference to them from within the onCreateOptionsMenu method when they're created, or you can use the findItem method on the Menu object, as shown in Listing 10.17, where onPrepareOptionsMenu is overridden.
Listing 10.17: Modifying Menu Items dynamically
@Override
public boolean onPrepareOptionsMenu(Menu menu) {
super.onPrepareOptionsMenu(menu);
MenuItem menuItem = menu.findItem(MENU_ITEM);
[ ... modify Menu Items ... ]
return true;
}
code snippet PA4AD_Ch10_ActionBar/src/ActionBarActivity.java
Handling Menu Selections
Android handles the Action Bar actions, overflow menu, and Activity menu selections using a single event handler, onOptionsItemSelected. The Menu Item selected is passed in to this method as the MenuItem parameter.
To react to the menu selection, compare the item.getItemId value to the Menu Item identifiers you used when populating the Menu (or their resource identifiers if defining your Menu in XML), as shown in Listing 10.18, and perform the corresponding action.
Listing 10.18: Handling Menu Item selections
public boolean onOptionsItemSelected(MenuItem item) {
super.onOptionsItemSelected(item);
// Find which Menu Item has been selected
switch (item.getItemId()) {
// Check for each known Menu Item
case (MENU_ITEM):
[ ... Perform menu handler actions ... ]
return true;
// Return false if you have not handled the Menu Item
default: return false;
}
}
code snippet PA4AD_Ch10_ActionBar/src/ActionBarActivity.java
If you have supplied Menu Items from within a Fragment, you can choose to handle them within the onOptionsItemSelected handler of either the Activity or the Fragment. Note that the Activity will receive the selected Menu Item first, and that the Fragment will not receive it if the Activity handles it and returns true.
Introducing Submenus and Context Menus
Context Menus use the same floating window as the submenus shown in Figure 10.12. Although their appearance is the same, the two menu types are populated differently.
![]()
Although Context Menus are still supported in Android 4.0, their use has become limited, with long-press functionality now used more commonly to support operations like drag and drop.
Users are unlikely to fi nd options supplied by the Context Menu, so they should be used sparingly.
Creating Submenus
Submenus are displayed as regular Menu Items that, when selected, reveal more items. Traditionally, submenus are displayed in a hierarchical tree layout. Android uses a different approach to simplify menu navigation for touch-screen devices. Rather than a tree structure, selecting a submenu presents either a single floating window (in the case of the legacy Menu system) or replaces the overflow menu (in the case of Android 3.0 and above), both of which display all its Menu Items.
You can add submenus by using the addSubMenu method. It supports the same parameters as the add method used to add normal Menu Items, enabling you to specify a group, unique identifier, and text string for each submenu. You can also use the setHeaderIcon and setIcon methods to specify an icon to display in the submenu's header bar or icon menu, respectively.
The Menu Items within a submenu support the same options as those assigned to the icon or extended menus, with the exception of the Action Bar action-related properties.
![]()
Submenus can't be used as actions, nor does Android support nested submenus.
The following code snippet shows an extract from an implementation of the onCreateMenuOptions code that adds a submenu to the main menu, sets the header icon, and then adds a submenu Menu Item:
SubMenu sub = menu.addSubMenu(0, 0, Menu.NONE, "Submenu");
sub.setHeaderIcon(R.drawable.icon);
sub.setIcon(R.drawable.icon);
MenuItem submenuItem = sub.add(0, 0, Menu.NONE, "Submenu Item");
Using Context Menus and Popup Menus
Context Menus are contextualized by the currently focused View and are triggered when a user long-presses the trackball, middle D-pad button, or a View (typically for approximately 3 seconds). A Context Menu is displayed as a floating window above your Activity.
Android 3.0 (API level 11) introduced the PopupMenu class, a lighter-weight alternative to the ContextMenu that anchors itself to a specific View.
You define and populate Context Menus and Popup Menus as you define and populate Activity Menus. There are two options available for creating Context Menus for a particular View.
Creating Context Menus
One option is to create a generic ContextMenu object for a View class by overriding a View's onCreateContextMenu handler, as shown here:
@Override
public void onCreateContextMenu(ContextMenu menu) {
super.onCreateContextMenu(menu);
menu.add("ContextMenuItem1");
}
The Context Menu created here will be available within any Activity that includes this View class.
The more common alternative is to create Activity-specific Context Menus by overriding the Activity's onCreateContextMenu method, and registering the Views that should use it using the registerForContextMenu method, as shown in Listing 10.19.
Listing 10.19: Assigning a Context Menu to a View
@Override
public void onCreate(Bundle savedInstanceState) {
super.onCreate(savedInstanceState);
EditText view = new EditText(this);
setContentView(view);
registerForContextMenu(view);
}
code snippet PA4AD_Ch10_ActionBar/src/ActionBarActivity.java
Once a View has been registered, the onCreateContextMenu handler will be triggered the first time a Context Menu is displayed for that View.
To populate the Context Menu parameter with the appropriate Menu Items, override onCreateContextMenu and check which View has triggered the menu creation.
@Override
public void onCreateContextMenu(ContextMenu menu, View v,
ContextMenu.ContextMenuInfo menuInfo) {
super.onCreateContextMenu(menu, v, menuInfo);
menu.setHeaderTitle("Context Menu");
menu.add(0, Menu.FIRST, Menu.NONE,
"Item 1").setIcon(R.drawable.menu_item);
menu.add(0, Menu.FIRST+1, Menu.NONE, "Item 2").setCheckable(true);
menu.add(0, Menu.FIRST+2, Menu.NONE, "Item 3").setShortcut('3', ‘3');
SubMenu sub = menu.addSubMenu("Submenu");
sub.add("Submenu Item");
}
As shown in the preceding code, the ContextMenu class supports the same add method as the Menu class, so you can populate a Context Menu in the same way that you populate Activity menus—using the add method. This includes using the add method to add submenus to your Context Menus. Note that icons will never be displayed; however, you can specify the title and icon to display in the Context Menu's header bar.
Android also supports late runtime population of Context Menus via Intent Filters. This mechanism lets you populate a Context Menu by specifying the kind of data presented by the current View and asking other Android applications if they support any actions for it. The most common examples of this mechanism are the cut/copy/paste Menu Items available on Edit Text controls.
Handling Context Menu Selections
Context Menu Item selections are handled much the same as Activity Menu selections. You can attach an Intent or Menu Item Click Listener directly to each Menu Item or use the preferred technique of overriding the onContextItemSelected method on the Activity, as follows:
@Override
public boolean onContextItemSelected(MenuItem item) {
super.onContextItemSelected(item);
// TODO [ ... Handle Menu Item selection ... ]
return false;
}
The onContextItemSelected event handler is triggered whenever a Context Menu Item is selected.
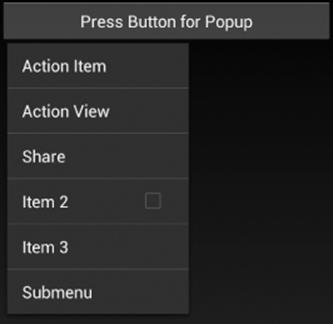
Using Popup Menus
An alternative to Context Menus, Popup Menus are displayed alongside a particular View instance, rather than above the entire Activity (see Figure 10.14). When targeting devices running Android 3.0 or above, it's best practice to use Popup Menus rather than Context Menus.
Figure 10.14
To assign a Popup Menu to a View, you must create a new Popup Menu, specifying the Activity Context and the View to which it should be anchored:
final PopupMenu popupMenu = new PopupMenu(this, myView);
Assign or inflate a Menu resource as you would for an Activity or Context Menu, and add a new OnMenuItemClickListener to handle Menu Item selections, as shown in Listing 10.20.
Listing 10.20: Assigning a Popup Menu to a View
final PopupMenu popupMenu = new PopupMenu(this, button);
popupMenu.inflate(R.menu.my_popup_menu);
popupMenu.setOnMenuItemClickListener(new OnMenuItemClickListener() {
public boolean onMenuItemClick(MenuItem item) {
switch (item.getItemId()) {
case (POPUP_ITEM_1) :
// TODO Handle popup menu clicks.
return true;
default: return false;
}
}
});
code snippet PA4AD_Ch10_ActionBar/src/ActionBarActivity.java
To display the Popup Menu, call its show method:
popupMenu.show();
Refreshing the Earthquake Monitor
In the following example you'll add a Menu Item to refresh the Earthquake monitor.
1. Create a new string resource that defines the menu text in the res/values/strings.xml file:
<string name="menu_refresh">Refresh</string>
2. Create a new main_menu.xml resource in the res/menu folder that contains the “refresh” and “preferences” Menu Items. The former should be specified as an action to be displayed on the Action Bar:
<menu xmlns:android="http://schemas.android.com/apk/res/android">
<item
android:id="@+id/menu_refresh"
android:title="@string/menu_refresh"
android:showAsAction="ifRoom|withText">
</item>
<item
android:id="@+id/menu_preferences"
android:title="@string/menu_preferences"
android:showAsAction="never">
</item>
</menu>
3. Modify the onCreateOptionsMenu method in the Earthquake Activity to inflate the menu resource from step 2:
@Override
public boolean onCreateOptionsMenu(Menu menu) {
super.onCreateOptionsMenu(menu);
MenuInflater inflater = getMenuInflater();
inflater.inflate(R.menu.main_menu, menu);
return true;
}
4. Having populated the Activity Menu and Action Bar actions, the next step is to handle the selection of these items. Modify the onOptionsItemSelected handler. Update the “preferences” selection to refer to its resource ID. When the “refresh” item is selected, start the update Service.
@Override
public boolean onOptionsItemSelected(MenuItem item) {
super.onOptionsItemSelected(item);
switch (item.getItemId()) {
case (R.id.menu_refresh): {
startService(new Intent(this, EarthquakeUpdateService.class));
return true;
}
case (R.id.menu_preferences): {
Class c = Build.VERSION.SDK_INT < Build.VERSION_CODES.HONEYCOMB ?
PreferencesActivity.class : FragmentPreferences.class;
Intent i = new Intent(this, c);
startActivityForResult(i, SHOW_PREFERENCES);
return true;
}
default: return false;
}
}
5. Take this opportunity to move the Search View to the Action Bar. Start by updating the menu definition to include a Search View:
<menu xmlns:android="http://schemas.android.com/apk/res/android">
<item
android:id="@+id/menu_search"
android:icon="@android:drawable/ic_menu_search"
android:actionViewClass="android.widget.SearchView"
android:showAsAction="ifRoom|collapseActionView">
</item>
<item
android:id="@+id/menu_refresh"
android:title="@string/menu_refresh"
android:showAsAction="ifRoom|withText">
</item>
<item
android:id="@+id/menu_preferences"
android:title="@string/menu_preferences"
android:showAsAction="never">
</item>
</menu>
6. Modify each of the main.xml layouts, removing the reference to the Search View.
7. Update the onCreateOptionsMenu handler to configure the Search View, and remove the corresponding code from the onCreate handler:
@Override
public boolean onCreateOptionsMenu(Menu menu) {
super.onCreateOptionsMenu(menu);
MenuInflater inflater = getMenuInflater();
inflater.inflate(R.menu.main_menu, menu);
// Moved from onCreate -- Retreive the Search View and configure/enable it.
SearchManager searchManager =
(SearchManager) getSystemService(Context.SEARCH_SERVICE);
SearchView searchView = (SearchView) menu.findItem(R.id.menu_search).getActionView();
searchView.setSearchableInfo(searchManager.getSearchableInfo(getComponentName()));
return true;
}
![]()
All code snippets in this example are part of the Chapter 10 Earthquake Part 2 project, available for download at www.wrox.com.
Going Full Screen
For specific situations, it makes sense for your application to occupy the entire screen, hiding or obscuring navigation controls and status information such as the time and Notifications. This is the case if, and only if, you are building an application that is designed to be fully immersive. Valid examples of immersive applications include immersive games such as first-person racers or shooters, eLearning applications, and video.
![]()
Hiding status information and navigation cues is a disruptive action likely to frustrate many users. If you choose to make your application “full screen,” you should make it easy for users to disable such behavior.
The UI of every Android device includes space managed by the system, dedicated to displaying status information such as the time, connectivity, and Notifications (new and ongoing). The system-controlled UI elements of Android have changed as the platform has evolved.
Prior to the introduction of tablets, this space was known as the “status bar,” and resided at the top of the screen for each handset, as shown in Figure 10.15.
Figure 10.15
![]()
The extra screen real-estate available for tablets, combined with a lack of hardware navigation keys, led to the introduction of a “system bar” in Android 3.0—a UI section at the bottom of the screen that contains both the contents normally displayed in the status bar, as well as software implementations of the back and home keys, as shown in Figure 10.16.
Figure 10.16
![]()
Android 4.0 saw the introduction of phone hardware that, like tablets, uses onscreen software buttons for navigation rather than hardware keys. As a result, a new “navigation bar” was introduced to house the back and home buttons, as shown in Figure 10.17. Unlike tablets, Android smartphones continue to use the status bar to display status information, just as they did in previous versions.
Figure 10.17

The result is that for tablets a single piece of screen is dedicated to displaying status information and navigation buttons, whereas on handsets status is displayed separately from the navigation.
To control the visibility of the navigation bar on handsets, or the appearance of the system bar in tablets, you can use the setSystemUiVisibility method on any View visible within your Activity hierarchy. Note that any user interaction with the Activity will revert these changes.
In Android 3.0 (API level 11) you can obscure, but not remove, the navigation bar on handsets and the system bar on tablets using the STATUS_BAR_HIDDEN flag.
myView.setSystemUiVisibility(View.STATUS_BAR_HIDDEN);
Android 4.0 (API level 14) deprecated this flag, replacing it with the following flags to better support handsets that use a separate navigation and status bar:
· SYSTEM_UI_FLAG_LOW_PROFILE—Obscures the navigation buttons in the same way as STATUS_BAR_HIDDEN
· SYSTEM_UI_FLAG_HIDE_NAVIGATION—Removes the navigation bar on handset devices, and obscures the navigation buttons used in the system bar on tablets
myView.setSystemUiVisibility(View.SYSTEM_UI_FLAG_LOW_PROFILE);
It's generally good practice to synchronize other changes within your UI with changes in navigation visibility. For example, you may choose to hide and display the Action Bar and other navigational controls based on entering and exiting “full screen mode.”
You can do this by registering an OnSystemUiVisibilityChangeListener to your View—generally, the View you are using to control the navigation visibility, as shown in Listing 10.21.
Listing 10.21: Reacting to changes in system UI visibility
myView.setOnSystemUiVisibilityChangeListener(
new OnSystemUiVisibilityChangeListener() {
public void onSystemUiVisibilityChange(int visibility) {
if (visibility == View.SYSTEM_UI_FLAG_VISIBLE) {
// TODO Display Action Bar and Status Bar
}
else {
// TODO Hide Action Bar and Status Bar
}
}
});
code snippet PA4AD_Ch10_ActionBar/src/ActionBarActivity.java
You also can hide the status bar along the top of all handset devices. This should be done cautiously because it can disrupt how people use their phones. In many cases—particularly for watching video—it's best practice to enable and disable the status bar from within an On System UI Visibility Change Listener.
To hide the status bar, add the LayoutParams.FLAG_FULLSCREEN flag to the Window:
myView.setSystemUiVisibility(View.SYSTEM_UI_FLAG_HIDE_NAVIGATION);
getWindow().addFlags(WindowManager.LayoutParams.FLAG_FULLSCREEN);
Note that this will not affect tablet devices, which use a system bar rather than a separate navigation and status bars.
Introducing Dialogs
Dialog boxes are a common UI metaphor in desktop, web, and mobile applications. They're used to help users answer questions, make selections, and confirm actions, and to display warning or error messages. Dialog boxes in Android are partially transparent, floating Activities or Fragments that partially obscure the UI that launched them.
In terms of Android UX design, Dialogs should be used to represent system-level events, such as displaying errors or supporting account selection. It is good practice to limit the use of Dialogs within your applications, and when using them to limit the degree of customization.
Depending on the platform and hardware configuration, dialogs may obscure the Activities behind them using a blur or dim filter, as shown in Figure 10.18.
Figure 10.18
There are three ways to implement a dialog in Android:
· Using the Dialog class (or its extensions)—In addition to the general-purpose AlertDialog class, Android includes a number of classes that extend Dialog. Each is designed to provide specific dialog-box functionality. A Dialog class-based screen is constructed and controlled entirely within its calling Activity, so it doesn't need to be registered in the manifest.
· Dialog-themed Activities—You can apply the dialog theme to a regular Activity to give it the appearance of a standard dialog box.
· Toasts—Toasts are special nonmodal transient message boxes, often used by Broadcast Receivers and Services to notify users of events occurring in the background. You learn more about Toasts in the section “Let's Make a Toast.”
Creating a Dialog
To create a new Dialog, instantiate a new Dialog instance and set the title and layout, using the setTitle and setContentView methods, respectively, as shown in Listing 10.22. The setContentView method accepts a resource identifier for a layout that will be inflated to display the Dialog's UI.
Once the Dialog is configured to your liking, use the show method to display it.
Listing 10.22: Creating a new Dialog using the Dialog class
// Create the new Dialog.
Dialog dialog = new Dialog(MyActivity.this);
// Set the title.
dialog.setTitle("Dialog Title");
// Inflate the layout.
dialog.setContentView(R.layout.dialog_view);
// Update the Dialog's contents.
TextView text = (TextView)dialog.findViewById(R.id.dialog_text_view);
text.setText("This is the text in my dialog");
// Display the Dialog.
dialog.show();
code snippet PA4AD_Ch10_Dialogs/src/MyActivity.java
Using the Alert Dialog Class
The AlertDialog class is one of the most versatile Dialog-class implementations. It offers a number of options that let you construct dialogs for some of the most common use cases, including the following:
· Presenting a message to users offering them one to three options in the form of buttons. This functionality is probably familiar to you if you've done any desktop programming for which the buttons presented are usually a combination of OK, Cancel, Yes, and No.
· Offering a list of options in the form of check boxes or radio buttons.
· Providing a text entry box for user input.
To construct the Alert Dialog UI, create a new AlertDialog.Builder object:
AlertDialog.Builder ad = new AlertDialog.Builder(context);
You can then assign values for the title and message to display, and optionally assign values to be used for any buttons, selection items, and text input boxes you want to display. That includes setting event listeners to handle user interaction.
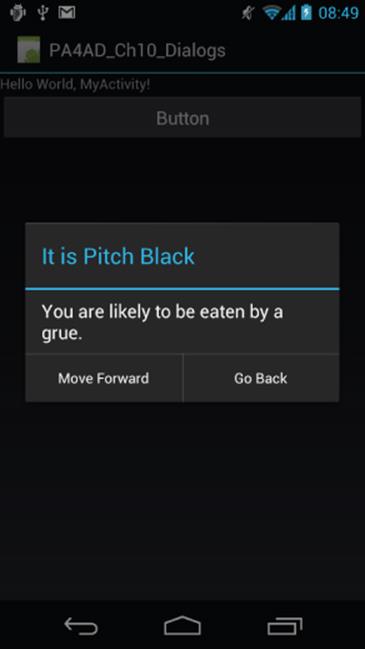
Listing 10.23 gives an example of an Alert Dialog used to display a message with two buttons. Clicking either button will close the Dialog after executing the attached On Click Listeners.
Listing 10.23: Configuring an Alert Dialog
Context context = MyActivity.this;
String title = "It is Pitch Black";
String message = "You are likely to be eaten by a Grue.";
String button1String = "Go Back";
String button2String = "Move Forward";
AlertDialog.Builder ad = new AlertDialog.Builder(context);
ad.setTitle(title);
ad.setMessage(message);
ad.setPositiveButton(
button1String,
new DialogInterface.OnClickListener() {
public void onClick(DialogInterface dialog, int arg1) {
eatenByGrue();
}
}
);
ad.setNegativeButton(
button2String,
new DialogInterface.OnClickListener(){
public void onClick(DialogInterface dialog, int arg1) {
// do nothing
}
}
);
code snippet PA4AD_Ch10_Dialogs/src/MyActivity.java
Use the setCancelable method to determine if the user should be able to close the dialog by pressing the back button without making a selection. If you choose to make the Dialog cancelable, you can use the setOnCancelListener method to attach an On Cancel Listener to react to this event:
ad.setCancelable(true);
ad.setOnCancelListener(
new DialogInterface.OnCancelListener() {
public void onCancel(DialogInterface dialog) {
eatenByGrue();
}
}
);
Using Specialized Input Dialogs
Android includes several specialized dialog boxes that encapsulate controls designed to facilitate common user-input requests. In order to maintain consistency, they should be used in preference to customized Dialogs wherever possible. They include the following:
· CharacterPickerDialog—Lets users select an accented character based on a regular character source.
· DatePickerDialog—Lets users select a date from a DatePicker View. The constructor includes a callback listener to alert your calling Activity when the date has been set.
· TimePickerDialog—Similar to the Date Picker Dialog, this dialog lets users select a time from a TimePicker View.
· ProgressDialog—Displays a progress bar beneath a message text box. This can be used to keep users informed of the ongoing progress of a time-consuming operation, though best practice is to allow users to interact with the application when such long-running processes are underway.
In each case, to use the specialist Dialog, construct a new instance of it, setting its properties and event handlers, before displaying the Dialog:
DatePickerDialog datePickerDialog =
new DatePickerDialog(
MyActivity.this,
new OnDateSetListener() {
public void onDateSet(DatePicker view, int year,
int monthOfYear, int dayOfMonth) {
// TODO Use the selected date.
}
},
1978, 6, 19);
datePickerDialog.show();
Managing and Displaying Dialogs Using Dialog Fragments
You can use the show method of each Dialog instance to display it, but a better alternative is to use Dialog Fragments. A Dialog Fragment is a Fragment that contains a Dialog.
Dialog Fragments were introduced in Android 3.0 (API level 11) and replace the deprecated Activity.onCreateDialog and Activity.onPrepareDialog handlers (described in more detail in the next section). Dialog Fragments are included as part of the Android Support Package, making it possible to use them for projects targeting all Android platforms down to Android 1.6 (API level 4).
A Dialog Fragment efficiently encapsulates and manages the Dialog's lifecycle and ensures that the Fragment and the containing Dialog states remain consistent.
To use a Dialog Fragment, extend the DialogFragment class, as shown in Listing 10.24. Override the onCreateDialog handler to return a Dialog constructed as described in the previous sections.
Listing 10.24: Using the On Create Dialog event handler
public class MyDialogFragment extends DialogFragment {
private static String CURRENT_TIME = "CURRENT_TIME";
public static MyDialogFragment newInstance(String currentTime) {
// Create a new Fragment instance with the specified
// parameters.
MyDialogFragment fragment = new MyDialogFragment();
Bundle args = new Bundle();
args.putString(CURRENT_TIME, currentTime);
fragment.setArguments(args);
return fragment;
}
@Override
public Dialog onCreateDialog(Bundle savedInstanceState) {
// Create the new Dialog using the AlertBuilder.
AlertDialog.Builder timeDialog =
new AlertDialog.Builder(getActivity());
// Configure the Dialog UI.
timeDialog.setTitle("The Current Time Is...");
timeDialog.setMessage(getArguments().getString(CURRENT_TIME));
// Return the configured Dialog.
return timeDialog.create();
}
}
code snippet PA4AD_Ch10_Dialogs/src/MyDialogFragment.java
You can display the Dialog Fragment using the Fragment Manager and Fragment Transactions the same way as you would any other Fragment, as described in Chapter 4 and shown in Listing 10.25. The Fragment's application appearance will depend on the Dialog it contains.
Listing 10.25: Displaying a Dialog Fragment
String tag = "my_dialog";
DialogFragment myFragment =
MyDialogFragment.newInstance(dateString);
myFragment.show(getFragmentManager(), tag);
code snippet PA4AD_Ch10_Dialogs/src/MyActivity.java
Any listeners you attach to the dialog must be handled within the containing Fragment—typically by calling a method in the parent Activity.
Alternatively, you can override the onCreateView handler to inflate a custom Dialog layout within your Dialog Fragment, just as you would your custom Dialog class, as shown in Listing 10.26.
Listing 10.26: Using the On Create View handler
@Override
public View onCreateView(LayoutInflater inflater, ViewGroup container,
Bundle savedInstanceState) {
// Inflate the Dialog's UI.
View view = inflater.inflate(R.layout.dialog_view, container, false);
// Update the Dialog's contents.
TextView text = (TextView)view.findViewById(R.id.dialog_text_view);
text.setText("This is the text in my dialog");
return view;
}
code snippet PA4AD_Ch10_Dialogs/src/MyDialogFragment.java
Note that you must choose to override only one of onCreateView or onCreateDialog. Overriding both will result in an exception being thrown.
In addition to providing improved resource use, this technique lets your Activity handle the persistence of state information within Dialogs. Any selection or data input (such as item selection and text entry) will be persisted if the Fragment is re-created due to a configuration change, such as screen rotation.
Managing and Displaying Dialogs Using Activity Event Handlers
Prior to the introduction of Fragments, the best practice way to display Dialogs was by overriding your Activity's onCreateDialog and onPrepareDialog handlers to prepare each Dialog, and showDialog to display them on demand.
By overriding the onCreateDialog handler, you can specify Dialogs that will be created on demand when showDialog is used to display a specific Dialog. As shown in Listing 10.27, the overridden method includes a switch statement that lets you determine which dialog is required.
Listing 10.27: Using the On Create Dialog event handler
static final private int TIME_DIALOG = 1;
@Override
public Dialog onCreateDialog(int id) {
switch(id) {
case (TIME_DIALOG) :
AlertDialog.Builder timeDialog = new AlertDialog.Builder(this);
timeDialog.setTitle("The Current Time Is...");
timeDialog.setMessage("Now");
return timeDialog.create();
}
return null;
}
code snippet PA4AD_Ch10_Dialogs/src/MyActivity.java
After the initial creation, each time showDialog is called, it will trigger the onPrepareDialog handler. By overriding this method you can modify a dialog each time it is displayed. This lets you contextualize any of the display values, as shown in Listing 10.28, which assigns the current time to the dialog created in Listing 10.27.
Listing 10.28: Using the On Prepare Dialog event handler
@Override
public void onPrepareDialog(int id, Dialog dialog) {
switch(id) {
case (TIME_DIALOG) :
SimpleDateFormat sdf = new SimpleDateFormat("HH:mm:ss");
Date currentTime =
new Date(java.lang.System.currentTimeMillis());
String dateString = sdf.format(currentTime);
AlertDialog timeDialog = (AlertDialog)dialog;
timeDialog.setMessage(dateString);
break;
}
}
code snippet PA4AD_Ch10_Dialogs/src/MyActivity.java
After overriding these methods, you can display the Dialogs by calling showDialog:
showDialog(TIME_DIALOG);
Pass in the identifier for the Dialog you want to display, and Android will create (if necessary) and prepare the Dialog before displaying it.
Although you can use the onCreateDialog and onPrepareDialog handlers, they have been deprecated in favor of Dialog Fragments, as described in the previous section.
Using Activities as Dialogs
Dialogs and Dialog Fragments offer a simple and lightweight technique for displaying screens, but you can also style an Activity so that it appears as a Dialog.
Note that in must circumstances you can gain the same level of control over the appearance and lifecycle of your Dialog by using a Dialog Fragment.
The easiest way to make an Activity look like a Dialog is to apply the android:style/Theme.Dialog theme when you add the Activity to your manifest, as shown in the following XML snippet:
<activity android:name="MyDialogActivity"
android:theme="@android:style/Theme.Dialog">
</activity>
This will cause your Activity to behave as a Dialog, floating on top of, and partially obscuring, the Activity beneath it.
Let's Make a Toast
Toasts are transient notifications that remain visible for only a few seconds before fading out. Toasts don't steal focus and are nonmodal, so they don't interrupt the active application.
Toasts are perfect for informing your users of events without forcing them to open an Activity or read a Notification. They provide an ideal mechanism for alerting users to events occurring in background Services without interrupting foreground applications.
Generally, your application should display Toasts only when one of its Activities is active.
The Toast class includes a static makeText method that creates a standard Toast display window. To construct a new Toast, pass the current Context, the text message to display, and the length of time to display it (LENGTH_SHORT or LENGTH_LONG) into the makeText method. After creating a Toast, you can display it by calling show, as shown in Listing 10.29.
Listing 10.29: Displaying a Toast
Context context = this;
String msg = "To health and happiness!";
int duration = Toast.LENGTH_SHORT;
Toast toast = Toast.makeText(context, msg, duration);
toast.show();
code snippet PA4AD_Ch10_Dialogs/src/MyActivity.java
Figure 10.19 shows a Toast. It will remain on-screen for approximately 2 seconds before fading out. The application behind it remains fully responsive and interactive while the Toast is visible.
Figure 10.19
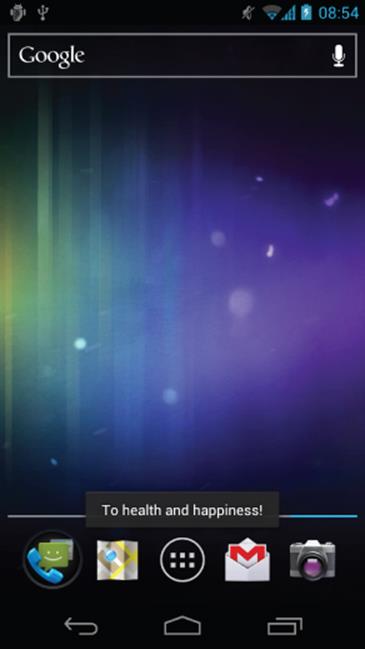
Customizing Toasts
The standard Toast message window is often sufficient, but in many situations you'll want to customize its appearance and screen position. You can modify a Toast by setting its display position and assigning it alternative Views or layouts.
Listing 10.30 shows how to align a Toast to the bottom of the screen using the setGravity method.
Listing 10.30: Aligning Toast text
Context context = this;
String msg = "To the bride and groom!";
int duration = Toast.LENGTH_SHORT;
Toast toast = Toast.makeText(context, msg, duration);
int offsetX = 0;
int offsetY = 0;
toast.setGravity(Gravity.BOTTOM, offsetX, offsetY);
toast.show();
code snippet PA4AD_Ch10_Dialogs/src/MyActivity.java
When a text message just isn't going to get the job done, you can specify a custom View or layout to use a more complex, or more visual, display. Using setView on a Toast object, you can specify any View (including a layout) to display using the Toast mechanism. For example, Listing 10.31assigns a layout, containing the CompassView Widget from Chapter 4 along with a TextView, to be displayed as a Toast.
Listing 10.31: Using Views to customize a Toast
Context context = getApplicationContext();
String msg = "Cheers!";
int duration = Toast.LENGTH_LONG;
Toast toast = Toast.makeText(context, msg, duration);
toast.setGravity(Gravity.TOP, 0, 0);
LinearLayout ll = new LinearLayout(context);
ll.setOrientation(LinearLayout.VERTICAL);
TextView myTextView = new TextView(context);
CompassView cv = new CompassView(context);
myTextView.setText(msg);
int lHeight = LinearLayout.LayoutParams.FILL_PARENT;
int lWidth = LinearLayout.LayoutParams.WRAP_CONTENT;
ll.addView(cv, new LinearLayout.LayoutParams(lHeight, lWidth));
ll.addView(myTextView, new LinearLayout.LayoutParams(lHeight, lWidth));
ll.setPadding(40, 50, 0, 50);
toast.setView(ll);
toast.show();
code snippet PA4AD_Ch10_Dialogs/src/MyActivity.java
The resulting Toast will appear, as shown in Figure 10.20.
Figure 10.20

Using Toasts in Worker Threads
As GUI components, Toasts must be created and shown on the GUI thread; otherwise, you risk throwing a cross-thread exception. In Listing 10.32 a Handler is used to ensure that the Toast is opened on the GUI thread.
Listing 10.32: Opening a Toast on the GUI thread
Handler handler = new Handler();
private void mainProcessing() {
Thread thread = new Thread(null, doBackgroundThreadProcessing,
"Background");
thread.start();
}
private Runnable doBackgroundThreadProcessing = new Runnable() {
public void run() {
backgroundThreadProcessing();
}
};
private void backgroundThreadProcessing() {
handler.post(doUpdateGUI);
}
// Runnable that executes the update GUI method.
private Runnable doUpdateGUI = new Runnable() {
public void run() {
Context context = getApplicationContext();
String msg = "To open mobile development!";
int duration = Toast.LENGTH_SHORT;
Toast.makeText(context, msg, duration).show();
}
};
code snippet PA4AD_Ch10_Dialogs/src/MyActivity.java
Introducing Notifications
Your application can use Notifications to alert users of events that may require their attention without one of its Activity's being visible.
Notifications are handled by the Notification Manager and currently have the ability to
· Display a status bar icon
· Flash the lights/LEDs
· Vibrate the phone
· Sound audible alerts (ringtones, Media Store audio)
· Display additional information within the notification tray
· Broadcast Intents using interactive controls from within the notification tray
Notifications are the preferred mechanism for invisible application components (Broadcast Receivers, Services, and inactive Activities) to alert users that events have occurred that may require attention. They are also used to indicate ongoing background Services—and are required to indicate a Service that has foreground priority.
Notifications are particularly well suited to mobile devices. It's likely that your users will have their phones with them at all times but quite unlikely that they will be paying attention to them, or your application, at any given time. Generally, users will have several applications open in the background, and they won't be paying attention to any of them.
In this environment it's important that your applications be able to alert users when specific events occur that require their attention.
Notifications can be persisted through insistent repetition, being marked ongoing, or simply by displaying an icon on the status bar. Status bar icons can be updated regularly or expanded to show additional information using the expanded notification tray, as shown in Figure 10.21.
Figure 10.21
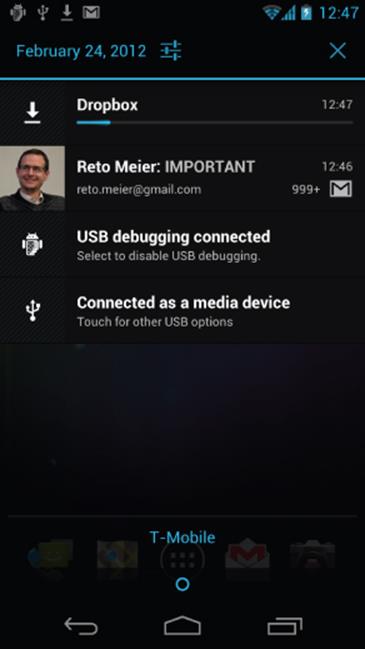
![]()
To display the expanded notification tray on smartphones, press anywhere on the status bar and drag it toward the bottom of the screen. On tablet devices, click the time on the lower-right corner of the system bar.
Introducing the Notification Manager
The NotificationManager is a system Service used to manage Notifications. Get a reference to it using the getSystemService method, as shown in Listing 10.33.
Listing 10.33: Using the Notification Manager
String svcName = Context.NOTIFICATION_SERVICE;
NotificationManager notificationManager;
notificationManager = (NotificationManager)getSystemService(svcName);
code snippet PA4AD_Ch10_Notifications/src/MyActivity.java
Using the Notification Manager, you can trigger new Notifications, modify existing ones, or cancel those that are no longer required.
Creating Notifications
Android offers a number of ways to convey information to users using Notifications:
· Status bar icon
· Sounds, lights, and vibrations
· Details displayed within the extended notification tray
This section examines the first two options. In the section “Setting and Customizing the Notification Tray UI,” you'll learn how to configure the UI displayed for your Notifications within the notification tray.
Creating a Notification and Configuring the Status Bar Display
Start by creating a new Notification object, passing in an icon to display on the status bar along with the ticker text to display on the status bar when the Notification is triggered, as shown in Listing 10.34.
Listing 10.34: Creating a Notification
// Choose a drawable to display as the status bar icon
int icon = R.drawable.icon;
// Text to display in the status bar when the notification is launched
String tickerText = "Notification";
// The extended status bar orders notification in time order
long when = System.currentTimeMillis();
Notification notification = new Notification(icon, tickerText, when);
code snippet PA4AD_Ch10_Notifications/src/MyActivity.java
The ticker text should be a short summary that describes what you are notifying the user of (for example, an SMS message or email subject line).
You also need to specify the timestamp of the Notification; the Notification Manager will sort Notifications in this order.
You can also set the Notification object's number property to display the number of events a status bar icon represents. Setting this value to a number greater than 1, as shown in the following line of code, overlays the values as a small number over the status bar icon:
notification.number++;
Before you can trigger the Notification, you must update its contextual information, as described in the section, “Setting and Customizing the Notification Tray UI.” Once that's done you can trigger the Notification as described in the section, “Triggering, Updating, and Canceling Notifications.” This process will be explored in more detail later in this chapter.
In the following sections you'll learn to enhance Notifications to provide additional alerts through hardware, particularly by making the device ring, flash, and vibrate. Android 3.0 (API level 11) introduced the Notification.Builder class to simplify the process of adding these additional features and will be covered in detail within the “Using the Notification Builder” section.
![]()
To use the Notification techniques described in the following sections without also displaying the status bar icon, simply cancel the Notification directly after triggering it. This stops the icon from displaying but doesn't interrupt the other effects.
Using the Default Notification Sounds, Lights, and Vibrations
The simplest and most consistent way to add sounds, lights, and vibrations to your Notifications is to use the default settings. Using the defaults property, you can combine the following constants:
· Notification.DEFAULT_LIGHTS
· Notification.DEFAULT_SOUND
· Notification.DEFAULT_VIBRATE
For example, the following code snippet assigns the default sound and vibration settings to a Notification:
notification.defaults = Notification.DEFAULT_SOUND |
Notification.DEFAULT_VIBRATE;
If you want to use all the default values, you can use the Notification.DEFAULT_ALL constant.
Making Sounds
Most native phone events, from incoming calls to new messages and low battery, are announced by audible ringtones.
Android lets you assign any available audio file to signal a Notification. Assign a new sound to a Notification using its sound property, specifying a URI to the audio file, as shown in the following snippet:
Uri ringURI =
RingtoneManager.getDefaultUri(RingtoneManager.TYPE_NOTIFICATION);
notification.sound = ringURI;
To use your own custom audio, push the file onto your device or include it as a raw resource, as described in Chapter 15, “Audio, Video, and Using the Camera.”
Vibrating the Device
You can use the device's vibrator to execute a vibration pattern specific to your Notification. Android lets you control the pattern of a vibration; you can use vibration to alert the user to new information being available, or use a specific pattern to convey the information directly.
Before you can use vibration in your application, you need to request the VIBRATE uses-permission in your manifest:
<uses-permission android:name="android.permission.VIBRATE"/>
To set a vibration pattern, assign a long[] to the Notification's vibrate property. Construct the array so that values representing the length of time (in milliseconds) to vibrate alternate with values representing the length of time to pause.
The following example shows how to modify a Notification to vibrate in a repeating pattern of 1 second on and 1 second off, for 5 seconds total:
long[] vibrate = new long[] { 1000, 1000, 1000, 1000, 1000 };
notification.vibrate = vibrate;
You can take advantage of this fine-grained control to pass contextual information to your users.
Flashing the Lights
Notifications also include properties to configure the color and flash frequency of the device's LED.
![]()
Each device may have different limitations with regard to control over the LED. If the color you specify is not available, as close an approximation as possible will be used. When using LEDs to convey information to the user, keep this limitation in mind and avoid making it the only way such information is made available.
The ledARGB property can be used to set the LED's color, whereas the ledOffMS and ledOnMS properties let you set the frequency and pattern of the flashing LED. You can turn on the LED by setting the ledOnMS property to 1 and the ledOffMS property to 0, or turn it off by setting both properties to 0.
After configuring the LED settings, you must also add the FLAG_SHOW_LIGHTS flag to the Notification's flags property. The following code snippet shows how to turn on the red device LED:
notification.ledARGB = Color.RED;
notification.ledOffMS = 0;
notification.ledOnMS = 1;
notification.flags = notification.flags | Notification.FLAG_SHOW_LIGHTS;
Controlling the color and flash frequency gives you another opportunity to pass additional information to users.
Using the Notification Builder
The Notification Builder, introduced in Android 3.0 (API level 11) to simplify the process of configuring the flags, options, content, and layout of Notifications, is the preferred alternative when constructing Notifications for newer Android platforms.
Listing 10.35 shows how to use the Notification Builder to construct a Notification using each of the options selected in the preceding sections.
Listing 10.35: Setting Notification options using the Notification Builder
Notification.Builder builder =
new Notification.Builder(MyActivity.this);
builder.setSmallIcon(R.drawable.ic_launcher)
.setTicker("Notification")
.setWhen(System.currentTimeMillis())
.setDefaults(Notification.DEFAULT_SOUND |
Notification.DEFAULT_VIBRATE)
.setSound(
RingtoneManager.getDefaultUri(
RingtoneManager.TYPE_NOTIFICATION))
.setVibrate(new long[] { 1000, 1000, 1000, 1000, 1000 })
.setLights(Color.RED, 0, 1);
Notification notification = builder.getNotification();
code snippet PA4AD_Ch10_Notifications/src/MyActivity.java
Setting and Customizing the Notification Tray UI
You can configure the appearance of the Notification within the extended notification tray in a number of ways:
· Use the setLatestEventInfo method to update the details displayed in the standard notification tray display.
· Use the Notification Builder to create and control one of several alternative notification tray UIs.
· Set the contentView and contentIntent properties to assign a custom UI for the extended status display using a Remote Views object.
· From Android 3.0 (API level 11) onward, you can assign Broadcast Intents to each View within the Remote Views object that describes your custom UI to make them fully interactive.
It's good form to use one Notification icon to represent multiple instances of the same event (e.g., receiving multiple SMS messages). To do this, create a new Notification that will update the values displayed in the notification tray UI to reflect the most recent message (or a summary of multiple messages) and retrigger the Notification to update the displayed values.
Using the Standard Notification UI
The simplest approach is to use the setLatestEventInfo method to specify the title and text fields used to populate the default notification tray layout (see Figure 10.22).
notification.setLatestEventInfo(context,
expandedTitle,
expandedText,
launchIntent);
Figure 10.22

The PendingIntent you specify will be fired if a user clicks the Notification item. In most cases that Intent should open your application and navigate to the Activity that provides context for the notification (e.g., showing an unread SMS or email message).
Android 3.0 (API level 11) expanded the size used for each Notification, introducing support for a larger icon to be displayed within the notification tray. You can assign the large icon by assigning it to the largeIcon property of your Notification.
Alternatively, you can use the Notification Builder to populate these details, as shown in Listing 10.36. Note that using the Builder provides the ability to set the info text that will be displayed at the lower right of the Notification, as shown in Figure 10.23.
Figure 10.23


Listing 10.36: Applying a custom layout to the Notification status window
builder.setSmallIcon(R.drawable.ic_launcher)
.setTicker("Notification")
.setWhen(System.currentTimeMillis())
.setContentTitle("Title")
.setContentText("Subtitle")
.setContentInfo("Info")
.setLargeIcon(myIconBitmap)
.setContentIntent(pendingIntent);
code snippet PA4AD_Ch10_Notifications/src/MyActivity.java
The Notification Builder also provides support for displaying a progress bar within your Notification. Using the setProgress method, you can specify the current progress in relation to a maximum value, as shown in Figure 10.24, or indicate that the progress should be indeterminate:
builder.setSmallIcon(R.drawable.ic_launcher)
.setTicker("Notification")
.setWhen(System.currentTimeMillis())
.setContentTitle("Progress")
.setProgress(100, 50, false)
.setContentIntent(pendingIntent);
Figure 10.24

Creating a Custom Notification UI
If the details available in the standard Notification display are insufficient (or unsuitable) for your needs, you can create your own layout and assign it to your Notification using a Remote Views object, as shown in Figure 10.25.
Figure 10.25

Listing 10.37 defines a custom layout that includes an icon, Text View, and progress bar.
Listing 10.37: Creating a custom layout for the Notification status window
<?xml version="1.0" encoding="utf-8"?>
<RelativeLayout
xmlns:android="http://schemas.android.com/apk/res/android"
android:padding="5dp"
android:layout_width="fill_parent"
android:layout_height="fill_parent">
<ImageView
android:id="@+id/status_icon"
android:layout_width="wrap_content"
android:layout_height="fill_parent"
android:layout_alignParentLeft="true"
/>
<RelativeLayout
android:layout_width="fill_parent"
android:layout_height="fill_parent"
android:paddingLeft="10dp"
android:layout_toRightOf="@id/status_icon">
<TextView
android:id="@+id/status_text"
android:layout_width="fill_parent"
android:layout_height="wrap_content"
android:layout_alignParentTop="true"
android:textColor="#000"
android:textSize="14sp"
android:textStyle="bold"
/>
<ProgressBar
android:id="@+id/status_progress"
android:layout_width="fill_parent"
android:layout_height="wrap_content"
android:layout_below="@id/status_text"
android:progressDrawable="@android:drawable/progress_horizontal"
android:indeterminate="false"
android:indeterminateOnly="false"
/>
</RelativeLayout>
</RelativeLayout>
code snippet PA4AD_Ch10_Notifications/res/layout/my_status_window.xml
To use this layout within a Notification, you must package it within a Remote Views object:
RemoteViews myView =
new RemoteViews(this.getPackageName(),
R.layout.my_status_window_layout);
Remote Views are a mechanism that enables you to embed and control a layout embedded within a separate application, most commonly when creating home screen Widgets. There are strict limits on the Views you can use when creating a layout to be used for Remote Views. These are covered in some detail in Chapter 14.
If you are using the Notification Builder, you can assign your custom View using the setContent method, as shown in Listing 10.38.
Listing 10.38: Applying a custom layout to the Notification status window
RemoteViews myRemoteView =
new RemoteViews(this.getPackageName(),
R.layout.my_notification_layout);
builder.setSmallIcon(R.drawable.notification_icon)
.setTicker("Notification")
.setWhen(System.currentTimeMillis())
.setContentTitle("Progress")
.setProgress(100, 50, false)
.setContent(myRemoteView);
code snippet PA4AD_Ch10_Notifications/src/MyActivity.java
When targeting platform releases earlier than Android 3.0 (API level 11), you can assign your custom View to the Notification's contentView property. You will also need to assign a Pending Intent to the contentIntent property:
Intent intent = new Intent(this, MyActivity.class);
PendingIntent pendingIntent
= PendingIntent.getActivity(this, 0, intent, 0);
notification.contentView = new RemoteViews(this.getPackageName(),
R.layout.my_status_window_layout);
notification.contentIntent = pendingIntent;
![]()
When you manually set the contentView property, you must also set the contentIntent property; otherwise, an exception will be thrown when the notification is triggered.
You can modify the properties and appearance of the Views used in your Notification layout using the set* methods on the Remote Views object, as shown in Listing 10.39, which modifies each View used in the layout defined in Listing 10.38.
Listing 10.39: Customizing your extended Notification window layout
notification.contentView.setImageViewResource(R.id.status_icon,
R.drawable.icon);
notification.contentView.setTextViewText(R.id.status_text,
"Current Progress:");
notification.contentView.setProgressBar(R.id.status_progress,
100, 50, false);
code snippet PA4AD_Ch10_Notifications/src/MyActivity.java
Note that to modify these views, you will need to broadcast a new Notification with the updated Remote Views object.
Android 4.0 (API level 14) introduced the ability to attach click listeners to the Views contained within your custom Notification layout. To assign a click listener to a View within your Remote Views layout, use the setOnClickPendingIntent method, passing in the resource id of the View to bind to, and a Pending Intent to broadcast when the View is clicked, as shown in Listing 10.40.
Listing 10.40: Adding click handlers to your customized extended Notification window layout
Intent newIntent = new Intent(BUTTON_CLICK);
PendingIntent newPendingIntent =
PendingIntent.getBroadcast(MyActivity.this, 2, newIntent, 0);
notification.contentView.setOnClickPendingIntent(
R.id.status_progress, newPendingIntent);
code snippet PA4AD_Ch10_Notifications/src/MyActivity.java
Clicking anywhere on the Notification layout that isn't bound in this way will trigger the Notification's content Intent.
Using this mechanism, you can make your notifications fully interactive—effectively allowing you to embed a home screen Widget within the Notification tray.
This technique is particularly useful when used with ongoing events such as notifications associated with media players, allowing users to control the playback with the pause and skip buttons.
Customizing the Ticker View
On some devices, particularly tablet devices, you can specify a Remote Views object that will be displayed within the system bar instead of the Notification ticker text.
Use the setTicker method on the Notification Builder to specify a Remote Views object to display, as shown in Listing 10.41. Note that you must still specify the ticker text to display on devices that don't support the custom ticker view.
Listing 10.41: Applying a custom layout to the Notification ticker
RemoteViews myTickerView =
new RemoteViews(this.getPackageName(),
R.layout.my_ticker_layout);
builder.setSmallIcon(R.drawable.notification_icon)
.setTicker("Notification", myTickerView)
.setWhen(System.currentTimeMillis())
.setContent(myRemoteView);
code snippet PA4AD_Ch10_Notifications/src/MyActivity.java
Configuring Ongoing and Insistent Notifications
You can configure Notifications as insistent and/or ongoing by setting the FLAG_INSISTENT and FLAG_ONGOING_EVENT flags, respectively.
Notifications flagged as ongoing are used to represent events that are currently in progress (such as a download in progress or music playing in the background).
Using the Notification Builder, you can mark a Notification as ongoing using the setOngoing method, as shown in Listing 10.42.
Listing 10.42: Setting an ongoing Notification
builder.setSmallIcon(R.drawable.notification_icon)
.setTicker("Notification")
.setWhen(System.currentTimeMillis())
.setContentTitle("Progress")
.setProgress(100, 50, false)
.setContent(myRemoteView)
.setOngoing(true);
code snippet PA4AD_Ch10_Notifications/src/MyActivity.java
If you aren't using the Notification Builder, you can apply the Notification.FLAG_ONGOING_EVENT flag directly to the Notification's flags property:
notification.flags = notification.flags |
Notification.FLAG_ONGOING_EVENT;
An ongoing Notification is a requirement for a foreground Service, as described in Chapter 9.
Insistent Notifications repeat their audio, vibration, and light settings continuously until canceled. These Notifications should be used only for events that require immediate and timely attention—such as an incoming call or the ringing of a user-set alarm clock.
To make a Notification insistent, apply the Notification.FLAG_INSISTENT flag directly to the Notification's flags property:
notification.flags = notification.flags |
Notification.FLAG_INSISTENT;
Note that insistent Notifications are particularly intrusive and should seldom be used within third-party applications. This is reflected in the lack of a corresponding Notification Builder method for setting this flag.
Triggering, Updating, and Canceling Notifications
To fire a Notification, pass it in to the notify method of the NotificationManager along with an integer reference ID, as shown in Listing 10.43. If you've used a Notification Builder to construct the Notification, use its getNotification method to obtain the Notification to broadcast.
Listing 10.43: Triggering a Notification
String svc = Context.NOTIFICATION_SERVICE;
NotificationManager notificationManager
= (NotificationManager)getSystemService(svc);
int NOTIFICATION_REF = 1;
Notification notification = builder.getNotification();
notificationManager.notify(NOTIFICATION_REF, notification);
code snippet PA4AD_Ch10_Notifications/src/MyActivity.java
To update a Notification that's already been fired, including updating the UI of any attached content View, retrigger it using the Notification Manager, passing the notify method the same reference ID.
You can pass in either the same Notification object or an entirely new one. As long as the ID values are the same, the new Notification will be used to replace the status icon and extended status window details.
To update a Notification without triggering any of the associated lights, audio, or vibration settings, use the Notification Builder's setOnlyAlertOnce method, as shown in Listing 10.44.
Listing 10.44: Updating a Notification without replaying the alerts
builder.setSmallIcon(R.drawable.notification_icon)
.setTicker("Updated Notification")
.setWhen(System.currentTimeMillis())
.setContentTitle("More Progress")
.setProgress(100, 75, false)
.setContent(myRemoteView)
.setOngoing(true)
.setOnlyAlertOnce(true);
Notification notification = builder.getNotification();
notificationManager.notify(NOTIFICATION_REF, notification);
code snippet PA4AD_Ch10_Notifications/src/MyActivity.java
Alternatively, you can apply the FLAG_ONLY_ALERT_ONCE flag directly to the Notification:
notification.flags = notification.flags |
Notification.FLAG_ONLY_ALERT_ONCE;
Canceling a Notification removes its icon from the status bar and its extended details from the Notification tray. It's good practice to cancel a Notification after the user has acted upon it—typically either by clicking it or by manually navigating to the application that launched it.
You can configure a Notification to automatically cancel itself when it's clicked by using the Notification Builder's setAutoCancel flag, as shown in Listing 10.45.
Listing 10.45: Setting an auto-cancel Notification
builder.setSmallIcon(R.drawable.ic_launcher)
.setTicker("Notification")
.setWhen(System.currentTimeMillis())
.setContentTitle("Title")
.setContentText("Subtitle")
.setContentInfo("Info")
.setLargeIcon(myIconBitmap)
.setContentIntent(pendingIntent)
.setAutoCancel(true);
code snippet PA4AD_Ch10_Notifications/src/MyActivity.java
Alternatively, apply the FLAG_AUTO_CANCEL flag when not using the Notification Builder:
notification.flags = notification.flags |
Notification.FLAG_AUTO_CANCEL;
To cancel the Notification, use the Notification Manager's cancel method, passing in the reference id of the Notification you want to cancel, as shown in Listing 10.46.
Listing 10.46: Canceling a Notification
notificationManager.cancel(NOTIFICATION_REF);
code snippet PA4AD_Ch10_Notifications/src/MyActivity.java
Canceling a Notification removes its status bar icon and clears it from the extended status window.
Adding Notifications and Dialogs to the Earthquake Monitor
The following example enhances the EarthquakeUpdateService to trigger a Notification for each new earthquake. In addition to displaying a status bar icon, the Notification tray view will display the magnitude and location of the latest quake, and selecting the notification will open the Earthquake Activity.
You'll also update the EarthquakeListFragment to display a summary dialog when an Earthquake is selected.
1. Start within the EarthquakeUpdateService. Create a new Notification Builder variable to help construct the Notifications that will be used to create each Notification:
private Notification.Builder earthquakeNotificationBuilder;
public static final int NOTIFICATION_ID = 1;
2. Extend the onCreate method to create the Notification Builder object with the standard Notification items to be used. Note that you will need to create a Notification icon and store it in your res/drawable folder.
@Override
public void onCreate() {
super.onCreate();
alarmManager = (AlarmManager)getSystemService(Context.ALARM_SERVICE);
String ALARM_ACTION;
ALARM_ACTION =
EarthquakeAlarmReceiver.ACTION_REFRESH_EARTHQUAKE_ALARM;
Intent intentToFire = new Intent(ALARM_ACTION);
alarmIntent =
PendingIntent.getBroadcast(this, 0, intentToFire, 0);
earthquakeNotificationBuilder = new Notification.Builder(this);
earthquakeNotificationBuilder
.setAutoCancel(true)
.setTicker("Earthquake detected")
.setSmallIcon(R.drawable.notification_icon);
}
3. Create a new broadcastNotification method that will update the Notification Builder instance using a Quake object. Use it to create and broadcast a Notification.
private void broadcastNotification(Quake quake) {
Intent startActivityIntent = new Intent(this, Earthquake.class);
PendingIntent launchIntent =
PendingIntent.getActivity(this, 0, startActivityIntent, 0);
earthquakeNotificationBuilder
.setContentIntent(launchIntent)
.setWhen(quake.getDate().getTime())
.setContentTitle("M:" + quake.getMagnitude())
.setContentText(quake.getDetails());
NotificationManager notificationManager
= (NotificationManager)getSystemService(Context.NOTIFICATION_SERVICE);
notificationManager.notify(NOTIFICATION_ID,
earthquakeNotificationBuilder.getNotification());
}
4. Update the addNewQuake method to broadcast the Notification. Insert a call the broadcastNotification method immediately before the call to insert the new quake into the Content Provider:
private void addNewQuake(Quake quake) {
ContentResolver cr = getContentResolver();
// Construct a where clause to make sure we don't already have this
// earthquake in the provider.
String w = EarthquakeProvider.KEY_DATE + " = " + quake.getDate().getTime();
// If the earthquake is new, insert it into the provider.
Cursor query = cr.query(EarthquakeProvider.CONTENT_URI, null, w, null, null);
if (query.getCount()==0) {
ContentValues values = new ContentValues();
values.put(EarthquakeProvider.KEY_DATE, quake.getDate().getTime());
values.put(EarthquakeProvider.KEY_DETAILS, quake.getDetails());
values.put(EarthquakeProvider.KEY_SUMMARY, quake.toString());
double lat = quake.getLocation().getLatitude();
double lng = quake.getLocation().getLongitude();
values.put(EarthquakeProvider.KEY_LOCATION_LAT, lat);
values.put(EarthquakeProvider.KEY_LOCATION_LNG, lng);
values.put(EarthquakeProvider.KEY_LINK, quake.getLink());
values.put(EarthquakeProvider.KEY_MAGNITUDE, quake.getMagnitude());
// Trigger a notification.
broadcastNotification(quake);
// Add the new quake to the Earthquake provider.
cr.insert(EarthquakeProvider.CONTENT_URI, values);
}
query.close();
}
5. To make the Notification more interesting, modify the broadcastNotification method to customize the extended Notification settings such as lights and vibration based on the size of the earthquake.
5.1 Add an audio component to the Notification, ringing the default notification ringtone if a significant earthquake (one with a magnitude greater than 6) occurs:
if (quake.getMagnitude() > 6) {
Uri ringURI =
RingtoneManager.getDefaultUri(RingtoneManager.TYPE_NOTIFICATION);
earthquakeNotificationBuilder.setSound(ringURI);
}
5.2 Set the device to vibrate in a pattern based on the power of the quake. Earthquakes are measured on an exponential scale, so you'll use the same scale when creating the vibration pattern.
5.3 For a barely perceptible magnitude 1 quake, the phone will vibrate for a fraction of a second; for one of magnitude 10, an earthquake that would split the earth in two, your users will have a head start on the Apocalypse when their devices vibrate for a full 20 seconds.
5.4 Most significant quakes fall between 3 and 7 on the Richter scale, or a more reasonable 200-millisecond-to-4-second range of vibration duration.
double vibrateLength = 100*Math.exp(0.53*quake.getMagnitude());
long[] vibrate = new long[] {100, 100, (long)vibrateLength };
earthquakeNotificationBuilder.setVibrate(vibrate);
5.5 Help your users perceive the nuances of an exponential scale by also using the device's LED to help convey the magnitude. Here you color the LED based on the size of the quake, and the frequency of the flashing is inversely related to the power of the quake:
int color;
if (quake.getMagnitude() < 5.4)
color = Color.GREEN;
else if (quake.getMagnitude() < 6)
color = Color.YELLOW;
else
color = Color.RED;
earthquakeNotificationBuilder.setLights(
color,
(int)vibrateLength,
(int)vibrateLength);
6. Add the vibrate uses-permission to your manifest:
<uses-permission android:name="android.permission.VIBRATE"/>
7. Let users find more details by opening a Dialog when they select an earthquake from the list. Create a new quake_details.xml layout resource for the Dialog you'll display when an item is clicked:
<?xml version="1.0" encoding="utf-8"?>
<LinearLayout xmlns:android="http://schemas.android.com/apk/res/android"
android:orientation="vertical"
android:layout_width="match_parent"
android:layout_height="match_parent"
android:padding="10dp">
<TextView
android:id="@+id/quakeDetailsTextView"
android:layout_width="match_parent"
android:layout_height="match_parent"
android:textSize="14sp"
/>
</LinearLayout>
8. Create a new EarthquakeDialog class that extends DialogFragment. It should accept a Quake object and use that to populate the dialog.
package com.paad.earthquake;
import java.text.SimpleDateFormat;
import android.app.Dialog;
import android.app.DialogFragment;
import android.content.Context;
import android.os.Bundle;
import android.view.LayoutInflater;
import android.view.View;
import android.view.ViewGroup;
import android.widget.TextView;
public class EarthquakeDialog extends DialogFragment {
private static String DIALOG_STRING = "DIALOG_STRING";
public static EarthquakeDialog newInstance(Context context, Quake quake) {
// Create a new Fragment instance with the specified
// parameters.
EarthquakeDialog fragment = new EarthquakeDialog();
Bundle args = new Bundle();
SimpleDateFormat sdf = new SimpleDateFormat("dd/MM/yyyy HH:mm:ss");
String dateString = sdf.format(quake.getDate());
String quakeText = dateString + "\n" + "Magnitude " + quake.getMagnitude() +
"\n" + quake.getDetails() + "\n" +
quake.getLink();
args.putString(DIALOG_STRING, quakeText);
fragment.setArguments(args);
return fragment;
}
@Override
public View onCreateView(LayoutInflater inflater, ViewGroup container,
Bundle savedInstanceState) {
View view = inflater.inflate(R.layout.quake_details, container, false);
String title = getArguments().getString(DIALOG_STRING);
TextView tv = (TextView)view.findViewById(R.id.quakeDetailsTextView);
tv.setText(title);
return view;
}
@Override
public Dialog onCreateDialog(Bundle savedInstanceState) {
Dialog dialog = super.onCreateDialog(savedInstanceState);
dialog.setTitle("Earthquake Details");
return dialog;
}
}
9. Finally, open the EarthquakeListFragment and override the onListItemClick handler to create a new Quake object, and use it to create and show the Earthquake Dialog.
@Override
public void onListItemClick(ListView l, View v, int position, long id) {
super.onListItemClick(l, v, position, id);
ContentResolver cr = getActivity().getContentResolver();
Cursor result =
cr.query(ContentUris.withAppendedId(EarthquakeProvider.CONTENT_URI, id),
null, null, null, null);
if (result.moveToFirst()) {
Date date =
new Date(result.getLong(
result.getColumnIndex(EarthquakeProvider.KEY_DATE)));
String details =
result.getString(
result.getColumnIndex(EarthquakeProvider.KEY_DETAILS));
double magnitude =
result.getDouble(
result.getColumnIndex(EarthquakeProvider.KEY_MAGNITUDE));
String linkString =
result.getString(
result.getColumnIndex(EarthquakeProvider.KEY_LINK));
double lat =
result.getDouble(
result.getColumnIndex(EarthquakeProvider.KEY_LOCATION_LAT));
double lng =
result.getDouble(
result.getColumnIndex(EarthquakeProvider.KEY_LOCATION_LNG));
Location location = new Location("db");
location.setLatitude(lat);
location.setLongitude(lng);
Quake quake = new Quake(date, details, location, magnitude, linkString);
DialogFragment newFragment = EarthquakeDialog.newInstance(getActivity(), quake);
newFragment.show(getFragmentManager(), "dialog");
}
}
![]()
All code snippets in this example are part of the Chapter 10 Earthquake 3 project, available for download at www.wrox.com.
With these changes complete, any new earthquake will trigger a Notification, accompanied by flashing lights, vibration, and a ringtone. Selecting any of the earthquakes from the list will display their details in a Dialog.
All materials on the site are licensed Creative Commons Attribution-Sharealike 3.0 Unported CC BY-SA 3.0 & GNU Free Documentation License (GFDL)
If you are the copyright holder of any material contained on our site and intend to remove it, please contact our site administrator for approval.
© 2016-2026 All site design rights belong to S.Y.A.