Professional Android 4 Application Development (2012)
Chapter 13. Maps, Geocoding, and Location-Based Services
What's in this Chapter?
Understanding forward and reverse geocoding
Creating interactive maps with Map Views and Map Activities
Creating and adding Overlays to maps
Finding your location with location-based services
Using proximity alerts
One of the defining features of mobile phones is their portability, so it's not surprising that some of the most enticing APIs are those that enable you to find, contextualize, and map physical locations.
Using the external Maps library included as part of the Google API package, you can create map-based Activities using Google Maps as a user interface element. You have full access to the map, which enables you to control display settings, alter the zoom level, and pan to different locations. Using Overlays you can annotate maps and handle user input.
This chapter also covers the location-based services (LBS) that enable you to find the device's current location. They include technologies such as GPS and cell- or Wi-Fi-based location-sensing techniques. You can specify which technology to use explicitly by name, or you can provide a set of Criteria in terms of accuracy, cost, and other requirements and let Android select the most appropriate.
Maps and location-based services use latitude and longitude to pinpoint geographic locations, but your users are more likely to think in terms of a street address. The maps library includes a geocoder that you can use to convert back and forth between latitude/longitude values and real-world addresses.
Used together, the mapping, geocoding, and location-based services provide a powerful toolkit for incorporating your phone's native mobility into your mobile applications.
Using Location-Based Services
“Location-based services” is an umbrella term that describes the different technologies you can use to find a device's current location. The two main LBS elements are:
· Location Manager—Provides hooks to the location-based services.
· Location Providers—Each of these represents a different location-finding technology used to determine the device's current location.
Using the Location Manager, you can do the following:
· Obtain your current location
· Follow movement
· Set proximity alerts for detecting movement into and out of a specified area
· Find available Location Providers
· Monitor the status of the GPS receiver
Access to the location-based services is provided by the Location Manager. To access the Location Manager, request an instance of the LOCATION_SERVICE using the getSystemService method, as shown in Listing 13.1.

Listing 13.1: Accessing the Location Manager
String serviceString = Context.LOCATION_SERVICE;
LocationManager locationManager;
locationManager = (LocationManager)getSystemService(serviceString);
code snippet PA4AD_Ch13_Location/src/MyActivity.java
Before you can use the location-based services, you need to add one or more uses-permission tags to your manifest.
The following snippet shows how to request the fine and coarse permissions in your application manifest:
<uses-permission android:name="android.permission.ACCESS_FINE_LOCATION"/>
<uses-permission android:name="android.permission.ACCESS_COARSE_LOCATION"/>
Fine and coarse permissions will be described in more detail in the following sections. Generally speaking, they control the level of accuracy your application can use when determining the user's location, where fine represents high accuracy and coarse less so.
Note that an application that has been granted fine permission will have coarse permission granted implicitly.
Using the Emulator with Location-Based Services
Location-based services are dependent on device hardware used to find the current location. When you develop and test with the Emulator, your hardware is virtualized, and you're likely to stay in pretty much the same location.
To compensate, Android includes hooks that enable you to emulate Location Providers for testing location-based applications. In this section you learn how to mock the position of the supported GPS provider.
![]()
If you plan to do location-based application development and use the Android Emulator, this section shows you how to create an environment that simulates real hardware and location changes. For the remainder of this chapter, it is assumed that you have used the examples in this section to update the location for the LocationManager.GPS_PROVIDER within the Emulator, or that you use a physical device.
Updating Locations in Emulator Location Providers
Use the Location Controls available from the DDMS perspective in Eclipse (Figure 13.1) to push location changes directly into the Emulator's GPS Location Provider.
Figure 13.1
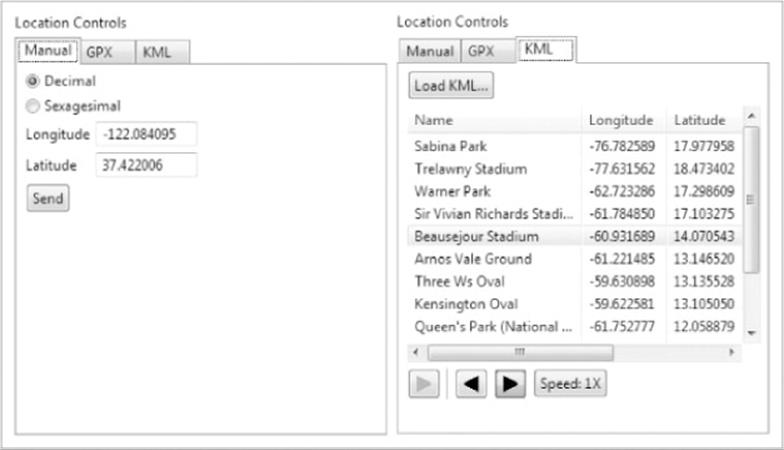
Figure 13.1 shows the manual and KML tabs. Using the manual tab you can specify particular latitude/longitude pairs. Alternatively, the KML and GPX tabs enable you to load Keyhole Markup Language (KML) and GPS Exchange Format (GPX) files, respectively. After these load you can jump to particular waypoints (locations) or play back each sequence of locations.
![]()
Most GPS systems record track-files using GPX, whereas KML is used extensively online to define geographic information. You can handwrite your own KML file or generate one by using Google Earth to find directions between two locations.
All location changes applied using the DDMS location controls will be applied to the GPS receiver, which must be enabled and active.
Configuring the Emulator to Test Location-Based Services
The GPS values returned by getLastKnownLocation do not change unless at least one application requests location updates. As a result, when the Emulator is first started, the result returned from a call to getLastKnownLocation is likely to be null, as no application has made a request to receive location updates.
Further, the techniques used to update the mock location described in the previous section are effective only when at least one application has requested location updates from the GPS.
Listing 13.2 shows how to enable continuous location updates on the Emulator, allowing you to use DDMS to update the mock location within the Emulator.
Listing 13.2: Enabling the GPS provider on the Emulator
locationManager.requestLocationUpdates(
LocationManager.GPS_PROVIDER, 0, 0,
new LocationListener() {
public void onLocationChanged(Location location) {}
public void onProviderDisabled(String provider) {}
public void onProviderEnabled(String provider) {}
public void onStatusChanged(String provider, int status,
Bundle extras) {}
}
);
code snippet PA4AD_Ch13_Location/src/MyActivity.java
Note that this code effectively locks the GPS Location Provider into an on state. This is considered poor practice, as it will quickly drain the battery on a real device; therefore, this technique should only be used when testing on the Emulator.
Selecting a Location Provider
Depending on the device, you can use several technologies to determine the current location. Each technology, available as a Location Provider, offers different capabilities—including differences in power consumption, accuracy, and the ability to determine altitude, speed, or heading information.
Finding Location Providers
The LocationManager class includes static string constants that return the provider name for three Location Providers:
· LocationManager.GPS_PROVIDER
· LocationManager.NETWORK_PROVIDER
· LocationManager.PASSIVE_PROVIDER
![]()
The GPS provider requires fine permission, as does the passive provider, whereas the network (Cell ID/Wi-Fi) provider requires only coarse.
To get a list of the names of all the providers available (based on hardware available on the device, and the permissions granted the application), call getProviders, using a Boolean to indicate if you want all, or only the enabled, providers to be returned:
boolean enabledOnly = true;
List<String> providers = locationManager.getProviders(enabledOnly);
Finding Location Providers by Specifying Criteria
In most scenarios it's unlikely that you want to explicitly choose a Location Provider to use. It's better practice to specify your requirements and let Android determine the best technology to use.
Use the Criteria class to dictate the requirements of a provider in terms of accuracy, power use (low, medium, high), financial cost, and the ability to return values for altitude, speed, and heading.
Listing 13.3 specifies Criteria requiring coarse accuracy, low power consumption, and no need for altitude, bearing, or speed. The provider is permitted to have an associated cost.
Listing 13.3: Specifying Location Provider
Criteria criteria = new Criteria();
criteria.setAccuracy(Criteria.ACCURACY_COARSE);
criteria.setPowerRequirement(Criteria.POWER_LOW);
criteria.setAltitudeRequired(false);
criteria.setBearingRequired(false);
criteria.setSpeedRequired(false);
criteria.setCostAllowed(true);
code snippet PA4AD_Ch13_Location/src/MyActivity.java
The coarse/fine values passed in to the setAccuracy represent a subjective level of accuracy, where fine represents GPS or better and coarse any technology significantly less accurate than that.
Android 3.0 introduced several additional properties to the Criteria class, designed for more control over the level of accuracy you require. The following extension of Listing 13.3 specifies that a high horizontal (latitude/longitude) and medium vertical (elevation) accuracy are required. Requirements for the accuracy of returned bearing and speed are set to low.
criteria.setHorizontalAccuracy(Criteria.ACCURACY_HIGH);
criteria.setVerticalAccuracy(Criteria.ACCURACY_MEDIUM);
criteria.setBearingAccuracy(Criteria.ACCURACY_LOW);
criteria.setSpeedAccuracy(Criteria.ACCURACY_LOW);
In terms of horizontal and vertical accuracy, high accuracy represents a requirement for results correct to within 100m. Low accuracy Providers are correct to more than 500m, whereas medium accuracy Providers represent accuracy between 100 and 500 meters.
When specifying accuracy requirements for bearing and speed, only ACCURACY_LOW and ACCURACY_HIGH are valid parameters.
Having defined the required Criteria, you can use getBestProvider to return the best matching Location Provider or getProviders to return all the possible matches. The following snippet demonstrates the use of getBestProvider to return the best Provider for your Criteria where the Boolean enables you restrict the result to a currently enabled Provider:
String bestProvider = locationManager.getBestProvider(criteria, true);
If more than one Location Provider matches your Criteria, the one with the greatest accuracy is returned. If no Location Providers meet your requirements, the Criteria are loosened, in the following order, until a provider is found:
· Power use
· Accuracy of returned location
· Accuracy of bearing, speed, and altitude
· Availability of bearing, speed, and altitude
The criterion for allowing a device with monetary cost is never implicitly relaxed. If no provider is found, null is returned.
To get a list of names for all the providers matching your Criteria, use getProviders. It accepts a Criteria object and returns a String list of all Location Providers that match it. As with the getBestProvider call, if no matching providers are found, this method returns null or an empty List.
List<String> matchingProviders = locationManager.getProviders(criteria,
false);
Determining Location Provider Capabilities
To get an instance of a specific provider, call getProvider, passing in the name:
String providerName = LocationManager.GPS_PROVIDER;
LocationProvider gpsProvider
= locationManager.getProvider(providerName);
This is useful only for obtaining the capabilities of a particular provider—specifically the accuracy and power requirements through the getAccuracy and getPowerRequirement methods.
In the following sections, most Location Manager methods require only a provider name or criteria to perform location-based functions.
Finding Your Current Location
One of the most powerful uses of location-based services is to find the physical location of the device. The accuracy of the returned location is dependent on the hardware available and the permissions requested by your application.
Location Privacy
Privacy is an important consideration when your application uses the user's location—particularly when it is regularly updating their current position. Ensure that your application uses the device location data in a way that respects the user's privacy by:
· Only using and updating location when necessary for your application
· Notifying users of when you track their locations, and if and how that location information is used, transmitted, and stored
· Allowing users to disable location updates, and respecting the system settings for LBS preferences
Finding the Last Known Location
You can find the last location fix obtained by a particular Location Provider using the getLastKnownLocation method, passing in the name of the Location Provider. The following example finds the last location fix taken by the GPS provider:
String provider = LocationManager.GPS_PROVIDER;
Location location = locationManager.getLastKnownLocation(provider);
![]()
getLastKnownLocation does not ask the Location Provider to update the current position. If the device has not recently updated the current position, this value may not exist or be out of date.
The Location object returned includes all the position information available from the provider that supplied it. This can include the time it was obtained, the accuracy of the location found, and it's latitude, longitude, bearing, altitude, and speed. All these properties are available via get methods on the Location object.
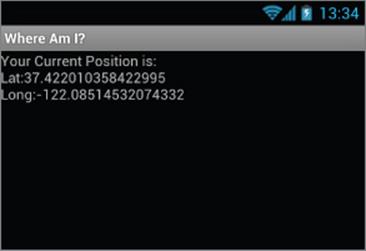
Where Am I Example
The following example—Where Am I—features a new Activity that finds the device's last known location using the GPS Location Provider.
![]()
This example assumes that you have enabled the GPS_PROVIDER Location Provider using the techniques shown previously in this chapter, or that you're running it on a device that supports GPS and has that hardware enabled.
In order to work, the device or Emulator must have recorded at least one location update. In the case of a device, this is most easily achieved by starting the Google Maps application; on an Emulator, enable location updates as described earlier in this chapter.
1. Create a new Where Am I project with a WhereAmI Activity. This example uses the GPS provider, so you need to include the uses-permission tag for ACCESS_FINE_LOCATION in your application manifest.
<?xml version="1.0" encoding="utf-8"?>
<manifest xmlns:android="http://schemas.android.com/apk/res/android"
package="com.paad.whereami"
android:versionCode="1"
android:versionName="1.0" >
<uses-sdk android:minSdkVersion="4" />
<uses-permission
android:name="android.permission.ACCESS_FINE_LOCATION"
/>
<application
android:icon="@drawable/ic_launcher"
android:label="@string/app_name" >
<activity
android:name=".WhereAmI"
android:label="@string/app_name" >
<intent-filter>
<action android:name="android.intent.action.MAIN" />
<category android:name="android.intent.category.LAUNCHER" />
</intent-filter>
</activity>
</application>
</manifest>
2. Modify the main.xml layout resource to include an android:ID attribute for the TextView control so that you can access it from within the Activity.
<?xml version="1.0" encoding="utf-8"?>
<LinearLayout xmlns:android="http://schemas.android.com/apk/res/android"
android:orientation="vertical"
android:layout_width="match_parent"
android:layout_height="match_parent">
<TextView
android:id="@+id/myLocationText"
android:layout_width="match_parent"
android:layout_height="wrap_content"
android:text="@string/hello"
/>
</LinearLayout>
3. Override the onCreate method of the WhereAmI Activity to get a reference to the Location Manager. Call getLastKnownLocation to get the last known location, and pass it in to an updateWithNewLocation method stub.
@Override
public void onCreate(Bundle savedInstanceState) {
super.onCreate(savedInstanceState);
setContentView(R.layout.main);
LocationManager locationManager;
String svcName = Context.LOCATION_SERVICE;
locationManager = (LocationManager)getSystemService(svcName);
String provider = LocationManager.GPS_PROVIDER;
Location l = locationManager.getLastKnownLocation(provider);
updateWithNewLocation(l);
}
private void updateWithNewLocation(Location location) {}
4. Complete the updateWithNewLocation method to show the passed-in Location in the Text View by extracting the latitude and longitude values.
private void updateWithNewLocation(Location location) {
TextView myLocationText;
myLocationText = (TextView)findViewById(R.id.myLocationText);
String latLongString = "No location found";
if (location != null) {
double lat = location.getLatitude();
double lng = location.getLongitude();
latLongString = "Lat:" + lat + "\nLong:" + lng;
}
myLocationText.setText("Your Current Position is:\n" +
latLongString);
}
![]()
All code snippets in this example are part of the Chapter 13 Where Am I Part 1 project, available for download at www.wrox.com.
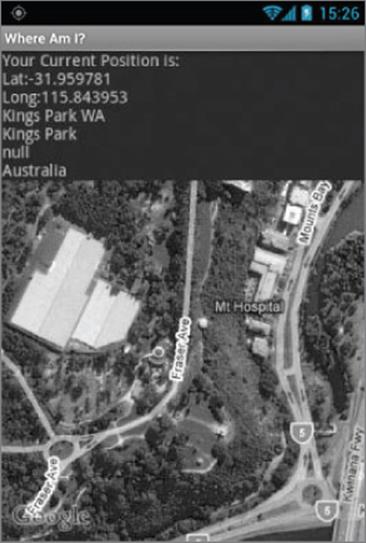
5. When running, your Activity should look like Figure 13.2.
Figure 13.2
Refreshing the Current Location
In most circumstances getting the last known location is unlikely to be sufficient for your applications needs. Not only is the value likely to be out of date, but most location-sensitive applications need to be reactive to user movement—and querying the Location Manager for the last known location does not force it to update.
The requestLocationUpdates methods are used to request regular updates of location changes using a LocationListener. Location Listeners also contain hooks for changes in a provider's status and availability.
The requestLocationUpdates method accepts either a specific Location Provider name or a set of Criteria to determine the provider to use. To optimize efficiency and minimize cost and power use, you can also specify the minimum time and the minimum distance between location change updates.
Listing 13.4 shows the skeleton code for requesting regular updates based on a minimum time and distance using a Location Listener.
Listing 13.4: Requesting location updates Using a Location Listener
String provider = LocationManager.GPS_PROVIDER;
int t = 5000; // milliseconds
int distance = 5; // meters
LocationListener myLocationListener = new LocationListener() {
public void onLocationChanged(Location location) {
// Update application based on new location.
}
public void onProviderDisabled(String provider){
// Update application if provider disabled.
}
public void onProviderEnabled(String provider){
// Update application if provider enabled.
}
public void onStatusChanged(String provider, int status,
Bundle extras){
// Update application if provider hardware status changed.
}
};
locationManager.requestLocationUpdates(provider, t, distance,
myLocationListener);
code snippet PA4AD_Ch13_Location/src/MyActivity.java
When the minimum time and distance values are exceeded, the attached Location Listener executes its onLocationChanged event.
![]()
You can request multiple location updates pointing to the same or different Location Listeners using different minimum time and distance thresholds or Location Providers.
Android 3.0 (API level 11) introduced an alternative technique for receiving location changes. Rather than creating a Location Listener, you can specify a Pending Intent that will be broadcast whenever the location changes or the location provider status or availability changes. The new location is stored as an extra with the key KEY_LOCATION_CHANGED.
This is a particularly useful alternative if you have multiple Activities or Services that require location updates as they can listen for the same broadcast Intents.
![]()
To ensure your application doesn't leak sensitive location information, you need to either target a specific Broadcast Receiver, as shown in Listing 13.5, or require permissions for your location update Intents to be received. More details on applying permissions to Broadcast Intents are available in Chapter 18, “Advanced Android Development.”
Listing 13.5 shows how to broadcast a Pending Intent to announce new location updates.
Listing 13.5: Requesting location updates using a Pending Intent
String provider = LocationManager.GPS_PROVIDER;
int t = 5000; // milliseconds
int distance = 5; // meters
final int locationUpdateRC = 0;
int flags = PendingIntent.FLAG_UPDATE_CURRENT;
Intent intent = new Intent(this, MyLocationUpdateReceiver.class);
PendingIntent pendingIntent = PendingIntent.getBroadcast(this,
locationUpdateRC, intent, flags);
locationManager.requestLocationUpdates(provider, t,
distance, pendingIntent);
code snippet PA4AD_Ch13_Location/src/MyActivity.java
Listing 13.6 shows how to create a Broadcast Receiver that listens for changes in location broadcast using a Pending Intent as shown in Listing 13.5.
Listing 13.6: Receiving location updates using a Broadcast Receiver
import android.content.BroadcastReceiver;
import android.content.Context;
import android.content.Intent;
import android.location.Location;
import android.location.LocationManager;
public class MyLocationUpdateReceiver extends BroadcastReceiver {
@Override
public void onReceive(Context context, Intent intent) {
String key = LocationManager.KEY_LOCATION_CHANGED;
Location location = (Location)intent.getExtras().get(key);
// TODO [... Do something with the new location ...]
}
}
code snippet PA4AD_Ch13_Location/src/MyLocationUpdateReceiver.java
Remember that you must add your Broadcast Receiver to the application manifest before it can begin receiving the Pending Intents.
To stop location updates, call removeUpdates, as shown in the following code. Pass in either the Location Listener instance or Pending Intent that you no longer want to have triggered.
locationManager.removeUpdates(myLocationListener);
locationManager.removeUpdates(pendingIntent);
To minimize the cost to battery life, you should disable updates whenever possible in your application, especially in cases where your application isn't visible and location changes are used only to update an Activity's UI. You can improve performance further by making the minimum time and distance between updates as large as possible.
Where timeliness is not a significant factor, you might consider using the Passive Location Provider (introduced in Android 2.2, API level 8), as shown in the following snippet.
String passiveProvider = LocationManager.PASSIVE_PROVIDER;
locationManager.requestLocationUpdates(passiveProvider, 0, 0,
myLocationListener);
The Passive Location Provider receives location updates if, and only if, another application requests them, letting your application passively receive location updates without activating any Location Provider.
Because the updates may come from any Location Provider, your application must request the ACCESS_FINE_LOCATION permission to use the Passive Location Provider. Call getProvider on the Location received by the registered Location Listener to determine which Location Provider generated each update.
Its passive nature makes this an excellent alternative for keeping location data fresh within your application while it is in the background, without draining the battery.
Tracking Your Location in Where Am I
In the following example, the Where Am I project is enhanced to update your current location by listening for location changes. Updates are restricted to one every 2 seconds, and only when movement of more than 10 meters has been detected.
Rather than explicitly selecting a provider, you update the application to use a set of Criteria and let Android find the best provider available.
1. Open the WhereAmI Activity in the Where Am I project. Update the onCreate method to use Criteria to find a Location Provider that features high accuracy and draws as little power as possible.
@Override
public void onCreate(Bundle savedInstanceState) {
super.onCreate(savedInstanceState);
setContentView(R.layout.main);
LocationManager locationManager;
String svcName = Context.LOCATION_SERVICE;
locationManager = (LocationManager)getSystemService(svcName);
Criteria criteria = new Criteria();
criteria.setAccuracy(Criteria.ACCURACY_FINE);
criteria.setPowerRequirement(Criteria.POWER_LOW);
criteria.setAltitudeRequired(false);
criteria.setBearingRequired(false);
criteria.setSpeedRequired(false);
criteria.setCostAllowed(true);
String provider = locationManager.getBestProvider(criteria, true);
Location l = locationManager.getLastKnownLocation(provider);
updateWithNewLocation(l);
}
2. Create a new LocationListener instance variable that fires the existing updateWithNew Location method whenever a location change is detected.
private final LocationListener locationListener = new LocationListener() {
public void onLocationChanged(Location location) {
updateWithNewLocation(location);
}
public void onProviderDisabled(String provider) {}
public void onProviderEnabled(String provider) {}
public void onStatusChanged(String provider, int status,
Bundle extras) {}
};
3. Return to onCreate and call requestLocationUpdates, passing in the new Location Listener object. It should listen for location changes every 2 seconds but fire only when it detects movement of more than 10 meters.
@Override
public void onCreate(Bundle savedInstanceState) {
super.onCreate(savedInstanceState);
setContentView(R.layout.main);
LocationManager locationManager;
String svcName = Context.LOCATION_SERVICE;
locationManager = (LocationManager)getSystemService(svcName);
Criteria criteria = new Criteria();
criteria.setAccuracy(Criteria.ACCURACY_FINE);
criteria.setPowerRequirement(Criteria.POWER_LOW);
criteria.setAltitudeRequired(false);
criteria.setBearingRequired(false);
criteria.setSpeedRequired(false);
criteria.setCostAllowed(true);
String provider = locationManager.getBestProvider(criteria, true);
Location l = locationManager.getLastKnownLocation(provider);
updateWithNewLocation(l);
locationManager.requestLocationUpdates(provider, 2000, 10,
locationListener);
}
If you run the application and start changing the device location, you see the Text View update accordingly.
![]()
All code snippets in this example are part of the Chapter 13 Where Am I Part 2 project, available for download at www.wrox.com.
Requesting a Single Location Update
Not every app requires regular location updates to remain useful. In many cases only a single location fix is required to provide adequate context for the functionality they provide or information they display.
Although getLastKnownLocation can be used to return the last known position, there's no guarantee that this location exists, or that it is still relevant. Similarly, you could use the Passive Location Provider to receive updates when other apps request them, but you have no control over when (or if) this will happen.
Introduced in Android 2.3 (API level 9), the requestSingleUpdate method enables you to specify a Provider or Criteria to use when requesting at least one update.
As shown in the snippet following, unlike requesting regular updates this method does not let you specify the frequency of updates because only a single update will be requested.
Looper looper = null;
locationManager.requestSingleUpdate(criteria, myLocationListener, looper);
When using a Location Listener, you can specify a Looper parameter. This allows you to schedule the callbacks on a particular thread—setting the parameter to null will force it to return on the calling thread.
Like the requestLocationUpdates method described earlier, you can choose to receive the single location update using either a Location Listener as previously shown, or through a Pending Intent as shown here.
locationManager.requestSingleUpdate(criteria, pendingIntent);
In either case, only one update will be received, so you need to unregister the receiver when that update occurs.
Best Practice for Location Updates
When using Location within your application, consider the following factors:
· Battery life versus accuracy—The more accurate the Location Provider, the greater its drain on the battery.
· Startup time—In a mobile environment the time taken to get an initial location can have a dramatic effect on the user experience—particularly if your app requires a location to be used. GPS, for example, can have a significant startup time, which you may need to mitigate.
· Update rate—The more frequent the update rate, the more dramatic the effect on battery life. Slower updates can reduce battery drain at the price of less timely updates.
· Provider availability—Users can toggle the availability of providers, so your application needs to monitor changes in provider status to ensure the best alternative is used at all times.
Monitoring Location Provider Status and Availability
Having used Criteria to select the best provider available for receiving location updates, you need to monitor changes in the availability of Location Providers to ensure that the one selected remains available and the best alternative.
Listing 13.7 shows how to monitor the status of your selected Provider, dynamically switching to a new provider should it become unavailable and switching to a better alternative should one be enabled.
Listing 13.7: Design pattern for switching Location Providers when a better alternative becomes available
package com.paad.location;
import java.util.List;
import android.app.Activity;
import android.content.Context;
import android.location.Criteria;
import android.location.Location;
import android.location.LocationListener;
import android.location.LocationManager;
import android.os.Bundle;
import android.util.Log;
public class DynamicProvidersActivity extends Activity {
private LocationManager locationManager;
private final Criteria criteria = new Criteria();
private static int minUpdateTime = 0; // 30 Seconds
private static int minUpdateDistance = 0; // 100m
private static final String TAG = "DYNAMIC_LOCATION_PROVIDER";
@Override
public void onCreate(Bundle savedInstanceState) {
super.onCreate(savedInstanceState);
setContentView(R.layout.main);
// Get a reference to the Location Manager
String svcName = Context.LOCATION_SERVICE;
locationManager = (LocationManager)getSystemService(svcName);
// Specify Location Provider criteria
criteria.setAccuracy(Criteria.ACCURACY_FINE);
criteria.setPowerRequirement(Criteria.POWER_LOW);
criteria.setAltitudeRequired(true);
criteria.setBearingRequired(true);
criteria.setSpeedRequired(true);
criteria.setCostAllowed(true);
// Only for Android 3.0 and above
criteria.setHorizontalAccuracy(Criteria.ACCURACY_HIGH);
criteria.setVerticalAccuracy(Criteria.ACCURACY_MEDIUM);
criteria.setBearingAccuracy(Criteria.ACCURACY_LOW);
criteria.setSpeedAccuracy(Criteria.ACCURACY_LOW);
// End of Android 3.0 and above only
}
@Override
protected void onPause() {
unregisterAllListeners();
super.onPause();
}
@Override
protected void onResume() {
super.onResume();
registerListener();
}
private void registerListener() {
unregisterAllListeners();
String bestProvider =
locationManager.getBestProvider(criteria, false);
String bestAvailableProvider =
locationManager.getBestProvider(criteria, true);
Log.d(TAG, bestProvider + " / " + bestAvailableProvider);
if (bestProvider == null)
Log.d(TAG, "No Location Providers exist on device.");
else if (bestProvider.equals(bestAvailableProvider))
locationManager.requestLocationUpdates(bestAvailableProvider,
minUpdateTime, minUpdateDistance,
bestAvailableProviderListener);
else {
locationManager.requestLocationUpdates(bestProvider,
minUpdateTime, minUpdateDistance, bestProviderListener);
if (bestAvailableProvider != null)
locationManager.requestLocationUpdates(bestAvailableProvider,
minUpdateTime, minUpdateDistance,
bestAvailableProviderListener);
else {
List<String> allProviders = locationManager.getAllProviders();
for (String provider : allProviders)
locationManager.requestLocationUpdates(provider, 0, 0,
bestProviderListener);
Log.d(TAG, "No Location Providers currently available.");
}
}
}
private void unregisterAllListeners() {
locationManager.removeUpdates(bestProviderListener);
locationManager.removeUpdates(bestAvailableProviderListener);
}
private void reactToLocationChange(Location location) {
// TODO [ React to location change ]
}
private LocationListener bestProviderListener
= new LocationListener() {
public void onLocationChanged(Location location) {
reactToLocationChange(location);
}
public void onProviderDisabled(String provider) {
}
public void onProviderEnabled(String provider) {
registerListener();
}
public void onStatusChanged(String provider,
int status, Bundle extras) {}
};
private LocationListener bestAvailableProviderListener =
new LocationListener() {
public void onProviderEnabled(String provider) {
}
public void onProviderDisabled(String provider) {
registerListener();
}
public void onLocationChanged(Location location) {
reactToLocationChange(location);
}
public void onStatusChanged(String provider,
int status, Bundle extras) {}
};
}
code snippet PA4AD_Ch13_Location/src/DynamicProvidersActivity.java
Using Proximity Alerts
Proximity alerts let your app set Pending Intents that are fired when the device moves within or beyond a set distance from a fixed location.
![]()
Internally, Android may use different Location Providers depending on how close you are to the outside edge of your target area. This allows the power use and cost to be minimized when the alert is unlikely to be fired based on your distance from the target area interface.
To set a proximity alert for a given area, select the center point (using longitude and latitude values), a radius around that point, and an expiry time-out for the alert. The alert fires if the device crosses over that boundary, both when it moves from outside to within the radius, and when it moves from inside to beyond it.
To specify the Intent to fire, you use a PendingIntent, a class that wraps an Intent in a kind of method pointer, as described in Chapter 5, “Intents and Broadcast Receivers.”
Listing 13.8 shows how to set a proximity alert that never expires and that is triggered when the device moves within 10 meters of its target.
Listing 13.8: Setting a proximity alert
private static final String TREASURE_PROXIMITY_ALERT = "com.paad.treasurealert";
private void setProximityAlert() {
String locService = Context.LOCATION_SERVICE;
LocationManager locationManager;
locationManager = (LocationManager)getSystemService(locService);
double lat = 73.147536;
double lng = 0.510638;
float radius = 100f; // meters
long expiration = -1; // do not expire
Intent intent = new Intent(TREASURE_PROXIMITY_ALERT);
PendingIntent proximityIntent = PendingIntent.getBroadcast(this, -1,
intent,
0);
locationManager.addProximityAlert(lat, lng, radius,
expiration,
proximityIntent);
}
code snippet PA4AD_Ch13_Location/src/MyActivity.java
When the Location Manager detects that you have crossed the radius boundary, the Pending Intent fires with an extra keyed as LocationManager.KEY_PROXIMITY_ENTERING set to true or false accordingly.
To receive proximity alerts, you need to create a BroadcastReceiver, such as the one shown in Listing 13.9.
Listing 13.9: Creating a proximity alert Broadcast Receiver
public class ProximityIntentReceiver extends BroadcastReceiver {
@Override
public void onReceive (Context context, Intent intent) {
String key = LocationManager.KEY_PROXIMITY_ENTERING;
Boolean entering = intent.getBooleanExtra(key, false);
// TODO [ … perform proximity alert actions … ]
}
}
code snippet PA4AD_Ch13_Location/src/ProximityIntentReceiver.java
To start listening for proximity alerts, register your receiver either by using a tag in your Manifest or in code as shown here:
IntentFilter filter = new IntentFilter(TREASURE_PROXIMITY_ALERT);
registerReceiver(new ProximityIntentReceiver(), filter);
Using the Geocoder
Geocoding enables you to translate between street addresses and longitude/latitude map coordinates. This can give you a recognizable context for the locations and coordinates used in location-based services and map-based Activities.
The Geocoder classes are included as part of the Google Maps library, so to use them you need to import it into your application by adding a uses-library node within the application node as shown here:
<uses-library android:name="com.google.android.maps"/>
As the geocoding lookups are done on the server, your applications also requires the Internet uses-permission in your manifest:
<uses-permission android:name="android.permission.INTERNET"/>
The Geocoder class provides access to two geocoding functions:
· Forward geocoding—Finds the latitude and longitude of an address
· Reverse geocoding—Finds the street address for a given latitude and longitude
The results from these calls are contextualized by means of a locale (used to define your usual location and language). The following snippet shows how you set the locale when creating your Geocoder. If you don't specify a locale, it assumes the device's default.
Geocoder geocoder = new Geocoder(getApplicationContext(),
Locale.getDefault());
Both geocoding functions return a list of Address objects. Each list can contain several possible results, up to a limit you specify when making the call.
Each Address object is populated with as much detail as the Geocoder was able to resolve. This can include the latitude, longitude, phone number, and increasingly granular address details from country to street and house number.
![]()
Geocoder lookups are performed synchronously, so they block the calling thread. It's good practice to move these lookups into a Service or and/or background thread, as demonstrated in Chapter 9, “Working in the Background.”
The Geocoder uses a web service to implement its lookups that may not be included on all Android devices. Android 2.3 (API level 9) introduced the isPresent method to determine if a Geocoder implementation exists on a given device:
bool geocoderExists = Geocoder.isPresent();
If no Geocoder implementation exists on the device, the forward and reverse geocoding queries described in the following sections will return an empty list.
Reverse Geocoding
Reverse geocoding returns street addresses for physical locations specified by latitude/longitude pairs. It's a useful way to get a recognizable context for the locations returned by location-based services.
To perform a reverse lookup, pass the target latitude and longitude to a Geocoder object's getFromLocation method. It returns a list of possible address matches. If the Geocoder could not resolve any addresses for the specified coordinate, it returns null.
Listing 13.10 shows how to reverse-geocode a given location, limiting the number of possible addresses to the top 10.
Listing 13.10: Reverse-geocoding a given location
private void reverseGeocode(Location location) {
double latitude = location.getLatitude();
double longitude = location.getLongitude();
List<Address> addresses = null;
Geocoder gc = new Geocoder(this, Locale.getDefault());
try {
addresses = gc.getFromLocation(latitude, longitude, 10);
} catch (IOException e) {
Log.e(TAG, "IO Exception", e);
}
}
code snippet PA4AD_Ch13_Geocoding/src/MyActivity.java
The accuracy and granularity of reverse lookups are entirely dependent on the quality of data in the geocoding database; as a result, the quality of the results may vary widely between different countries and locales.
Forward Geocoding
Forward geocoding (or just geocoding) determines map coordinates for a given location.
![]()
What constitutes a valid location varies depending on the locale (geographic area) within which you search. Generally, it includes regular street addresses of varying granularity (from country to street name and number), postcodes, train stations, landmarks, and hospitals. As a general guide, valid search terms are similar to the addresses and locations you can enter into the Google Maps search bar.
To geocode an address, call getFromLocationName on a Geocoder object. Pass in a string that describes the address you want the coordinates for, the maximum number of results to return, and optionally provide a geographic bounding box within which to restrict your search results:
List<Address> result = gc.getFromLocationName(streetAddress, maxResults);
The returned list of Addresses may include multiple possible matches for the named location. Each Address includes latitude and longitude and any additional address information available for those coordinates. This is useful to confirm that the correct location was resolved, and for providing location specifics in searches for landmarks.
![]()
As with reverse geocoding, if no matches are found, null is returned. The availability, accuracy, and granularity of geocoding results depends entirely on the database available for the area you search.
When you do forward lookups, the Locale specified when instantiating the Geocoder is particularly important. The Locale provides the geographical context for interpreting your search requests because the same location names can exist in multiple areas.
Where possible, consider selecting a regional Locale to help avoid place-name ambiguity, and try to provide as many address details as possible, as shown in Listing 13.11.
Listing 13.11: Geocoding an address
Geocoder fwdGeocoder = new Geocoder(this, Locale.US);
String streetAddress = "160 Riverside Drive, New York, New York";
List<Address> locations = null;
try {
locations = fwdGeocoder.getFromLocationName(streetAddress, 5);
} catch (IOException e) {
Log.e(TAG, "IO Exception", e);
}
code snippet PA4AD_Ch13_Geocoding/src/MyActivity.java
For even more specific results, you can restrict your search to within a geographical area by specifying the lower-left and upper-right latitude and longitude as shown here:
List<Address> locations = null;
try {
locations = fwdGeocoder.getFromLocationName(streetAddress, 10,
llLat, llLong, urLat, urLong);
} catch (IOException e) {
Log.e(TAG, "IO Exception", e);
}
This overload is particularly useful with a Map View, letting you restrict the search to the visible map area.
Geocoding Where Am I
In this example you extend the Where Am I project to include and update the current street address whenever the device moves.
1. Start by modifying the manifest to include the Internet uses-permission:
<uses-permission android:name="android.permission.INTERNET"/>
2. Then open the WhereAmI Activity. Modify the updateWithNewLocation method to instantiate a new Geocoder object and call the getFromLocation method, passing in the newly received location and limiting the results to a single address.
3. Extract each line in the street address and the locality, postcode, and country, and append this information to an existing Text View string.
private void updateWithNewLocation(Location location) {
TextView myLocationText;
myLocationText = (TextView)findViewById(R.id.myLocationText);
String latLongString = "No location found";
String addressString = "No address found";
if (location != null) {
double lat = location.getLatitude();
double lng = location.getLongitude();
latLongString = "Lat:" + lat + "\nLong:" + lng;
double latitude = location.getLatitude();
double longitude = location.getLongitude();
Geocoder gc = new Geocoder(this, Locale.getDefault());
try {
List<Address> addresses = gc.getFromLocation(latitude, longitude, 1);
StringBuilder sb = new StringBuilder();
if (addresses.size() > 0) {
Address address = addresses.get(0);
for (int i = 0; i < address.getMaxAddressLineIndex(); i++)
sb.append(address.getAddressLine(i)).append("\n");
sb.append(address.getLocality()).append("\n");
sb.append(address.getPostalCode()).append("\n");
sb.append(address.getCountryName());
}
addressString = sb.toString();
} catch (IOException e) {}
}
myLocationText.setText("Your Current Position is:\n" +
latLongString + "\n\n" + addressString);
}
![]()
All code snippets in this example are part of the Chapter 13 Where Am I Part 3 project, available for download at www.wrox.com.
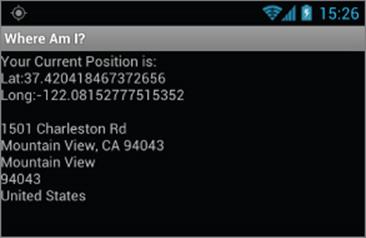
If you run the example now, it should appear as shown in Figure 13.3.
Figure 13.3
Creating Map-Based Activities
One of the most intuitive ways to provide context for a physical location or address is to use a map. Using a MapView, you can create Activities that include an interactive map.
Map Views support annotation using Overlays and by pinning Views to geographical locations. Map Views offer full programmatic control of the map display, letting you control the zoom, location, and display modes—including the option to display a satellite view.
In the following sections you see how to use Overlays and the MapController to create dynamic map-based Activities. Unlike online mashups, your map Activities run natively on the device, giving you a more customized and personal user experience.
Introducing Map View and Map Activity
This section introduces several classes used to support Android maps:
· MapView is the user interface element that displays the map.
· MapActivity is the base class you extend to create an Activity that can include a Map View. The MapActivity class handles the application life cycle and background service management required for displaying maps. You can only use Map Views within MapActivity-derived Activities.
· Overlay is the class used to annotate your maps. Using Overlays, you can use a Canvas to draw onto any number of layers displayed on top of a Map View.
· MapController is used to control the map, enabling you to set the center location and zoom levels.
· MyLocationOverlay is a special Overlay that can be used to display the current position and orientation of the device.
· ItemizedOverlays and OverlayItems are used together to let you create a layer of map markers, displayed using Drawables and associated text.
Getting Your Maps API Key
To use a Map View in your application, you must first obtain an API key from the Android developer website at http://code.google.com/android/maps-api-signup.html.
Without an API key the Map View cannot download the tiles used to display the map.
To obtain a key, you need to specify the MD5 fingerprint of the certificate used to sign your application. Generally, you sign your application using two certificates: a default debug certificate and a production certificate. The following sections explain how to obtain the MD5 fingerprint of any signing certificate used with your application.
Getting Your Development/Debugging MD5 Fingerprint
If you use Eclipse with the ADT plug-in to debug your applications, they will be signed with the default debug certificate stored in the debug keystore.
You can find the location of your keystore in the Default Debug Keystore textbox after selecting Windows Í Preferences Í Android Í Build. Typically the debug keystore is stored in the following platform-specific locations:
· Windows Vista — \users\<username>\.android\debug.keystore
· Windows XP — \Documents and Settings\<username>\.android\debug.keystore
· Linux or Mac — </.android/debug.keystore
To find the MD5 fingerprint of your debug certificate, use the keytool command from your Java installation:
![]()
Each computer you use for development will have a different debug certificate and MD5 value. If you want to debug and develop map applications across multiple computers, you need to generate and use multiple API keys.
keytool -list -alias androiddebugkey -keystore <keystore_location>.keystore
-storepass android -keypass android
Getting your Production/Release MD5 Fingerprint
Before you compile and sign your application for release, you need to obtain a map API key using the MD5 fingerprint for your release certificate.
Find the MD5 fingerprint using the keytool command and specify the -list parameter and the keystore and alias you will use to sign your release application.
keytool -list -alias my-android-alias -keystore my-android-keystore
You will be prompted for your keystore and alias passwords before the MD5 fingerprint is returned.
Creating a Map-Based Activity
To use maps in your applications, you need to extend MapActivity. The layout for the new class must then include a MapView to display a Google Maps interface element.
The Android maps library is not a standard Android package; as an optional API, it must be explicitly included in the application manifest before it can be used. Add the library to your manifest using a uses-library tag within the application node, as shown in the following XML snippet:
<uses-library android:name="com.google.android.maps"/>
![]()
The maps package as described here is not part of the standard Android open-source project (AOSP). It is provided within the Android SDK by Google and is available on most Android devices. However, be aware that because it is a nonstandard package, an Android device may not feature this particular library.
The Map View downloads its map tiles on demand; as a result, any application that features a Map View needs to include a uses-permission for Internet access. To do this, you need to add a uses-permission tag to your application manifest for INTERNET, as shown here:
<uses-permission android:name="android.permission.INTERNET"/>
After adding the library and configuring your permission, you're ready to create your new map-based Activity.
MapView controls can be used only within an Activity that extends MapActivity. Override the onCreate method to lay out the screen that includes a MapView, and override isRouteDisplayed to return true if the Activity will be displaying routing information (such as traffic directions).
Listing 13.12 shows the framework for creating a new map-based Activity.
Listing 13.12: A skeleton map Activity
import com.google.android.maps.MapActivity;
import com.google.android.maps.MapController;
import com.google.android.maps.MapView;
import android.os.Bundle;
public class MyMapActivity extends MapActivity {
private MapView mapView;
private MapController mapController;
@Override
public void onCreate(Bundle savedInstanceState) {
super.onCreate(savedInstanceState);
setContentView(R.layout.map_layout);
mapView = (MapView)findViewById(R.id.map_view);
}
@Override
protected boolean isRouteDisplayed() {
// IMPORTANT: This method must return true if your Activity
// is displaying driving directions. Otherwise return false.
return false;
}
}
code snippet PA4AD_Ch13_Mapping/src/MyMapActivity.java
The corresponding layout file used to include the MapView is shown in Listing 13.13. You need to include your map API key (as described earlier in this chapter) to use a Map View in your application.
Listing 13.13: A map Activity layout resource
<?xml version="1.0" encoding="utf-8"?>
<LinearLayout
xmlns:android="http://schemas.android.com/apk/res/android"
android:orientation="vertical"
android:layout_width="fill_parent"
android:layout_height="fill_parent">
<com.google.android.maps.MapView
android:id="@+id/map_view"
android:layout_width="fill_parent"
android:layout_height="fill_parent"
android:enabled="true"
android:clickable="true"
android:apiKey="mymapapikey"
/>
</LinearLayout>
code snippet PA4AD_Ch13_Mapping/res/layout/map_layout.xml
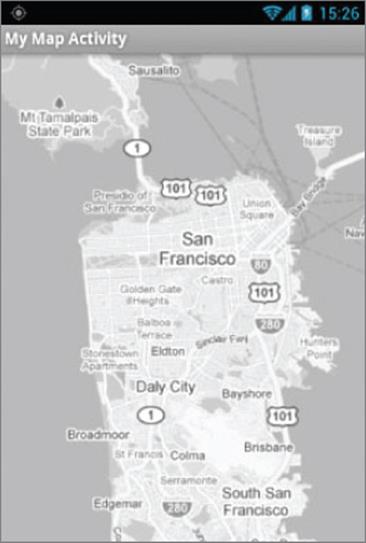
Figure 13.4 shows an example of a basic map-based Activity.
![]()
Android currently supports only one MapActivity and one MapView per application.
Figure 13.4
Maps and Fragments
Map Views can be included within Fragments, provided that the Fragment is attached to a Map Activity. This can be problematic if you are using the Android Support Library to provide support for Fragments on Android platforms prior to Android 3.0.
In such scenarios, you must choose between having your Activity extend FragmentActivity in order to provide Fragment support, or MapActivity in order to include a Map View element.
At the time of writing, the support library did not include a MapFragment or MapFragmentActivity class to enable the use of Map Views within support library Fragments. As a result, it is not currently possibly to include Map Views within support library Fragments and Fragment Activities.
There are several third-party support libraries that attempt to circumvent this restriction. Alternatively, one approach is to create alternative Activity classes for pre- and post-Honeycomb devices, such that Maps within Fragments are used only where supported.
For the remainder of this chapter where Fragments are discussed, it will be assumed that they are native Fragments on devices targeting Android 3.0 (API level 11) or above.
Configuring and Using Map Views
By default the Map View shows the standard street map (refer to Figure 13.4). In addition you can choose to display a satellite view and the expected traffic overlay, as shown in the following code snippet:
mapView.setSatellite(true);
mapView.setTraffic(true);
You can also query the Map View to find the current and maximum available zoom levels:
int maxZoom = mapView.getMaxZoomLevel();
int currentZoom = mapView.getZoomLevel();
You can also obtain the center point and currently visible longitude and latitude span (in decimal degrees). This is particularly useful for performing geographically limited Geocoder lookups:
GeoPoint center = mapView.getMapCenter();
int latSpan = mapView.getLatitudeSpan();
int longSpan = mapView.getLongitudeSpan();
You can also choose to display the standard map zoom controls using the setBuiltInZoomControls method.
mapView.setBuiltInZoomControls(true);
To customize the zoom controls use the getZoomButtonsController method to obtain an instance of the Zoom Buttons Controller. You can use the controller to customize the zoom speed, enable or disable the zoom in or out controls, and add additional buttons to the zoom controls layout.
ZoomButtonsController zoomButtons = mapView.getZoomButtonsController();
Using the Map Controller
Use the Map Controller to pan and zoom a MapView. You can get a reference to a MapView's controller using getController.
MapController mapController = mapView.getController();
Map locations in the Android mapping classes are represented by GeoPoint objects, which contain a latitude and longitude measured in microdegrees. To convert degrees to microdegrees, multiply by 1E6 (1,000,000).
Before you can use the latitude and longitude values stored in the Location objects returned by location-based services, you need to convert them to microdegrees and store them as GeoPoints.
Double lat = 37.422006*1E6;
Double lng = -122.084095*1E6;
GeoPoint point = new GeoPoint(lat.intValue(), lng.intValue());
Recenter and zoom the Map View using the setCenter and setZoom methods available on the Map View's MapController.
mapController.setCenter(point);
mapController.setZoom(1);
When you use setZoom, 1 represents the widest (or most distant) zoom and 21 the tightest (nearest) view.
The actual zoom level available for a specific location depends on the resolution of Google's maps and imagery for that area and can be found by calling getMaxZoomLevel on the associated Map View. You can also use zoomIn and zoomOut to change the zoom level by one step or zoomToSpan to specify a latitude or longitude span to zoom to.
The setCenter method “jumps” to a new location; to show a smooth transition, use animateTo.
mapController.animateTo(point);
Mapping Where Am I
The following code example extends the Where Am I project again. This time you add mapping functionality by transforming it into a Map Activity. As the device location changes, the map automatically re-centers on the new position.
1. Start by checking your project properties to ensure your project build target is a Google APIs target rather than an Android Open Source Project target. This is necessary in order to use the Google mapping components. You can access your project's build properties by selecting it in your project hierarchy and selecting File Í <MenuArrow><MenuArrow>Properties and selecting the Android tab.
2. Modify the application manifest to add the maps library:
<?xml version="1.0" encoding="utf-8"?>
<manifest xmlns:android="http://schemas.android.com/apk/res/android"
package="com.paad.whereami"
android:versionCode="1"
android:versionName="1.0" >
<uses-sdk android:minSdkVersion="4" />
<uses-permission android:name="android.permission.INTERNET"/>
<uses-permission
android:name="android.permission.ACCESS_FINE_LOCATION"
/>
<application
android:icon="@drawable/ic_launcher"
android:label="@string/app_name">
<uses-library android:name="com.google.android.maps"/>
<activity
android:name=".WhereAmI"
android:label="@string/app_name">
<intent-filter>
<action android:name="android.intent.action.MAIN" />
<category android:name="android.intent.category.LAUNCHER" />
</intent-filter>
</activity>
</application>
</manifest>
3. Change the inheritance of the WhereAmI Activity to extend MapActivity instead of Activity. You also need to include an override for the isRouteDisplayed method. Because this Activity won't show routing directions, you can return false.
public class WhereAmI extends MapActivity {
@Override
protected boolean isRouteDisplayed() {
return false;
}
[ ... existing Activity code ... ]
}
4. Modify the main.xml layout resource to include a MapView using the fully qualified class name. You need to obtain a maps API key to include within the android:apikey attribute of the com.android.MapView node.
<?xml version="1.0" encoding="utf-8"?>
<LinearLayout
xmlns:android="http://schemas.android.com/apk/res/android"
android:orientation="vertical"
android:layout_width="match_parent"
android:layout_height="match_parent">
<TextView
android:id="@+id/myLocationText"
android:layout_width="match_parent"
android:layout_height="wrap_content"
android:text="@string/hello"
/>
<com.google.android.maps.MapView
android:id="@+id/myMapView"
android:layout_width="match_parent"
android:layout_height="match_parent"
android:enabled="true"
android:clickable="true"
android:apiKey="myMapKey"
/>
</LinearLayout>
5. Running the application now should display the original address text with a MapView beneath it, as shown in Figure 13.5.
Figure 13.5
6. Returning to the WhereAmI Activity, configure the Map View and store a reference to its MapController as an instance variable. Set up the Map View display options to show the satellite and zoom in for a closer look.
private MapController mapController;
@Override
public void onCreate(Bundle savedInstanceState) {
super.onCreate(savedInstanceState);
setContentView(R.layout.main);
// Get a reference to the MapView
MapView myMapView = (MapView)findViewById(R.id.myMapView);
// Get the Map View's controller
mapController = myMapView.getController();
// Configure the map display options
myMapView.setSatellite(true);
myMapView.setBuiltInZoomControls(true);
// Zoom in
mapController.setZoom(17);
LocationManager locationManager;
String svcName= Context.LOCATION_SERVICE;
locationManager = (LocationManager)getSystemService(svcName);
Criteria criteria = new Criteria();
criteria.setAccuracy(Criteria.ACCURACY_FINE);
criteria.setPowerRequirement(Criteria.POWER_LOW);
criteria.setAltitudeRequired(false);
criteria.setBearingRequired(false);
criteria.setSpeedRequired(false);
criteria.setCostAllowed(true);
String provider = locationManager.getBestProvider(criteria, true);
Location l = locationManager.getLastKnownLocation(provider);
updateWithNewLocation(l);
locationManager.requestLocationUpdates(provider, 2000, 10,
locationListener);
}
7. The final step is to modify the updateWithNewLocation method to re-center the map on the current location using the Map Controller:
private void updateWithNewLocation(Location location) {
TextView myLocationText;
myLocationText = (TextView)findViewById(R.id.myLocationText);
String latLongString = "No location found";
String addressString = "No address found";
if (location != null) {
// Update the map location.
Double geoLat = location.getLatitude()*1E6;
Double geoLng = location.getLongitude()*1E6;
GeoPoint point = new GeoPoint(geoLat.intValue(),
geoLng.intValue());
mapController.animateTo(point);
double lat = location.getLatitude();
double lng = location.getLongitude();
latLongString = "Lat:" + lat + "\nLong:" + lng;
double latitude = location.getLatitude();
double longitude = location.getLongitude();
Geocoder gc = new Geocoder(this, Locale.getDefault());
if (!Geocoder.isPresent())
addressString = "No geocoder available";
else {
try {
List<Address> addresses = gc.getFromLocation(latitude, longitude, 1);
StringBuilder sb = new StringBuilder();
if (addresses.size() > 0) {
Address address = addresses.get(0);
for (int i = 0; i < address.getMaxAddressLineIndex(); i++)
sb.append(address.getAddressLine(i)).append("\n");
sb.append(address.getLocality()).append("\n");
sb.append(address.getPostalCode()).append("\n");
sb.append(address.getCountryName());
}
addressString = sb.toString();
} catch (IOException e) {
Log.d("WHEREAMI", "IO Exception", e);
}
}
}
myLocationText.setText("Your Current Position is:\n" +
latLongString + "\n\n" + addressString);
}
![]()
All code snippets in this example are part of the Chapter 13 Where Am I Part 4, available for download at www.wrox.com.
Creating and Using Overlays
Overlays enable you to add annotations and click handling to MapViews. Each Overlay enables you to draw 2D primitives, including text, lines, images, and shapes, directly onto a canvas, which is then overlaid onto a Map View.
You can add several Overlays onto a single map. All the Overlays assigned to a Map View are added as layers, with newer layers potentially obscuring older ones. User clicks are passed through the stack until they are either handled by an Overlay or registered as clicks on the Map View itself.
Creating New Overlays
To add a new Overlay, create a class that extends Overlay. Override the draw method to draw the annotations you want to add, and override onTap to react to user clicks (generally made when the user taps an annotation added by this Overlay).
Listing 13.14 shows the framework for creating a new Overlay that can draw annotations and handle user clicks.
Listing 13.14: Creating a new Overlay
import android.graphics.Canvas;
import com.google.android.maps.GeoPoint;
import com.google.android.maps.MapView;
import com.google.android.maps.Overlay;
public class MyOverlay extends Overlay {
@Override
public void draw(Canvas canvas, MapView mapView, boolean shadow) {
if (shadow == false) {
// TODO [ ... Draw annotations on main map layer ... ]
}
else {
// TODO [ ... Draw annotations on the shadow layer ... ]
}
}
@Override
public boolean onTap(GeoPoint point, MapView mapView) {
// Return true if screen tap is handled by this overlay
return false;
}
}
code snippet PA4AD_Ch13_Mapping/src/MyOverlay.java
Introducing Projections
The canvas used to draw Overlay annotations is a standard Canvas that represents the visible display surface. To add annotations based on physical locations, you need to convert between geographical points and screen coordinates.
The Projection class enables you to translate between latitude/longitude coordinates (stored as GeoPoints) and x/y screen pixel coordinates (stored as Points).
A map's Projection may change between subsequent calls to draw, so it's good practice to get a new instance each time. Get a Map View's Projection by calling getProjection.
Projection projection = mapView.getProjection();
Use the fromPixel and toPixel methods to translate from GeoPoints to Points and vice versa.
For performance reasons, you can best use the toPixel Projection method by passing a Point object to be populated (rather than relying on the return value), as shown in Listing 13.15.
Listing 13.15: Using map Projections
Point myPoint = new Point();
// To screen coordinates
projection.toPixels(geoPoint, myPoint);
// To GeoPoint location coordinates
GeoPoint gPoint = projection.fromPixels(myPoint.x, myPoint.y);
code snippet PA4AD_Ch13_Mapping/src/MyOverlay.java
Drawing on the Overlay Canvas
You handle Canvas drawing for Overlays by overriding the Overlay's draw handler.
The passed-in Canvas is the surface on which you draw your annotations, using the same techniques introduced in Chapter 4, “Building User Interfaces” for creating custom user interfaces for Views. The Canvas object includes the methods for drawing 2D primitives on your map (including lines, text, shapes, ellipses, images, and so on). Use Paint objects to define the style and color.
Listing 13.16 uses a Projection to draw text and an ellipse at a given location.
Listing 13.16: A simple map Overlay
@Override
public void draw(Canvas canvas, MapView mapView, boolean shadow) {
Projection projection = mapView.getProjection();
Double lat = -31.960906*1E6;
Double lng = 115.844822*1E6;
GeoPoint geoPoint = new GeoPoint(lat.intValue(), lng.intValue());
if (shadow == false) {
Point myPoint = new Point();
projection.toPixels(geoPoint, myPoint);
// Create and setup your paint brush
Paint paint = new Paint();
paint.setARGB(250, 255, 0, 0);
paint.setAntiAlias(true);
paint.setFakeBoldText(true);
// Create the circle
int rad = 5;
RectF oval = new RectF(myPoint.x-rad, myPoint.y-rad,
myPoint.x+rad, myPoint.y+rad);
// Draw on the canvas
canvas.drawOval(oval, paint);
canvas.drawText("Red Circle", myPoint.x+rad, myPoint.y, paint);
}
}
code snippet PA4AD_Ch13_Mapping/src/MyOverlay.java
![]()
For more advanced drawing features see Chapter 11, “Advanced User Experience,” that introduces gradients, strokes, and filters.
Handling Map Tap Events
To handle map taps (user clicks), override the onTap event handler within the Overlay extension class. The onTap handler receives two parameters:
· A GeoPoint that contains the latitude/longitude of the map location tapped
· The MapView that was tapped to trigger this event
When you override onTap, the method should return true if it has handled a particular tap and false to let another Overlay handle it, as shown in Listing 13.17.
Listing 13.17: Handling map-tap events
@Override
public boolean onTap(GeoPoint point, MapView mapView) {
// Perform hit test to see if this overlay is handling the click
if ([ ... perform hit test ... ]) {
// TODO [ ... execute on tap functionality ... ]
return true;
}
// If not handled return false
return false;
}
code snippet PA4AD_Ch13_Mapping/src/MyOverlay.java
Adding and Removing Overlays
Each MapView contains a list of Overlays currently displayed. You can get a reference to this list by calling getOverlays, as shown in the following snippet:
List<Overlay> overlays = mapView.getOverlays();
Adding and removing items from the list is thread-safe and synchronized, so you can modify and query the list safely. You should still iterate over the list within a synchronization block synchronized on the List.
To add an Overlay onto a Map View, create a new instance of the Overlay and add it to the list, as shown in the following snippet.
MyOverlay myOverlay = new MyOverlay();
overlays.add(myOverlay);
mapView.postInvalidate();
The added Overlay displays the next time the Map View is redrawn, so it's usually a good practice to call postInvalidate after you modify the list to update the changes on the map display.
Annotating Where Am I
This final modification to Where Am I creates and adds a new Overlay that displays a white circle at the device's current position.
1. Create a new MyPositionOverlay Overlay class:
import android.graphics.Canvas;
import android.graphics.Paint;
import android.graphics.Point;
import android.graphics.RectF;
import android.location.Location;
import com.google.android.maps.GeoPoint;
import com.google.android.maps.MapView;
import com.google.android.maps.Overlay;
import com.google.android.maps.Projection;
public class MyPositionOverlay extends Overlay {
@Override
public void draw(Canvas canvas, MapView mapView, boolean shadow) {
}
@Override
public boolean onTap(GeoPoint point, MapView mapView) {
return false;
}
}
2. Create a new instance variable to store the current Location, and add setter and getter methods for it.
Location location;
public Location getLocation() {
return location;
}
public void setLocation(Location location) {
this.location = location;
}
3. Override the draw method to add a small white circle at the current location.
private final int mRadius = 5;
@Override
public void draw(Canvas canvas, MapView mapView, boolean shadow) {
Projection projection = mapView.getProjection();
if (shadow == false && location != null) {
// Get the current location
Double latitude = location.getLatitude()*1E6;
Double longitude = location.getLongitude()*1E6;
GeoPoint geoPoint;
geoPoint = new
GeoPoint(latitude.intValue(),longitude.intValue());
// Convert the location to screen pixels
Point point = new Point();
projection.toPixels(geoPoint, point);
RectF oval = new RectF(point.x - mRadius, point.y - mRadius,
point.x + mRadius, point.y + mRadius);
// Setup the paint
Paint paint = new Paint();
paint.setARGB(250, 255, 255, 255);
paint.setAntiAlias(true);
paint.setFakeBoldText(true);
Paint backPaint = new Paint();
backPaint.setARGB(175, 50, 50, 50);
backPaint.setAntiAlias(true);
RectF backRect = new RectF(point.x + 2 + mRadius,
point.y - 3*mRadius,
point.x + 65, point.y + mRadius);
// Draw the marker
canvas.drawOval(oval, paint);
canvas.drawRoundRect(backRect, 5, 5, backPaint);
canvas.drawText("Here I Am",
point.x + 2*mRadius, point.y,
paint);
}
super.draw(canvas, mapView, shadow);
}
4. Now open the WhereAmI Activity class, and add the MyPositionOverlay to the MapView.
Add a new instance variable to store the MyPositionOverlay; then override onCreate to create a new instance of the class, and add it to the MapView's Overlay list.
private MyPositionOverlay positionOverlay;
@Override
public void onCreate(Bundle savedInstanceState) {
super.onCreate(savedInstanceState);
setContentView(R.layout.main);
// Get a reference to the MapView
MapView myMapView = (MapView)findViewById(R.id.myMapView);
// Get the Map View's controller
mapController = myMapView.getController();
// Configure the map display options
myMapView.setSatellite(true);
myMapView.setBuiltInZoomControls(true);
// Zoom in
mapController.setZoom(17);
// Add the MyPositionOverlay
positionOverlay = new MyPositionOverlay();
List<Overlay> overlays = myMapView.getOverlays();
overlays.add(positionOverlay);
myMapView.postInvalidate();
LocationManager locationManager;
String svcName= Context.LOCATION_SERVICE;
locationManager = (LocationManager)getSystemService(svcName);
Criteria criteria = new Criteria();
criteria.setAccuracy(Criteria.ACCURACY_FINE);
criteria.setPowerRequirement(Criteria.POWER_LOW);
criteria.setAltitudeRequired(false);
criteria.setBearingRequired(false);
criteria.setSpeedRequired(false);
criteria.setCostAllowed(true);
String provider = locationManager.getBestProvider(criteria, true);
Location l = locationManager.getLastKnownLocation(provider);
updateWithNewLocation(l);
locationManager.requestLocationUpdates(provider, 2000, 10,
locationListener);
}
5. Modify the updateWithNewLocation method to update its position when a new location is received:
private void updateWithNewLocation(Location location) {
TextView myLocationText;
myLocationText = (TextView)findViewById(R.id.myLocationText);
String latLongString = "No location found";
String addressString = "No address found";
if (location != null) {
// Update the position overlay.
positionOverlay.setLocation(location);
[ ... Existing updateWithNewLocation method ... ]
}
![]()
All code snippets in this example are part of the Chapter 13 Where Am I Part 5 project, available for download at www.wrox.com.
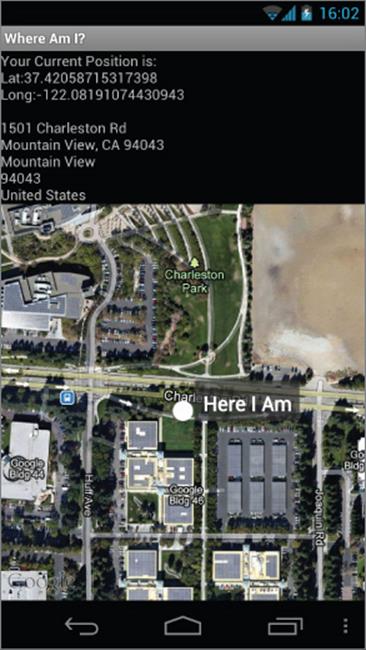
When run, your application displays your current device location with a white circle and supporting text, as shown in Figure 13.6.
![]()
It's worth noting that this is not the preferred technique for displaying your current location on a map. This functionality is implemented natively by Android through the MyLocationOverlay class. If you want to display and follow your current location, you should consider using (or extending) this class, as shown in the next section, instead of implementing it manually as shown here.
Figure 13.6
Introducing My Location Overlay
The MyLocationOverlay class is a native Overlay designed to show your current location and orientation on a MapView.
To use My Location Overlay you need to create a new instance, passing in the application Context and target Map View, and add it to the MapView's Overlay list, as shown here:
List<Overlay> overlays = mapView.getOverlays();
MyLocationOverlay myLocationOverlay = new MyLocationOverlay(this, mapView);
overlays.add(myLocationOverlay);
You can use My Location Overlay to display both your current location and orientation (represented as a flashing blue marker.)
The following snippet shows how to enable both the compass and marker.
myLocationOverlay.enableCompass();
myLocationOverlay.enableMyLocation();
Introducing Itemized Overlays and Overlay Items
OverlayItems are used to supply simple marker functionality to your Map Views via the ItemizedOverlay class.
ItemizedOverlays provide a convenient shortcut for adding markers to a map, letting you assign a marker image and associated text to a particular geographical position. The ItemizedOverlay instance handles the drawing, placement, click handling, focus control, and layout optimization of eachOverlayItem marker for you.
To add an ItemizedOverlay marker layer to your map, create a new class that extends ItemizedOverlay<OverlayItem>, as shown in Listing 13.18.
![]()
ItemizedOverlay is a generic class that enables you to create extensions based on any class that implements OverlayItem.
Within the constructor, you need to call through to the superclass after defining the bounds for your default marker. You must then call populate to trigger the creation of each OverlayItem; populate must be called whenever the data used to create the items changes.
Within your implementation, override size to return the number of markers to display and createItem to create a new item based on the index of each marker.
Listing 13.18: Creating a new Itemized Overlay
import android.graphics.drawable.Drawable;
import com.google.android.maps.GeoPoint;
import com.google.android.maps.ItemizedOverlay;
import com.google.android.maps.OverlayItem;
public class MyItemizedOverlay extends ItemizedOverlay<OverlayItem> {
public MyItemizedOverlay(Drawable defaultMarker) {
super(boundCenterBottom(defaultMarker));
populate();
}
@Override
protected OverlayItem createItem(int index) {
switch (index) {
case 0:
Double lat = 37.422006*1E6;
Double lng = -122.084095*1E6;
GeoPoint point = new GeoPoint(lat.intValue(), lng.intValue());
OverlayItem oi;
oi = new OverlayItem(point, "Marker", "Marker Text");
return oi;
}
return null;
}
@Override
public int size() {
// Return the number of markers in the collection
return 1;
}
}
code snippet PA4AD_Ch13_Mapping/MyItemizedOverlay.java
To add an ItemizedOverlay implementation to your map, create a new instance (passing in the Drawable marker image to use for each marker) and add it to the map's Overlay list.
List<Overlay> overlays = mapView.getOverlays();
Drawable drawable = getResources().getDrawable(R.drawable.marker);
MyItemizedOverlay markers = new MyItemizedOverlay(drawable);
overlays.add(markers);
![]()
The map markers placed by the Itemized Overlay use state to indicate if they are selected. Use the StateListDrawable described in Chapter 11 to indicate when a marker has been selected.
In Listing 13.18, the list of Overlay items is static and defined in code. More typically your Overlay items will be a dynamic ArrayList to which you want to add and remove items at run time.
Listing 13.19 shows the skeleton class for a dynamic Itemized Overlay implementation, backed by an Array List and supporting the addition and removal of items at run time.
Listing 13.19: Skeleton code for a dynamic Itemized Overlay
public class MyDynamicItemizedOverlay extends
ItemizedOverlay<OverlayItem> {
private ArrayList<OverlayItem> items;
public MyDynamicItemizedOverlay(Drawable defaultMarker) {
super(boundCenterBottom(defaultMarker));
items = new ArrayList<OverlayItem>();
populate();
}
public void addNewItem(GeoPoint location, String markerText,
String snippet) {
items.add(new OverlayItem(location, markerText, snippet));
populate();
}
public void removeItem(int index) {
items.remove(index);
populate();
}
@Override
protected OverlayItem createItem(int index) {
return items.get(index);
}
@Override
public int size() {
return items.size();
}
}
code snippet PA4AD_Ch13_Mapping/src/MyDynamicItemizedOverlay.java
Pinning Views to the Map and Map Positions
You can pin any View-derived object to a Map View (including layouts and other View Groups), attaching it to either a screen position or a geographical map location.
In the latter case, the View moves to follow its pinned position on the map, effectively acting as an interactive map marker. As a more resource-intensive solution, this is usually reserved for supplying the detail “balloons”often displayed on mashups to provide further detail when a marker is clicked.
You implement both pinning mechanisms by calling addView on the MapView, usually from the onCreate or onRestore methods within the MapActivity containing it. Pass in the View you want to pin and the layout parameters to use.
The MapView.LayoutParams parameters you pass in to addView determine how, and where, the View is added to the map.
To add a new View to the map relative to the screen, specify a new MapView.LayoutParams, including arguments that set the height and width of the View, the x/y screen coordinates to pin to, and the alignment to use for positioning, as shown in Listing 13.20.
Listing 13.20: Pinning a View to a map
int y = 10;
int x = 10;
EditText editText1 = new EditText(getApplicationContext());
editText1.setText("Screen Pinned");
MapView.LayoutParams screenLP;
screenLP = new MapView.LayoutParams(MapView.LayoutParams.WRAP_CONTENT,
MapView.LayoutParams.WRAP_CONTENT,
x, y,
MapView.LayoutParams.TOP_LEFT);
mapView.addView(editText1, screenLP);
code snippet PA4AD_Ch13_Mapping/src/MyMapActivity.java
To pin a View relative to a physical map location, pass four parameters when constructing the new Map View LayoutParams, representing the height, width, GeoPoint to pin to, and layout alignment, as shown in Listing 13.21.
Listing 13.21: Pinning a View to a geographical location
Double lat = 37.422134*1E6;
Double lng = -122.084069*1E6;
GeoPoint geoPoint = new GeoPoint(lat.intValue(), lng.intValue());
MapView.LayoutParams geoLP;
geoLP = new MapView.LayoutParams(MapView.LayoutParams.WRAP_CONTENT,
MapView.LayoutParams.WRAP_CONTENT,
geoPoint,
MapView.LayoutParams.TOP_LEFT);
EditText editText2 = new EditText(getApplicationContext());
editText2.setText("Location Pinned");
mapView.addView(editText2, geoLP);
code snippet PA4AD_Ch13_Mapping/src/MyMapActivity.java
Panning the map can leave the first TextView stationary in the upper-left corner, whereas the second TextView moves to remain pinned to a particular position on the map.
To remove a View from a Map View, call removeView, passing in the View instance you want to remove, as shown here.
mapView.removeView(editText2);
Mapping Earthquakes Example
The following step-by-step guide demonstrates how to add a map to the Earthquake project you last saw in Chapter 10. The map will be used to display a map of recent earthquakes.
![]()
In this example you will be adding a MapView to a Fragment. As a result, you will not be able to complete this example using the support library.
1. Start by ensuring the build target in your project properties refer to an Android build that includes the Google APIs. Then modify the Earthquake Activity so that it inherits from MapActivity, and add an implementation for isRouteDisplayed that returns false:
public class Earthquake extends MapActivity {
@Override
protected boolean isRouteDisplayed() {
return false;
}
[ ... Existing class code ... ]
}
2. You can add only one Map View to each Activity, so to ensure this is the case, you should create the Map View within the Earthquake Activity rather than the Fragment. Modify the onCreate handler to create a new MapView and store it as a public property:
MapView mapView;
String MyMapAPIKey = // TODO [Get Map API Key];
@Override
public void onCreate(Bundle savedInstanceState) {
super.onCreate(savedInstanceState);
mapView = new MapView(this, MyMapAPIKey);
[ ... Existing onCreate handler code ... ]
}
3. Modify the onCreateView handler within the EarthquakeMapFragment to return the MapView from the parent Activity:
@Override
public View onCreateView(LayoutInflater inflater, ViewGroup container,
Bundle savedInstanceState) {
MapView earthquakeMap = ((Earthquake)getActivity()).mapView;
return earthquakeMap;
}
4. Update the application manifest to import the map library:
<?xml version="1.0" encoding="utf-8"?>
<manifest
xmlns:android="http://schemas.android.com/apk/res/android"
package="com.paad.earthquake"
android:versionCode="1"
android:versionName="1.0" >
<uses-sdk android:targetSdkVersion="15"
android:minSdkVersion="11" />
<uses-permission android:name="android.permission.INTERNET"/>
<uses-permission android:name="android.permission.VIBRATE"/>
<application
android:icon="@drawable/ic_launcher"
android:label="@string/app_name">
<uses-library android:name="com.google.android.maps"/>
[ ... Existing application nodes ... ]
</application>
</manifest>
At this point, starting your application should make the Map View visible either in the tablet view or when the Map tab is selected on Smartphones.
5. Create a new EarthquakeOverlay class that extends Overlay. It draws the position and magnitude of each earthquake on the Map View:
import java.util.ArrayList;
import android.database.Cursor;
import android.database.DataSetObserver;
import android.graphics.Canvas;
import android.graphics.Paint;
import android.graphics.Point;
import android.graphics.RectF;
import com.google.android.maps.GeoPoint;
import com.google.android.maps.MapView;
import com.google.android.maps.Overlay;
import com.google.android.maps.Projection;
public class EarthquakeOverlay extends Overlay {
@Override
public void draw(Canvas canvas, MapView mapView, boolean shadow) {
Projection projection = mapView.getProjection();
if (shadow == false) {
// TODO: Draw earthquakes
}
}
}
5.1 Add a new constructor that accepts a Cursor to the current earthquake data, and store that Cursor as an instance variable:
Cursor earthquakes;
public EarthquakeOverlay(Cursor cursor) {
super();
earthquakes = cursor;
}
5.2 Create a new refreshQuakeLocations method that iterates over the results Cursor and extracts the location of each earthquake, extracting the latitude and longitude before storing each coordinate in a List of GeoPoints:
ArrayList<GeoPoint> quakeLocations;
private void refreshQuakeLocations() {
quakeLocations.clear();
if (earthquakes != null && earthquakes.moveToFirst())
do {
int latIndex
= earthquakes.getColumnIndexOrThrow(EarthquakeProvider.KEY_LOCATION_LAT);
int lngIndex
= earthquakes.getColumnIndexOrThrow(EarthquakeProvider.KEY_LOCATION_LNG);
Double lat
= earthquakes.getFloat(latIndex) * 1E6;
Double lng
= earthquakes.getFloat(lngIndex) * 1E6;
GeoPoint geoPoint = new GeoPoint(lat.intValue(),
lng.intValue());
quakeLocations.add(geoPoint);
} while(earthquakes.moveToNext());
}
5.3 Call refreshQuakeLocations from the Overlay's constructor:
public EarthquakeOverlay(Cursor cursor) {
super();
earthquakes = cursor;
quakeLocations = new ArrayList<GeoPoint>();
refreshQuakeLocations();
}
5.4 Create a new public swapCursor method that will allow you to pass in new result Cursors:
public void swapCursor(Cursor cursor) {
earthquakes = cursor;
refreshQuakeLocations();
}
5.5 Complete the EarthquakeOverlay by overriding the draw method to iterate over the list of GeoPoints, drawing a marker at each earthquake location. In this example a simple red circle is drawn, but you could easily modify it to include additional information, such as by adjusting the size of each circle based on the magnitude of the quake.
int rad = 5;
@Override
public void draw(Canvas canvas, MapView mapView, boolean shadow) {
Projection projection = mapView.getProjection();
// Create and setup your paint brush
Paint paint = new Paint();
paint.setARGB(250, 255, 0, 0);
paint.setAntiAlias(true);
paint.setFakeBoldText(true);
if (shadow == false) {
for (GeoPoint point : quakeLocations) {
Point myPoint = new Point();
projection.toPixels(point, myPoint);
RectF oval = new RectF(myPoint.x-rad, myPoint.y-rad,
myPoint.x+rad, myPoint.y+rad);
canvas.drawOval(oval, paint);
}
}
}
6. Return to the EarthquakeMapFragment and modify the onCreateView handler to create the Earthquake Overlay and add it to the Map View:
EarthquakeOverlay eo;
@Override
public View onCreateView(LayoutInflater inflater, ViewGroup container,
Bundle savedInstanceState) {
MapView earthquakeMap = ((Earthquake)getActivity()).mapView;
eo = new EarthquakeOverlay(null);
earthquakeMap.getOverlays().add(eo);
return earthquakeMap;
}
7. Still in the EarthquakeMapFragment, modify it to implement LoaderManager .LoaderCallbacks:
public class EarthquakeMapFragment extends Fragment
implements LoaderManager.LoaderCallbacks<Cursor> {
EarthquakeOverlay eo;
public Loader<Cursor> onCreateLoader(int id, Bundle args) {
return null;
}
public void onLoadFinished(Loader<Cursor> loader, Cursor cursor) {
}
public void onLoaderReset(Loader<Cursor> loader) {
}
@Override
public View onCreateView(LayoutInflater inflater, ViewGroup container,
Bundle savedInstanceState) {
MapView earthquakeMap = ((Earthquake)getActivity()).mapView;
eo = new EarthquakeOverlay(null);
earthquakeMap.getOverlays().add(eo);
return earthquakeMap;
}
}
8. Implement onCreateLoader to create a Cursor Loader to return all the earthquakes you want to display on the map:
public Loader<Cursor> onCreateLoader(int id, Bundle args) {
String[] projection = new String[] {
EarthquakeProvider.KEY_ID,
EarthquakeProvider.KEY_LOCATION_LAT,
EarthquakeProvider.KEY_LOCATION_LNG,
};
Earthquake earthquakeActivity = (Earthquake)getActivity();
String where = EarthquakeProvider.KEY_MAGNITUDE + " > " +
earthquakeActivity.minimumMagnitude;
CursorLoader loader = new CursorLoader(getActivity(),
EarthquakeProvider.CONTENT_URI, projection, where, null, null);
return loader;
}
9. Implement the onLoadFinished and onLoaderReset methods to apply the returned Cursors to the Earthquake Overlay you created in step 5:
public void onLoadFinished(Loader<Cursor> loader, Cursor cursor) {
eo.swapCursor(cursor);
}
public void onLoaderReset(Loader<Cursor> loader) {
eo.swapCursor(null);
}
10. Finally, override the onActivityCreated handler to initiate the Loader:
@Override
public void onActivityCreated(Bundle savedInstanceState) {
super.onActivityCreated(savedInstanceState);
getLoaderManager().initLoader(0, null, this);
}
![]()
All code snippets in this example are part of the Chapter 13 Earthquake Part 6 project, available for download at www.wrox.com.
If you run the application and view the Earthquake Map, your application should appear, as shown in Figure 13.7.
Figure 13.7

All materials on the site are licensed Creative Commons Attribution-Sharealike 3.0 Unported CC BY-SA 3.0 & GNU Free Documentation License (GFDL)
If you are the copyright holder of any material contained on our site and intend to remove it, please contact our site administrator for approval.
© 2016-2026 All site design rights belong to S.Y.A.