Programming Chrome Apps
Chapter 1. Your First Chrome App
In this chapter, I’ll take you step by step through building your first, simple Chrome App. I’ll explain the key differences between a Chrome App and an ordinary web app of the sort with which you may already be familiar. I’ll tell you how to run your app, how to use the new Chrome Dev Editor, and how to publish it to the Chrome Web Store.
From Web Apps to Chrome Apps
To build this first Chrome App, let’s begin with something you already know how to build: a simple web app that converts meters to feet, as shown in Figure 1-1. To use the app, you enter an amount of meters in the first field and then click the Convert button. The app then displays the equivalent amount in feet in the second field.
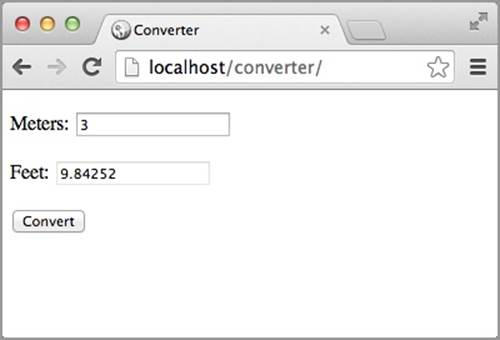
Figure 1-1. Converter web app running in Chrome
Like all web apps, the user interface for our sample app is built from an HTML file, (index.html), which you can see in the following:
<!DOCTYPE html>
<html lang="en">
<head>
<meta charset="utf-8" />
<title>Converter</title>
<script src="converter.js"></script>
</head>
<body>
<p>
<label for="meters">Meters:</label>
<input type="text" id="meters">
</p><p>
<label for="feet">Feet:</label>
<input type="text" id="feet" readonly>
</p><p>
<button id="convert">Convert</button>
</p>
</body>
</html>
The <script> tag brings in the following JavaScript, which is in the file converter.js:
window.onload = function () {
document.querySelector("#convert").addEventListener("click",
function () {
var meters = document.querySelector("#meters");
var feet = document.querySelector("#feet");
feet.value = meters.value * 3.28084;
}
);
};
The code executes in the window.onload event handler to ensure that all of the HTML elements are loaded before they’re referenced. Another event handler is set up to do the actual work when you click the Convert button. Both handlers are passed anonymous functions that execute when the corresponding event fires.
ONLOAD VERSUS DOMCONTENTLOADED
An alternative to the onload event is DOMContentLoaded, which is a little better for web pages because it fires as soon as the DOM is loaded without waiting for things such as images and styles. But, because all Chrome App resources must be local, the performance difference is inconsequential, and I prefer onload because I want to know that the entire interface is complete before I execute any JavaScript.
Use any text editor you like for these two files and all other source files you’ll need. It’s convenient to use an editor that can group files in a folder together, but that’s not essential.
Two more small files turn this web app into a Chrome App. The first, manifest.json, identifies the web app as a Chrome App. The manifest is coded in JavaScript Object Notation (JSON) to define values for at least four required properties, like this:
{
"app": {
"background": {
"scripts": [ "background.js" ]
}
},
"manifest_version": 2,
"name": "Converter",
"version": "1.0.0"
}
Here are the properties:
app.background
The name of the background script. This property is what identifies this app as a Chrome App, not something else such as an Extension.
manifest_version
This is always 2, indicating that the app will use the second and newest version of the Chrome application programming interface (API).
name
The name of the app.
version
The version of the app, set to anything you like, as long as it’s one to four dot-separated integers.
NOTE
Unlike the more relaxed rules for JavaScript, JSON requires that you enclose all keys in double-quotes.
The script file referenced from the manifest, background.js, is where execution begins. In contrast, processing for a web app begins with the HTML file. In practice, the JavaScript in a background script only sets up application-wide event handlers, leaving the bulk of the processing to the JavaScript referenced from the HTML file (converter.js, in this case).
The most important application-wide event is the chrome.app.runtime.onLaunched event, fired when the application launches. When that happens, an application usually wants to create a window in which to run the HTML file, like this, in background.js:
chrome.app.runtime.onLaunched.addListener(
function () {
chrome.app.window.create('index.html');
}
);
There are a few other events that you might set up handlers for in your background script, such as chrome.runtime.onInstalled and chrome.runtime.onSuspend; I’ll discuss those when we actually need them.
Keep in mind that, unlike other JavaScript files in your app, the background script can be unloaded by Chrome when it’s inactive and then reloaded (executed from the top) when it becomes active again. As a result, it’s important to do nothing there other than to add event listeners. Technically, the background script runs an event page, which can be unloaded, not a background page, which stays loaded. Chrome Apps can never have background pages, even though the background property is what appears in the manifest and the file is usually named background.js.
Chrome Apps don’t need any kind of linker or packaging utility. You just put these four files (index.html, converter.js, manifest.json, and background.js) in a folder called, for example, converter, and you have a Chrome App.
If you’d like, you can use CSS for styling, and you can put it in any of the usual places: in the HTML file or in separate CSS files. Just remember that they need to be present in the app folder; you cannot download them from a website. You can also have several JavaScript files if you want, each referenced from a <script> tag in the HTML file. Again, make sure that all resources are local—inside the app folder.
Running a Chrome App
Here’s what you do to run your Chrome App:
1. In Chrome, open the Extensions page, in either of two ways: you can access it by using the Window menu or the Chrome customization menu (the icon at the upper right of the Chrome window) or, in the address bar, you can type chrome://extensions. (“Extensions” is somewhat of a misnomer, because the page is used for Chrome Apps as well as Extensions.)
2. Ensure that the “Developer mode” checkbox is checked.
3. Click the “Load unpacked extension” button and then select the Chrome App’s folder.
4. After the app installs, click the Launch link, as shown in Figure 1-2.
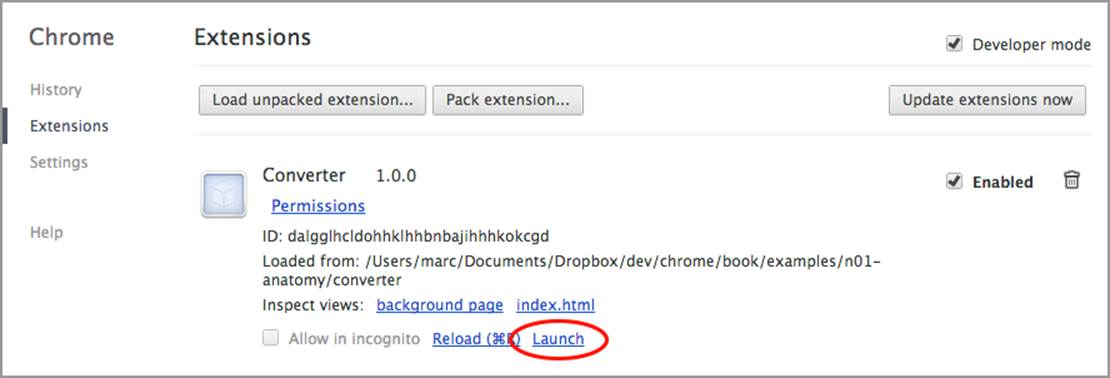
Figure 1-2. Converter Chrome App installed in Chrome
When the app launches, the chrome.app.runtime.onLaunched event is fired, its handler executes, a window is created, and you’ll see the app running in its own window, as depicted in Figure 1-3.
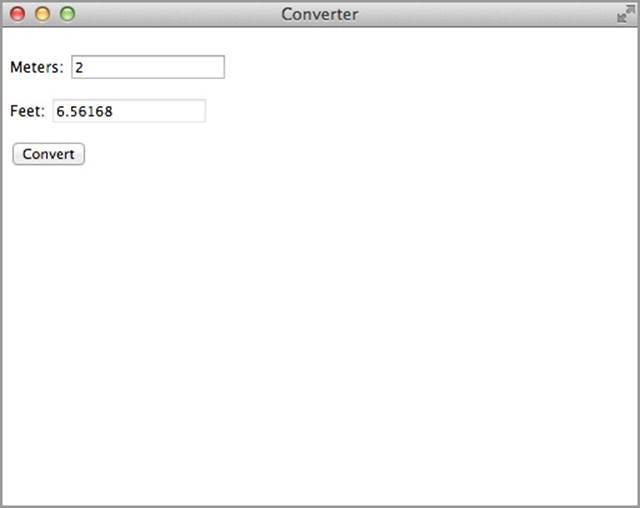
Figure 1-3. Converter Chrome App running
An app running in its own window is nifty, but there’s a lot more to Chrome Apps besides that. Unlike web apps downloaded from a server, Chrome Apps have access to special APIs that can access files anywhere on the computer, carry out automatic file synchronization, access hardware (for example, audio, USB, and Bluetooth), and much more. That’s what this book is about!
In addition to running on the desktop platforms that support Chrome (Mac OS X, Windows, Linux, and ChromeOS), Chrome Apps can use a technology called Cordova to run natively on the Android and iOS mobile platforms. I’ll explain how Cordova works in Appendix D. (There are Chrome browsers for Android and iOS, but as of now, Chrome Apps don’t run on them.)
Using the Chrome Dev Editor
As I was finishing up this book, Google released a developer preview of an integrated development enviroment (IDE) for Chrome called the Chrome Dev Editor. In addition to handling Chrome Apps written in JavaScript (what this book covers), you can also use the Dart language (a Google successor to JavaScript) and develop web apps in either language (along with HTML and CSS, of course).
Although the text editor built in to the Chrome Dev Editor is pretty minimal compared to what you’re probably using, it does make testing easier by avoiding the need to load unpacked extensions from the Extensions page, it makes uploading to the Chrome Web Store easier (no need to zip anything), and it makes testing Cordova apps much easier (see Appendix D).
To begin using the Chrome Dev Editor, download and install it from the Chrome Web Store as you would any Chrome App. Next, launch it and then, from the menu, choose New Project. A dialog box opens from which you can choose the type of app you want to create. Choose JavaScript Chrome App (see Figure 1-4) and click Create.
The app’s files are then created automatically, three of which are shown in Figure 1-5, Figure 1-6, and Figure 1-7.
Next, click the Run button (shown circled in Figure 1-7). Figure 1-8 shows the results.
To develop your app, you edit and modify the created files as you want, although you might prefer to switch to your favorite text editor for that. I use the Chrome Dev Editor only for building the initial app and for testing; I don’t like using the IDE’s built-in editor for anything much more complex than that.
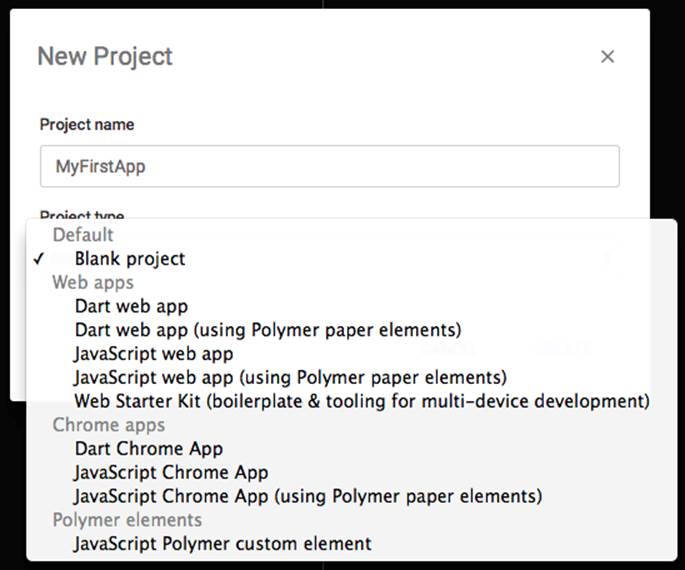
Figure 1-4. Creating a new app with the Chrome Dev Editor
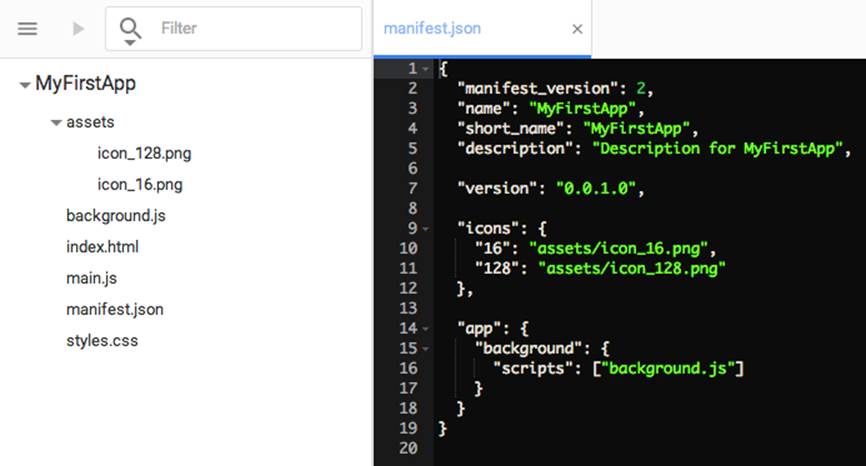
Figure 1-5. manifest.json as created with the Chrome Dev Editor
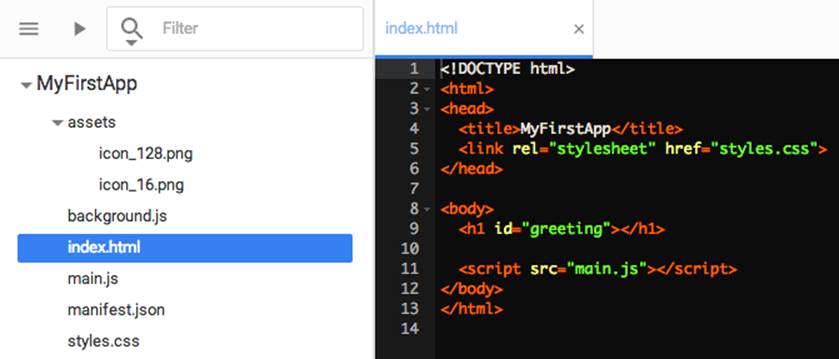
Figure 1-6. index.html as created with the Chrome Dev Editor
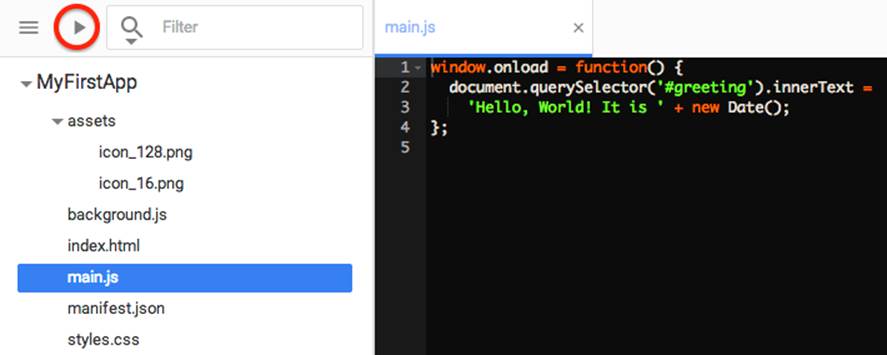
Figure 1-7. main.js as created with the Chrome Dev Editor
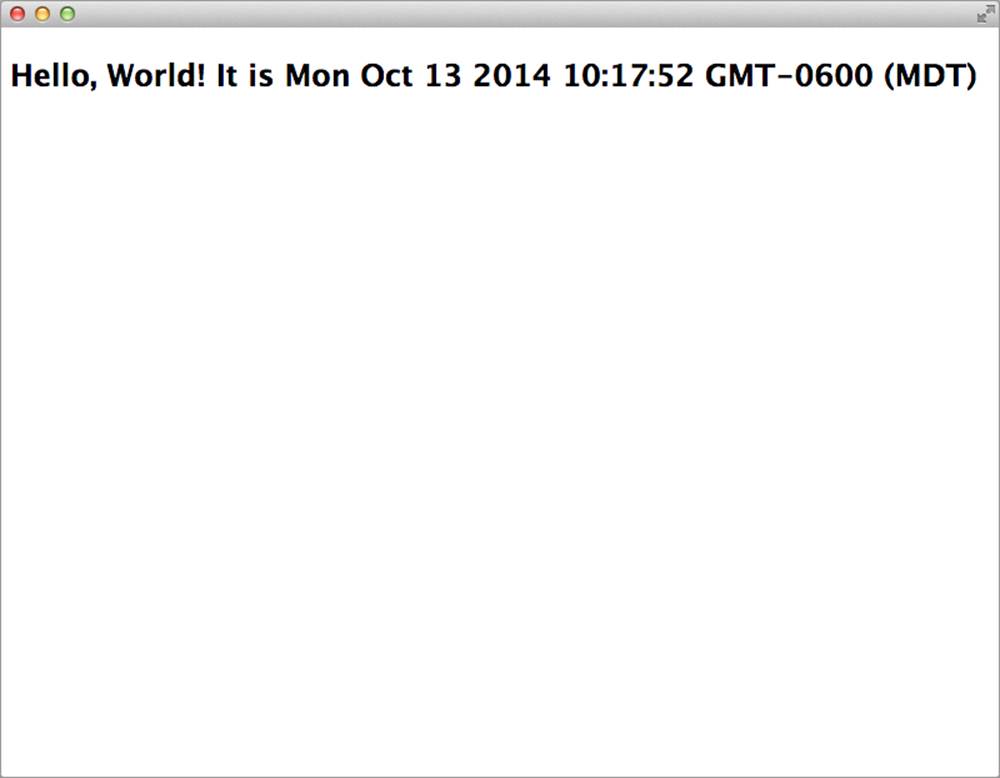
Figure 1-8. Running the app created with the Chrome Dev Editor
Differences Among Chrome Apps, Chrome Extensions, and Hosted Apps
There are two other kinds of executables that run on Chrome but aren’t the same as Chrome Apps and aren’t covered by this book:
Chrome Extensions
These modify or extend the operation of the Chrome browser. Extensions also have access to special APIs, but they’re generally different from Chrome App APIs.
Hosted Apps
These are just web-page URLs packaged up so that they can be uploaded to the Chrome Web Store. There are no special APIs for them.
The manifest.json file determines what kind of executable you have. As we’ve seen, Chrome Apps always have an app.background.scripts property in their manifest.json file, like this:
...
"app": {
"background": {
"scripts": [ "background.js" ]
}
}
....
Chrome Extensions have a background.scripts property (background at the top level), as in the following:
...
"background": {
"scripts": [ "eventpage.js" ],
"persistent": false
}
....
(If the persistent property is omitted or true, the Extension has a background page instead of an event page; this distinction is absent from Chrome Apps, which always have event pages.)
Hosted Apps have an app.launch property, like this:
"app": {
"launch": {
"web_url": "http://basepath.com/"
}
}
NOTE
In the interest of being thorough with my description: Chrome Apps used to be called “Packaged Apps,” a term still erroneously used by some people. Packaged Apps worked differently and had a different manifest.json format, and they’re no longer supported by Chrome. Their manifest had an app.launch.local_path property:
"app": {
"launch": {
"local_path": "main.html"
}
}
If you have old code with a manifest like this, you need to convert it to a Chrome App with the manifest_version property set to 2.
Again, in the interest of being thorough: there are also web apps with no manifest.json file at all that aren’t installed into Chrome; they run when their URL is requested by a browser. These are just web pages that might run some JavaScript to give them an app-like user interface. There are zillions of these: Gmail, Amazon, Facebook, and so on. The web app that started this chapter is one of these, too.
Chrome App Restrictions
In return for running in its own window and getting access to the Chrome APIs, Chrome Apps have to live with some restrictions, mostly for security. After all, if an app is able to access hardware devices and any of the user’s files, it had better play by some very strict rules, officially called the Content Security Policy (CSP). Let’s take a look at these rules:
§ There can be no JavaScript in any HTML files—not in a <script> element, and not as an attribute, like this:
<button onclick='go();'>Go</button>
Instead, you put any JavaScript in its own file (or files) and attach event listeners with JavaScript, as we saw in the Converter example.
§ No navigation can appear in the HTML file, such as:
<a href='page1.html'>Next Page</a>
or:
<form action="process_form.php" method="POST">
You can still use forms, but all processing must be done in JavaScript via an event listener attached to a submit button. Instead of using multiple HTML pages to show various parts of the user interface, you must modify the document object model (DOM) in JavaScript. This is why apps such as Chrome Apps are sometimes called single-page apps.
§ No on-the-fly compiling of strings to JavaScript with eval, setTimeout, setInterval, or new Function is allowed. In practice, even if you don’t do these things, libraries you might want to use do, which makes finding libraries that work with Chrome Apps challenging. (setTimeout and setInterval with function callbacks are allowed.)
This restriction prevents Cross-Site Scripting (XSS) attacks, in which JavaScript is injected into HTML.
§ Access to external resources is restricted. For example, it’s illegal to do this:
<img src='http://basepath.com/images/shahn.jpg'>
To access an external image, you must retrieve it as a blob from JavaScript, construct a blob URL, and show that in an image element. (You can see an example in Chapter 3.)
If the image is inside the app folder, you are allowed to reference it locally, so you can treat any static images shipped with your app normally:
<img src='logo.png'>
§ None of the built-in dialogs, such as alert or confirm, can be used. Instead, you can pop up your own modal dialog, as I’ll show in Appendix A. If you just want to display something for debugging, you can use console.log to write to the console.
§ You cannot use cookies. Because cookies are local data sent to the server with HTTP requests, they’re meaningless in Chrome Apps. Instead, there are several other ways to keep local data (see Chapter 3).
§ You cannot use embedded processing plug-ins, such as Flash, Silverlight, or ActiveX.
§ You cannot use a Web SQL database, which is nonstandard but is implemented in Chrome for non–Chrome-App pages. For Chrome Apps, there’s a non-SQL IndexedDB API (Chapter 3).
Even though these restrictions might seem to be burdensome, they’re mostly not a problem if you stop thinking of Chrome Apps as web apps and think of them instead as local, installed apps that can access the web. This is exactly the same mindset that Mac, Windows, and Linux programmers have had for years.
Although there’s no way to test the theory, it’s probably true that it’s easier for someone who never heard of the web to learn to program Chrome Apps than it is for anyone familiar with developing for the web. But it’s likely that if you’re reading this book, you’re in the latter group. So, programming Chrome Apps will be confusing at first, and you’ll keep bumping into the restrictions (with mysterious error messages on the console), but after a while you’ll catch on.
More on the Manifest
The manifest.json file for the Converter app used just the four required properties, but there are lots more properties, only a few of which you’re likely to use unless you’re doing something pretty exotic. Many of them aren’t even documented.
There are three recommended properties (according to Google):
default_locale
A subdirectory of the locales directory (in the app folder) that contains the default strings. There’s more on this in Chapter 6, in Internationalization and Localization.
description
A plain text string (no HTML) that describes the app. In a homage to mainframe line printers of 50 years ago, the length is limited to 132 characters. (OK, I’m kidding about the homage, but not the strange limit.)
icons
One or more icons; you need only one for running on Chrome (as opposed to Cordova for mobile platforms).
There’s no need for an icon during development, but you’ll want one when you publish your app. Your icon should be 128 × 128 pixels; it will be resized as necessary by Chrome. Several image formats are supported, but PNG icons work best because they support transparency.
You can draw an icon using almost any graphics program. If you don’t have one, you can download Gliffy Diagrams, a free Chrome App available from the Chrome Web Store.
Suppose that you have an icon file named icon-128.png. You would need to code the icon property in the manifest like this:
"icons": {
"128": "icon-128.png"
}
Note that "128" is a string, like all JSON keys, not a number.
Although any 128 × 128 icon will work according to the Chrome API documentation, for the Chrome Web Store there are additional recommendations (e.g., margins) which you can read about in “Supplying Images” on the Chrome developer site.
The most important optional property is permissions, which I discuss in the next section. I’ll explain any others you might want to use in conjunction with the API calls that they affect.
Permissions
Most of the Chrome APIs that are available only to Chrome Apps require a specific permission to be listed in the permissions property in the manifest. This is so the user can be prompted to agree to the permission when the app is installed from the Chrome Web Store. For example,Figure 1-9 shows what I saw when I tried to install UberConference:
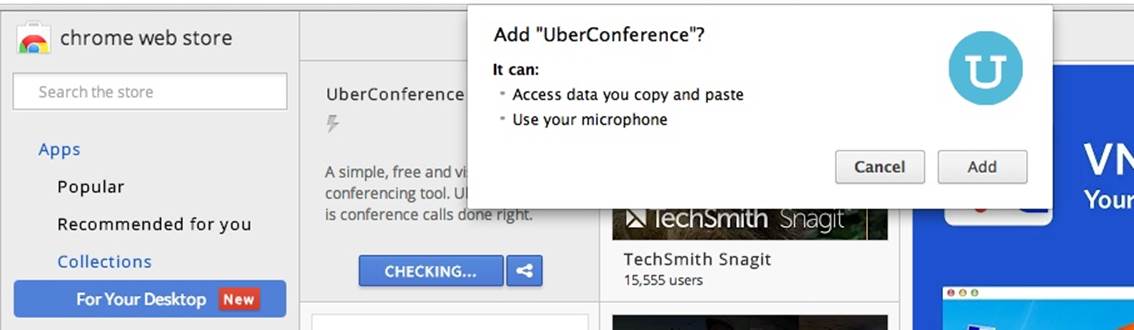
Figure 1-9. A permission-request dialog box
The dialog box included “Access data you copy and paste” because UberConference listed the clipboardRead and clipboardWrite permissions, and “Use your microphone” came from the audio permission, which was requested in the manifest, something like this:
"permissions": [
"clipboardRead",
"clipboardWrite",
"audio"
]
You can read through the list of permissions on the Chrome developer site. I’ll introduce specific permissions as we proceed, along with the APIs that need them.
Debugging Chrome Apps
Suppose that you have a bug, such as in the following example where feet is misspelled on the last line of the click event handler ("use strict" makes that a detectable error):
"use strict";
window.onload = function () {
document.querySelector("#convert").addEventListener("click",
function () {
var meters = document.querySelector("#meters");
var feet = document.querySelector("#feet");
feat.value = meters.value * 3.28084;
}
);
};
When you click the button, the Developer Tools debugger shows you exactly where and what the problem is. Figure 1-10 shows that in this case, it’s a ReferenceError, which you can see in the panel on the right.
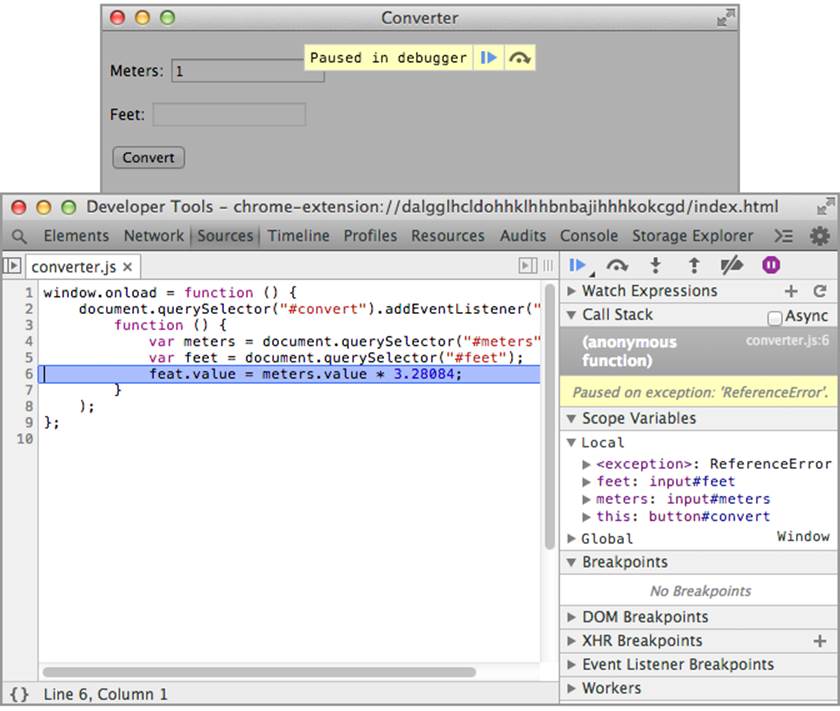
Figure 1-10. The Developer Tools debugger gives the location of a bug
You can also set breakpoints by clicking on the line number in the margin, as shown in Figure 1-11. Then, when you click the button, execution pauses, as shown in Figure 1-12.
As with most debuggers, you can use the Developer Tools debugger to single-step, go into and out of functions, inspect variables, and so forth. You can read more and even watch some videos at developer.chrome.com/devtools.
An even more useful Developer Tools tab is the Console. Here, you can see error messages generated by Chrome and your own debugging output that you write with the console API. For more documentation on this, go to the Console API Reference.
The call I use the most is console.log to write messages to the log, as demonstrated in Figure 1-13, which I got by adding one line:
var meters = document.querySelector("#meters");
console.log(meters);
var feet = document.querySelector("#feet");
feet.value = meters.value * 3.28084;
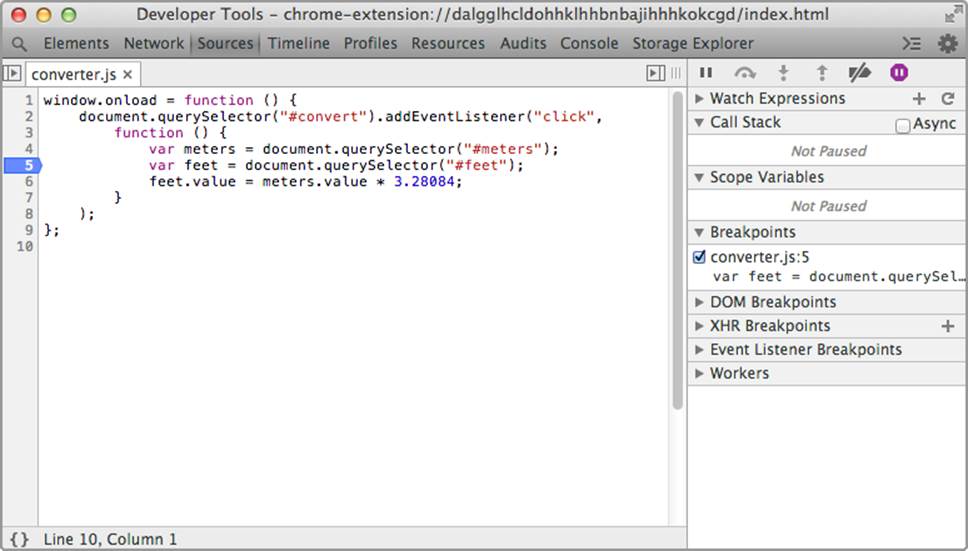
Figure 1-11. A breakpoint set in debugger
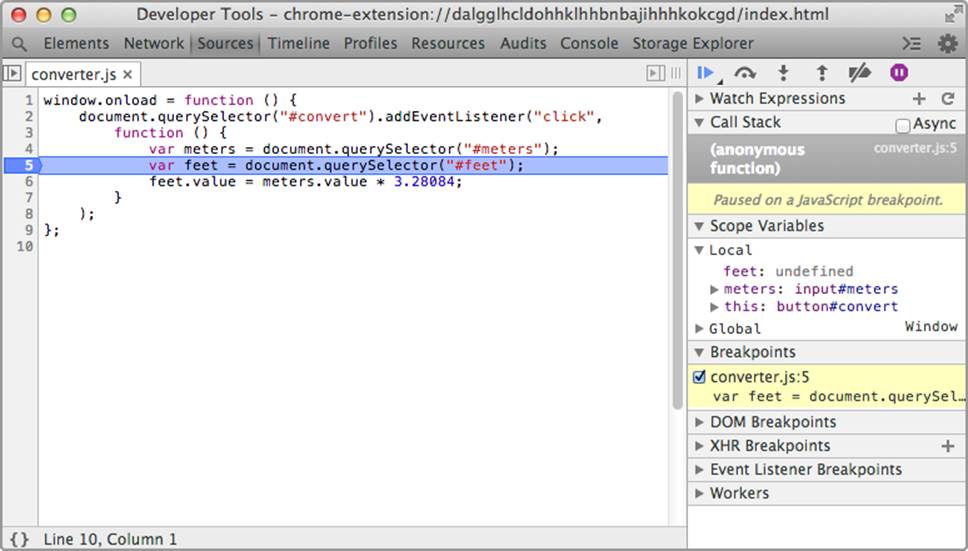
Figure 1-12. App paused at the breakpoint
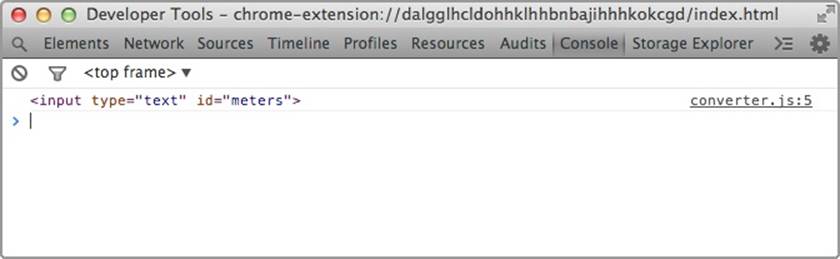
Figure 1-13. Value displayed as HTML
If you want to see the JavaScript object (see Figure 1-14), use console.dir instead:
var meters = document.querySelector("#meters");
console.dir(meters);
var feet = document.querySelector("#feet");
feet.value = meters.value * 3.28084;
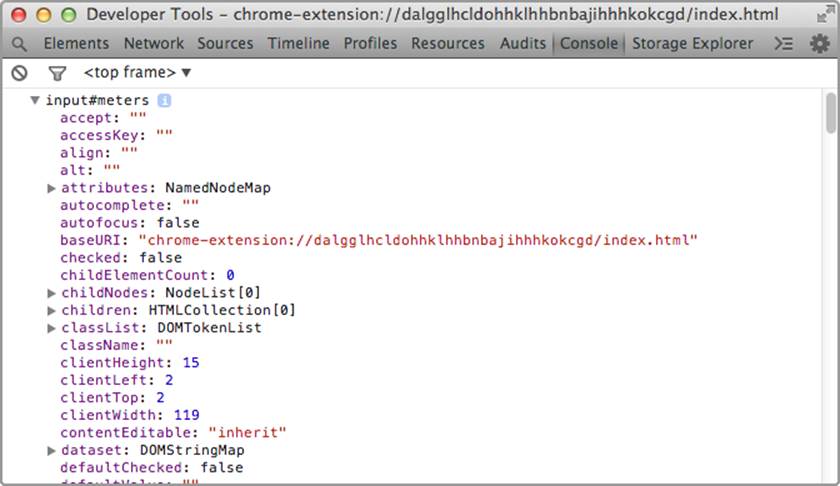
Figure 1-14. Value displayed as JavaScript object
There are additional console API calls for assertions, error logging, and getting a stack trace, which you can read about in the Console API Reference.
Chrome Release Channels
As you might already know, there are four release channels for Chrome. These provide differing degrees of testing and update frequency. As releases mature, they make their way through the channels, which are described here:
Stable
Most tested, and intended to be used by most nondevelopers. These releases are updated about every six weeks, with minor updates more often.
Beta
A release due to become stable as soon as it’s fully tested, subjected to field testing as a beta, and had some remaining bugs fixed. That takes about a month. Major updates occur about every six weeks, with minor updates oftener.
Dev
More buggy than beta. These are updated once or twice a week, with no lag for major versions.
Canary
Updated daily. You get the latest code, whether it works or not.
For any installation of Chrome, you need to choose among Stable, Beta, and Dev. (I usually run Beta.) However, you can install Canary alongside one of the others, to be run only when you need it. You should definitely do that if you want to try out new APIs or see if bugs you discover have been fixed.
As of this writing, a few APIs that I’ll cover haven’t made it beyond the Dev channel, but they’ll surely be at least in Beta in a few months.
Publishing a Chrome App
When you’re ready to distribute your Chrome App, you can self-publish it by posting it on your website or publish it to the Chrome Web Store.
Self-Publishing
To self-publish your Chrome App, you first need to pack it into a form of ZIP file called a CRX file (filename ending with .crx), which you do by clicking the “Pack extension” button on the Chrome Extensions page (make sure “Developer mode” is checked). Then, you copy that CRX file to your website and put a link to it somewhere so that your users can download it.
There’s no “Load packed extension” button to go with “Load unpacked extension,” which you use during development. Instead, the user must find the downloaded CRX file by using the Mac Finder, Windows Explorer, Chrome OS Files app, or whatever Linux equivalent he or she is using, and drag it to the Chrome Extensions page. A dialog box should then display, asking the user to confirm that he or she wants to install it.
Note that on ChromeOS, the file can’t be on the Google Drive; the user must place it in the Downloads directory or on an external device (hard drive, USB stick, or SD card).
The installation instructions are somewhat tricky, so you might find that self-publishing is much less convenient than using the Chrome Web Store.
Publishing on the Chrome Web Store
Unlike Apple, which has a fairly rigorous, arbitrary, and slow (measured in weeks) approval process for its store, Google doesn’t seem to care what’s put into its store, and it makes new and updated apps available within hours. You can even upload apps that are restricted to a group of testers. When I signed up, there was a one-time fee of $5 to use the store (Apple charges about $100 per year).
You need a ZIP file of the app’s folder (ending with .zip), not a CRX file. And, be aware that you can’t just change the filename of a CRX file to end with .zip, because it’s not exactly a ZIP file. You have to zip the folder by using whatever your operating system’s file browser (Finder, Windows Explorer, Chrome OS Files app, and so on) provides or by using a separate ZIP utility.
To begin, go to the Chrome Developer Dashboard, sign in with your Google account (if you’re not already signed in), and pay the fee. Next, click the “Add new item” button and upload your app. You’ll then be presented with a form where you enter a detailed description; the app’s icon (the same file that’s referenced by the manifest, in most cases); some screenshots; some promotional tile images; your website URL; the regions where you want the app distributed; the pricing (if it isn’t free); the language; whether it’s “mature content”; and whether it’s for all users, only people with the link, or just trusted testers, possibly including members of a Google Group that you own or manage. I won’t go into the details of all these fields; Google has lots of documentation and advice to which you can refer.
After your app is in the store, anyone you’ve allowed to access it can install it right from the store, without dealing with the Extensions page at all.
The Chrome Dev Editor automates the job of zipping and uploading your app, although you still have to fill out the submission form the usual way. From the menu, just choose Publish to Chrome Web Store.
UNPACKED FOLDERS, CRX FILES, AND ZIP FILES
I’ve explained in the text where and when you use these three forms of a Chrome App, but I don’t blame you for confusing them (I did myself at one time), so here’s another explanation all in one place:
Unpacked folder
Used during development. Installed from the Extensions page by using the “Load unpacked extension” button.
CRX file
Created with the “Pack extension” button. Used only for self-publishing. Installed by dragging it to the Extensions page. Filename ends in .crx.
ZIP file
Created with your operating system’s file browser (Finder, Windows Explorer, Chrome OS Files, and so on). Needed to upload an app to the Chrome Web Store. Not needed if you publish from within the Chrome Dev Editor. Filename ends in .zip.
If you think it’s strange that the Chrome Web Store doesn’t just accept a CRX file, I’m with you.
Chapter Summary
In this chapter we explored how to build a minimal Chrome App; identified its principal parts such as the manifest.json file; and saw how to run it, debug it, and publish it.
Now you’re ready to start exploring the Chrome APIs, many of which are available only to Chrome Apps.
All materials on the site are licensed Creative Commons Attribution-Sharealike 3.0 Unported CC BY-SA 3.0 & GNU Free Documentation License (GFDL)
If you are the copyright holder of any material contained on our site and intend to remove it, please contact our site administrator for approval.
© 2016-2026 All site design rights belong to S.Y.A.