Programming Chrome Apps
Chapter 3. Local Storage, Sync Storage, and IndexedDB
This chapter covers three more storage types first introduced in Table 2-1 in Chapter 2: Local Storage, Sync Storage, and the IndexedDB database. All three store key-value pairs (KVPs), not files.
We’ll be extending the Simple Editor app from Chapter 2, using Local and Sync Storage. Then, I’ll introduce a mailing-list app to demonstrate what you can do with IndexedDB.
Local and Sync Storage
Many browsers, including Chrome, support localStorage, which is similar to persistent cookies in that it stores KVPs. The main difference is that localStorage has greater capacity and isn’t passed to the server along with HTTP requests. Similarly, sessionStorage is similar to session cookies in that it lasts only as long as the current session.
However, Chrome Apps can’t use localStorage. Instead, there’s a Chrome API, chrome.storage.local, that’s better: it can store JavaScript objects (localStorage is limited to strings) and, like most Chrome APIs, it operates asynchronously, allowing the app to be more responsive. What’s more, there’s a variant, chrome.storage.sync, with the same API, which is automatically synchronized between computers running the same app, similar to the way that Sync Files are synchronized.
NOTE
As is specified in Chapter 2, you need storage permission in your manifest to use the chrome.storage APIs.
Chrome Apps can use sessionStorage, but there’s no reason to do so. Because a Chrome App HTML page can’t be refreshed and can’t navigate to another page in the same window, there’s no concept of session, and any global variables you define within your JavaScript will persist for as long as the window is open. (In case you were wondering, cookies don’t work in Chrome Apps, which is no loss.)
chrome.storage.local persists even if the app is reinstalled, as long as its ID is the same. The ID is important also for chrome.storage.sync, because this is what ties together the same app installed on multiple computers. You can think of the ID as identifying the storage. This means that the storage is really local, not only to your computer, but also to the app ID; there’s no way to share it between apps.
Setting and Getting Local Storage
You set values in local storage by using chrome.storage.local.set:
chrome.storage.local.set(items, callback)
There’s a single callback. An error occurred if it’s called with chrome.runtime.lastError defined; otherwise, setting succeeded. The items argument is an object whose keys are set to the corresponding values in local storage. Other keys already there are unaffected.
To retrieve one or more keys from local storage, you call chrome.storage.local.get:
chrome.storage.local.get(x, callback)
The argument is the key to retrieve, or an array of keys to retrieve, or null to retrieve the entire contents of local storage (for this app). Here, too, the callback is for an error if chrome.runtime.lastError is defined.
To see what you can expect to store and get back, consider this example:
var obj = {
k_array: [ 1, 2, 3, 4, "five", { number: "six" } ],
k_date: new Date(),
k_function: function () { return 123; },
k_object: { k2_key1: "one", k2_key2: "two" },
k_regex: /abc/,
k_string: "string value"
};
chrome.storage.local.set(obj,
function () {
chrome.storage.local.get(null,
function (items) {
if (chrome.runtime.lastError)
console.log(chrome.runtime.lastError);
else
console.dir(items);
}
);
}
);
Note the argument of null to the get function, called from the set callback.
The console is shown in Figure 3-1.
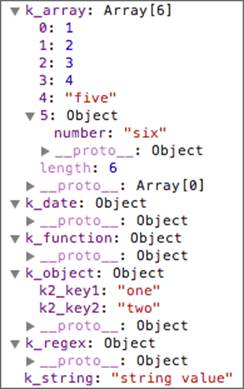
Figure 3-1. A console showing local storage objects
You can see that strings and numbers are stored without problem, and so are arrays and objects that ultimately store strings and numbers, but dates, functions, and regular expressions aren’t handled. The workaround is to store dates and regular expressions as strings. However, there’s no purpose in storing functions in local storage, so they don’t need a workaround.
Local storage is best for small amounts of data, say a megabyte or two at most. It’s ideal for recording app preferences, as we’re about to see. For larger amounts of data, files or IndexedDB are better.
Implementing setParams and getParams
The examples in Chapter 2 need to use local storage to store the backup directory’s entry ID, which is done through two wrapper functions, setParams and getParams, whose code we can now show:
function setParams(x, wantSync) {
var storageArea = wantSync ? chrome.storage.sync : chrome.storage.local;
storageArea.set(x,
function () {
if (chrome.runtime.lastError)
console.log(chrome.runtime.lastError);
}
);
}
function getParams(x, callback, wantSync) {
var storageArea = wantSync ? chrome.storage.sync : chrome.storage.local;
storageArea.get(x,
function (items) {
if (chrome.runtime.lastError)
console.log(chrome.runtime.lastError);
else
callback(items);
}
);
}
As we’ll see, the local and sync storage APIs are the same, except for the storage area object they operate on, so you can set an optional wantSync to true for sync storage. In Chapter 2, when these functions are first used, the argument is omitted, so the entry ID is stored in local storage, which is what is needed for the entry ID, because it’s inherently local.
Adding Color Options to the Simple Editor App
To further show how you can use local storage to store and retrieve KVPs, we’ll modify Simple Editor to provide options for setting the text-area background and foreground colors. Figure 3-2 shows the new Options button, and Figure 3-3 shows the dialog that opens when you click it and select new colors. Figure 3-4 shows the new colors after you dismiss the dialog.
Let’s look only at the changes to implement the color options. First, there’s another line of HTML in index.html for the Options button:
...
<button id="saveas">Save As...</button>
<button id="options" style='float: right;'>Options...</button>
<p id="message"> </p>
<textarea id="textarea" cols="60" rows="20" style='outline: none;'></textarea>
...
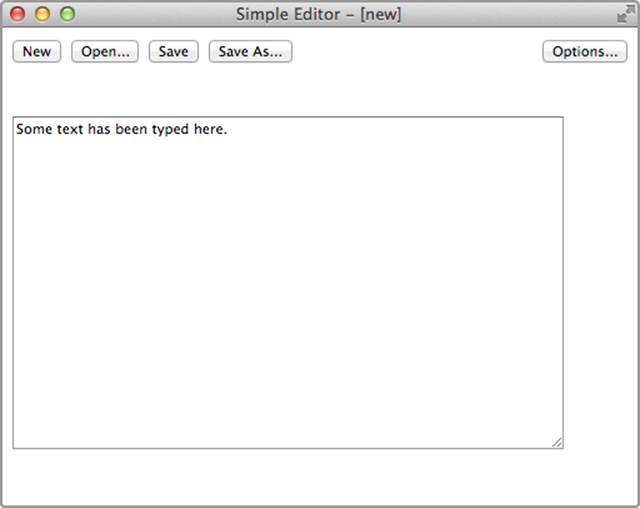
Figure 3-2. Simple Editor with default colors
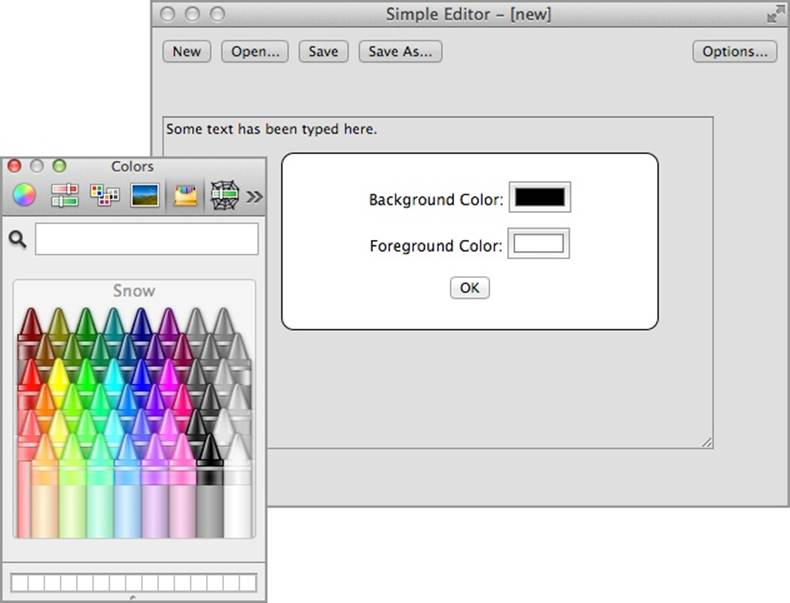
Figure 3-3. The color-choosing dialog with color picker
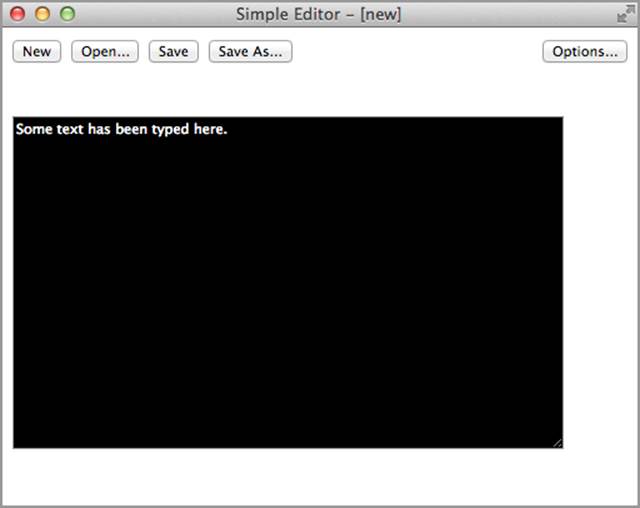
Figure 3-4. Simple Editor with new colors applied
The event handler is set for the Options button like so:
var optionsButton = document.querySelector("#options");
if (optionsButton)
optionsButton.addEventListener("click", options);
function options() {
var bg;
var fg;
Dialogs.dialog(
"<p>Background Color: <input type='color' id='bg-color'>" +
"<p>Foreground Color: <input type='color' id='fg-color'>" +
"<p><button id='setbackup'>Set Backup...</button>" +
"<p><button id='dlg-ok'>OK</button>",
[
{
id: 'dlg-ok',
action: function () {
setBackground(bg.value, true);
setForeground(fg.value, true);
}
}
],
function () {
bg = document.querySelector('#bg-color');
fg = document.querySelector('#fg-color');
var bgcolor = taElement.style["background-color"];
var fgcolor = taElement.style["color"];
if (bgcolor && fgcolor) {
bg.value = rgb2hex(bgcolor);
fg.value = rgb2hex(fgcolor);
}
else {
bg.value = "#ffffff";
fg.value = "#000000";
}
document.querySelector("#setbackup").addEventListener("click",
setBackup);
}
);
}
The complicated call to Dialogs.dialog is explained in detail in Appendix A, but, briefly, here’s how you would set up this dialog:
§ Supply HTML for the dialog, consisting of two color pickers, a button to set the backup directory (in case we want to change it), and an OK button.
§ Supply an action for the OK button to call setBackground and setForeground to set the colors from the color-picker values. Actions here also dismiss the dialog.
§ Supply an initialization function that sets the initial state of the color pickers to whatever the current text area styles are. (See About rgb2hex for what that function does.) The function also sets the event handler for the Set Backup button, which is the identical setBackup function that you can see in Adding Backup by Using Retained File Entries.
Note that the action for the Set Backup button isn’t set in the action argument, where the OK button’s action is, because we don’t want the dialog dismissed when the backup is set.
ABOUT RGB2HEX
When a color style is retrieved, it’s in the form rgb(R,G,B), where the components span a range of 0–255. However, the color picker (<input type="color"> element) requires that it be initialized using the form #rrggbb, where the components are in hex. The function rgb2hex makes the conversion, as shown here:
function rgb2hex(rgb) {
var components = rgb.match(/^rgb\((\d+),\s*(\d+),\s*(\d+)\)$/);
function hex(x) {
return ("0" + parseInt(x).toString(16)).slice(-2);
}
return "#" + hex(components[1]) + hex(components[2]) + hex(components[3]);
}
Here are the two functions called when you click the OK button in the dialog:
function setBackground(color, wantSave) {
if (color) {
document.querySelector("#textarea").style["background-color"] = color;
if (wantSave)
setParams({ background: color }, wantSync);
}
}
function setForeground(color, wantSave) {
if (color) {
document.querySelector("#textarea").style["color"] = color;
if (wantSave)
setParams({ foreground: color }, wantSync);
}
}
The wantSync global is set to false, so we’ll be using local storage:
var wantSync = false;
Later, we’ll be using sync storage, and all we’ll have to do to get it is set the global to true.
To use either storage area, you must request storage permission in the manifest.json file (see also Chapter 2):
"permissions": [
{
"fileSystem": [
"write",
"directory",
"retainEntries"
]
},
"storage"
]
The setForeground and setBackground functions change the colors in the window immediately and also, if the second argument is true, set the colors in local storage.
When the app is launched, we want to set the text area from whatever colors were saved in local storage:
getParams(["foreground", "background"],
function (items) {
if (chrome.runtime.lastError)
console.log(chrome.runtime.lastError);
else {
setForeground(items.foreground);
setBackground(items.background);
}
},
wantSync
);
Observe how the first line passes an array of two keys to getParams and onto the get method. If the function succeeds, it sets the foreground and background from those colors. The second argument to setForeground and setBackground is omitted; there’s no need to set local storage, because that’s where the colors just came from.
With these changes, Simple Editor sets its colors from local storage when it’s first launched. If colors are changed via the Options dialog, they’re saved back into local storage.
Sync Storage
Now, we’ll change Simple Editor to work with sync storage, instead of local storage. By doing so, all installations of the app by a user will share options. Conveniently, we need to change only one line:
var wantSync = true;
If you review the code, you’ll see that only the colors are saved in sync storage, not the backup directory entry ID.
Sync storage behaves identically to local storage, except that Chrome synchronizes changes to the storage if the app is installed on more than one computer. If you disable syncing in Chrome settings, however, the two storage areas operate identically.
When a change is made to sync storage, that change is very quickly—within a second or two—reflected in the storage area accessed by every installation of the app. The next time the app is launched, it will retrieve the new colors.
If you want to make the app more responsive by informing it when the colors are changed, you can install the following handler for the chrome.storage.onChanged event:
chrome.storage.onChanged.addListener(
function(changes, areaName) {
if (areaName === "sync") {
if (changes.foreground)
setForeground(changes.foreground.newValue);
if (changes.background)
setBackground(changes.background.newValue);
}
}
);
Here, we care only about changes when the areaName argument to the callback is sync. (Another possible value is local, which doesn’t apply to sync storage. A third value, managed, is documented but doesn’t appear to apply to Chrome Apps.) The changes argument is an object indicating what changed. Each key is associated with an object with two properties: newValue, which is what we want, and oldValue, which does not concern us.
To see the syncing, you need to install the app on two computers. Because the IDs need to be the same, it won’t do to move the source code over to the second computer and intall it with the “Load unpacked extension” button on the Extensions window. Instead, click the “Pack extension” button to create a .crx file and install that on both computers, guaranteeing that the ID will be the same. Or, upload the app to the Chrome Web Store and install it on both computers from there. (See Publishing a Chrome App.)
Note that only the color options are synced, not the text being edited, which is what the syncing version of the Note app did in Chapter 1. Simple Editor edits files local to a computer.
Removing Items and Clearing Storage
Two other APIs that you’ll sometimes need are remove, for removing a key from local or sync storage, and clear, for clearing all keys:
chrome.storage.local.remove(x, callback)
chrome.storage.sync.remove(x, callback)
chrome.storage.local.clear(callback)
chrome.storage.sync.clear(callback)
In the callbacks, chrome.runtime.lastError defined means there was an error. The argument to remove, like the argument to get, can be a key or an array of keys, but it cannot be null.
IndexedDB
As Table 2-1 in Chapter 2 indicates, IndexedDB is sandboxed, so any data you store there is imprisoned in a single app. You can’t do any of the common things that are done with a database, such as share it between apps or manage it with a database utility. Think of IndexedDB as being neither more nor less accessible than local files, over which its only advantage is that it stores indexed objects instead of flat data.
It would be nice if there were both Local IndexedDB and External IndexedDB, as there are with files, but that’s not the case. Local is all you have.
I’ll present two IndexedDB examples here:
§ Some simple code sequences to do basic things, such as creating a database, adding objects, and retrieving an object.
§ A complete app that maintains a mailing list, including import and export capabilities.
NOTE
In this book, I cover maybe half of the IndexedDB API, but enough so you’ll get a thorough understanding of how to use it. You can read all the details at the entry for IndexedDB on the Mozilla Developer Network.
IndexedDB Objects and Method Chaining
IndexedDB is implemented in terms of API objects, such as IDBFactory, IDBDatabase, IDBObjectStore, IDBIndex, IDBCursor, and IDBTransaction. For example, to find an object by its key, you begin with an IDBDatabase, from which you get an IDBTransaction, from which you get an IDBObjectStore, from which you get an IDBIndex whose get method gives you the object with that key. Fortunately, the IndexedDB API implements method chaining, so the code to find an object isn’t so bad:
db
.transaction("mailing-list")
.objectStore("mailing-list")
.index("name-index")
.get("Jones")
Opening a Database
You begin with indexedDB, which is an IDBFactory object from which you can request a particular version of a database. With conventional SQL databases, you execute so-called data manipulation language (DML) statements to create tables, indexes, views, and so on. IndexedDB has nothing like that, because any objects, with any keys, can be stored without advance notice.
Still, when a database is first created or when its design changes, you’d like the chance to at least construct some indexes. The way IndexedDB handles this is to introduce the idea of an upgrade. If you request a version that doesn’t yet exist, the onupgradeneeded callback is called, giving you the chance to create needed objects. On subsequent requests for the same version, the upgrade callback isn’t called, and you’re just given access to the database.
For example, here’s how to request a database and create an index called name-index when the database is new:
function openDatabase() {
var request = indexedDB.open("db1", 1);
request.onsuccess = function(event) {
db = request.result;
db.onerror = errorHandler;
showMessage('Database opened', true);
};
request.onerror = errorHandler;
request.onupgradeneeded = function(event) {
var db = event.target.result;
var store = db.createObjectStore("mailing-list", { autoIncrement: true });
store.createIndex("name-index", "last", { unique: false });
};
}
The database is named db1 and we’ve requested version 1. Because that doesn’t exist initially, the onupgradeneeded callback creates the object store and an index named name-index on the last key. If in the future the database is modified, perhaps by creating an additional index, the version would be changed to 2 and the onupgradeneeded callback would be changed as appropriate. If the version requested already exists, it’s just opened, without calling the onupgradeneeded callback.
The showMessage and errorHandler functions are identical to what Simple Editor used (see Local Files).
In terms of conventional relational databases, you could think of an object store as a table, but it’s not at all tabular, because each object in it could have different keys (columns, in relational database terms). Each object in an object store represents a record, and I’ll often refer to an object stored in an IndexedDB database as a record. This is to distinguish it from all the other objects that JavaScript apps deal with.
Adding Objects in a Transaction
IndexedDB operations such as adding or retrieving an object occur in a transaction, represented by an IDBTransaction object. As with relational database transactions, a transaction is atomic—done in its entirety or not at all. Transactions are also independent, but inasmuch as IndexedDB databases are sandboxed and JavaScript is single-threaded, inconsistencies due to simultaneous updates aren’t much of a problem, unless you access the database from Web Workers, which can run concurrently.
You get a transaction with the transaction method of an IDBDatabase object, like this, where we want a read/write transaction:
db
.transaction("mailing-list", "readwrite")
Then, from an IDBTransaction, you can get a reference to the IDBObjectStore:
db
.transaction("mailing-list", "readwrite")
.objectStore("mailing-list")
Given an IDBObjectStore, you can call the add method to add an object:
db
.transaction("mailing-list", "readwrite")
.objectStore("mailing-list")
.add(obj)
.onsuccess = function (event) {
// adding succeeded
};
Putting that all together, here’s code that adds three objects:
add({last: "Smith", first: "John"});
add({last: "Jones", first: "Mary"});
add({last: "Gonzalez", first: "Sharon"});
function add(obj) {
db
.transaction("mailing-list", "readwrite")
.objectStore("mailing-list")
.add(obj)
.onsuccess = function (event) {
console.log('added', obj);
};
}
It’s important to understand that aside from the last property, which is what the index is based on (see the call to createIndex in the openDatabase function that appears in the preceding section), no other property of the object has been introduced to the database. Indeed, any object stored in an IndexedDB database can have any properties. This is very much unlike a relational database, in which all columns must be part of a table’s definition.
You can see these objects and the index on the Resources tab in Developer Tools (Figure 3-5 and Figure 3-6).
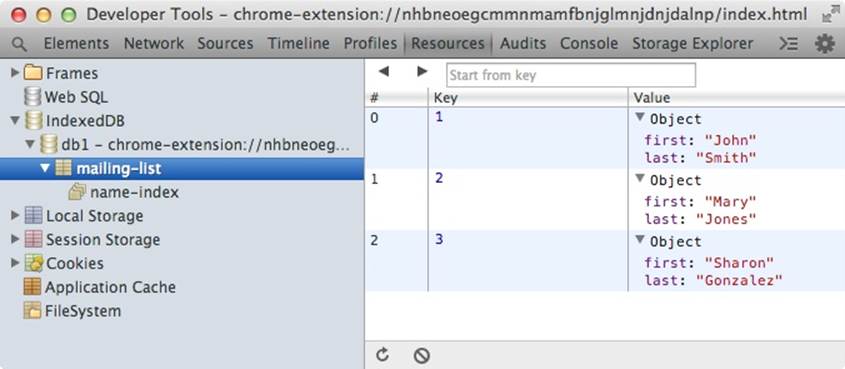
Figure 3-5. IndexedDB objects shown in Developer Tools
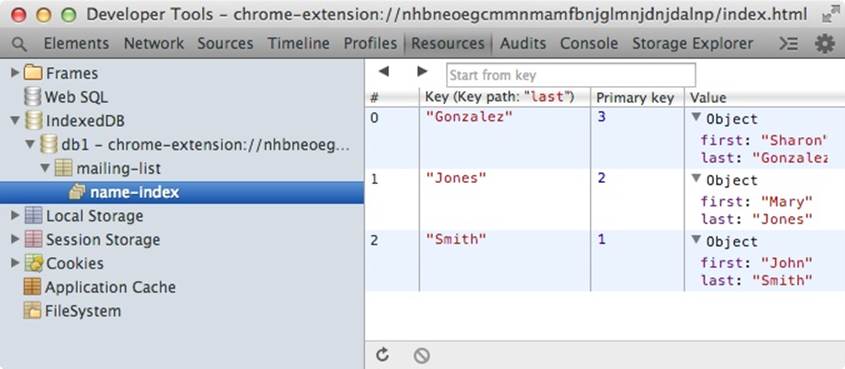
Figure 3-6. IndexedDB index shown in Developer Tools
Retrieving Objects by Using an Index
To retrieve an object by key using an index, you call the index method of the IDBObjectStore and then the get method of the IDBIndex:
db
.transaction("mailing-list")
.objectStore("mailing-list")
.index("name-index")
.get("Jones")
.onsuccess = function (event) {
console.log("Found: ", event.target.result);
};
The console shows the following:
Found: Object {last: "Jones", first: "Mary"}
Mailing List Example
For a more elaborate example, Figure 3-7 shows an app that manages a mailing list. At the top is a text field and a button used to search for a record (an object in the database). Next come 2 navigation buttons, Prev and Next, used to browse the database. Then there are 3 buttons for clearing the form, deleting the record shown in the form, and saving any changes. In the middle is the form itself. Finally, at the bottom are 4 buttons for managing the database. These buttons—especially Delete Database—wouldn’t normally be available to all users, but they are here to simplify the example. At the bottom is a message area that, in this screenshot, shows that the database was updated. We’ll see exactly what each of the 10 buttons does as we go through the code.
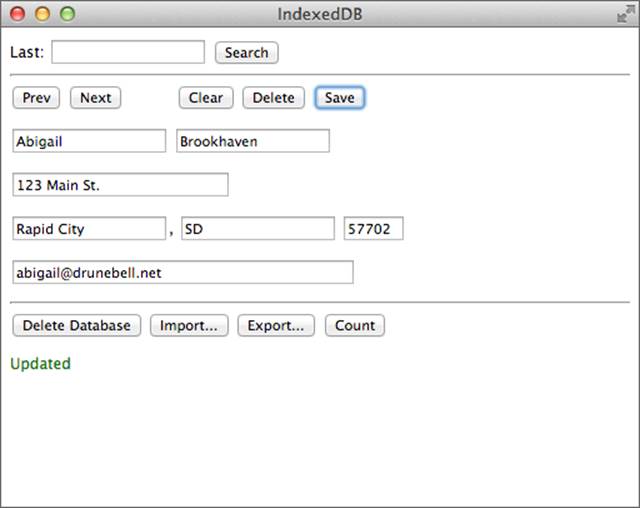
Figure 3-7. The Mailing List app using IndexedDB
Handling Forms
Here’s the index.html file that defines the user interface:
<!DOCTYPE html>
<html lang="en">
<head>
<meta charset="utf-8" />
<title>IndexedDB</title>
<script src="lib/Dialogs.js"></script>
<script src="IndexedDB.js"></script>
</head>
<body>
<label for="search">Last:</label>
<input type="text" id="search-key">
<button id="search">Search</button>
<hr>
<button id="prev">Prev</button>
<button id="next">Next</button>
<button id="clear" style='margin-left: 40px;'>Clear</button>
<button id="delete">Delete</button>
<button id="save">Save</button>
<p>
<input type="text" id="field-first">
<input type="text" id="field-last">
<p>
<input type="text" id="field-street" size="30">
<p>
<input type="text" id="field-city">,
<input type="text" id="field-state">
<input type="text" id="field-zip" size="5">
<p>
<input type="text" id="field-email" size="50">
<input type="hidden" id="field-primaryKey">
<hr>
<button id="delete_db">Delete Database</button>
<button id="import">Import...</button>
<button id="export">Export...</button>
<button id="count">Count</button>
<p id="message"> </p>
</body>
</html>
Notice that an <input> tag is used for each field, although they’re not inside a <form> element. Because Chrome Apps can’t have any navigation, there’s nothing to be gained by using a form with a submit button, as is pointed out in Chrome App Restrictions. Getting data that the user types is handled in JavaScript with this function, which returns an object formed from the input fields:
function getForm() {
return {
last: document.querySelector("#field-last").value,
first: document.querySelector("#field-first").value,
street: document.querySelector("#field-street").value,
city: document.querySelector("#field-city").value,
state: document.querySelector("#field-state").value,
zip: document.querySelector("#field-zip").value,
email: document.querySelector("#field-email").value
};
}
There are two ways that data can populate the form:
§ Typed by the user as a new record
§ Retrieved from the database and perhaps modified by the user
When the user clicks the Save button, we have to know which case applies, because adding a new record and updating an existing record are different. That’s the purpose of the hidden field field-primaryKey at the bottom of the form. If a record is retrieved, it will hold the primary key (an integer). If the record is new, that field will be empty. To make this work, the function that populates the form must put the primary key there if one exists:
function fillForm(object, primaryKey) {
if (!object)
object = {};
if (!primaryKey)
primaryKey = 0;
document.querySelector("#field-last").value = val(object.last);
document.querySelector("#field-first").value = val(object.first);
document.querySelector("#field-street").value = val(object.street);
document.querySelector("#field-city").value = val(object.city);
document.querySelector("#field-state").value = val(object.state);
document.querySelector("#field-zip").value = val(object.zip);
document.querySelector("#field-email").value = val(object.email);
document.querySelector("#field-primaryKey").value = primaryKey;
}
function val(x) {
return x ? x : "";
}
When fillForm is called with no arguments, as it is when the form is to be cleared, we don’t want “undefined” to appear in the form, so the val function ensures that undefined properties show as as empty fields. We can see a call like that in the handler for the Clear button:
document.querySelector("#clear").addEventListener("click",
function () {
fillForm();
}
);
Later, when we see the code for the Search button, we’ll see that the call is instead this:
fillForm(cursor.value, cursor.primaryKey);
Adding and Updating Records
With the primary key in a hidden field in the form, if the record is modified, the app will know that it’s an update rather than an addition. We can see that in the code for the Save button’s handler:
document.querySelector("#save").addEventListener("click",
function () {
var store = db
.transaction("mailing-list", "readwrite")
.objectStore("mailing-list");
var object = getForm();
var key = document.querySelector("#field-primaryKey").value;
var primaryKey = key ? parseInt(key) : 0;
if (primaryKey === 0) {
store
.add(object)
.onsuccess = function (event) {
showMessage('Added', true);
};
}
else {
store
.put(object, primaryKey)
.onsuccess = function (event) {
showMessage('Updated', true);
};
}
}
);
The database has already been opened and the global db defined with the same openDatabase function that we saw earlier. An object representing the data in the form is returned by the call to getForm. If the value of the field-primaryKey field is defined, primaryKey is nonzero; otherwise, the record is new and it’s zero. The call to parseInt ensures that primaryKey is an integer, not a string.
If parseInt is zero, the add method of the IDBObjectStore in store is called to add a new object to the database. Otherwise, put is called to update an existing record, identified by its primary key.
Deleting Records
The handler for the Delete button uses the delete method of IDBObjectStore:
document.querySelector("#delete").addEventListener("click",
function () {
var primaryKey =
parseInt(document.querySelector("#field-primaryKey").value);
if (primaryKey > 0) {
db
.transaction("mailing-list", "readwrite")
.objectStore("mailing-list")
.delete(primaryKey)
.onsuccess = function (event) {
fillForm();
showMessage('Deleted', true);
};
}
}
);
A user can delete a record showing in the form only if it was retrieved from the database, as indicated by the field-primaryKey field being nonzero. If it’s zero, no record was retrieved, so there’s nothing to delete. (An improvement would be to disable the Delete button when it’s ineffective.)
Counting Records
The Count button calls the IDBObjectStore method count to count the records:
document.querySelector("#count").addEventListener("click",
function () {
db
.transaction("mailing-list")
.objectStore("mailing-list")
.count()
.onsuccess = function (event) {
Dialogs.alert(event.target.result + ' objects in database');
};
}
);
If you click that button, you see the result in Figure 3-8.
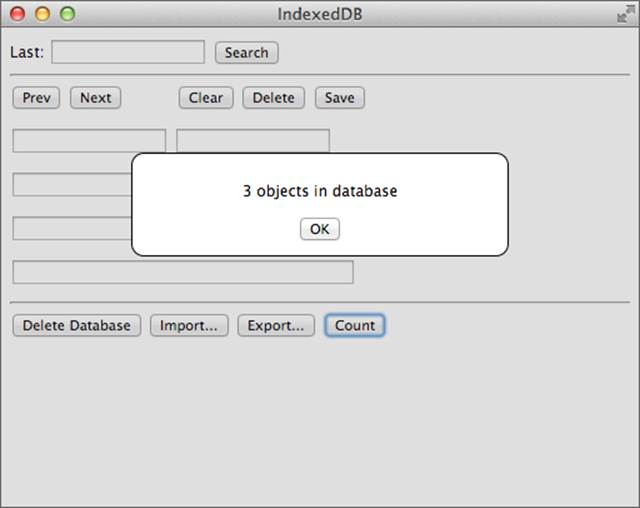
Figure 3-8. Result from clicking the Count button
Searching and Ranges
The Search button searches the database for the name the user typed in the Last field (id="search-key"). If there’s no exact match, it finds the next record in the index. This involves a couple of new things, cursors and ranges, which I’ll explain after you get a chance to look at the code:
document.querySelector("#search").addEventListener("click",
function () {
fillForm();
search(document.querySelector("#search-key").value, "next", 0);
}
);
function search(key, dir, primaryKey) {
primaryKey = parseInt(primaryKey);
var range;
if (dir === "next")
range = IDBKeyRange.lowerBound(key, false);
else
range = IDBKeyRange.upperBound(key, false);
db
.transaction("mailing-list")
.objectStore("mailing-list")
.index("name-index")
.openCursor(range, dir)
.onsuccess = function (event) {
var cursor = event.target.result;
if (cursor) {
if (primaryKey > 0) {
if (primaryKey === cursor.primaryKey)
primaryKey = 0;
cursor.continue();
}
else {
showMessage('');
fillForm(cursor.value, cursor.primaryKey);
}
}
else
showMessage('Not found');
};
}
Actually, the Prev and Next buttons also call search, but first we’ll consider the Search case, for which the first argument is the key to be searched, the second (dir) is next, and the third (primaryKey) is 0. The complication is what happens if the key isn’t found, in which case we want the next key. For example, this makes it possible for a search for “Br” to find the first name that starts with “Br”, perhaps “Brier.”
To do that, instead of using the get method, which is what we saw in Retrieving Objects by Using an Index, we open a cursor on the IDBIndex object, which creates an IDBCursor object that’s delivered to its onsuccess callback. With a cursor, you can go through records sequentially. Initially, the onsuccess callback for openCursor has the cursor (in event.target.result) set to the first record in the supplied range. However, if the continue method is called, the cursor moves to the next record in the range, and the onsuccess callback is called again. The cursor stays alive as long as you’re in that callback. As soon as it returns—by falling off the end in this case—the cursor goes away.
However, for the Search button, primaryKey is 0, so continue isn’t called, and in the else clause the message is cleared and fillForm is called to display the retrieved record, which is that to which the cursor is pointing.
If cursor is undefined, the call to openCursor found nothing in the range, and the message “Not found” is shown.
Now for an explanation of those ranges. The call to IDBKeyRange.lowerBound returns a range (an IDBKeyRange object) with a lower bound of key (what was typed in the search field). The second argument indicates whether the range should be open, which means that it excludes thekey. Here, the key is included in the range so that an exact match will find the record with that last name.
Similarly, IDBKeyRange.upperBound returns a range with an upper bound of key.
Because the dir argument for the Search button is next, the range has an inclusive lower bound equal to the key. This means that the cursor that is opened begins there, with an exact match if there is one, and otherwise with the first record in the range.
I’ve only explained the part of search that the Search button uses, skipping the primaryKey > 0 case. For the Next button, we have that case:
document.querySelector("#next").addEventListener("click",
function () {
search(document.querySelector("#field-last").value, "next",
document.querySelector("#field-primaryKey").value);
}
);
Observe that the first argument now is the last name from the form, not what was typed into the search field at the top of the window.
Here the primaryKey argument to search is the one from the form’s hidden field, which has a nonzero value if that record was retrieved from the database. What the Next button should do is find the next record, not the one that’s in the form, and that’s what this code in the searchfunction does:
if (primaryKey > 0) {
if (primaryKey === cursor.primaryKey)
primaryKey = 0;
cursor.continue();
}
If primaryKey !== cursor.primaryKey, the record found is not the one in the form, so we call continue to get the next record, and that goes on until we do find the record in the form. Then, we set primaryKey = 0 to stop after one more continue, taking the else case next time.
How could it happen that the record found is not the one in the form, when the search range included the last name from the form? Easy: two records have the same last name. The search will find the first one in the index, which might not be the one in the form, so we have to loop until the cursor is positioned on the correct record. Then, the next one is the one we want.
Handling the Prev button is similar, except the key is used to set the upper bound of the range, given that dir is not equal to next:
document.querySelector("#prev").addEventListener("click",
function () {
search(document.querySelector("#field-last").value, "prev",
document.querySelector("#field-primaryKey").value);
}
);
Let’s recap how searching and navigation work:
1. The Search button finds the first record that matches what’s typed into the search field, not necessarily an exact match.
2. The Next button finds the first record that’s after the one appearing in the form (with the primary key set).
3. The Prev button finds the record that precedes the one in the form.
Deleting a Database
With most database applications, system-administrator operations such as deleting a database wouldn’t be performed by application programs; rather, they would be done using a database utility that only administrators have permission to use. However, because IndexedDB databases are sandboxed, it isn’t possible to create a separate utility, not even as a Chrome App, because its app ID wouldn’t be the same as the one that owns the database. The same goes for importing and exporting the database: the app has to do it, or it can’t be done.
That’s why the Delete Database, Import, and Export buttons are there, although in a real app they might be tucked away in a menu, not right there on the main window. They might be password-protected, too.
But I’m in the Wild West (Colorado), so here’s the code to delete a database:
document.querySelector("#delete_db").addEventListener("click", deleteDatabase);
function deleteDatabase() {
console.log('d');
Dialogs.confirm('Delete entire database?', 'Delete', 'Cancel',
function () {
fillForm();
if (db) {
db.close();
db = null;
}
var request = indexedDB.deleteDatabase("db1");
request.onsuccess = function() {
openDatabase();
};
request.onerror = errorHandler;
}
);
}
The existing IDBDatabase object in db isn’t used, because deleteDatabase is a method on the IDBFactory object indexedDB. After confirmation from the user, the form is cleared and the database is closed, just to be safe. (db.close is synchronous, so no callback is needed.) Then,deleteDatabase is called and, if it succeeds, the database is reopened so that the app can continue to be used. That is, the database is effectively cleared of data because a new one comes right back. (In your own IndexedDB app, you might want to do things differently.)
Importing Data
Again, importing is an operation that a separate database utility might do, if only such a thing were possible with IndexedDB in Chrome Apps. It works by opening an external file (see External Files) that contains data in JSON format, and then adding each record to the database. Here’s the part that reads the file:
document.querySelector("#import").addEventListener("click", importData);
function importData() {
chrome.fileSystem.chooseEntry(
{
type: 'openFile'
},
function (entry) {
if (entry) {
entry.file(
function (file) {
var reader = new FileReader();
reader.onloadend = function() {
var objects = JSON.parse(this.result);
loadData(objects);
showMessage('Opened OK', true);
};
reader.readAsText(file);
},
errorHandler
);
}
}
);
}
The JSON objects to be imported are passed to the loadData function, which adds them using the same methods that we saw earlier for the Add button:
function loadData(objects) {
var transaction = db.transaction("mailing-list", "readwrite");
transaction.oncomplete = function(event) {
showMessage(objects.length + ' objects imported', true);
};
var store = transaction.objectStore("mailing-list");
for (var x of objects)
store.add(x);
}
Where does the JSON data to be imported come from? One place would be exported data, which comes in the next section. Or, you can get test data in JSON format from generatedata.com. It looks something like this:
[
{
"last": "Hart",
"first": "Nero",
"street": "467-6831 Aliquam Rd.",
"city": "Bridgeport",
"state": "CT",
"zip": "36575",
"email": "vulputate.nisi.sem@lectusconvallisest.co.uk"
},
{
"last": "Keller",
"first": "Simon",
"street": "477-1645 Gravida Rd.",
"city": "Kailua",
"state": "HI",
"zip": "48332",
"email": "ante.ipsum.primis@Nullafacilisi.org"
},
...
]
To protect the innocent, this data is fake (as you probably guessed from those ridiculous email addresses).
Exporting Data
Here’s the first part of the code for the Export button:
document.querySelector("#export").addEventListener("click", exportData);
function exportData() {
chrome.fileSystem.chooseEntry(
{
type: 'saveFile'
},
function (entry) {
if (entry)
saveToEntry(entry);
}
);
}
function saveToEntry(entry) {
entry.createWriter(
function(fileWriter) {
fileWriter.onerror = errorHandler;
fileWriter.onwrite = function() {
writeData(fileWriter);
};
fileWriter.truncate(0);
},
errorHandler
);
}
After a FileWriter is created and the file is truncated, the actual writing is done by the writeData function. We’ll use a cursor to cycle through all the records in the database and then use the write method of the FileWriter to write the record, like this:
function writeData(fileWriter) {
var objects = [];
db
.transaction("mailing-list")
.objectStore("mailing-list")
.openCursor()
.onsuccess = function (event) {
var cursor = event.target.result;
if (cursor) {
fileWriter.onwrite = function () {
cursor.continue(); // ouch!
};
fileWriter.onerror = errorHandler;
fileWriter.write(cursor.value);
}
else
writeObjects(fileWriter, objects);
};
}
Because openCursor is called with no arguments, it begins with the first record in the index. The function looks straightforward enough, but it won’t work. Before I tell you why, you might want to pause here and see if you can figure it out for yourself.
Give up? The problem is that, as I said earlier, the cursor is alive only within the onsuccess callback, and execution stays there when the continue method is called. However, the call to write is asynchronous, so the onsuccess handler returns after it’s called, killing the cursor. In theonwrite callback the cursor is no longer defined. The JavaScript cursor variable is still defined, because of function closure; it’s just that the object it points to is no longer in working order.
This is a real screwup, for sure. The FileWriter APIs aren’t to blame. I think the fault lies with the way cursors are designed. But there’s nothing to be done about it, so the way to export with a cursor is to add all the records to a giant object representing the entire database and then, when the cursor is no longer needed, write the entire thing at once. That’s what this code does:
function writeData(fileWriter) {
var objects = [];
db
.transaction("mailing-list")
.objectStore("mailing-list")
.openCursor()
.onsuccess = function (event) {
var cursor = event.target.result;
if (cursor) {
objects.push(cursor.value);
cursor.continue();
}
else
writeObjects(fileWriter, objects);
};
}
function writeObjects(fileWriter, objects) {
fileWriter.onwrite = function () {
showMessage(objects.length + ' objects exported', true);
};
fileWriter.onerror = errorHandler;
fileWriter.write(new Blob([JSON.stringify(objects)]));
}
Because in this example the primary keys are integers, another way to export would be to retrieve the records one-by-one via the primary key, iterating from 1 until no more objects exist. It’s tricky to figure out what the maximum primary key is, because, as a result of deletions, it’s not the same as the object count. But, if you can get past that, it would be possible to write the records one-by-one, instead of accumulating thousands of them in a huge object.
Chapter Summary
In this chapter, we described the key-value-pair APIs: Local Storage, Sync Storage, and IndexedDB, which completes the list of storage methods introduced at the beginning of Chapter 2. The one remaining storage topic, media galleries, we’ll defer to Chapter 5.
All materials on the site are licensed Creative Commons Attribution-Sharealike 3.0 Unported CC BY-SA 3.0 & GNU Free Documentation License (GFDL)
If you are the copyright holder of any material contained on our site and intend to remove it, please contact our site administrator for approval.
© 2016-2026 All site design rights belong to S.Y.A.