Google Drive and Docs in 30 Minutes (2nd Edition) – The unofficial guide to the new Google Drive, Docs, Sheets & Slides (2015)
Chapter 1. Getting started with Drive and Google’s mobile apps
Google Drive, Docs, Sheets, and Slides take seconds to set up. The registration requirements are startlingly simple. All you need to do is provide an email address and answer a few basic questions on a Web form or your phone. No discs or downloads are needed!
This chapter will also explain the Google Drive interface, and will give some tips on how to organize your files and folders. For this and all other chapters, I recommend using the Google Chrome browser, which is available for Windows, Macs, and Linux desktop and laptop computers. If you don’t have it installed, visit chrome.google.com for instructions to download and install the browser.
Before we get started, I have a quick note relating to nomenclature.
What’s the difference between Google Drive and Google Docs?
Google has struggled with branding their online office suite. In the 2000s, “Google Docs” referred to the entire suite of programs, not just the word processor. Later, “Google Drive” was the umbrella term, and all access to the files and applications took place through Google Drive.
With the new Google Drive, Google has begun to use the individual names of the applications, and separate certain functionality. For instance, the Google Drive app for Android and iOS is no longer required to access files created with Docs, Sheets, or Slides.
Here is a quick list of the applications and basic functionality:
●Google Drive is used for storage of files, including non-Google formats such as Microsoft Office documents. It also has a folder/file hierarchy used to view and access files.
●Google Docs (also known as Google Documents) is the online word processor. Docs has similar functionality to Microsoft Word.
●Google Sheets is the online spreadsheet program, similar to Microsoft Excel.
●Google Slides is the presentation program, similar to Microsoft PowerPoint.
●Google Forms is closely integrated with Sheets. It lets users create online forms for data entry, such as a survey or sign-up sheet. The data is automatically entered into a spreadsheet in Google Sheets.
●Google Drawings can be used to draw shapes, text, and other elements for basic illustrations or annotated photos.
If you are using a PC or Mac, all of these applications can be accessed via Google Drive (drive.google.com). On mobile devices, the standalone apps for Docs, Sheets, and Slides can be used to directly access or create documents, spreadsheets, or presentations.
Because Drive plays such a central role when it comes to organizing files, many of the instructions in this guide will refer to Drive even if it’s possible to carry out the same task in Docs, Sheets, or Slides.
Registration
Google Drive requires a Google Account, which will let you log in to any Google service, including Drive, Gmail, YouTube, and the Android mobile operating system.
Registration can be completed on a PC, laptop, or mobile device. Instructions are given below.
Some readers may also want to access Drive, Docs, Sheets and Slides using a Chromebook, Google’s stripped-down laptop. Chromebooks require a Google Account to activate, so once you are logged in you can start using the applications right away.
If you already have a Gmail account or an Android phone that you have logged into in order to download apps, there is no need to create a new account. Simply use the same login credentials on drive.google.com or the Google Drive, Docs, Sheets, and Slides apps. More information about using the apps is given later in this chapter.
How to activate a new Google Account on a PC, Mac, or Chromebook
Here are the steps to register for Google Drive:
1.Go to drive.google.com. Press the Go to Google Drive button to go to the login screen.
2.If you already have a Google Account, enter your Google username (the email address associated with the account) and password and click Sign In. You can then skip ahead to the next section in this guide.
3.If you don’t have an account, click the blue Create an account link near the bottom of the screen.
4.You’ll be prompted to submit a variety of information to create a new Google Account.
5.Enter a first and last name. Note that the name you enter will be associated with any content you create or share on any Google services, including YouTube videos, app and product reviews on Google Play, and shared Google Drive folders and files. If you are not comfortable using your real name in these situations, use an alternative first and last name.
6.In the next field, type a username that will become your new Gmail address. Or, click “I prefer to use my current email address” and enter an existing email address that you want to associate with Google Drive and other Google services. It can be any working email address, including Yahoo Mail, Live.com, Aol.com, or your work email. If the username is already registered, you will be asked to create a new one.
7.Enter a password (minimum of 8 characters long).
8.Enter your birthday. This is required. If you don’t want to use your actual DOB, make one up—it’s your chance to be 21 again!
9.Enter your gender. This is mandatory, although if you are uncomfortable with this step you can choose “Other.”
10.Mobile Phone is an optional field. I recommend entering a real mobile number here, as this can help prevent other people from taking control of your account—Google will use the number to verify you are the actual owner in case someone attempts to log in to Google Drive from a new computer.
11.Enter a series of numbers and/or letters to prove to Google that you are human (this helps prevent malicious computer programs from signing up for Google services and spreading spam).
12.Select your location.
13.Agree to Google’s Privacy Policy and Terms of Service, and click the Next Step button.
14.If you’ve done everything right, you’ll be taken to a confirmation page.
15.Check your inbox for the confirmation message that Google sent you, and click on the link to activate your Google Account. You must do this to use Google Drive, Docs, Sheets, and Slides.
16.Return to drive.google.com, and log on with your email address and the password you created.
17.To log out of Google Drive, click on your profile photo in the upper right corner of the browser window and press the Sign Out button.

If you are using an Android phone or tablet, an iPhone, or an iPad, you will need to first download the Google Drive app via the Google Play app store (Android) or Apple App Store (iOS). Later in this chapter, I explain how to get started with the mobile apps for Drive, Docs, Sheets, and Slides.
Why you should use Google’s mobile apps
Who would have thought that having access to your Google files on the go could be so much fun?
For some, this may seem bizarre. Indeed, I can confirm it’s pure torture trying to draft a letter or enter data into a spreadsheet on a tiny phone screen while seated on a bucking subway train. The mobile formatting options in the Android and iOS apps for Docs, Sheets, and Slides are limited. In addition, many users have reported lag when entering text and performing other functions.
But other features of the Google Drive mobile app—as well as the individual apps for Google Docs, Google Sheets, and Google Slides—are quite useful. For people who don’t own a laptop or PC, the mobile apps may be the only option available.
Here’s what you can do with the Google Drive app as well as the individual apps for Docs, Sheets, and Slides:
●Review existing documents, spreadsheets, presentations and drawings. This is helpful if you need to review a document on the way to a meeting, and don’t have time to take out your laptop. Files can be previewed from the Google Drive app.
●Create new documents and edit existing ones. The latest crop of apps from Google lets users edit documents. While this is convenient for creating new documents and making simple changes, it’s not possible to do serious text entry or editing unless you are using a larger tablet or an attached keyboard. On small-screen devices, text formatting is limited, and many advanced features cannot be accessed.
●Turn your phone’s camera into a portable scanner. Google Drive can instantly create PDFs using the camera on your phone or tablet, and save them to your Google Drive account. It’s a great way to make quick records of important documents.
●Upload photos and other files to your Google Drive account. The app can import photos and other files on your device into your Google Drive account.
●Share documents with other people. This is a perfect feature to activate after a meeting, meal, or phone call. After discussing a file on your phone or tablet, you can immediately share it using the apps for Google Docs, Google Sheets, and Google Slides.
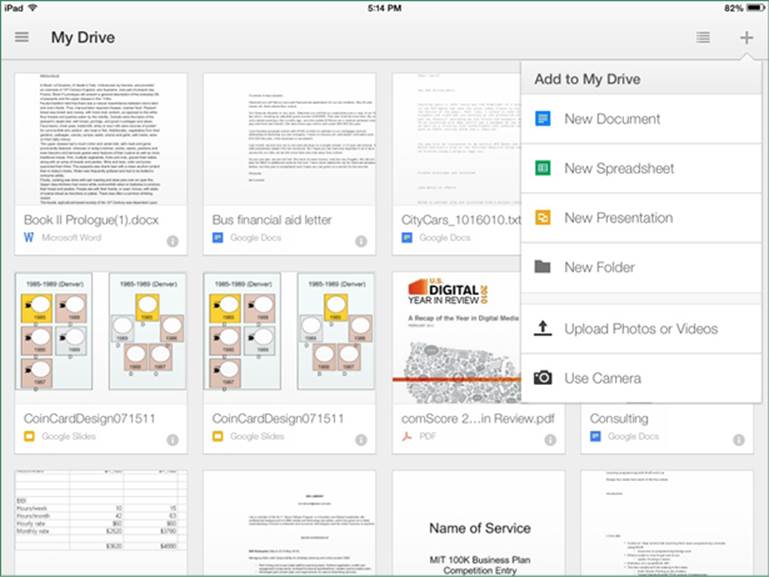
This is the interface for the Google Drive app on the iPad:
There are many more possibilities, which are described below.
What the different apps do
Google offers the following individual apps for Android and iOS phones and tablets. Key features are listed for each app.
Google Drive
The Drive app lets users:
●Preview files, including PDF, Microsoft Office, and image files.
●Upload files stored in the mobile device, including images and videos.
●Scan documents using the device’s camera. The images are automatically turned into PDFs, which are then stored in My Drive.
●Organize files and folders.
Google Docs
This app can be used for:
●Editing Microsoft Word and Google Docs documents, including typing and deleting text and applying basic formatting (text size, fonts, bullet lists, etc.).
●Sharing documents with other users.
●Inserting tables and comments.
Google Sheets
The Google Sheets app lets users handle the following tasks:
●Opening and editing spreadsheets created in Google Sheets or Microsoft Excel.
●Creating and editing formulas.
●Applying limited formatting (fonts, background colors, borders, justification, number formats, etc).
It’s possible to view charts in the Sheets app, but chart creation is not supported. In addition, there is no AutoSum button, meaning there is no way to automatically apply functions to cells or groups of cells.
Google Slides
The Google Slides mobile app has a limited feature set:
●Editing text in PowerPoint or Slides presentations.
●Previewing the presentations.
●Reviewing and editing speaker notes.
●Add new slides.
●Adding images, shapes, and text boxes (PowerPoint only)
It’s not yet possible to insert or edit animations or other more sophisticated formatting and features.
Sharing and printing
Docs, Sheets, and Slides allow users to share files or links with other Google accounts. However, this is currently limited to files that have been created in Docs, Sheets, or Slides. Sharing is not possible with Microsoft Office files, PDFs, or other non-Google formats.
Printing from a mobile device can be done through Google Cloud Printing, but setup is required (see the section about Printing, later in this chapter).
Installing apps on Android and iOS
Accessing Drive, Docs, Sheets, and Slides on a phone or tablet involves downloading the relevant apps and then activating them. If you haven’t already done so, it will be necessary to create a Google account in order to use Drive or any of the productivity apps. Note that apps only work on Android devices and Apple products that use iOS, such as the iPhone and iPad.
For BlackBerry and Windows phone users, there are no native Google apps for Drive, Docs, Sheets, and Slides. However, it is still possible to access Google Drive via a mobile Web browser on practically any device. The mobile Web option (http://m.google.com) gives users limited viewing, editing, and printing capabilities.
Android
Because the Android mobile operating system is a Google product, and Drive, Docs, Sheets, and Slides are also Google products, it’s very easy to get the apps up and running on practically any Android phone or tablet. Some phones and tablets may already have the apps installed.
If you can’t find Drive on your Android device, open Google Play (the app store for Android) and download Drive, followed by Docs, Sheets, and Slides.
When opened for the first time, the apps should automatically detect your Google account, either through the account you use on Google Play or the Gmail app. To add another Google account, tap the menu button in the upper left corner of the screen and tapAdd account.
The individual apps are small and quick to download and install.
iOS
Installing the apps for Google Drive, Docs, Slides, and Sheets on an iPhone or iPad requires a visit to the Apple App Store. You will need to provide existing Google credentials to use the apps, or follow the steps described in the Registration section earlier in this chapter to create a new account.
When you open the app, you will be prompted to enter the login credentials for an existing account, or create a new account. After logging into Drive, the iOS device will save your credentials for Docs, Sheets, and Slides.
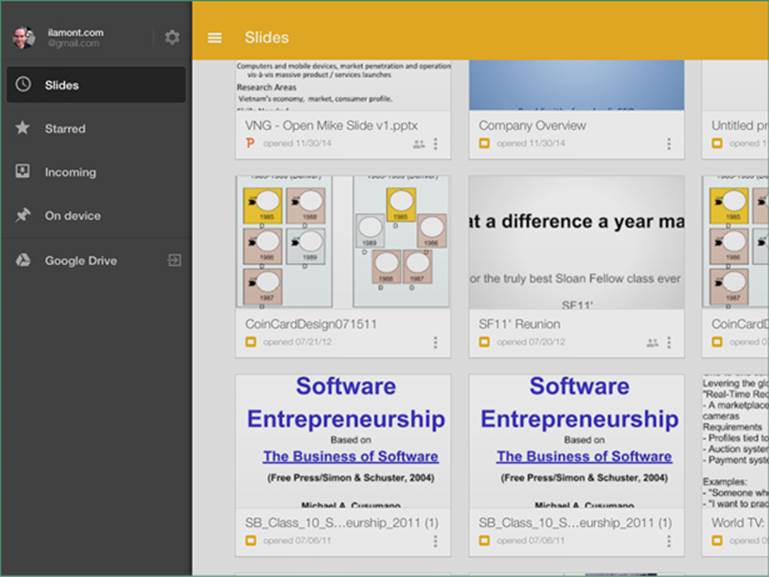
You can also use multiple Google Accounts on a single device. Tap the Menu icon (three horizontal lines) to display the account being used (see screenshot), and then tap the profile photo or email address displayed.
There are several very useful features in the iOS versions of these Google apps:
●Offline editing. Edit documents without an Internet connection.
●Collaborative editing. People can simultaneously edit a document.
●Edit Microsoft Office documents. This feature lets users make edits to existing Word, Excel, and PowerPoint files.
I have also noticed some buggy behavior in the iOS apps, including files failing to open in Docs and Sheets. However, Google is quite diligent about fixing problems with the iOS apps, which are used by millions of people.
Navigating the main screen in Google Drive
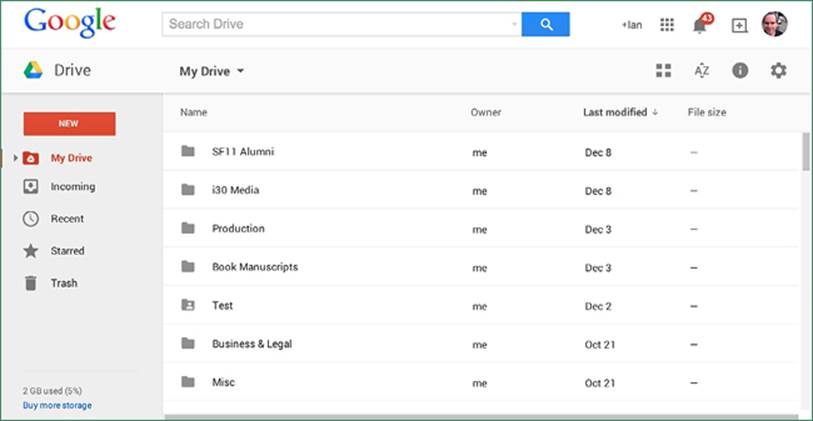
When you log onto Google Drive for the first time on a PC, laptop, or Chromebook, you’ll see something like this:
Older Google Drive accounts may show a slightly different interface that uses a Create button instead of a New button. To switch to the new interface, click the gear icon and select Experience the new Drive.
There are many elements on the screen, but here are the ones you really need to pay attention to:
New button
The New button is where most of the action in Drive takes place. The button is similar to the New menu option in many desktop software applications to create a new file. Pressing New will display options for creating the following types of files and folders:
●Google Docs. Select this option to create a new document.
●Google Sheets. Creates a new spreadsheet.
●Google Slides. Creates a new presentation.
●More. Options include creating a new online form in Google Forms or a drawing in Google Drawings.
The New button also has options for creating a new folder (for instance, “History Class” or “2015 Northeast Sales”) as well as options for uploading files and folders.
My Drive
My Drive displays the folders in your Drive account on the left side of the browser screen. Click the small triangle next to My Drive to expand or collapse the list.
The list of files and folders takes up the central area of the browser window. Click a folder to see the files it contains. When you first start using Google Drive, the list will seem short. Trust me: It won’t stay that way for long!
Incoming, Recent, Starred and Trash
Below My Drive on the left side of the browser window are additional groups of files and folders:
●Incoming includes shared files and folders (learn more about sharing and collaboration in Chapter 6)
●Recent is a reverse-chronological list of files that you have created, uploaded, or edited.
●Starred consists of files that you have marked with a star (to do this, select the file on the Google Drive main screen, click the More actions icon, and then click Add star).
●Trash holds deleted items in a holding pattern until you delete them for good or restore them (useful in case you change your mind). To get rid of an item for good, select it and click the Delete forever link at the top of the list.
Special options for selected files and folders
There are several icons that appear at the top of the Drive window after you select a folder or file name:
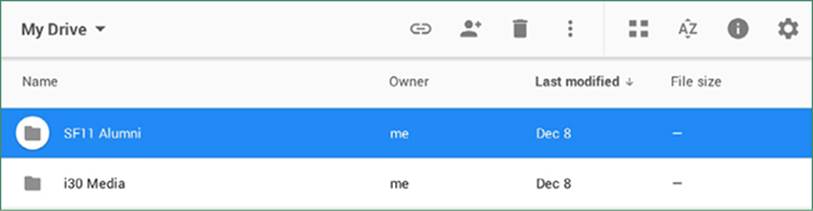
Here’s what the icons do:
Get link. The chain icon lets you copy the link of the selected file. However, unless the file is public (see How to enable public editing in Chapter 6) the link can only be used by people who have sharing rights for the file in question.
Share. The silhouette icon lets you share selected files or folders with others. Click the icon, enter an email address, and select the level of sharing:
●Can edit
●Can comment
●Can view
A more detailed explanation about sharing files and folders can be found in Chapter 6, Collaboration.
Trash icon. This icon makes it easy to remove files. Just press the garbage can, and the selected items will be put in the holding pen for Trash. Permanently deleting the files requires an extra step, as described earlier.
More actions. The three vertical dots icon expands a new menu with options to open files or folders, create new folders, add stars, rename the selected file or folder, view details about the selected file or folder, or download the file or folder contents to your hard drive.
Grid view/list view. This button toggles the view of files and folders, using large icons or a list of the contents.
Sort options. The AZ button switches between alphabetical and date-based lists of folders and files.
Settings. The gear icon accesses Google Drive’s settings, described later in this guide.
Once you are comfortable with Google Drive’s main screen and some of the basic commands, you can refer to the glossary of keyboard shortcuts at the back of this guide to quickly navigate the screen and activate basic features.
Preview mode
Clicking or tapping certain types of files in My Drive will open them in Preview mode. Here’s an example of a PDF file being previewed in a browser window:
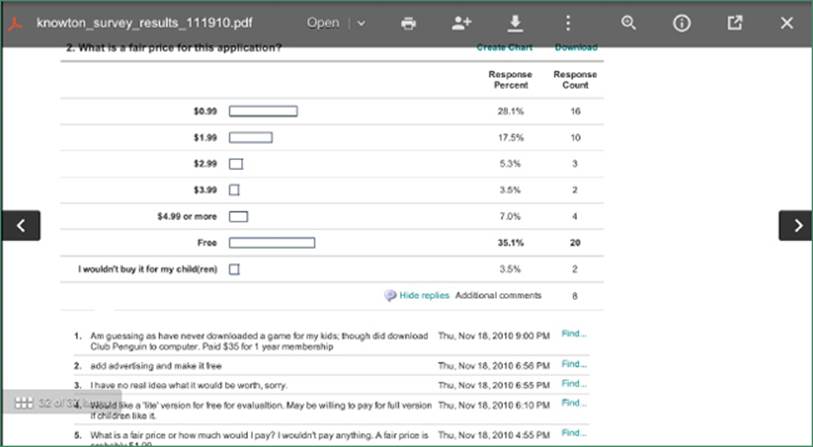
The toolbar is a quick way to print, download, share, or open the file for editing or conversion. Functions include:
Open. Lets users select a third-party application to open the file (see Chapter 5 for more information about installing third-party apps).
Print. Sends the file to the local or network printer. Certain previewed documents can also be saved as PDFs.
Share. Clicking the icon that looks like a person and a plus symbol brings up the Share dialogue, which lets you email a link to view or edit the file (see Chapter 6, Collaboration).
Download. The down arrow downloads a copy of the file to your hard drive.
More actions. Clicking the three vertical dots lets you rename or “star” the document (i.e., mark the file for future reference or follow-up).
Zoom. Examine the file close up, to better see certain details.
More details. View the file type, size, sharing information, and other settings.
Click the “X” to shut the preview and return to My Drive.
Note that native Google Docs, Sheets, and Slides files won’t preview—they will simply open in the relevant Google application.
In the Google Drive mobile app, Preview mode extends to Google Docs, Sheets, and Slides files. To edit them, tap the pencil icon at the top of the screen.
Organizing Google Drive
You’re going to use Google Drive a lot. Over the course of a year, scores of letters, reports, spreadsheets, shared folders with other people (more on that in Chapter 6), and other types of files will end up in your Google Drive account. Using the apps within Google Drive, you can create as many documents, spreadsheets and presentations as you want. For non-Google formats such as Microsoft Word documents or .jpg images, there is a cap (currently 15 gigabytes, but I expect this to rise) that comes with your Google Account.
It can be tricky finding a specific file once you have hundreds listed on your Google Drive homepage. The following section will describe some steps you can take to tame the clutter.
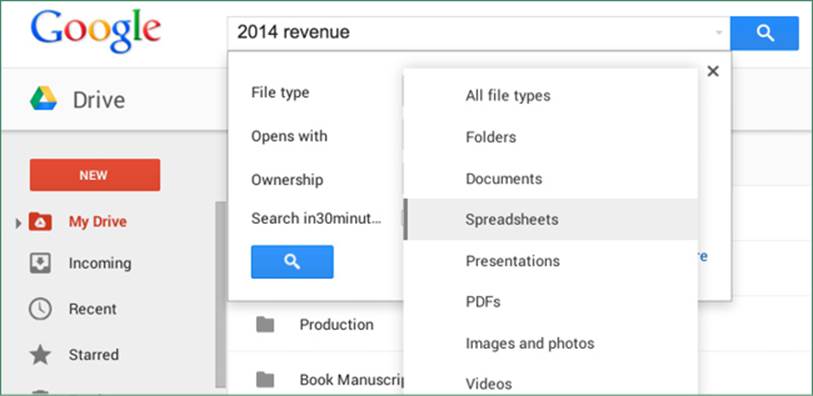
How to use search in Google Drive
The search field is located at the top of the browser window. It lets you search the contents of every file in your Google Drive repository. It may not seem important now, but once you have a lot of files in Drive, you’ll find yourself using it all of the time.
Here’s what you need to know about search in Drive:
●You can search for the file name (“Christmas wish list”), or a portion of the file name (“wish”).
●You can search for text or keywords that appear in the body of a document, spreadsheet, or presentation.
●Use Search Options to search by file type (for example, only PDFs) or search shared files or files that are visible to the public.
How to use folders
While search in Google Drive is effective, it doesn’t work so well when you have lots of files or need to collaborate with people on groups of files. For these reasons, I recommend creating folders in Google Drive. Folders are easy to set up:
1.Press the New button and select Folder.
2.Name the folder and press Create.
3.On Google Drive’s main page, drag files to the folder you just created.
It’s also possible to create subfolders within a Google Drive folder.
An alternate way of managing your Google Drive files and folders is to use the Google Drive application. See Chapter 7, How to add files to Google Drive using a PC or Mac.
Printing
Printing a document, spreadsheet, presentation, or drawing is straightforward—in most cases, it’s simply a matter of clicking the Print icon.
However, setting up printers can be tricky, particularly when wireless printers are involved.
Printing with a wired printer
If you are using a home or office printer connected to a PC or laptop with a USB cable, printing is easy:
1.Open the document in the Google Chrome browser.
2.Make sure the printer is turned on, loaded with paper, and no other jobs are in the queue.
3.Click the print icon and follow the instructions.
Chromebooks do not have direct printing functionality—you’ll need to set up Google Cloud Print (see below).
Google Cloud Print and wireless printers
If you have access to a wireless-enabled “Cloud Ready” printer, you can print Google Docs, Sheets, and Slides documents from PCs, laptops, Chromebooks, and mobile devices. This is possible using Google Cloud Print, which connects devices to printers via Wi-Fi networks.
There are special considerations when using Google Cloud Print:
●Google Cloud Print requires extra installation steps. Users of Android devices may also have to install the Google Cloud Print app before they can print from their phones or tablets.
●Google Cloud Print services are associated with individual Google accounts. If you have multiple Google accounts, make sure that you use the same account when you are attempting to print.
Google advises owners of Cloud Ready printers to first follow the manufacturers’ instructions relating to connecting the printer to your local Wi-Fi network. Then, follow these steps:
PCs and laptops
1.Once the printer has been connected to the network, it should be shown as an available printing option when using Google Docs, Sheets, or Slides in the Google Chrome browser.
2.If not, use Chrome to visit http://www.google.com/cloudprint/learn/ and click the Try it now button.
3.If you still don’t see your printer in the list, go to http://www.google.com/landing/cloudprint/ in Chrome and click the Add Cloud Ready printer button, and follow the instructions for your printer.
4.When trying to print a document using Google Cloud Print, you may see options to “print” to Google Drive, commercial services, and other mobile devices. These are used for remote printing or sending PDF files.
Android phones and tablets
1.Google Cloud Print services may already be enabled. To check, open the Google Docs app, select a file, and then Share & export > Print. If you see the wireless printer in the list, you can start printing.
2.If not, open the Google Play app store and find the Google Cloud Print app. Install it.
3.Go to the menu (the three bars icon) and select Add printers. If the printer has already been added to another computer or device on the network, it may not be visible, but it should still be available for the next step.
4.When using Share & export > Print in the Google Docs, Sheets, and Slides apps, available Cloud Ready printers will be displayed.
IOS phones and tablets
Google Cloud Print services should be visible when opening a document in the Google Docs, Google Sheets, or Google Slides apps. Go to More > Share & export > Print and select Google Cloud Print to see available printers.
If you do not see a Cloud Ready printer that has already been configured, make sure you are logged into the same Google account that you used to add the printer to the network.
Google Cloud Print and wired printers
It’s possible to attach a wired printer to Google Cloud Print.
Why would you want to do this, considering a PC or laptop can send print jobs directly to the printer, without Google Cloud Print?
The answer: Other laptops, PCs, and mobile devices on the same network will be able to wirelessly print Google Docs, Sheets, and Slides files. It’s a cool feature, albeit one that requires extra setup steps to make it work.
Here are the instructions for enabling a wired printer to be used with Google Cloud Print services:
1.Make sure the wired printer is turned on and connected to the PC or laptop you are using.
2.Launch Google Chrome, and click the Settings icon (three bars in the upper right corner of the browser window).
3.Click Show Advanced Settings.
4.Scroll down to Google Cloud Print and click Manage.
5.Under Classic Printers, click the Add Printers button.
6.You will be presented with a list of detected printers, as well as the option to automatically add printers in the future (see screenshot). Make sure the appropriate checkboxes are selected, and then click Add Printers.

Once Google Cloud Print is enabled for a wired printer attached to a PC or a laptop, the printer will not need to be configured for other computers and devices connected to the same wireless network.
Working with Microsoft Office formats
Google knows that most of its users work with Microsoft Office files. Even if you don’t have Microsoft Office installed, colleagues or classmates may email you Office attachments, or they may insist you send them Office attachments because they don’t use Google’s online office suite.
Google has made it relatively easy to convert files between Microsoft Office and Google Docs, Sheets, and Slides. In addition, Google has added functionality to its mobile apps, Chromebooks, and the Google Chrome Web browser that lets users edit the original Word, Excel, and PowerPoint files.
However, there are some limitations associated with native editing and converted documents, as described in the following pages.
Direct editing of Microsoft Office formats
Users can edit Microsoft Word, Excel, and PowerPoint files in Google Docs, Sheets, and Slides using Office Compatibility Mode. This feature comes built into Chromebooks and the mobile apps for Android and iOS, and can be activated on the Chrome browser on PCs and Macs (go to Window > Extensions, search for Office Editing for Docs, Sheets & Slides and install).
However, there are some limitations:
●Office Compatibility Mode will not work with Internet Explorer, Firefox, Safari, or other browsers.
●Files with the .doc, .docx, .xls, .xlsx, .ppt, and .pptx extensions can be edited if they were created in Microsoft Office 2007 or newer versions of Microsoft Office. Older files (created in Microsoft Office 2003 and earlier) are not supported unless they are resaved with a more recent version of Microsoft Office.
●It may not be possible to edit large documents, especially large Excel spreadsheets.
Note: Collaborative editing (described in Chapter 6, Collaboration) is not possible when Microsoft Office files are opened for editing. However, it is possible to convert Office files to the equivalent Google formats for collaborative editing.
Converting Microsoft Office formats to Google formats
When you upload a Word document, Excel spreadsheet, or PowerPoint presentation to Google Drive, you have the option of converting them to the equivalent formats in Google Docs, Sheets, and Slides.
Microsoft Office formats that can be converted include:
●Word (.doc, .docx)
●Excel (.xls, .xlsx)
●PowerPoint (.ppt, .pptx)
Converting these formats not only lets you edit them in Docs/Sheets/Slides, but also lets you collaborate on them with other people (see Chapter 6).
There are some drawbacks, however:
●Microsoft formatting may be stripped out or replaced with formatting elements that look quite different in Google applications. This is not much of an issue for a simple report or spreadsheet, but it can be a big problem for brochures, presentations, and other files that have sophisticated formatting.
●Some features available in Microsoft Office are not available in the equivalent Google format, or are implemented much differently. Examples include Track changes and comments.
●If the file needs to be brought back into Microsoft Office, another conversion process will have to take place using Google’s Download as feature.
Conversion can take place automatically during the upload process. Alternately, you can select the uploaded file in Drive and use one of the following methods to convert it:
●Right-click over the selected file and choose Open with.
●Click the More Actions icon (which looks like three vertical dots) at the top of the screen and select the option to open it in Google Docs/Sheets/Slides.
●Preview the file, then select the Open with option.
All materials on the site are licensed Creative Commons Attribution-Sharealike 3.0 Unported CC BY-SA 3.0 & GNU Free Documentation License (GFDL)
If you are the copyright holder of any material contained on our site and intend to remove it, please contact our site administrator for approval.
© 2016-2026 All site design rights belong to S.Y.A.