Google Drive and Docs in 30 Minutes (2nd Edition) – The unofficial guide to the new Google Drive, Docs, Sheets & Slides (2015)
Chapter 2. Google Docs
Google’s suite of apps has many uses. However, if I had to name the killer feature, it would be the ability to instantly create or edit online documents, spreadsheets, presentations and other types of files from any Web browser or Chromebook, or the free apps for Android and iOS phones and tablets. They are a cheap, quick and effective substitute for Microsoft Office.
This chapter will explain how to get started with Docs, the most popular application in the suite after Google Drive. Docs is also the easiest one to get started with. Go to docs.google.com to get started, or download the Google Docs app for Android and iOS.
Please also refer to the book website (googledrive.in30minutes.com) for additional resources. The site includes a FAQ, as well as short videos to help you get up to speed with creating documents and other files.
Docs basics
Docs was launched in 2006. At the time, there were no other programs in the suite. It’s still the most popular standalone application—everyone needs to use a word processor in the course of conducting business, attending school, or taking care of personal matters. It’s more than adequate for performing the following tasks:
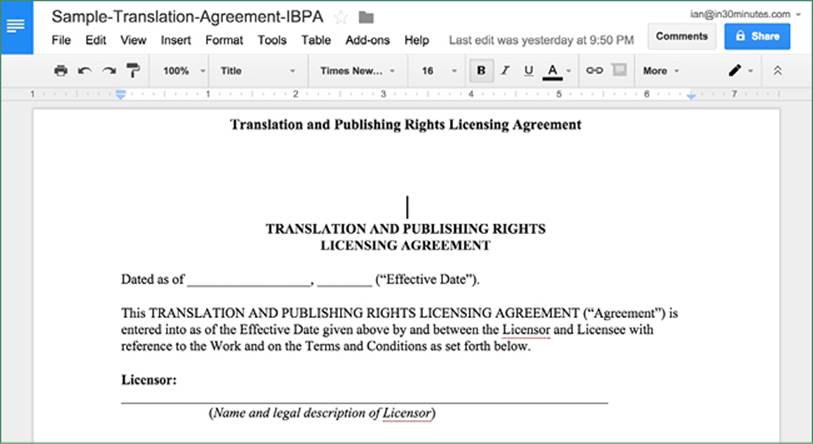
●Composing a letter (see screenshot, below).
●Writing a speech.
●Building a report with graphics and a table of contents.
●Preparing an itinerary or event schedule.
●Building a resume.
●Exporting PDFs.
●Printing.
Is Docs suitable for creating more complex documents, such as a doctoral dissertation or a slick newsletter? The answer to both questions is “no.” You’ll still need to use Microsoft Word or professional-grade publishing tools for heavy-duty footnoting or formatting.
But for other tasks, Docs does the job. Further, it offers features that haven’t yet been introduced to Microsoft Office, such as Research, Drawings, and Add-ons. I use Docs to write reports and letters and rely heavily upon collaboration features (see Chapter 6) when I am preparing new In 30 Minutes guides for publication.
In this section, I’ll cover the basics. They include:
●Creating, naming, and saving files (these instructions apply to other Google applications, including Sheets, Slides, and Drawings).
●Applying simple formatting changes.
●Exporting and printing.
Once you are comfortable with the basic commands, you may want to refer to the helpful glossary of keyboard shortcuts in the back of this guide.
Navigating Google Docs (browser/Chromebook)
It’s possible to open an existing Google Docs file directly from Google Drive. However, it’s also possible to open a file from the Google Docs home screen, which is distinct from Google Drive’s main screen.
This is what the Google Docs home screen looks like in a Web browser or Chromebook:
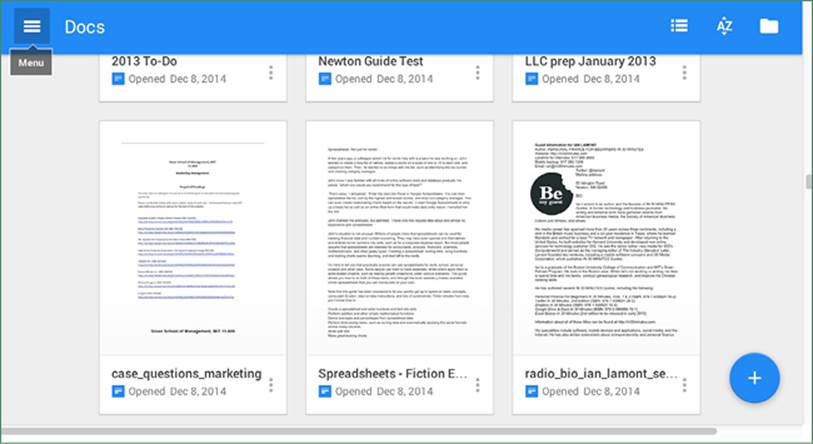
Here’s what the icons do:
Menu. The icon that looks like three bars lets you switch to Drive, Sheets, or Slides, or access Settings, which includes Offline editing (see Chapter 7, Working offline).
List View/Grid View. Switches between thumbnails of the Google Docs and Word documents stored in your account, and a list view that shows the titles.
AZ button. Changes how the view is sorted (for instance, By title or Last modified).
Open File Picker. The folder icon lets users search for documents, and upload new documents.
Plus icon. The large icon on the bottom of the screen creates a new Google Docs document.
Next to each document, you will also notice an icon that looks like three dots. This is the More icon, which displays the following functions:
●Rename
●Remove
●Open in new tab
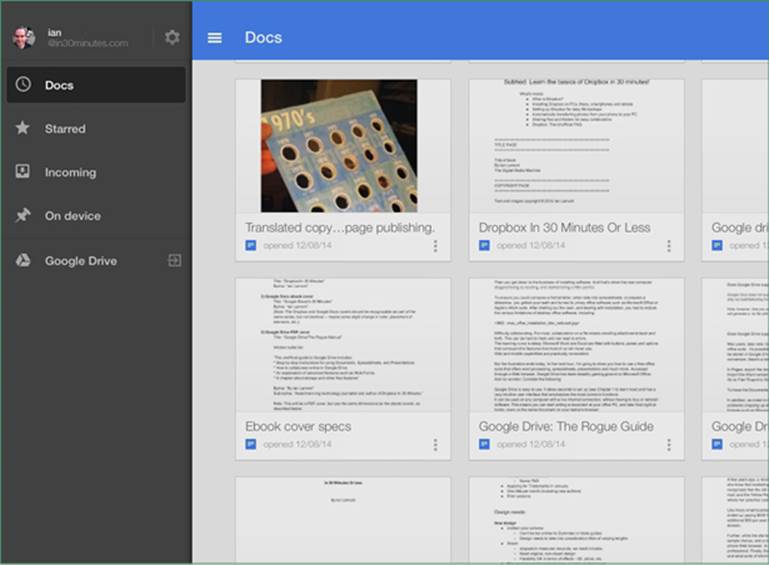
Navigating Google Docs (Android/iOS)
The Google Docs mobile app has a similar set of icons. The Plus and List View/Grid View icons have the same functions as the browser version of Docs, but the Menu icon has additional functions:
●Starred—These are documents that you have “starred” for future reference or follow-up.
●Incoming—These documents have been created by other Google users and shared with you. If it’s empty, it means no one has shared documents with you (yet).
●On device—Documents which are saved locally, and are therefore accessible for offline editing (see Chapter 7).
The More icon in the Google Docs mobile app has additional functionality:
●Rename
●Share & export
●Keep on device
●Details
●Remove
How to create a new document in Docs
Browser/Chromebook
1.Open drive.google.com and log on.
2.From Google Drive main screen: Click the New button on the left side of the screen. You will see different formats to choose from. Pick Google Docs.
3.From Google Docs main screen: Click the “+” icon.
4.A blank document will appear (see screenshot, below). You can start typing right away.
5.To change the name of the document, click the default “untitled” name at the top of the screen.
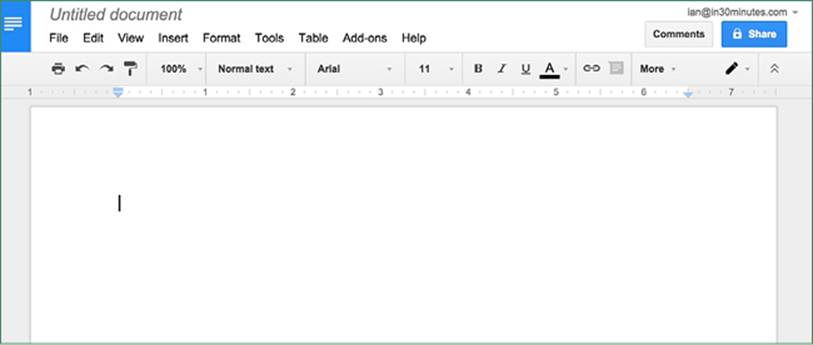
The document is now ready for you to add text, pictures and other elements. You can type some text to get started. There is no “save” function—Docs auto-saves as you type.
To close the document and return to the Google Docs home screen, tap the blue icon with white lines in the upper left corner.
Android/iOS
1.Open the Google Docs app.
2.Click the large “+” icon.
3.Enter a name for the document.
You can now begin typing or adding other elements to the file. To close the document and return to the Google Docs home screen, tap the blue icon in the upper left corner of the screen.
How to rename a document
Browser/Chromebook
To rename a document while it’s open, simply double-click the existing title, and enter a new name.
A document can also be renamed by clicking the More icon from the Google Docs home screen, or by selecting the file in Google Drive and then clicking the More icon or right-clicking and selecting Rename.
Android/iOS
From the Google Docs home screen, tap the More icon next to the file in question and select Rename.
How to format a document
The following section covers formatting for Google Docs in a browser or Chromebook. Because formatting options in the Google Docs mobile app are very limited, I advise switching to a browser or Chromebook to format a document.
If you’ve used Microsoft Word or formatted email with Outlook or a Web-based email program such as Yahoo Mail or Gmail, most of the menu selections and buttons in the Docs toolbar (shown below) will look familiar:

The Print icon should be self-explanatory. Other toolbar formatting buttons include:
●Paragraph styles. Besides Normal Text, a limited number of heading styles are available.
●Fonts. You can choose from about a dozen serif, sans-serif and special fonts and change the size.
●Font decoration. Bold/underline/italics can be activated with buttons, as well as text color (the underlined letter A) and background color.
●Text alignment. Indentation, centered text, flush right.
●Internal/External Links. The chain icon lets you add URLs to selected text, as well as links to internal bookmarks (which can be placed using the Insert > Bookmark command).
Additional formatting options are available via the Format menu.
Inserting images, page numbers, and more
The Insert command on the browser-based version of Google Docs is an easy way to import various graphic, text and other objects, including:
●Images. Upload a photo, drag a photo, reference a photo’s URL, or even take a photo with a webcam. Once the image is inserted, select it to show the text-wrapping options.
●Drawings. Selecting this brings up the Google Drawings application (see Chapter 5), and lets you make quick diagrams.
●Page numbers. The options for numbering pages are more limited than Microsoft Word, but for letters or simple reports, it’s adequate.
●Footnotes. These are automatically numbered at the bottom of the page.
●Special characters. The list includes math symbols, arrows, non-Roman scripts, and even game pieces.
●Page break.
●Headers and Footers. Unlike Microsoft Word, which allows the creation of sophisticated graphics and other header/footer elements, Google Docs only has simple text and formatting options for the header and footer.
●Table of Contents. This function lets users create a simple TOC based on headings in the body of the document.
●Comments. Comments appear in the right margin, and are color-coded if collaborators have access.
Note that the Insert options on the Google Docs app for iOS and Android are limited.
Import and export options
Heavy users of Google Docs frequently have to import Microsoft Word documents or export Word and PDF files. There are additional conversion features supported by Google Docs.
Exporting Word, PDF, and text formats
Docs auto-saves what you are doing as you type. There are other options to save, download, and export your file, using the File menu:
●Rename. Select File > Rename, or click the title at the top of the browser window and retype the new name over the existing name.
●Make a copy. This creates an identical version of the Google Docs file, and prompts you to give it a new name.
●Download as. This is an export function and lets users save documents as:
●Microsoft Word (.docx).
●OpenDocument (.odt).
●Text and Rich Text (.txt and .rtf).
●PDF. Note that on-screen formatting in Google Docs does not always match what comes out in the PDF, but for basic letters, résumés, and reports, it’s usually a close match.
●Web page. Docs will save your file as an HTML document.
On the Google Docs app for Android and iOS, export options are hidden under the More icon. Select Share & Export to access the following options:
●Share. Share access with another person via email.
●Send a copy. Create a PDF or Word version of the document via email, Bluetooth, etc.
●Print. Send the document to a printer, or send a PDF version to another paired device. Note that printing a paper copy of the document requires configuring Google Cloud Print beforehand.
●Make a copy. Duplicates the document, and prompts you to rename the new version.
●Save as Word. Saves a .docx version of the current document.
How to publish to the Web
This option is something you won’t find in Microsoft Word, Apple Pages, or other desktop word processors. Docs lets you publish a live copy of the document to a Google URL. The Web copy looks similar to the view that you see in Google Docs, but it can’t be edited.
While this function is not supported on the Google Docs app for Android and iOS, it’s easy to publish a document to the Web using the browser and Chromebook versions of Google Docs:
1.Open the document.
2.Go to File > Publish to Web.
3.Link is selected by default, but if you want HTML code to display the document on a blog or another Web page, choose Embed.
4.Use the optional Published content & settings to restrict the viewership or disable republishing when changes are made.
5.Click the Publish button.
6.Copy the link or embed code, and/or choose one of the options to share the document via Gmail, Facebook, or Twitter.
The Web copy will be updated if you or a collaborator update the original in Google Drive. Note that page numbers, line spacing, and other formatting may be changed or stripped out. Nevertheless, publishing to the Web is a great way to share content on Google Docs with a wider audience.
Note: publishing to the Web makes the document available to anyone who has a copy of the URL, so this option should not be used for sensitive documents.
How to import documents from other programs
Google Drive and Docs can import and convert all kinds of files. Compatibility may be limited, however. This is especially true of .doc or .docx files that were heavily formatted in Microsoft Word, as well as heavily formatted .rtf files . If the formatting is not supported in Docs, it will be changed or stripped out.
In the screenshot below, the image on the left is an actual .docx file, made with a Microsoft Word newsletter template. The image on the right is the same file after it was imported into Google Drive and converted into a Docs file. As you can see, the headers and images were stripped out and the fonts don’t match up:
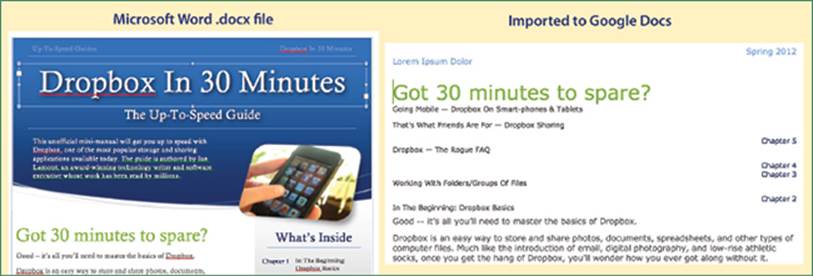
This is not a big issue for simple reports, letters, and résumés which are not heavily formatted.
Uploaded Microsoft Word .doc or .docx files may be automatically converted to Google Docs editor format, but conversion can be disabled in the settings for Google Drive. To convert a Microsoft Word document to Google Docs after it’s been uploaded, refer to the instructions in Chapter 1, Working with Microsoft Office formats.
There are several ways to upload a .docx, .doc, .rtf, or .txt file:
Google Drive
1.In Google Drive’s main screen, click the New button and File upload.
2.Navigate your hard drive to choose the .doc, .docx, .txt, or .rtf file that you want to import.
3.After uploading is complete, the file will appear in your My Drive list. Microsoft Word documents have a blue symbol next to them (a blue “W”).
Google Docs (browser/Chromebook)
1.Click the Open file picker icon, which looks like a folder, and click Upload.
2.In the pop-up that appears, Click the Select a file from your computer button or drag the file you want to upload to the center of the pop-up.
3.Microsoft Word files should automatically be converted to Google Docs editor mode. If not, open the file and select File > Open with Google Docs.
Google Docs (Android/iOS app)
1.Click the Open file picker icon (the folder) and select Device storage.
2.Locate the document in the device’s storage, and tap its name.
Microsoft Word documents will automatically open in Office Compatibility Mode for editing. To convert them to Google Docs, follow the instructions in Converting Microsoft Office formats to Google formats.
Templates and more
There are additional features in Google Docs that beginners will find extremely useful. Note that some of them are not available in desktop word processors, such as Microsoft Word and Apple Pages.
Templates
You can create documents, spreadsheets and presentations from pre-existing templates that Google or users have created.
There are hundreds of templates available. I’ve used templates for invoices, résumés and fax cover letters:
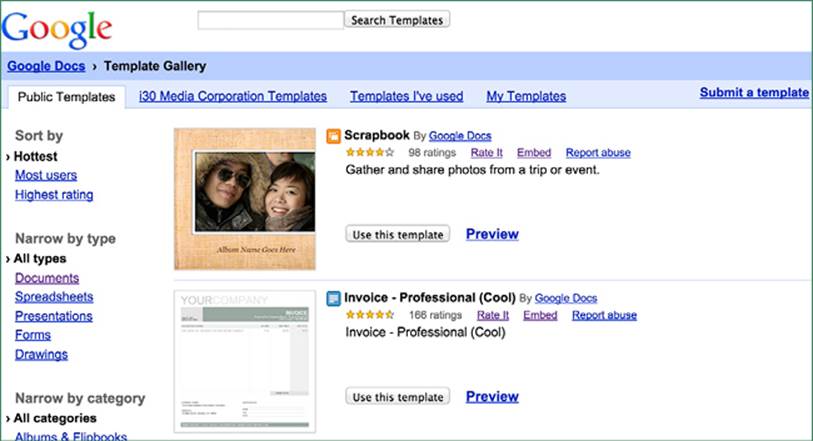
To use a template, do the following:
1.In an existing document, go to File > New > From template. Alternately, visit https://drive.google.com/templates
2.Click the Public templates tab, if it’s not already selected.
3.Use the Search templates field to find a specific type of template, or browse the categories on the left.
Translate Document
This feature will create a rough translation of your document in any language that Google Translate supports. It can give people who speak a different language a rough idea of what your document is about.
However, the quality of the translations is poor. It is not a substitute for a qualified human translator.
To use this feature:
1.Open your document.
2.Go to Tools > Translate document.
3.Select the language you want to translate your document to, and click the Translate button.
4.Google Docs will create a new copy of the document with the title “Translated copy of [original name]”.
Research, Collaboration, Offline Editing, and Add-ons
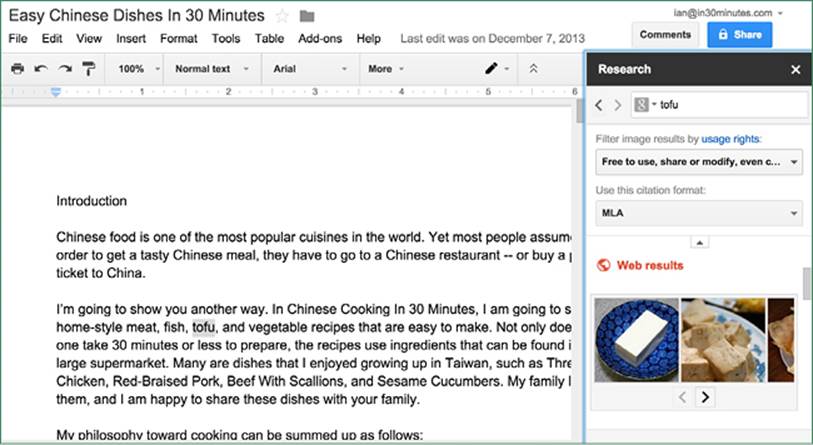
Google Docs has a neat feature called Research which lets you quickly find information about a highlighted topic in your document. It also displays online images to insert into the document. The images can be sorted so only free-to-use pictures and logos are shown. Clicking on the image will insert it into the document with a footnote so you don’t have to type in the source information.
To use this feature, highlight a word or phrase in your document and then select Tools > Research. A sidebar will appear with the Web and image results. Click the tiny triangle at the top of the sidebar to see the licensing and footnote options:
Collaboration lets users invite other people to collaboratively edit a document in real time. It has to be seen to be believed. Chapter 6 explains how to activate collaboration features.
Offline files is a very helpful feature for working in Docs while you are traveling or otherwise not connected to the Internet. Extra setup steps may be required, as described in Chapter 7.
Add-ons are small applications that work with Google Docs. To access them, click Add-ons > Get add-ons. Examples include a quick citation generator, as well as an add-on that creates a table of contents in the sidebar.
All materials on the site are licensed Creative Commons Attribution-Sharealike 3.0 Unported CC BY-SA 3.0 & GNU Free Documentation License (GFDL)
If you are the copyright holder of any material contained on our site and intend to remove it, please contact our site administrator for approval.
© 2016-2026 All site design rights belong to S.Y.A.