Android Application Development For Dummies, 3rd Edition (2015)
Part III. Creating a Feature‐Rich Application
Chapter 12. Handling User Input
In This Chapter
![]() Working with EditText views
Working with EditText views
![]() Creating date pickers and time pickers
Creating date pickers and time pickers
![]() Setting up alert dialogs
Setting up alert dialogs
![]() Validating user input
Validating user input
Rarely does an application not allow users to interact with it. Whether they use text, a date or time picker, a radio button, a check box, or any other input mechanism, users need to interact with your application in one way or another. This chapter focuses solely on user input in the form of alert confirmation, free‐form text, and dates and times.
Creating the User Input Interface
The most common input type is the EditText view, used for free‐form text entry. With an EditText view, you can provide an onscreen keyboard or let the user choose the physical keyboard (if the device provides one) to enter input.
Creating an EditText view
In Chapter 10, you created a view layout XML file, named fragment_task_edit.xml, that contained these lines of code:
<EditText
android:id="@+id/title"
android:layout_width="match_parent"
android:layout_height="wrap_content"
. . .
android:hint="@string/title"/>
The snippet creates an input mechanism on the screen where the user can type a task title. The EditText view spans the width of the screen and occupies only as much height as it needs. When the view is selected, Android automatically opens the onscreen keyboard to allow user input. And when the EditText is empty, it displays a hint to the user describing what it’s for; in this case, the hint text is “Title”.
The previous example takes a minimalistic approach, compared to the following EditText example, which is also present in the fragment_task_edit.xml layout file:
<EditText
android:id="@+id/notes"
android:layout_width="match_parent"
android:layout_height="wrap_content"
. . .
android:gravity="top"
android:hint="@string/notes"
android:minLines="5"/>
This code creates the body description text of the task. The layout width and height are the same as in the EditText view in the previous example. These three properties outline the differences in this EditText definition:
· minLines: Specifies the height of the EditText view. Because the EditText view is a subclass of the TextView object, they share this property. This code specifies a minimum of five lines for the EditText object onscreen so that the view resembles a text input mechanism for long messages.
 Compare this view to the body portion of any email client, and you can see that they’re much the same — the body is much larger than the subject. In this case, the body is much larger than the title.
· gravity: The default gravity of an EditText aligns text to the middle of the view when the user places focus into the field, though it isn’t what users would expect when they work with a multiline input mechanism. To position the cursor at the top of the EditTextview, as users might expect, you must set the gravity of the EditText view to top, to force the text to gravitate to the top of the EditText input as shown on the right in Figure 12-1.
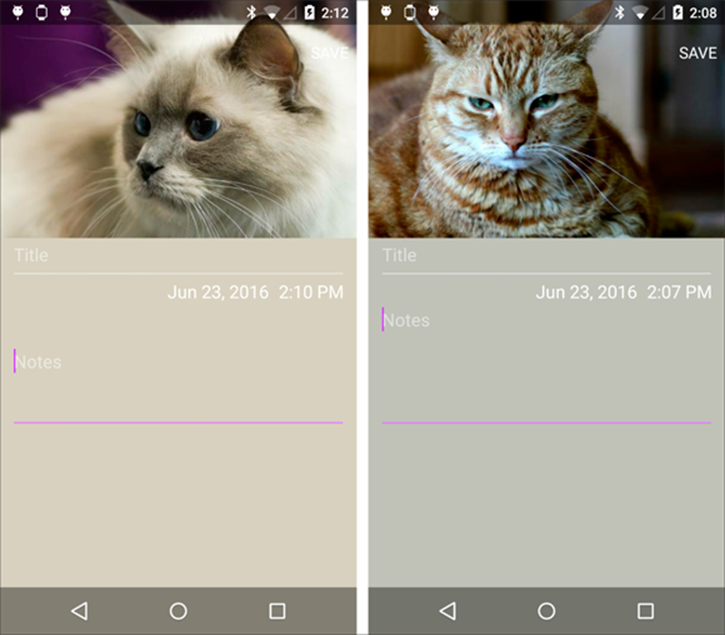
Figure 12‐1: An EditText view, with gravity set to center (left) and top (right).
Displaying an onscreen keyboard
The EditText view is responsible for the onscreen keyboard display. Because most devices have no physical keyboard, an onscreen keyboard must be present for interaction with the input mechanisms. One property that the EditText view provides is a way to manipulate the visual aspect of the onscreen keyboard.
You adjust the onscreen keyboard because different EditText input types might need different keys. For example, if the EditText is a phone number, the onscreen keyboard should display only numbers. If the EditText value is an email address, however, the onscreen keyboard should display common email style attributes — such as the at (@) symbol.
 Configuring the onscreen keyboard properly can significantly increase the usability of your application.
You can configure the way the onscreen keyboard looks by using the inputType property on the EditText view. For example, if you set android:inputType="number" on the body EditText, the keyboard displays number keys rather than letter keys, as shown inFigure 12-2.
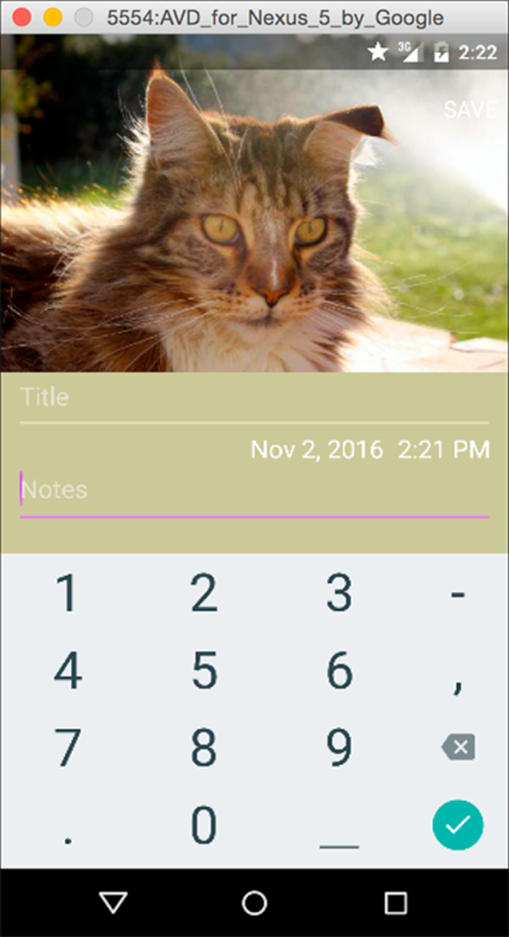
Figure 12‐2: Keyboard customized for number entry.
The inputType attribute has too many options to cover in this book, but you can examine the full list at http://d.android.com/reference/android/widget/TextView.html#attr_android:inputType.
Getting Choosy with Dates and Times
A Task Reminder application without a way to set the date and time is a poor Task Reminder application — it would be only a simple task list application.
If you’ve programmed dates and times in another programming language, you realize that building a mechanism for a user to enter the date and time can be a painstaking process. The Android platform comes to your rescue by providing two classes to assist you: DatePickerand TimePicker. These pickers also provide built‐in classes for opening a dialog where the user selects a date and time. Therefore, you can either embed the DatePicker or TimePicker into your application’s views or use the DialogFragment classes.
Creating picker buttons
The fragment_task_edit.xml file contains two TextViews to help show the DatePicker and TimePicker (under the EditText definitions described earlier). You can see these two buttons in Listing 12-1 .
Listing 12‐1: The Date and Time TextViews
<!-- The time button. -->
<TextView
style="@android:style/TextAppearance.Medium"
android:id="@+id/task_time"
android:layout_width="wrap_content"
android:layout_height="wrap_content"
android:layout_below="@id/title"
android:layout_alignEnd="@id/title"
android:layout_marginEnd="3dp"/>
<!-- The date button. -->
<TextView
style="@android:style/TextAppearance.Medium"
android:id="@+id/task_date"
android:layout_width="wrap_content"
android:layout_height="wrap_content"
android:layout_toStartOf="@id/task_time"
android:layout_alignBottom="@id/task_time"
android:layout_marginEnd="10dp"/>
You already added these buttons to your layout in Chapter 10. See that chapter for a description of what this code does.
Date and time pickers
Every task in your app should have an associated date and time, which can be used to set reminders for the user at a future date. As noted in the previous section, you already have two TextViews that represent the task’s date and time. All that remains is to
· Show the task’s date and time.
· Create picker dialogs that display the date and time.
· Hook up the dialogs to the TaskEditFragment to let the user change the date and time.
Showing the task’s date and time
Open TaskEditFragment and add the lines in bold:
public class TaskEditFragment extends Fragment {
. . .
// Constants for saving instance state
static final String TASK_ID = "taskId";
static final String TASK_DATE_AND_TIME = "taskDateAndTime"; →6
// Views
View rootView;
EditText titleText;
EditText notesText;
ImageView imageView;
TextView dateButton; →13
TextView timeButton;
// Some information about this task that we'll store here until we
// save it to the database
long taskId;
Calendar taskDateAndTime; →19
@Override
public void onCreate(Bundle savedInstanceState) {
super.onCreate(savedInstanceState);
// If we're restoring state from a previous activity, restore the
// previous date as well
if (savedInstanceState != null) {
taskId = savedInstanceState.getLong(TASK_ID);
taskDateAndTime = →29
(Calendar) savedInstanceState.getSerializable
(TASK_DATE_AND_TIME);
}
// If we didn’t have a previous date, use "now"
if (taskDateAndTime == null) { →35
taskDateAndTime = Calendar.getInstance();
}
. . .
}
@Override
public View onCreateView(LayoutInflater inflater, ViewGroup container,
Bundle savedInstanceState) {
. . .
// From the layout, get a few views that we're going to work with
rootView = v.getRootView();
titleText = (EditText) v.findViewById(R.id.title);
notesText = (EditText) v.findViewById(R.id.notes);
imageView = (ImageView) v.findViewById(R.id.image);
dateButton = (TextView) v.findViewById(R.id.task_date); →53
timeButton = (TextView) v.findViewById(R.id.task_time);
. . .
updateDateAndTimeButtons(); →58
return v;
}
@Override
public void onSaveInstanceState(Bundle outState) {
super.onSaveInstanceState(outState);
// These two fields may have changed while our activity was
// running, so make sure we save them to our outState bundle so
// we can restore them later in onCreate.
outState.putLong(TASK_ID, taskId);
outState.putSerializable(TASK_DATE_AND_TIME, taskDateAndTime); →71
}
/**
* Call this method whenever the task’s date/time has changed and
* we need to update our date and time buttons.
*/
private void updateDateAndTimeButtons() {
// Set the time button text
DateFormat timeFormat = →80
DateFormat.getTimeInstance(DateFormat.SHORT);
String timeForButton = timeFormat.format(
taskDateAndTime.getTime());
timeButton.setText(timeForButton);
// Set the date button text
DateFormat dateFormat = DateFormat.getDateInstance(); →87
String dateForButton = dateFormat.format(
taskDateAndTime.getTime());
dateButton.setText(dateForButton);
}
}
Now if you run the app, you will see that each edit page has a date and time appear underneath the title. Here’s an explanation of what the additions in the previous code do:
→ 6 Much like you needed to create a constant string to name the taskId data when it’s saved in onSaveInstanceState, you do the same here for the date and time information.
Saving field names in Android
Android activities and fragments aren’t like standard Java objects, where you can store information in a field in the object and expect it always to be there. Normally in Java, if a person object is set to the name "Michael", you can expect that name to always be "Michael", but surprisingly this isn’t always the case in Android.
Unlike in Java, Android can destroy activities and fragments at any time. These elements can also be re‐created later — and a re‐created activity needs to look indistinguishable from one that was never destroyed and re‐created. Android reserves the right to destroy objects when memory is running low, but it retains the ability to re‐create them later, to offer the user a seamless experience.
If you store the string "Michael" in a field named name, that field isn’t saved automatically if the activity or fragment is destroyed and re‐created. You have to save the field manually, by storing it in a bundle in onSaveInstanceState() and restoring it from the savedInstanceState bundle in onCreate().
Remember: Anytime you add a field to an activity or a fragment, you must add the appropriate code to the onSavedInstanceState() and onCreate() methods to save it and restore it — otherwise, your app will behave strangely in some circumstances but not in others.
→ 13 Creates two TextViews, one for the date of the task and one for the time. You will make each one individually clickable later in the chapter so that the user can set them.
→ 19 The taskDateAndTime field stores both the date and the time for the task. Remember: Because this is a new field that may be changed, you must remember to save it in onSaveInstanceState and restore it in onCreate!
→ 29 When the activity is created, check and see if there was already a date and time saved for it. If there was, then read it out of the savedInstanceState bundle and save it to taskDateAndTime.
→ 35 If there wasn’t a previous value set for the date and time, then just use the current time.
→ 53 Finds the date and time TextViews from the layout.
→ 58 At the end of onCreate, call updateDateAndTimeButtons to . . . you guessed it, update the date and time buttons. You will end up calling this method a few times later, whenever the user changes the values of the date and time.
→ 71 If Android is shutting down this activity and asking you to save your instance state, then make sure to save the taskDateAndTime to the outState bundle. Calendar objects can be serialized (stored as data), so this line uses the putSerializable()method to save them.
Find out more information about Java serialization at http://java.sun.com/developer/technicalArticles/Programming/serialization.
You can save all kinds of other types into bundles, such as ints, longs, strings, parcelables, and other exotic elements, so check http://d.android.com/reference/android/os/Bundle.html to see the full list.
→ 80 Updates the time button text. First, get a Time formatter by calling DateFormat.getTimeInstance(DateFormat.SHORT), which will return times such as "5:45 PM" in the United States (but different formats in other locales). Then call format on this formatter to format the taskDateAndTime. Finally, update the timeButton with the string returned by the formatter.
→ 87 Updates the date button text. This is the same as the code for the time formatter, but it uses getDateInstance rather than getTimeInstance. Because we didn’t specify a type of format to the getDateInstance call, it will use the default, which evaluates to strings like "Jan 19, 2038" in the United States.
Creating date and time pickers
Android has built‐in date picker and time picker dialogs that you may use to let users pick dates and times. They require a little bit of massaging to work in recent versions of Android, so here is how you use them.
First, create a file in the com/dummies/tasks/fragment directory named DatePickerDialogFragment.java. The DatePickerDialogFragment will be a reusable dialog fragment that “wraps” a standard Android DatePickerDialog.
In the file, put the following code:
/**
* A lightweight wrapper for a DatePickerDialog that wraps the dialog
* in a fragment.
*/
public class DatePickerDialogFragment extends DialogFragment { →5
static final String YEAR = "year"; →6
static final String MONTH = "month";
static final String DAY = "day";
public static DatePickerDialogFragment newInstance( →10
Calendar date) {
DatePickerDialogFragment fragment =
new DatePickerDialogFragment();
Bundle args = new Bundle();
args.putInt(YEAR, date.get(Calendar.YEAR));
args.putInt(MONTH, date.get(Calendar.MONTH));
args.putInt(DAY, date.get(Calendar.DAY_OF_MONTH));
fragment.setArguments(args);
return fragment;
}
@Override
public Dialog onCreateDialog(Bundle savedInstanceState) {
OnDateSetListener callback = (OnDateSetListener) →27
getFragmentManager()
.findFragmentByTag
(TaskEditFragment
.DEFAULT_FRAGMENT_TAG);
Bundle args = getArguments(); →33
return new DatePickerDialog(getActivity(), callback,
args.getInt(YEAR),
args.getInt(MONTH),
args.getInt(DAY));
}
}
Here’s what the code does:
→ 5 Every dialog that you use in your app should extend DialogFragment. For more information about DialogFragment, visit http://d.android.com/reference/android/app/DialogFragment.html.
→ 6 The constant strings that will be used in this class to read and write the year, month, and day in bundles.
→ 10 Creates a newInstance method like you created for the TaskEditFragment earlier in this chapter. The newInstance method knows how to construct an instance of the date picker for a given date. First, it constructs a newDatePickerDialogFragment. Then, it constructs the bundle of parameters containing the year, month, and day, which the DatePickerDialogFragment will use to create a dialog showing that date.
→ 27 Finds the TaskEditFragment that created this dialog by name. You’ll use that fragment as the edit callback, so that when the user chooses a new date in the DatePicker dialog, the dialog calls back into the edit fragment to set the new date.
→ 33 Constructs a new DatePicker dialog that is hosted by this fragment. It sets its Year, Month, and Day to the values specified in the args bundle.
Next, you do the same thing but for the TimePickerDialogFragment. Create TimePickerDialogFragment.java in com/dummies/tasks/fragment, and add the following code:
/**
* A lightweight wrapper for a TimePickerDialog that wraps the dialog
* in a fragment.
*/
public class TimePickerDialogFragment extends DialogFragment {
static final String HOUR = "hour";
static final String MINS = "mins";
public static TimePickerDialogFragment newInstance(
Calendar time) {
TimePickerDialogFragment fragment =
new TimePickerDialogFragment();
Bundle args = new Bundle();
args.putInt(HOUR, time.get(Calendar.HOUR_OF_DAY));
args.putInt(MINS, time.get(Calendar.MINUTE));
fragment.setArguments(args);
return fragment;
}
@Override
public Dialog onCreateDialog(Bundle savedInstanceState) {
OnTimeSetListener listener = (OnTimeSetListener)
getFragmentManager()
.findFragmentByTag(
TaskEditFragment
.DEFAULT_FRAGMENT_TAG);
Bundle args = getArguments();
return new TimePickerDialog(getActivity(), listener,
args.getInt(HOUR),
args.getInt(MINS), false);
}
}
This code is basically identical to the DatePickerDialogFragment in the previous listing, but this one is for time rather than for dates.
Sometimes you may need to use savedInstanceState to restore the state from previous instances. However, in this case, the dialog already does it for you, so you can safely ignore savedInstanceState in this method.
Hooking up the date and time pickers to the fragment
Now modify the TaskEditFragment to open the date and time pickers when the date or time is clicked.
Edit TaskEditFragment.java and add the code in bold:
public class TaskEditFragment extends Fragment {
. . .
@Override
public View onCreateView(LayoutInflater inflater, ViewGroup container,
Bundle savedInstanceState) {
. . .
updateDateAndTimeButtons();
// Tell the date and time buttons what to do when we click on
// them.
dateButton.setOnClickListener( →15
new View.OnClickListener() {
@Override
public void onClick(View v) {
showDatePicker();
}
});
timeButton.setOnClickListener(
new View.OnClickListener() {
@Override
public void onClick(View v) {
showTimePicker();
}
});
return v;
}
/**
* A helper method to show our Date picker
*/
private void showDatePicker() {
// Create a fragment transaction
FragmentTransaction ft = getFragmentManager().beginTransaction() →40
DatePickerDialogFragment newFragment = →42
DatePickerDialogFragment.newInstance( taskDateAndTime );
newFragment.show(ft, "datePicker"); →45
}
private void showTimePicker() { →48
// Create a fragment transaction
FragmentTransaction ft = getFragmentManager().beginTransaction();
TimePickerDialogFragment fragment = →52
TimePickerDialogFragment.newInstance(taskDateAndTime);
fragment.show(ft, "timePicker"); →55
}
}
This code adds two methods: showDatePicker and showTimePicker. It also calls those two methods from inside OnClickListeners that are attached to the date and time text views. Here are some more details:
→ 15 Creates an OnClickListener and attaches it to the dateButton. When clicked, the OnClickListener will call showDatePicker, which is defined on line 40. The same thing is next done for the timeButton.
→ 40 The showDatePicker method does three things. First, it begins a fragment transaction using the FragmentManager, just like you did earlier in the chapter inside TaskEditActivity. Then . . .
→ 42 . . . it creates the DatePickerDialogFragment and initializes it with the appropriate values.
→ 45 Show the dialog, and name it datePicker. By naming it, Android can automatically manage its state for you if it needs to be killed and re‐created.
→ 48 The showTimePicker method does the same thing that showDatePicker did, except for times rather than dates.
→ 52 Creates the TimePickerDialogFragment and initializes it with the appropriate values.
→ 55 Shows the dialog, and names it timePicker. By naming it, Android can automatically manage its state for you if the dialog needs to be killed and re‐created.
In theory, you should now be able to run the app and click on a date or time to see the picker dialogs. However, there’s a bug in the code. The app will crash because the pickers have no way to return the value that the user picks to the TaskEditFragment. If the user selects a new date or time, how does the TaskEditFragment know?
The answer is to have TaskEditFragment implement OnDateSetListener and OnTimeSetListener.
Edit TaskEditFragment and make the following changes:
public class TaskEditFragment extends Fragment
implements DatePickerDialog.OnDateSetListener,
TimePickerDialog.OnTimeSetListener
{
. . .
/**
* This is the method that our DatePicker dialog will call when
* the user picks a date in the dialog.
*/
@Override
public void onDateSet(DatePicker view, int year, int monthOfYear,
int dayOfMonth) {
taskDateAndTime.set(Calendar.YEAR, year);
taskDateAndTime.set(Calendar.MONTH, monthOfYear);
taskDateAndTime.set(Calendar.DAY_OF_MONTH, dayOfMonth);
updateDateAndTimeButtons();
}
/**
* This is the method that our TimePicker dialog will call when
* the user picks a time in the dialog.
*/
@Override
public void onTimeSet(TimePicker view, int hour, int minute) {
taskDateAndTime.set(Calendar.HOUR_OF_DAY, hour);
taskDateAndTime.set(Calendar.MINUTE, minute);
updateDateAndTimeButtons();
}
}
These two methods are callbacks. When the user chooses a new date or time in the picker dialogs, the dialogs call back to the fragment named DEFAULT_FRAGMENT_TAG (see line 27 of DatePickerDialogFragment), in this case the TaskEditFragment, and callonDateSet or onTimeSet as appropriate.
The onDateSet method then sets the year, month, and day of taskDateAndTime, and calls updateDateAndTimeButtons. The onTimeSet method does the same, except for the time.
Try running your app! You should now be able to click any date or time, choose a new date or time, and watch that date and time update when you return to the TaskEditFragment. You should see something like Figure 12-3.
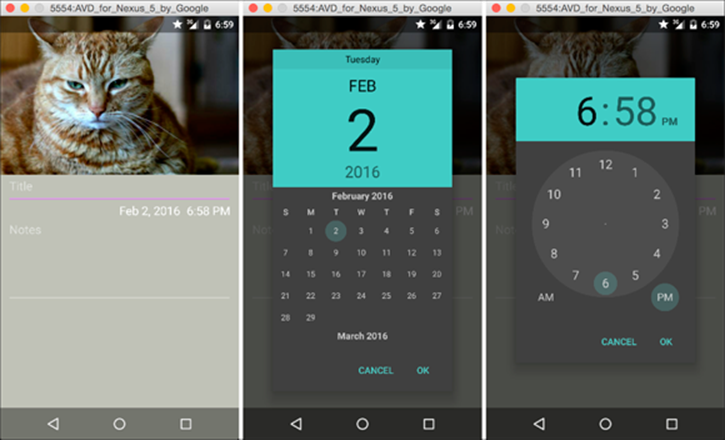
Figure 12‐3: The Edit page showing date and time (left), the date picker (middle), and the time picker (right).
If you leave the TaskEditActivity and return to it later, you may wonder why the date and time don’t remember the values you set. This is because you have not yet implemented the database to store all these values. You will do that in Chapter 13.
Creating an Alert Dialog
From time to time it may be necessary to alert the user to something that has happened. In the Tasks app, perhaps you want to display a welcome message and offer instructions on how to create a task. The Android system has a framework built around dialogs that provide you with the implementation you may need.
Various types of dialogs are available:
· Alert: Notifies the user of an important occurrence. Also allows you to set the text value of a button and the action to be performed when it’s clicked. As a developer, you can provide the AlertDialog with a list of items to display, from which the user can make a selection. You used an AlertDialog in Chapter 11 to confirm whether the user wanted to delete a task or not.
· Custom: A custom dialog created and programmed by you, the master Android developer. You create a custom dialog class by extending the Dialog base class or using custom layout XML files.
Seeing why you should work with dialogs
If you’ve never worked with an application that failed to alert you, or warn you appropriately, consider the example of an email client not notifying you that you have new email. How annoying would that be? Alerting users to important issues or choices that need to be made is an integral part of any user experience.
This list gives a few examples of using a dialog to inform the user of a message or a necessary action:
· The user is trying to input some data that is invalid.
· The network has become unavailable.
· The user needs to select a date or time (as in the Tasks app).
· The state of the phone is incompatible with the application. (It might need to have GPS enabled or an SD card added, for example.)
· The user needs to choose from a list of items.
Though this list isn’t comprehensive, it gives you an idea into what is possible with dialogs.
Choosing the appropriate dialog for a task
Though you determine which dialog to use for a given scenario, you can ask a logical series of questions to choose the appropriate one:
1. Does the user need to be able to perform an advanced action in the dialog?
An advanced action isn’t supported by the AlertDialog class.
· Yes: Create a custom Dialog class by extending the Dialog base class or creating one from a custom layout XML file. You can find more information about custom dialogs at http://developer.android.com/guide/topics/ui/dialogs.html#CustomLayout.
· No: Continue to Step 2.
2. Does the user need to answer a question such as “Are you sure?” with a Yes or No value?
· Yes: Create an AlertDialog and react to the buttons on the AlertDialog by using onClickListener() calls.
· No: Continue to Step 3.
3. Does the user need to make a selection from a simple list of items?
· Yes: Create an AlertDialog.
· No: Continue to Step 4.
4. Does the user simply need to be alerted?
· Yes: Create a simple AlertDialog.
· No: You may not need a dialog if you can notify the user another way.
Creating your own alert dialog
At times, you need to notify the user of important information by presenting a dialog. Android makes it quite simple with its introduction of the AlertDialog.Builder class, which lets you easily create an AlertDialog with various options and buttons. Your app can react to these button clicks via the onClickListener() of each button.
You used the AlertDialog.Builder in Chapter 11. Listing 12-2 shows another example of how to create one, this time using a DialogFragment.
Dialogs should always use DialogFragment in Android apps. Refer to Chapter 11 for more details.
Suppose that the user has tapped the Save button in the Tasks application, and you want to open a window (similar to the one in Figure 12-4) so that the user can confirm.
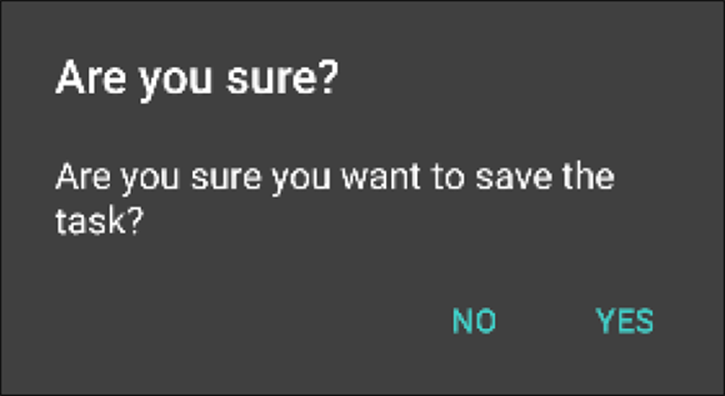
Figure 12‐4: A hypothetical confirmation AlertDialog.
In Listing 12-2, you create an AlertDialog object using the AlertDialog.Builder class and then add an AlertDialogFragment (which works similarly to DatePickerDialogFragment and TimePickerDialogFragment).
Listing 12‐2: Creating an AlertDialogFragment with the AlertDialog.Builder Class
public class AlertDialogFragment extends DialogFragment {
@Override
public Dialog onCreateDialog(Bundle savedInstanceState) {
AlertDialog.Builder builder
= new AlertDialog.Builder(getActivity()); →5
builder.setMessage("Are you sure you want to save the task?") →6
.setTitle("Are you sure?") →7
.setCancelable(false) →8
.setPositiveButton("Yes", →9
new DialogInterface.OnClickListener() { →10
public void onClick(DialogInterface dialog, int id) {
// Perform some action such as saving the item →12
}
})
.setNegativeButton("No", new DialogInterface.OnClickListener() →15
public void onClick(DialogInterface dialog, int id) {
dialog.cancel(); →17
}
});
return builder.create(); →20
}
}
The code is explained in this list:
→ 5 Sets up the AlertDialog.Builder class with the context of the AlertDialog.Builder as the current running activity.
→ 6 Specifies the message to show in the middle of the AlertDialog (as shown in Figure 12-4). The value can be a string or a string resource.
→ 7 Sets the title of the AlertDialog. The value can be a string or a string resource.
→ 8 Sets the cancelable attribute to false, requiring the user to select a button in the AlertDialog. If this flag is set to false, the user cannot tap the Back button on the device to exit the AlertDialog. Set it to true and the user can tap the Back button.
→ 9 Specifies the text on the positive button. The user clicks the Yes button to perform the action indicated on line 10. This value can be a string or a string resource.
→ 10 A block of code (ending on line 12) that defines the onClickListener() for the Yes button. The code on line 12 executes when the button is tapped.
→ 15 Specifies the text on the negative button. This button indicates that the user doesn’t want to perform the action being requested via AlertDialog. The text value of this button is set to No. It can be a string or a string resource.
→ 17 Sets the onClickListener() for the negative button. The listener provides a reference to the dialog that’s being shown. It’s called the cancel() method on the Dialog object to close the dialog when the user clicks No on the AlertDialog.
→ 20 Notifies Android to create the AlertDialog via the create() method.
To show the dialog, you start a fragment transaction in the usual manner:
FragmentTransaction ft = getFragmentManager().beginTransaction();
DialogFragment newFragment = new AlertDialogFragment();
newFragment.show(ft, "alertDialog");
Creating a dialog with the AlertDialog.Builder class is easier than having to derive your own Dialog class. If possible, create your dialog with the AlertDialog.Builder class because it gives your application a consistent user experience that’s familiar to most Android users.
When the user taps the Save button (or whatever button the code is attached to), an AlertDialog opens so that the user can confirm saving the task. This data most likely is stored in a database, as covered in Chapter 13.
You can find helpful examples of using other options on the Dialog class at http://d.android.com/guide/topics/ui/dialogs.html.
Validating Input
What happens when the user enters invalid text or no text? Input validation now enters the picture.
Input validation verifies the input before the save takes place. If a user enters no text for the title or the message and attempts to save, should she be allowed to? Of course not.
The method in which you provide validation to the user is up to you. Here are some common methods:
· EditText.setError(): If you detect that the user has tried to enter invalid text in a field, simply call setError() and pass the error message. Android then decorates EditText with an error icon and displays an error message. The message stays onscreen until the user changes the value of the field or until you call setError(null).
· TextWatcher: Implement a TextWatcher on the EditText view. This class provides callbacks to you every time the text changes in the EditText view. Therefore, you can inspect the text on each keystroke.
· On Save: When the user attempts to save a form, inspect all the form fields at that time and inform the user of any issues that were found.
· onFocusChanged(): Inspect the values of the form when the onFocusChanged() event is called — which is called when the view has focus and when it loses focus. This is usually a good place to set up validation.
The Task application provides no input validation. However, you can add validation via one or more of the methods described.
Toasting the user
The most common way to inform the user of a potential problem, such as an error in input value, is to display a Toast message. This type of message appears onscreen for only a few seconds by default.
Providing a Toast message is as simple as implementing the following code, where you inform the user of the input error:
Toast.makeText(getActivity(), "Title must be filled in", Toast.LENGTH_SHORT).show();
You might show this message when the user fails to enter a title in the title field and then clicks the Save button.
The only problem with a Toast message is that it’s short‐lived by default. A user who happens to glance away at the wrong time will likely miss seeing it. You can configure your Toast messages to appear longer by using Toast.LENGTH_LONG rather thanToast.LENGTH_SHORT, but remember that it still disappears after a slightly longer time. Use a dialog rather than a Toast for critical messages that you need to be sure a user sees.
Using other validation techniques
A Toast message isn’t the only way to inform users of a problem with their input. A few other popular validation techniques are described in this list:
· AlertDialog : Create an instance of an AlertDialog that informs the user of errors. This method ensures that the user sees the error message because the alert must be either canceled or accepted.
· Input‐field highlighting: If the field is invalid, the background color of the input field (the EditText view) can change to indicate that the value is incorrect.
· Custom validation: If you’re feeling adventurous, you can create a custom validation library to handle validations of all sorts. It might highlight the field and draw small views with arrows pointing to the error, for example, similar to the Google validation of its sign‐in window when you log on to a device for the first time.
You can use these common methods to display input validation information, or you can dream up new ways to inform users of errors. For example, Chapter 9 mentions the NotificationManager, which you can use to inform users of a problem with a background service in the status bar.
All materials on the site are licensed Creative Commons Attribution-Sharealike 3.0 Unported CC BY-SA 3.0 & GNU Free Documentation License (GFDL)
If you are the copyright holder of any material contained on our site and intend to remove it, please contact our site administrator for approval.
© 2016-2026 All site design rights belong to S.Y.A.