Android Application Development For Dummies, 3rd Edition (2015)
Part II. Building and Publishing Your First Application
 Learn how to test your Android app online at www.dummies.com/extras/androidappdevelopment
In this part . . .
Part II walks you through developing a useful Android application. You start with the basics of the Android tools and then delve into developing the screens and Home screen widgets that users will interact with. When the application is complete, you sign your application digitally so that you can publish it. You finish by publishing your application to the Google Play Store.
Chapter 3. Your First Android Project
In This Chapter
![]() Creating a new, blank project in Android Studio
Creating a new, blank project in Android Studio
![]() Understanding errors
Understanding errors
![]() Creating an emulator
Creating an emulator
![]() Running your first app
Running your first app
![]() Studying the anatomy of a project
Studying the anatomy of a project
Before you start creating that next blockbuster Android application, I walk you through creating your first Android application to help solidify a few key aspects in the Android project‐creation process. In this chapter, you create a simple “Hello Android” application that requires no coding whatsoever. What — no coding? How is that possible? Follow along as I show you.
Starting a New Project in Android Studio
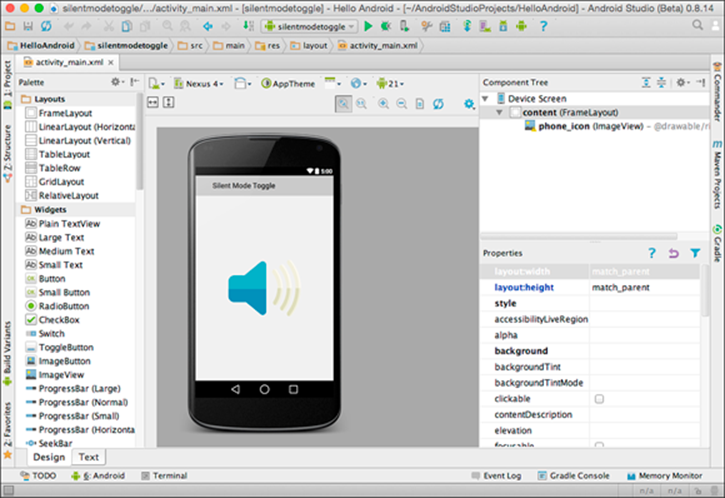
First things first: Start Android Studio. You should see a screen that looks similar to the one shown in Figure 3-1. Now you’re ready to start cooking with Android.
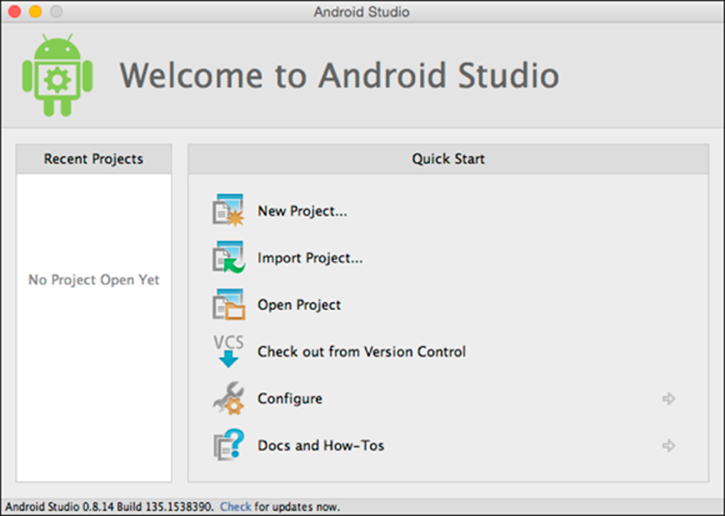
Figure 3‐1: The Android Studio development environment.
 If you haven’t set up your development environment yet, turn to Chapter 2. It shows you how to set up all the tools and frameworks necessary to develop Android applications.
Follow these steps to create your first Android application project:
1. In Android Studio, choose File⇒New Project.
The Create New Project Wizard opens, as shown in Figure 3-2.
2. Enter Hello Android as the application name.
The application name is the name of the application as it pertains to Android. When the application is installed on the emulator or physical device, this name appears in the application launcher.
3. Enter dummies.com as the Company Domain.
Your Package name should autocomplete to com.dummies.helloandroid. This is the name of the application ID, which will generally be the same as your Java package. (See the nearby sidebar “Java package nomenclature.”)
4. Choose a location for your project.
The default location will probably be fine. Click Next.
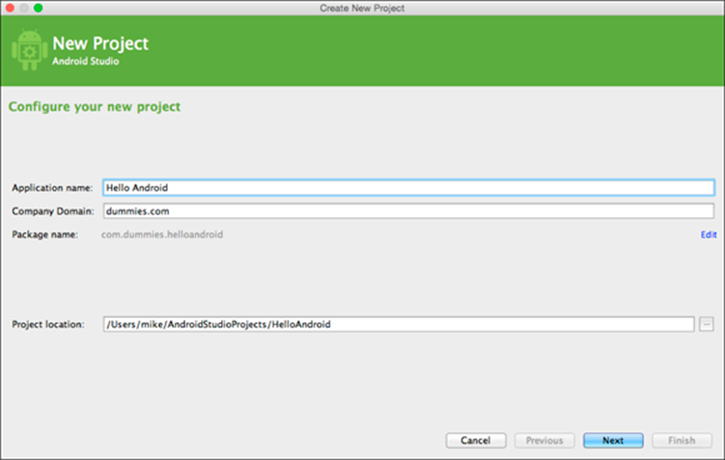
Figure 3‐2: The Create New Project Wizard.
Java package nomenclature
A package in Java is a way to organize Java classes into namespaces similar to modules. Each package must have a unique name for the classes it contains. Classes in the same package can access one another’s package‐access members.
Java packages have a naming convention defined as the hierarchical naming pattern. Each level of the hierarchy is separated by periods. A package name starts with the highest‐level domain name of the organization; then the subdomains are listed in reverse order. At the end of the package name, the company can choose what it wants to call the package. The package name com.dummies.helloandroid is the name used in this example.
Notice that the highest‐level domain is at the front of the package name (com). Subsequent subdomains are separated by periods. The package name traverses through the subdomains to get to the final package name of helloandroid.
A great example of another use for a package is having a Java package for all your web‐related communications. Any time you need to find a web‐related Java class, you can open that Java package and work on your web‐related Java classes. Packages allow you to keep your code organized.
5. Select Phone and Tablet, choose a Minimum SDK version of API 21: Android 5.0 Lollipop, and click Next.
The Minimum SDK drop‐down list identifies which application programming interface (API) you want to develop for this project. Always set the Build Target SDK to the latest version that you’ve tested your app on. When you select Lollipop, you build and test your app on devices going up to Lollipop. Doing so allows you to develop with the Lollipop APIs, which include new features such as the Material Design look and feel. If you had selected Android 2.2 as the target, for example, you wouldn’t be able to use any features introduced in Lollipop (or 2.3, 3.1, and so on).
6. In the Create Activity box, choose Blank Activity and click Next.
The Add an Activity screen appears, as shown in Figure 3-3.
7. Enter MainActivity in the Activity Name box, activity_main in the Layout name, MainActivity in the Title, and menu_main as the Menu Resource Name.
The New Blank Activity screen defines what the initial activity is called — the entry point to your application. When Android runs your application, this activity is the first one to be accessed.
The Layout name is the name of the file that will contain the layout of your activity’s user interface.
8. Click the Finish button.
You’re done! You should see Android Studio think for a few moments, and then create a new project with your new blank activity, ready for you to populate (see Figure 3-4).
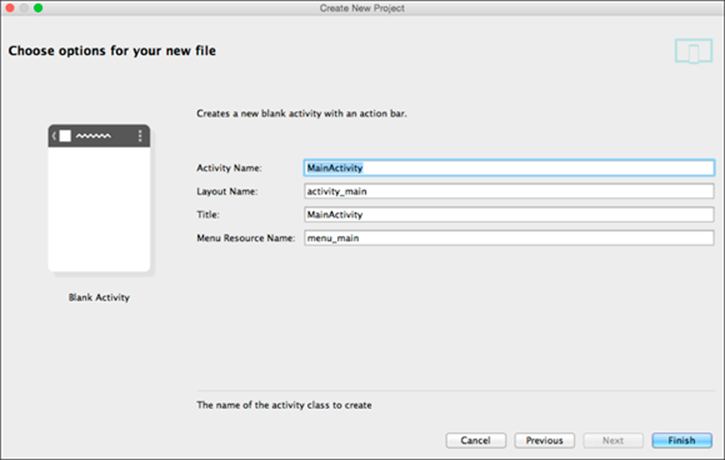
Figure 3‐3: Set up your new activity.
Understanding Android versioning
Version codes aren’t the same as version names. (Huh?) Android has version names and version codes. Each version name has a single version code associated with it. The following table outlines the version names and their respective version code. You can also find this information in the Build Target section of the New Android Project dialog box.
|
Platform Version |
API Level |
Codename |
|
4.0 |
14 |
Ice Cream Sandwich |
|
4.0.3 |
15 |
Ice Cream Sandwich |
|
4.1 |
16 |
Jelly Bean |
|
4.2 |
17 |
Jelly Bean |
|
4.3 |
18 |
Jelly Bean |
|
4.4 |
19 |
Kit Kat |
|
4.4W |
20 |
Wearables |
|
5.0 |
21 |
Lollipop |
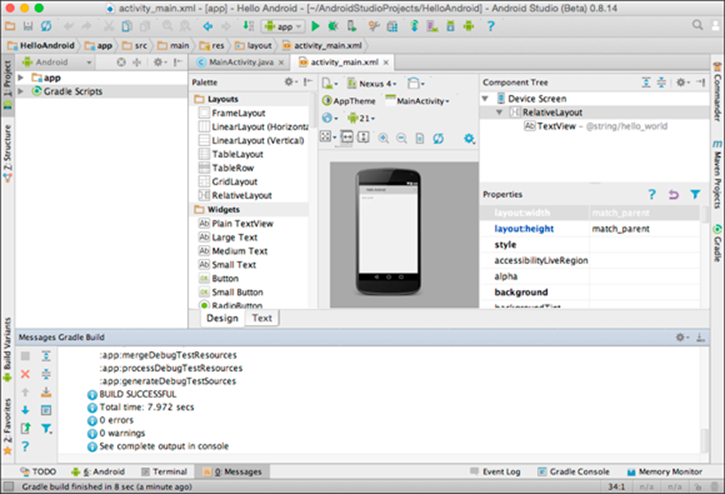
Figure 3‐4: The Android Studio development environment with your first Android project, Hello Android.
Responding to Errors
The Android project generated by Android Studio is a fresh, clean project with no compiled binary sources. You will need to understand what happens under the hood of Android Studio at a high level. Click the MainActivity.java tab in Android Studio, then changepackage com.dummies.helloandroid to org.dummies.helloandroid, like in Figure 3-5.
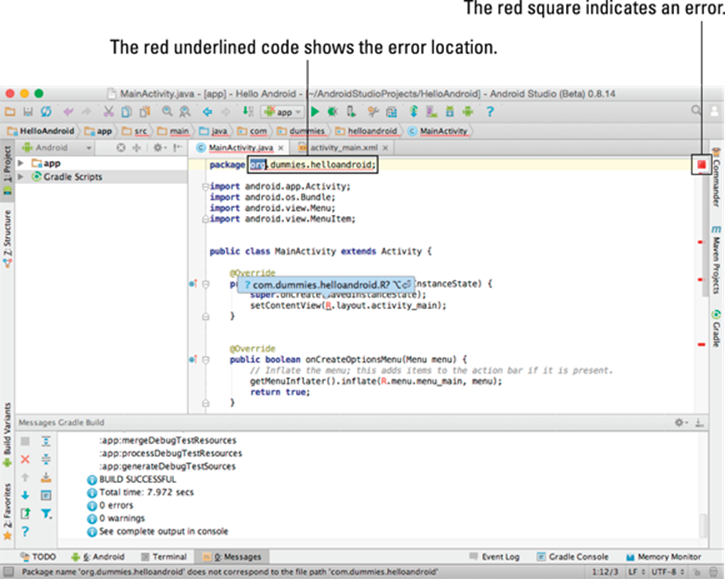
Figure 3‐5: Android Studio notifies you that something is wrong with the project.
You may notice a little red square on the upper right‐hand side of the window (refer again to Figure 3-5). That icon is Android Studio’s way of letting you know that something is wrong with the project in the workspace. If you look carefully, you’ll see a red line below it that indicates exactly where in the file the error was detected.
Now choose Navigate⇒Next Highlighted Error. The editor jumps your cursor to the location of the error so you can fix it. If you keep selecting it, you can jump from error to error. Once all the errors are fixed, Android Studio then jumps you from warning to warning until you fix all those as well. Eventually, once all your problems are fixed, the icon will turn a very satisfying green.
Now put your text cursor back on org.dummies.helloandroid. If you look carefully in the lower left‐hand corner of the screen, Android Studio gives you some assistance to fix the problem (Figure 3-6). Here it says:
Package name "org.dummies.helloandroid" does not correspond to the file path
"com.dumies.helloandroid"
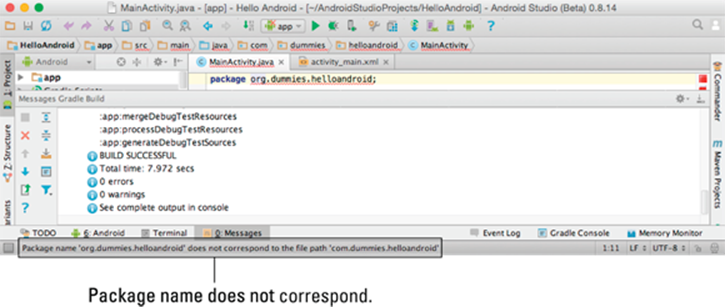
Figure 3‐6: Package name org.dummies.helloandroid does not correspond to the file path com.dummies.helloandroid.
If you don’t see it, you can choose View⇒Error Description to see the message. With your text cursor still on the error, press Alt+Enter to view a couple Quick Fix options for this error. You want to change the package name back to what it should be, so choose Set package name to com.dummies.helloandroid.
Setting Up an Emulator
You’re almost ready to run your Hello Android application! The next step is to set up an emulator.
An emulator (also known as an AVD) is an Android Virtual Device that looks, acts, walks, and talks (well, maybe not walks and talks) like a physical Android device. AVDs can be configured to run just about any particular version of Android.
Follow these steps to create your first AVD:
1. Choose Tools⇒Android⇒AVD Manager.
The AVD Manager dialog box opens.
2. Click Create a Virtual Device, then click the Nexus 5 item and click Next, as inFigure 3-7.
3. In the System Image dialog box, select the Lollipop x86 item as inFigure 3-8, then click Next.
4. In the Configure AVD dialog box, use the default AVD name or change it to a haiku.
Leave everything else alone, as in Figure 3-9.
5. Click the Finish button.
Figure 3-10 shows the completed AVD Manager dialog box. You should now see your new AVD listed under Your Virtual Devices.
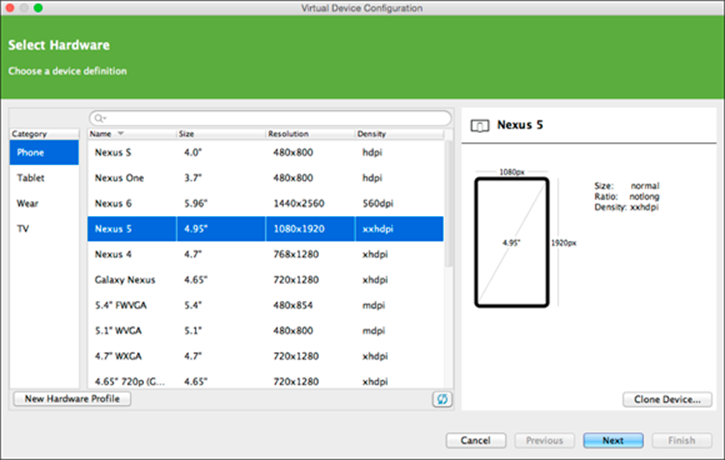
Figure 3‐7: The Select Hardware dialog box.
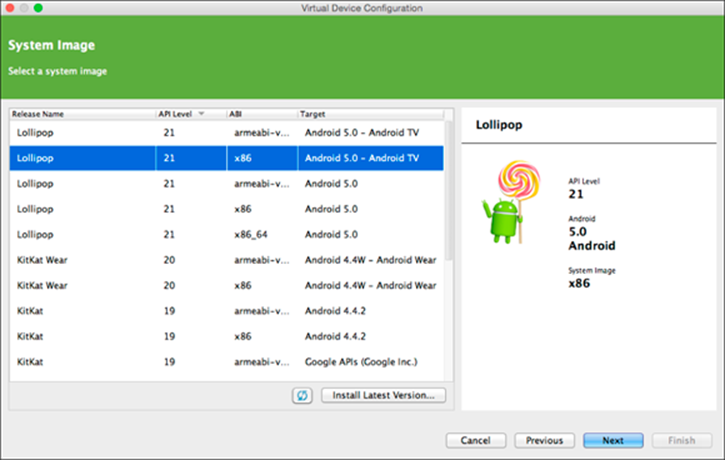
Figure 3‐8: The System Image dialog box.
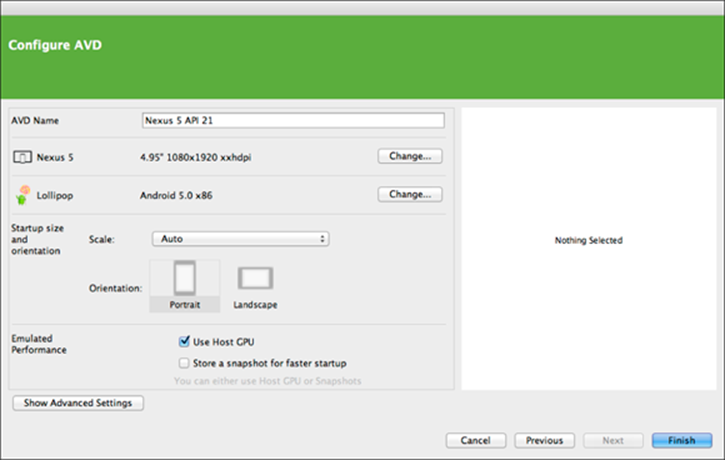
Figure 3‐9: The Configure AVD dialog box.
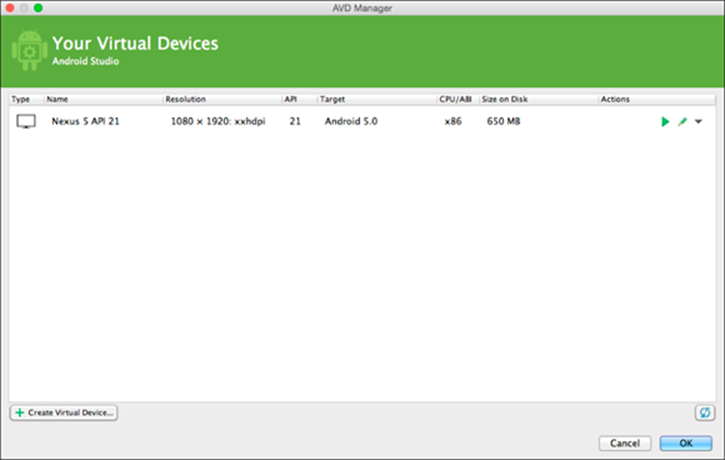
Figure 3‐10: The recently created AVD in the AVD Manager.
Running the Hello Android App
Understanding the basics of how to get an Android application up and running is a simple but detailed process. You’re now ready to see your hard work in action. You’ve created an Android Virtual Device; now it’s time to get the application running. Finally!
Running the app in the emulator
Starting your application is as simple as choosing Run⇒Run ’app’. At this point, Android Studio will compile your app. When it’s done, choose Launch Emulator and select the emulator you just created. Check Use same device for future launches, and click OK. Android Studio compiles your application, deploys it to the emulator, and then runs it, as shown in Figure 3-11.
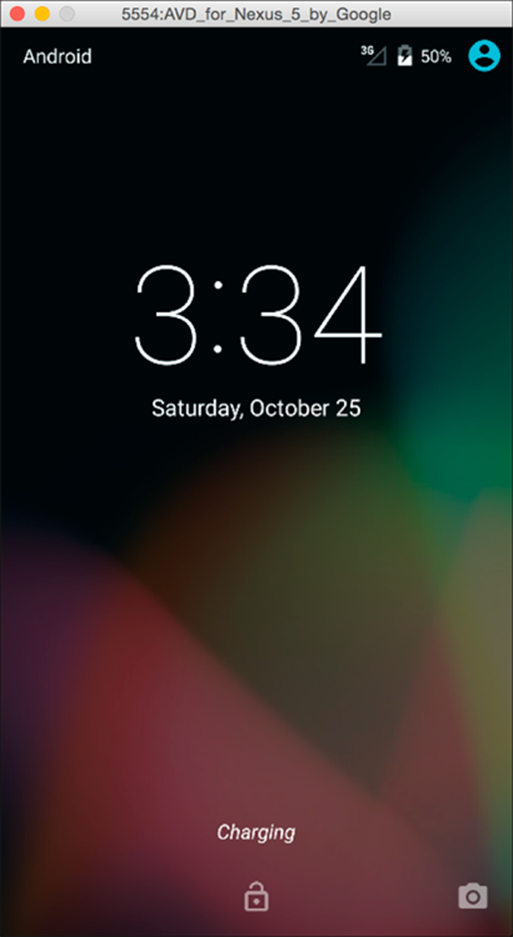
Figure 3‐11: The Android Emulator, showing the port number that the emulator is running under and the AVD name on the window’s title bar.
 Look for “HAX is working and emulator runs in fast virt mode” in the Run app log at the bottom of Android Studio, as in Figure 3-12.
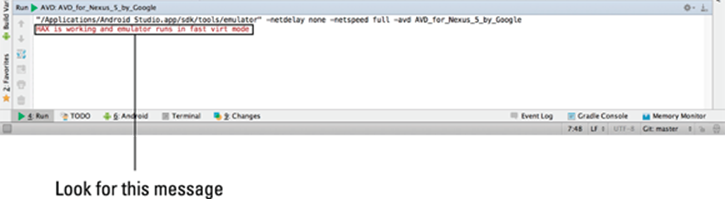
Figure 3‐12: HAX is working and emulator runs in fast virt mode.
If you don’t see this, then your emulator will likely run much slower than it could. To fix this, you will want to enable the
· Graphics acceleration
· Intel HAXM virtual machine acceleration
Visit http://d.android.com/tools/devices/emulator.html# acceleration for more information about how to enable these two features to speed up your emulator.
 Help! If your emulator never loads and stays stuck on the ANDROID screen(s), there’s no need to worry, comrade. The first time the emulator starts, it can take many minutes to finish loading because you’re running a virtual Linux system in the emulator. The emulator has to boot up and initialize. The slower your computer, the slower the emulator is in its boot process.
You can save valuable time by leaving the emulator running. The emulator doesn’t have to be loaded every time you want to run your application. After the emulator is running, you can change your source code and then rerun your application. Because you checked the Use same device for future launches option, Android Studio will reuse it when running your app.
When the emulator finishes loading, you see your app running with the words “Hello world!” like in Figure 3-13.
Figure 3‐13: The Hello Android application in the emulator.
You’ve just created and started your first Android application.
Checking app logs
You can view the logs of your application in the Android tool window, as shown in Figure 3-14. This tool window should have popped up automatically when you ran your app, but if it didn’t, you can access it by choosing View⇒Tool Windows⇒Android.
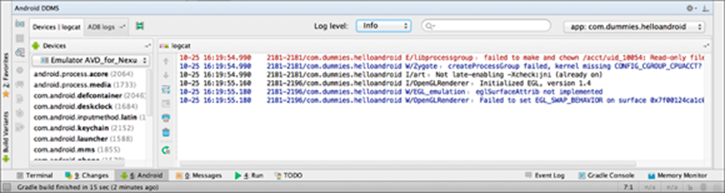
Figure 3‐14: The Android Tool window displaying logs from your app.
Inside the Android view, you’ll see your app’s log output in the logcat tab. Here’s an example log that you might see:
1885-1885/com.dummies.helloandroid I/art: Not late-enabling
-Xcheck:jni (already on)
1885-1898/com.dummies.helloandroid I/art: Profiler disabled.
To enable setprop dalvik.vm.profiler 1
1885-1885/com.dummies.helloandroid W/Resources: Preloaded drawable resource
#0x1080093 (android:drawable/sym_def_app_icon) that varies with
configuration!!
1885-1885/com.dummies.helloandroid I/am_on_resume_called: [0,com.dummies.
helloandroid.MainActivity]
The logcat view provides valuable information on the state of your application. It lets you know it’s launching an activity, shows which device you’re connected to, and shows warnings and errors. In the previous example, you can see that thecom.dummies.helloandroid.MainActivity, the activity you just wrote, was run and its on_resume was called:
1885-1885/com.dummies.helloandroid I/am_on_resume_called:
[0,com.dummies.helloandroid.MainActivity]
I’ll explain what on_resume means later in the book, but for now just know that your activity was started up as expected.
Understanding Project Structure
You’ve created your first application. You even did it without coding. It’s nice that Android Studio provides you with the tools to fire up a quick application, but it won’t write your next blockbuster application for you. The beginning of this chapter walked you through how to create a boilerplate Android application by using the New Android Project Wizard. The rest of this chapter shows you how to use the file structure that the Wizard created for you.
 The following sections aren’t ones you should skim (they’re vital!), because you’ll spend your entire Android development time navigating these folders. Understanding what they’re for and how they got there is a key aspect of understanding Android development.
Navigating your app’s folders
In Android Studio, the Project View expands to show the Hello Android project, as shown in Figure 3-15. If you don’t see the Project view, choose View⇒Tool Windows⇒Project to turn it on. Then click on Android in the upper left and select Project to view the Project view.
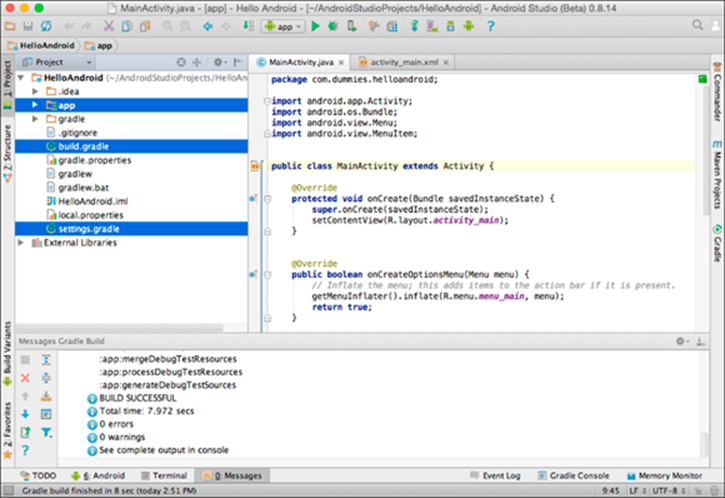
Figure 3‐15: The Project view with the Hello Android project folder structure expanded.
The Project view and Android views are both very useful. Try switching back and forth between them both to see which you prefer. For more information about the Android view, visit https://developer.android.com/sdk/installing/studio‐androidview.html.
After the Hello Android project is expanded, you’ll see a few directories and files. The important ones are
· app: Where your main app code is placed.
· build.gradle: Your top‐level build file. It’s not the only build.gradle file in your project, but it’s the one at the top. It tells gradle, the Android build system, how to build the various subdirectories in your project.
· settings.gradle: This file doesn’t have much in it right now, but it does contain the list of subdirectories that gradle needs to build. In this case, it just lists app.
Go ahead and open up the app directory and look what’s inside. Some of the interesting folders and files here include
· Another build.gradle: The build.gradle file in this directory is different from the one at the top level. This build.gradle file includes the real meat of what’s necessary to compile your app. You’ll examine it in more detail later.
· build: This directory isn’t something you normally look at. It contains temporary and generated files that are built by the Android build system during the course of compiling your app.
· libs: This directory is also something you won’t normally look at. If you need to add third‐party libraries to your project, you can download the jars and put them into this libs directory to include in your app. However, more commonly you add them as dependencies into your build.gradle file. You’ll find out more about how to add dependencies to your Android projects in Chapter 9.
· src: This directory is the most interesting one here. It contains all the source files necessary to build and test your app.
Go ahead and open up the src directory now. You’ll see two directories:
· androidTest: This directory is where you’ll put all your test cases to test your app.
· main: Your app’s source code is inside the main folder.
If you open the main folder, you’ll see three things:
· AndroidManifest.xml
· java
· res
The AndroidManifest.xml file tells Android what’s inside your app. Android uses this information to find and load the various components of your app. You’ll find out more about AndroidManifest.xml in Chapter 9.
 To learn how to use the androidTest folder to create automated test cases for your app, read the articles online about testing at www.dummies.com/extras/androidappdevelopment.
The following sections discuss the other folders.
Java Source (java) folder
The Java source folder — known as the java folder in Android projects — includes your stub MainActivity.java file, which you created in the New Android Project Wizard earlier in this chapter. If you open the java folder, you’ll see thecom.dummies.helloandroid package, with the MainActivity.java file inside.
You aren’t limited to a single package in your Android applications. In fact, separating the different pieces of your app into separate packages is considered to be a best practice. For example, your application might have Customer objects that represent a customer, and those customers are retrieved via a web API. To make that easy, you might also have some http classes that represent your API. One way you might organize these classes is to use packages like the following:
· com.dummies.helloandroid.models
· com.dummies.helloandroid.http
These packages contain their respective Java components. com.dummies.helloandroid.models contains the domain model Java classes (such as your Customer object), and com.dummies.helloandroid.http contains the HTTP‐related Java classes used to access your web APIs.
Resources (res) folder
The res folder contains the various resources that your application will use. Classic examples of resources include text strings, images, and layout files, but there are many other kinds of less‐common resources that you might include with your app. See Table 3-1 for a more complete list.
Table 3‐1 Supported Subdirectories of the res Directory
|
Directory |
Resource Type |
|
anim/ |
XML files that define animations. |
|
color/ |
XML files that define a list of colors. |
|
drawable/ |
Bitmap files (.png, .9.png, .jpg, .gif) or XML files that are compiled into drawable resources. Typically you would use one of the other drawable directories instead of using this one directly. |
|
drawable‐xxhdpi/ |
Drawables for screens with extra‐extra‐high resolution, approximately 480 dpi. |
|
drawable‐xhdpi/ |
Drawables for screens with extra‐high resolution, approximately 320 dpi. |
|
drawable‐hdpi/ |
Drawables for high‐resolution screens, approximately 240 dpi. |
|
drawable‐ldpi/ |
Drawables for low‐resolution screens, approximately 120 dpi. |
|
drawable‐mdpi/ |
Drawables for medium‐resolution screens, approximately 160 dpi. |
|
layout/ |
XML files that define a user interface layout. |
|
menu/ |
XML files that represent application menus. |
|
raw/ |
Arbitrary files to save in their raw form. Files in this directory aren’t compressed by the system and can be accessed by Resources.openRawResource(). |
|
values/ |
XML files that contain simple values, such as strings, integers, and colors. Whereas XML resource files in other res/ folders define a single resource based on the XML filenames, files in the values/ directory define multiple resources for various uses. You should follow a few filename conventions, outlined in the nearby sidebar “Naming resources in the values directory,” for the resources you can create in this directory. |
Android allows you to define the same resource multiple times in different folders. For example, if you open up res/values/strings.xml, you’ll see that the hello_world string is defined to be the text “Hello world!” If you wanted to, you could define the samehello_world string in res/values‐es/strings.xml and give it the value of "¡Hola Mundo!" Android would then automatically choose the Spanish translation when the app runs on a Spanish device, and the English translation when it runs on an English device. You can use the same trick to use different layouts on different sized devices.
You can access your resources in code via resource IDs that are generated by Android Studio in the R class. (See “The mysterious build/generated folder,” later in this chapter.)
You should place each resource in a specific subdirectory of your project’s res directory. Table 3-1 lists the subdirectories that are the most common types of resource folders under the parent res directory.
That is a lot of drawable directories! Don’t worry, you do not need to supply images and icons for every possible resolution device that your app runs on. In general, you should provide drawables for the highest resolution you expect to need (usually xxhdpi), and the device will scale them down to other resolutions. For performance reasons and to avoid any scaling artifacts, you may decide to scale them down yourself and put them into the appropriate drawables directory, and that’s why Android gives you so many different drawable directories to choose from.
Naming resources in the values directory
You should follow a few filenaming conventions for the resources you can create in the values directory:✓
· arrays.xml for resource arrays (storing like items, such as strings or integers, together).
· colors.xml for resources that define color values; accessed via the R.color class.
· dimens.xml for resources that define dimension values (20px equals 20 pixels, for example); accessed via the R.dimen class.
· strings.xml for string values; accessed via the R.string class.
· styles.xml for resources that represent styles; accessed via the R.style class. A style is similar to a cascading style sheet in HTML. You can define many styles and have them inherit from one another.
A full discussion of the powerful resource mechanism inside Android could fill its own book, but this book covers the basics to get you up and running. The resource mechanism can help with internationalization (enabling your app for different languages and countries), device size and density, and even resources for the mode that the phone may be in. To dive into the ocean of resources, review the “Providing Resources” section of the Dev Guide in the Android documentation, at http://d.android.com/guide/topics/resources/providing‐resources.html.
The mysterious build/generated folder
Ah, you finally get to witness the magic that is the generated folder. When you create an Android application, before the first compilation, the generated folder doesn’t exist. Upon the first compilation, Android Studio generates the generated folder and its contents. To see it, make sure Project Tool window is set to Project view instead of Android view.
The generated folder contains source files generated by Android Studio. One particular file it creates is the R.java file (I will tell you more about that topic in a moment). The generated folder contains items generated from the res directory. Without a proper understanding of what the res folder is and what it contains, you have no clue what the generated folder is for. But because you’re already an expert on the res folder, you can dive right into the generated folder.
When you write Java code in Android, you reach a point when you need to reference the items in the res folder. You do this by using the R class. The R.java file is an index to all resources defined in your res folder. You use this class as a shorthand way to reference resources you’ve included in your project. This is particularly useful with the code‐completion features of Android Studio because you can quickly identify the proper resource via code completion.
Go to the app/build/generated/source/r/debug/com/dummies/helloandroid folder in the Hello Android project. Now open the R.java file by double‐clicking it. You can see a Java class that contains nested Java classes. These nested Java classes have the same names as some of the res folders defined in the preceding res section. Under each of those subclasses, you can see members that have the same names as the resources in their respective res folders (excluding their file extensions). The Hello Android project’s R.javafile should look similar to the following code:
/* AUTO-GENERATED FILE. DO NOT MODIFY.
*
* This class was automatically generated by the
* aapt tool from the resource data it found. It
* should not be modified by hand.
*/
package com.dummies.helloandroid;
public final class R {
public static final class attr {
}
public static final class dimen {
public static final int activity_horizontal_margin=0x7f040000;
public static final int activity_vertical_margin=0x7f040001;
}
public static final class drawable {
public static final int ic_launcher=0x7f020000;
}
public static final class id {
public static final int action_settings=0x7f080000;
}
public static final class layout {
public static final int activity_main=0x7f030000;
}
public static final class menu {
public static final int main=0x7f070000;
}
public static final class string {
public static final int action_settings=0x7f050000;
public static final int app_name=0x7f050001;
public static final int hello_world=0x7f050002;
}
public static final class style {
/** Customize your theme here.
*/
public static final int AppTheme=0x7f060000;
}
}
Whoa — what’s all that 0x stuff? Android Studio generates this code for you so that you don’t have to worry about what’s happening behind the scenes. As you add resources and the project is rebuilt, Android Studio regenerates the R.java file. This newly generated file contains members that reference your recently added resources.
You should never edit the R.java file by hand. If you do, your application may not compile, and then you’re in a world of hurt. If you accidentally edit the R.java file and can’t undo your changes, you can delete the gen folder and build your project. At this point, Android Studio will regenerate the R.java file for you.
Viewing the application’s manifest file
You keep track of everything you own and need through lists, don’t you? Well, that’s similar to what the Android manifest file does. It keeps track of everything your application needs, requests, and has to use in order to run.
The Android manifest file is stored in your src/main directory and is named AndroidManifest.xml. Every application must have an Android manifest file.
What the Android manifest file contains
The application manifest file provides essential information to the Android system — information that it must have before it can run any of your application’s code. The application manifest file also provides
· The name of your application ID for the application, which is the unique identifier for your application in the Android system as well as in the Google Play Store
· The icon for your application
· The components of the application, such as the activities and background services
· The declaration of the permissions your application requires to run
Permissions
Assume that your application needs to access the Internet to retrieve some data. Android restricts Internet access by default. For your application to have access to the Internet, you need to ask for it.
In the application manifest file, you must define which permissions your application needs to operate. Table 3-2 lists some commonly requested permissions.
Table 3‐2 Commonly Requested Application Permissions
|
Permission |
What It Means |
|
Internet |
The application needs access to the Internet. |
|
Write External Storage |
The application needs to write data to the Secure Digital card (SD card). |
|
Camera |
The application needs access to the camera. |
|
Access Fine Location |
The application needs access to the global positioning system (GPS) location. |
|
Read Phone State |
The application needs to access the state of the phone (such as ringing). |
Viewing the build.gradle file
The build.gradle file tells Android Studio how to build your app.
You can also compile your app using the command line instead of Android Studio if you want. Simply choose View⇒Tool Windows⇒Terminal (or open your own terminal) and cd to the HelloAndroid directory. Then type ./gradlew assembleDebug to build your app into app/build/outputs/apk. Type ./gradlew tasks for a list of valid build targets you can use. And visit http://d.android.com/sdk/installing/studio‐build.html for more information about using Gradle with Android.
Your build.gradle file might start off like the following:
apply plugin: 'com.android.application'
android {
compileSdkVersion 21
buildToolsVersion "21.1.2"
defaultConfig {
applicationId "com.dummies.helloandroid"
versionCode 1
versionName "1.0"
minSdkVersion 21
targetSdkVersion 21
}
...
The following further explains this code:
· The compileSdkVersion tells Android Studio what version of the Android SDK you are compiling against. This version is set based off the choices you made when you went through the New Activity Wizard earlier in this chapter.
· The buildToolsVersion tells Android Studio what version of the build tools to use (which is the version of the tools that you installed on your computer).
· The applicationId must match the package that you set in your AndroidManifest.xml file.
Version code
The version code is an integer value that represents the version of the application relative to other versions of your application. The Google Play Store uses it as a basis for identifying the application internally and for handling updates.
You can set the version code to any integer value you want, but you must make sure that each successive release has a version code greater than the previous one.
Typically, on the first release, you set the version code to 1. Then you monotonically increase the value with each release, whether the release is major or minor. This means that the version code doesn’t have a strong resemblance to the application release version that’s visible to the user, which is the version name. (See the next section.) The version code typically isn’t displayed to your users.
You must increase the version code with every version of the app that you publish to the Google Play Store. The Google Play Store does not accept an app that has the same version code as one that has previously been uploaded.
Version name
The version name is a string value that represents the app’s version as it should display to the user. The value is a string that can be anything, but it typically follows a common release‐name nomenclature that describes the application version:
<major>.<minor>.<optional point>
An example of this release‐name nomenclature might be 2.1 or 3.2.4.
The Android system doesn’t use this value for any purpose other than to display it to users. Android uses the version code rather than the version name internally.
The version name may be any other type of absolute or relative version identifier. The Foursquare application, for example, uses a version‐naming scheme that corresponds to the date. An example of the version application name is 2012.05.02, which clearly represents a date. The version name is left up to you. You should plan ahead and make sure that your versioning strategy makes sense to you and your users.
Understanding the Compile SDK, Minimum SDK, and Target SDK Versions
This section discusses three very important parameters you should understand about supporting different versions of Android in your app. Reviewing this section will help you determine what settings to use to support users who are running your app on older versions of Android.
Compile SDK Version
The Compile SDK Version is the version of Android in which you write code. If you choose 5.0, you can write code with all the APIs in version 21. If you choose 2.2, you can write code only with the APIs that are in version 2.2 or earlier. You can’t use the Wi‐Fi Direct APIs in version 2.2, for example, because they weren’t introduced until version 4.0.
Minimum SDK Version
Android operating system (OS) versions are backward‐compatible. If your minSdkVersion is set to Android version 4.0, for example, your application can run on Android 5.0, 4.4, 4.3, 4.2, 4.1, and 4.0. The benefit of choosing the 4.0 framework is that your application is exposed to a much larger market share. Your app can be installed on devices going back to 4.0 (and on future versions, too!). Selecting an older version isn’t free of consequences, however. By targeting an older framework, you’re limiting the functionality you have access to.
You should set the minSdkVersion to the oldest version of Android that you are willing to support. For this app you will simplify your development life by supporting only the latest version of Android, but see Chapter 17 for more information about supporting older versions of Android.
If your Minimum SDK Version is not the same as your Compile SDK Version, you must take great care! For example, you might set your Compile SDK Version to 5.0 in order to use the latest APIs and your Minimum SDK Version to 16 to support devices running Android 4.1, but your app will crash if you use 5.0 APIs and run it on an Android 4.1 device (because Android 4.1 did not have any of 5.0’s APIs).
The Google Play Store decides which users to show your app to based on your minSdkVersion. If you’re having trouble deciding which version to set as your minimum, the current version distribution chart can help you decide: http://d.android.com/about/dashboards.
The minSdkVersion is technically optional, but you should always set it! If you don’t know what to set it to, then set it to the same value as your compileSdkVersion.
It’s up to you to test your app on all the versions of Android between your Minimum SDK Version and the latest Android SDK version! To help automate your testing, visit the book’s website and read the articles online atwww.dummies.com/extras/androidappdevelopment.
Target SDK Version
Compile SDK Version and Minimum SDK Version are arguably the most important SDK version settings that you need to understand. However, there’s a third SDK version called targetSdkVersion that’s often misunderstood and equally important to understand.
You should set the targetSdkVersion to the most recent version of Android that you have tested on. In this case, I am building and testing against Lollipop, so that’s what I’ll set my targetSdkVersion to.
Whenever a new version of Android comes out, you will want to update the targetSdkVersion to the latest Android version and test your app to fix any problems. If you don’t update the targetSdkVersion, Android devices will assume that your app wasn’t tested on the latest version of Android, so they may introduce some backward‐compatibility behavior for your app to make sure your app still looks and feels the way you designed it for that older version of Android. It gets a little tricky, so the best policy is to always keep yourtargetSdkVersion up to date with the latest versions of Android.
What’s up next
You’re now done examining the guts of your Hello World! app. Next, you are going to create another app with a little more functionality, which you’ll upload to the Google Play Store so that your mom and her friends can download it to their Android phones.
All materials on the site are licensed Creative Commons Attribution-Sharealike 3.0 Unported CC BY-SA 3.0 & GNU Free Documentation License (GFDL)
If you are the copyright holder of any material contained on our site and intend to remove it, please contact our site administrator for approval.
© 2016-2026 All site design rights belong to S.Y.A.