Programming Google App Engine
Chapter 14. Sending and Receiving Email Messages
While today’s Internet offers many modes of communication, one of the oldest modes is still one of the most popular: email. People use email for correspondence, announcements, newsletters, and many other kinds of long-form, direct messages. Specific to web applications, email is the primary mechanism for representing and validating identity, and managing access to application-specific accounts. Email is how your app reaches out to your users when they are not on your website and signed in.
An App Engine app can send email messages by calling the Mail service API. An app might send email to notify users of system events or the actions of other users (such as to send social networking invitations), confirm user actions (such as to confirm an order), follow up on long-term user actions (such as to send a shipping notice for an order), or send system notifications to administrators. The app can send email on behalf of itself or the app’s administrators. The app can also send email on behalf of the currently signed-in user, during the request handler.
Sending email messages is similar to initiating HTTP requests: the app calls a service by using an API, and the service takes care of making remote connections and managing the appropriate protocols. Unlike the URL Fetch service, the Mail service does not return a response immediately. Instead, messages are enqueued for delivery, and errors are reported via “bounce” email messages to the sender address.
An app can also receive email messages sent to specific addresses. This might allow an app to provide an email interface to the application, or to moderate or monitor email discussions. The app can reply to the email immediately, or set up work that causes a reply to be sent later.
Receiving email messages is also similar to receiving HTTP requests. In fact, this uses the same mechanism: request handlers. When a service receives an email message intended for your app, the Mail service sends an HTTP request to the app using a specified URL with the message in the HTTP payload. The app processes incoming messages, using request handlers mapped to the specified URLs. The service ignores the response for the request; if the app needs to reply to the user, it can send a message using the API.
Figure 14-1 illustrates the flow of incoming email messages.
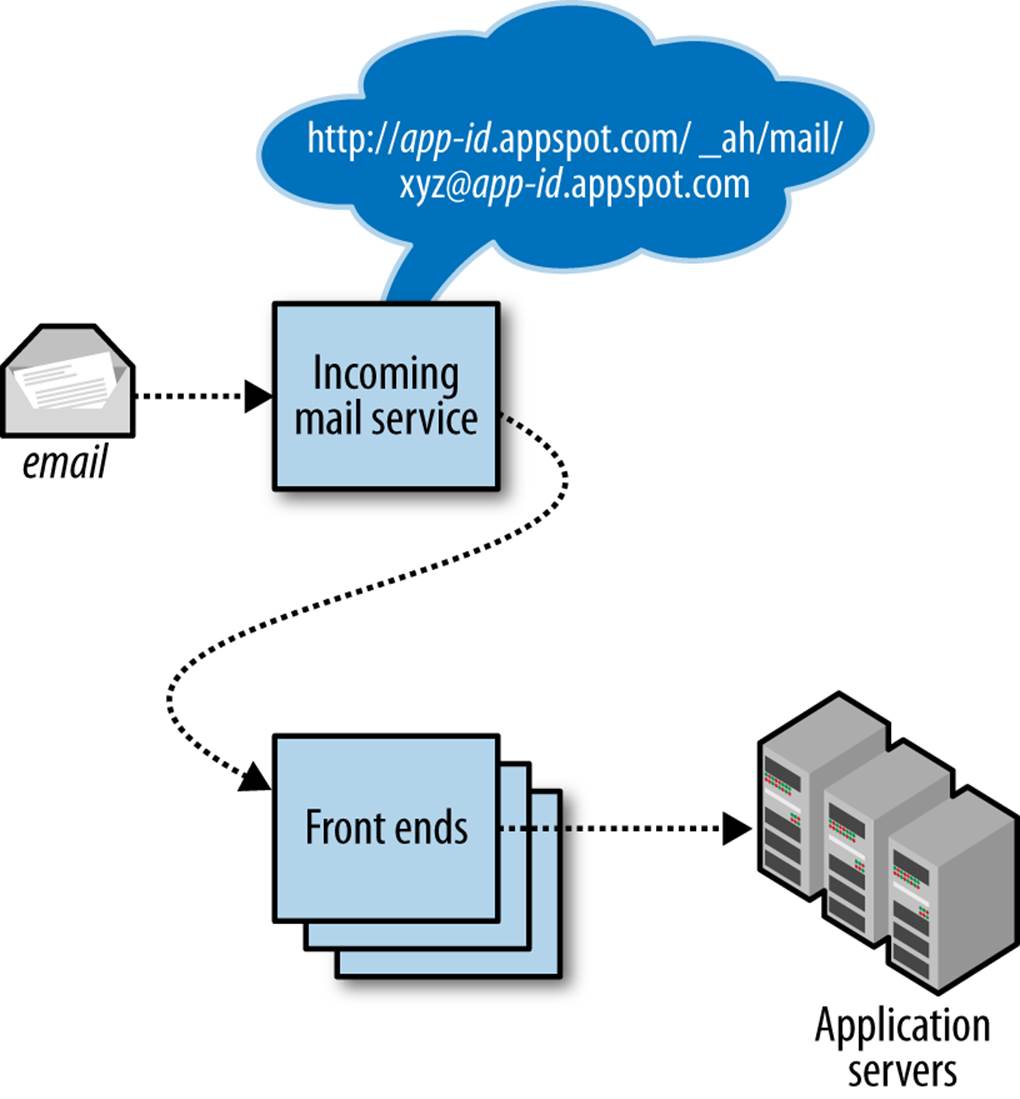
Figure 14-1. Architecture of incoming email messages, calling web hooks in response to incoming message events
Each app has its own set of incoming email addresses, based on its application ID. For email, the app can receive messages at addresses of these forms:
app-id@appspotmail.com
anything@app-id.appspotmail.com
App Engine does not support receiving email at an address on an app’s custom (Google Apps) domain name. However, you can use an email address on your custom domain as a “From” address by setting it up as a Google account, and then making that account a “developer” of the app in the Administration Console. You can further configure automatic forwarding of replies to that address by using Gmail.
In this chapter, we discuss the APIs for sending and receiving email messages, and language-specific tools for creating and processing those messages.
Sending Email Messages
To send an email message, you call the API of the Mail service. The outgoing message has a sender address (“From”), one or more recipients (“To,” “Cc,” or “Bcc”), a subject, a message body, and optional file attachments.
An email message can contain a limited set of message headers, which are understood by mail servers and clients. The headers an app can set are restricted to prevent the service from being abused to send forged messages. (See the official documentation for the current list of allowed headers.) The Mail service attaches additional headers to the message, such as the date and time the message is sent.
You can specify a multipart message body, such as to include both plain text and HTML versions of the message, and to include attachments. The total size of the message, including all headers and attachments, cannot exceed 10 megabytes.
The call to the Mail service is asynchronous. When your application calls the Mail service to send a message, the message is enqueued for delivery, and the service call returns. If there is a problem delivering the message, such as if the remote mail server cannot be contacted or the remote server says the address is invalid, an error message is sent via email to the sender address. The app is not notified of the failure by the service directly. If the app must be notified of a message send failure, you can use an incoming email address for the app as the sender address. The app will have to parse the message sent by the remote server for an error.
When running on App Engine, outgoing email counts towards your outgoing bandwidth quota, as well as the quota for the total number of email recipients. You can increase these quota by adjusting your billing settings. Email messages sent to the application administrators use a separate limit (Admins Emailed in the Quotas display of the Administration Console) to allow for apps that send maintenance reports and alerts to administrators but do not need to send email to arbitrary recipients.
TIP
App Engine gives special treatment to the limit on email recipients to prevent abuse of the system, such as sending junk or scam email (which is against the terms of service and an all-around lousy thing to do). New apps are only allowed a small number of email recipients per month under the free plan. When you activate billing for an app for the first time, this limit is not raised until the first charge to your billing account succeeds. This is intended to discourage abusers from activating billing with invalid payment details just to temporarily raise the recipient limit.
If your app relies on sending email to many users (such as for registration confirmation), be sure to activate billing and test your email features two weeks in advance of launching your website.
Sending Email from the Development Server
When your app runs in the development server, sending a message causes the server to print information about the message to the logs, and no message is sent. In the Python development server only, you can configure the server to actually send email messages by using either Sendmail (if it’s set up on your machine) or an SMTP server.
To configure the Python development server to use Sendmail to send email, give the server the --enable_sendmail flag:
dev_appserver.py --enable_sendmail appdir
To configure the Python development server to use an SMTP server to send email, use the --smtp_host=... (with optional --smtp_port=...), --smtp_user=..., and --smtp_password=... arguments:
dev_appserver.py \
--smtp_host=smtp.example.com \
--smtp_user=exmail \
--smtp_password="t3!!t43w0r!d" \
appdir
The Java development server does not support sending email; it just logs the message at the “info” log level. You can adjust the level at which outgoing mail messages are logged by running the development server with the mail.log_mail_level property set to a value such as WARNING. You can also tell the development server to log the body of the message by setting the mail.log_mail_body system property to true. From the command line:
dev_appserver.sh \
--jvm_flag=-Dmail.log_mail_level=WARNING \
--jvm_flag=-Dmail.log_message_body=true \
appdir
From Eclipse, select the Run menu, Debug Configurations, and then select your app’s configuration. Select the Arguments tab, then in the “VM arguments” section, set VM properties like this:
-Dmail.log_mail_level=WARNING -Dmail.log_mail_body=true
Sender Addresses
The sender (“From”) address on an outgoing email message must be one of the allowed addresses:
§ The Google Account address of one of the application administrators
§ The address of the user currently signed in to the app with Google Accounts (during the request handler that is sending the message)
§ A valid incoming email address for the application
Replies to messages sent by the app go to the sender address, as do error messages sent by the outgoing mail server (such as “Could not connect to remote host”) or the remote mail server (such as “User not found”).
You can use an application developer’s Google Account address as the sender address. To add accounts as application administrators, go to the Developers section of the Administration Console. If you do not want to use the account of a specific developer as the sender address, you can create a new Google Account for a general purpose address, then add it as a developer for the app: in the Console, select Permissions, then invite the user account. Be sure to select the Viewer role, so if someone gets the account’s password, that person cannot make changes to the app. You can use Gmail to monitor the account for replies, and you can set up automatic email forwarding in Gmail to relay replies to specific administrators or a mailing list (or Google Group) automatically.
TIP
A Google account can use a Gmail address or a Google Apps domain address. If your app has a custom domain, you can create a new Google account with an address on the domain (such as support@example.com), give the account Viewer permissions for the app, and use the address for outgoing mail.
If you don’t have an Apps domain, you can create a Gmail account, using the application ID, and add app-id@gmail.com as a developer. Note that if you create the Gmail account before you register the application ID, you must be signed in using the Gmail account when you register the application ID. App Engine won’t let you register an app ID that matches a Gmail account name unless you are signed in with that account.
Technically it’s possible for someone else to register a Gmail account with your app ID after you have registered the app ID, although it’s unlikely. If you’d like to claim your ID as a Gmail address, do it soon. Of course, the owner of the Gmail account can’t administer your app unless you add the account as a developer.
You can use the email address of a user as the sender address if and only if the address is of a registered Google Account, the user is signed in, and the user initiated the request whose handler is sending the email. That is, you can send email on behalf of the “current” user. This is useful if the email is triggered by the user’s action and if replies to the message ought to go to the user’s email address. The Google Accounts API does not expose the user’s human-readable name, so you won’t be able to provide that unless you get it from the user yourself.
As we mentioned earlier, an application can receive email messages at addresses of the form app-id@appspotmail.com or anything@app-id.appspotmail.com, where app-id is your application ID and anything can be any string that’s valid on the left side of the email address (it can’t contain an @ symbol). You can use an incoming email address as the sender of an email message to have replies routed to a request handler.
The “anything” lets you create custom sender addresses on the fly. For example, a customer support app could start an email conversation with a unique ID and include the ID in the email address (support+ID@app-id.appspotmail.com), and save replies for that conversation in the datastore so the entire thread can be viewed by customer service personnel.
Note that the sender address will also receive error (“bounce”) messages. If you use an incoming mail address as the sender, you could have the app process error messages to remove invalid email addresses automatically. Note that different remote email servers may use different formatting for error messages.
Any email address can also have a human-friendly name, such as "The Example Team <admin@example.com>". How you do this is specific to the interface; we’ll look at the interfaces in a moment.
You can include a separate “Reply-to” address in addition to the sender (“From”) address. Most mail readers and servers will use this address instead of the sender address for replies and error messages. The “Reply-to” address must meet the same requirements as the sender address.
The development server does not check that the sender address meets these conditions because it doesn’t know who the app’s developers are. Be sure to test features that send email while running on App Engine.
Recipients
An outgoing email message can use any address for a recipient, and can have multiple recipients.
A recipient can be a primary recipient (the “To” field), a secondary or “carbon-copied” recipient (the “Cc” field), or a “blind carbon-copied” recipient (“Bcc”). The “To” and “Cc” recipients are included in the content of the message, so a reply intended for all recipients can be sent to the visible addresses. The “Bcc” recipients receive the message, but their addresses are not included in the content of the message, and so are not included in replies.
The “Bcc” recipient type is especially useful if you want a single message to go to multiple recipients, but you do not want any recipient to know who received the message. You can use this technique to send an email newsletter to users without exposing the users’ email addresses. A common technique for newsletters is to use the sender address as the sole “To” recipient, and make everyone else a “Bcc” recipient.
The number of recipients for an email message counts toward an email recipient quota. This quota is initially small to prevent unsolicited email advertisers from abusing the system. You can raise this quota by allocating part of your budget toward email recipients.
TIP
When you enable billing in your app for the first time, the email recipients quota will not increase from the free level until your first payment is processed. This is one of several measures to prevent spammers from abusing the service.
Attachments
An app can attach files to an email message. One good use of attachments is to include images for rich HTML email messages.
For security reasons (mostly having to do with insecure email clients), some file types are not allowed as email attachments. A file’s type is determined by its filename extension. For example, files that represent executable programs (such as .exe, .bat, or .sh) are not allowed. Currently, common file archive types, like .zip, are also not allowed.
The MIME content type of each attachment is derived from the filename extension. If a filename extension is not recognized, the content type is set to application/octet-stream.
See the official documentation for the complete list of disallowed attachment types, as well as a list of mappings from extensions to MIME content types.
TIP
If you want to deliver files to users that are not allowed as attachments, one option is to send a link to a request handler that delivers the file through the browser. The link can be personalized with a temporary unique ID, or restricted using Google Accounts authentication.
Sending Email in Python
The Python API includes two ways of preparing and sending messages. One way is to call a function with the fields of the message as keyword arguments. Another is to prepare the message in an object, then call a method on the object to send the message. The Mail service API is provided by the google.appengine.api.mail package.
The send_mail() method takes the fields of the message as parameters:
from google.appengine.api import mail
from google.appengine.api import users
message_body = '''
Welcome to Example! Your account has been created.
You can edit your user profile by clicking the
following link:
http://www.example.com/profile/
Let us know if you have any questions.
The Example Team
'''
# (admin@example.com is a Google Account that has
# been added as a developer for the app.)
mail.send_mail(
sender='The Example Team <admin@example.com>',
to=users.get_current_user().email(),
subject='Welcome to Example.com!',
body=message_body)
Alternatively, you can prepare the message using an EmailMessage object, then call its send() method. The EmailMessage constructor accepts the same arguments as the send_mail() function:
message = mail.EmailMessage(
sender='The Example Team <admin@example.com>',
to=users.get_current_user().email(),
subject='Welcome to Example.com!',
body=message_body)
message.send()
You can also set the fields of an EmailMessage using attributes of the object. This allows you to reuse the same object to send multiple messages with modified values.
The possible fields of a message are listed in Table 14-1.
Table 14-1. Fields of an email message in the Python interface
|
Field |
Value |
Required? |
|
sender |
The sender’s email address. A string. |
Required |
|
to |
A “To” recipient address as a string, or multiple “To” recipient addresses as a list of strings. |
Required |
|
subject |
The subject of the message. A string. |
Required |
|
body |
The plain-text body of the message. A string. |
Required |
|
cc |
A “Cc” recipient address as a string, or multiple “Cc” recipient addresses as a list of strings. |
Optional |
|
bcc |
A “Bcc” recipient address as a string, or multiple “Bcc” recipient addresses as a list of strings. “Bcc” recipients receive the message, but are not included in the content of the message. |
Optional |
|
reply_to |
An alternate address to which clients should send replies instead of the sender address. A string. |
Optional |
|
html |
An alternate HTML representation of the body of the message, displayed instead of body by HTML-capable email readers. A string. |
Optional |
|
attachments |
File attachments for the message. A list of tuples, one per attachment, each containing the filename and the file data. |
Optional |
|
headers |
A dict of additional message headers. See the official documentation for a list of allowed headers. |
Optional |
The value of an email address field (sender, to, cc, bcc, reply_to) can be a plain email address:
'juliet@example.com'
It can also be an address with a human-readable name, in the standard format (RFC 822):
'Juliet <juliet@example.com>'
When you call the send() method or the send_mail() function, the API checks the message to make sure it is valid. This includes testing the email addresses for validity, and making sure the message has all the required fields. You can call functions to perform these checks separately. The is_email_valid(address) function returns True if it considers an email address valid. The is_initialized() method of an EmailAddress object returns True if the object has all the fields necessary for sending.
The API includes a shortcut method that sends an email message to all administrators (developers) for the application. The send_mail_to_admins() function accepts the same arguments as send_mail(), but without the recipient fields. There is also an AdminEmailMessage class that is similar to the EmailMessage class, but with recipients set to be the app administrators automatically. When calling this function, the message size is limited to 16 kilobytes. (This is a safety limit that ensures delivery of important administrative messages.)
Example 14-1 shows a larger example using EmailMessage, with both plain text and HTML parts, and an attachment.
Example 14-1. An example of sending an email message in Python, using several features
from google.appengine.api import mail
def send_registration_key(user_addr, software_key_data):
message_body = '''
Thank you for purchasing The Example App, the best
example on the market! Your registration key is attached
to this email.
To install your key, download the attachment, then select
"Register..." from the Help menu. Select the key file, then
click "Register".
You can download the app at any time from:
http://www.example.com/downloads/
Thanks again!
The Example Team
'''
html_message_body = '''
<p>Thank you for purchasing The Example App, the best
example on the market! Your registration key is attached
to this email.</p>
<p>To install your key, download the attachment, then select
<b>Register...</b> from the <b>Help</b> menu. Select the key file, then
click <b>Register</b>.</p>
<p>You can download the app at any time from:</p>
<p>
<a href="http://www.example.com/downloads/">
http://www.example.com/downloads/
</a>
</p>
<p>Thanks again!</p>
<p>The Example Team<br />
<img src="http://www.example.com/images/logo_email.gif" /></p>
'''
message = mail.EmailMessage(
sender='The Example Team <admin@example.com>',
to=user_addr,
subject='Your Example Registration Key',
body=message_body,
html=html_message_body,
attachments=[('example_key.txt', software_key_data)])
message.send()
Sending Email in Java
The Java interface to the Mail service is the JavaMail standard interface (javax.mail.*). There is also a low-level interface, although you can access every feature of the service through the JavaMail implementation. (As such, we’ll only discuss the JavaMail interface here.)
To use JavaMail, you first create a JavaMail “session.” The Session object usually contains information needed to connect to a mail server, but with App Engine, no configuration is needed. You prepare the message as a MimeMessage object, then send it using the send() static method of the Transport class. The Transport class uses the most recently created session to send the message:
import java.util.Properties;
import javax.mail.Message;
import javax.mail.MessagingException;
import javax.mail.Session;
import javax.mail.Transport;
import javax.mail.internet.AddressException;
import javax.mail.internet.InternetAddress;
import javax.mail.internet.MimeMessage;
import com.google.appengine.api.users.User;
import com.google.appengine.api.users.UserServiceFactory;
// ...
User user = UserServiceFactory.getUserService().getCurrentUser();
String recipientAddress = user.getEmail();
Properties props = new Properties();
Session session = Session.getDefaultInstance(props, null);
String messageBody =
"Welcome to Example! Your account has been created. " +
"You can edit your user profile by clicking the " +
"following link:\n\n" +
"http://www.example.com/profile/\n\n" +
"Let us know if you have any questions.\n\n" +
"The Example Team\n";
try {
Message message = new MimeMessage(session);
message.setFrom(new InternetAddress("admin@example.com",
"The Example Team");
message.addRecipient(Message.RecipientType.TO,
new InternetAddress(recipientAddress);
message.setSubject("Welcome to Example.com!");
message.setText(messageBody);
Transport.send(message);
} catch (AddressException e) {
// An email address was invalid.
// ...
} catch (MessagingException e) {
// There was an error contacting the Mail service.
// ...
}
As shown here, you call methods on the MimeMessage to set fields and to add recipients and content. The simplest message has a sender (setFrom(), one “To” recipient (addRecipient(), a subject (setSubject(), and a plain-text message body (setText().
The setFrom() method takes an InternetAddress. You can create an InternetAddress with just the email address (a String) or the address and a human-readable name as arguments to the constructor. The email address of the sender must meet the requirements described earlier. You can use any string for the human-readable name.
The addRecipient() method takes a recipient type and an InternetAddress. The allowed recipient types are Message.RecipientType.TO (“To,” a primary recipient), Message.RecipientType.CC (“Cc” or “carbon-copy,” a secondary recipient), andMessage.RecipientType.BCC (“Bcc” or “blind carbon-copy,” where the recipient is sent the message but the address does not appear in the message content). You can call addRecipient() multiple times to add multiple recipients of any type.
The setText() method sets the plain-text body for the message. To include an HTML version of the message body for mail readers that support HTML, you create a MimeMultipart object, then create a MimeBodyPart for the plain-text body and another for the HTML body and add them to the MimeMultipart. You then make the MimeMultipart the content of the MimeMessage:
import javax.mail.Multipart;
import javax.mail.internet.MimeBodyPart;
import javax.mail.internet.MimeMultipart;
// ...
String textBody = "...text...";
String htmlBody = "...HTML...";
Multipart multipart = new MimeMultipart();
MimeBodyPart textPart = new MimeBodyPart();
textPart.setContent(textBody, "text/plain");
multipart.addBodyPart(textPart);
MimeBodyPart htmlPart = new MimeBodyPart();
htmlPart.setContent(htmlBody, "text/html");
multipart.addBodyPart(htmlPart);
message.setContent(multipart);
You attach files to the email message in a similar way:
Multipart multipart = new MimeMultipart();
// ...
byte[] fileData = getBrochureData();
String fileName = "brochure.pdf";
String fileType = "application/pdf";
MimeBodyPart attachmentPart = new MimeBodyPart();
attachmentPart.setContent(fileData, fileType);
attachmentPart.setFileName(fileName);
multipart.addBodyPart(attachmentPart);
// ...
message.setContent(multipart);
You can add multiple MimeBodyPart objects to a single MimeMultipart. The plain-text body, the HTML body, and the file attachments are each part of a MIME multipart message.
When using a MimeMultipart, you must include a text/plain part to be the plain-text body of the message. The multipart object overrides any plain-text content set on the MimeMessage with setText().
App Engine’s implementation of the JavaMail interface includes a shortcut for sending an email message to all of the app’s administrators. To send a message to all administrators, use a recipient address of "admins", with no @ symbol or domain name.
Receiving Email Messages
To receive incoming email messages, you must first enable the feature in your app’s configuration. Incoming email is disabled by default, so unwanted messages are ignored and do not try to contact your app or incur costs.
To enable inbound services, you add a section to the app’s configuration file. In Python, you add a section similar to the following in the app.yaml file:
inbound_services:
In Java, you add a similar section to the appengine-web.xml file, anywhere inside the root element:
<inbound-services>
<service>mail</service>
</inbound-services>
Once your app is deployed, you can confirm that the incoming mail service is enabled from the Administration Console, under Application Settings. If your app does not appear to be receiving HTTP requests for incoming email messages, check the Console and update the configuration if necessary.
With the mail inbound service enabled in configuration, an application can receive email messages at any of several addresses. An incoming mail message is routed to the app in the form of an HTTP request.
Email sent to addresses of the following forms are routed to the default version of the app:
app-id@appspotmail.com
anything@app-id.appspotmail.com
The HTTP request uses the POST action, and is sent to the following URL path:
/_ah/mail/to-address
The recipient email address of the message is included at the end of the URL path, so the app can distinguish between different values of “anything.”
The body content of the HTTP POST request is the complete MIME email message, including the mail headers and body. It can be parsed by any library capable of parsing MIME email messages. We’ll look at examples in Python and Java in the next two sections.
The development server console (http://localhost:8080/_ah/admin/) includes a feature for simulating incoming email by submitting a web form. The development server cannot receive actual email messages.
TIP
If the app has the incoming mail service enabled but does not have a request handler for the appropriate URL, or if the request handler returns an HTTP response code other than 200 for the request, the message gets “bounced” and the sender receives an error email message.
Receiving Email in Python
To receive email in Python, you map the incoming email URL path to a script handler in app.yaml file:
handlers:
- url: /_ah/mail/.+
script: handle_email.py
The app address used for the message is included in the URL path, so you can set up separate handlers for different addresses directly in the configuration:
handlers:
- url: /_ah/mail/support%40.*app-id\.appspotmail\.com
script: support_contact.py
- url: /_ah/mail/.+
script: handle_email.py
Email addresses are URL-encoded in the final URL, so this pattern uses %40 to represent an @ symbol. Also notice you must include a .* before the application ID when using this technique, so the pattern works for messages sent to version-specific addresses (such as support@dev.app-id.appspotmail.com).
The Python SDK includes a class for parsing the POST content into a convenient object, called InboundEmailMessage (in the google.appengine.api.mail package). It takes the multipart MIME data (the POST body) as an argument to its constructor. Here’s an example using the webapp framework:
from google.appengine.api import mail
from google.appengine.ext import webapp2
class IncomingMailHandler(webapp2.RequestHandler):
def post(self):
message = mail.InboundEmailMessage(self.request.body)
sender = message.sender
recipients = message.to
body = list(message.bodies(content_type='text/plain')[0]
# ...
application = webapp2.WSGIApplication([('/_ah/mail/.+', IncomingMailHandler)],
debug=True)
The InboundEmailMessage object includes attributes for the fields of the message, similar to EmailMessage. sender is the sender’s email address, possibly with a displayable name in the standard format (Mr. Sender <sender@example.com>). to is a list of primary recipient addresses, and cc is a list of secondary recipients. (There is no bcc on an incoming message, because blind-carbon-copied recipients are not included in the message content.) subject is the message’s subject.
The InboundEmailMessage object may have more than one message body: an HTML body and a plain-text body. You can iterate over the MIME multipart parts of the types text/html and text/plain, using the bodies() method. Without arguments, this method returns an iterator that returns the HTML parts first, and then the plain-text parts. You can limit the parts returned to just the HTML or plain-text parts by setting the content_type parameter. For example, to get just the plain-text bodies:
for text_body in message.bodies(content_type='text/plain'):
# ...
In the example earlier, we extracted the first plain-text body by passing the iterator to the list() type, then indexing its first argument (which assumes one exists):
text = list(message.bodies(content_type='text/plain')[0]
If the incoming message has file attachments, then these are accessible on the attachments attribute. As with using EmailMessage for sending, this attribute is a list of tuples whose first element is the filename and whose second element is the data byte string. InboundEmailMessageallows all file types for incoming attachments, and does not require that the filename accurately represent the file type. Be careful when using files sent to the app by users, since they may not be what they say they are, and have not been scanned for viruses.
The Python SDK includes a convenient webapp handler base class for processing incoming email, called InboundMailHandler in the google.appengine.ext.webapp.mail_handlers package. You use the handler by creating a subclass that overrides the receive() method, then installing it like any other handler. When the handler receives an email message, the receive() method is called with an InboundEmailMessage object as its argument:
from google.appengine.ext.webapp import mail_handlers
class MyMailHandler(mail_handlers.InboundMailHandler):
def receive(self, message):
# ...
application = webapp2.WSGIApplication([('/_ah/mail/.+', MyMailHandler)],
debug=True)
Receiving Email in Java
In Java, you map the incoming email URL path to a servlet with an entry in the deployment descriptor (web.xml):
<servlet>
<servlet-name>mailreceiver</servlet-name>
<servlet-class>myapp.MailReceiverServlet</servlet-class>
</servlet>
<servlet-mapping>
<servlet-name>mailreceiver</servlet-name>
<url-pattern>/_ah/mail/*</url-pattern>
</servlet-mapping>
The JavaMail and servlet APIs provide everything we need to parse the MIME multipart message in the HTTP POST request. The MimeMessage class (in the javax.mail.internet package) has a constructor that accepts a java.io.InputStream, which we can get from theHttpServletRequest by using its getInputStream() method. The MimeMessage constructor also needs a JavaMail Session, which, as with sending email, can use the default empty configuration:
import java.io.IOException;
import java.util.Properties;
import javax.mail.Session;
import javax.mail.MessagingException;
import javax.mail.Multipart;
import javax.mail.Part;
import javax.mail.internet.MimeMessage;
import javax.servlet.http.*;
public class MailReceiverServlet extends HttpServlet {
public void doPost(HttpServletRequest req,
HttpServletResponse resp)
throws IOException {
Properties props = new Properties();
Session session = Session.getDefaultInstance(props, null);
try {
MimeMessage message = new MimeMessage(session, req.getInputStream();
String contentType = message.getContentType();
Object content = message.getContent();
if (content instanceof String) {
// A plain text body.
// ...
} else if (content instanceof Multipart) {
// A multipart body.
for (int i = 0; i < (Multipart) content).getCount(); i++) {
Part part = (Multipart) content).getBodyPart(i);
// ...
}
}
} catch (MessagingException e) {
// Problem parsing the message data.
// ...
}
}
}
If the incoming message is a MIME multipart message (such as a message with an HTML body, or attachments), the getContent() method of the MimeMessage returns an object that implements the Multipart interface. You can use this interface to get a count of the parts (getCount() and select parts by index (getBodyPart(int index), which returns a BodyPart).
All materials on the site are licensed Creative Commons Attribution-Sharealike 3.0 Unported CC BY-SA 3.0 & GNU Free Documentation License (GFDL)
If you are the copyright holder of any material contained on our site and intend to remove it, please contact our site administrator for approval.
© 2016-2025 All site design rights belong to S.Y.A.