Hello App Inventor!: Android programming for kids and the rest of us (2015)
Chapter 10. Barcodes and scanners
Barcodes have been around since the 1970s, and there aren’t many products now that don’t use them. No doubt you’ve used barcodes in the supermarket at the self-checkout registers.

Barcodes are groups of black and white lines that represent numbers according to the widths and spacing of parallel lines. They can be read by either special optical scanners or smartphone cameras that provide product information that can be read by a computer. The barcode is considered to be one-dimensional (the lines travel in one direction). A QR code is a two-dimensional barcode (a matrix code). To read such codes, make sure you have a free QR code scanner such as QR Droid.
The barcode scanner in App Inventor is an easy-to-use, non-visible component that uses the phone’s camera to read a QR code or a barcode. The decision you have to make is what to do with the barcode once you’ve read it. In this chapter, you’ll make three apps: one showing how the numbers in a barcode can be used for a petfinder game, the next a practical app for getting information about a product by scanning its barcode, and the third a QR code treasure-hunt app that can be used to communicate clues to treasure hunters.
To have fun with a barcode is pretty simple; to use the actual information embedded in the barcode means you have to learn how to use the activity starter that launches other apps. You may want to launch the browser in response to scanning a barcode, or you might want to develop a clever game that launches another game as a reward for finding a particular barcode!
Learning Point: Using a barcode scanner
![]()
Before you take a step further, make sure you have a scanner installed on your phone. QR scanners will read one-dimensional barcodes, too. Scoot on over to the Google Play Store and install a free scanner such as QR Droid or ZXing. App Inventor’s barcode scanner talks to the actual barcode scanner installed on your phone and says, “Take a scan. OK: what have you got for me?”
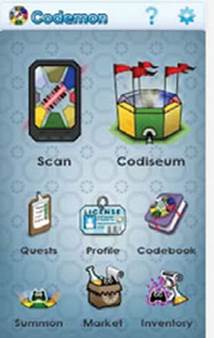
A number of Android apps are commercially available that utilize the mystery and fun of the barcode scanner. One of our favorites is Codemon, which is described as combining the concepts of Pet Collection, Pokemon, and Barcode Battler (these are also fun collection apps that use barcodes). We’ve put together a much simpler app that retains some of the mystery but is still simple enough to write and customize yourself.
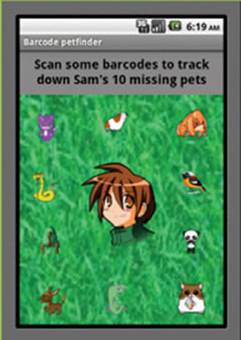
Barcode Petfinder app
PURPOSE OF THIS APP
This game uses the BarcodeScanner component and some if statements to enable the user to scan existing barcodes on books or drinks or anything and reveal a collection of pets. The challenge in the barcode pet shop is to collect all 10 pets for Sam, who has lost his pets in the long grass!
APP RATING
![]()
ASSETS YOU’LL NEED
Grass background, 10 pet images, and a picture of pet owner Sam.
As you may know already, a typical barcode is made up of 14 digits. In order to put some challenge into this game, the user doesn’t know the key to each of the pets. The keys are 000, 11, 12, 13, 14, 15, 16, 17, 18, and 19. For example, the barcode number 0004011234598 unlocks the hamster, the chameleon, and the donkey because it contains 000, 11, and 12 but none of the other keys. When you’re designing the game, you’ll program in a different number to correspond to each of the animals.
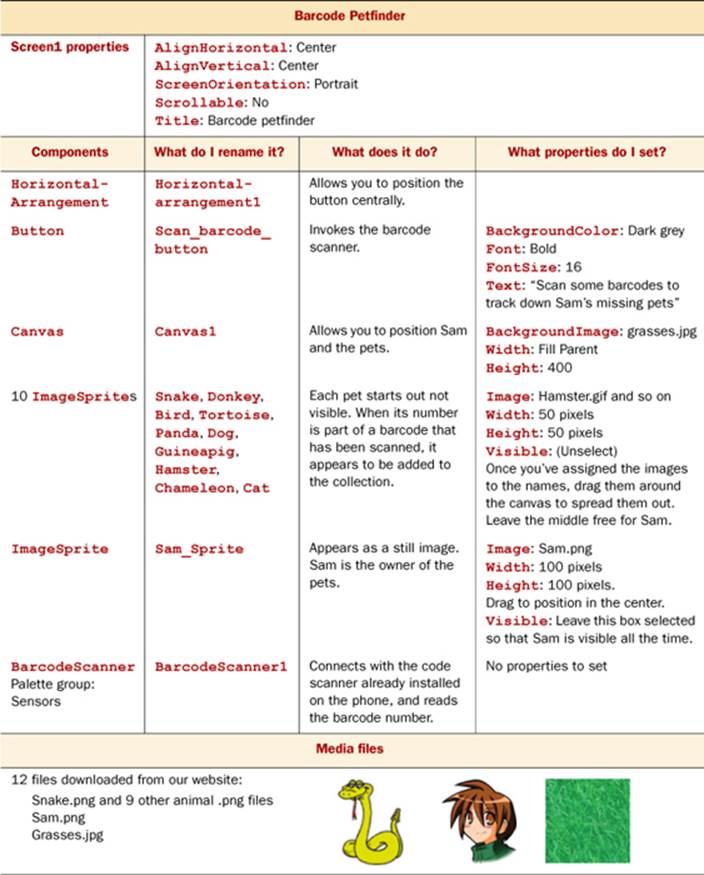
To code the petfinder, you need to begin by scanning the barcode when the user clicks the Scan button. Next the result of the barcode scanner needs to be looked at using an if statement; and if the numbers contain any of the strings that “unlock” a pet, the pet is made visible.
1. Opening the scanner and scanning a barcode
This small set of blocks does quite a lot. It enables the user to click the Scan button, and then it opens the scanner so the built-in scanner can scan the barcode.

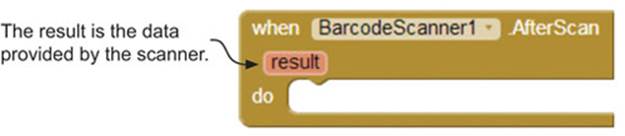
2. Collecting the barcode scanner result
Pull out the event handler for the BarcodeScanner. This takes the information from the scanner and holds it as result.
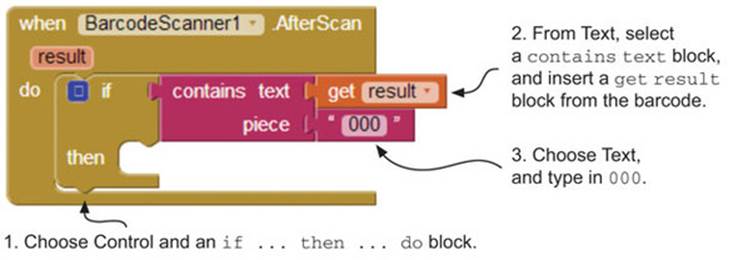
3. Looking for secret codes in the barcode scanner result
Earlier, we explained that each of the animals matches a string of numbers. The hamster, for example, matches 000. This is something we made up; in testing, we’ve found that using mostly two-digit strings means the user doesn’t easily find all 10 pets but can find them by scanning a number of products.
This block looks at the result returned by the barcode scanner and says, “Is 000 in there? If it is, I’m going to do something.” The next block will tell it what to do.
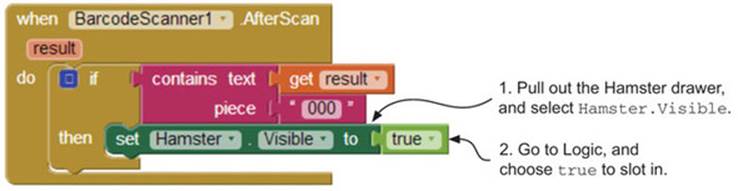
4. Revealing the hamster
The hamster sprite is of course always on the screen—it’s just invisible (as are all the other sprites). These blocks change the hamster to visible so the user feels that they have “found” it.
5. Revealing all the pets
You have to repeat the previous step nine more times for the rest of the pets to be included. All the blocks tuck into the one event handler. And, of course, each time you have to use the blocks from the animals drawer and change the secret numbers needed to find them: Hamster 000, Chameleon 11, Donkey 12, Panda 13, Snake 14, Tortoise 15, Dog 16, Cat 17, Bird 18, and Guineapig 19.
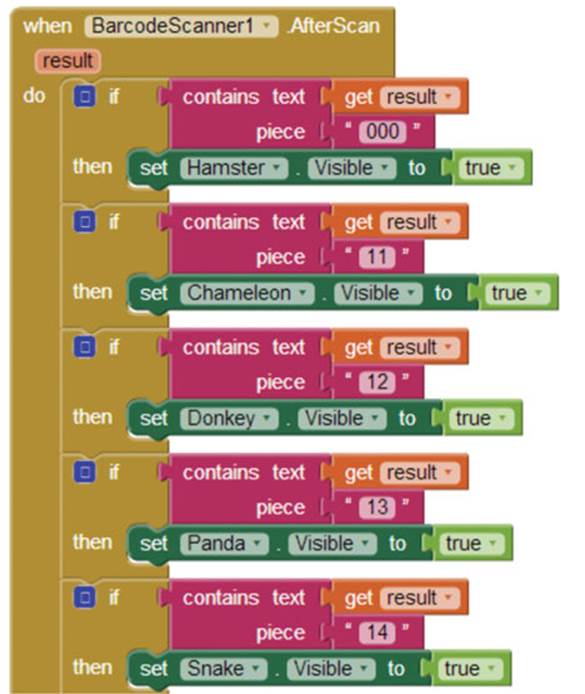
As you can see, the only thing that changes about each if statement in the event handler is the number in the text block and the name of the animal. So, the first if block has the text block with “000” and the set block with Hamster.Visible. The second if block has the text block with “11”, and the set block is for the Chameleon.Visible. As the user scans a barcode, if it contains 000, the hamster become visible; if the barcode contains 11, the chameleon becomes visible; and so on.
Taking it further
1. Use the same logic for the program, but have the user collect cars.
2. If you want to make Barcode Petfinder challenging, you can include a timer and a score count and have users find the greatest number of pets in the least time.
3. You can make the app a lot more complicated by making pets disappear if certain barcodes are scanned or by earning food for pets with certain barcodes.
Book Finder app
PURPOSE OF THIS APP
This app lets you scan the barcode of a book and then search for that book on the web.

APP RATING
![]()
ASSETS YOU’LL NEED
Basket image, Scan Barcode image.
As we mentioned earlier, the barcode contains some information that could be genuinely useful to you. For example, if you have the barcode of a book and want to find out how much it costs or where you can buy it, the key is, of course, the internet! The barcode on a book relates directly to the ISBN number, which uniquely identifies that book. By scanning the barcode and launching a search engine (like Google or Yahoo!), you can go straight to a website that contains information about the book. It works for other products too: pizza, salad, lemonade, ice cream ... (it must be lunchtime!). In order to launch the internet browser from App Inventor, you need to use a component that’s new to you: the ActivityStarter component.
Learning Point: What is the ActivityStarter component?
![]()
We have a phrase in Britain (which comes from an advertising campaign for paint): “It does what it says on the tin.” This is just such an example. The ActivityStarter component ... starts activities. If you want to start another app from within your app, you have to find out the package and class name (a way of organizing code in Java) and set the properties of the component to match. This could include searching the web for something, going to a particular web page, opening a map on Google Earth, starting someone else’s app from in your app ... almost anything a smartphone can do.
Again the wonderful people at MIT have a useful list of package and class names for activities you may want to start: it’s at http://mng.bz/0x89. Our example should help too!
To get started, you have to first code the Scan Barcode button to enable the user to click it to open the barcode scanner. This involves adding a Scan_barcode_button.Click event and calling BarcodeScanner1.DoScan. Second, you need to create a set of blocks that prints the result from the barcode scanner on screen, joined with the text “ISBN” to show the user the book’s unique code. You do this by using the clever join block, which lets you take some of your own text (“ISBN”) and join it to the number the scanner has picked up from the barcode. Finally, you code the button that starts the activity starter. The activity starter opens Google and quickly searches for the barcode that your scanner has read.
1. Creating the event handler to scan the barcode
This first block uses the button click to call the barcode scanner.

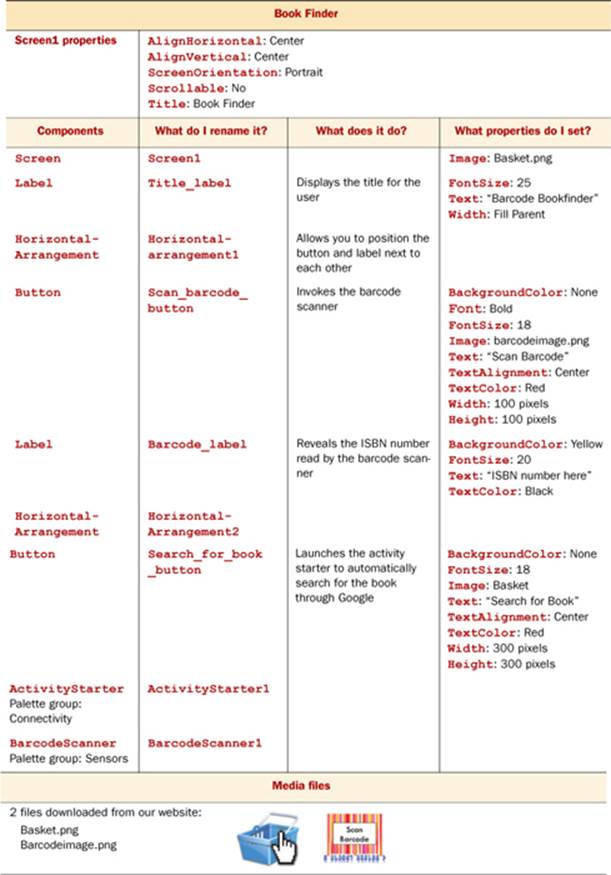
2. Using the scanner result to print the ISBN number
Now you’ll set the barcode label text so it reads “ISBN” with the ISBN number (which was read by the barcode scanner) right next to it. This reassures the user that the correct book has been scanned: they can check the barcode, because the ISBN number is usually printed on the book as well as the code.
Next you need to create a new variable called current_barcode. It holds the result of the barcode scanner so it can be used in other event handlers later. Initialize it to be an empty text box.
![]()
3. Searching the web
To open a specific web page from the app you’ve created in App Inventor, you need to set the properties of two blocks from the Activity Starter component. We’ll explain each separately and then let you see how the blocks fit together.
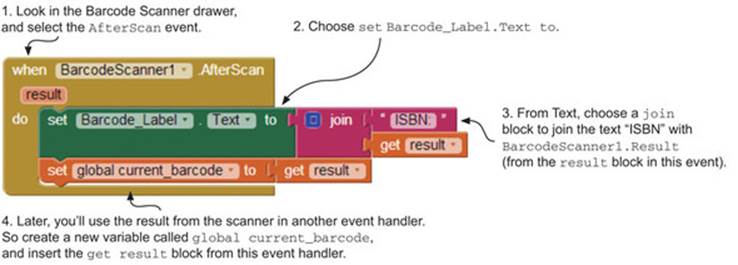
You need to first tell App Inventor that you want the activity starter to go to the internet by setting ActivityStarter1.Action to android.intent.action.VIEW (use a text block—type it exactly as printed here).
![]()
Next you tell it which website to view by setting its Data.Uri (Uniform Resource Identifier). This automatically goes to the page you’re looking for, much like a link in a website. If you wanted your app to automatically call Facebook, for example, you could you set this tohttps://www.facebook.com/. But you want the app to visit the page that would come up had you gone into Google and typed in the barcode of the book you’re scanning. So the URI you want to visit is http://www.google.com/m?q=. Then you add BarcodeScanner1.Result so you find the book that you’ve scanned through Google. The m?q= means, “Exactly which URI are you looking for?”

Note
Don’t worry about the warning signs on these blocks. They’re a result of the blocks not being attached to an event handler, and they will magically disappear once you complete this section.
Learning Point: What is a URI?
![]()
A Uniform Resource Identifier (URI) is a string of characters (number, symbols, letters, or all three) used to identify a name or a web resource. You may have heard of Uniform Resource Locators (URLs) and Uniform Resource Names (URNs), both of which count as URIs. If you think of URLs as addresses and URNs as names, it may help. Strictly speaking, a URI is either the address or the name or both together.
Now that you’ve set the activity starter, you need to call it using the block shown at right.
![]()
Put it all together, and you get this:
Now your user can scan the barcode of a book and launch Google to search for the book automatically, all from their phone. Good, eh?
Taking it further
1. Combine ideas from chapter 6 (lists) and chapter 11 (TinyDB) to write an app that stores a list of book barcodes along with a user’s comment and star rating for each book. Scanning a book barcode retrieves the comment and star rating.
2. If you want to know how to open other apps using ActivityStarter, explore the link offered earlier (http://mng.bz/0x89). This page has lots of technical information—but that’s what Inventors like!
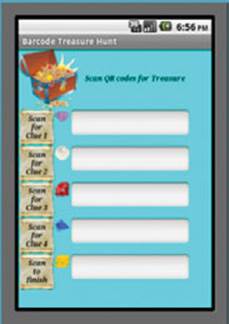
QR Treasure Hunt app
PURPOSE OF THIS APP
This game uses the BarcodeScanner component to read clues and assign points to the players.
APP RATING
![]()
ASSETS YOU’LL NEED FOR THE APP
Clue text file, amethyst.png, goldcoin.png, pearl.png, ruby.png, sapphire.png, scroll.png, and TreasureChest.png
ASSETS YOU’LL NEED TO PLAY THE GAME
Printed-out QR codes.
How does the game work?
This is a party game mixed with an app, which your friends will love. Here’s what you need to do:
1. Come up with a set of questions that relate to places and that could be answered by your friends. The example we have provided is one that our own children could play in the house and garden during the summer.
2. Using a QR generator like goQR.me, type in the questions and print each of the QR codes. You can create your own QR codes for websites you’ve developed or for favorites that aren’t your own. Just go to a QR site such as http://goqr.me/ and follow the instructions there, keeping the questions short. Each of the QR clues leads the players to the next location. We recommend numbering the clues on the back so you can make sure you put them in the right locations.
3. Hide all the clues in the appropriate places. Test the hunt before you try it with your friends, to make sure it goes well.
4. Email the APK (Android package file) for your app to your friends so they can join in the treasure hunt.
5. Do it all again. The QR Treasure Hunt app is designed so that all you need to change are the QR codes on the clue printouts each time. The app refreshes each time it’s closed.
Learning Point: How can I shorten my QR codes?
![]()
One thing to remember is to keep your URL reasonably short (below 300 characters). Services like http://tinyurl.com enable you to shorten website addresses in order to do this.
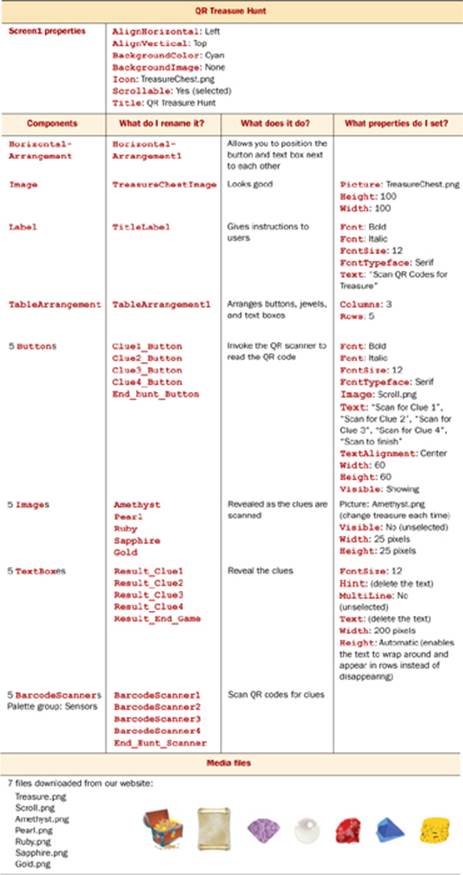
The coding of this app is reasonably simple but effective. You first need to code the buttons so they open the barcode scanner. Next you use the result of the scan to reveal the treasure (like gold or perhaps a sapphire) as a reward for the user and the clue to find the next treasure.
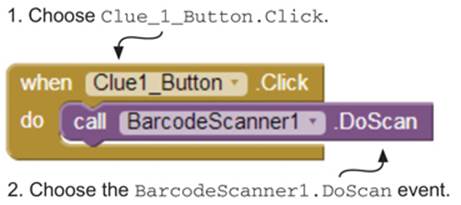
1. Scanning the QR codes
Pull out an event handler, and call a method that lets the user click the clue button and scan the QR code. Do this for each of the clues so you have five blocks, each one like this.
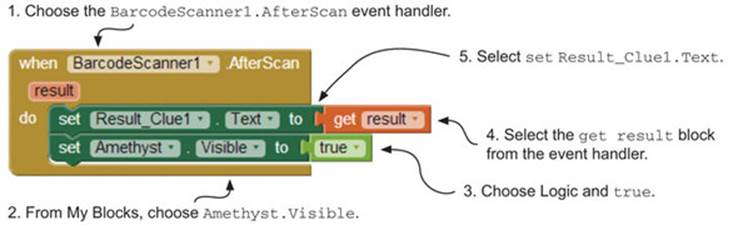
2. Revealing the treasure and the clues
As the user scans the QR code, the treasure becomes visible and the clue for the next treasure appears in the text box. For example, scanning a particular code might earn the user a ruby.
Do this for each of the results so you have five blocks like this.
Following is the QR table we used to make our own treasure hunt. Our kids are young, so you may want to make the clues a bit harder to keep your users guessing! We created the quiz by going around the house and garden and finding four well-spaced-out places by the sunflowers, the piano, the kitchen table, and the trampoline. Then we tried to think up clues to lead the kids to these places:
|
Clue 1 |
Which flower produces seeds that the hamster would enjoy eating? |
|
|
Clue 2 |
Where could you play chopsticks? |
|
|
Clue 3 |
Rearrange the words “tikhnec btlea” to find the next clue. |
|
|
Clue 4 |
On which piece of equipment would you do a seat drop? |
|
|
End of hunt |
Congratulations! You’ve found the treasure. |
|


Taking it further
Later in the book, you’ll learn how to save into a database on the phone. You may want to use this knowledge to let the users save their treasure and clues as they go along.
![]()
What did you learn?
In this chapter, you learned the following:
· What barcodes and QR codes are
· How to use the BarcodeScanner component
· How to use the .AfterScan block
· How to use logic to make an image visible
· How to use the ActivityStarter component to search on the web
· How to produce your own QR code
Test your knowledge
1
What is the difference between a QR code and a barcode?
2
Name three things you can do with an activity starter.
3
What is a URI?
All materials on the site are licensed Creative Commons Attribution-Sharealike 3.0 Unported CC BY-SA 3.0 & GNU Free Documentation License (GFDL)
If you are the copyright holder of any material contained on our site and intend to remove it, please contact our site administrator for approval.
© 2016-2026 All site design rights belong to S.Y.A.