Hello App Inventor!: Android programming for kids and the rest of us (2015)
Chapter 14. From idea to app
Now that you have the skills and knowledge of an App Inventor, we’ll look at how you can turn your ideas into fully working apps. This is a process, and the finished app may be different from what you first imagined—and that’s OK! Almost all the apps in this book started out as slightly different ideas on paper: as we worked them through, we changed the way they looked or functioned. Sometimes App Inventor worked in a way we hadn’t thought of and had us really scratching our heads. On the flip side, we also often discovered a great smartphone feature that we went on to add to an app.

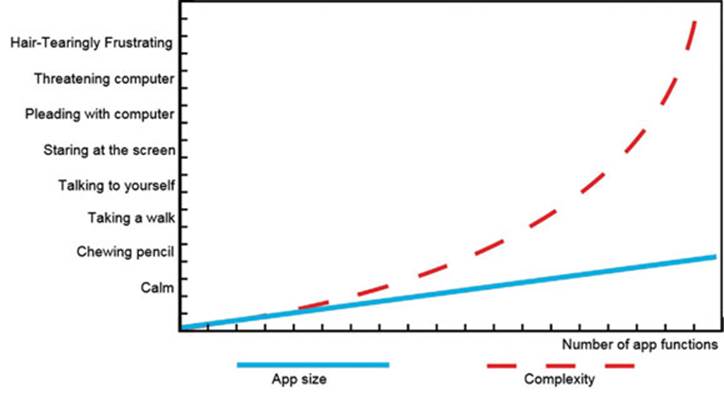
So far, you’ve built apps that are fairly simple—this was so you could learn a couple of features or concepts at a time and concentrate on those. If you’ve tackled some of the “Try It Out” challenges at the end of each chapter, you probably feel that making apps on your own is very different from following instructions in a book. You’ll notice that as your apps get bigger, they quickly become more complicated—as this graph shows.
General problem-solving strategies (useful for app inventing)
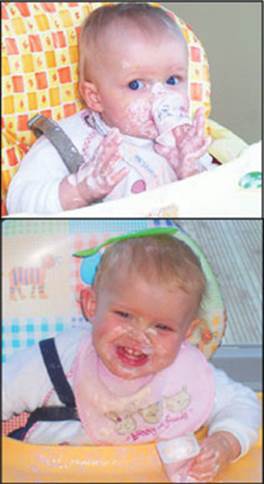
The difference between following instructions and creating something yourself is a little like the difference between a baby being fed by its parents and learning to feed itself. This increasing complexity can result in things getting messy very quickly! But messy is good—it means you’re learning; the trick is to keep things manageable (like the top baby) and not get frustrated if something goes wrong early on (like the baby with a spoon on its head).
So how do you keep problems manageable and monitor your progress? We’ve put together some general strategies for any problem-solving activity—including app building. Which one you choose depends on what you’re working on and how you work as an individual. For that reason, you’ll find them scattered throughout this chapter—see how many you can spot:
· Decompose —Break hard problems into smaller chunks. Are those chunks still too hard? Then break those down, too. Keep going until you’ve solved it! This strategy is also called divide and conquer. You’ll see decomposition a lot in this chapter.
· Get out your pencil —Some programmers find it helpful to write out steps in plain language. Others draw a flowchart of part of the app to check that it makes sense.
· Prototype —Start small with some of the basic functions of the app, get them to work, and then add extra bits afterward.
· Recycle —Chances are, someone has already written an app that’s a little like yours—or at least has solved some of your problems. There are heaps of helpful people out there making videos and writing tutorials about what they’ve done. Use their stuff, give them credit, and return the favor when you’ve solved a problem or written an app.
· Comment your programs —Use comments on blocks to make it clear how they’re meant to work.
· Involve the users —Find people who might use your app and get them involved early on, so you don’t waste time designing a lovely app that is never used.
· Test —One of the great features of App Inventor is that unlike with other programming languages, you can live-test your app as you build it. You can try different approaches and also attempt to “break” an app: for example, by putting text in a text box when the app expects a number.
· Talk about it —Work with a partner, and be sure you can explain to each other how you think the program should work.
These strategies can be combined. You might do them several times, adding detail as you solve problems. For example, you might make a rough prototype of how an app works, then talk about it with a friend, and finally refine it into a more detailed prototype.
In this chapter we’ll show you how to build two complex apps, using some of these strategies to help keep you on track. For the Alarm Clock app, we’ll share with you how we went about things, what the problems were, and how we solved them (or not!). We’ll give you the full app component table at the end of the Alarm Clock section—but don’t rush straight there; see if you can solve the problems we came across. The important thing we hope you learn is that making the apps wasn’t easy, but we got there using some of the strategies we listed and a little patience.
In the second half of the chapter, you’ll develop a full game with levels. But first comes a revamp of your smartphone’s basic alarm clock.
Zombie Alarm! app
Smartphone alarm clocks can be boring. That’s a shame, because here’s a device that can play any sound and display any picture or animation. We figured it was time for a fun alarm clock aimed at kids that would get them up in the morning. The basic idea was to have a clock displayed onscreen and a way for the user to enter an alarm time. When that time was reached, an animation would activate with sound—and that would repeat until the user switched off the alarm. Now what we needed was some inspiration. Time for ...
User involvement
End users often have brilliant ideas, and if you’re designing an app for someone else, you need to ask them what they want. The following template can help you interview your users or focus your thoughts on what potential end users might want. For an alarm clock aimed at an age group of 7–12, we came up with the following questions and answers:
|
Name of app idea |
|
|
Fun Alarm Clock |
|
|
Section 1: Introduction |
|
|
What is the problem or opportunity that the app will solve? |
The user wants a fun alarm clock designed just for them, to help them wake up in time for school. |
|
Are there any similar apps? |
Shrek Alarm |
|
Section 2: Users |
|
|
What age group is the app aimed at? |
7–12 |
|
What other types of interests do the users have? |
Computer games, theme parks, Minecraft, music, TV, comic books |
|
What other apps do the users like? |
Temple Run, Flappy Bird |
|
Section 3: What does the app do? |
|
|
If you had to describe the app in the time it takes an elevator to go up five floors, what would that description be? |
The alarm is a fun way to wake up. Instead of just an audible alarm going off, the alarm has an animation. The idea is that the user enjoys the graphic so much that they wake up fully in time to see the end animation. |
|
What are the inputs? |
Boxes to set the alarm time Check box to set the alarm on or off |
|
What are the outputs? |
The current time Animation and sound effects |
|
Section 4: Design |
|
|
Are there any specific images or icons that need to be used in the app? |
Original artwork would be good, with the color scheme and fonts matching the animation in style. |
|
What does the app need to do? |
1. Display the current time. 2. Record the alarm time. 3. Enable the user to activate and deactivate the alarm. 4. At the alarm time, trigger the current-time alarm. 5. The alarm trigger causes the animation to start and sound effects to be played. 6. The alarm repeats until the user deactivates it. |
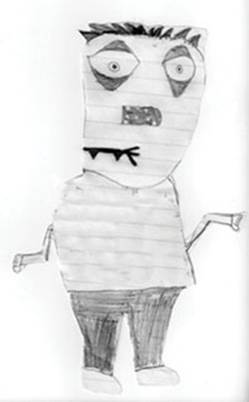
Now that the basic idea was in place, we needed some inspiration for what the central animation should be. We doodled a bit and chewed our pencils. One idea we liked was a flower clock with animated petals that dropped off—but it didn’t feel like something that would appeal to kids or get them out of bed. Inspiration came when we combined the idea of things falling off with a hand-drawn cartoon that Carl’s son left on his computer desk. And so the idea of a zombie alarm clock was born (eek!). When the alarm was activated, the zombie’s body parts would start falling off, and some suitable squelchy noises and moans of “Brainzzz!” would hopefully be enough to wake the dead (or at least 7–12-year-old kids).
Decomposing: get out your pencil
To get the zombie to decompose, you first need to decompose the problems that this app idea gives you. So before hitting App Inventor, it’s time to take out those pencils and make a list of the problems and questions you can see. Here are some that we saw:
1. How to update an onscreen clock.
2. How to trigger an alarm at the time the user selected.
3. How to get the zombie image into the computer.
4. How to make parts fall off the zombie.
5. What happens to the zombie parts that fall off?
6. Once the zombie has fallen completely apart, how do you start again?
7. How to warn the user if they quit the alarm app.
8. When the user switches off the alarm, how do you reset everything back to the beginning?
That list was just for starters, and it’s looking complicated already, but at least you have some specific things to solve. By working out what the problems are, you can focus on solving them bit by bit, and you can decide what to spend your time tackling first.
Tip
Making lists isn’t just useful for coding; you can use it to solve any problem. This was brilliantly illustrated by the genius Albert Einstein: when asked by a journalist what he would do if he had only 60 minutes to save the planet, he responded, “I would spend 55 minutes defining the problem and then 5 minutes solving it!”
You can group related problems together: for instance, you have timer problems (1 and 2), then graphics and animation problems (3, 4, 5, 6, and 7). Let’s tackle these problems one at a time by prototyping and testing each part.
Solving the timer problems
In this section we’ll decompose and tackle the timer problems.
Problem 1: How to update an onscreen clock
This is easy to solve because you can recycle some code from chapter 7, where you figured out how to display the system time whenever the user clicked a button. Now, rather than updating the clock on a button click, you can use a timer to update the clock. We prototyped this by starting a new app with a Label called TimeLabel in a Horizontal-Arrangement and a Clock called TimeNowClock. Next we copied the code from chapter 7 into the TimeNowClock.Timer event, like so:
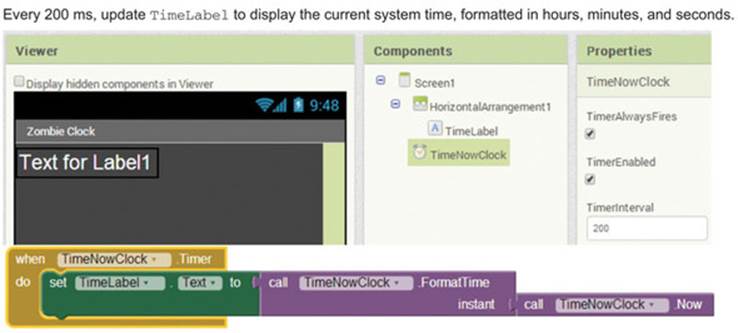
Why 200 milliseconds (ms) for the timer interval? Well, this came from a bit of trial and error: firing it more slowly meant that every now and then, the TimeLabel display would skip a second onscreen. That’s probably because when a clock timer event fires, it needs to complete all its blocks before the timer restarts—so if you set the timer to update once a second, and updating the label takes 50 ms, the timer only restarts after 1,050 ms. Eventually, all those extra 50 ms add up, and the seconds skip a beat. Choosing a faster trigger of 200 ms means you’ll definitely finish updating the screen and restarting the clock before the next system time second ticks by.
Learning Point: Timer wait time
![]()
You can test our theory about timers waiting for blocks to fire by putting a big counting loop that updates a label inside a fast-firing timer trigger, as shown here.
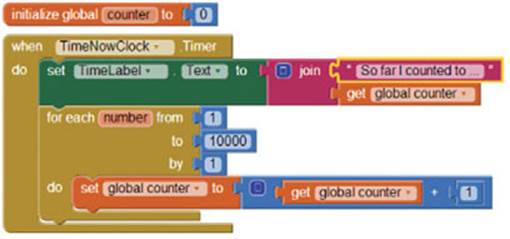
No matter how fast you set the TimeNowClock timer interval, you’ll find that the message you see onscreen updates slowly—the speed is limited by how fast your phone can count to 10,000.
If you run the code so far, you’ll see that the screen displays the time; but if you look carefully, there’s something odd. Can you spot it?
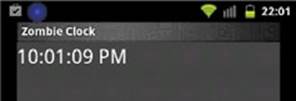
The system time in the top-right corner of the screen reads 22:01, but the reported time in the app is 10:01:09 PM. At first this looked like a problem—the user needs to know that if they set the alarm time to 07:30, they will be woken up in the morning; and we wondered whether such an alarm would also be triggered at 19:30. As it turns out, it’s just a quirk of App Inventor—the FormatTime block always defaults to AM/PM format, whereas everything else in App Inventor uses 24-hour format. We tested this by swapping the FormatTime block in our code to blocks of code that output the hours, minutes, and seconds separately, like so:
Problem 2: How to trigger an alarm at the time the user selected
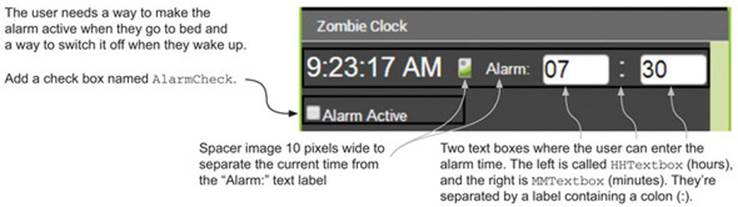
Next we added some additional objects to our horizontal arrangement so the user has two text boxes in which to set their alarm time’s hours and minutes. We also added a check box so the user can control when the alarm is active.
We selected the NumbersOnly property of the text boxes to stop the user from typing letters by mistake.
Time to prototype some blocks to make the alarm go off. You won’t worry about the zombie animation yet—first let’s get the phone to make a noise. Add a sound object called AlarmSound, and choose a sound file source (such as the “baaa” sound from chapter 2). This is temporary; later you’ll replace it with zombie sounds.
Now you have a couple of questions to answer. Before you read the answers, think the questions through, get out your pencil and/or talk to someone else about them, and see if you can work out some solutions:
1. What conditions need to be true to play the sound?
2. What event checks to see whether the alarm sound should be played?
For question 1, three conditions all have to be true before the alarm sounds:
· The AlarmCheck check box needs to be selected. If the user didn’t select it at bedtime, they don’t want to be woken up.
· The system time’s hours needs to equal the value entered in HHTextbox.
· The system time’s minutes needs to equal the value entered in MMTextbox.
For question 2, the trigger event to check whether the alarm should be played has to be a timer. Think about it: the user isn’t going to be interacting with the phone (for example, pushing a button) while they’re asleep, so the only option is a regular timed event. You can add a new Clockcalled AlarmCheckClock to do this. How often should it check whether the alarm time is reached (the timer interval property)? It needs to be less than a minute; otherwise you might miss the alarm time. We opted for once a second (1,000 ms) so the alarm will trigger almost as soon as the alarm time is reached. Here’s everything put together:
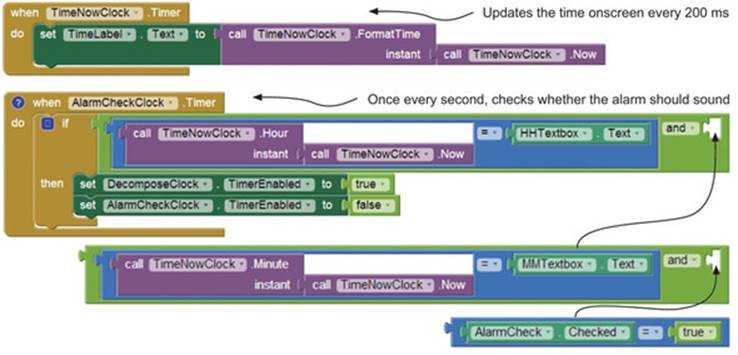
There are three test conditions for the if block, and we had to split them up here to fit them on the book page. The arrows show how you fit them together to make an awfully long set of blocks! Hopefully in a future update App Inventor will let you add and statements below each other so it’s easier to view this kind of thing. We also added comments to the code so that we didn’t get confused about what the two timers are doing.
Time to test: run the app, enter the current time in the hour and minute text boxes, and click the check box. What happens? You should hear your sound play—and it will repeat until the current time changes to one minute after the alarm time. This is almost what you want; but if the user doesn’t wake up in the first minute, you want the alarm to keep sounding forever (or at least until they turn it off). To solve this problem, you can recycle an idea from the Splat the Rat app—remember how you have one timer that shows the rat and another that hides the rat? You can use that idea of one timer handing off to another in a sort of relay here. Try working this out with pencil and paper now.
Here’s the way we thought it could work:
1. Every second, check to see whether the alarm should fire (we’ve already worked this out).
2. If all the conditions for starting the alarm are met, stop the AlarmCheckClock timer and start a new timer (you’ll call this DecomposeClock because later you’ll use it to make the zombie fall apart).
3. Every time DecomposeClock fires, it will do the following:
1. Play the alarm sound.
2. Check to see if the AlarmCheck check box has been switched off. If so, DecomposeClock switches off and the AlarmCheckClock timer switches on.
To try this, add a new clock to your app. Call it DecomposeClock, and set its TimerInterval property to 3,000 ms and its Enabled property to False. Here are the steps we’ve worked out, turned into blocks:

Re-test the app, and you’ll find that the alarm goes off as it did before—but now it continues to sound every 3 seconds until the user switches it off.
Solving the graphics and animation problems
That’s solved all the timer-related problems (fingers crossed). Let’s move on to the graphics and animation problems.
Problem 3: How to get the zombie image into the computer
One idea was to simply scan or photograph the zombie image and turn it into a sprite. Can you see any problems with that? You want pieces to drop off the zombie, and to do that you need to turn it into a jigsaw puzzle of separate sprites.
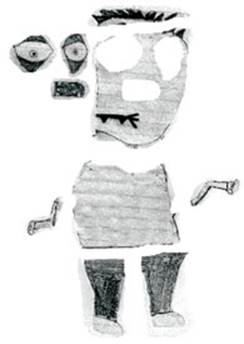
There are a couple of ways you can do this. One option is to scan the image and then cut out pieces using a graphics editor like Paint. That gives you something like the image on the left, where we’ve used the freeform selection tool in Microsoft Paint to roughly chop up the image. It’s quick to do, but any areas you chop out end up leaving a hole in the original image. We also felt it would be good to color the image, and that wasn’t easy on a scanned graphic.
We found that a better option was to use the scanned image, but we redrew over it using a vector drawing program (we used Serif DrawPlus, but there are lots of alternatives). You can see how it worked on the right.
Using a vector drawing package means it’s easy to resize the image so it fits the phone’s screen. You can use the built-in fill effects to color the image; and because the parts are traced separately, when an eye or nose falls off, you won’t see a gaping hole. We used the drawing package to draw a mud bank for the zombie to stand on—this also provided an easy (and slightly sneaky) way to solve problem 5.
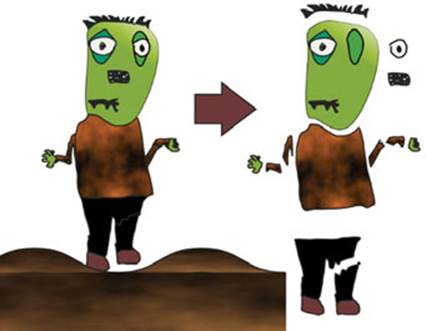
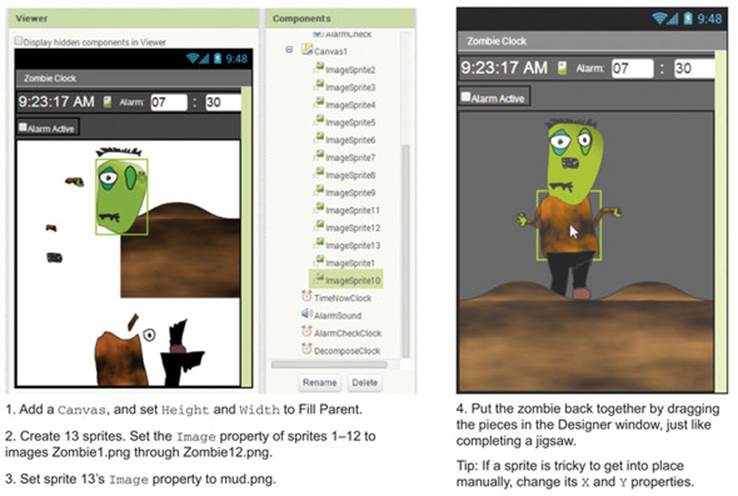
In the end, we split the zombie into 12 different parts plus the mud bank. You can download them as separate images from the website.
Now you need to put the zombie back together again in the app. This is exactly like putting a jigsaw puzzle together, and frankly it’s a little tedious—but trust us, it’ll all be worthwhile when you wake up to a moaning zombie. First you need to create 13 sprites on a canvas and then upload the 12 zombie parts and the mud bank as their image properties. Then you need to get all 13 sprites in just the right place onscreen—it’s handy to use a phone for live testing here, because it’s annoying to have the app look great on your PC only to find out it looks terrible on your phone. Our top tip when you’re doing this is that any sprite you move will come to the foreground—so you need to work from the back to the front (do the head first, then the hair, eye, and nose). If you don’t do this, you’ll end up with an even weirder-looking zombie—for example, with a nose that is behind its face.
Once the zombie was back together in the app and standing on the mud bank, we set the background color of the canvas to dark grey to add a suitably gloomy atmosphere. You could try adding a spooky background image to the canvas—say, a scary castle, a swamp, or (worst of all) a shopping mall. Here you can see how we re-composed the jigsaw zombie:
Problem 4: How to make parts fall off the zombie
The situation so far is that you have an alarm that plays a sound and a zombie made of 12 parts. You need to link them so the alarm plays zombie-type sounds and triggers an animation of each part of the zombie dropping off in turn.
Setting up the zombie sounds is pretty easy. We used a microphone and some sound-editing software (Audacity) to make a suitable squelchy sound that plays whenever a body part drops off and a spooky “brainzz” sound that plays when the zombie has completely fallen apart. You can download the files from the website. Change your AlarmSound Source property to the squelch.mp3 file, and add a new sound object called Brainzz and set its source to the Brainzz.mp3 file.
To animate all the body parts, you’ll set their Heading property to 290 (drifting toward bottom right of the canvas) and their Speed property to 6 to start them moving. You need an efficient solution here because coding separate blocks for all 12 body parts is a big task—and what if you wanted a more complex image, maybe one with 50 parts? In the Hungry Spider app, you saw how lots of fly sprites can be efficiently animated using a list of sprite objects; and you can recycle that idea here, too. Here are the steps behind the blocks:
1. Set up a list called ZombieParts that contains all the zombie part sprites.
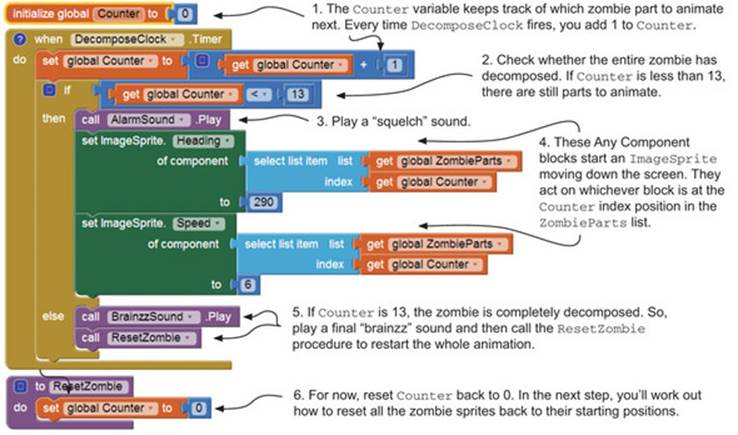
2. Set up a variable called Counter with a value of 0.
3. When DecomposeClock fires, do the following:
1. Add 1 to Counter.
2. If Counter is less than 13, there are still parts to animate. So:
o Play the alarm sound (you’ll play a “squelch” sound).
o Animate the sprite in the ZombieParts list that’s at Counter’s index position, by setting its Speed to 6 and Heading to 290.
3. Else (if Counter is 13 or more, meaning all the parts have dropped off):
o Play a new sound called Brainzz.
o Reset all the sprites to their start positions so the zombie is whole again, ready to repeat the decomposition.
o Reset the Counter variable to 0.
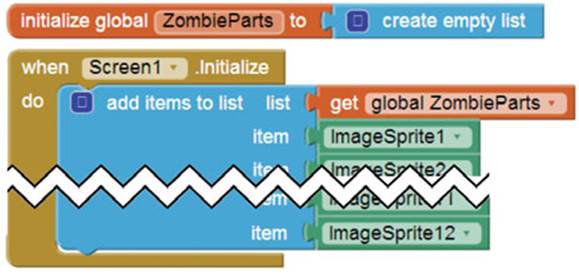
Step 1 sets up the ZombieParts list. You’ll create a new variable Zombie-Parts as an empty list; then, at screen-initialize time, you’ll add all 12 zombie ImageSprites to the list. We’ve shown you the first and last image sprites here—in between, you need to add ImageSprites 2–11.
Steps 2 and 3 deal with what happens when the DecomposeClock timer fires every 3 seconds. Just like in Hungry Spider, you’re going to use Any Component blocks to set -properties of all the zombie image sprites. The difference is that in Hungry Spider, you used a for each loop to start all the flies moving at once, whereas in this case you want to animate a new zombie part every time DecomposeClock fires. That’s why you’re using the global variable Counter that keeps track of which part has just been animated—between the times when DecomposeClock fires. Here are the blocks:
Note
You could have set the Heading property of all the sprites in the Designer window, but why do something 12 times when you can have the blocks do it for you?
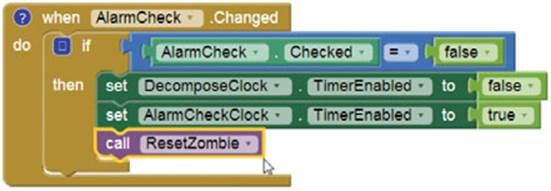
Why did you set up a separate ResetZombie procedure? Couldn’t you reset the Counter to 0 right after playing the Brainzz sound? You do this because you don’t only reset the zombie when it’s fully decomposed—you also want to reset it when the user turns off the alarm, so that you have a fully formed zombie ready to go again the next time the alarm triggers. By making a ResetZombie procedure, you can call it from the previous blocks and from the AlarmCheck.Changed event, too. That means you save yourself some time. Let’s make that addition now before we forget.
If you try the app now, you’ll see that it’s almost complete. When the alarm time is reached, the zombie falls apart with squelchy sounds and calls for “Brainzz!” But all its body parts just sit at the bottom of the screen and don’t re-form into a whole zombie. The first problem is easy to solve, but the second is pretty hard!
Problem 5: What happens to the zombie parts that fall off?
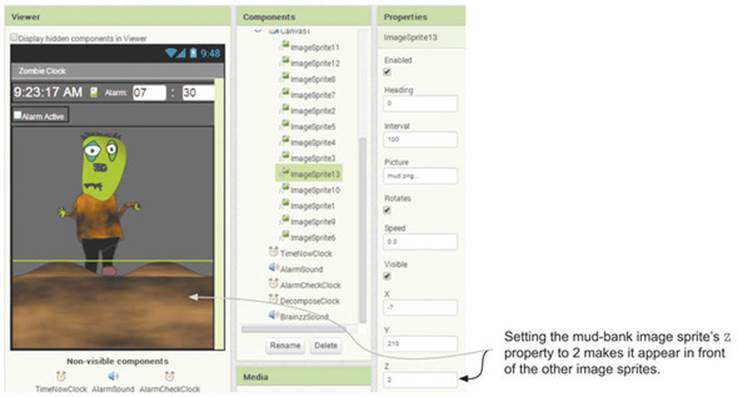
One of the reasons we put a thick mud bank at the bottom of the screen is so you don’t have to worry about programming blocks to hide the 12 zombie parts as they reach the bottom of the screen. Instead you can just let them drop behind the mud bank. You know that image sprites have Xand Y properties for their position. They also have a Z property that controls how the sprites are layered. The higher the Z number, the closer the sprite is to the front of the screen. So if you set the Z property of the mud bank to 2, it will be in front of all the other sprites (which have a Z value of 1).
Test the app now, and the zombie should slide out of view—if he’s still peeking from behind, make the mud bank a little larger.
Problem 6: Once the zombie has fallen completely apart, how do you start again?
How would you tackle this problem? You need all the zombie parts to go back to the positions they started in. Think about how you might do that before reading further ...
... Nope, too soon—think a little more, please. ![]() Did you think about x and y positions?
Did you think about x and y positions?
One solution that is fairly easy from a programming point of view is to write down the x and y positions of all the sprites from the Designer screen. Then you could store them in two lists—say, ZombieX and ZombieY. A for each loop could then be added to the ResetZombie procedure that would set the x and y positions of each image sprite. That’s a good solution, but it could be improved. Here are the problems with it:
1. Writing down x and y coordinates of 12 image sprites is tedious—and the app already knows all the x and y image sprite coordinates when it starts.
2. What if you move the zombie around in the Designer window? You have to remember to change the x and y positions in the list blocks, too.
There’s a clever solution to these problems: use blocks to record all the x and y positions directly when the screen initializes. Then, later on, you can use a for each block, just as you originally worked out. Here we’ve added the blocks that record all the image sprite positions during theScreen1.Initialize event:
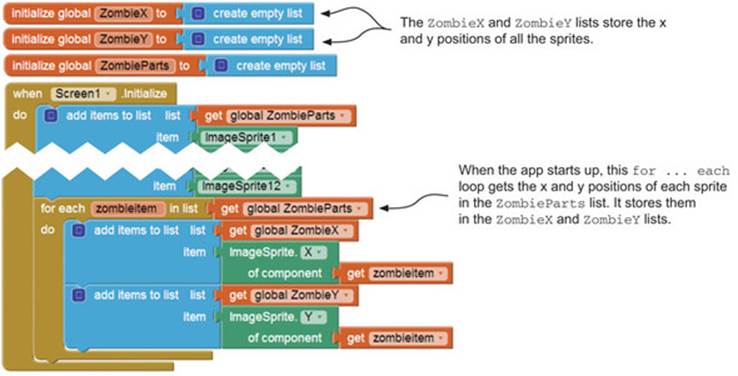
Don’t forget that the two blocks that have an of component socket are special Any Component blocks—that’s why you can reuse them for all the image sprites.
The last big piece of the jigsaw puzzle is to reset the zombie. The next set of blocks shows how to cycle through the 12 image sprites, setting their speed back to 0 and their x/y coordinates back to the values you collected. This took a few attempts to get right, because at first we tried the same sort of “for each in list” loop that you can see in the previous example. We hadn’t thought about the fact that to reset the sprites, we needed to access three lists at the same time: ZombieParts (the list of sprites) as well as ZombieX and ZombieY. That meant we needed a common index number to access the same position in all three lists. The solution was a regular for each loop with a range from 1 to 12; we could then use the loop’s counter (which we renamed zombiepart) as an index to access all three lists. Now that we’ve figured that out, you can recycle that idea whenever you need to work with several lists at once. Here are the blocks:
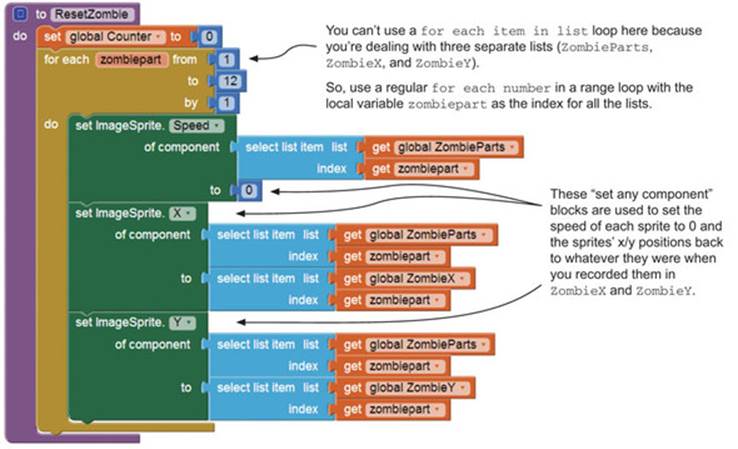
If you run the app, it works, but there is one final twist (literally)—all the zombie parts are rotated when they’re put back together! This is because we forgot to change the Rotate property of the image sprites to be false (unselected). You could add blocks in the screen’s Initialize event to fix this, but it’s just as quick to simply unselect the Rotates box for each sprite in the Designer window. It took us literally less than 30 seconds—ready, steady, go!
Problem 7: How to warn the user if they quit the alarm app
To solve this problem, we recycled code from another App Inventor website. Pura Vida Apps by Taifun had a solution we could use: we just added a Notifier object (Notifier1) and then copied the blocks from http://mng.bz/KHno.

OK, on to our final problem ...
Problem 8: When the user switches off the alarm, how do you reset- t everything back to the beginning?
... which turns out not to be a problem at all—or rather, we’d already solved it. That’s because we made a general ResetZombie procedure, and we’d already added a call to it from the AlarmCheck.Changed event. So whenever the user unchecks the check box, the zombie automatically resets. That’s the power of reusable procedures.
The next section gives you the full specification of what the program does and the objects and properties we invented.
Note
App Inventor can’t wake up your phone’s screen or stop your screen from sleeping. But even when the screen sleeps, you’ll still hear the alarm sounds. You could cancel the screen timeout manually in your phone settings, but make sure your phone is fully charged—or, even better, plugged in to a power source.
We hope you enjoy Zombie Alarm! as much as we do—we particularly like when his eyeball drops out. Now use your imagination to come up with your own animated alarm clock.
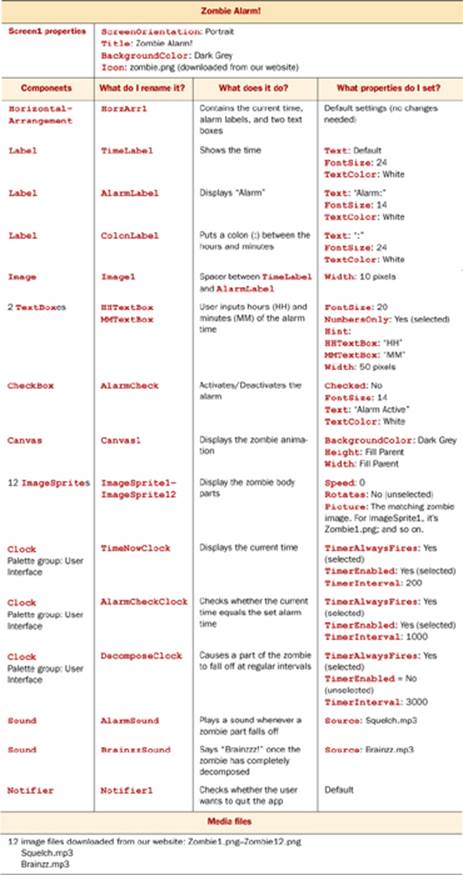
Zombie Alarm! app: full specification

PURPOSE OF THIS APP
Almost everything can be enhanced by the inclusion of a zombie—and this alarm clock is no exception. The app displays the current time. The user enters their alarm time and selects a check box to set the alarm, and at the appropriate time, bits start dropping off the zombie with a squelchy alarm sound (and the occasional “Brainzz”). When all 12 parts of the zombie have fallen in the mud, he is resurrected. This loop continues until the user wakes up and unchecks the Alarm Active check box.
APP RATING
![]()
ASSETS YOU’LL NEED
12 zombie parts (kindly drawn by Carl’s son, Daniel); “brainzz” and “squelch” sounds.
Taking it further
Give the user a choice of wake-up sound effects for the Zombie Alarm! app.
Designing a complete game
In the final app of the book, we decided to get really ambitious and create a multilevel game that uses both the phone’s orientation sensors and the touch screen. At some point, we used all our problem-solving strategies to deal with this app’s complexity (decomposing problems, getting out a pencil, prototyping, recycling, commenting our programs, involving users, and testing).
The final game took about a week to make from scratch, but prior to that we had a bunch of ideas and prototypes.
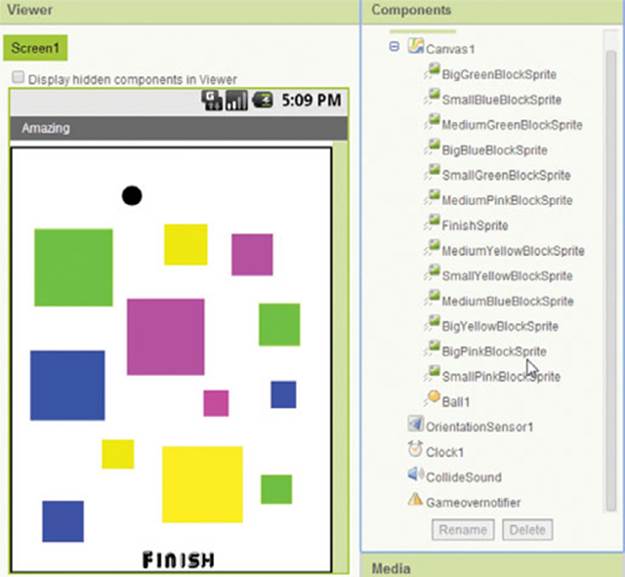
Here’s Paula’s early prototype of the game that inspired the final app. The idea is to tilt the phone so the ball rolls between the blocks until it reaches the bottom of the screen. At the same time, the blocks can be moved around by dragging them with your finger.
From start to finish, we made lots of small prototypes of the way the app looked and the way it played. Here are some of the problems we encountered along the way:
1. What should the rules of the game be?
2. How can we get the user interested in winning, so they want to keep playing?
3. How will one level be different than another?
4. How can we write code blocks that make it easy to add levels without programming lots of extra code?
Learning Point: Prototyping
![]()
The first computer mouse was designed using a roll-on deodorant tube and a butter dish. It didn’t work with a computer, of course, but the prototype helped people understand the idea and think about how a computer mouse might work.
In app development, you might prototype a user interface to see how an app would look, without worrying about the blocks. You could also prototype some of the blocks to see how the app would work, without worrying about the interface. App prototypes are just early versions of part of the app to help programmers and users find and solve problems.
Developing the characters and rules
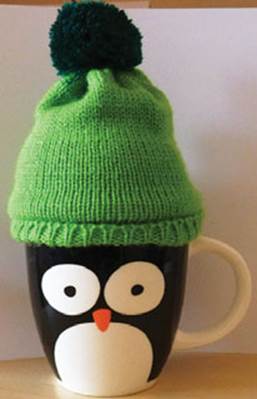
The prototype was great to demonstrate that our idea worked, but it looks like a basic puzzle game—the user had no emotional investment in getting the ball through the maze, other than a sense of accomplishment. If you think of games that people enjoy, there are usually characters that they identify with. Nintendo is particularly good at this: many players feel a connection with Mario, Luigi, or Princess Peach. Inspiration for our main character came from a coffee mug.
A penguin sliding about on ice made sense in the context of the game—the motion is similar to a ball rolling around a maze. We would start the penguin at the top of the screen, and it would have to slide around obstacles to reach an exit point at the bottom of the screen. We named our penguin Gentoo, after a species of Antarctic penguins, and she’s female (because there are so many male game characters).
This was a good start, but Mario faces Bowser, Pac-Man is hunted by ghosts, and those Angry Birds are angry at the pesky pigs—what we needed was a villain. Our idea was to make a Yeti that had the power to turn Gentoo into a block of ice, sending her back to the beginning. The rules of the game developed from these ideas, and here’s what we ended up with:
· Gentoo must travel along an icy path from top left on the screen to bottom left. She starts with five lives.
· If Gentoo falls into the sea, she loses a life and starts back at the beginning of the current level.
· A Yeti moves randomly along the path. If it touches Gentoo, she freezes, loses a life, and returns to the beginning.
· Gentoo has a stock of five snowballs that she can fire at the Yeti. A snowball hit freezes the Yeti for 5 seconds. During this time, Gentoo can touch the Yeti without freezing.
· A fish appears and disappears at random intervals. If Gentoo eats the fish, she gains a life.
· Gentoo scores 10 points for hitting the Yeti with a snowball, 50 points for completing a level, and 500 points for completing all the levels.
· If Gentoo completes all the levels, the game cycles back to the first level and resets the number of snowballs to five.
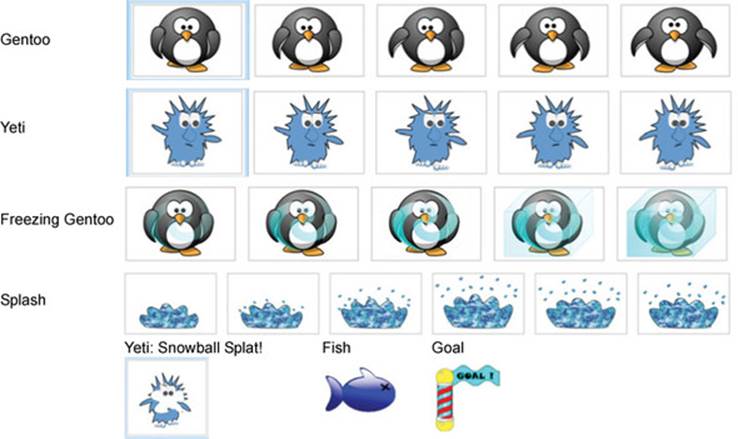
Now we needed some graphics. The character graphics were developed by starting with some public domain vector images and making some changes—for instance, the Yeti was a smooth blob, so we made him spiky (a bit like a snowflake).
We also made stop-frame animations in which we changed the images a little at a time to generate a series of images that could be uploaded to App Inventor. (You already know from the Creepy Spider app how to turn these images into animated sprites.) Once we had an animation for Gentoo and Yeti walking around, we created animations for Gentoo splashing in the sea and being frozen. Finally we created a fish image, a goal post, and a snowball splat to a single Yeti image for when Gentoo freezes him with a snowball (we only needed one image because the Yeti isn’t animated when he is splatted). We used Serif DrawPlus to do this—but there’s lots of other software you could use. Here are some examples of the graphics we created:
Tip
Have you noticed that Gentoo and the Yeti face forward rather than left or right? That helps you because, as you saw in the Hungry Spider app, if you want sprites that can face left and right, you have to produce two sets of images and write blocks of code that can switch between them depending on which direction the sprite is travelling. Having the characters face the player means you cut down on a lot of coding! If you’re familiar with MIT’s Scratch programming interface (http://scratch.mit.edu/), you know there are sprite controls to do this hard work automatically—hopefully we’ll see something similar in App Inventor very soon.
Designing the levels
What could you change about each level to make it more challenging? You have lots of choices here: make the Yeti faster, add more Yetis, add ice that is more slippery, reduce the number of times the fish appears, and so on. We settled on a simple example to start with, which changes the following items with each new level:
· The path that Gentoo travels gets narrower and more complicated.
· The Yeti’s speed increases.
· The Yeti’s starting point changes.
· The fish appears in a different place on each level.
Once we had the level changes working, we could try out additional ideas to make each level harder.
Changing Gentoo’s path on each level is the hardest to achieve. In the prototype at the beginning of this section, all the wall blocks were separate sprites. That means for every new level, we would need to set the x and y positions of all the wall sprites; and that’s not really a pathway, it’s just a collection of blocks. For a complicated path with joined-up walls, we might have 20 or more sprites to set for each level—and that’s a lot of coding even if you use lists of x and y positions. Fortunately, we had a cunning solution. App Inventor lets you test the background color of any x, y point on the canvas using a method called Canvas.GetBackgroundColor. So if Gentoo starts on a white, icy path, you can use a timer to keep checking whether a point under her feet is still white. If it isn’t, you can assume that she has fallen into the water. This approach has a massive advantage: you can draw each level in your favorite drawing package and upload it as a canvas background in App Inventor. As long as the path is white, the game will work—no complicated x, y coordinates and collision detection needed. See? We told you it was cunning. You can use exactly the same trick to keep the Yeti from falling off the path. Here are the three increasingly difficult levels we drew.

We had the rules and graphics; now it was time to make the app.
A-Mazeing Penguin app

PURPOSE OF THIS APP
Help Gentoo escape the Yeti by tilting your phone to move her along the icy path from the top of the screen to the goal at the bottom. Sneak past the Yeti by touching the screen to throw a snowball. Eat blue fish to gain extra lives.
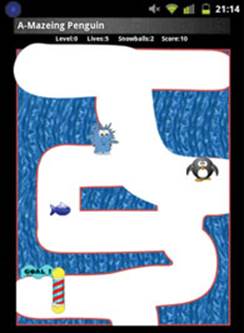
APP RATING
![]()
ASSETS YOU’LL NEED
3 level images, 9 penguin images (animation), 7 freezing penguin images (animation), 15 splash images (animation), 6 Yeti images (animation), 1 splatted Yeti image, 1 fish image, 1 goal image, and 8 sound effects—phew!

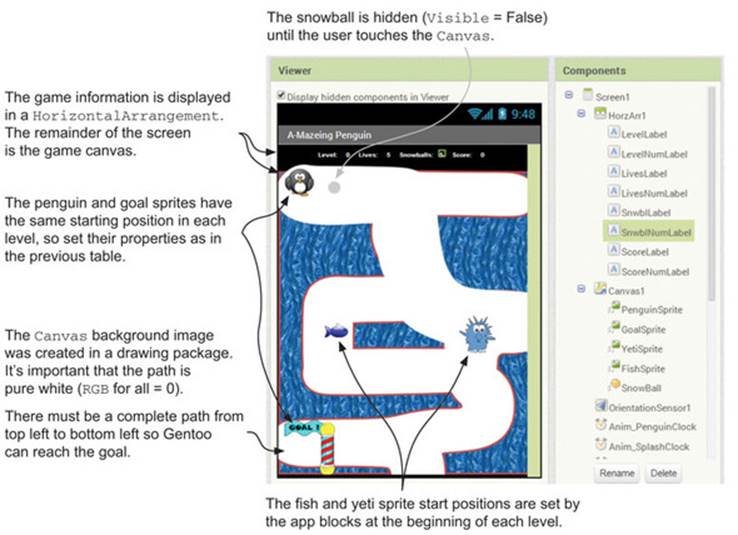
1. Setting up the screen
The screen setup is straightforward, but there are a lot of media files to import. Take your time doing this; wait for each one to upload fully before moving on to the next one.
Here’s the layout:
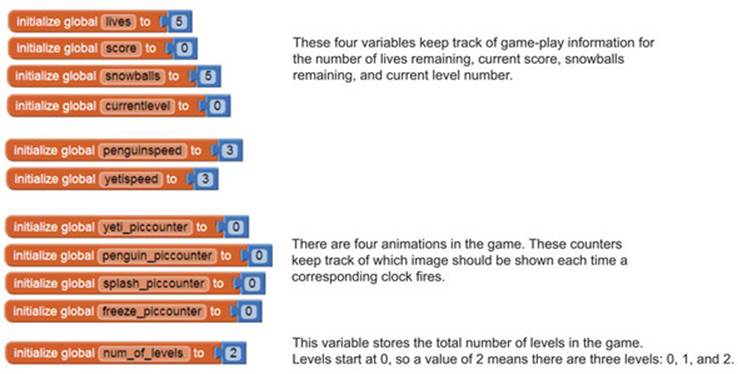
2. Coding the blocks: setting up the variables
You’ll have a lot to keep track of in this game. Make a quick list now of the variables you think you’ll need. Following you’ll find our final list. We have three sorts of variables: those that keep track of gameplay information like the score, those that set the speed of sprites, and those that control the animation of sprites. The variable penguinspeed isn’t changed anywhere in the program, but it’s a useful variable when you want to test what speed works best on your phone. You could also use it to change the difficulty of each level: for example, you could create a red fish that makes Gentoo move at half speed for 30 seconds.
Here are the variables used throughout the app:
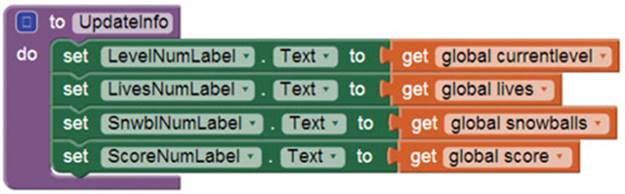
3. Updating the game information
There will be lots of times in the game when you want to update the information at the top of the screen. For example, when a snowball is fired, you’ll reduce the number of snowballs by one; or you’ll indicate when the player loses or gains a life. It makes a lot of sense to write a general procedure to do this that you can call on all these occasions—you’ll call it UpdateInfo, and it will set each of the text labels to the value of the matching variable, like so:
4. Animating and moving the penguin
Most of the code here, you’ve seen before. You can recycle much of it from previous apps in the book.
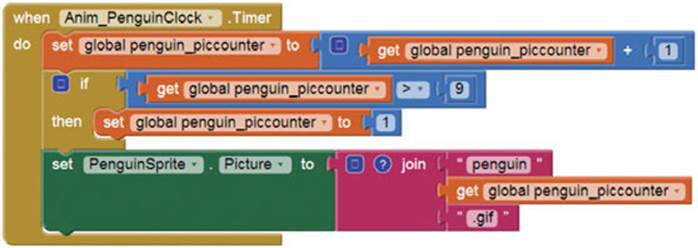
Animating the penguin works exactly as in Hungry Spider. Each time the timer fires, you add 1 to a picture counter variable. If you’ve reached the last of the nine images, you reset the counter to 1. Then you set PenguinSprite’s Picture property to a filename made of the word penguin+ the current counter + .gif. So if the counter is 5, PenguinSprite.Picture="penguin5.gif".
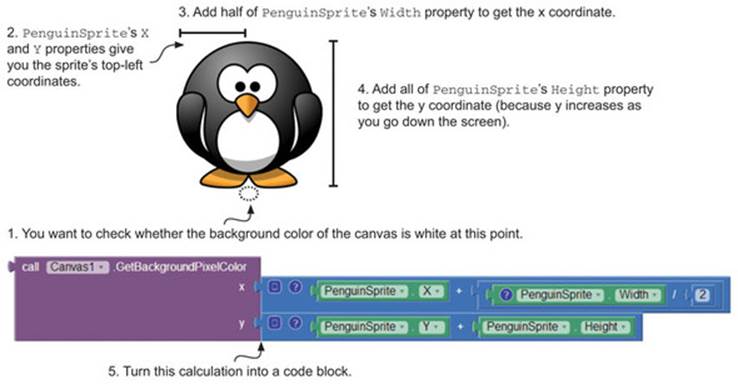
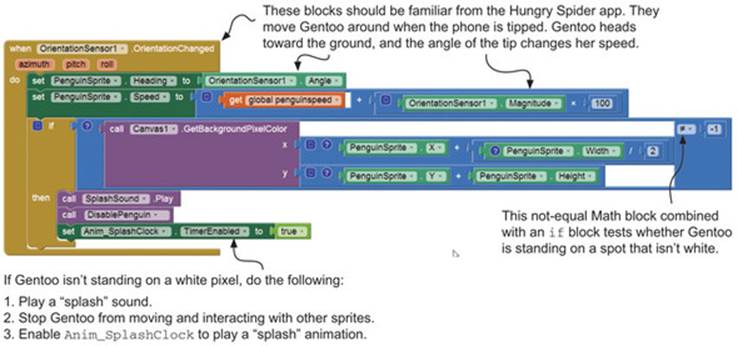
If you run the app, you should see a flapping Gentoo. Now you need to make her move around by responding to the orientation sensor. This is the same thing you did in Hungry Spider—but here, each time Gentoo moves, you also need to check that she is still on the white ice path. To do this, you’ll test the color of the canvas between her feet every time the orientation sensor changes. The color white has a value of -1 in App Inventor; so if during any of your tests the color doesn’t equal -1, you’ll play a “splash” animation (because the path is surrounded by the sea), reduce Gentoo’s lives by one, and send her back to the beginning of that level.
Step 1 is to figure out how to check the color of the canvas between Gentoo’s feet. You can use a canvas block called GetBackgroundPixelColor, which has sockets for an x and a y coordinate. If you feed in Gentoo’s x and y positions, that’ll tell you the color at the top left of the sprite. Here’s how to modify PenguinSprite.X and Y and feed them into Canvas1.GetBackgroundPixelColor:
Now you can make a decision based on whether the result of this block is -1 (white) and combine this with the Hungry Spider blocks that used the orientation sensor to move the character around.
5. Making a splash
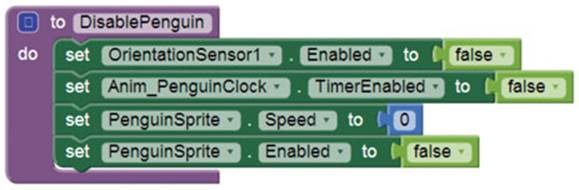
At the moment, you haven’t defined the procedure DisablePenguin that you see in the previous blocks, and Anim_SplashClock currently does nothing. To stop Gentoo in her tracks, you need to do four things:
1. Disable the orientation sensor. This stops the OrientationSensor.Changed event from triggering, which would start Gentoo moving again.
2. Disable Anim_PenguinClock to turn off Gentoo’s walking animation.
3. Set PenguinSprite.Speed to 0.
4. Disable PenguinSprite, in case the Yeti collides with Gentoo.
If you put all this in a procedure then you can also call the same procedure when Gentoo is frozen by the Yeti. The blocks are shown at right.
You now have a penguin that stops moving and interacting whenever it steps on a non-white pixel. Next you need to play a “splash” animation, but unlike your other animations, you only want it to play once—one big splash. To do this, you can adapt the Gentoo animation blocks you’ve already made, but insert a decision that asks whether you’ve reached the last frame of the animation. When you do reach the last frame, you’ll stop the splash animation, deduct a life, and decide whether it’s Game Over or whether the player has lives left to play. You’ll see a new procedure in the following blocks: LoseALife. Create the procedure now (we’ll tell you what to add in a moment). Here are the blocks:
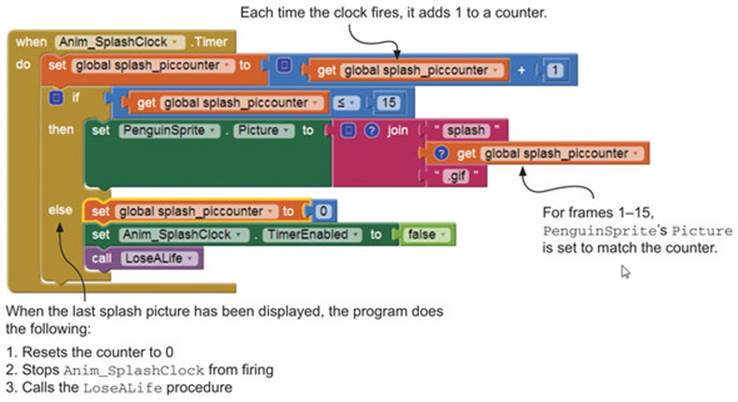
6. How to lose a life
You’ve played the “splash” sound and animation. Now you need to deduct a life from the lives variable. You’ll also reset the number of snowballs to five, because if the player runs out of snowballs and the Yeti is close by, the player should only die once and then have a fighting chance to win the level. It’s also important at this point to update the information bar at the top of the screen by calling UpdateInfo.
Now you have to make a decision:
1. If the player has zero lives remaining, it’s Game Over. You’ll need to pause the game and give them a chance to play again. You can do this using a notifier. You’ll then need to reset all the variables back to the beginning.
2. If the player has lives remaining, you’ll reset Gentoo—we call this respawning. To respawn, you need to reverse the changes you made when Gentoo first made a splash. Here’s the Respawn procedure that does the reset.
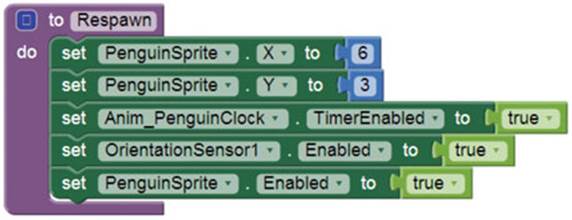
Here’s the LoseALife procedure that carries out the steps we described and calls the Respawn procedure if the player has lives remaining:
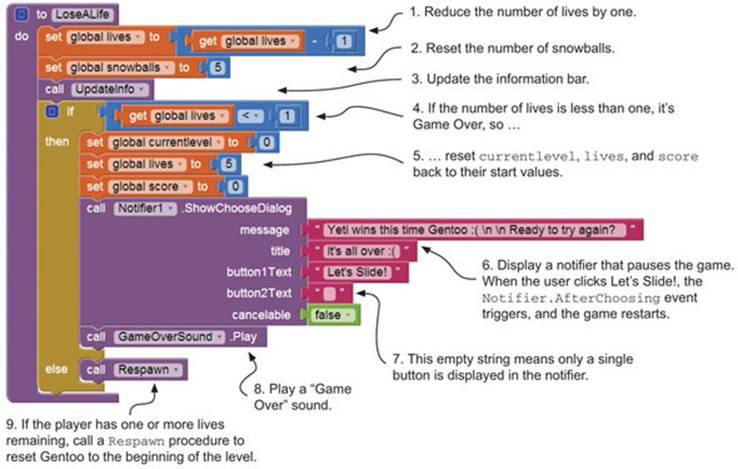
At the moment, the game won’t restart after Gentoo has lost all her lives, because you haven’t yet programmed the Notifier1.AfterChoosing event. You’ll do this in section 10, which looks at how you start a new level or restart the game.
7. A fishy interlude
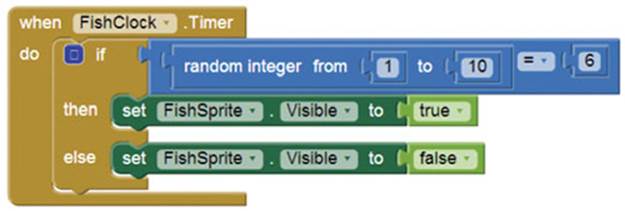
After all that complexity, let’s take a more manageable bite out of the game and do something easy—you want to make the (life-giving) blue fish appear at random intervals. It isn’t animated and doesn’t move around, so you just need to set FishSprite’s Visible property to true or false at random intervals. To do this, you have FishClock fire every 6 seconds. When it fires, you’ll pick a number between 1 and 10. If it’s 6, you’ll show the fish. That means at any moment, there is a 1 in 10 chance that the fish will be onscreen. Here are the blocks.
At the moment, Gentoo doesn’t interact with the fish, but you’ll deal with this shortly in a single procedure that handles what happens if Gentoo collides with the fish, the Yeti, or the goal. Before that, let’s ...
8. Get that Yeti moving
The Yeti’s movement recycles lots of the penguin code. The only difference with the Yeti is that he doesn’t respond to the phone’s movement—he just wanders around randomly, bumping off the sides of the ice path. For that reason, you can do the Yeti’s animation and movement blocks all together in one event, which is triggered when Anim_YetiClock fires. The Yeti’s initial position and speed are set later in the program, but for testing purposes make sure he’s on the white path in the Designer window and set his Speed property to 3.
If you run the app now, you’ll see the Yeti glide across the screen—you need to keep him on the path, though. To do this, you’ll detect the color of the canvas at a spot between his feet. Sound familiar? It’s exactly what you did with Gentoo. If the spot isn’t white, you’ll change his direction to keep him on the path.
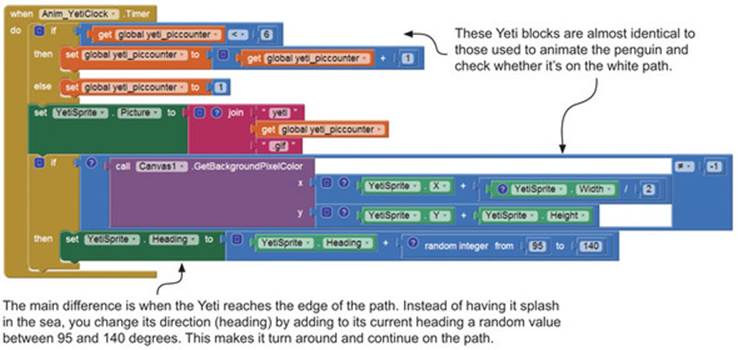
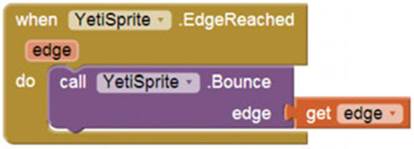
So far so good—the Yeti should now roam around randomly like, well, like we imagine a Yeti should do. Sometimes we did find that our Yeti got stuck in a corner; that was because he was still on the path but couldn’t go any further because he reached the screen edge. You can solve that by recycling the code from the flies in Hungry Spider so the Yeti bounces off screen edges.
9. When penguins collide ...
Most of your gameplay elements are now onscreen and moving around, but they aren’t interacting with each other. Gentoo can touch the Yeti, the fish, and the goal—but nothing happens. It’s time to write blocks that detect a penguin collision. There are three possibilities to think through:
· Gentoo collides with the Yeti. Oh no! If this happens, you’ll do exactly the same process as when Gentoo falls in the water—the only difference is that this time, you’ll play a “freeze” animation and sound rather than a “splash” animation and sound.
· Gentoo collides with the fish. Yum yum! If this happens, you’ll make the fish disappear, add 1 to the number of lives, play a “one-up” sound, and update the information bar.
· Gentoo collides with the goal. Hooray! Gentoo has completed the level. You’ll need to load the next maze.
Because only one of these three things can take place at a time, you can use an if ... then ... else ... if decision block. This works just like an if ... then ... else block, but each time a condition is false, you ask a different if question, like so:
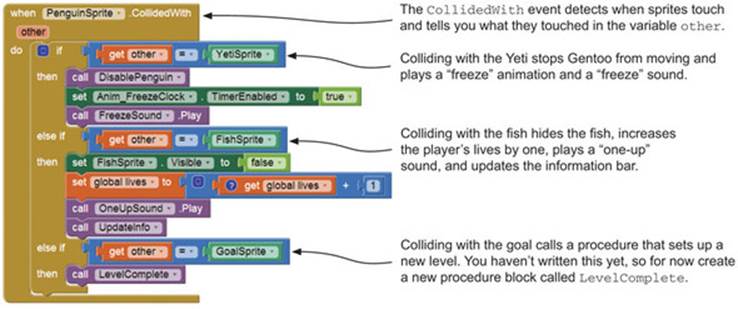
For now, you’ll leave part of PenguinSprite.CollidedWith as calling an empty procedure (define a new procedure called LevelComplete, but don’t add any blocks yet). The reason is that if you finish your last gameplay elements—Anim_FreezeClock and throwing a snowball—you’ll have a working game for level 1. It’s then much easier to add the final code that creates as many levels as you can draw.
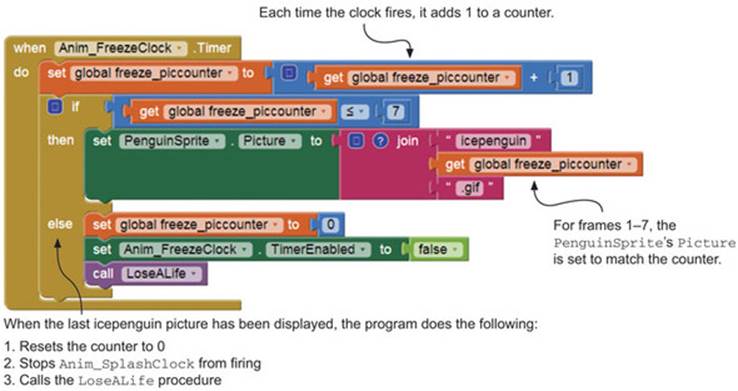
Here’s the Anim_FreezeClock.Timer code that activates when Gentoo and the Yeti collide as you’ve just seen. Can you spot the difference between this and Anim_SplashClock? They’re virtually identical—this is recycling in action. The only changes are that there are seven frames of animation and the image files all start with the word icepenguin.
10. The snowballs strike back!
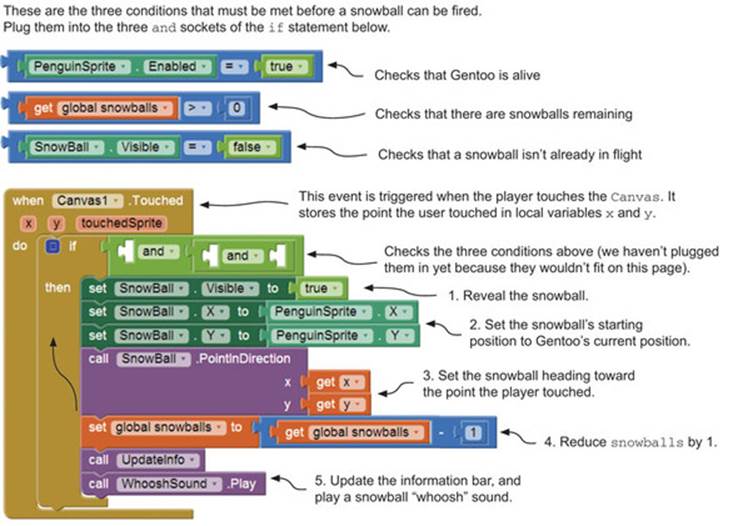
At the moment, Gentoo is helpless—she has to run around avoiding the Yeti. Let’s give her some ammunition to splat him with, in the form of five fat snowballs. The idea is that the player touches the screen (Canvas1.Touched event), and a snowball is launched toward the point they touched (hopefully the Yeti).
Before you can let Gentoo fire a snowball, three conditions must be met:
· Gentoo must have some snowballs left to fire.
· There must not be a snowball already in flight—these aren’t rapid-fire snowballs.
· PenguinSprite must be “active”—you can’t fire snowballs when you’re frozen or underwater!
As long as these three conditions are all true, you’ll move the snowball to Gentoo’s current position, make it visible, and set its heading toward the point the user touched. The snowball already has speed (you set that in properties), so it fires immediately. Here’s the code to throw the snowball, update the number of snowballs remaining, and play a “whoosh” sound:
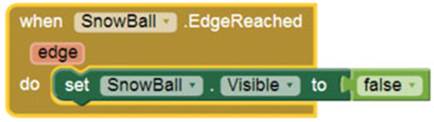
Once the snowball is in flight, there are two possibilities:
· The snowball misses the Yeti and reaches the edge of the screen. You can detect that as an event and make the snowball invisible. Here are the blocks:
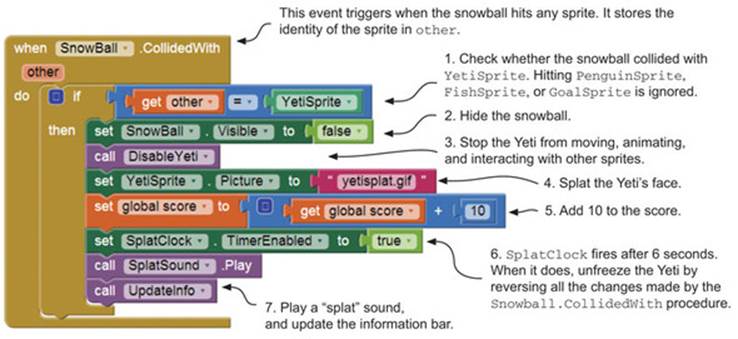
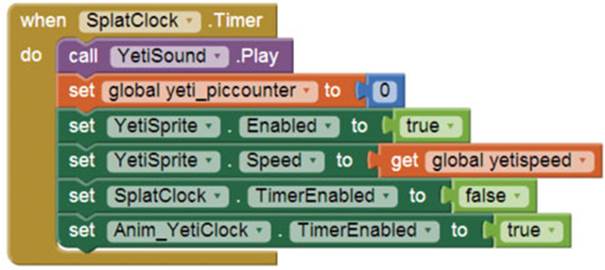
· The snowball collides with the Yeti (which you can detect with a SnowBall.Collided- With event). When this is triggered, you’ll hide the snowball and switch off the Yeti animation, replacing it with a single image of a Yeti with snow on his face. The Yeti will be disabled so Gentoo can touch him without being frozen. You’ll also update the player’s score and then set a timer to wait 6 seconds before you let the Yeti be enabled and start moving again.
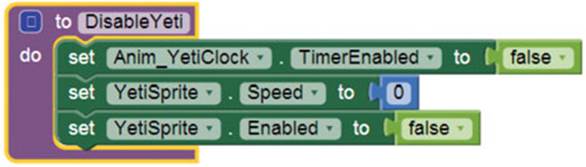
Disabling the Yeti is exactly the same as disabling Gentoo when she’s frozen (more recycling). The only difference is that you don’t want to disable the phone’s orientation sensor—the player can still move Gentoo. Here’s the new procedure:
You’ll call DisableYeti whenever a snowball collides with YetiSprite, along with the other changes we just discussed. Here are the blocks:
The final part of the snowball section is to have the Yeti unfreeze. To do this, you’ll play YetiSound so the player knows the Yeti is unfreezing, and set his animation back to the beginning frame. Then you just need to reverse the DisableYeti blocks and turn off SplatClock (until the next time the Yeti gets a snowball in the nose).
That’s it—you should have a fully functioning level 1. Try it out!
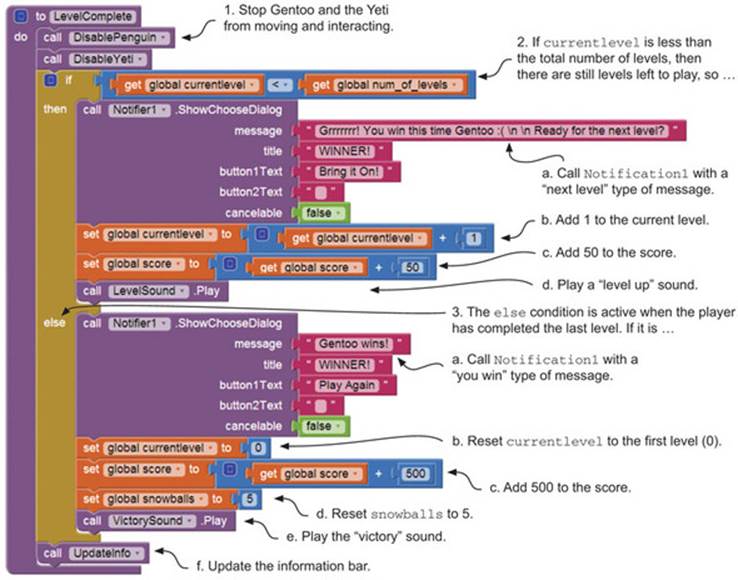
11. Level up!
Earlier you created a procedure called LevelComplete that is called when Gentoo reaches GoalSprite. At the moment, LevelComplete is empty. This procedure needs to do the following:
1. Stop Gentoo and the Yeti from moving.
2. Decide whether the player has reached the end of a level or the end of the game. If the player has levels left to play, then currentlevel will be less than num_of_levels.
1. If there are levels left to play, you’ll increase currentlevel by 1 and increase the score by 50.
2. If all levels are complete, you’ll set currentlevel back to 0, increase the score by 500, and give Gentoo 5 new snowballs.
3. In both the level-complete and game-complete cases, you’ll also show a notifier congratulating the player.
Here are the blocks:
Notice that you show a notification, play some sounds, and change some variables, but at this stage a new level hasn’t been loaded. It’s time to ...
12. Load a new level
The final part of this gigantic jigsaw puzzle of blocks is to figure out how to start a new level. There are three situations when you need to load a new level:
1. When the app first starts (Screen1.Initialize event)
2. When Gentoo reaches GoalSprite
3. When it’s Game Over for the player (to restart at level 0)
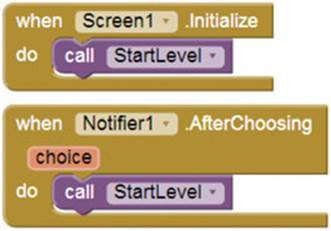
For situation 1, you can use the Screen1.Initialize event to trigger a procedure that updates the level. Let’s call the procedure StartLevel—create it now as an empty procedure.
For situations 2 and 3 (reaching the goal or Game Over), you’ll call a notifier to pause the game and tell the player what happened. If you look back at the LoseALife and LevelComplete procedures, you’ll see that you already have the notifier set up. You can use the notifierAfterChoosing event to trigger a procedure that updates the level as shown at right.
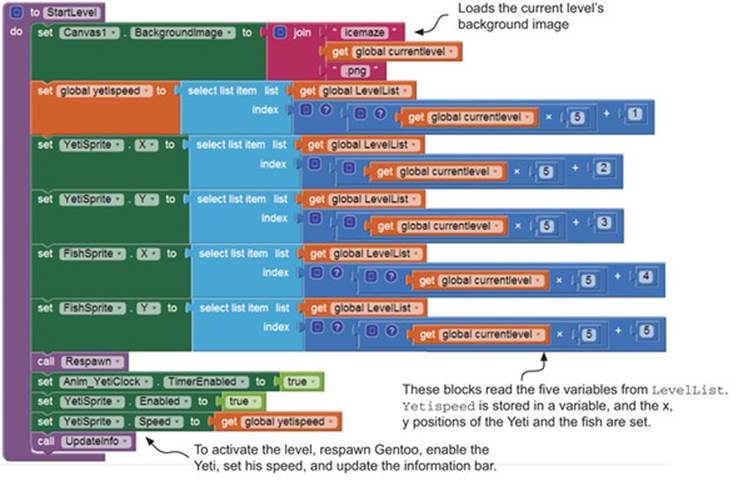
So what does StartLevel do? The previous “Designing Levels” section in this chapter said that each new level should change the canvas background to be a narrower and more complicated path. Also changing in each level are the Yeti’s speed and the starting coordinates (x, y) of the fish and the Yeti.
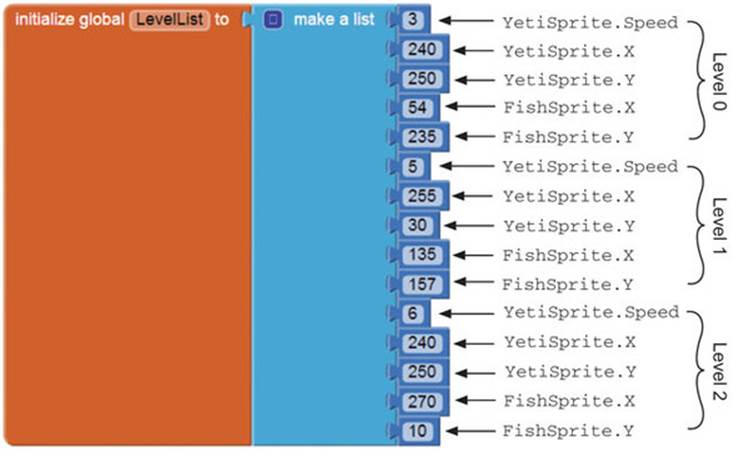
Save your levels with the same name structure as the animated sprites: icemaze + a level number + .png. So if you set the current level to 2 and set canvas1 .backgroundimage to icemaze + currentlevel = .png, level 2 will be loaded.
The other items (Yeti speed, Yeti x, Yeti y, fish x, and fish y) can all be stored in lists. In fact, they can all be stored in one giant list, as long as you keep the order of these items the same for each level. You’ll call this LevelList. The beauty of this system is that if you want to create 15 levels, you just add the Yeti and fish variables to the bottom of the list for each level and upload the relevant ice maze background images numbered from 1–15.
There are five variables for each level. So if you know your current level number and the order of the variables, you can find any variable in the list using these steps:
1. Multiply currentlevel by 5 (because there are 5 variables).
2. Add a position number to find a variable, as follows: YetiSpriteSpeed = +1, YetiSpriteX = +2, YetiSpriteY = +3, FishSpriteX = +4, FishSpriteY = +5.
Sound complicated? Try it out. Let’s say you’re on level 2, and you want to know what YetiSprite.Speed should be set to. Multiply currentlevel (2) by 5: 2 x 5 = 10. Now add 1 because you want to find out the YetiSpriteSpeed: 10 + 1 = 11. Look at the list. What is in the 11th position? It’s 6—so you set YetiSprite’s speed to 6.
You can use this idea to read and use all these variables at the start of each level. In addition, at the start of a level, you’ll need to respawn Gentoo, enable the Yeti, and update the information bar. Here are the blocks:
And that is the final block of the game! It’s a lot of work, but we think the result is worth it. Although there are only three levels right now, adding more is easy. The game has a couple of small glitches: the sound effects can take a moment to load, meaning you sometimes get a warning message when the app starts; sometimes the snowball disappears in flight; and occasionally the Yeti gets stuck. But those are tiny problems that can be ironed out with a little time and testing. If you find the game too hard, you can change Gentoo’s and the Yeti’s speed variables.
We hope you think the game is fun to play and that the apps in this chapter inspire you to experiment and invent your own complete apps and games. When you do, let us know on the Manning Hello App Inventor! forum (www.manning.com/beer/AuthorOnline)—we’d love to see them.
Taking it further
1. Stop the A-Mazeing Penguin app from being cancelled by a Back key click, just like you did in Zombie Alarm!.
2. Draw another three levels and add them to the app.
3. Add a timer so the player has to get to the goal before time runs out.
4. Make up your own additional A-Mazeing Penguin rules and add them to the blocks. For example, players must eat a fish before they can exit a level.
5. Add a high score to A-Mazeing Penguin, and give the player a chance to tweet or text their score.
![]()
What did you learn?
In this chapter, you learned about the following:
· Techniques to help you build complex apps: decomposing problems, getting out your pencil, prototyping, recycling, commenting your programs, involving users, and testing
· How to test and debug blocks
· Using procedures to make code reusable
· How to prepare your own graphics and animations for use in apps
· How to store the positions of sprites in a list and then restore the sprites back to their start positions
· How to stop an app from quitting just because the Back button is clicked
· How to develop game rules and turn them into blocks of code
Test your knowledge
1
How does user involvement help you make better apps?
2
How might these people use decomposition in their jobs?
1. Chef
2. Architect
3. Lawyer
4. Scientist
3
How do procedures help app designers?
All materials on the site are licensed Creative Commons Attribution-Sharealike 3.0 Unported CC BY-SA 3.0 & GNU Free Documentation License (GFDL)
If you are the copyright holder of any material contained on our site and intend to remove it, please contact our site administrator for approval.
© 2016-2026 All site design rights belong to S.Y.A.