Hello App Inventor!: Android programming for kids and the rest of us (2015)
Chapter 7. Clocks and timers
Take a look at the clock on a microwave oven. If you had to tell an alien what it was for, what would you say? Does it just provide information about the time?
Normally, this kind of clock does two useful things:
1. It tells you what time of day it is in hours and minutes.
2. When the oven is cooking, it shows a countdown of how long is left and does something useful when the timer gets to zero: stops the oven and goes “Ping!”
It might also do other cool (or hot) stuff, like starting the oven at a preset time or changing cooking programs halfway through. Why all this talk about microwaves? Well, the Clock component in App Inventor is similar to an oven clock. It can
· Tell you information about the current time (and the date)
· Count down and do something useful after a set time has passed
One important difference between an App Inventor clock and a microwave oven clock is that an App Inventor Clock timer automatically restarts over and over again until you turn it off. Try that with a microwave, and you’ll quickly have burned food and a house on fire!
What time is it?
We’re writing this chapter at exactly 1402295407271—at least, that’s what time my Android phone thinks it is. What on Earth does that mean? Well, it’s exactly 1402295407271 milli-seconds since midnight on January 1, 1970. This date and time were chosen as a standard fixed starting point for lots of different computers and devices and means they can all refer to time in the same way. Having a standard way of writing about times and dates is sensible for several reasons:
· Humans write dates and times differently across the world. For example, writing this in the UK, today’s date is 09/06/2014, but in the United States it’s 06/09/2014.
· Computers deal in milliseconds, whereas human beings mostly deal in hours, minutes, and seconds.
· Storing information like today’s date in text form (Mon Jun 9 2014 07:30:07 GMT+0100) takes more memory and processing time than just saying 1402295407271 milliseconds—especially when you want to start running calculations involving time.
Time to experiment

There are a couple of ways to tell the time in App Inventor, so before you build some fully fledged apps, let’s experiment with the blocks. This is the kind of thing programmers do in the real world, especially if the systems they’re working with don’t have a good instruction book (documentation). Even better—trying things out helps ideas stick in your head. You’re going to set up a basic app and then change a block or two to see what happens when you run it. Because this isn’t a full app, and it has a few simple components, you’ll build it without the usual app table describing all the components.
Start with a new app called ClockExperiments1. You might find it useful to save each experiment as a checkpoint with a helpful name so you can remember what you found out. Don’t forget to add comments to your blocks, too.
Add three components: a Label (ClockOutputLabel), a Button (ExperimentButton), and a non-visible Clock (MyClock), all from the User Interface section of the Palette (don’t forget to rename them and set their text as shown):
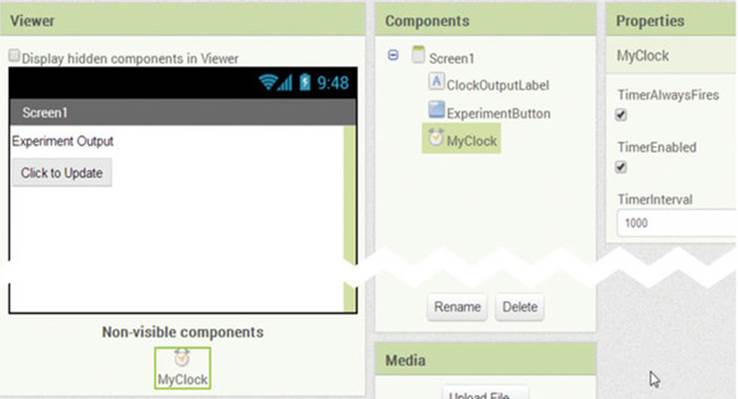
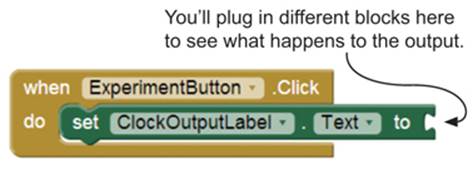
Turning to the blocks, you have a simple setup with a button Click event resulting in a change to the label. Here’s the basic test rig.
Outputting the system time
To start off, let’s see how many milliseconds it’s been since midnight on 1/1/1970. Plug the MyClock.SystemTime block (from MyClock) into the test blocks, and then run the program on your phone or emulator. Click the button a few times, and you’ll see those milliseconds whooshing by! From the milliseconds you can work out all kinds of useful things like what the date and time are right now or even what day of the week it is. Luckily, App Inventor has a lot of built-in blocks that can do the conversion for you. Before you can use them, you need to know aboutInstants.
Instant answers
In chapter 5, you found out that variables can be different data types like numbers, strings, or Booleans. App Inventor stores times (and dates) using a data type called Instant-InTime, or Instant for short. The MyClock.SystemTime block in the example converts a time Instant (at the moment you clicked the button) into a number so you can see the number of milliseconds. Let’s take an Instant in time right now and convert it into something a little more useful than milliseconds. Here are the blocks:

Run the program on your phone, and you should see the date and time formatted something like Aug 29, 2014 9:19:34 PM. Now do some experimentation—switch out the middle MyClock.FormatDateTime block for some of the other clock format functions. Try each of the following blocks, clicking the button on your phone each time to see the result:
|
MyClock.Second |
MyClock.Month |
|
MyClock.Minute |
MyClock.MonthName |
|
MyClock.Hour |
MyClock.Year |
|
MyClock.DayOfMonth |
MyClock.FormatDate |
|
MyClock.Weekday |
MyClock.FormatTime |
|
MyClock.WeekdayName |
1. What’s the difference between MyClock.Month and MyClock.MonthName?
2. What’s the difference between MyClock.Weekday and MyClock.WeekdayName?
3. If MyClock.Weekday = 7, what day of the week is it?
Making time
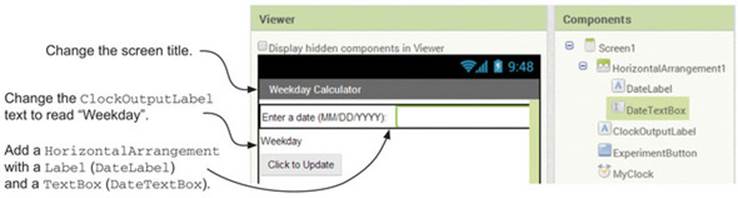
You can output the date/time in a dozen different ways, but how do you use dates and times in the past or future? Let’s try calculating the weekday of a date such as your next birthday. Rather than start from scratch, save your current project with the name WeekdayCalculator (choose Save As on the Designer screen). Make these changes to the UI so the user has somewhere to type a date:
In the last section, you used MyClock.Now as your Instant. Now you want to make a new Instant based on the date the user types in. You’ll then format that Instant as a WeekdayName such as Friday. The end result is that when you enter a date and click the button, the app tells you the weekday. Here are the blocks:

Taking it further: validation
If the date is invalid or in the wrong format, the app generates an error message and exits. You can catch some of these errors using validation, because months can only be from 1–12 and days can only be from 1–31. By making separate text boxes for the MM, DD, and YYYY parts, you can then use if statements to check whether the range of MM and DD is sensible before running the app (for example, MM must be a number greater than 0 and less than 13). If you’re feeling really clever, you can also say things like “If the month is 2, then the days must be 29 or less” (because February can never have more than 29 days).
Learning Point: App Inventor time formats
![]()
In this example, you ask the user to type using United States date format (MM/DD/YYYY) because that’s what App Inventor expects. In fact, App Inventor can automatically convert a date/time to an Instant as long as it’s in one of the following forms. Try each of them in your text box now to see the results:
· Date only —MM/DD/YYYY, like 12/19/1971.
· Time only —hh:mm, like 22:10. App Inventor assumes you’re referring to today’s date, but you can also type a time beyond 24 hours. For example, 24:10 is the same as saying “One day plus 10 minutes from now.”
· Date and time (with seconds) combined —MM/DD/YYYY hh:mm:ss, like 12/19/1971 22:10:15.
This section has covered how to use some of the date and time functions of the Clock component. Now we’ll look at the other Clock functions, using timers to trigger events at regular times called intervals.
Using timers
Almost everything you’ve done in the book so far relies on the user doing something to make the app respond; it might be clicking a button, or dragging their finger on the screen, or shaking the phone. Timers mean you can get the app to do useful things at regular intervals, even if the user isn’t touching the phone. You’ll start by making a simple app that beeps at regular intervals.
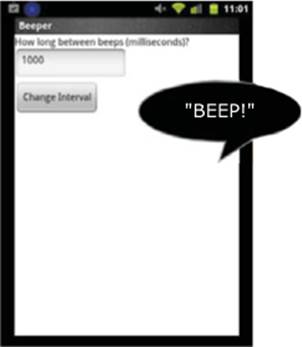
Beeper app
PURPOSE OF THIS APP
This app demonstrates how the timer works by beeping at regular intervals. The beeper begins by beeping every second; the user can change this interval by typing a number of milliseconds and clicking a button. You’ll also see how this app can be adapted to play a simple game called Where Are Ewe Hiding?
APP RATING
![]()
ASSETS YOU’LL NEED
Audio file: beep.wav.
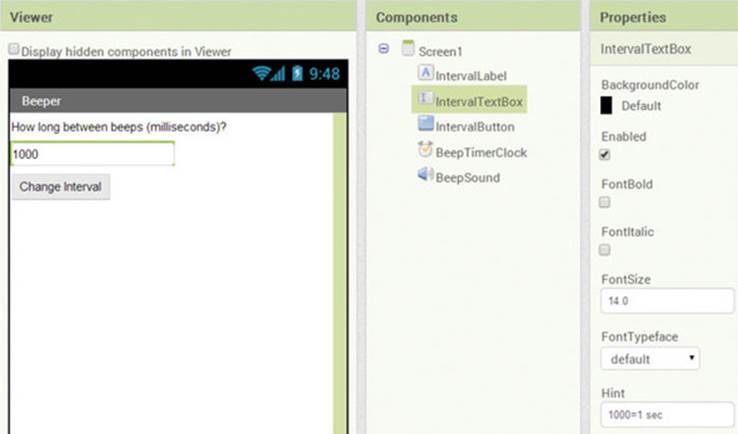
Start a new project called Beeper (you’ll use components similar to those in Weekday Calculator, so you can choose Save Project As > Beeper).
|
Beeper |
|||
|
Screen1 properties |
Title: Beeper |
||
|
Components |
What do I rename it? |
What does it do? |
What properties do I set? |
|
Label |
IntervalLabel |
Instructs the user |
Text: “How long between beeps (milliseconds)?” |
|
TextBox |
IntervalTextBox |
Where the user enters the time to wait between beeps |
Hint: “1000 = 1 sec” NumbersOnly = Yes (selected) Text: “1000” |
|
Button |
IntervalButton |
Sets the time between beeps to the value typed in IntervalTextBox |
Text: “Change Interval” |
|
Sound |
BeepSound |
Plays the beep.wav sound |
MinimumInterval: 1 Source: beep.wav |
|
Clock Palette group: User Interface |
BeepTimerClock |
When the timer fires, plays a beep sound |
TimerAlwaysFires: Yes (selected) TimerEnabled: Yes (selected) TimerInterval: 1000 |
|
Media files |
|||
|
1 sound file downloaded from our website: beep.wav |
|||
1. Setting up the screen
Here’s the screen layout. It’s one of the simplest in the book: just the five components, ordered as shown.
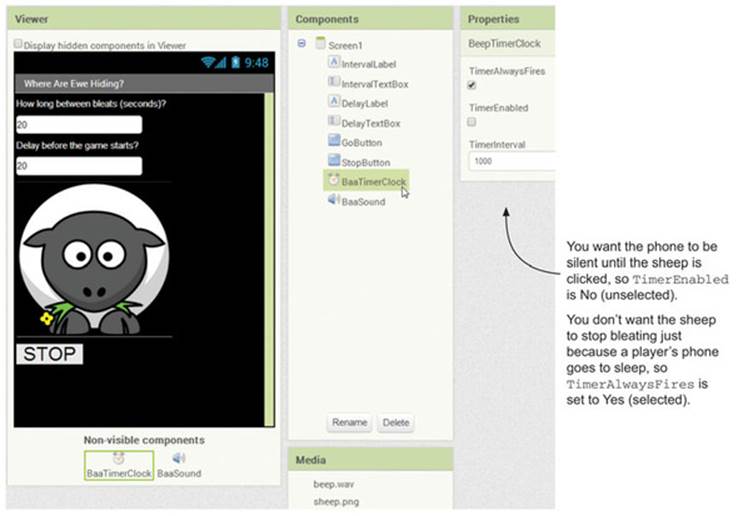
A clock like BeepTimerClock has three important timer properties:
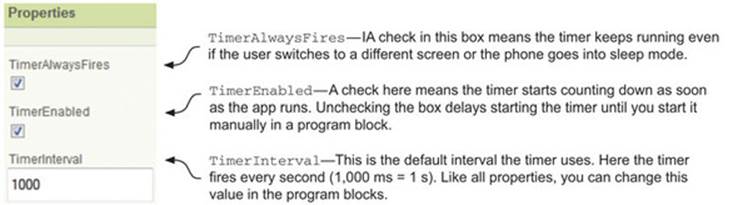
Let’s think about why you might choose these options:
· TimerAlwaysFires —In an application like an alarm clock, you want the timer to keep checking whether it’s time to sound an alarm, even if the phone receives a call or goes to sleep. But for something like a game, you probably want the game to pause if the phone receives a call or sleeps. So for an alarm you set TimerAlwaysFires to True, but for a game you might set it to False.
· TimerEnabled —The decision here is, do you want the clock to start firing right away or only if the user switches on the clock through some action? For example, a bedside clock app that displays the current time probably needs the timer enabled right away, but a stopwatch app only needs its clock to be enabled when the user clicks a Go button.
· TimerInterval —This is how often the clock fires. For something like a stopwatch, you probably want it to fire lots of times every second (maybe every 100 ms) so you can capture at least tenths of a second. But if you want a chime to sound every 60 seconds, thenTimerInterval can be much slower (such as 60,000 ms).
The other new property you’ve come across here is setting BeepSound’s MinimumInterval to 1 (millisecond). By default, this is set to 1,000 ms (1 second), and for most apps that’s fine. But in this case, if the user wants to play a sound really often (say, every 20 milliseconds), you want them to be able to hear the difference.
2. Coding the blocks
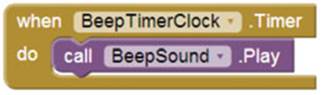
When a timer fires (reaches zero), it generates a Timer event—just like a button click. Select the BeepTimerClock.Timer event block, and plug in the BeepSound.Play block. If you run the app, you’ll hear a beep once a second after the app starts running.
At the moment, entering a number of milliseconds in IntervalTextBox and clicking the button does nothing. You want the BeepTimerClock interval to change to whatever the user typed in—so if they type 10000, it will beep every 10 seconds. You need to add a button Click event and change the BeepTimerClock Interval property to whatever the user typed:

The basic app is finished—try some different values to see how the timer responds. If you try small intervals, you may hear the beep overlapping itself and therefore increasing in volume.
In the next app, you’ll turn this simple idea into a hide-and-seek game for your phone. Along the way, you’ll learn how to turn timers on and off.
Where Are Ewe Hiding? app
PURPOSE OF THIS APP
This game makes a noise (in this case, a baa) at random intervals. The user can choose a maximum time between bleats and a time delay before the game starts. Touching the sheep starts the game, and the Stop button ends it. Here are some ideas for how you could use this with friends who all have phones that run the app:
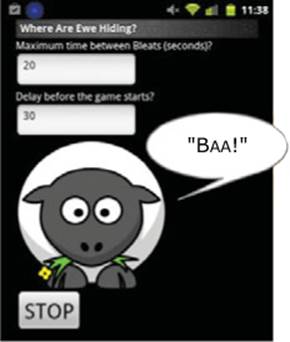
· Playing Hide and Seek —Everyone has to turn their phone volume up and run this app before they go hide. You never know when the sound might give away your position.
· Playing Blind Man’s Bluff —Everyone except a blindfolded player runs this app on their phone. The blindfolded player hunts for them while they move around the room. If your phone makes a sound, you must freeze for 5 seconds.
· Playing Hunt the Thimble —Everyone runs the app and hides their phone. The seeker then has 60 seconds to find as many phones as possible.
APP RATING
![]()
ASSETS YOU’LL NEED
Sound file, baa.wav; and image file, sheep.png.
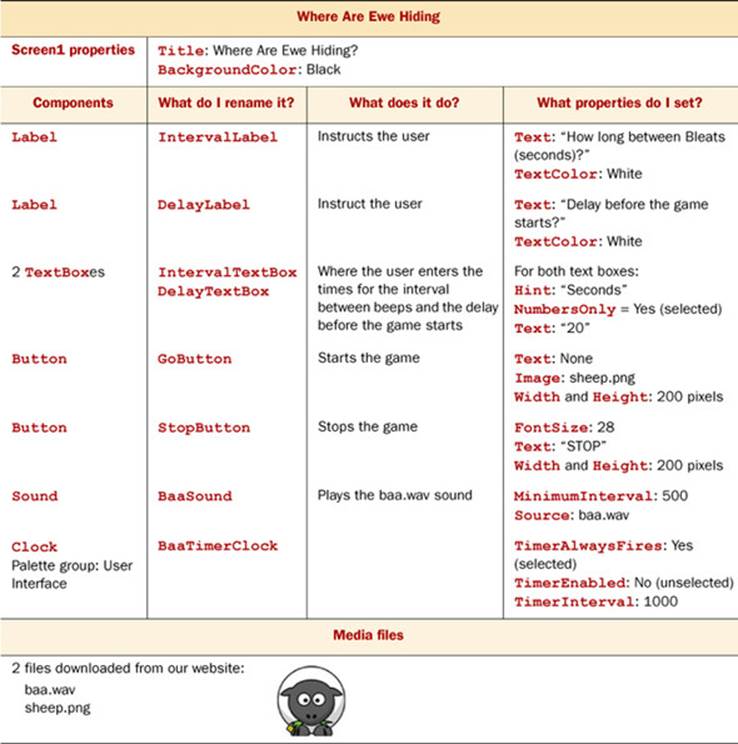
1. Setting up the screen
Here we’ve kept the layout simple; you might like to use some screen-arrangement components to tidy things up a little. Notice that you set TimerEnabled to False—that means the timer won’t fire until you’re ready. When you make your own apps, it’s easy to forget this, so get into the habit now of disabling timers unless you definitely want them to start as soon as the app runs.
Also, in this app you’re letting the user enter seconds rather than milliseconds, so you have to remember to convert their input by multiplying the number of seconds in the text boxes by 1,000. Here’s the layout.
2. Coding the blocks
When the user touches the sheep to start the game, you want to do the following:
1. Convert the value in DelayTextbox to milliseconds by multiplying it by 1,000.
2. Set the timer interval to be the same as the value in step 1 so the sheep doesn’t start baaing until the user is ready.
3. Activate the timer.
Here are the blocks:

This means when GoButton is clicked, the timer starts counting down and then fires.
Each time BaaTimerClock fires, you want to change the timer interval to a random time between, say, half a second up to the user’s maximum time (from IntervalTextBox) and then play the “baa” sound. The app will continue baaing at random intervals until the user clicks. For example if you set the maximum time (IntervalTextBox) to 15 seconds, your sheep might baa at 6 and a half seconds, then 10 seconds later, then 2 seconds later, and any time in that range of half a second up to 15 seconds. You might get 2 baas in a row and then wait for 15 seconds. The larger the maximum time, the more likely you’ll have long periods of silence. You could use this to even up differences in players—so if big kids and little kids are playing together, the big kids could have a maximum of 10 seconds and the little kids might get, say, a 30-second maximum between baas. Here are the blocks:

The last really easy bit of code says that when the user clicks StopButton, the game no longer plays “baa” sounds. To do this, you switch off (disable) BaaTimerClock:

Multiple timers
Complex apps like games often need lots of events to be timed at the same time. For example, in a game like Pac-Man, you need timers to
· Control the animations, like Pac-Man chomping and the ghosts flashing
· Insert pauses in the game between levels
· Count down when Pac-Man eats a power pill
It would be impossible to do this with just one clock, but luckily clocks are free—so you can add as many as you like! Also, using multiple clocks with specific names helps other people understand your program and saves you from getting in a confused tangle when you’re programming. In the next simple example, you’ll learn how to use three timers in one app.
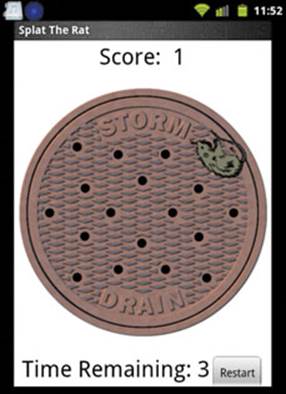
Splat the Rat app
PURPOSE OF THIS APP
This game shows a rat at random intervals. Touch the rat quickly as many times as you can before it disappears, to splat it. Each splat adds 1 to your score. Games are limited to 30 seconds total time.
APP RATING
![]()
ASSETS YOU’LL NEED
Sound and image files: splat.wav, squeek.wav, rat.png, and storm_drain_cover.png.
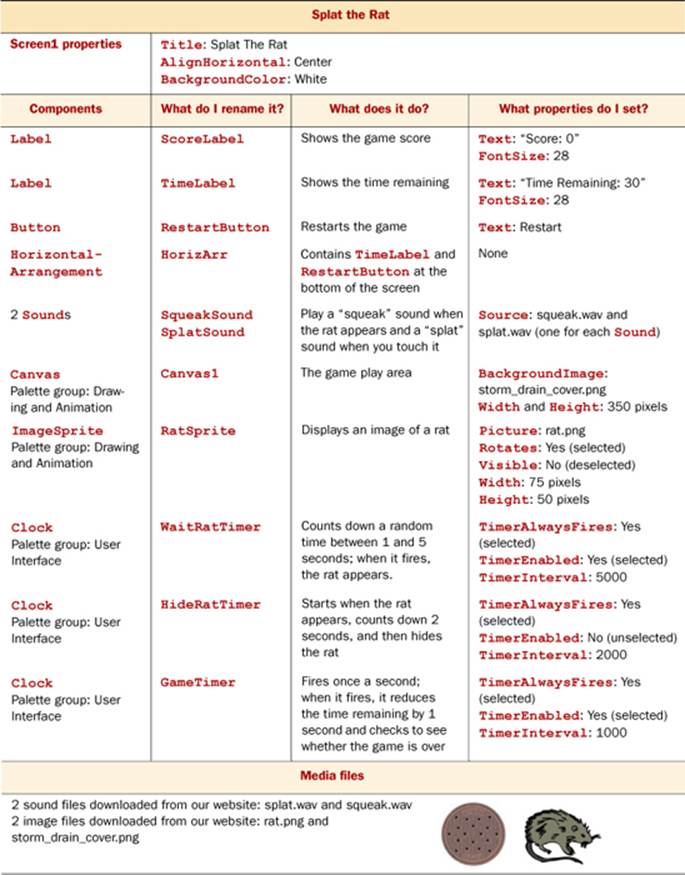
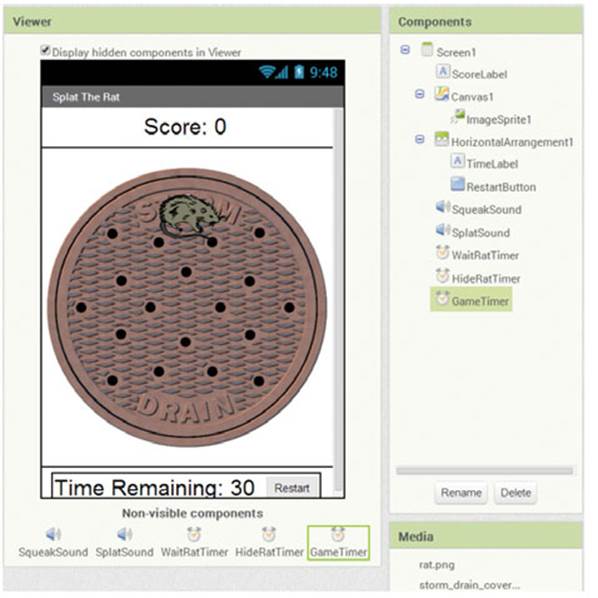
1. Setting up the screen
Set up the screen as shown here.
At the moment you can sit RatSprite anywhere on the drain cover. Once you have the basic game working, you’ll set it whizzing around the screen.
You might be wondering why you need three timers. There are lots of ways to approach this game, just as when you’re writing a story there are lots of different words and phrasings you might choose. Part of being a programmer is choosing the way you think is best; you can probablyimprove the game further. In fact, you could make a simple version of the game with one timer and an if ... else block—you might want to try this first. The logic behind the blocks would be as follows, when the timer fires:
1. Set the timer’s interval to a random number between, say, 1 and 10 seconds.
2. If the rat is visible, then hide it. If the rat is hidden, then show it:
IF RatSprite.Visible = True THEN RatSprite.Visible = False
ELSE RatSprite.Visible = True
That would work, but the gameplay wouldn’t be right because there would be no end point—the rat would keep appearing and disappearing forever. The rat would also spend about the same amount of time hidden as it did onscreen, but you want it to stay hidden more and only flash onscreen for short bursts to make the game challenging. There are all kinds of ways to solve this problem, and we had to think hard about how the timers should be set up at the start of the app. Here’s what we came up with:
1. To make sure the game ends, GameTimer fires once a second. When it has fired 30 times (30 seconds), the game is over.
2. To make the rat hide and appear for different amounts of time, you use WaitRatTimer and HideRatTimer to work like a relay team:
1. WaitRatTimer controls when the rat appears. It fires at a random time between 1 to 5 seconds, shows the rat, and passes control to HideRatTimer.
2. HideRatTimer lets the rat appear for just 2 seconds. Then it hides the rat and passes control back to WaitRatTimer.
Learning Point: The tortoise and the hare—timers that start other timers
![]()
Getting one timer to start another is a useful trick to remember that is used in lots of apps. But a confusing thing can happen when you have a fast timer (the hare) starting a slow timer (the tortoise). Here’s what happens if the hare fires every second and the tortoise fires every 2 seconds:
|
Time |
0s |
1s |
2s |
3s |
|
Action |
Hare timer starts |
Hare fires and starts the tortoise timer |
Hare fires and restarts the tortoise timer |
Hare fires and restarts the tortoise timer |
This will keep happening, with the result that the tortoise timer never fires. That can be frustrating and stops the program from working.
You can have a similar problem if part of your app takes longer to run than the timer that starts it—weird things happen, like only part of the app working.
The solution is that when the hare fires, it switches off (disables) itself and starts the tortoise. Then, when the tortoise has finished, it disables itself and restarts the hare.
Here’s the new sequence:
|
Time |
0s |
1s |
2s |
3s |
|
Action |
Hare timer starts |
Hare fires, disables itself, and starts the tortoise timer |
Tortoise fires, disables itself, and starts the hare timer |
That sequence will keep repeating, with the hare and tortoise working together.
2. Coding the blocks: showing and hiding the rat
You’ll sort out the scoring and gameplay mechanism in a moment, but first let’s get the rat working. When WaitRatTimer fires after 5 seconds, you want it to choose a new timer interval for itself so the rat isn’t too predictable. You can do this in exactly the same way as in Where Are Ewe Hiding? earlier in this chapter. Then you need to show the rat for 2 seconds and play a “squeak” sound. That means
1. Show RatSprite.
2. Play a “squeak” sound.
3. Switch off WaitRatTimer.
4. Switch on HideRatTimer.
Here are the blocks:

At this point the rat is onscreen and squeaking. You only want it there for 2 seconds, though, so as soon as HideRatTimer fires you reverse what just happened as shown here.
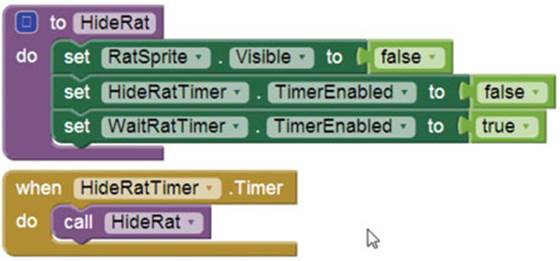
The rat is hidden, and WaitRatTimer is again counting down a random amount of time before you restart the whole process of showing the rat.
This app always has the rat onscreen for 2 seconds, so you don’t change its Timer-Interval. But once you have it working, try a random time like with the WaitRatTimer, and see how that affects gameplay.
Run the app on your phone, and you should see the rat appearing and disappearing. Now let’s figure out how to splat it!
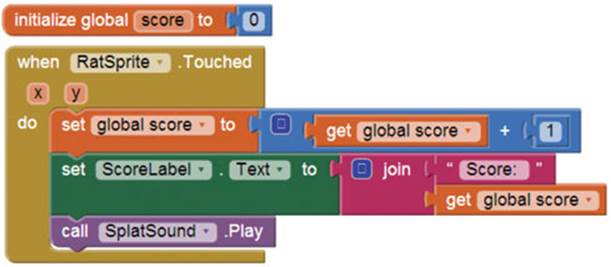
3. Splat that rat! Changing the score
This should look familiar—you need a variable to store the score, set to 0. You detect that the rat is touched using the RatSprite.Touched event. When it’s triggered, you increase the score by 1, change the score onscreen, and play a satisfying splat sound.
4. Timing, ending, and restarting the game
The concepts here (variables and if statements) were all covered in chapter 5. The only difference is that you’re triggering the events using the GameTimer.Timer event, which fires once a second.
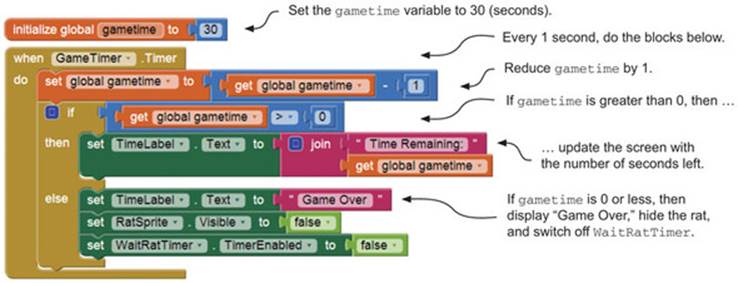
Learning Point: Comparing values—equals vs. greater/less than
![]()
You might think it’s a little strange that you test to see whether gametime is greater than 0 to decide whether to continue with the game. Why not just use If gametime = 0 ...?
Less-than and greater-than are good catch-all operators in case something goes wrong in your program. In this case, if at some point gametime got set to -1 (maybe GameTimer fired erratically), testing to see if it equaled 0 would result in the game going on forever. But checking to see if it’s greater than 0 means any time it’s 0 or less, the game will stop.
If you run the game on your phone now, you’ll find that the countdown timer works, splatting the rat increases your score, and the game ends after 30 seconds.
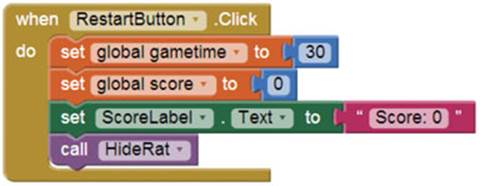
Starting a new game is super-simple. Reset the GameTime and Score variables and Score-Label. Hide the rat, and switch the timers back to their start states—you already have a procedure to do that called HideRat (that’s the beauty of procedures). Here are the blocks.
The game is pretty much finished—but you might find it less than exciting. Hitting a stationary rat isn’t much of a challenge. Let’s introduce some craziness!
5. Setting the rat free
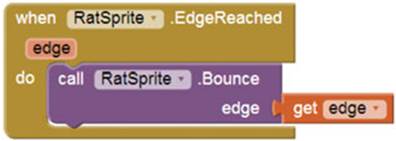
In chapter 4, you saw how to move a sprite. You’ll do the same thing here by giving the RatSprite a heading and speed in its properties. Switch to the App Inventor Designer window, and set these properties for RatSprite: Heading 25, Interval 100, Speed 20. This starts the rat running in one direction, but when it reaches the canvas edge, it will stop. You can bounce the rat by adding the blocks shown here. Note that the get edge block is an event argument (see chapter 5). We’ll explain these animation settings and blocks in the next chapter.
Run the app, and you’ll find the game much more challenging.
Taking it further
Here are some ideas to change the difficulty:
1. Try making the rat smaller or larger, faster or slower. You can do this using properties in the App Inventor Designer, but you could also change these properties randomly each time a timer fires. If you used GameTimer, they would even change every second—an incredible growing and shrinking rat, perhaps?!
2. Read the next chapter, and then animate the splat so the rat changes to a splat symbol for 1 second when touched.
3. Try making multiple rats—and give bonus scores for splatting more than one. You could even add a Rat King who only appears very briefly but is worth mega points.
![]()
What did you learn?
In this chapter, you learned the following:
· That many computers store times and dates in a standard format that we humans would find hard to work with: milliseconds from midnight on 1/1/1970
· How to use clocks to find out and display the current date and time
· How to make and use an Instant in milliseconds for some point in the past or future
· How timers can trigger events
· How to work with multiple timers, and how to enable and disable timers
In chapter 14, we’ll take these ideas further in an app called Zombie Alarm! that uses timers, lists, and animation to make an alarm clock. You might want to take a sneak peek now while these ideas are fresh in your head.
Test your knowledge
1
Which one of these examples would generate an error?
1. MyClock.MakeInstant from 19/12/1971
2. MyClock.MakeInstant from 02/28/2013
3. MyClock.MakeInstant from 04/02/1989
2
For an Instant made from 04/02/1989, what would each of the following be?
1. MyClock.DayOfMonth
2. MyClock.Month
3. MyClock.MonthName
3
Is each one of these statements True or False?
1. A timer fires once and then stops.
2. More than one timer can fire at the same time.
3. When a timer is enabled, it continues counting down from the point when it was disabled.
4. All timers start when the app starts.
Try it out
1
Experiment with the “Taking it further” ideas for Splat the Rat.
2
Try making a stopwatch. Can you add lap times?
3
Make a clock that displays the time and a different image depending on the time of day: for example, a Sun from 7 a.m. to 7 p.m. and a Moon from 7 p.m. to 7 a.m.
4
Make a season clock that tells you what the season is today. Can it also tell you how long until the season changes?
5
Make a kitchen timer: the user puts in a number of minutes and the timer beeps when dinner is ready.
All materials on the site are licensed Creative Commons Attribution-Sharealike 3.0 Unported CC BY-SA 3.0 & GNU Free Documentation License (GFDL)
If you are the copyright holder of any material contained on our site and intend to remove it, please contact our site administrator for approval.
© 2016-2026 All site design rights belong to S.Y.A.