Programming Android (2011)
Part II. About the Android Framework
Chapter 10. Handling and Persisting Data
To accomplish many of the activities offered by modern mobile phones, such as tracking contacts, events, and tasks, a mobile operating system and its applications must be adept at storing and keeping track of large quantities of data. This data is usually structured in rows and columns, like a spreadsheet or a very simple database. Beyond a traditional application’s requirements for storing data, the Android application life cycle demands rapid and consistent persistence of data for it to survive the volatility of the mobile environment, where devices can suddenly lose power or the Android operating system can arbitrarily decide to remove your application from memory.
Android provides the light-weight but powerful SQLite relational database engine for persisting data. Furthermore, as described in Chapter 3, the content provider feature lets applications expose their data to other applications.
In this chapter, we provide a simple SQL tutorial so that you can learn to work with Android SQLite persistence. We also walk you through an interesting application—MJAndroid—that provides a real-world look at how to manipulate a database in Android. Later, in Chapter 15, we’ll reference the same example to demonstrate the use of the mapping API in Android. Chapter 12 will show you how to implement a content provider.
Relational Database Overview
A relational database provides an efficient, structured, and generic system for managing persistent information. With a database, applications use structured queries to modify information in persistent two-dimensional matrices called tables (or in the original theoretical papers, relations). Developers write queries in a high-level language called the Standard Query Language, or more commonly, SQL. SQL is the common language for relational database management systems (RDBMSs) that have been a popular tool for data management since the late 1970s. SQL became an industry-wide standard when it was adopted by NIST in 1986 and ISO in 1987. It is used for everything from terabyte Oracle and SQL Server installations to, as we shall see, storing email on your phone.
Database tables are a natural fit for data that includes many instances of the same kind of thing—a typical occurrence in software development. For example, a contact list has many contacts, all of which potentially have the same type of information (i.e., address, phone number, etc.). Each “row” of data in a table stores information about a different person, while each “column” stores a specific attribute of each person: names in one column, address in another column, and home phone number in a third. When someone is related to multiple things (such as multiple addresses), relational databases have ways of handling that too, but we won't go into such detail in this chapter.
SQLite
Android uses the SQLite database engine, a self-contained, transactional database engine that requires no separate server process. Many applications and environments beyond Android make use of it, and a large open source community actively develops SQLite. In contrast to desktop-oriented or enterprise databases, which provide a plethora of features related to fault tolerance and concurrent access to data, SQLite aggressively strips out features that are not absolutely necessary in order to achieve a small footprint. For example, many database systems use static typing, but SQLite does not store database type information. Instead, it pushes the responsibility of keeping type information into high-level languages, such as Java, that map database structures into high-level types.
SQLite is not a Google project, although Google has contributed to it. SQLite has an international team of software developers who are dedicated to enhancing the software’s capabilities and reliability. Reliability is a key feature of SQLite. More than half of the code in the project is devoted to testing the library. The library is designed to handle many kinds of system failures, such as low memory, disk errors, and power failures. The database should never be left in an unrecoverable state, as this would be a showstopper on a mobile phone where critical data is often stored in a database. Fortunately, the SQLite database is not susceptible to easy corruption—if it were, an inopportune battery failure could turn a mobile phone into an expensive paperweight.
The SQLite project provides comprehensive and detailed documentation at http://www.sqlite.org/docs.html.
The SQL Language
Writing Android applications usually requires a basic ability to program in the SQL language, although higher-level classes are provided for the most common data-related activities. This chapter provides a beginner’s introduction to SQLite. Although this is not a book about SQL, we will provide you with enough detail about Android-oriented SQL to let you implement data persistence in a wide variety of Android applications. For more comprehensive information pertaining to the SQLite language, see http://www.sqlite.org/lang.html. We’ll use simple SQL commands to explain the SQLite language, and along the way, we’ll demonstrate how to use the sqlite3 command to see the effects those queries have on the tables they modify. You may also find the W3Schools tutorial useful: http://www.w3schools.com/sql/sql_intro.asp.
With SQLite, the database is a simple file in the Android filesystem, which could reside in flash or external card memory, but you will find that most applications’ databases reside in a directory called /data/data/com.example.yourAppPackage/databases. You can issue the ls command in the adb shell to list the databases that Android has created for you in that directory.
The database takes care of persistence—that is, it updates the SQLite file in the way specified by each SQL statement issued by an application. In the following text, we describe SQLite commands as they are used inside the sqlite3 command-line utility. Later we will show ways to achieve the same effects using the Android API. Although command-line SQL will not be part of the application you ship, it can certainly help to debug applications as you’re developing them. You will find that writing database code in Android is usually an iterative process of writing Java code to manipulate tables, and then peeking at created data using the command line.
SQL Data Definition Commands
Statements in the SQL language fall into two distinct categories: those used to create and modify tables—the locations where data is stored—and those used to create, read, update, and delete the data in those tables. In this section we’ll look at the former, the data definition commands:
CREATE TABLE
Developers start working with SQL by creating a table to store data. The CREATE TABLE command creates a new table in an SQLite database. It specifies a name, which must be unique among the tables in the database, and various columns to hold the data. Each column has a unique name within the table and a type (the types are defined by SQL, such as a date or text string). The column may also specify other attributes, such as whether values have to be unique, whether there is a default value when a row is inserted without specifying a value, and whether NULL is allowed in the column.
A table is similar to a spreadsheet. Returning to the example of a contact database, each row in the table contains the information for one contact. The columns in the table are the various bits of information you collect about each individual contact: first name, last name, birthday, and so on. We provide several examples in this chapter that will help you to begin using our job database.
NOTE
The tables created by SQL CREATE TABLE statements and the attributes they contain are called a database schema.
DROP TABLE
This removes a table added with the CREATE TABLE statement. It takes the name of the table to be deleted. On completion, any data that was stored in the table may not be retrieved.
Here is some SQL code that will create and then delete a simple table for storing contacts:
CREATE TABLE contacts (
first_name TEXT,
last_name TEXT,
phone_number TEXT,
height_in_meters REAL);
DROP TABLE contacts;
When entering commands through sqlite3, you must terminate each command with a semicolon.
You may change the database schema after you create tables (which you may want to do to add a column or change the default value of a column) by entering the ALTER TABLE command.
SQLite types
You must specify a type for each column that you create in all tables that you define, as discussed in SQL Data Definition Commands. SQLite supports the following data types:
TEXT
A text string, stored using the database encoding (UTF-8, UTF-16BE, or UTF-16LE). You will find that the TEXT type is the most common.
REAL
A floating-point value, stored as an 8-byte IEEE floating-point number.
BLOB
Arbitrary binary data, stored exactly as if it was input. You can use the BLOB data type to store any kind of variable-length data, such as an executable file, or a downloaded image. Generally, blobs can add a large performance overhead to a mobile database and you should usually avoid using them. In Chapter 13, we present an alternate scheme to store images downloaded from the Internet.
INTEGER
A signed integer, stored in 1, 2, 3, 4, 6, or 8 bytes depending on the magnitude of the value.
Specific information regarding SQLite types is available at http://www.sqlite.org/datatype3.html.
Database constraints
Database constraints mark a column with particular attributes. Some constraints enforce data-oriented limitations, such as requiring all values in a column to be unique (e.g., a column containing Social Security numbers). Other constraints exhibit more functional uses. Relational constraints,PRIMARY KEY and FOREIGN KEY, form the basis of intertable relationships.
Most tables should have a particular column that uniquely identifies each given row. Designated in SQL as a PRIMARY KEY, this column tends to be used only as an identifier for each row and (unlike a Social Security number) has no meaning to the rest of the world. Thus, you do not need to specify values for the column. Instead, you can let SQLite assign incrementing integer values as new rows are added. Other databases typically require you to specially mark the column as autoincrementing to achieve this result. SQLite also offers an explicit AUTOINCREMENT constraint, but autoincrements primary keys by default. The incrementing values in the column take on a role similar to an opaque object pointer in a high-level language such as Java or C: other database tables and code in a high-level language can use the column to reference that particular row.
When database rows have a unique primary key, it is possible to start thinking about dependencies between tables. For example, a table used as an employee database could define an integer column called employer_id that would contain the primary key values of rows in a different table calledemployers. If you perform a query and select one or more rows from the employers table, you can use grab their IDs and to look up employees in an employees table through the table's employer_id column. This allows a program to find the employees of a given employer. The two tables (stripped down to a few columns relevant to this example) might look like this:
CREATE TABLE employers (
_id INTEGER PRIMARY KEY,
company_name TEXT);
CREATE TABLE employees (
name TEXT,
annual_salary REAL NOT NULL CHECK (annual_salary > 0),
employer_id REFERENCES employers(_id));
The idea of a table referring to another table’s primary key has formal support in SQL as the FOREIGN KEY column constraint, which enforces the validity of cross-table references. This constraint tells the database that integers in a column with a foreign key constraint must refer to valid primary keys of database rows in another table. Thus, if you insert a row into the employees table with an employer_id for a row that does not exist in the employers table, many flavors of SQL will raise a constraint violation. This may help you to avoid orphaned references, also known as enforcement of foreign keys. However, the foreign key constraint in SQLite is optional, and is turned off in Android. As of Android 2.2, you cannot rely on a foreign key constraint to catch incorrect foreign key references, so you will need to take care when creating database schemas that use foreign keys.
There are several other constraints with less far-reaching effects:
UNIQUE
Forces the value of the given column to be different from the values in that column in all existing rows, whenever a row is inserted or updated. Any insert or update operation that attempts to insert a duplicate value will result in an SQLite constraint violation.
NOT NULL
Requires a value in the column; NULL cannot be assigned. Note that a primary key is both UNIQUE and NOT NULL.
CHECK
Takes a Boolean-valued expression and requires that the expression return true for any value inserted in the column. An example is the CHECK (annual_salary > 0), attribute shown earlier in the employees table.
SQL Data Manipulation Commands
Once you have defined tables using data definition commands, you can then insert your data and query the database. The following data manipulation commands are the most commonly used SQL statements:
SELECT
This statement provides the main tool for querying the database. The result of this statement is zero or more rows of data, where each row has a fixed number of columns. You can think of the SELECT statement as producing a new table with only the rows and columns that you choose in the statement. The SELECT statement is the most complicated command in the SQL language, and supports a broad number of ways to build relationships between data across one or more database tables. Clauses for SQL’s SELECT command, which are all supported by the Android API, include the following:
§ FROM, which specifies the tables from which data will be pulled to fulfill the query.
§ WHERE, which specifies conditions that selected rows in the tables must match to be returned by the query.
§ GROUP BY, which orders results in clusters according to column name.
§ HAVING, which further limits results by evaluating groups against expressions. You might remove groups from your query that do not have a minimum number of elements.
§ ORDER BY, which sets the sort order of query results by specifying a column name that will define the sort, and a function (e.g., ASC for ascending, DSC for descending) that will sort the rows by elements in the specified column.
§ LIMIT, which limits the number of rows in a query to the specified value (e.g., five rows).
Here are a few examples of SELECT statements:
SELECT * FROM contacts;
SELECT first_name, height_in_meters
FROM contacts
WHERE last_name = "Smith";
SELECT employees.name, employers.name
FROM employees, employers
WHERE employee.employer_id = employer._id
ORDER BY employer.company_name ASC;
The first statement retrieves all the rows in the contacts table, because no WHERE clause filters results. All columns (indicated by the asterisk, *) of the rows are returned. The second statement gets the names and heights of the members of the Smith family. The last statement prints a list of employees and their employers, sorted by company name.
For more information, see http://www.sqlite.org/lang_select.html.
INSERT
This statement adds a new data row to a specified database table along with a set of specified values of the proper SQLite type for each column (e.g., 5 for an integer). The insert may specify a list of columns affected by the insert, which may be less than the number of columns in the table. If you don’t specify values for all columns, SQLite will fill in a default value for each unspecified column, if you defined one for that column in your CREATE TABLE statement. If you don’t provide a default, SQLite uses a default of NULL.
Here are a few examples of INSERT statements:
INSERT INTO contacts(first_name)
VALUES("Thomas");
INSERT INTO employers VALUES(1, "Acme Balloons");
INSERT INTO employees VALUES("Wile E. Coyote", 100000.000, 1);
The first adds a new row to the contacts for someone whose first name is Thomas and whose last name, phone number, and height are unknown (NULL). The second adds Acme Balloons as a new employer, and the third adds Wile E. Coyote as an employee there.
For more information, see http://www.sqlite.org/lang_insert.html.
UPDATE
This statement modifies some rows in a given table with new values. Each assignment specifies a table name and a given function that should provide a new value for the column. Like SELECT, you can specify a WHERE clause that will identify the rows that should be updated during an invocation of the UPDATE command. Like INSERT, you can also specify a list of columns to be updated during command execution. The list of columns works in the same manner as it does with INSERT. The WHERE clause is critical; if it matches no rows, the UPDATE command will have no effect, but if the clause is omitted, the statement will affect every row in the table.
Here are a few examples of UPDATE statements:
UPDATE contacts
SET height_in_meters = 10, last_name = "Jones"
UPDATE employees
SET annual_salary = 200000.00
WHERE employer_id = (
SELECT _id
FROM employers
WHERE company_name = "Acme Balloons");
The first claims that all your friends are giants with the last name Jones. The second is a more complex query. It gives a substantial raise to all the employees of Acme Balloons.
For more information, see http://www.sqlite.org/lang_update.html.
Additional Database Concepts
You now know enough simple SQL to be able to start working with databases in Android. As the applications you write grow in sophistication, you are likely to make use of the following SQL constructs that we won’t cover in detail in this book:
Inner join
An inner join selects data across two or more tables where data is related by a foreign key. This type of query is useful for assembling objects that need to be distributed across one or more tables. The employee/employer example earlier demonstrated an inner join. As we’ve noted, since Android does not enforce foreign keys, you can get into trouble here if a key for a join does not exist as a valid cross-table reference—that is, a foreign key column actually points to a primary key of a row in another table that actually exists.
Compound query
SQLite supports complex database manipulations through combinations of statements. One of the update examples shown earlier was a compound query with a SELECT embedded in an UPDATE.
Triggers
A database trigger allows a developer to write SQL statements that will receive a callback when particular database conditions occur.
For detailed information on these topics, we suggest you consult a book on SQL, such as Learning SQL by Alan Beaulieu or SQL Pocket Guide by Jonathan Gennick, both published by O’Reilly.
Database Transactions
Database transactions make sequences of SQL statements atomic: either all statements succeed or none of them have any effect on the database. This can be important, for instance, if your app encounters an unfortunate occurrence such as a system crash. A transaction will guarantee that if the device fails partway through a given sequence of operations, none of the operations will affect the database. In database jargon, SQLite transactions support the widely recited ACID transaction properties: http://en.wikipedia.org/wiki/ACID.
With SQLite, every database operation that modifies a database runs in its own database transaction, which means a developer can be assured that all values of an insert will be written if the statement succeeds at all. You can also explicitly start and end a transaction so that it encompasses multiple statements. For a given transaction, SQLite does not modify the database until all statements in the transaction have completed successfully.
Given the volatility of the Android mobile environment, we recommend that in addition to meeting the needs for consistency in your app, you also make liberal use of transactions to support fault tolerance in your application.
Example Database Manipulation Using sqlite3
Now that you understand the basics of SQL as it pertains to SQLite, let’s have a look at a simple database for storing video metadata using the sqlite3 command-line tool and the Android debug shell, which you can start by using the adb command. Using the command line will allow us to view database changes right away, and will provide some simple examples of how to work with this useful database debugging tool. SQLite has more information on sqlite3 at http://www.sqlite.org/sqlite.html. Note that it is likely easiest at first to run this example using the Android emulator, since you will need root access in order to run it on a device.
We’ll get the example started by initializing the database:
$ adb shell
# cd /data/data/
# mkdir com.oreilly.demo.pa.ch10.sql
# cd com.oreilly.demo.pa.ch10.sql
# mkdir databases
# cd databases
#
# sqlite3 simple_video.db
SQLite version 3.6.22
Enter ".help" for instructions
Enter SQL statements terminated with a ";"
sqlite>
NOTE
Note that developers should not create these directories by hand, as we have done in this example, since Android will create them during installation of an application. Directory creation is merely useful for this particular example because we do not yet have an application in which the directories would have been automatically created.
The sqlite3 command line accepts two kinds of commands: legal SQL, and single-word commands that begin with a period (.). You can see the first (and probably most important!) of these in the introduction message: .help. Try it out, just to get an idea of the options available to you:
sqlite> .help
.bail ON|OFF Stop after hitting an error. Default OFF
.databases List names and files of attached databases
.dump ?TABLE? ... Dump the database in a SQL text format
.echo ON|OFF Turn command echo on or off
.exit Exit this program
.explain ON|OFF Turn output mode suitable for EXPLAIN on or off.
.header(s) ON|OFF Turn display of headers on or off
.help Show this message
.import FILE TABLE Import data from FILE into TABLE
.indices TABLE Show names of all indices on TABLE
.load FILE ?ENTRY? Load an extension library
.mode MODE ?TABLE? Set output mode where MODE is one of:
csv Comma-separated values
column Left-aligned columns. (See .width)
html HTML <table> code
insert SQL insert statements for TABLE
line One value per line
list Values delimited by .separator string
tabs Tab-separated values
tcl TCL list elements
.nullvalue STRING Print STRING in place of NULL values
.output FILENAME Send output to FILENAME
.output stdout Send output to the screen
.prompt MAIN CONTINUE Replace the standard prompts
.quit Exit this program
.read FILENAME Execute SQL in FILENAME
.schema ?TABLE? Show the CREATE statements
.separator STRING Change separator used by output mode and .import
.show Show the current values for various settings
.tables ?PATTERN? List names of tables matching a LIKE pattern
.timeout MS Try opening locked tables for MS milliseconds
.timer ON|OFF Turn the CPU timer measurement on or off
.width NUM NUM ... Set column widths for "column" mode
There’s another important command in this list: .exit. Remember it! It’s how you get out of here. Alternatively, you can quit with the Ctrl-D keystroke.
Another important thing to remember is that every SQL command needs to be terminated with a semicolon. If you see something like this:
sqlite> select * from video
...>
it just means SQLite thinks you’ve started to enter SQL, and it is waiting for the ; at the end. Note that the . commands do not need to be terminated by a semicolon.
NOTE
We’ve used ls as an example of a command a user might have absentmindedly typed if he forgot he was using sqlite3. ls is not actually a sqlite3 command; if you type ; after ls, sqlite will complain with an error, and then you can enter correct dot commands or sql statements.
Most of the “dot” commands aren’t very interesting at this point, because this database is still empty. So let’s add some data:
sqlite> create table video (
...> _id integer primary key,
...> title text,
...> description text,
...> url text);
These lines create a new table called video. The types of the columns are integer and text. The table contains a primary key called _id. This particular column name is not chosen accidentally. Android requires the use of this exact name in order for the table to work with its cursor system.
We can see the newly created tables using the “dot” command .table:
sqlite> .table
video
sqlite>
Next we’ll go through a few different queries that illustrate the SQL concepts we introduced earlier, and that an application based on these tables. First, let’s insert some data into our new tables so that our queries return some example results:
INSERT INTO video (_id, title, url)
VALUES(1, "Epic Fail Car", "http://www.youtube.com/watch?v=01ynapTnYVkeGE");
INSERT INTO video (_id, title, url)
VALUES(2, "Epic Fail Bicycle", "http://www.youtube.com/watch?v=7n7apTnYVkeGE");
INSERT INTO video (_id, title, url)
VALUES(3, "Epic Fail Wagon", "http://www.youtube.com/watch?v=m0iGn2c47LA");
INSERT INTO video (_id, title, url)
VALUES(4, "Epic Fail Sidewalk", "http://www.youtube.com/watch?v=m0iGn2cNcNo");
INSERT INTO video (_id, title, url)
VALUES(5, "Epic Fail Motorcycle",
"http://www.youtube.com/watch?v=7n7apBB8qkeGE");
Be careful to balance your quotes. If you enter a single quote, sqlite3 will prompt you forever, until it gets the match.
In this example, we did not enter values for all the columns in the table. The contents of the parentheses after the INTO phrase in the statement list the columns into which the statement will put data. The parentheses after the VALUES phrase contain the values themselves, in the same order.
Now suppose you want to find the names of all the videos that have the word fragment cycle in them. Use a SELECT query:
sqlite> SELECT title FROM video WHERE title LIKE "%cycle%";
Epic Fail Bicycle
Epic Fail Motorcycle
Sqlite3 prints the rows one to a line. In the example, we capitalized SQL reserved words to help keep syntax clear. It is not necessary to do so. They can be uppercase, lowercase, or mixed case.
The example also shows the rudimentary pattern matching available in SQL. The keyword LIKE, combined with the wildcard percent sign character (%), allows you to match parts of strings.
Suppose now that we’d like all the videos, with their URLs, sorted in reverse alphabetical order by title:
sqlite> SELECT title, url FROM video ORDER BY title DESC;
Epic Fail Wagon|http://www.youtube.com/watch?v=m0iGn2c47LA
Epic Fail Sidewalk|http://www.youtube.com/watch?v=m0iGn2cNcNo
Epic Fail Motorcycle|http://www.youtube.com/watch?v=7n7apBB8qkeGE
Epic Fail Car|http://www.youtube.com/watch?v=01ynapTnYVkeGE
Epic Fail Bicycle|http://www.youtube.com/watch?v=7n7apTnYVkeGE
You can see that sqlite3 uses the pipe character (|) to separate the values in different columns.
We didn’t add descriptions for our videos. Let’s add just one, now:
sqlite> UPDATE video SET description="Crash!" WHERE title LIKE "%Car";
sqlite> UPDATE video SET description="Trip!" WHERE title LIKE '%Sidewalk%';
sqlite> SELECT title, description FROM video WHERE NOT description IS NULL;
Epic Fail Car|Crash!
Epic Fail Sidewalk|Trip!
Finally, let’s delete a record using its ID:
sqlite> DELETE FROM video WHERE _id = 1;
sqlite> SELECT _id, description FROM videos;
2|Epic Fail Bicycle
3|Epic Fail Wagon
4|Epic Fail Sidewalk
5|Epic Fail Motorcycle
SQL and the Database-Centric Data Model for Android Applications
Now that you have some basic SQL programming knowledge, we can start thinking about how to put it to use in an Android application. Our goal is to create robust applications based on the popular Model-View-Controller (MVC) pattern that underlies well-written UI programs, specifically in a way that works well for Android. Wikipedia has background information on MVC at http://en.wikipedia.org/wiki/Model_view_controller.
One fundamental difference between mobile phone apps and desktop apps is how they handle persistence. Traditional desktop-based applications—word processors, text editors, drawing programs, presentation programs, and so on—often use a document-centric form of the MVC pattern. They open a document, read it into memory, and turn it into objects in memory that form the data model. Such programs will make views for the data model, process user input through their controller, and then modify the data model (Figure 10-1). The key consequence of this design is that you explicitly open and save documents in order to make the data model persist between program invocations. We’ve seen how user interface components work in Android. Next we’ll explore the Android APIs for database manipulation, which will prepare you to implement an application data model that works in a new way.

Figure 10-1. Document-centric applications, which implement a data model with in-memory objects
Robust use of Android combines data models and user interface elements in a different manner. Apps run on mobile devices with limited memory, which can run out of battery power at unpredictable and possibly inopportune times. Small mobile devices also place a premium on reducing the interactive burden on the user: reminding a user he ought to save a document when he is trying to answer a phone call is not a good user experience. The whole concept of a document is absent in Android. The user should always have the right data at hand and be confident her data is safe.
To make it easy to store and use application data incrementally, item by item, and always have it in persistent memory without explicitly saving the whole data model, Android provides support in its database, view, and activity classes for database-centric data (Figure 10-2). We’ll explain how to use Android database classes to implement this kind of model.
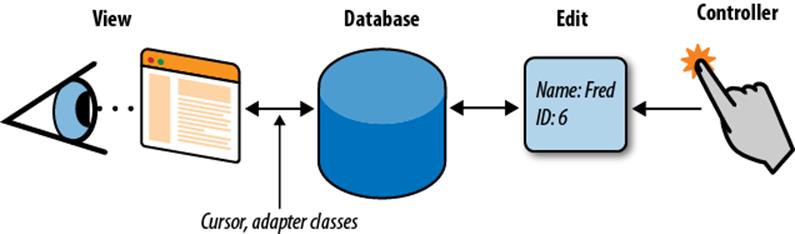
Figure 10-2. Android support for a data model that mostly resides in a database
The Android Database Classes
This section introduces the Java classes that give you access to the SQLite functions described earlier in the chapter, with the data-centric model we just described in mind:
SQLiteDatabase
Android’s Java interface to its relational database, SQLite. It supports an SQL implementation rich enough for anything you’re likely to need in a mobile application, including a cursor facility.
Cursor
A container for the results of a database query that supports an MVC-style observation system. Cursors are similar to JDBC result sets and are the return value of a database query in Android. A cursor can represent many objects without requiring an instance for each one. With a cursor, you can move to the start of query results and access each row one at a time as needed. To access cursor data, you call methods named as Cursor.getAs*(int columnNumber) (e.g., getAsString). The values the cursor will return depend on the current cursor index, which you can increment by calling Cursor.moveToNext, or decrement by calling Cursor.moveToPrevious, as needed. You can think of the current index of the cursor as a pointer to a result object.
Cursors are at the heart of the basis for Android MVC, which we will cover in detail in Chapter 12.
SQLiteOpenHelper
Provides a life cycle framework for creating and upgrading your application database. It’s quite helpful to use this class to assist with the critical task of transitioning the data from one version of an application to a possible new set of database tables in a new version of an application.
SQLiteQueryBuilder
Provides a high-level abstraction for creating SQLite queries for use in Android applications. Using this class can simplify the task of writing a query since it saves you from having to fiddle with SQL syntax yourself.
Database Design for Android Applications
In the next section, we’ll examine some code from Chapter 12 that deals with persistent storage of video-related metadata information: title, description, and video URL. This code resides inside an Android content provider, which we feel is an appropriate location for database code. Without explaining much about content providers, we’ll discuss how to write a database for one. Chapter 12 explains in detail how to write a content provider. The following code will help us illustrate how to create and use an SQLite database in Android. This application will use roughly the same database that we just examined using the sqlite3 command-line tool. This time, though, we’ll be writing code that uses the Android API to manipulate the data.
Basic Structure of the SimpleVideoDbHelper Class
In our example, the SimpleFinchVideoContentProvider.java file encapsulates all the SQL logic necessary to work with the simple_video database in Android. Applications that need access to the persistent data in this database interact with the provider and the cursors it supplies, as we’ll explain in Chapter 12. Clients are completely insulated from the details of how the data is actually stored. This is good programming practice and should be emulated in all your Android applications that use databases.
For now, since we are focusing on how to use databases in Android, it’s sufficient to know that SimpleVideoDbHelper is the model of the database in the provider: everything specific to the implementation of the database—its name, the names of its columns, the definitions of its tables—takes effect in this class. For a large, complex database, of course, the helper class may be much more complex and be composed of several components.
SimpleVideoDbHelper inherits from the abstract SQLiteOpenHelper class, and therefore must override the onCreate and onUpgrade methods. The onCreate method is automatically called when the application starts for the first time. Its job is to create the database. When new versions of the application ship, it may be necessary to update the database, perhaps adding tables, adding columns, or even changing the schema entirely. When this is necessary, the task falls to the onUpgrade method, which is called whenever the DATABASE_VERSION in the call to the constructor is different from the one stored with the database. When you ship a new version of a database, you must increment the version number:
public static final String VIDEO_TABLE_NAME = "video";
public static final String DATABASE_NAME = SIMPLE_VIDEO + ".db";
private static int DATABASE_VERSION = 2;
public static final int ID_COLUMN = 0;
public static final int TITLE_COLUMN = 1;
public static final int DESCRIPTION_COLUMN = 2;
public static final int TIMESTAMP_COLUMN = 3;
public static final int QUERY_TEXT_COLUMN = 4;
public static final int MEDIA_ID_COLUMN = 5;
private static class SimpleVideoDbHelper extends SQLiteOpenHelper {
private SimpleVideoDbHelper(Context context, String name,
SQLiteDatabase.CursorFactory factory)
{
super(context, name, factory, DATABASE_VERSION);
}
@Override
public void onCreate(SQLiteDatabase sqLiteDatabase) {
createTable(sqLiteDatabase);
}
private void createTable(SQLiteDatabase sqLiteDatabase) {
String qs = "CREATE TABLE " + VIDEO_TABLE_NAME + " (" +
FinchVideo.SimpleVideos._ID +
" INTEGER PRIMARY KEY AUTOINCREMENT, " +
FinchVideo.SimpleVideos.TITLE_NAME + " TEXT, " +
FinchVideo.SimpleVideos.DESCRIPTION_NAME + " TEXT, " +
FinchVideo.SimpleVideos.URI_NAME + " TEXT);";
sqLiteDatabase.execSQL(qs);
}
@Override
public void onUpgrade(SQLiteDatabase sqLiteDatabase,
int oldv, int newv)
{
sqLiteDatabase.execSQL("DROP TABLE IF EXISTS " +
VIDEO_TABLE_NAME + ";");
createTable(sqLiteDatabase);
}
}
The general elements associated with SimpleVideoDbHelper code are:
Constants
The SimpleVideoDbHelper class defines two important constants:
DATABASE_NAME
This holds the filename of the database, simple_video.db in this case. This names the actual SQLite database file. Recall that we mentioned this file resides in the following path, and that Android will take care to create the database file for you:/data/data/com.oreilly.demo.pa.finchvideo/databases/simple_video.db.
DATABASE_VERSION
This defines the database version, which you choose arbitrarily and increment whenever you change the database schema. If the version of the database on the machine is less than DATABASE_VERSION, the system runs your onUpgrade method to upgrade the database to the current level.
VIDEO_TABLE_NAME
This is the name of the only table in our simple database.
*_NAME
These are the names of the columns in the database. As mentioned earlier, it is essential to define a column named _id and use it as the primary key, for any table that you will access through a cursor.
Constructor
The constructor for the database in this provider, SimpleVideoDbHelper, uses the super function to call its parent’s constructor. The parent does most of the work of creating the database object.
onCreate
When an Android application attempts to read or write data to a database that does not exist, the framework executes the onCreate method. The onCreate method in the YouTubeDbHelper class shows one way to create the database. If initializing the database required a substantial amount of SQL code, it might be preferable to keep the code in the strings.xml resource file. This might make the Java code much more readable. But it also forces a developer modifying the code to look in two separate files to see what’s really going on. Of course, if a program has a simple database, it might be easier to just write the SQL in Java, as we have done in SimpleVideoDbHelper, or if you use a query builder, there may be no SQL at all.
NOTE
If you intend to load your SQL from a String resource, you must take care of a change to the string mentioned only briefly in the Android documentation: escape all single quotes and double quotes with a backslash (changing " to \" and ' to \') within a resource string, or enclose the entire string in either single or double quotes. You should also turn off formatting in the string, using the formatted="false" attribute. For example:
<string name="sql_query" formatted="false">
SELECT * FROM videos WHERE name LIKE \"%cycle%\"
</string>
The onCreate method doesn’t actually have to create the database. It is passed a brand-new, empty database and must completely initialize it. In SimpleVideoDbHelper, this is a simple task and is accomplished with the call to createVideosTable.
onUpdate
The onUpdate method for SimpleVideoContentProvider is very simple: it deletes the database. When the provider tries to use it later, Android will call the onCreate method because it does not exist. While such a crude approach might be acceptable in this extremely simple case, a provider intended only as a cache for network data, it would certainly not be acceptable for, say, a database of contacts! Your customers won’t be very happy if they have to rekey their information each time they upgrade software versions. So our onUpdate method won’t work very well in real life. In general, the onUpdate method will have to recognize all previous versions of databases used by an application and have a data-safe strategy for converting those databases to the most recent format. A larger application would have several upgrade scripts, one for each version that might be out in the wild. The application would then execute each upgrade script in turn until the database was completely up-to-date.
createVideosTable
We created this function to encapsulate the SQL code that creates our table.
Using the Database API: MJAndroid
In this section, we present a more advanced example application, called MJAndroid, that demonstrates the use of a small database for a hypothetical job-searching application. In this chapter, we explore the data persistence aspects of this program. In Chapter 15, we take a look at how the application integrates mapping features to show job query results on a map. First we’ll explain the application in a bit more detail.
Android and Social Networking
One of the great promises of Android mobile phones is their ability to run applications that enhance opportunities for social networking among users. This promise echoes the reality of the Internet—the first generation of Internet applications were about user access to information, and many of those applications have been very popular. The second wave of Internet applications were about connecting users to one another. Applications such as Facebook, YouTube, and many others enhance our ability to connect with people of similar interests, and allow the application users to provide some or all of the content that makes the application what it is. Android has the potential to take that concept and add a new dimension—mobility. It’s expected that a whole new generation of applications will be built for users of mobile devices: social networking applications that are easy to use while walking down the street, applications that are aware of the user’s location, applications that allow the easy sharing of content-rich information like pictures and videos, etc. MJAndroid provides a concrete example of how Android can address this growing niche.
In the case of the MJAndroid MicroJobs application, the user is trying to locate a temporary job in her geographic vicinity, where she can work for a few hours to earn some extra money. The premise is that employers looking for temporary help have entered available jobs, descriptions, hours, and offered wages in a web-based database that is accessible from Android mobile phones. People looking for a few hours’ work can use the MicroJobs application to access that database, look for jobs in their immediate area, communicate with friends about potential employers and potential jobs, and call the employer directly if they are interested in the position. For our purposes here, we won’t create an online service, we’ll just have some canned data on the phone. The application has a number of features that extend that central idea in ways that are unique to mobile handsets:
Mapping
The Android mobile phone environment provides support for dynamic, interactive maps, and we’re going to take full advantage of its capabilities. In The MapView and MapActivity you’ll see that with very little code, we’ll be able to show dynamic maps of our local neighborhood, getting location updates from the internal GPS to automatically scroll the map as we move. We’ll be able to scroll the map in two directions, zoom in and out, and even switch to satellite views.
Finding friends and events
Again in Chapter 15, we’ll see a graphic overlay on the map that will show us where jobs are located in the area, and will allow us to get more information about a job by just touching its symbol on the map. We will access Android’s contact manager application to get address information for our friends (telephone numbers, instant messaging addresses, etc.), and the MicroJobs database to get more information about posted jobs.
Instant messaging
When we find friends we want to chat with, we will be able to contact them via instant messages, by trading SMS messages with our friends’ mobile phones.
Talking with friends or employers
If IMing is too slow or cumbersome, we’ll be able to easily place a cellular call to our friends, or call the employer offering a job.
Browsing the Web
Most employers have an associated website that provides more detailed information. We’ll be able to select an employer off a list or off the map and quickly zero in on their website to find out, for example, what the place looks like.
This is a fun application that could easily be developed further into a full-blown service, but our intent in this book is to show you just how easy it is to develop and combine these powerful capabilities in your own application. Like all the code in this book, the complete code is available for download. Although it’s not absolutely required in order to understand the material in the book, you are strongly encouraged to download the source to your own computer. That way you’ll have it readily available for reference, and it will be easy to cut sections of code and paste them into your own applications as you move on. For now, we’ll use the MJAndroid example to provide a “close to real world” example to dig into the Android database API.
Figure 10-3 shows the screen displayed by MJAndroid when you first run it. It’s a map of your local area, overlaid with a few buttons and pins.
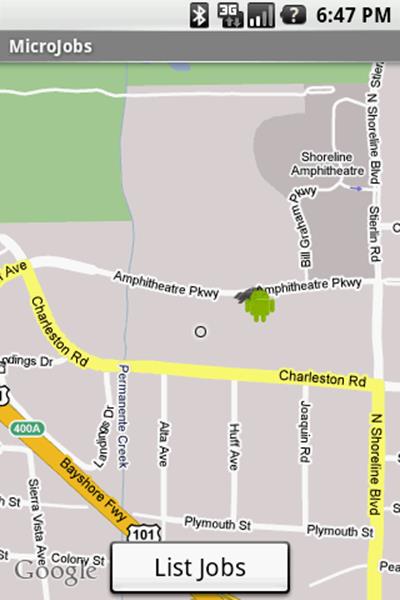
Figure 10-3. MJAndroid opening screenshot
The Source Folder (src)
The package name for MJAndroid is com.microjobsinc.mjandroid. Eclipse lays out the equivalent directory structure, just as it would for any Java project, and shows you the whole thing when you open the src folders. In addition to these package folders there is a folder named for the package that contains all the Java files for the project. These include the following files:
MicroJobs.java
The main source file for the application—the activity that starts first, displays the map that is the centerpiece of the application, and calls other activities or services as necessary to implement different features in the user interface.
MicroJobsDatabase.java
A database helper that provides easy access to the local MJAndroid database. This is where all the employer, user, and job information is stored, using SQLite.
AddJob.java and EditJob.java
Part of the database portion of MJAndroid. They provide screens that the user can use to add or edit job entries in the database.
MicroJobsDetail.java
The Activity that displays all the detail information about a particular job opportunity.
MicroJobsEmpDetail.java
The Activity that displays information about an employer, including name, address, reputation, email address, phone number, and so forth.
MicroJobsList.java
The Activity that displays a list of jobs (as opposed to the map view in MicroJobs.java). It shows a simple list of employers and jobs, and allows the user to sort the list by either field, as well as to call up specifics about the job or employer by touching the name on the list.
Loading and Starting the Application
Running MJAndroid from the SDK is complicated by the fact that the application uses a MapView. Android requires a special Maps API key whenever you use a MapView, and the key is tied to your particular development machine. We learned in Application Signing about the requirements for signing and starting your application, and since this application relies on the maps API, you will need to have set up your API key for the example to work properly. To start MJAndroid, just open and run the eclipse project for this chapter, as you have done for other chapters.
Database Queries and Reading Data from the Database
There are many ways to read data from an SQL database, but they all come down to a basic sequence of operations:
1. Create a SQL statement that describes the data you need to retrieve.
2. Execute that statement against the database.
3. Map the resultant SQL data into data structures that the language you’re working in can understand.
This process can be very complex in the case of object-relational mapping software, or relatively simple but labor-intensive when writing the queries directly into your application. Object relational mapping (ORM, at http://en.wikipedia.org/wiki/Object_relational_mapping) tools shield your code from the complexities of database programming and object mapping by moving that complexity out of your immediate field of vision. Your code may be more robust in the face of database changes, but at the cost of complex ORM setup and maintenance. Currently, it’s not typical to use an ORM in an Android application.
The simple approach of writing queries directly into your application works well only for very small projects that will not change much over time. Applications directly containing database code have some added risk of fragility, because when the database schema changes, any code that references the schema must be examined and potentially rewritten.
A common middle-ground approach is to sequester all the database logic into a set of objects whose sole purpose is to translate application requests into database requests and deliver the results back to the application. This is the approach we have taken with the MJAndroid application; all the database code is contained in the single class MicroJobsDatabase, which also extends SQLiteOpenHelper. But with SimpleFinchVideoContentProvider the database is simple enough that we don’t bother to use external strings.
When not used with a content provider, Android gives us the ability to customize cursors, and we use that ability to further reduce code dependencies by hiding all the information about each specific database operation inside a custom cursor. The interface to the caller in the getJobs method ofMicroJobsDatabase appears first in the code that follows. The method’s job is to return a JobsCursor filled with jobs from the database. The user can choose (through the single parameter passed to the getJobs method) to sort jobs by either the title column or the employer_name column:
public class MicroJobsDatabase extends SQLiteOpenHelper {
...
/** Return a sorted JobsCursor
* @param sortBy the sort criteria
*/
public JobsCursor getJobs(JobsCursor.SortBy sortBy) {![]()
String sql = JobsCursor.QUERY + sortBy.toString();![]()
SQLiteDatabase d = getReadableDatabase();![]()
JobsCursor c = (JobsCursor) d.rawQueryWithFactory(![]()
new JobsCursor.Factory(),
sql,
null,
null);
c.moveToFirst();![]()
return c;![]()
}
...
public static class JobsCursor extends SQLiteCursor{![]()
public static enum SortBy{![]()
title,
employer_name
}
private static final String QUERY =
"SELECT jobs._id, title, employer_name, latitude, longitude, status "+
"FROM jobs, employers "+
"WHERE jobs.employer_id = employers._id "+
"ORDER BY ";
private JobsCursor(SQLiteDatabase db, SQLiteCursorDriver driver,
String editTable, SQLiteQuery query) {![]()
super(db, driver, editTable, query);
}
private static class Factory implements SQLiteDatabase.CursorFactory{![]()
@Override
public Cursor newCursor(SQLiteDatabase db,
SQLiteCursorDriver driver, String editTable,
SQLiteQuery query) {![]()
return new JobsCursor(db, driver, editTable, query);![]()
}
}
public long getColJobsId(){![]()
return getLong(getColumnIndexOrThrow("jobs._id"));
}
public String getColTitle(){
return getString(getColumnIndexOrThrow("title"));
}
public String getColEmployerName(){
return getString(getColumnIndexOrThrow("employer_name"));
}
public long getColLatitude(){
return getLong(getColumnIndexOrThrow("latitude"));
}
public long getColLongitude(){
return getLong(getColumnIndexOrThrow("longitude"));
}
public long getColStatus(){
return getLong(getColumnIndexOrThrow("status"));
}
}
Here are some of the highlights of the code:
![]()
Function that fashions a query based on the user’s requested sort column (the sortBy parameter) and returns results as a cursor.
![]()
Creates the query string. Most of the string is static (the QUERY variable), but this line tacks on the sort column. Even though QUERY is private, it is still available to the enclosing class. This is because the getJobs method and the JobsCursor class are both within the MicroJobsDatabaseclass, which makes JobsCursor’s private data members available to the getJobs method.
To get the text for the sort column, we just run toString on the enumerated parameter passed by the caller. We could have defined an associative array, which would give us more flexibility in naming variables, but this solution is simpler. Additionally, the names of the columns pop up quite nicely using your IDE’s autocompletion.
![]()
Retrieves a handle to the database.
![]()
Creates the JobsCursor cursor using the SQLiteDatabase object’s rawQueryWithFactory method. This method lets us pass a factory method that Android will use to create the exact type of cursor we need. If we had used the simpler rawQuery method, we would get back a generic Cursorlacking the special features of JobsCursor.
![]()
As a convenience to the caller, moves to the first row in the result. This way the cursor is returned ready to use. A common mistake is to forget the moveToFirst call and then pull your hair out trying to figure out why the Cursor object is throwing exceptions.
![]()
The cursor is the return value.
![]()
Class that creates the cursor returned by getJobs.
![]()
Simple way to provide alternate sort criteria: store the names of columns in an enum. This type is used in item 2.
![]()
Constructor for the customized cursor. The final argument is the query passed by the caller.
![]()
Factory class to create the cursor, embedded in the JobsCursor class.
![]()
Creates the cursor from the query passed by the caller.
![]()
Returns the cursor to the enclosing JobsCursor class.
![]()
Convenience functions that extract particular columns from the row under the cursor. For instance, getColTitle returns the value of the title column in the row currently referenced by the cursor. This separates the database implementation from the calling code and makes that code easier to read.
NOTE
While subclassing a cursor is a nice trick for using a database within a single application, it won’t work with the content provider API, since Android does not have a way for cursor subclasses to be shared across processes. Additionally, the MJAndroid application is a contrived example to demonstrate using a database: we present an application with a more robust architecture that you might see in a production application in Chapter 13.
A sample use of the database follows. The code gets a cursor, sorted by title, through a call to getJobs. It then iterates through the jobs:
MicroJobsDatabase db = new MicroJobsDatabase(this);![]()
JobsCursor cursor = db.getJobs(JobsCursor.SortBy.title);![]()
for (int rowNum = 0; rowNum < cursor.getCount(); rowNum++) {![]()
cursor.moveToPosition(rowNum);
doSomethingWith(cursor.getColTitle());![]()
}
Here are some of the highlights of the code:
![]()
Creates a MicroJobsDatabase object. The argument, this, represents the context as discussed previously.
![]()
Creates the JobsCursor cursor, referring to the SortBy enumeration discussed earlier.
![]()
Uses generic Cursor methods to iterate through the cursor.
![]()
Still within the loop, invokes one of the custom accessor methods provided by JobsCursor to “do something” chosen by the user with the value of each row’s title column.
Using the query method
While it’s helpful for applications that execute nontrivial database operations to isolate their SQL statements as shown previously, it’s also convenient for applications with simple database operations, such as our SimpleFinchVideoContentProvider, to make use of the methodSQLiteDatabase.query, as shown in the following video-related example:
videoCursor = mDb.query(VIDEO_TABLE_NAME, projection,
where, whereArgs,
null, null, sortOrder);
As with SQLiteDatabase.rawQueryWithFactory shown previously, the return value of the query method is a Cursor object. Here, we assign this cursor to the previously defined videoCursor variable.
The query method runs a SELECT on a given table name, in this case the constant VIDEO_TABLE_NAME. The method takes two parameters. First, a projection that names the columns that should only show up in the query—other column values will not show up in the cursor results. Many applications work just fine passing null for the projection, which will cause all column values to show up in the resultant cursor. Next, the where argument contains a SQL where clause, without the WHERE keyword. The where argument can also contain a number of '?' strings that will be replaced with the values of whereArgs. We’ll discuss in more detail how these two values bind together when we discuss the execSQL method.
Modifying the Database
Android Cursors are great when you want to read data from the database, but the class android.database.Cursor does not provide methods for creating, updating, or deleting data. The SQLiteDatabase class provides two basic APIs that you can use for both reading and writing:
§ A set of four methods called simply insert, query, update, and delete
§ A more general execSQL method that takes any single SQL statement that does not return data and runs it against the database
We recommend using the first set of calls when your operations fit its capabilities. We’ll show you both ways to use the MJAndroid operations.
Inserting data into the database
The SQL INSERT statement is used whenever you want to insert data into an SQL database. The INSERT statement maps to the “create” operation of the CRUD methodology.
In the MJAndroid application, the user can add jobs to the list by clicking on the Add Job menu item when looking at the Jobs list. The user can then fill out a form to input the employer, job title, and description. After the user clicks on the Add Job button on the form, the following line of code is executed:
db.addJob(employer.id, txtTitle.getText().toString(),
txtDescription.getText().toString());
This code calls the addJob function, passing in the employer ID, the job title, and the job description. The addJob function does the actual work of writing the job out to the database.
Using the insert method
The following example demonstrates use of the insert method:
/**
* Add a new job to the database. The job will have a status of open.
* @param employer_id The employer offering the job
* @param title The job title
* @param description The job description
*/
public void addJob(long employer_id, String title, String description) {
ContentValues map = new ContentValues();![]()
map.put("employer_id", employer_id);
map.put("title", title);
map.put("description", description);
try{
getWritableDatabase().insert("jobs", null, map);![]()
} catch (SQLException e) {
Log.e("Error writing new job", e.toString());
}
}
Here are some of the highlights of the code:
![]()
The ContentValues object is a map of column names to column values. Internally, it’s implemented as a HashMap<String,Object>. However, unlike a simple HashMap, ContentValues is strongly typed. You can specify the data type of each value stored in a ContentValues container. When you pull values back out, ContentValues will automatically convert values to the requested type if possible.
![]()
The second parameter to the insert method is nullColumnHack. It’s used only as a default value when the third parameter, the map, is null and therefore the row would otherwise be completely empty.
Using the execSQL method
This solution works at a lower level than the insert solution. It creates SQL and passes it to the library to execute. Although you could hardcode every statement, including the data passed by the user, this section shows a preferable method that employs bind parameters.
A bind parameter is a question mark that holds a place in an SQL statement, usually for a paramater passed by the user such as a value in a WHERE clause. After creating an SQL statement with bind parameters, you can reuse it repeatedly, setting the actual value of the bind parameters before executing it each time:
/**
* Add a new job to the database. The job will have a status of open.
* @param employer_id The employer offering the job
* @param title The job title
* @param description The job description
*/
public void addJob(long employer_id, String title, String description){
String sql = ![]()
"INSERT INTO jobs " +
"(_id, employer_id, title, description, start_time, end_time, status) " +
"VALUES " +
"(NULL, ?, ?, ?, 0, 0, 3)";
Object[] bindArgs = new Object[]{employer_id, title, description};
try{
getWritableDatabase().execSQL(sql, bindArgs);![]()
} catch (SQLException e) {
Log.e("Error writing new job", e.toString());
}
}
Here are some of the highlights of the code:
![]()
Builds an SQL query template named sql that contains bindable parameters that will be filled in with user data. The bindable parameters are marked by question marks in the string. Next, we build an object array named bindArgs that contains one object per element in our SQL template. There are three question marks in the template, so there must be three elements in the object array.
![]()
Executes the SQL command by passing the SQL template string and the bind arguments to execSQL.
Using an SQL template and bind arguments is much preferred over building up the SQL statement, complete with parameters, into a String or StringBuilder. By using a template with parameters, you protect your application from SQL injection attacks. These attacks occur when a malicious user enters information into a form that is deliberately meant to modify the database in a way that was not intended by the developer. Intruders normally do this by ending the current SQL command prematurely, using SQL syntax characters, and then adding new SQL commands directly in the form field. The template-plus-parameters approach also protects you from more run-of-the-mill errors, such as invalid characters in the parameters. It also leads to cleaner code as it avoids long sequences of manually appended strings by automatically replacing question marks.
Updating data already in the database
The MicroJobs application enables the user to edit a job by clicking on the job in the Jobs list and choosing the Edit Job menu item. The user can then modify the strings for employer, job title, and description in the editJob form. After the user clicks on the Update button on the form, the following line of code is executed:
db.editJob((long)job_id, employer.id, txtTitle.getText().toString(),
txtDescription.getText().toString());
This code calls the editJob method, passing the job ID and the three items the user can change: employer ID, job title, and job description. The editJob method does the actual work of modifying the job in the database.
Using the update method
The following example demonstrates use of the update method:
/**
* Update a job in the database.
* @param job_id The job id of the existing job
* @param employer_id The employer offering the job
* @param title The job title
* @param description The job description
*/
public void editJob(long job_id, long employer_id, String title, String description)
{
ContentValues map = new ContentValues();
map.put("employer_id", employer_id);
map.put("title", title);
map.put("description", description);
String[] whereArgs = new String[]{Long.toString(job_id)};
try{
getWritableDatabase().update("jobs", map, "_id=?", whereArgs);![]()
} catch (SQLException e) {
Log.e("Error writing new job", e.toString());
}
}
Here are some of the highlights of the code:
![]()
The first parameter to update is the name of the table to manipulate. The second is the map of column names to new values. The third is a small snippet of SQL. In this case, it’s an SQL template with one parameter. The parameter is marked with a question mark, and is filled out with the contents of the fourth argument.
Using the execSQL method
The following example demonstrates use of the execSQL method:
/**
* Update a job in the database.
* @param job_id The job id of the existing job
* @param employer_id The employer offering the job
* @param title The job title
* @param description The job description
*/
public void editJob(long job_id, long employer_id, String title, String description)
{
String sql =
"UPDATE jobs " +
"SET employer_id = ?, "+
" title = ?, "+
" description = ? "+
"WHERE _id = ? ";
Object[] bindArgs = new Object[]{employer_id, title, description, job_id};
try{
getWritableDatabase().execSQL(sql, bindArgs);
} catch (SQLException e) {
Log.e("Error writing new job", e.toString());
}
}
For this example application, we show the simplest possible function. This makes it easy to understand in a book, but is not enough for a real application. In a real application you would want to check input strings for invalid characters, verify that the job exists before trying to update it, verify that the employer_id value is valid before using it, do a better job of catching errors, and so on. You would also probably authenticate the user for any application that is shared by multiple people.
Deleting data in the database
The MicroJobs application enables the user to delete a job as well as create and change it. From the main application interface, the user clicks on the List Jobs button to get a list of jobs and then clicks on a particular job to see the job detail. At this level, the user can click on the “Delete this job” menu item to delete the job. The application asks the user whether he really wants to delete the job. When the user hits the Delete button in response, the following line of code in the MicroJobsDetail.java file is executed:
db.deleteJob(job_id);
This code calls the deleteJob method of the MicroJobsDatabase class, passing it the job ID to delete. The code is similar to the functions we’ve already seen and lacks the same real-world features.
Using the delete method
The following example demonstrates use of the delete method:
/**
* Delete a job from the database.
* @param job_id The job id of the job to delete
*/
public void deleteJob(long job_id) {
String[] whereArgs = new String[]{Long.toString(job_id)};
try{
getWritableDatabase().delete("jobs", "_id=?", whereArgs);
} catch (SQLException e) {
Log.e("Error deleteing job", e.toString());
}
}
Using the execSQL method
The following example demonstrates use of the execSQL method:
/**
* Delete a job from the database.
* @param job_id The job id of the job to delete
*/
public void deleteJob(long job_id) {
String sql = String.format(
"DELETE FROM jobs " +
"WHERE _id = '%d' ",
job_id);
try{
getWritableDatabase().execSQL(sql);
} catch (SQLException e) {
Log.e("Error deleteing job", e.toString());
}
}
All materials on the site are licensed Creative Commons Attribution-Sharealike 3.0 Unported CC BY-SA 3.0 & GNU Free Documentation License (GFDL)
If you are the copyright holder of any material contained on our site and intend to remove it, please contact our site administrator for approval.
© 2016-2026 All site design rights belong to S.Y.A.