Programming Android (2011)
Part III. A Skeleton Application for Android
The first two parts of this book describe an approach to key architectural issues in Android applications. The skeleton applications described in Part III embody this approach. You can use the code as a starting point for your own applications.
Chapter 11. A Framework for a Well-Behaved Application
In this chapter and the next, we introduce framework or “skeleton” applications that exemplify many of the design and implementation approaches presented in this book, especially in Chapter 3 where we introduced the components of an application.
The framework application in this chapter can be used as a starting point for your own applications. We recommend this approach to creating applications over starting from scratch, or from smaller examples that do not implement all the aspects of the Activity object and process life cycle.
The approach we take in this chapter enables you to visualize and understand the component life cycle before you know you need it. Retrofitting life cycle handling to an application that was written without understanding life cycles, or with the expectation that life cycle handling won’t be needed, is one of the easiest ways to create an Android application that fails unexpectedly, in ways that are hard to reproduce consistently, and that has persistent bugs that can remain undiscovered across multiple attempts to eradicate them. In other words, it’s best to learn this before it bites you in the ass.
While this chapter isn’t about user interfaces, you should keep in mind that the Android user interface classes were designed with both the constraints of the Android architecture and the capabilities of the Android system in mind. Implementations of user interface and life cycle handling go hand in hand. Correctly handling the life cycles of an application, the process that contains the application, the Activity objects that contain the UI of the application, and the Fragment objects that might be contained in an Activity instance are key to a good user experience.
To get the application framework code as you read it here, you can download an archive from the Examples link on the book’s website, http://oreilly.com/catalog/0636920010364, which may include more features and corrections of errata.
Visualizing Life Cycles
Earlier in this book, and in the Android developer documentation, you saw aspects of component life cycles diagrammed and read about how life cycles work. The problem with these descriptions is that component life cycles are dynamic, and a state diagram is a static picture. Moreover, component and process life cycle transitions are driven by memory management: when you run out, things start to happen in component life cycles to recover memory. Memory allocation, garbage collection, and the way Android enables memory recovery to span processes are inherently not as deterministic as running a block of code, and are configuration-dependent. Here, by instrumenting and running code, we will see application life cycles as they happen, and enable you to experiment with them in a running program.
Visualizing the Activity Life Cycle
We will make the Activity component life cycle more visible to you by running an instrumented program and observing the behavior of the Activity life cycle methods using the LogCat view in Eclipse. The following code is a listing of the Activity subclass with the life cycle methods implemented, and logging calls in each method. The callouts in the code refer to a method-by-method explanation of life cycle handling in Life cycle methods of the Activity class. Take a look at this listing to see what kind of information will be logged:
package com.oreilly.demo.pa.ch10.finchlifecycle;
import android.app.Activity;
import android.os.Bundle;
import android.util.Log;
import android.view.Menu;
import android.view.MenuItem;
public class FinchLifecycle extends Activity {
// Make strings for logging
private final String TAG = this.getClass().getSimpleName();
private final String RESTORE = ", can restore state";
// The string "fortytwo" is used as an example of state
private final String state = "fortytwo";
@Override
public void onCreate(Bundle savedState) {![]()
super.onCreate(savedState);
setContentView(R.layout.main);
String answer = null;
// savedState could be null
if (null != savedState) {
answer = savedState.getString("answer");
}
Log.i(TAG, "onCreate"
+ (null == savedState ? "" : (RESTORE + " " + answer)));
}
@Override
protected void onRestart() {![]()
super.onRestart();
// Notification that the activity will be started
Log.i(TAG, "onRestart");
}
@Override
protected void onStart() {![]()
super.onStart();
// Notification that the activity is starting
Log.i(TAG, "onStart");
}
@Override
protected void onResume() {![]()
super.onResume();
// Notification that the activity will interact with the user
Log.i(TAG, "onResume");
}
protected void onPause() {![]()
super.onPause();
// Notification that the activity will stop interacting with the user
Log.i(TAG, "onPause" + (isFinishing() ? " Finishing" : ""));
}
@Override
protected void onStop() {![]()
super.onStop();
// Notification that the activity is no longer visible
Log.i(TAG, "onStop");
}
@Override
protected void onDestroy() {![]()
super.onDestroy();
// Notification that the activity will be destroyed
Log.i(TAG,
"onDestroy "
// Log which, if any, configuration changed
+ Integer.toString(getChangingConfigurations(), 16));
}
// ////////////////////////////////////////////////////////////////////////////
// Called during the life cycle, when instance state should be saved/restored
// ////////////////////////////////////////////////////////////////////////////
@Override
protected void onSaveInstanceState(Bundle outState) {![]()
// Save instance-specific state
outState.putString("answer", state);
super.onSaveInstanceState(outState);
Log.i(TAG, "onSaveInstanceState");
}
@Override
public Object onRetainNonConfigurationInstance() { ![]()
Log.i(TAG, "onRetainNonConfigurationInstance");
return new Integer(getTaskId());
}
@Override
protected void onRestoreInstanceState(Bundle savedState) {![]()
super.onRestoreInstanceState(savedState);
// Restore state; we know savedState is not null
String answer = null != savedState ? savedState.getString("answer") : "";
Object oldTaskObject = getLastNonConfigurationInstance();
if (null != oldTaskObject) {
int oldtask = ((Integer) oldTaskObject).intValue();
int currentTask = getTaskId();
// Task should not change across a configuration change
assert oldtask == currentTask;
}
Log.i(TAG, "onRestoreInstanceState"
+ (null == savedState ? "" : RESTORE) + " " + answer);
}
// ////////////////////////////////////////////////////////////////////////////
// These are the minor life cycle methods, you probably won't need these
// ////////////////////////////////////////////////////////////////////////////
@Override
protected void onPostCreate(Bundle savedState) { ![]()
super.onPostCreate(savedState);
String answer = null;
// savedState could be null
if (null != savedState) {
answer = savedState.getString("answer");
}
Log.i(TAG, "onPostCreate"
+ (null == savedState ? "" : (RESTORE + " " + answer)));
}
@Override
protected void onPostResume() { ![]()
super.onPostResume();
Log.i(TAG, "onPostResume");
}
@Override
protected void onUserLeaveHint() { ![]()
super.onUserLeaveHint();
Log.i(TAG, "onUserLeaveHint");
}
}
When you are ready to run the application, first show the LogCat view by selecting Window→Show View→Other… and expanding the Android folder in the Show View dialog. Then select LogCat, as shown in Figure 11-1.
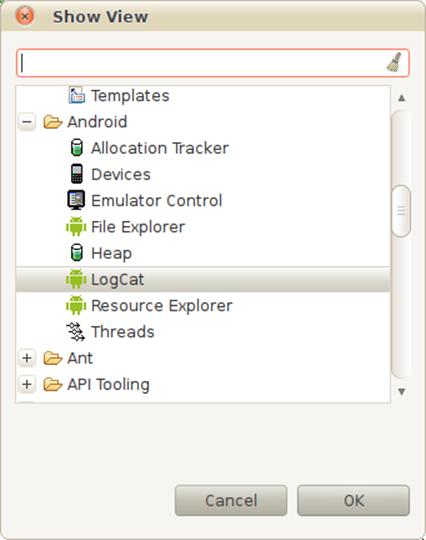
Figure 11-1. Selecting the LogCat view from the list shown
Now run the application in an emulator, or on a physical device. Since the example in this chapter has been built with both the Fragment API in Android API level 11, corresponding to Android version 3.0 “Honeycomb,” and the version of the Fragment class in the Android Compatibility Package, you can use either code base to run the example.
You will start to see logging information in the LogCat view in Eclipse. To see only the logging information from the code in the previous listing, you can filter the logging information. Click the green plus sign in the toolbar of the logging window to bring up a dialog for defining a logging filter, as shown in Figure 11-2.
In this case, you will want to filter the log based on the tag we use in the FinchLifecycle class, which happens to be the name of the class: “FinchLifecycle”. We name the filter “activity-lifecycle”, as shown in Figure 11-2.
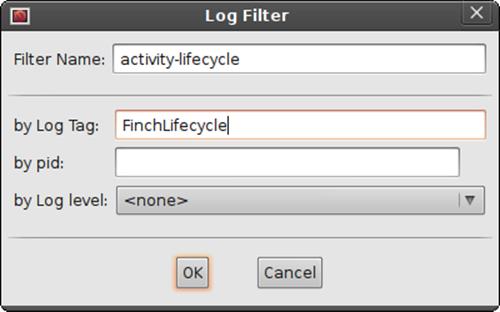
Figure 11-2. Making a filter that will show only log data tagging with “FinchLifecycle”
Now, when you run the program, you will see only the logging output for the activity life cycle methods in the tab labeled “activity-lifecycle” in the LogCat view, as shown in Figure 11-4. If you want to see all the logging information, the Log tab will show an unfiltered log.
When you run the program, you will see, if you use an emulator running Android 3.0, something like the screenshot in Figure 11-3.
We use Android 3.0 here because this chapter includes coverage of life cycles and the Fragment class.
TIP
If you want to run the example on a device or emulator that predates Android 3.0, you can use the “backported” version of the example that makes use of the Android Compatibility Package, which enables the use of Fragment and other Android API level 11 classes in Android versions back to API level 4, corresponding to Android 1.6.

Figure 11-3. The example code of this chapter running in an Android 3.0 emulator
The first thing you will see in the “activity-lifecycle” tab of the LogCat view is the set of log messages in Figure 11-4.
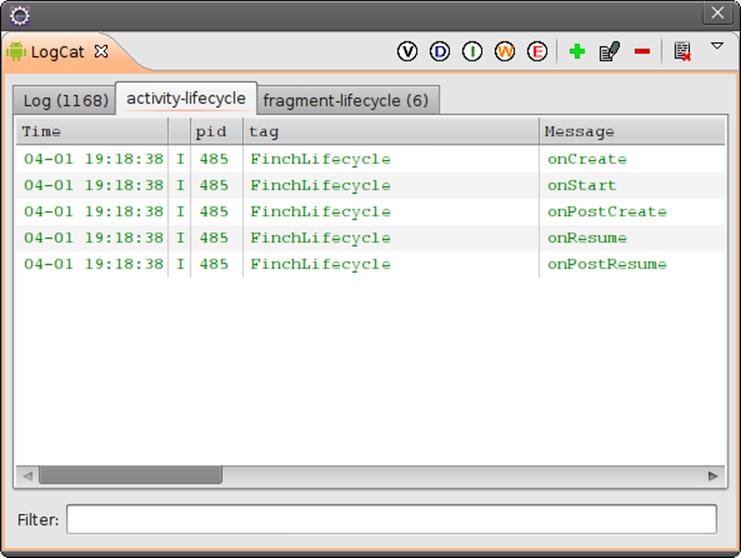
Figure 11-4. Logging output showing a new process and activity state being restored
In order to generate interesting logging information, you can start other applications and go back and forth, using the application switcher or the Launcher to return to the Finch application. Start enough other applications, and on returning to the Finch application, you will see that the process ID, or PID, has changed, but the application appears to be in the same state as you left it. This is because state was restored for this activity, and all other components of the application, from the saved state. The log information shown in the screenshot in Figure 11-5 shows just such a transition.
NOTE
If you find there is no output in the LogCat view, switch to the DDMS perspective (using the Window menu) and click on the device, or emulator, you are using in the Devices view.
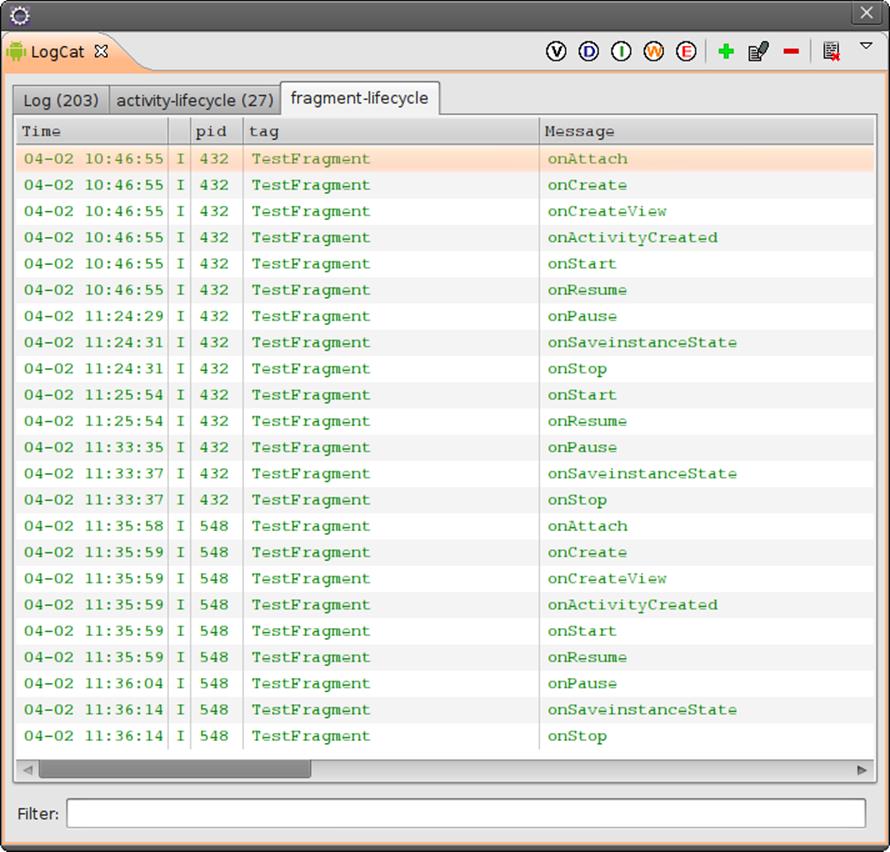
Figure 11-5. Logging output showing a new process and activity state being restored
By starting other applications that need memory, you have triggered some of the strategies Android uses to recover memory. Of course, since Android applications run in a virtual machine similar to a Java virtual machine, the first thing that happens is garbage collection, where the memory taken up by unused, unreferenced instances of objects is recovered. Android adds another strategy to garbage collection: activity components that are not visible to the user can have their state saved, and then they are “destroyed,” which really just means the system deletes its references to those components and they can then be garbage-collected. Android has yet another strategy for memory recovery: by telling all the components in an application to save their state, whole processes can be deleted and their memory recovered. This is how Android enables a form of “garbage collection” that spans multiple processes.
Memory recovery and life cycles
The life of an Android activity seems perilous and fleeting. An activity’s process can be killed or the Activity object destroyed, seemingly at the system’s whim. On top of that, you don’t even get a guarantee that all your life cycle method overrides will get called when the process is killed.
A good basis for understanding life cycles in Android is to focus on what happens when an Activity instance is destroyed, and when a process is killed:
Destroying an activity
An activity is destroyed and the onDestroy method is called when Android wants to discard this instance of the Activity class. “Discard” means that the Android system will set its references to the Activity instance to null. And that means that, unless your code is holding a reference to thisActivity, the Activity will, by and by, get garbage-collected. The word destroy is confusing to some—it implies actively wiping out something.
After the onDestroy method is called, you can be sure that this instance of your subclass of Activity will not be used again. But this does not necessarily mean that your application, or the process it is running in, is going to stop running. In fact, a new instance of the same Activity subclass could be instantiated and called. For example, this happens almost immediately after a configuration change (changing the screen orientation, for example) causes the previously used Activity object to be destroyed so that resource loading can start afresh for the new configuration.
Killing a process
When an Android system starts running out of memory, it finds processes to kill. Typically, Android applications run in separate processes, so garbage collection in one process can’t reach all the memory in an Android system. That means that in low-memory conditions, Android finds processes that do not have components that are in use and kills them. In extremis, Android will also kill processes that do have components that are being used. For simple applications, their process becomes a candidate for being killed after onPause has been called. That is, all the otherActivity life cycle methods that can be called after onPause have no guarantee they will be called if the Android system needs to acquire some free memory by killing a process.
In both of these cases, your application is likely to need to save some state that exists temporarily in the user interface of an application: various inputs the user entered that have not yet been processed, the state of some visual indicator that is not part of the data model, and so on. This is why each component of your application, and especially each activity, will need to override some life cycle methods.
Life cycle methods of the Activity class
Now that we know when and why the life cycle methods are called in general, let’s look at the individual methods in the previous program listing and see what they do:
![]()
The onCreate method is called after an Activity instance has been created. This is where most applications perform most of their initialization: reading in the layouts and creating View instances, binding to data, and so on. Note that, if this Activity instance has not been destroyed, nor the process killed, this is not called again. It is called only if a new instance of an Activity class is created. The argument to this method is a Bundle object that contains saved application state. If there is no saved state, the value of this argument is null.
![]()
The onRestart method is called only if an activity has been stopped. “Stopped” means the activity is not in the foreground, interacting with the user. This method is called before the onStart method.
![]()
The onStart method is called when the Activity object and its views become visible to the user.
![]()
The onResume method is called when the Activity object and its views become interactive with the user.
![]()
The onPause method is called when a different Activity instance is going to be visible and the current Activity has stopped interacting with the user.
![]()
The onStop method is called when an activity is no longer visible to, or interacting with, the user.
![]()
The onDestroy method is called when an Activity instance is going to be destroyed—no longer used. Before this method is called, the activity has already stopped interacting with the user and is no longer visible on the screen. If this method is being called as the result of a call tofinish, a call to isFinishing will return true.
Saving and restoring instance state
Memory recovery and the component life cycle is why your Activity subclasses need to save state. Here is how and when they should do it:
The Bundle class exists to hold serialized data in the form of key-value pairs. The data can be primitive types, or it can be any type that implements the Parcelable interface (see Parcelable). You can find out more about Bundle on the Android Developers site, athttp://developer.android.com/reference/android/os/Bundle.html. In saving Activity instance state, you will use the “put” methods of the Bundle class.
In the call to onCreate, and in the call to onRestoreInstanceState, a Bundle object is passed to the method. It contains data that a previous instance of the same Activity class put there in order to store it across instantiations. That is, if an Activity instance has state, apart from what is persisted in a data model, it can be saved and restored across multiple instances of that Activity class. To the user, it looks like she has picked up right where she left off, but she may be looking at an entirely new instance of an Activity class, possibly in an entirely new process.
You may have noticed that the onPause life cycle method does not provide a Bundle object for storing state. So when is state stored? There are separate methods in the Activity class for saving state, and for being notified that state is being restored:
![]()
This is where an application gets a chance to save instance state. Instance state should be state that is not persisted with an application’s data model, such as the state of an indicator or other state that is only part of the Activity object. This method has an implementation in the parent class: it calls the onSaveInstanceState method of each View object in this instance of Activity, which has the result of saving the state of these View objects, and this is often the only state you need to store this way. Data that your subclass needs to store is saved using the “put” methods of the Bundle class.
![]()
The onRestoreInstanceState method is called when there is instance state to be restored. If this method is called, it is called after onStart and before onPostCreate, which is a minor life cycle method described in Minor life cycle methods of the Activity class.
Configuration changes and the activity life cycle
Previously, we covered how you can provoke the Android system into killing the process that your activity, and every other component of your application, is running in by launching enough applications that some processes are killed. The logs you would see, and the one in the screenshot inFigure 11-5, show that the process ID changes, and that a new instance of the Activity subclass that defines how this application interacts with the user is created. This new instance reloads all the resources for this activity, and if there were any application data to be loaded, that would be loaded anew, too. The net effect is that the user proceeds as though nothing has happened: the new instance looks like the old one because it has the same state.
There is another way to force Android to use a new Activity instance: change the configuration of the system. The most common configuration change applications encounter is a change in screen orientation. But there are many dimensions to what counts as a new configuration: changes in whether a hard keyboard is accessible or not, changes in locale, changes in font size, and more. The common factor in all changes to configuration is that they can require resources to be reloaded, usually because they need layouts to be recalculated.
The easiest way to make sure every resource used in an activity is loaded anew in light of the new configuration is for the current instance of the activity to be discarded, and a new instance created, so that it reloads all resources. To cause this to occur while running the application in an emulator, press the 9 key on the numeric keypad. This changes the screen orientation in the emulator. In the log, you will see something like what is in the screenshot in Figure 11-6. You will see in the log that the onDestroy method is called since the Activity instance is discarded as part of changing configurations, not when the system, running low on memory, kills the process. You will also notice that across new instances of the Activity object the process ID stays the same—the system has no need to recover the memory the application is using.
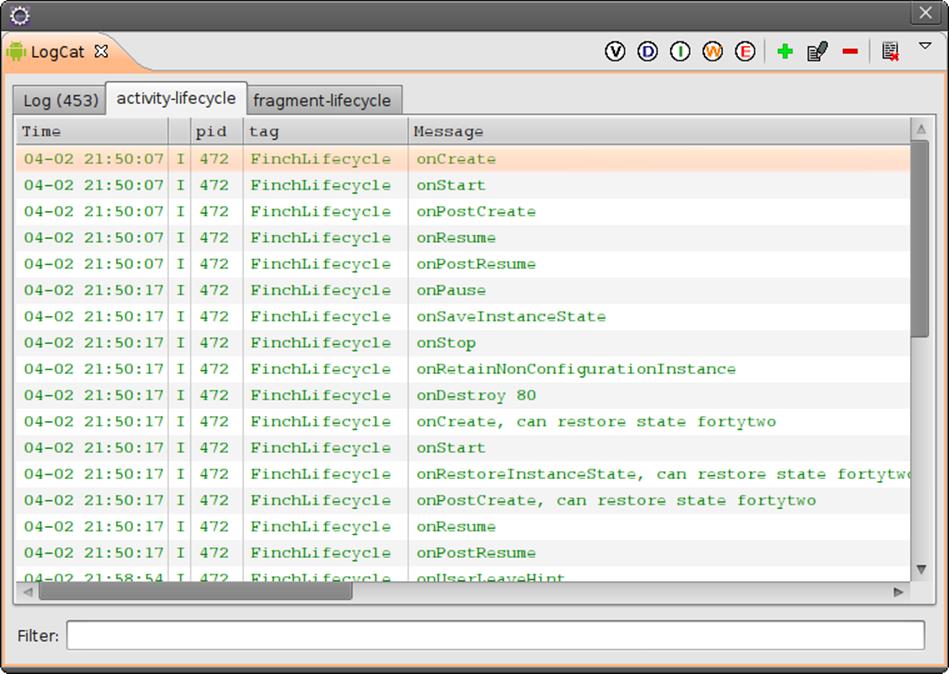
Figure 11-6. The PID remaining unchanged when the onDestroy method is called
This approach may seem profligate: a new instance of the Activity? What for? Why can’t I preserve this instance? Isn’t that going to be slow? In most cases, however, the resources loaded by an activity when it starts constitute most of the state of that Activity instance. In many cases, the largest amount of computation that takes place in an activity happens when it reads the XML file and calculates layouts. And, in most cases, a configuration change such as screen orientation or locale change requires nearly every resource to have its layout recalculated. So, turning a configuration change into what amounts to a restart of an activity is inevitable, as is the amount of processing that goes into that restart.
Keep in mind that the only thing going on when Android “destroys” an activity is that the reference to the activity is discarded, eventually to be garbage-collected. Every time the user moves from one activity to a new activity, all the computation that goes into creating that new activity is performed. Doing the same when a configuration change occurs is not an extraordinary amount of work for the system.
Minor life cycle methods of the Activity class
Several additional methods, other than the main life cycle methods used in the Android documentation to describe the activity life cycle, are also called as an activity moves through its life cycle:
![]()
The onPostCreate method is called after onRestoreInstanceState is called. It may be useful if your application requires that state be restored in two stages. It is passed a Bundle object containing instance state.
![]()
The onPostResume method is called after onResume, when the Activity instance should be visible and is interacting with the user.
![]()
The onUserLeaveHint method is called if an activity is going to stop being visible and interacting with the user due to the user’s actions—for example, pressing the back or home hard keys. This is a convenient place to clear alerts and dialogs.
You can see in the program listing in Figure 11-6 that we have implemented overrides of these methods in order to log when they are called. These methods exist for cases where, for example, you need an additional stage for restoring instance state.
However, if you really need to preserve some data across configuration changes, and it isn’t part of the state that gets stored in the Bundle object between instances, and it isn’t part of the data model that would get saved, you can use the onRetainNonConfigurationInstance method to “stash” a reference to an object. This reference can then be requested by a new Activity instance using the getLastNonConfigurationInstance method:
![]()
The onRetainNonConfigurationInstance method is called after onStop, which means there is no guarantee it will be called, nor even, if it is called, that the reference returned will be preserved and provided to the subsequent Activity instance. The getLastNonConfigurationInstance()method can be called in the onCreate method, or subsequently when restoring activity state.
To illustrate the use of these methods, we return an object containing the task ID of the activity when onRetainNonConfigurationInstance is called, and when onRestoreInstanceState(Bundle) is called, we check it to see that the task ID has not changed. This confirms that, even if the instance of the component or even of the whole process is different to the user, it’s the same task.
The most commonly cited use case for using these methods is to store the results of a web query: you could redo the query, but the latency of a query to a web server might be a few seconds. So, while the data can be re-created if the system cannot preserve it for the new Activity object instance to retrieve, there is a significant upside to caching it. However, in this book we show you, in Chapter 13, how to interpose a local database as a cache in RESTful applications, reducing the need for this kind of optimization.
Visualizing the Fragment Life Cycle
If you are developing for Android 3.0 “Honeycomb,” API level 11 or later, the Fragment API is available. If, however, you prefer to develop for a pre-Honeycomb version of Android and would like to use Fragment objects in your user interface, you can use the Android Compatibility Package, as described in Chapter 8. The example code for this chapter is provided in two forms: one that is set up to work with API level 11 as the target API, and one that can be targeted to API levels as low as API level 4, corresponding to Android 1.6. You will find the following Fragmentcode identical except for the package declaration for the Fragment class, and you will find it behaves identically with respect to the Fragment life cycle.
This code, like the Activity class presented earlier, instruments the life cycle callbacks so that they can be observed as the program runs:
package com.oreilly.demo.pa.ch10.finchlifecycle;
import android.app.Activity;
import android.app.Fragment;
import android.os.Bundle;
import android.util.Log;
import android.view.LayoutInflater;
import android.view.View;
import android.view.ViewGroup;
public class TestFragment extends Fragment {
// get a label for our log entries
private final String TAG = this.getClass().getSimpleName();
public TestFragment() {
}
@Override
public void onAttach(Activity activity) {![]()
super.onAttach(activity);
Log.i(TAG, "onAttach");
}
@Override
public void onCreate(Bundle saved) {![]()
super.onCreate(saved);
if (null != saved) {
// Restore state here
}
Log.i(TAG, "onCreate");
}
@Override
public View onCreateView(LayoutInflater inflater, ViewGroup container,![]()
Bundle saved) {
View v = inflater.inflate(R.layout.fragment_content, container, false);
Log.i(TAG, "onCreateView");
return v;
}
@Override
public void onActivityCreated(Bundle saved) {![]()
super.onActivityCreated(saved);
Log.i(TAG, "onActivityCreated");
}
@Override
public void onStart() {![]()
super.onStart();
Log.i(TAG, "onStart");
}
@Override
public void onResume() {![]()
super.onResume();
Log.i(TAG, "onResume");
}
@Override
public void onPause() {![]()
super.onPause();
Log.i(TAG, "onPause");
}
@Override
public void onStop() {![]()
super.onStop();
Log.i(TAG, "onStop");
}
// ////////////////////////////////////////////////////////////////////////////
// Called during the life cycle, when instance state should be saved/restored
// ////////////////////////////////////////////////////////////////////////////
@Override
public void onSaveInstanceState(Bundle toSave) {![]()
super.onSaveInstanceState(toSave);
Log.i(TAG, "onSaveinstanceState");
}
}
As you did with the LogCat filter for finding the log entries that show Activity component callbacks, you will set up a filter for Fragment callbacks.
If you repeat the steps you took—starting other applications until you see in the LogCat window that the Fragment life cycle methods are being called—you will see that each Fragment instance in an Activity instance behaves like the enclosing Activity with respect to the Views it contains. Similar life cycle transitions and states are called.
Let’s take a look at each method that gets called, now that we know when they are called:
![]()
The onAttach method is called when the Fragment instance is associated with an Activity instance. This does not mean the Activity is fully initialized.
![]()
The onCreate method is called when the Fragment instance is being created, or re-created. If it is being re-created after the Fragment or the containing Activity component has been destroyed, the bundle argument will be non-null if any state had been saved.
![]()
The onCreateView method is called when the Fragment instance should create the View object hierarchy it contains. Fragment has an unusual role in an Activity: it behaves somewhat like a ViewGroup, but it isn’t part of the View class hierarchy. You can think of it as enabling the Activityto contain multiple sets of View instances. In our example, we load an extremely simple layout containing a TextView.
![]()
The onActivityCreated method is called when the Activity containing the Fragment instance has been created, and the View objects contained by the Fragment have been created. At this point, it is safe to search for View objects by their ID, for example.
![]()
The onStart method is called when the Fragment becomes visible, in a very similar way to the Activity method onStart.
![]()
The onResume method is called when the Fragment becomes visible, and is running.
![]()
The onPause method also is called under the same conditions as an Activity instance’s onPause method when the Fragment is about to be taken out of the foreground.
![]()
The onStop method is called when the Fragment is about to stop running.
![]()
The onSaveInstanceState method is called when it is necessary to save instance state so that if the instance is destroyed (really, just dereferenced) any class-specific state that needs to be stored can be stored in the Bundle object passed to this call.
Fragment objects are not components. You can think of them as a way of breaking up an Activity object into multiple objects contained within an Activity, each with its own View hierarchy that behaves like it is inside an Activity.
The Activity Class and Well-Behaved Applications
Understanding application life cycles is key to implementing well-behaved applications, and it is also key to understanding misbehaving applications. Lagging performance, excessive resource use, and unexpected user interface behavior can often be diagnosed by observing the application’s life cycle. Life cycle is difficult to understand just by looking at code or the documentation page for the Activity class. To enable you to observe life cycle as it is happening, we will put logging calls into our implementations of Android life cycle methods, run the programs, and observe how life cycle works in a running program. In using this framework, you can leave these logging calls in your application’s code as you develop it because applications often come to need logging in these methods to diagnose problems.
Most of the methods called on changes in life cycle are implemented on a per-component basis, and some on a per-process basis. Each type of component—Service, BroadcastReceiver, ContentProvider, and Activity—has its own life cycle. Life cycles of components other than Activity are covered in Chapter 3. Most life cycles are simpler than the Activity life cycle. This is because the Activity class interacts with the user, and when an Activity is no longer a visible part of the user interface, it is likely that the memory occupied by resources associated with that Activity instance could be scavenged if needed. Managing memory occupied by resources related to components is one of the principal purposes of component life cycles.
The Activity Life Cycle and the User Experience
In fact, if your application is well designed for the mobile environment in general, it will need less code in application life cycle management:
§ If the data used by an activity is always up-to-date and in a database, you will not have to explicitly store it in the code in an application life cycle method.
§ If your user interface has minimal state, you won’t have to save much, if any, state in an activity life cycle method.
These seem like stringent constraints, but in mobile and other appliance-like devices, they are not. The battery on a mobile phone can die at any time, and the less an application’s data model and state are held in memory, the less the user will lose when the device shuts off unexpectedly. A mobile user may be interrupted by a phone call and the user will never get a chance to return to an application to perform operations that save data. Mobile applications are not intended to work like typical interactive applications on personal computers, with documents on filesystems that become in-memory data models, to be explicitly saved, or else the data is lost.
In this chapter and the next, you will see that application life cycle, the data model and other aspects of application architecture, and the user experience are all intertwined, and that the path of least resistance, and least implementation in life cycle methods, leads to application implementations that are robust, are easy to use, are good citizens of the Android environment, and perform well. If you treat a battery failure the same as the user no longer using an activity or the same as the system killing an activity to claw back memory and other system resources, you will simplify your implementation and unburden the user. Explicit actions such as “save” and “quit” should be avoided in the mobile user experience, and in the implementation of well-behaved applications.
Life Cycle Methods of the Application Class
The life cycle methods of the Application class are, and should be, infrequently used in simple applications. And they should be used with restraint even in complex applications. Is is easy to bloat Application class overrides with data that hangs around in memory across multiple activities. This defeats Android’s ability to manage resources on a per-component basis. For example, if you move the reference to some data from an Activity object to the Application object, all you have done is extend the system’s chase for resources in a low-memory situation to the application life cycle, and you must manage this data separately from the activity life cycle.
Here, we implement the life cycle methods of the Application class to show their place in the Android application life cycle, and because logging information from these methods may be useful:
package com.finchframework.finch;
import android.app.Application;
import android.content.res.Configuration;
import android.util.Log;
/**
* @author zigurd
*
* This the framework's Application subclass. This illustrates what
* you may need to do in an Application subclass.
*
* To get this class instantiated, you must refer to it in the
* application tag of the manifest.
*/
public class FinchApplication extends Application {
private final String TAG = this.getClass().getSimpleName();
@Override
public void onCreate() {
// First, call the parent class
super.onCreate();
// This is a good place to put code that must manage global data across
// multiple activities, but it's better to keep most things in a
// database, rather than in memory
Log.i(TAG, "onCreate");
}
@Override
public void onTerminate() {
Log.i(TAG, "onTerminate");
}
@Override
public void onLowMemory() {
// In-memory caches should be thrown overboard here
Log.i(TAG, "onLowMemory");
}
@Override
public void onConfigurationChanged(Configuration newConfig) {
Log.i(TAG, "onConfigurationChanged");
if (Log.isLoggable(TAG, Log.VERBOSE)) {
Log.v(TAG, newConfig.toString());
}
}
}
Earlier we mentioned that many applications can do without subclassing Application. Because of this, the New Android Project Wizard does not create an Application subclass, nor does it add a reference to it in the manifest. Like the initial object that gets started when an interactive application starts, the Application subclass you create gets instantiated by the Android system as part of launching an application. In much the same way as Android handles Activity subclasses, it knows which class to make an instance of, and uses the android:name property of the applicationtag in the manifest. The easiest way to get this right is by using the Application tab of the manifest editor. The first field on that editing tab is labeled Name (see Figure 11-7). Clicking the Browse button next to that field shows the Application subclasses in your application.
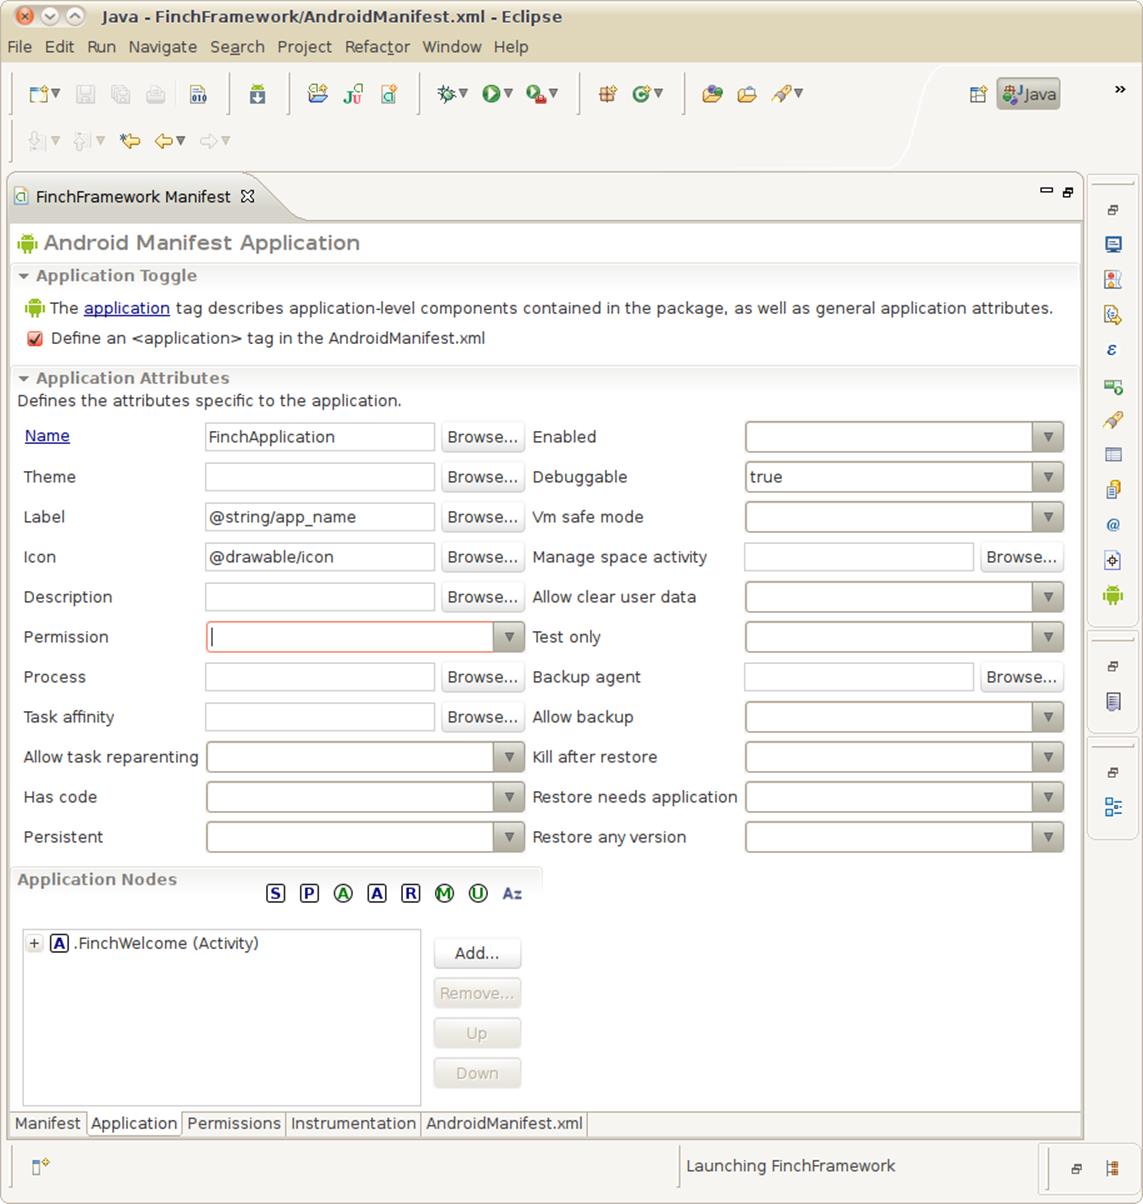
Figure 11-7. The Name field on the Application tab of the manifest editor, where you enter the name of the Application subclass you have defined
As with the Activity class’s life cycle methods, it is most revealing to know when life cycle methods get called. You can, of course, find this out by debugging an application and setting breakpoints in each method, but often the most informative information is found by looking at long-running applications’ behavior, and filtering a log by the tags used in the Activity and Application subclasses, to get an idea of when life cycle methods have been called.
Two of the most interesting callbacks to track in the Application class are onLowMemory and onTerminate, which will tell you when, obviously enough, the system thinks it is in a low-memory condition and when your application terminates. The second situation is usually not obvious because most Android applications do not need to explicitly exit, since Android’s memory management, in concert with component life cycles, is enough to sweep out unused code if it was correctly implemented with respect to life cycle and memory management.
A Flowing and Intuitive User Experience Across Activities
After the basics of the life cycle of an activity, navigation and flow from one activity to another is the next most fundamental aspect of the architecture of Android applications, and it goes hand in hand with life cycle. In a mobile device with a small screen, an intuitive flow among multiple screens is key to maximizing the visual information the user can access and use. When applications are correctly implemented and maximally cooperative, a user may navigate among several activities, each of which is implemented in a separate application, and think he has used only one application.
Multitasking in a Small-Screen Environment
Keeping track of multiple tasks—multiple programs, documents, and so forth—in a personal computer’s user interface is something so commonplace that you may not think much about how it is accomplished. Multiple documents, overlapping windows, and a mouse pointer are all ingredients of a user interface paradigm called the “desktop metaphor.” Your personal computer screen is a metaphor for a real desk, with overlapping documents on it. Move a document to the top by selecting it with the pointer, and it becomes the document you are working on.
On a small screen, the entire screen is devoted to a single task, and the concept of a task, and task switching, is inherently less visual. In mobile user interfaces, a back stack—a stack of activities you can go back to—is often a central concept. In Android, the back stack is called the “activity stack.”
Tasks and Applications
If an activity is the basic unit of Android user interaction, a “task” is the next-larger grouping. In Android, the word task does not denote an executable object such as a process or application; instead, it refers to a single activity stack with, potentially, multiple activities from multiple applications in it. Those activities can be implemented in multiple separate applications, as shown in Figure 3-3 in Chapter 3. As the user interacts with the system, sometimes one activity will, by way of an Intent object, ask the system to find an activity that matches the intent’s specifications. If that activity is in another application, it usually becomes part of the task the user began when she launched an application from the Launcher or Home screen shortcut.
When the user launches what she thinks of as an application, she also starts the “root activity” of a task. This becomes concrete to the user through Android’s methods of task switching: after an application has been launched, pressing an application icon in the Home activity, or the Recent Tasks switcher that pops up when you long-press the Home button, returns to an already-started task (in most cases).
Tasks are not processes. In fact, the process for the current activity of a task may have been killed, but it will be restarted, and a new instance of the Activity object instantiated, and its state restored, when the user switches to that task. The user doesn’t have to concern herself with how memory is managed. The Android system will restore processes and activities in a task as the user needs them.
Android provides developers with rich control over the behavior of tasks. Used correctly, your control over task behavior will reinforce the Android concept of tasks and make the user feel as though the back button always does what she expects. If it’s used incorrectly or in poor taste, the user may find herself asking, “How did I get here?”
Specifying Launch and Task Behavior
Tasks are not represented by a class in the Android APIs, and you won’t be controlling task objects with method calls. Task behavior is set by parameters in an application’s manifest. Task behavior can also be modified as part of creating and using an intent. As you will see from the explanation of how task behavior is controlled, activity life cycle and task behavior are intertwined.
Launch mode
An activity’s launch mode is an attribute set in the activity tag in an application’s manifest. This attribute affects task behavior and, indirectly, life cycle.
The android:launchMode attribute has four valid values, which are mutually exclusive:
"standard"
The "standard" launch mode is the default. With this value of the android:launchMode attribute, an activity can be launched multiple times, with multiple instances of this Activity class existing at the same time. These instances may belong to multiple tasks, usually the task that owns the component that called startActivity() to cause the activity to be launched. The diagram in Figure 11-8 shows multiple instances of an activity at the top of a task.
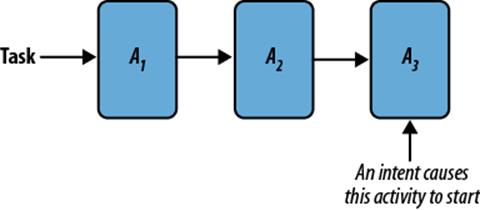
Figure 11-8. The standard launch mode, which creates a new activity
"singleTop"
The "singleTop" launch mode differs from "standard" in that, if an instance of an activity with this value of the android:launchMode attribute already exists, and is in the task that would own the activity to be launched, and is at the top of the activity stack, the existing activity gets the Intentobject via the onNewIntent() method, rather than a new activity being started. The diagram in Figure 11-9 shows a single instance of a "singleTop" activity at the top of a task.
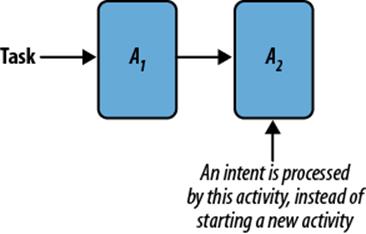
Figure 11-9. The singleTop launch mode, which causes the intent to be processed by the top activity if it matches the intent
"singleTask"
The "singleTask" launch mode specifies that the activity to be launched is the root of a new task, unless an instance of this activity already exists, in which case the behavior is like "singleTop", and the Intent object associated with launching this activity is processed through a call toonNewIntent().
"singleInstance"
The "singleInstance" launch mode specifies that the activity to be launched is the root of a new task, and it specifies that any activity launched by this activity is also in a new task, ensuring that this activity is the one and only activity in its task.
Task affinity
The android:taskAffinity attribute can be set to be the same as the value of an android:name attribute of an activity. If it is not set, the default value is the name of the package specified in the <manifest> tag.
Task affinity is used to put an activity in a specific task. That is, if you do not want the default behavior in Android, where new activities become part of the task that started those activities, task affinity enables you to override that behavior and specify the desired task, which usually is a task associated with the application that implements this activity.
Other activity attributes affecting task behavior
Other attributes that modify task behavior include the android:noHistory attribute. If this attribute is set to true the activity is not placed on the activity stack when the user navigates away from it. This is useful for activities such as log in screens that should not be revisited, except when authentication is actually required.
The android:process attribute can be set to the name of a process in which the activity should run, instead of the process created for the first component to run in an application. This attribute is notable mainly because it does not affect task 'margin-bottom:0cm;margin-bottom:.0001pt;line-height: normal;vertical-align:baseline'>The android:finishOnTaskLaunch attribute causes any other instance of this activity to be finished when a new instance is launched. Using this attribute ensures that these kinds of activities are never stacked, and appear only once among all activities in all tasks.
The android:alwaysRetainTaskState attribute tells the Android system, if it is set to true, that the stack of activities above a root activity should never be cleared. By default, the system can clear the activity stack above a root activity after an interval in which the task has not been used.
Modifying task behavior with intent flags
Most task behavior is determined by attributes in the activity tag of the manifest. The exception to this is in a set of flags that can be set in an Intent object.
There is a surprisingly large number of ways to modify task behavior in intent flags. Some are obviously useful, but some are just perplexing, in an area of functionality that is perplexing enough as it is:
FLAG_ACTIVITY_BROUGHT_TO_FRONT
This flag is used by the system to implement the behavior to be used when an Activity has the singleTask or singleInstance launch mode attribute specified.
FLAG_ACTIVITY_CLEAR_TASK
This flag indicates the tasks to be cleared before the new activity starts. This means the new activity is the new root activity of the task.
FLAG_ACTIVITY_CLEAR_TOP
This flag has the effect of putting the activity the Intent object matches on top of the activity stack, if it is in the activity stack of the current task, by finishing all activities on top of the one the Intent object matches. The activity that ends up at the top of the activity stack is itself finished and re-created, unless it is capable of receiving a new intent via the onNewIntent() method.
FLAG_ACTIVITY_CLEAR_WHEN_TASK_RESET
This flag indicates that the activity being launched is the activity that should be on top of the activity stack if the task is reset. “Reset” means the top of the activity stack is cleared. This is done after some time has passed.
FLAG_ACTIVITY_EXCLUDE_FROM_RECENTS
The activity started with this flag is not saved on the activity stack.
FLAG_ACTIVITY_FORWARD_RESULT
This flag means the new activity can provide a result to the activity that launched the current activity. In other words, “Here, you answer this.”
FLAG_ACTIVITY_LAUNCHED_FROM_HISTORY
This flag means the new activity was launched from the “recents” menu to replace an instance that had been destroyed.
FLAG_ACTIVITY_MULTIPLE_TASK
This flag means the new activity can be the root of multiple tasks, and if used with FLAG_ACTIVITY_NEW_TASK, in fact creates multiple tasks. This can be confusing to the user, since the Android system does not provide the user with a way to distinguish among multiple tasks with the same root activity.
FLAG_ACTIVITY_NEW_TASK
This flag means the new activity is the root of a new task, unless FLAG_ACTIVITY_MULTIPLE_TASK is also set, in which case multiple tasks with the same root activity are created and the aforementioned cautions apply.
FLAG_ACTIVITY_NO_ANIMATION
This flag suppresses transition animation.
FLAG_ACTIVITY_NO_HISTORY
The new activity is not on the back stack. It is the same as the noHistory attribute.
FLAG_ACTIVITY_NO_USER_ACTION
This flag suppresses the onUserLeaveHint callback for the current activity. Assuming this callback is used to clear alerts, the alerts will stay up. This is useful for activity transitions the user did not initiate, such as displaying an incoming call or message.
FLAG_ACTIVITY_PREVIOUS_IS_TOP
This flag means the new activity will not be treated as the top of the activity stack, and the previous top activity will be treated as the top for the purposes of deciding whether the intent should be delivered to the top activity, or whether a new activity should be created. There is no known use case for this flag.
FLAG_ACTIVITY_REORDER_TO_FRONT
If the activity is already running, it will be raised to the top of the activity stack and made visible.
Some of these flags have been added since API level 1, and are ignored in earlier APIs.
Some of these flags have the effect of overriding task behavior set in the manifest. Some flags affect other behavior, such as transition animations. And in some cases, a flag in an Intent object is the only way to modify task behavior.
Use all of these with caution. Unexpected task behavior can destroy the user’s sense of place in the Android UI.
All materials on the site are licensed Creative Commons Attribution-Sharealike 3.0 Unported CC BY-SA 3.0 & GNU Free Documentation License (GFDL)
If you are the copyright holder of any material contained on our site and intend to remove it, please contact our site administrator for approval.
© 2016-2025 All site design rights belong to S.Y.A.