Programming Android (2011)
Part IV. Advanced Topics
Chapter 16. Sensors, NFC, Speech, Gestures, and Accessibility
Thanks to advances in technology, both the environment and the user can interact with devices in a variety of ways, from external sensors that can detect when a device has changed orientation within an environment, to touch-screen adaptations that enable complex gestures to trigger an event within the device. Android provides APIs that enable the developer to access these sensors and the user to interact with these devices in a variety of ways. In this chapter, we will explore some of these APIs—sensors, NFC (Near Field Communication), the Gesture libraries, and accessibility.
Sensors
The modern smartphone provides more than just the ability to send and receive communication in various forms. The addition of external sensors that can report information about the environment the phone is in has made the phone more powerful and useful for the user as well as the developer. Starting with Android 1.5 (API level 3), a standard set of sensors are available. The physical sensors include, but are not limited to, accelerometers that measure acceleration along various axes, gyroscopes that measure rotational change around some axes, magnetic field sensors that sense the strength of magnetic fields along a set of axes, a light sensor that measures the amount of ambient light, a proximity sensor that measures external objects’ proximity to the device, temperature sensors that measure ambient temperature, and pressure sensors that act as a barometer. The direct measured value of each sensor is considered a raw measurement, and thus the associative sensor is a “raw sensor.” With some of the sensors, the measurements can be combined or collected and calculations can be made over the collected measurements to show a more complex measurement. For example, by integrating the gyroscope’s measurements of rotational change over time you can measure the rotational vector. This sort of complex measurement is often derived from a composite sensor.
To access a sensor or set of sensors, Android provides a convenient system service called the SensorManager. This can be accessed via the getSystemService() method of the Context with the argument of Context.SENSOR_SERVICE. With the SensorManager you then can get a specific sensor via thegetDefaultSensor() method.
However, a composite sensor may sometimes be returned, so if you wish to get access to the raw sensor and its associated data, you should use getSensorList():
SensorManager mngr =
(SensorManager) context.getSystemService(Context.SENSOR_SERVICE);
// getting the default accelerometer
Sensor accel = mngr.getDefaultSensor (Sensor.TYPE_ACCELEROMETER);
// getting the raw accelerometer
List<Sensor> list = mngr.getSensorList(Sensor.TYPE_ACCELEROMETER);
Once you get a sensor or set of sensors, you can actually enable them and start getting their data by registering a listener against the sensors. Data should begin to come in at the rate you give as an argument. This rate can be SENSOR_DELAY_NORMAL, SENSOR_DELAY_UI (a rate appropriate for basic UI interaction), SENSOR_DELAY_GAME (a high rate that many games would find sufficient), SENSOR_DELAY_FASTEST (“give it to me as fast as you can”), or a specified delay between events in units of milliseconds:
SensorEventListener listener = new SensorEventListener() {
@Override
public void onAccuracyChanged(Sensor sensor, int accuracy) { }
@Override
public void onSensorChanged(SensorEvent event) { }
};
// registering a listener
mngr.registerListener(listener, sensor, SensorManager.SENSOR_DELAY_UI);
The two methods in a SensorEventListener—onAccuracyChanged() and onSensorChanged()—are called when data from the sensor in question is available. onAccuracyChanged() is called whenever a change to the degree of error or accuracy with the sensor occurs. The onSensorChanged() method is perhaps the more interesting method, in that the data the sensor is measuring is passed to it wrapped in a SensorEvent object.
It is incredibly important to unregister the listener and thus disable the sensor when you no longer need it (e.g., when an activity is paused); otherwise, the device will continue to use resources and drain power. The system will not take care of this for you even when the screen is turned off:
mngr.unregisterListener(listener);
While the sensor is on, SensorEvent is passed to the listener via the onSensorChanged() method. It is in this SensorEvent’s values that each sensor type differs.
Position
The phone’s coordinate system is based on the screen and default orientation of the phone. The x-, y-, and z-axes are as shown in Figure 16-1 and work as follows:
x-axis
Horizontal, with positive values to the right and negative values to the left
y-axis
Vertical, with positive values upward and negative values downward
z-axis
Positive values coming out of the screen toward the front and negative values behind the screen (the z zero point rests on the screen)
When the user moves the phone, the axes follow the phone’s movement and do not swap places.

Figure 16-1. Phone coordinate system
The accuracy and variance of the various sensors depend on the quality of hardware. In many cases, significant levels of jitter/noise will need to be eliminated (through the use of low-pass filters, for example). The type of filter and its construction is up to the developer to design and create.
Accelerometer
The accelerometer measures the acceleration applied to the device and returns values along the three axes (value[0] for the x-axis, value[1] for the y-axis, and value[2] for the z-axis). The values are in SI units (m/s2). It is important to note that the force of gravity is not eliminated from the values returned. Thus, when the device is sitting on a table (say, face up) value[2] will read 9.81 m/s2.
Since it became a fairly common need to eliminate or determine the force of gravity along the various axes, Android 2.3 (API level 9) also supports a linear acceleration sensor and a gravity sensor, discussed later in this chapter.
Gyroscope
The gyroscope measures the angular speed or rate of rotation around the three axes. All values are in radians/second. Rotation is positive in the counterclockwise direction. That is, an observer looking at the device screen normally—located at 0, 0, 100 in device coordinates—would report positive rotation if the device appeared to be rotating counterclockwise. Since this is angular speed, to calculate an angle you must integrate the values over a period of time:
private static final float NS2S = 1.0f / 1000000000.0f;
private float timestamp;
private float[] angle;
@Override
public void onSensorChanged(SensorEvent event) {
float gyrox = event.values[0];
float gyroy = event.values[1];
float gyroz = event.values[2];
// here we integrate over time to figure out the rotational angle around each axis
if (timestamp != 0) {
final float dT = (event.timestamp - timestamp) * NS2S;
angle[0] += gyrox * dT;
angle[1] += gyroy * dT;
angle[2] += gyroz * dT;
}
timestamp = event.timestamp;
}
Since this is a common problem set, Android 2.3 (API level 9) supports a rotation vector sensor, which we discuss in the following section.
Rotation vector
The rotation vector, in Android 2.3 and later versions, represents the orientation of the device as a combination of an angle and an axis, in which the device has rotated through an angle Θ around an axis <x, y, z>. Even though this can be calculated via the gyroscope, many developers ended up doing this often enough that Google provided the rotation vector to help simplify the use case.
The three elements of the rotation vector are <x*sin(Θ/2), y*sin(Θ/2), and z*sin(Θ/2)>, such that the magnitude of the rotation vector is equal to sin(Θ/2) and the direction of the rotation vector is equal to the direction of the axis of rotation. The three elements of the rotation vector are equal to the last three components of a unit quaternion <cos(Θ/2), x*sin(Θ/2), y*sin(Θ/2), and z*sin(Θ/2)>. Elements of the rotation vector are unitless.
Linear acceleration
Another sensor type is supported by Android 2.3 (API level 9) to simplify a common calculation with the use of the accelerometer. The value sent is a three-dimensional vector indicating acceleration along each device axis, not including gravity. This means the values are the result of linear acceleration on each axis minus the effects of gravity along that axis. This makes it easier to filter out gravity’s constant effects for those of us using the phone while on Earth. All values have units of m/s2.
Gravity
The values resulting from this sensor make up a three-dimensional vector indicating the direction and magnitude of gravity. This too is an Android 2.3 (API level 9) sensor that provides a common calculation. Units are m/s2.
Other Sensors
Android also supports the following sensors:
Light
This sensor provides a single-valued array (value[0]) that represents the ambient light level in SI lux units (lx).
Magnetic
This sensor measures the ambient magnetic fields in microteslas (μT) along the x-, y-, and z-axes.
Pressure
Not many devices provide this sensor. Those that do will provide the values in kilopascals (kPa).
Proximity
This sensor measures a single-valued array (value[0]) representing distance measured in centimeters (cm) to the sensor. In some cases, the proximity sensor may provide only a “near” (0) versus “far” (1) binary measurement. In that case, a distance equal to or greater than the sensor’sgetMaximumRange() value will return “far” and anything less than that will return “near.”
Temperature
This is another sensor that not many devices provide. The values will be in centigrade (C).
Near Field Communication (NFC)
Near Field Communication is a short-range (up to 20 cm), high-frequency, wireless communication technology. It is a standard that extends the Radio Frequency Identification (RFID) standard by combining the interface of a smartcard and a reader into a single device. This standard is primarily built for mobile phone use, and thus is attracting a lot of attention among vendors that are interested in contactless data transmission (such as credit card sales). The standard enables NFC to be used in three specific ways:
Card emulation
The device is a contactless card (and thus can be read by other readers).
Reader mode
The device can read RFID tags.
P2P mode
Two devices can communicate back and forth and exchange data.
In Android 2.3 (API level 9), Google introduced the Reader Mode NFC functionality. Starting in Android 2.3.3 (API level 10), the ability to write data to an NFC tag and exchange data via P2P mode is also available.
NFC tags consist of data encoded in NFC Data Exchange Format (NDEF), a message format specified by the NFC Forum Type 2 Specification. Each NDEF message consists of one or more NDEF records. The official technical specification for NFC can be found at http://www.nfc-forum.org/. To develop and test an NFC reading application it is highly suggested that you get an NFC-compliant device (such as the Nexus S, at http://www.google.com/phone/detail/nexus-s) and an NFC-compliant tag.
To use NFC functionality in your application, you need to declare the following permission in your manifest:
<uses-permission android:name="android.permission.NFC" />
To restrict the installation of the application to devices that can use NFC, add the following to your manifest as well:
<uses-feature android:name="android.hardware.nfc" />
Reading a Tag
Reader mode is for receiving notices when an RFID/NFC tag is scanned. In Android 2.3 (API level 9), the only means to do this is to create an Activity that listens for the android.nfc.action.TAG_DISCOVERED intent, which is broadcast when a tag is read. Android 2.3.3 (API level 10) offers a more comprehensive means to receive this notice, following the process shown in Figure 16-2.
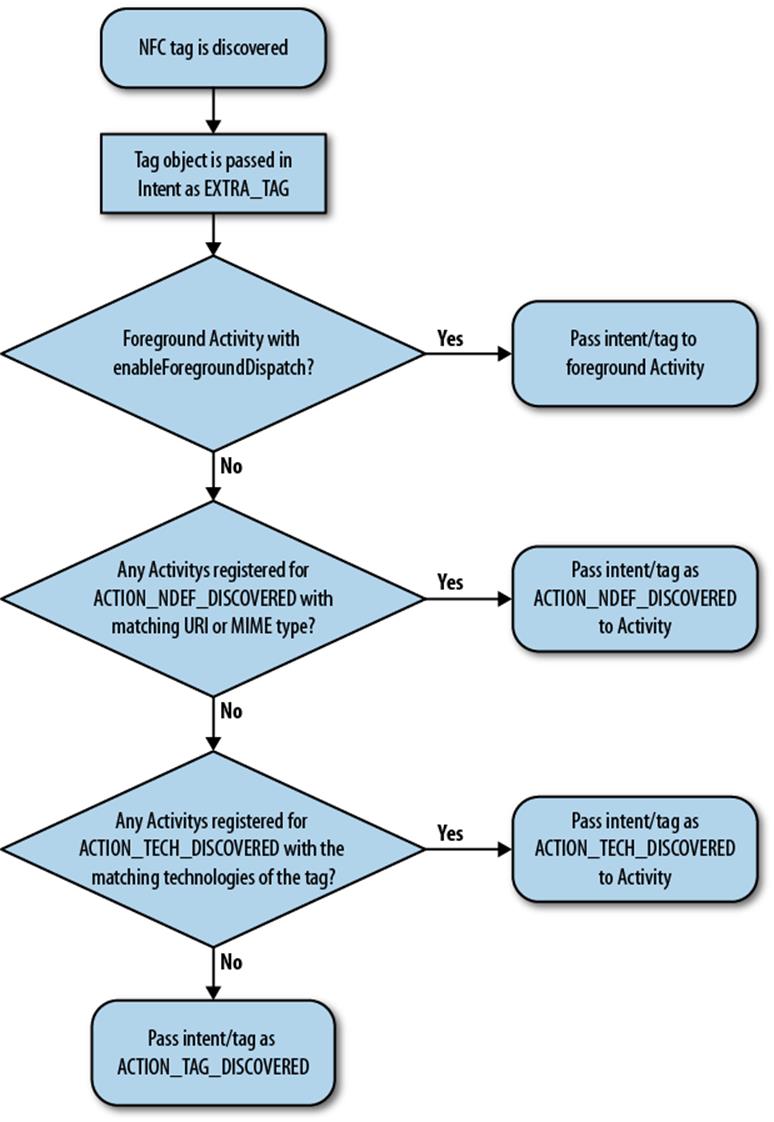
Figure 16-2. NFC tag flow in Android 2.3.3 (API level 10)
In Android 2.3.3 (API level 10) and later, when an NFC tag is discovered the tag object (a Parcelable) is placed into an Intent as an EXTRA_TAG. The system then begins to follow a logic flow to determine the best Activity to which to send the intent. This is designed to give a high probability of dispatching a tag to the correct activity without showing the user an activity chooser dialog (i.e., in a transparent manner), and thus prevent the connection between the tag and the device from being broken by unneeded user interaction. The first thing that is checked is whether there is anActivity in the foreground that has called the enableForegroundDispatch() method. If so, the intent is passed to the Activity and things stop there. If not, the system inspects the first NdefRecord in the first NdefMessage of the tag’s data. If the NdefRecord is URI, Smart Poster, or MIME data, the system then checks for an Activity registered for the ACTION_NDEF_DISCOVERED intent (android.nfc.action.NDEF_DISCOVERED) with that type of data. If this exists, the Activity that matches (the narrower the match, the better) receives the intent and things stop there. If this is not the case, the system seeks an Activity that is registered for ACTION_TECH_DISCOVERED and that matches the specific set of technologies of the tag (again, the narrower the match, the better). If there is a match, the intent is passed to that Activity and everything is settled. However, should no Activity exist that passes the prior checks, the intent is finally passed as an ACTION_TAG_DISCOVERED action, much as Android 2.3 (API level 9) handles the tag.
To set up a foreground Activity to be the first to receive the tag, you must retrieve the NFC device adapter and call enableForegroundDispatch with the Activity’s context reference. The actual NFC device adapter is represented by the NfcAdapter class. To retrieve the actual adapter of the device,issue getDefaultAdapter() in Android 2.3 (API level 9) or getDefaultAdapter(context) in Android 2.3.3 (API level 10):
NfcAdapter adapter = NfcAdapter.getDefaultAdapter();
// --- for API 10 only
// NfcAdapter adapter = NfcAdapter.getDefaultAdapter(context);
if(adapter != null) {
// true if enabled, false if not
boolean enabled = adapter.isEnabled();
}
Once the NFC device adapter is retrieved, construct a PendingIntent and pass it to the enableForegroundDispatch() method. This method must be called from the main thread and only when the Activity is in the foreground (after onResume() has been called):
PendingIntent intent =
PendingIntent.getActivity(this, 0,
new Intent(this, getClass()).addFlags(Intent.FLAG_ACTIVITY_SINGLE_TOP),
0);
NfcAdapter.getDefaultAdapter(this).enableForegroundDispatch(this, intent,
null, null);
It is extremely important that when the Activity leaves the foreground (when onPause() is called) you call the disableForegroundDispatch() method:
@Override
protected void onPause() {
super.onPause();
if(NfcAdapter.getDefaultAdapter(this) != null)
NfcAdapter.getDefaultAdapter(this).disableForegroundDispatch(this);
}
}
In the case of registering an Activity for ACTION_NDEF_DISCOVERED, the Activity must have android.nfc.action.NDEF_DISCOVERED as an intent-filter and any specific data filters in the manifest file:
<activity android:name=".NFC233">
<!-- listen for android.nfc.action.NDEF_DISCOVERED -->
<intent-filter>
<action android:name="android.nfc.action.NDEF_DISCOVERED"/>
<data android:mimeType="text/*" />
</intent-filter>
</activity>
This goes for the TECH_DISCOVERED case as well (the following example also includes a metadata resource describing the specific technology that resides in the NFC tag that we are narrowing in on, such as NDEF content):
<activity android:name=".NFC233">
<intent-filter>
<action android:name="android.nfc.action.TECH_DISCOVERED" />
</intent-filter>
<meta-data android:name="android.nfc.action.TECH_DISCOVERED"
android:resource="@xml/nfcfilter"
/>
</activity>
<?xml version="1.0" encoding="utf-8"?>
<!-- capture anything using NfcF or with NDEF payloads-->
<resources xmlns:xliff="urn:oasis:names:tc:xliff:document:1.2">
<tech-list>
<tech>android.nfc.tech.NfcF</tech>
</tech-list>
<tech-list>
<tech>android.nfc.tech.NfcA</tech>
<tech>android.nfc.tech.MifareClassic</tech>
<tech>android.nfc.tech.Ndef</tech>
</tech-list>
</resources>
An example of registering for the ACTION_TAG_DISCOVERED intent would be written in the manifest file like this:
<!-- this will show up as a dialog when the nfc tag is scanned -->
<activity android:name=".NFC" android:theme="@android:style/Theme.Dialog">
<intent-filter>
<action android:name="android.nfc.action.TAG_DISCOVERED"/>
<category android:name="android.intent.category.DEFAULT"/>
</intent-filter>
</activity>
When a tag is read, the system broadcasts an intent with the payload as the associated data. In Android 2.3.3 (API level 10), a Tag object is also included as an EXTRA_TAG. This Tag object provides a means to retrieve the specific TagTechnology and to perform advanced operations (such as I/O). Be aware that Arrays passed to and returned by this class are not cloned, so be careful not to modify them:
Tag tag = (Tag) intent.getParcelableExtra(NfcAdapter.EXTRA_TAG);
In Android 2.3 (API level 9) and later, the ID of the tag is wrapped within the intent and keyed with the term “android.nfc.extra.ID” (NfcAdapter.EXTRA_ID) as a byte array:
byte[] byte_id = intent.getByteArrayExtra(NfcAdapter.EXTRA_ID);
This data is packaged up as an array of Parcelable objects (NdefMessage) keyed with the term “android.nfc.extra.NDEF_MESSAGES” (NfcAdapter.EXTRA_NDEF_MESSAGES):
Parcelable[] msgs =
intent.getParcelableArrayExtra(NfcAdapter.EXTRA_NDEF_MESSAGES);
NdefMessage[] nmsgs = new NdefMessage[msgs.length];
for(int i=0;i<msgs.length;i++) {
nmsgs[i] = (NdefMessage) msgs[i];
}
Within each NdefMessage is an array of NdefRecord. This record will always include a 3-bit TNF (type name format), the type of record, a unique ID, and the payload. For specifics look at the NdefRecord doc (http://developer.android.com/reference/android/nfc/NdefRecord.html). Currently there are several known types, of which we cover the four most common: TEXT, URI, SMART_POSTER, and ABSOLUTE_URI:
// enum of types we are interested in
private static enum NFCType {
UNKNOWN, TEXT, URI, SMART_POSTER, ABSOLUTE_URI
}
private NFCType getTagType(final NdefMessage msg) {
if(msg == null) return null;
// we are only grabbing the first recognizable item
for (NdefRecord record : msg.getRecords()) {
if(record.getTnf() == NdefRecord.TNF_WELL_KNOWN) {
if(Arrays.equals(record.getType(), NdefRecord.RTD_TEXT)) {
return NFCType.TEXT;
}
if(Arrays.equals(record.getType(), NdefRecord.RTD_URI)) {
return NFCType.URI;
}
if(Arrays.equals(record.getType(), NdefRecord.RTD_SMART_POSTER)) {
return NFCType.SMART_POSTER;
}
} else if(record.getTnf() == NdefRecord.TNF_ABSOLUTE_URI) {
return NFCType.ABSOLUTE_URI;
}
}
return null;
}
To read the payload of an NdefRecord.RTD_TEXT type, the first byte of the payload will define the status, and thus the encoding type of the text payload:
/*
* the First Byte of the payload contains the "Status Byte Encodings" field,
* per the NFC Forum "Text Record Type Definition" section 3.2.1.
*
* Bit_7 is the Text Encoding Field.
* * if Bit_7 == 0 the the text is encoded in UTF-8
* * else if Bit_7 == 1 then the text is encoded in UTF16
* Bit_6 is currently always 0 (reserved for future use)
* Bits 5 to 0 are the length of the IANA language code.
*/
private String getText(final byte[] payload) {
if(payload == null) return null;
try {
String textEncoding = ((payload[0] & 0200) == 0) ? "UTF-8" : "UTF-16";
int languageCodeLength = payload[0] & 0077;
return new String(payload, languageCodeLength + 1,
payload.length - languageCodeLength - 1, textEncoding);
} catch (Exception e) {
e.printStackTrace();
}
return null;
}
When reading in the payload of a standard URI (NdefRecord.RTD_URI) type, the first byte of the payload defines the URI’s prefix:
/**
* NFC Forum "URI Record Type Definition"
*
* Conversion of prefix based on section 3.2.2 of the NFC Forum URI Record
* Type Definition document.
*/
private String convertUriPrefix(final byte prefix) {
if(prefix == (byte) 0x00) return "";
else if(prefix == (byte) 0x01) return "http://www.";
else if(prefix == (byte) 0x02) return "https://www.";
else if(prefix == (byte) 0x03) return "http://";
else if(prefix == (byte) 0x04) return "https://";
else if(prefix == (byte) 0x05) return "tel:";
else if(prefix == (byte) 0x06) return "mailto:";
else if(prefix == (byte) 0x07) return "ftp://anonymous:anonymous@";
else if(prefix == (byte) 0x08) return "ftp://ftp.";
else if(prefix == (byte) 0x09) return "ftps://";
else if(prefix == (byte) 0x0A) return "sftp://";
else if(prefix == (byte) 0x0B) return "smb://";
else if(prefix == (byte) 0x0C) return "nfs://";
else if(prefix == (byte) 0x0D) return "ftp://";
else if(prefix == (byte) 0x0E) return "dav://";
else if(prefix == (byte) 0x0F) return "news:";
else if(prefix == (byte) 0x10) return "telnet://";
else if(prefix == (byte) 0x11) return "imap:";
else if(prefix == (byte) 0x12) return "rtsp://";
else if(prefix == (byte) 0x13) return "urn:";
else if(prefix == (byte) 0x14) return "pop:";
else if(prefix == (byte) 0x15) return "sip:";
else if(prefix == (byte) 0x16) return "sips:";
else if(prefix == (byte) 0x17) return "tftp:";
else if(prefix == (byte) 0x18) return "btspp://";
else if(prefix == (byte) 0x19) return "btl2cap://";
else if(prefix == (byte) 0x1A) return "btgoep://";
else if(prefix == (byte) 0x1B) return "tcpobex://";
else if(prefix == (byte) 0x1C) return "irdaobex://";
else if(prefix == (byte) 0x1D) return "file://";
else if(prefix == (byte) 0x1E) return "urn:epc:id:";
else if(prefix == (byte) 0x1F) return "urn:epc:tag:";
else if(prefix == (byte) 0x20) return "urn:epc:pat:";
else if(prefix == (byte) 0x21) return "urn:epc:raw:";
else if(prefix == (byte) 0x22) return "urn:epc:";
else if(prefix == (byte) 0x23) return "urn:nfc:";
return null;
}
In the case of an absolute URI (NdefRecord.TNF_ABSOLUTE_URI) type, the whole payload is encoded in UTF-8 and makes up the URI:
if(record.getTnf() == NdefRecord.TNF_ABSOLUTE_URI) {
String uri = new String(record.getPayload(), Charset.forName("UTF-8");
}
The special Smart Poster (NdefRecord.RTD_SMART_POSTER) type consists of multiple subrecords of text or URI (or absolute URI) data:
private void getTagData(final NdefMessage msg) {
if(Arrays.equals(record.getType(), NdefRecord.RTD_SMART_POSTER)) {
try {
// break out the subrecords
NdefMessage subrecords = new NdefMessage(record.getPayload());
// get the subrecords
String fulldata = getSubRecordData(subrecords);
System.out.println("SmartPoster: "+fulldata);
} catch (Exception e) {
e.printStackTrace();
}
}
}
// method to get subrecord data
private String getSubRecordData(final NdefRecord[] records) {
if(records == null || records.length < 1) return null;
String data = "";
for(NdefRecord record : records) {
if(record.getTnf() == NdefRecord.TNF_WELL_KNOWN) {
if(Arrays.equals(record.getType(), NdefRecord.RTD_TEXT)) {
data += getText(record.getPayload()) + "\n";
}
if(Arrays.equals(record.getType(), NdefRecord.RTD_URI)) {
data += getURI(record.getPayload()) + "\n";
} else {
data += "OTHER KNOWN DATA\n";
}
} else if(record.getTnf() == NdefRecord.TNF_ABSOLUTE_URI) {
data += getAbsoluteURI(record.getPayload()) + "\n";
} else data += "OTHER UNKNOWN DATA\n";
}
return data;
}
Writing to a Tag
As of Android 2.3.3 (API level 10), the ability to write data to a tag is available. To do this, the Tag object must be used to get the appropriate TagTechnology within the tag. NFC tags are based on a number of independently developed technologies and offer a wide range of capabilities. TheTagTechnology implementations provide access to these different technologies and capabilities. In this case, the NDEF technology is needed to retrieve and modify the NdefRecords and NdefMessages in the tag:
// get the tag from the Intent
Tag mytag = (Tag) intent.getParcelableExtra(NfcAdapter.EXTRA_TAG);
// get the Ndef (TagTechnology) from the tag
Ndef ndefref = Ndef.get(mytag);
Note the following requirements when performing I/O operations with a TagTechnology:
§ connect() must be called before using any other I/O operation.
§ I/O operations may block, and should never be called on the main application thread.
§ Only one TagTechnology can be connected at a time. Other calls to connect() will return an IOException.
§ close() must be called after completing I/O operations with a TagTechnology, and it will cancel all other blocked I/O operations on other threads (including connect()) with an IOException.
Therefore, to write data to a tag, a connect() is called from within a thread that is separate from that of the main thread. Once this is done, isConnected() should be checked to verify that the connection has been established. If the connection is established, writeNdefMessage() with a constructedNdefMessage (containing at least one NdefRecord) may be called. Once the data is written, close() is called to cleanly terminate the process.
The full code to write a text record to a tag using its NDEF TagTechnology reference is as follows:
// pass in the Ndef TagTechnology reference and the text we wish to encode
private void writeTag(final Ndef ndefref, final String text) {
if(ndefref == null || text == null || !ndefref.isWritable()) {
return;
}
(new Thread() {
public void run() {
try {
Message.obtain(mgsToaster, 0,
"Tag writing attempt started").sendToTarget();
int count = 0;
if(!ndefref.isConnected()) {
ndefref.connect();
}
while(!ndefref.isConnected()) {
if(count > 6000) {
throw new Exception("Unable to connect to tag");
}
count++;
sleep(10);
}
ndefref.writeNdefMessage(msg);
Message.obtain(mgsToaster, 0,
"Tag write successful!").sendToTarget();
} catch (Exception t) {
t.printStackTrace();
Message.obtain(mgsToaster, 0,
"Tag writing failed! - "+t.getMessage()).sendToTarget();
} finally {
// ignore close failure...
try { ndefref.close(); }
catch (IOException e) { }
}
}
}).start();
}
// create a new NdefRecord
private NdefRecord newTextRecord(String text) {
byte[] langBytes = Locale.ENGLISH.
getLanguage().
getBytes(Charset.forName("US-ASCII"));
byte[] textBytes = text.getBytes(Charset.forName("UTF-8"));
char status = (char) (langBytes.length);
byte[] data = new byte[1 + langBytes.length + textBytes.length];
data[0] = (byte) status;
System.arraycopy(langBytes, 0, data, 1, langBytes.length);
System.arraycopy(textBytes, 0, data, 1 + langBytes.length, textBytes.length);
return new NdefRecord(NdefRecord.TNF_WELL_KNOWN,
NdefRecord.RTD_TEXT,
new byte[0],
data);
}
P2P Mode
P2P mode is enabled in Android 2.3.3 (API level 10) when one device is set up to transmit data over NFC to another device that can receive NFC data. The sending device may also receive data from the receiving device, and thus peer-to-peer (P2P) communication occurs. To do this, theenableForegroundNdefPush() method in the NfcAdapter class is used. This enables the Activity to transmit an NdefMessage, when it is in the foreground, to another NFC device that supports the “com.android.npp” NDEF push protocol. The enableForegroundNdefPush() method must be called from the main thread (such as in onResume()):
@Override
public void onResume() {
super.onResume();
NdefRecord[] rec = new NdefRecord[1];
rec[0] = newTextRecord("NFC Foreground Push Message");
NdefMessage msg = new NdefMessage(rec);
NfcAdapter.getDefaultAdapter(this).enableForegroundNdefPush(this, msg);
}
// create a new NdefRecord
private NdefRecord newTextRecord(String text) {
byte[] langBytes = Locale.ENGLISH.
getLanguage().
getBytes(Charset.forName("US-ASCII"));
byte[] textBytes = text.getBytes(Charset.forName("UTF-8"));
char status = (char) (langBytes.length);
byte[] data = new byte[1 + langBytes.length + textBytes.length];
data[0] = (byte) status;
System.arraycopy(langBytes, 0, data, 1, langBytes.length);
System.arraycopy(textBytes, 0, data, 1 + langBytes.length, textBytes.length);
return new NdefRecord(NdefRecord.TNF_WELL_KNOWN,
NdefRecord.RTD_TEXT,
new byte[0],
data);
}
While enableForegroundNdefPush() is active, standard tag dispatch is disabled. Only the foreground activity may receive tag-discovered dispatches via enableForegroundDispatch().
It is important that when the Activity is no longer in the foreground (onPause()) disableForegroundNdefPush() is called:
@Override
protected void onPause() {
super.onPause();
if(NfcAdapter.getDefaultAdapter(this) != null) {
NfcAdapter.getDefaultAdapter(this).disableForegroundNdefPush(this);
}
}
Gesture Input
In the world of touch-screen devices, the use of complex gestures (such as multiple swipes of the finger in different directions on the screen) is a great way to make interactions both fun and easy to do. Starting with Android 1.6 (API level 4), a gestures API is available for use. Within this API, the easiest way to add gesture input capability to an app is to use android.gesture.GestureOverlayView:
<!-- an example usage of GestureOverlayView in a layout xml -->
<android.gesture.GestureOverlayView
xmlns:android="http://schemas.android.com/apk/res/android"
android:id="@+id/gestures"
android:layout_width="fill_parent"
android:layout_height="fill_parent"
android:gestureStrokeType="multiple"
android:eventsInterceptionEnabled="true">
</<android.gesture.GestureOverlayView>
GestureOverlayView is a specialized FrameLayout that you can place over other widgets or that can contain other widgets. It can capture strokes on the touch screen as well as display a colored line (the default is yellow) representing the stroke path. AGestureOverlayView.OnGesturePerformedListener interface is provided to enable the ability to react to a gesture that has been performed:
GestureOverlayView gestures = (GestureOverlayView) findViewById(R.id.gestures);
gestures.addOnGesturePerformedListener(
new GestureOverlayView.OnGesturePerformedListener() {
@Override
public void onGesturePerformed(GestureOverlayView overlay, Gesture gesture) {
// do nothing for now
}
});
Once the gesture is performed, you can see if it is recognized within the Gesture library. The Gesture library can be read in via various means using the GestureLibraries class’s static methods. Once the library is loaded (loading a GestureStore), the performed gesture can be passed to it and then analyzed using the recognize method. This method returns a list of Predictions, each holding a score and name, with the score indicating the closeness to the named gesture within the library:
final GestureLibrary library = GestureLibraries.fromFile("/Some/File/Path");
library.load(); // load library
GestureOverlayView gestures = (GestureOverlayView) findViewById(R.id.gestures);
gestures.addOnGesturePerformedListener(
new GestureOverlayView.OnGesturePerformedListener() {
@Override
public void onGesturePerformed(GestureOverlayView overlay, Gesture gesture) {
// do the recognize
ArrayList<Prediction> predictions = library.recognize(gesture);
if (predictions.size() > 0) {
for(Prediction prediction: predictions) {
// the score is high enough that we know it's a hit
if (prediction.score > 1.0) {
// let's show a toast telling us what the gesture is named
Toast.makeText(this,
prediction.name, Toast.LENGTH_SHORT).show();
}
}
}
}
});
The basic anatomy of a Gesture consists of multiple GestureStroke objects, and each GestureStroke object is made up of GesturePoint objects. The GesturePoint is made up of x and y spatial coordinates and a single timestamp indicating when the point was generated. When a Gesture is stored in a GestureStore (within a GestureLibrary) it is keyed with a name (String).
Adding a Gesture to a GestureLibrary is pretty straightforward. You provide a name to associate the gesture, as well as the Gesture object, and then save it to the library. Note that a library must be read from an external file source (such as the SD card or private file) for the library to be modifiable and, thus, a gesture store. A library read from a raw resource is read-only (use of GestureLibraries.fromRawResource(context, resId)):
public void saveGesture(String name, Gesture gesture) {
library.addGesture(name, gesture);
library.save();
}
Accessibility
Starting with Android 1.6 (API level 4), an accessibility API designed to make Android apps more widely usable by blind and low-vision users is available. The core of the accessibility API is the AccessibilityService, an abstract class that is run in the background.
This use of the AccessibilityService ultimately means you are extending it, and thus it is a service and must be declared within the manifest. Not only must the declaration be made, but this type of service also has a specific intent it must handle (android.accessibilityservice.AccessibilityService):
<service android:name=".Accessibility">
<intent-filter>
<action android:name="android.accessibilityservice.AccessibilityService" />
</intent-filter>
</service>
When creating an AccessibilityService class you must declare the feedback and event types. You do this by generating an AccessibilityServiceInfo object, setting the various variables, and then passing it to the setServiceInfo() method. Please note that the system will pick up this information only after it has bound to the class/object:
AccessibilityServiceInfo info = new AccessibilityServiceInfo();
info.eventTypes = AccessibilityEvent.TYPES_ALL_MASK;
// timeout (ms) after the most recent event of a given type before notification
info.notificationTimeout = 50;
info.feedbackType = AccessibilityServiceInfo.FEEDBACK_GENERIC |
AccessibilityServiceInfo.FEEDBACK_AUDIBLE |
AccessibilityServiceInfo.FEEDBACK_HAPTIC |
AccessibilityServiceInfo.FEEDBACK_SPOKEN |
AccessibilityServiceInfo.FEEDBACK_VISUAL;
info.packageNames = new String[1];
// only handle this package
info.packageNames[0] = getPackageName();
setServiceInfo(info);
Once the service has started and the system has bound to it, events will be received and passed to the onAccessibilityEvent() method:
@Override
public void onAccessibilityEvent(AccessibilityEvent event) {
// here we check to see if it was a 'click' event
if(event.getEventType() == AccessibilityEvent.TYPE_VIEW_CLICKED) {
// do something with the click event
}
}
At this point, you have various options to react to the event. Usually the Vibrator Service is used to provide a haptic response along with sound or speech. The Vibrator is a system-level service that is retrieved via the context getSystemService() method. Once the Vibrator object is retrieved, a pattern of vibrations can be applied when reacting to an event:
// get Vibrator
Vibrator vibrate = (Vibrator) getSystemService(Service.VIBRATOR_SERVICE);
// pattern to vibrate with
long[] pattern = new long[] { 0L, 100L };
// vibrate
vibrate.vibrate(pattern, -1);
Android provides a TextToSpeech engine that you can use to provide speech. To use this you instantiate an android.speech.tts.TextToSpeech class, which initializes the TextToSpeech engine. Once initialized, speech can be produced by calling the speak method on the class. A variety of methods and options can be called, such as setting locale, pitch, or speech speed. Be sure to call the shutdown method when the TextToSpeech instance is no longer needed so that its resources can be recovered:
TextToSpeech tts = new TextToSpeech(thisContext, new TextToSpeech.OnInitListener() {
@Override
public void onInit(int status) {
// notification when the TextToSpeech Engine has been initialized
}
);
// say 'click'
tts.speak("Click", 2, null);
// no longer needed and thus we shut down and release the resources
tts.shutdown();
For more accessibility-related resources check out the Eyes-Free open source project (http://code.google.com/p/eyes-free).
All materials on the site are licensed Creative Commons Attribution-Sharealike 3.0 Unported CC BY-SA 3.0 & GNU Free Documentation License (GFDL)
If you are the copyright holder of any material contained on our site and intend to remove it, please contact our site administrator for approval.
© 2016-2025 All site design rights belong to S.Y.A.