Programming Android (2011)
Part IV. Advanced Topics
Chapter 17. Communication, Identity, Sync, and Social Media
One of the primary data types that is stored and used (and reused) in Android is contact data. This consists of the various pieces of information associated with a contact—name, phone number, email, and so on. In Android 2.0 (API level 5), contact data was significantly expanded (allowing access to multiple accounts and support for aggregation of similar contacts). In earlier chapters we covered the use of content providers and Android database classes, so we will not cover that preliminary material in this chapter. Instead, we will focus on the use of the ContactsContract content provider.
Account Contacts
To access the account contacts the following permissions must be provided in the manifest:
<uses-permission android:name="android.permission.GET_ACCOUNTS" />
<uses-permission android:name="android.permission.READ_CONTACTS" />
<uses-permission android:name="android.permission.WRITE_CONTACTS" />
Within an Activity, we can use the managedQuery method to query the ContactsContract.Contacts data and return a Cursor for our use:
private Cursor getContacts() {
Uri uri = ContactsContract.Contacts.CONTENT_URI;
String[] projection = new String[] {
ContactsContract.Contacts._ID,
ContactsContract.Contacts.LOOKUP_KEY,
ContactsContract.Contacts.DISPLAY_NAME
};
String selection = null;
String[] selectionArgs = null;
String sortOrder = ContactsContract.Contacts.DISPLAY_NAME +
" COLLATE LOCALIZED ASC";
return managedQuery(uri, projection, selection, selectionArgs, sortOrder);
}
For complete information on the columns and constants available in the ContactsContract.Contacts class, refer to the developer documentation at http://developer.android.com/reference/android/provider/ContactsContract.Contacts.html.
Once we have the Cursor, we can load it within a SimpleCursorAdapter and have it display the specific data fields we want, in this case the “display name” of the contact:
String[] fields = new String[] {
ContactsContract.Data.DISPLAY_NAME
};
SimpleCursorAdapter adapter = new SimpleCursorAdapter(this,
R.layout.contact,
cursor,
fields,
new int[] {R.id.name});
// get the listview
ListView contactlist = (ListView) findViewById(R.id.contactlist);
// set the adapter and let it render
contactlist.setAdapter(adapter);
Here is the layout that contains the ListView (referenced as R.id.contactlist):
<?xml version="1.0" encoding="utf-8"?>
<LinearLayout xmlns:android="http://schemas.android.com/apk/res/android"
android:orientation="vertical"
android:layout_width="fill_parent"
android:layout_height="fill_parent"
android:background="#fff"
>
<ListView android:id="@+id/contactlist"
android:layout_width="fill_parent"
android:layout_height="wrap_content"
/>
</LinearLayout>
Here is the contact layout (referenced as R.layout.contact) used for the SimpleCursorAdapter:
<?xml version="1.0" encoding="utf-8"?>
<LinearLayout xmlns:android="http://schemas.android.com/apk/res/android"
android:layout_width="wrap_content"
android:layout_height="wrap_content"
android:background="#fff"
>
<TextView android:id="@+id/name"
android:layout_width="fill_parent"
android:layout_height="wrap_content"
android:textColor="#000"
android:textSize="25sp"
android:padding="5dp"
/>
</LinearLayout>
Here we delete a contact by providing the Cursor and the position within the Cursor to delete:
private void deleteContact(Cursor cursor, int position) {
cursor.moveToPosition(position);
long id = cursor.getLong(0);
String lookupkey = cursor.getString(1);
Uri uri = ContactsContract.Contacts.getLookupUri(id, lookupkey);
String[] selectionArgs = null;
String where = null;
ContentResolver cr = getContentResolver();
cr.delete(uri, where, selectionArgs);
}
To add a contact in this example we construct a collection of ContentProviderOperations and batch-apply them. Note that we first insert the new contact and then add the phone information should it be available (as it is in this case). In order to do the inserts, we generate an insert-specificContentProviderOperation by creating a ContentProviderOperation.Builder with the SimpleCursorContentProviderOperation.newInsert() method and then building with the build() method:
String accountNameWeWant = "SpecialAccount";
String phone = "8885551234";
String name = "Bob";
String accountname = null;
String accounttype = null;
Account[] accounts = AccountManager.get(this).getAccounts();
// find the account we want. if we don't find it we use 'null' - the default
for(Account account : accounts) {
if(account.equals(accountNameWeWant)) {
accountname = account.name;
accounttype = account.type;
break;
}
}
ArrayList<ContentProviderOperation> ops =
new ArrayList<ContentProviderOperation>();
ops.add(ContentProviderOperation.newInsert
(ContactsContract.RawContacts.CONTENT_URI)
.withValue(ContactsContract.RawContacts.ACCOUNT_TYPE, accountname)
.withValue(ContactsContract.RawContacts.ACCOUNT_NAME, accounttype)
.build());
// create the new contact
ops.add(
ContentProviderOperation.newInsert(ContactsContract.Data.CONTENT_URI)
.withValueBackReference(ContactsContract.Data.RAW_CONTACT_ID, 0)
.withValue(ContactsContract.Data.MIMETYPE,
ContactsContract.CommonDataKinds.StructuredName.CONTENT_ITEM_TYPE)
.withValue(ContactsContract.CommonDataKinds.StructuredName.DISPLAY_NAME,
name)
.build());
// if there is a phone num we add it
if(phone.getText() != null
&& phone.getText().toString().trim().length() > 0) {
ops.add(ContentProviderOperation.newInsert
(ContactsContract.Data.CONTENT_URI)
.withValueBackReference(ContactsContract.Data.RAW_CONTACT_ID, 0)
.withValue(ContactsContract.Data.MIMETYPE,
ContactsContract.CommonDataKinds.Phone.CONTENT_ITEM_TYPE)
.withValue(ContactsContract.CommonDataKinds.Phone.NUMBER,
phone)
.withValue(ContactsContract.CommonDataKinds.Phone.TYPE,
ContactsContract.CommonDataKinds.Phone.TYPE_HOME)
.build());
}
try {
getContentResolver().applyBatch(ContactsContract.AUTHORITY, ops);
} catch (Exception e) {
e.printStackTrace();
}
Authentication and Synchronization
Starting with Android 2.0 (API level 5), it is possible to write custom sync providers to integrate with system contacts, calendars, and so forth. Synchronizing with a remote service at this time is unfortunately a precarious endeavor, as any misstep at particular points can literally cause the Android system to crash and reboot (with very little indication as to what was done incorrectly). Hopefully, as Android evolves, synchronizing will become easier and less tricky. For now, the process consists of two parts—authentication (Account Authenticator) and synchronization (Sync Provider).
Before diving into the details of the two parts, we would like to note that the examples we provide here have two components—a server side and the Android client side. The server side that we use is a basic web service that accepts specific GET requests and responds back with a JSON-formatted response. The relevant GET URI as well as the example response are provided within each section. The source that comes with this book includes the full server-side source for completeness.
The other thing to note is that in the example we provide, we choose to sync with the account contacts. This is not the only thing that you can sync up. You can sync up with any content provider you have access to, or even to application-specific stored data.
Authentication
To get the client to authenticate with a remote server using the Android Account Authenticator system, three pieces must be put into place:
§ A service that is triggered by the android.accounts.AccountAuthenticator intent and that, in its onBind method, returns a subclass of AbstractAccountAuthenticator
§ An activity that prompts the user to enter her credentials
§ An XML file describing how your account should look when displayed to the user
Let’s address the service first. In the manifest we need android.permission.AUTHENTICATE_ACCOUNTS to be enabled:
<uses-permission android:name="android.permission.AUTHENTICATE_ACCOUNTS" />
Then the service needs to be described in the manifest. Note that the android.accounts.AccountAuthenticator intent is included within the intent-filter descriptor. The manifest also describes a resource for the AccountAuthenticator:
<service android:name=".sync.authsync.AuthenticationService">
<intent-filter>
<action android:name="android.accounts.AccountAuthenticator" />
</intent-filter>
<meta-data android:name="android.accounts.AccountAuthenticator"
android:resource="@xml/authenticator" />
</service>
The resource we indicated in the manifest follows. In particular, it describes the accountType that will distinguish this authenticator from other authenticators using the account’s definition. Be very careful with this XML document (e.g., do not directly assign a string to the android:label or have a missing drawable indicated), as Android will crash and burn the moment you attempt to add a new account (from within the Account & Sync settings):
<?xml version="1.0" encoding="utf-8"?>
<account-authenticator xmlns:android="http://schemas.android.com/apk/res/android"
android:accountType="com.oreilly.demo.pa.ch17.sync"
android:icon="@drawable/icon"
android:smallIcon="@drawable/icon"
android:label="@string/authlabel"
/>
Now that the service is described within the manifest, we can turn to the service itself. Note that the onBind() method returns an Authenticator class. This class extends the AbstractAccountAuthenticator class:
package com.oreilly.demo.pa.ch17.sync.authsync;
import android.app.Service;
import android.content.Intent;
import android.os.IBinder;
public class AuthenticationService extends Service {
private static final Object lock = new Object();
private Authenticator auth;
@Override
public void onCreate() {
synchronized (lock) {
if (auth == null) {
auth = new Authenticator(this);
}
}
}
@Override
public IBinder onBind(Intent intent) {
return auth.getIBinder();
}
}
Before we get to the full source of the Authenticator class, there is a method within the AbstractAccountAuthenticator that is important—addAccount(). This method ultimately is called when the button indicating our custom account is selected from the Add Account screen. A LoginActivity (our custom Activity, which will ask the user to sign in) is described within the Intent that is placed within the Bundle that is returned. The AccountManager.KEY_ACCOUNT_AUTHENTICATOR_RESPONSE key included in the intent is vital, as it includes the AccountAuthenticatorResponse object that is needed to ship back the account keys once the user has successfully certified against the remote service:
public class Authenticator extends AbstractAccountAuthenticator {
public Bundle addAccount(AccountAuthenticatorResponse response,
String accountType, String authTokenType,
String[] requiredFeatures, Bundle options) {
Intent intent = new Intent(context, LoginActivity.class);
intent.putExtra(AccountManager.KEY_ACCOUNT_AUTHENTICATOR_RESPONSE, response);
Bundle bundle = new Bundle();
bundle.putParcelable(AccountManager.KEY_INTENT, intent);
return bundle;
}
}
Now for the full Authenticator activity that extends the AbstractAccountAuthenticator:
package com.oreilly.demo.pa.ch17.sync.authsync;
import com.oreilly.demo.pa.ch17.sync.LoginActivity;
import android.accounts.AbstractAccountAuthenticator;
import android.accounts.Account;
import android.accounts.AccountAuthenticatorResponse;
import android.accounts.AccountManager;
import android.content.Context;
import android.content.Intent;
import android.os.Bundle;
public class Authenticator extends AbstractAccountAuthenticator {
public static final String AUTHTOKEN_TYPE
= "com.oreilly.demo.pa.ch17.sync";
public static final String ACCOUNT_TYPE
= "com.oreilly.demo.pa.ch17.sync";
private final Context context;
public Authenticator(Context context) {
super(context);
this.context = context;
}
@Override
public Bundle addAccount(AccountAuthenticatorResponse response,
String accountType, String authTokenType,
String[] requiredFeatures, Bundle options) {
Intent intent = new Intent(context, LoginActivity.class);
intent.putExtra(AccountManager.KEY_ACCOUNT_AUTHENTICATOR_RESPONSE, response);
Bundle bundle = new Bundle();
bundle.putParcelable(AccountManager.KEY_INTENT, intent);
return bundle;
}
@Override
public Bundle confirmCredentials(AccountAuthenticatorResponse response,
Account account, Bundle options) {
return null;
}
@Override
public Bundle editProperties(AccountAuthenticatorResponse response,
String accountType) {
return null;
}
@Override
public Bundle getAuthToken(AccountAuthenticatorResponse response,
Account account, String authTokenType, Bundle loginOptions) {
return null;
}
@Override
public String getAuthTokenLabel(String authTokenType) {
return null;
}
@Override
public Bundle hasFeatures(AccountAuthenticatorResponse response,
Account account, String[] features) {
return null;
}
@Override
public Bundle updateCredentials(AccountAuthenticatorResponse response,
Account account, String authTokenType, Bundle loginOptions) {
return null;
}
}
For this exercise, the remote server has a login API call (accessed via an HTTP URI) that takes the username and password as variables. Should the login succeed, the response comes back with a JSON string containing a token:
uri: http://<serverBaseUrl>:<port>/login?username=<name>&password=<pass>
response: { "token" : "someAuthenticationToken" }
The LoginActivity that requests the user to input the username and password for the account then proceeds to contact the remote server. Once the expected JSON string is returned, the handleLoginResponse() method is called and passes the relevant information about the account back to theAccountManager:
package com.oreilly.demo.pa.ch17.sync;
import org.json.JSONObject;
import com.oreilly.demo.pa.ch17.R;
import com.oreilly.demo.pa.ch17.sync.authsync.Authenticator;
import android.accounts.Account;
import android.accounts.AccountAuthenticatorActivity;
import android.accounts.AccountManager;
import android.app.Dialog;
import android.app.ProgressDialog;
import android.content.ContentResolver;
import android.content.Intent;
import android.os.Bundle;
import android.os.Handler;
import android.os.Message;
import android.provider.ContactsContract;
import android.view.View;
import android.view.View.OnClickListener;
import android.widget.EditText;
import android.widget.Toast;
public class LoginActivity extends AccountAuthenticatorActivity {
public static final String PARAM_AUTHTOKEN_TYPE = "authtokenType";
public static final String PARAM_USERNAME = "username";
public static final String PARAM_PASSWORD = "password";
private String username;
private String password;
@Override
public void onCreate(Bundle savedInstanceState) {
super.onCreate(savedInstanceState);
getVars();
setupView();
}
@Override
protected Dialog onCreateDialog(int id) {
final ProgressDialog dialog = new ProgressDialog(this);
dialog.setMessage("Attemping to login");
dialog.setIndeterminate(true);
dialog.setCancelable(false);
return dialog;
}
private void getVars() {
username = getIntent().getStringExtra(PARAM_USERNAME);
}
private void setupView() {
setContentView(R.layout.login);
findViewById(R.id.login).setOnClickListener(new OnClickListener() {
@Override
public void onClick(View v) {
login();
}
});
if(username != null) {
((EditText) findViewById(R.id.username)).setText(username);
}
}
private void login() {
if(((EditText) findViewById(R.id.username)).getText() == null ||
((EditText) findViewById(R.id.username)).getText().toString().
trim().length()
< 1) {
Toast.makeText(this, "Please enter a Username",
Toast.LENGTH_SHORT).show();
return;
}
if(((EditText) findViewById(R.id.password)).getText() == null ||
((EditText) findViewById(R.id.password)).getText().toString().
trim().length()
< 1) {
Toast.makeText(this, "Please enter a Password",
Toast.LENGTH_SHORT).show();
return;
}
username = ((EditText) findViewById(R.id.username)).getText().toString();
password = ((EditText) findViewById(R.id.password)).getText().toString();
showDialog(0);
Handler loginHandler = new Handler() {
@Override
public void handleMessage(Message msg) {
if(msg.what == NetworkUtil.ERR) {
dismissDialog(0);
Toast.makeText(LoginActivity.this, "Login Failed: "+
msg.obj, Toast.LENGTH_SHORT).show();
} else if(msg.what == NetworkUtil.OK) {
handleLoginResponse((JSONObject) msg.obj);
}
}
};
NetworkUtil.login(getString(R.string.baseurl),
username, password, loginHandler);
}
private void handleLoginResponse(JSONObject resp) {
dismissDialog(0);
final Account account = new Account(username, Authenticator.ACCOUNT_TYPE);
if (getIntent().getStringExtra(PARAM_USERNAME) == null) {
AccountManager.get(this).addAccountExplicitly(account, password, null);
ContentResolver.setSyncAutomatically(account,
ContactsContract.AUTHORITY, true);
} else {
AccountManager.get(this).setPassword(account, password);
}
Intent intent = new Intent();
intent.putExtra(AccountManager.KEY_ACCOUNT_NAME, username);
intent.putExtra(AccountManager.KEY_ACCOUNT_TYPE,
Authenticator.ACCOUNT_TYPE);
if (resp.has("token")) {
intent.putExtra(AccountManager.KEY_AUTHTOKEN, resp.optString("token"));
}
setAccountAuthenticatorResult(intent.getExtras());
setResult(RESULT_OK, intent);
finish();
}
}
The LoginActivity’s layout XML is:
<?xml version="1.0" encoding="utf-8" ?>
<LinearLayout
xmlns:android="http://schemas.android.com/apk/res/android"
android:orientation="vertical"
android:layout_width="fill_parent"
android:layout_height="wrap_content"
android:background="#fff">
<ScrollView
android:layout_width="fill_parent"
android:layout_height="0dip"
android:layout_weight="1">
<LinearLayout
android:layout_width="fill_parent"
android:layout_height="wrap_content"
android:layout_weight="1"
android:orientation="vertical"
android:paddingTop="5dip"
android:paddingBottom="13dip"
android:paddingLeft="20dip"
android:paddingRight="20dip">
<EditText
android:id="@+id/username"
android:singleLine="true"
android:layout_width="fill_parent"
android:layout_height="wrap_content"
android:minWidth="250dip"
android:scrollHorizontally="true"
android:capitalize="none"
android:hint="Username"
android:autoText="false" />
<EditText
android:id="@+id/password"
android:singleLine="true"
android:layout_width="fill_parent"
android:layout_height="wrap_content"
android:minWidth="250dip"
android:scrollHorizontally="true"
android:capitalize="none"
android:autoText="false"
android:password="true"
android:hint="Password"
android:inputType="textPassword" />
</LinearLayout>
</ScrollView>
<FrameLayout
android:layout_width="fill_parent"
android:layout_height="wrap_content"
android:background="#fff"
android:minHeight="54dip"
android:paddingTop="4dip"
android:paddingLeft="2dip"
android:paddingRight="2dip">
<Button
android:id="@+id/login"
android:layout_width="wrap_content"
android:layout_height="wrap_content"
android:layout_gravity="center_horizontal"
android:minWidth="100dip"
android:text="Login" />
</FrameLayout>
</LinearLayout>
At this point, the account is established and is ready to be used to synchronize data.
Synchronization
To synchronize an account’s data we once again are dealing with three pieces—a service that is registered to listen for an android.content.SyncAdapter intent and that returns an AbstractThreadedSyncAdapter extended class on the onBind() method, an XML descriptor describing the structure of the data that is to be viewed and synced, and a class extending the AbstractThreadedSyncAdapter that handles the actual sync.
For our example, we wish to sync up contact information for the account that we described in the preceding section. Do note that contact information is not the only information you can sync up. You can sync up with any content provider you have access to, or even to application-specific stored data.
The following permissions are indicated in the manifest:
<uses-permission android:name="android.permission.GET_ACCOUNTS" />
<uses-permission android:name="android.permission.READ_CONTACTS" />
<uses-permission android:name="android.permission.WRITE_CONTACTS" />
<uses-permission android:name="android.permission.AUTHENTICATE_ACCOUNTS" />
<uses-permission android:name="android.permission.USE_CREDENTIALS" />
<uses-permission android:name="android.permission.MANAGE_ACCOUNTS" />
<uses-permission android:name="android.permission.INTERNET" />
<uses-permission android:name="android.permission.WRITE_SETTINGS" />
<uses-permission android:name="android.permission.WRITE_SECURE_SETTINGS" />
<uses-permission android:name="android.permission.READ_SYNC_STATS" />
<uses-permission android:name="android.permission.READ_SYNC_SETTINGS" />
<uses-permission android:name="android.permission.WRITE_SYNC_SETTINGS" />
Now we describe the service we intend to use. Note that the android.content.SyncAdapter intent is included and both a structure for the contact data and the SyncAdapter are described:
<service android:name=".sync.authsync.SyncService">
<intent-filter>
<action android:name="android.content.SyncAdapter" />
</intent-filter>
<meta-data android:name="android.content.SyncAdapter"
android:resource="@xml/syncadapter" />
<meta-data android:name="android.provider.CONTACTS_STRUCTURE"
android:resource="@xml/contacts" />
</service>
In the sync-adapter XML resource, note the accountType descriptor. The content we intend to work with is the Android contacts data:
<?xml version="1.0" encoding="utf-8"?>
<sync-adapter xmlns:android="http://schemas.android.com/apk/res/android"
android:contentAuthority="com.android.contacts"
android:accountType="com.oreilly.demo.pa.ch17.sync"
/>
Here is the contacts descriptor XML. Note the names of the various columns we described:
<?xml version="1.0" encoding="utf-8"?>
<ContactsSource xmlns:android="http://schemas.android.com/apk/res/android">
<ContactsDataKind
android:mimeType=
"vnd.android.cursor.item/vnd.com.oreilly.demo.pa.ch17.sync.profile"
android:icon="@drawable/icon"
android:summaryColumn="data2"
android:detailColumn="data3"
android:detailSocialSummary="true" />
</ContactsSource>
The SyncService we created returns the SyncAdapter class. This is our custom class that extends AbstractThreadedSyncAdapter:
package com.oreilly.demo.pa.ch17.sync.authsync;
import android.app.Service;
import android.content.Intent;
import android.os.IBinder;
public class SyncService extends Service {
private static final Object lock = new Object();
private static SyncAdapter adapter = null;
@Override
public void onCreate() {
synchronized (lock) {
if (adapter == null) {
adapter = new SyncAdapter(getApplicationContext(), true);
}
}
}
@Override
public void onDestroy() {
adapter = null;
}
@Override
public IBinder onBind(Intent intent) {
return adapter.getSyncAdapterBinder();
}
}
Continuing with this exercise, we create a getfriends method on the remote server side. This takes the token that was passed back and stored by the successful login coded up in the previous section, and a time indicating the last time the call was made (if it is the first time, 0 is passed). The response is another JSON string describing the friends (with ID, name, and phone), the time the call was made (in Unix time on the server), and a history describing additions and deletions of friends for this account. In the history, the type field is 0 to add and 1 to delete. The who field is the ID of the friend, and the time shows when the operation occurred:
uri: http://<serverBaseUrl>:<port>/getfriends?token=<token>&time=<lasttime>
response:
{
"time" : 1295817666232,
"history" : [
{
"time" : 1295817655342,
"type" : 0,
"who" : 1
}
],
"friend" : [
{
"id" : 1,
"name" : "Mary",
"phone" : "8285552334"
}
]
}
The AbstractThreadedSyncAdapter class, extending SyncAdapter, follows:
public class SyncAdapter extends AbstractThreadedSyncAdapter {
private final Context context;
private static long lastsynctime = 0;
public SyncAdapter(Context context, boolean autoInitialize) {
super(context, autoInitialize);
this.context = context;
}
@Override
public void onPerformSync(Account account, Bundle extras, String authority,
ContentProviderClient provider, SyncResult syncResult) {
String authtoken = null;
try {
authtoken = AccountManager.get(context).blockingGetAuthToken(account,
Authenticator.AUTHTOKEN_TYPE, true);
ListFriends friendsdata =
ListFriends.fromJSON(
NetworkUtil.getFriends(context.getString(R.string.baseurl),
authtoken, lastsynctime, null));
lastsynctime = friendsdata.time;
sync(account, friendsdata);
} catch (Exception e) {
e.printStackTrace();
}
}
private void sync(Account account, ListFriends data) {
// MAGIC HAPPENS
}
}
The full SyncAdapter class follows, with the various actions that occur when the sync method receives data. The various additions and deletions of the contact information are included. (Contact and ContentProvider operations are covered in previous chapters and sections.)
package com.oreilly.demo.pa.ch17.sync.authsync;
import java.util.ArrayList;
import android.accounts.Account;
import android.accounts.AccountManager;
import android.content.AbstractThreadedSyncAdapter;
import android.content.ContentProviderClient;
import android.content.ContentProviderOperation;
import android.content.ContentUris;
import android.content.Context;
import android.content.SyncResult;
import android.database.Cursor;
import android.os.Bundle;
import android.provider.ContactsContract;
import android.provider.ContactsContract.RawContacts;
import com.oreilly.demo.pa.ch17.R;
import com.oreilly.demo.pa.ch17.sync.NetworkUtil;
import com.oreilly.demo.pa.ch17.sync.dataobjects.Change;
import com.oreilly.demo.pa.ch17.sync.dataobjects.ListFriends;
import com.oreilly.demo.pa.ch17.sync.dataobjects.User;
public class SyncAdapter extends AbstractThreadedSyncAdapter {
private final Context context;
private static long lastsynctime = 0;
public SyncAdapter(Context context, boolean autoInitialize) {
super(context, autoInitialize);
this.context = context;
}
@Override
public void onPerformSync(Account account, Bundle extras, String authority,
ContentProviderClient provider, SyncResult syncResult) {
String authtoken = null;
try {
// get accounttoken. this eventually calls our Authenticator
// getAuthToken()
authtoken = AccountManager.get(context).blockingGetAuthToken(account,
Authenticator.AUTHTOKEN_TYPE, true);
ListFriends friendsdata =
ListFriends.fromJSON(
NetworkUtil.getFriends(context.getString(R.string.baseurl),
authtoken, lastsynctime, null));
lastsynctime = friendsdata.time;
sync(account, friendsdata);
} catch (Exception e) {
e.printStackTrace();
}
}
// where the magic happens
private void sync(Account account, ListFriends data) {
User self = new User();
self.username = account.name;
ArrayList<ContentProviderOperation> ops =
new ArrayList<ContentProviderOperation>();
// cycle through the history to find the deletes
if(data.history != null && !data.history.isEmpty()) {
for(Change change : data.history) {
if(change.type == Change.ChangeType.DELETE) {
ContentProviderOperation op = delete(account, change.who);
if(op != null) ops.add(op);
}
}
}
// cycle through the friends to find ones we do not already have and add them
if(data.friends != null && !data.friends.isEmpty()) {
for(User f : data.friends) {
ArrayList<ContentProviderOperation> op = add(account, f);
if(op != null) ops.addAll(op);
}
}
if(!ops.isEmpty()) {
try {
context.getContentResolver().applyBatch(ContactsContract.AUTHORITY,
ops);
} catch (Exception e) {
e.printStackTrace();
}
}
}
// adding a contact. note we are storing the id referenced in the response
// from the server in the SYNC1 field - this way we can find it with this
// server based id
private ArrayList<ContentProviderOperation> add(Account account, User f) {
long rawid = lookupRawContact(f.id);
if(rawid != 0) return null;
ArrayList<ContentProviderOperation> ops =
new ArrayList<ContentProviderOperation>();
ops.add(ContentProviderOperation.newInsert(
ContactsContract.RawContacts.CONTENT_URI)
.withValue(RawContacts.SOURCE_ID, 0)
.withValue(RawContacts.SYNC1, f.id)
.withValue(ContactsContract.RawContacts.ACCOUNT_TYPE,
Authenticator.ACCOUNT_TYPE)
.withValue(ContactsContract.RawContacts.ACCOUNT_NAME,
account.name)
.build());
if(f.name != null && f.name.trim().length() > 0) {
ops.add(ContentProviderOperation.newInsert(
ContactsContract.Data.CONTENT_URI)
.withValueBackReference(ContactsContract.Data.RAW_CONTACT_ID,
0)
.withValue(ContactsContract.Data.MIMETYPE,
ContactsContract.CommonDataKinds.StructuredName.CONTENT_ITEM_TYPE)
.withValue(ContactsContract.CommonDataKinds.
StructuredName.DISPLAY_NAME, f.name)
.build());
}
if(f.phone != null && f.phone.trim().length() > 0) {
ops.add(ContentProviderOperation.newInsert
(ContactsContract.Data.CONTENT_URI)
.withValueBackReference(ContactsContract.Data.RAW_CONTACT_ID, 0)
.withValue(ContactsContract.Data.MIMETYPE,
ContactsContract.CommonDataKinds.Phone.CONTENT_ITEM_TYPE)
.withValue(ContactsContract.CommonDataKinds.Phone.NUMBER, f.phone)
.withValue(ContactsContract.CommonDataKinds.Phone.TYPE,
ContactsContract.CommonDataKinds.Phone.TYPE_HOME)
.build());
}
ops.add(ContentProviderOperation.newInsert(ContactsContract.Data.CONTENT_URI)
.withValueBackReference(ContactsContract.Data.RAW_CONTACT_ID, 0)
.withValue(ContactsContract.Data.MIMETYPE,
"vnd.android.cursor.item/vnd.com.oreilly.demo.pa.ch17.sync.profile")
.withValue(ContactsContract.Data.DATA2, "Ch15 Profile")
.withValue(ContactsContract.Data.DATA3, "View profile")
.build()
);
return ops;
}
// delete contact via the server based id
private ContentProviderOperation delete(Account account, long id) {
long rawid = lookupRawContact(id);
if(rawid == 0) return null;
return ContentProviderOperation.newDelete(
ContentUris.withAppendedId(
ContactsContract.RawContacts.CONTENT_URI,
rawid))
.build();
}
// look up the actual raw id via the id we have stored in the SYNC1 field
private long lookupRawContact(long id) {
long rawid = 0;
Cursor c = context.getContentResolver().query(
RawContacts.CONTENT_URI, new String[] {RawContacts._ID},
RawContacts.ACCOUNT_TYPE + "='" +
Authenticator.ACCOUNT_TYPE + "' AND "+
RawContacts.SYNC1 + "=?",
new String[] {String.valueOf(id)},
null);
try {
if(c.moveToFirst()) {
rawid = c.getLong(0);
}
} finally {
if (c != null) {
c.close();
c = null;
}
}
return rawid;
}
}
An important detail might be missed in the previous SyncAdapter class: during the onPerformSync() call, we attempt to get the authtoken from the AccountManager by using the blockingGetAuthToken() method. This eventually calls the AbstractAccountAuthenticator that is associated with this account. In this case, it calls the Authenticator class we provided in the previous section. Within the Authenticator class, the method getAuthToken() is called. An example follows:
@Override
public Bundle getAuthToken(AccountAuthenticatorResponse response, Account account,
String authTokenType, Bundle loginOptions) {
// check and make sure it is the right token type we want
if (!authTokenType.equals(AUTHTOKEN_TYPE)) {
final Bundle result = new Bundle();
result.putString(AccountManager.KEY_ERROR_MESSAGE,
"invalid authTokenType");
return result;
}
// if we have the password, let's try and get the current
// authtoken from the server
String password = AccountManager.get(context).getPassword(account);
if (password != null) {
JSONObject json = NetworkUtil.login(context.getString(R.string.baseurl),
account.name, password, true, null);
if(json != null) {
Bundle result = new Bundle();
result.putString(AccountManager.KEY_ACCOUNT_NAME, account.name);
result.putString(AccountManager.KEY_ACCOUNT_TYPE, ACCOUNT_TYPE);
result.putString(AccountManager.KEY_AUTHTOKEN,
json.optString("token"));
return result;
}
}
// if all else fails let's see about getting the user to log in
Intent intent = new Intent(context, LoginActivity.class);
intent.putExtra(LoginActivity.PARAM_USERNAME, account.name);
intent.putExtra(AccountManager.KEY_ACCOUNT_AUTHENTICATOR_RESPONSE, response);
Bundle bundle = new Bundle();
bundle.putParcelable(AccountManager.KEY_INTENT, intent);
return bundle;
}
Bluetooth
Bluetooth was the nickname for King Harald of Denmark. The following article on Sun’s developer site (http://developers.sun.com/mobility/midp/articles/bluetooth1/) contains a variety of information about Bluetooth, including the possibly apocryphal assertion that a runic stone erected in honor of Harald states:
Harald Christianized the Danes
Harald controlled Denmark and Norway
Harald thinks notebooks and cellular phones should communicate seamlessly
To show you how to use Android’s Bluetooth classes in your applications, we will create a utility for connecting to and transferring data to and from Bluetooth devices. This code is based on the BluetoothChat example in the Android SDK. It has been generalized to cover more applications of Bluetooth, and it has been modified to make it easier to adapt to your purposes.
As we explore Android’s Bluetooth APIs, we will see how this code makes use of these APIs, and how you can use the code for application-specific purposes, including as a diagnostic tool for Bluetooth development.
First we will learn more about how Bluetooth works, and how it is implemented in Android.
The Bluetooth Protocol Stack
This section takes a look at the standards and protocols that make up the Bluetooth protocol stack (see Figure 17-1). These protocols and standards are what characterize Bluetooth: the kinds of data Bluetooth is designed to move, how many devices can be connected at the same time, latency, and so on.
Bluetooth has emerged as a separate form of networking because it is a “personal area network,” or PAN, also referred to as a piconet. Bluetooth is designed to connect up to eight devices and to carry data at a maximum of approximately three megabits per second. The connected devices must be close to one another: within about 10 meters. Bluetooth operates at very low power levels, in milliwatts. That means very small batteries can last a long time: a Bluetooth headset with a tiny, lightweight battery can last for hours of talking—about as long as the much larger battery in your mobile handset can last, because the mobile radio signal must be able to reach a relatively distant antenna.
The kinds of devices for which Bluetooth is useful include low and medium data-rate devices such as keyboards, mice, tablets, printers, speakers, headphones, and headsets, and the mobile and personal computing devices those peripheral devices may want to talk to. Bluetooth also supports connections among PCs and mobile handsets.
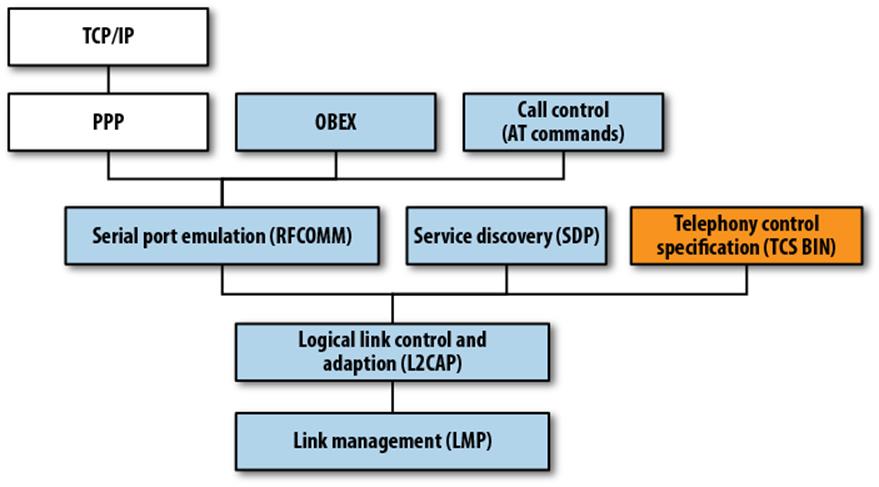
Figure 17-1. The Android Bluetooth protocol stack
Bluetooth-specific protocols and adopted protocols
One useful way of thinking about the Bluetooth protocol stack is to separate it into Bluetooth-specific protocols and “adopted” protocols that run on top of Bluetooth. Taken together, Bluetooth and the adopted protocols can be dauntingly complex, but if you set aside, for a while, the fact that large, complex protocols such as OBEX and TCP/IP run on top of Bluetooth, it’s more understandable. Therefore, we will start with the lower layers of Bluetooth and emphasize how these layers shape how you can make use of Bluetooth.
Another useful mental model of Bluetooth is that it replaces serial ports. This means the lower layers of Bluetooth emulate, and enable you to manage, a virtual set of serial cables between peripherals. This is the type of Bluetooth protocol we will be using. This, in turn, enables us to use the simple java.io classes InputStream and OutputStream to read and write data.
Bluez: The Linux Bluetooth Implementation
A mobile handset may want to connect to all kinds of Bluetooth devices, unlike peripheral devices that need to be connectable only to a computer or handset. That means a mobile handset wants to have a fairly complete implementation of Bluetooth and the adopted protocols, as well as a user interface that enables the necessary interactions for making and managing connections and for using applications that communicate over Bluetooth.
Android uses the Bluez Bluetooth stack, which is the most commonly used Bluetooth stack for Linux. It superseded a project called Open BT. Information on Bluez can be found at the Bluez project site, http://www.bluez.org.
Bluez was developed at Qualcomm, and has been adopted into the Linux kernel. The project was begun in 2001 and has been an active and well-supported project ever since. Bluez is, therefore, a stable and compatible implementation—another reason Linux is a good choice for handset operating systems.
Using Bluetooth in Android Applications
Using Bluetooth in Android means using classes that were designed to encapsulate the way Bluetooth works in the Android operating system: the Bluez stack provides ways to enumerate devices, listen for connections, and use connections; the java.io package provides classes for reading and writing data; and the Handler and Message classes provide a way to bridge between the threads that manage Bluetooth input and output and the user interface. Let’s take a look at the code and how these classes are used.
Compiling and running this code will give you an idea of what Android’s Bluetooth classes can do for applications that need to build simple connections to nearby devices.
The first step in trying out this Bluetooth application is to pair your handset with a PC. Then, you need a program that monitors what the PC has received via Bluetooth to see that what you send from this application got to your PC. In this case we’ll use the Linux utility hcidump.
Start the program under the debugger if you want to set some breakpoints and step through it, especially the parts of the application that open and accept connections. You can create the connection from your PC, using the Blueman applet in Linux, or from the app. Once the connection is created, start hcidump in a terminal to see that what you typed into the app is received by the PC. Use the flags shown below to show only the content of the Bluetooth connection:
sudo hcidump -a -R
Now, what you send from your device should show up as the output of hcidump on your PC.
Bluetooth and related I/O classes
This program relies on the BluetoothAdapter class to control the device’s Bluetooth adapter, the BluetoothDevice class to represent the state of the connected device, and the BluetoothSocket class to represent sockets for listening for and making connections:
package com.finchframework.bluetooth;
import android.os.Handler;
import android.os.Message;
public class BtHelperHandler extends Handler {
public enum MessageType {
STATE,
READ,
WRITE,
DEVICE,
NOTIFY;
}
public Message obtainMessage(MessageType message, int count, Object obj) {
return obtainMessage(message.ordinal(), count, -1, obj);
}
public MessageType getMessageType(int ordinal) {
return MessageType.values()[ordinal];
}
}
The BtHelperHandler class defines some constants and provides a little bit of wrapper code that makes message-related methods cleaner.
BtSPPHelper.java is what encapsulates our use of the Bluetooth Serial Port Protocol (SPP):
package com.finchframework.bluetooth;
import java.io.IOException;
import java.io.InputStream;
import java.io.OutputStream;
import java.util.UUID;
import com.finchframework.finch.R;
import android.bluetooth.BluetoothAdapter;
import android.bluetooth.BluetoothDevice;
import android.bluetooth.BluetoothServerSocket;
import android.bluetooth.BluetoothSocket;
import android.content.Context;
import android.os.Bundle;
import android.os.Message;
import android.util.Log;
/**
* Helper class that runs AsyncTask objects for communicating with a Bluetooth
* device. This code is derived from the Bluetoothchat example, but modified in
* several ways to increase modularity and generality: The Handler is in a
* separate class to make it easier to drop into other components.
*
* Currently this only does Bluetooth SPP. This can be generalized to other
* services.
*/
public class BtSPPHelper {
// Debugging
private final String TAG = getClass().getSimpleName();
private static final boolean D = true;
public enum State {
NONE,
LISTEN,
CONNECTING,
CONNECTED;
}
// Name for the SDP record when creating server socket
private static final String NAME = "BluetoothTest";
// Unique UUID for this application
private static final UUID SPP_UUID =
UUID.fromString("00001101-0000-1000-8000-00805F9B34FB");
// Member fields
private final BluetoothAdapter mAdapter;
private final BtHelperHandler mHandler;
private AcceptThread mAcceptThread;
private ConnectThread mConnectThread;
private ConnectedThread mConnectedThread;
private State mState;
private Context mContext;
/**
* Constructor. Prepares a new Bluetooth SPP session.
* @param context The UI Activity Context
* @param handler A Handler to send messages back to the UI Activity
*/
public BtSPPHelper(Context context, BtHelperHandler handler) {
mContext = context;
mAdapter = BluetoothAdapter.getDefaultAdapter();
mState = State.NONE;
mHandler = handler;
}
/**
* Set the current state of the chat connection
* @param state The current connection state
*/
private synchronized void setState(State state) {
if (D) Log.d(TAG, "setState() " + mState + " -> " + state);
mState = state;
// Give the new state to the Handler so the UI Activity can update
mHandler.obtainMessage(BtHelperHandler.MessageType.STATE,
-1, state).sendToTarget();
}
/**
* Return the current connection state.
*/
public synchronized State getState() {
return mState;
}
/**
* Start the session. Start AcceptThread to begin a
* session in listening (server) mode.
*
* Typically, call this in onResume()
*/
public synchronized void start() {
if (D) Log.d(TAG, "start");
// Cancel any thread attempting to make a connection
if (mConnectThread != null) {mConnectThread.cancel(); mConnectThread = null;}
// Cancel any thread currently running a connection
if (mConnectedThread != null) {
mConnectedThread.cancel();
mConnectedThread = null;
}
// Start the thread to listen on a BluetoothServerSocket
if (mAcceptThread == null) {
mAcceptThread = new AcceptThread();
mAcceptThread.start();
}
setState(State.LISTEN);
}
/**
* Start the ConnectThread to initiate a connection to a remote device.
* @param device The BluetoothDevice to connect
*/
public synchronized void connect(BluetoothDevice device) {
if (D) Log.d(TAG, "connect to: " + device);
// Cancel any thread attempting to make a connection
if (mState == State.CONNECTING) {
if (mConnectThread != null) {
mConnectThread.cancel();
mConnectThread = null;
}
}
// Cancel any thread currently running a connection
if (mConnectedThread != null) {
mConnectedThread.cancel();
mConnectedThread = null;
}
// Start the thread to connect with the given device
mConnectThread = new ConnectThread(device);
mConnectThread.start();
setState(State.CONNECTING);
}
/**
* Start the ConnectedThread to begin managing a Bluetooth connection
*
* @param socket
* The BluetoothSocket on which the connection was made
* @param device
* The BluetoothDevice that has been connected
*/
private synchronized void connected(BluetoothSocket socket,
BluetoothDevice device) {
if (D)
Log.d(TAG, "connected");
// Cancel the thread that completed the connection
if (mConnectThread != null) {
mConnectThread.cancel();
mConnectThread = null;
}
// Cancel any thread currently running a connection
if (mConnectedThread != null) {
mConnectedThread.cancel();
mConnectedThread = null;
}
// Cancel the accept thread because we only want to connect to one
// device
if (mAcceptThread != null) {
mAcceptThread.cancel();
mAcceptThread = null;
}
// Start the thread to manage the connection and perform transmissions
mConnectedThread = new ConnectedThread(socket);
mConnectedThread.start();
// Send the name of the connected device back to the UI Activity
mHandler.obtainMessage(BtHelperHandler.MessageType.DEVICE, -1,
device.getName()).sendToTarget();
setState(State.CONNECTED);
}
/**
* Stop all threads
*/
public synchronized void stop() {
if (D) Log.d(TAG, "stop");
if (mConnectThread != null) {
mConnectThread.cancel();
mConnectThread = null;
}
if (mConnectedThread != null) {
mConnectedThread.cancel();
mConnectedThread = null;
}
if (mAcceptThread != null) {
mAcceptThread.cancel();
mAcceptThread = null;
}
setState(State.NONE);
}
/**
* Write to the ConnectedThread in an unsynchronized manner
* @param out The bytes to write
* @see ConnectedThread#write(byte[])
*/
public void write(byte[] out) {
ConnectedThread r;
// Synchronize a copy of the ConnectedThread
synchronized (this) {
if (mState != State.CONNECTED) return;
r = mConnectedThread;
}
// Perform the write unsynchronized
r.write(out);
}
private void sendErrorMessage(int messageId) {
setState(State.LISTEN);
mHandler.obtainMessage(BtHelperHandler.MessageType.NOTIFY, -1,
mContext.getResources().getString(messageId)).sendToTarget();
}
/**
* This thread listens for incoming connections.
*/
private class AcceptThread extends Thread {
// The local server socket
private final BluetoothServerSocket mmServerSocket;
public AcceptThread() {
BluetoothServerSocket tmp = null;
// Create a new listening server socket
try {
tmp = mAdapter.listenUsingRfcommWithServiceRecord(NAME, SPP_UUID);
} catch (IOException e) {
Log.e(TAG, "listen() failed", e);
}
mmServerSocket = tmp;
}
public void run() {
if (D) Log.d(TAG, "BEGIN mAcceptThread" + this);
setName("AcceptThread");
BluetoothSocket socket = null;
// Listen to the server socket if we're not connected
while (mState != BtSPPHelper.State.CONNECTED) {
try {
// This is a blocking call and will only return on a
// successful connection or an exception
socket = mmServerSocket.accept();
} catch (IOException e) {
Log.e(TAG, "accept() failed", e);
break;
}
// If a connection was accepted
if (socket != null) {
synchronized (BtSPPHelper.this) {
switch (mState) {
case LISTEN:
case CONNECTING:
// Situation normal. Start the connected thread.
connected(socket, socket.getRemoteDevice());
break;
case NONE:
case CONNECTED:
// Either not ready or already connected.
// Terminate new socket.
try {
socket.close();
} catch (IOException e) {
Log.e(TAG, "Could not close unwanted socket", e);
}
break;
}
}
}
}
if (D) Log.i(TAG, "END mAcceptThread");
}
public void cancel() {
if (D) Log.d(TAG, "cancel " + this);
try {
mmServerSocket.close();
} catch (IOException e) {
Log.e(TAG, "close() of server failed", e);
}
}
}
/**
* This thread runs while attempting to make an outgoing connection
* with a device. It runs straight through; the connection either
* succeeds or fails.
*/
private class ConnectThread extends Thread {
private final BluetoothSocket mmSocket;
private final BluetoothDevice mmDevice;
public ConnectThread(BluetoothDevice device) {
mmDevice = device;
BluetoothSocket tmp = null;
// Get a BluetoothSocket for a connection with the
// given BluetoothDevice
try {
tmp = device.createRfcommSocketToServiceRecord(SPP_UUID);
} catch (IOException e) {
Log.e(TAG, "create() failed", e);
}
mmSocket = tmp;
}
public void run() {
Log.i(TAG, "BEGIN mConnectThread");
setName("ConnectThread");
// Always cancel discovery because it will slow down a connection
mAdapter.cancelDiscovery();
// Make a connection to the BluetoothSocket
try {
// This is a blocking call and will only return on a
// successful connection or an exception
mmSocket.connect();
} catch (IOException e) {
sendErrorMessage(R.string.bt_unable);
// Close the socket
try {
mmSocket.close();
} catch (IOException e2) {
Log.e(TAG, "unable to close() socket during connection failure",
e2);
}
// Start the service over to restart listening mode
BtSPPHelper.this.start();
return;
}
// Reset the ConnectThread because we're done
synchronized (BtSPPHelper.this) {
mConnectThread = null;
}
// Start the connected thread
connected(mmSocket, mmDevice);
}
public void cancel() {
try {
mmSocket.close();
} catch (IOException e) {
Log.e(TAG, "close() of connect socket failed", e);
}
}
}
/**
* This thread runs during a connection with a remote device.
* It handles all incoming and outgoing transmissions.
*/
private class ConnectedThread extends Thread {
private final BluetoothSocket mmSocket;
private final InputStream mmInStream;
private final OutputStream mmOutStream;
public ConnectedThread(BluetoothSocket socket) {
Log.d(TAG, "create ConnectedThread");
mmSocket = socket;
InputStream tmpIn = null;
OutputStream tmpOut = null;
// Get the BluetoothSocket input and output streams
try {
tmpIn = socket.getInputStream();
tmpOut = socket.getOutputStream();
} catch (IOException e) {
Log.e(TAG, "temp sockets not created", e);
}
mmInStream = tmpIn;
mmOutStream = tmpOut;
}
public void run() {
Log.i(TAG, "BEGIN mConnectedThread");
byte[] buffer = new byte[1024];
int bytes;
// Keep listening to the InputStream while connected
while (true) {
try {
// Read from the InputStream
bytes = mmInStream.read(buffer);
// Send the obtained bytes to the UI Activity
mHandler.obtainMessage(BtHelperHandler.MessageType.READ,
bytes, buffer).sendToTarget();
} catch (IOException e) {
Log.e(TAG, "disconnected", e);
sendErrorMessage(R.string.bt_connection_lost);
break;
}
}
}
/**
* Write to the connected OutStream.
* @param buffer The bytes to write
*/
public void write(byte[] buffer) {
try {
mmOutStream.write(buffer);
// Share the sent message back to the UI Activity
mHandler.obtainMessage(BtHelperHandler.MessageType.WRITE, -1, buffer)
.sendToTarget();
} catch (IOException e) {
Log.e(TAG, "Exception during write", e);
}
}
public void cancel() {
try {
mmSocket.close();
} catch (IOException e) {
Log.e(TAG, "close() of connect socket failed", e);
}
}
}
}
The BtSPPHelper class brings the use of these classes together, and also contains the definition of private Thread subclasses that listen for, connect, and run connections.
This is also where the java.io package meets Android Bluetooth: the BluetoothSocket objects contain methods that return references to InputStream and OutputStream objects to be used to read and write data on the socket connection:
package com.finchframework.bluetooth;
import java.util.Set;
import com.finchframework.finch.R;
import android.app.Activity;
import android.bluetooth.BluetoothAdapter;
import android.bluetooth.BluetoothDevice;
import android.content.BroadcastReceiver;
import android.content.Context;
import android.content.Intent;
import android.content.IntentFilter;
import android.os.Bundle;
import android.util.Log;
import android.view.View;
import android.view.Window;
import android.view.View.OnClickListener;
import android.widget.AdapterView;
import android.widget.ArrayAdapter;
import android.widget.Button;
import android.widget.ListView;
import android.widget.TextView;
import android.widget.AdapterView.OnItemClickListener;
/**
* Derived from the Bluetooth Chat example, an activity that enables
* picking a paired or discovered Bluetooth device
*/
public class DeviceListActivity extends Activity {
// Debugging
private static final String TAG = "DeviceListActivity";
private static final boolean D = true;
// Return Intent extra
public static String EXTRA_DEVICE_ADDRESS = "device_address";
// Member fields
private BluetoothAdapter mBtAdapter;
private ArrayAdapter<String> mPairedDevicesArrayAdapter;
private ArrayAdapter<String> mNewDevicesArrayAdapter;
@Override
protected void onCreate(Bundle savedInstanceState) {
super.onCreate(savedInstanceState);
// Set up the window
setContentView(R.layout.device_list);
// Set result CANCELED in case the user backs out
setResult(Activity.RESULT_CANCELED);
// Initialize the button to perform device discovery
Button scanButton = (Button) findViewById(R.id.button_scan);
scanButton.setOnClickListener(new OnClickListener() {
public void onClick(View v) {
doDiscovery();
v.setVisibility(View.GONE);
}
});
// Initialize array adapters. One for already paired devices and
// one for newly discovered devices
mPairedDevicesArrayAdapter = new ArrayAdapter<String>(this,
R.layout.device_name);
mNewDevicesArrayAdapter = new ArrayAdapter<String>(this,
R.layout.device_name);
// Find and set up the ListView for paired devices
ListView pairedListView = (ListView) findViewById(R.id.paired_devices);
pairedListView.setAdapter(mPairedDevicesArrayAdapter);
pairedListView.setOnItemClickListener(mDeviceClickListener);
// Find and set up the ListView for newly discovered devices
ListView newDevicesListView = (ListView) findViewById(R.id.new_devices);
newDevicesListView.setAdapter(mNewDevicesArrayAdapter);
newDevicesListView.setOnItemClickListener(mDeviceClickListener);
// Register for broadcasts when a device is discovered
IntentFilter filter = new IntentFilter(BluetoothDevice.ACTION_FOUND);
this.registerReceiver(mReceiver, filter);
// Register for broadcasts when discovery has finished
filter = new IntentFilter(BluetoothAdapter.ACTION_DISCOVERY_FINISHED);
this.registerReceiver(mReceiver, filter);
// Get the local Bluetooth adapter
mBtAdapter = BluetoothAdapter.getDefaultAdapter();
// Get a set of currently paired devices
Set<BluetoothDevice> pairedDevices = mBtAdapter.getBondedDevices();
// If there are paired devices, add each one to the ArrayAdapter
if (pairedDevices.size() > 0) {
findViewById(R.id.title_paired_devices).setVisibility(View.VISIBLE);
for (BluetoothDevice device : pairedDevices) {
mPairedDevicesArrayAdapter.add(device.getName() +
"\n" + device.getAddress());
}
} else {
String noDevices =
getResources().getText(R.string.none_paired).toString();
mPairedDevicesArrayAdapter.add(noDevices);
}
}
@Override
protected void onDestroy() {
super.onDestroy();
// Make sure we're not doing discovery anymore
if (mBtAdapter != null) {
mBtAdapter.cancelDiscovery();
}
// Unregister broadcast listeners
this.unregisterReceiver(mReceiver);
}
/**
* Start device discover with the BluetoothAdapter
*/
private void doDiscovery() {
if (D) Log.d(TAG, "doDiscovery()");
// Indicate scanning in the title
setProgressBarIndeterminateVisibility(true);
setTitle(R.string.scanning);
// Turn on sub-title for new devices
findViewById(R.id.title_new_devices).setVisibility(View.VISIBLE);
// If we're already discovering, stop it
if (mBtAdapter.isDiscovering()) {
mBtAdapter.cancelDiscovery();
}
// Request discover from BluetoothAdapter
mBtAdapter.startDiscovery();
}
// The on-click listener for all devices in the ListViews
private OnItemClickListener mDeviceClickListener = new OnItemClickListener() {
public void onItemClick(AdapterView<?> av, View v, int arg2, long arg3) {
// Cancel discovery because it's costly and we're about to connect
mBtAdapter.cancelDiscovery();
// Get the device MAC address, which is the last 17 chars in the View
String info = ((TextView) v).getText().toString();
String address = info.substring(info.length() - 17);
// Create the result Intent and include the MAC address
Intent intent = new Intent();
intent.putExtra(EXTRA_DEVICE_ADDRESS, address);
// Set result and finish this Activity
setResult(Activity.RESULT_OK, intent);
finish();
}
};
// The BroadcastReceiver that listens for discovered devices and
// changes the title when discovery is finished
private final BroadcastReceiver mReceiver = new BroadcastReceiver() {
@Override
public void onReceive(Context context, Intent intent) {
String action = intent.getAction();
// When discovery finds a device
if (BluetoothDevice.ACTION_FOUND.equals(action)) {
// Get the BluetoothDevice object from the Intent
BluetoothDevice device =
intent.getParcelableExtra(BluetoothDevice.EXTRA_DEVICE);
// If it's already paired, skip it, because it's been listed already
if (device.getBondState() != BluetoothDevice.BOND_BONDED) {
mNewDevicesArrayAdapter.add(
device.getName() + "\n" + device.getAddress());
}
// When discovery is finished, change the Activity title
} else if (BluetoothAdapter.ACTION_DISCOVERY_FINISHED.equals(action)) {
setProgressBarIndeterminateVisibility(false);
setTitle(R.string.select_device);
if (mNewDevicesArrayAdapter.getCount() == 0) {
String noDevices =
getResources().getText(R.string.none_found).toString();
mNewDevicesArrayAdapter.add(noDevices);
}
}
}
};
}
The DeviceListActivity class
This activity displays a dialog that lists known devices and enables the user to request a scan for devices. Unlike those parts of the app where Thread subclasses are used to implement asynchronous I/O and Handler subclasses pass the results to the UI thread, the startDiscovery method of theBluetoothAdapter class kicks off a separate thread and communicates results using broadcast intents. A BroadcastReceiver is used here to process those results.
The BtConsoleActivity class
The BtConsoleActivity class creates a chat-like activity for interacting with a Bluetooth device. The menus in this activity enable connecting to a device, and the main view in this activity is a scrolling list of data sent and received. At the bottom of the screen, there is an EditText view for entering text to be sent to the other end of the SPP connection.
Handler classes are used to glue the single-threaded UI to the threads that listen, connect, and perform I/O on socket connections.
All materials on the site are licensed Creative Commons Attribution-Sharealike 3.0 Unported CC BY-SA 3.0 & GNU Free Documentation License (GFDL)
If you are the copyright holder of any material contained on our site and intend to remove it, please contact our site administrator for approval.
© 2016-2025 All site design rights belong to S.Y.A.