Programming Android (2011)
Part I. Tools and Basics
Chapter 3. The Ingredients of an Android Application
Based on the foundation laid in the last chapter for writing robust Java code, this chapter introduces the major high-level concepts involved in programming for the Android platform.
Traditional Programming Models Compared to Android
When starting applications, operating systems traditionally use a single entry point, often called main, which might parse some command-line arguments and then proceed to execute a loop that would read user input and produce output. The OS would load the program code into a process and then start executing it. Conceptually, this kind of process would look something like Figure 3-1.
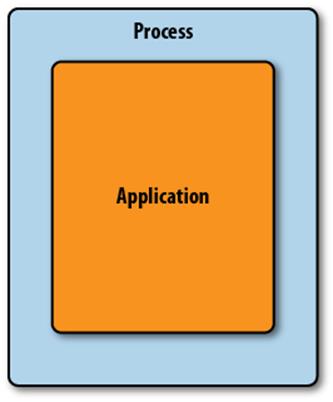
Figure 3-1. A simple application in a process
With programs written in Java, it gets a little more complex: a Java virtual machine (VM) in a process loads bytecode to instantiate Java classes as the program uses them. This process looks something like Figure 3-2. If you use a rich graphical user interface system like Swing, you might start a UI system and then write callbacks to your code that process events.
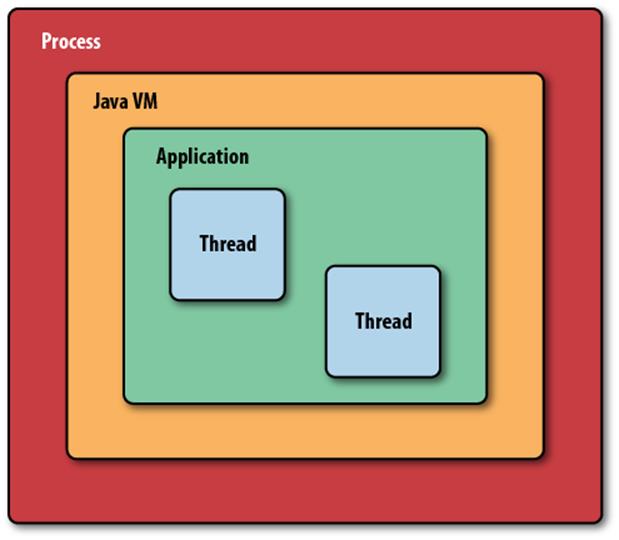
Figure 3-2. A Java application, running in a Java virtual machine, in a process
Android introduces a richer and more complex approach by supporting multiple application entry points. Android programs should expect the system to start them in different places, depending on where the user is coming from and what she wants to do next. Instead of a hierarchy of places, your program is a cooperating group of components that may be started from outside the normal flow of your application. For example, a component to scan a bar code provides a discrete function that many applications can integrate into their UI flow. Instead of relying on the user to directly start each application, the components themselves invoke one another to perform interactions on behalf of the user.
Activities, Intents, and Tasks
An Android activity is both a unit of user interaction—typically filling the whole screen of an Android mobile device—and a unit of execution. When you make an interactive Android program, you start by subclassing the Activity class. Activities provide the reusable, interchangeable parts of the flow of UI components across Android applications.
How, then does one activity invoke another, and pass information about what the user wants to do? The unit of communication is the Intent class. An Intent represents an abstract description of a function that one activity requires another activity to perform, such as taking a picture. Intents form the basis of a system of loose coupling that allows activities to launch one another. When an application dispatches an intent, it’s possible that several different activities might be registered to provide the desired operation.
You have already "written" the code for an activity in the test application you created to verify that your Android SDK is correctly installed. Let’s take a look at that code again:
public class TestActivity extends Activity {
/** Called when the activity is first created. */
@Override
public void onCreate(Bundle savedInstanceState) {
super.onCreate(savedInstanceState);
setContentView(R.layout.main);
}
}
When the system starts this activity it calls the constructor for TestActivity, a subclass of Activity, and then calls its onCreate method. This causes the view hierarchy described in the main.xml file to load and display. The onCreate method kicks off the life cycle of the Activity, whichChapter 11 covers in detail.
The Activity class is one of the most important classes in the Android system, promoting apps' modularity and allowing functionality to be shared. An Activity interacts with the Android runtime to implement key aspects of the application life cycle. Each activity can also be independently configured, through a Context class.
Each activity in an Android application is largely separate from other activities. The code that implements one activity does not directly call methods in the code that implements another activity. Other elements in the Android framework—such the Intent already mentioned—are used to manage communication instead. Thus, you are discouraged from keeping references to Activity objects. The Android Runtime Environment, which creates and manages activities and other application components, often reclaims the memory they use in order to restrict individual tasks to relatively small amounts of memory. You will find ad hoc attempts to manage activity memory to be largely counterproductive.
TIP
We use the word activity to refer to instances of the Activity class, much the way that object is used to refer to instances of classes.
Instead of a user interface flow control based on method calls, applications describe an Intent that they want to execute and ask the system to find one that matches. The Android Home screen application starts your program using these descriptions, and each app can then do the same using its own choice of intents. Android Developers call the resultant flow a “task”: a chain of activities that often span more than one application, and, indeed, more than one process. Figure 3-3 shows a task spanning three applications and multiple activities (Table 3-1 gives an example). The chain of activities comprising this task spans three separate processes and heaps, and can exist independently of other tasks that may have started other instances of the same Activity subclasses.
Table 3-1. Examples of a single task, made up of activities across applications
|
App |
Activity |
User’s next action |
|
Messaging |
View list of messages |
User taps on a message in the list |
|
Messaging |
View a message |
User taps Menu→View Contact |
|
Contacts |
View a contact |
User taps Call Mobile |
|
Phone |
Call the contact's mobile number |
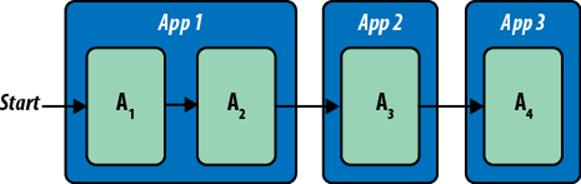
Figure 3-3. Activities in a single task, spanning multiple applications
Other Android Components
Three other components in Android contribute to applications: services, content providers, and broadcast receivers. The Service class supports background functions. The ContentProvider class provides access to a data store for multiple applications, and the Broadcast Receiver allows multiple parties to listen for intents broadcast by applications.
You will find that, compared to its components, the application itself is a relatively unimportant unit. Well-designed applications “dissolve” into the Android environment, where they can start activities in other applications to borrow their functions, and provide or augment their own functionality through the use of supporting Android components. You can think of Android's content providers and intents as a secondary API that you should learn to use in order to take advantage of Android's strongest features and integrate seamlessly with the Android platform.
Service
The Android Service class is for background tasks that may be active but not visible on the screen. A music-playing application would likely be implemented as a service in order to continue to play music while a user might be viewing web pages. Services also allow applications to share functions through long-term connections. This practice is reminiscent of Internet services such as FTP and HTTP, which wait until a request from a client triggers them. The Android platform avoids reclaiming service resources, so once a service starts, it is likely to be available unless memory gets extremely constrained.
Like Activity, the Service class offers methods that control its life cycle, such as stopping and restarting the service.
Content Providers
Content provider components are roughly analogous to a RESTful web service: you find them using a URI, and the operations of a ContentProvider subclass parallel RESTful web operations such as putting and getting data. A special URI starting with the content://, which is recognized across the local device, gives you access to the content provider data. To use a ContentProvider, you specify a URI and how to act on referenced data. Here is a list of content provider operations, which provide the well-known quartet of basic data handling activities: create (insert), read (query), update, and delete:
Insert
The insert method of the ContentProvider class is analogous to the REST POST operation. It inserts new records into the database.
Query
The query method of the ContentProvider class is analogous to the REST GET operation. It returns a set of records in a specialized collection class called Cursor.
Update
The update method of the ContentProvider class is analogous to the REST UPDATE operation. It replaces records in the database with updated records.
Delete
The delete method of the ContentProvider class is analogous to the REST DELETE operation. It removes matching records from the database.
TIP
REST stands for “Representational State Transfer.” It isn’t a formal protocol the way that HTTP is. It is more of a conceptual framework for using HTTP as a basis for easy access to data. While REST implementations may differ, they all strive for simplicity. Android’s content provider API formalizes REST-like operations into an API and is designed in the spirit of REST’s simplicity. You can find more information on REST on Wikipedia: http://en.wikipedia.org/wiki/REST.
Content provider components are the heart of the Android content model: by providing a ContentProvider, your application can share data with other applications and manage the data model of an application. A companion class, ContentResolver, enables other components in an Android system to find content providers. You will find content providers throughout the platform, used both in the operating system and in applications from other developers. Notably, the core Android applications make use of content providers that can provide quick and sophisticated functions for new Android applications, including providers for Browser, Calendar, Contacts, Call Log, Media, and Settings.
Content providers are unique among the IPC systems found on other platforms, such as CORBA, RMI, and DCOM, which focus on remote procedure calls. Content providers operate both as a persistence mechanism and as a form of interprocess communication. Instead of just enabling interprocess method calls, content providers allow developers to efficiently share entire SQL databases across processes: instead of sharing just objects, content providers manage entire SQL tables.
Using a content provider
Due to its importance in Android, we provide a brief introduction here to writing a client that uses a content provider. This example, which uses one of the most important content providers—the Contacts database—should give you a somewhat more grounded understanding of how a content provider can fit into your application. The ContentProvider class provides the central content provider API, which you can subtype to manipulate specific types of data. Activities access specific content provider instances using the ContentResolver class and associated URLs as follows:
// code from an activity method
ContentProviderClient client = getContentResolver().
acquireContentProviderClient("content://contacts/people");
ContentProvider provider = client.getLocalContentProvider();
Using a content provider involves calling its data operations with REST-style URIs defined by the UriMatcher class. UriMatcher provides a simple string matching utility for REST-based URLs, with support for wild-carding strings. Content provider URLs always take the following form:
content://authority/path/id
where authority is the Java package of the content provider namespace (often the Java namespace of the content provider implementation). Here are some example content provider URIs:
// references a person
content://contacts/people/25
// this URI designates the phone numbers of the person whose ID is "25"
content://contacts/people/25/phones
When a developer calls the query method on a content provider, the call will return a Cursor object that implements the android.database.Cursor interface. This interface lets you retrieve one result (like a row from a database) at a time using an index that is automatically updated as you retrieve each result. Developers familiar with JDBC can compare this to java.sql.ResultSet. In most cases, Cursor objects represent the results of queries on SQLite tables. Developers can access cursor fields using the indexes of the underlying SQLite table. Here is an example of iterating an Android cursor and accessing its fields:
// code from an activity method
Cursor contactsCursor =
managedQuery(ContactsContract.Contacts.CONTENT_URI,
null, null, null, null);
if (contactsCursor.moveToFirst()) {
int idx = contactsCursor.getColumnIndex(Contacts.People.DISPLAY_NAME);
do { name = contactsCursor.getString(idx); }
while (contactsCursor.moveToNext());
}
Note here that whenever a client uses a cursor from a provider, it’s critical to close the cursor when the client is’s done with it. Failure to do so will result in a serious memory leak that can crash your application. Android provides two ways to ensure that provider cursors get closed when not in use:
§ The activity calls Cursor.close directly.
§ The activity calls managedQuery to query content providers, or calls startManagingCursor(Cursor c). Both of these calls rely on the system to watch cursor references to know when a given reference has no more active clients. When reference counts indicate that all clients have finished, the system will itself call Cursor.close.
We’ll spend more time covering data and content providers in detail in Chapters 12 and 13.
Content providers and the Internet
Together with the Activity component of an Android application, content providers provide the necessary parts of a Model-View-Controller (MVC) architecture. In addition to supporting REST-like operations, they support the observer pattern that supports MVC. The ContentResolver class provides a notifyChange method that broadcasts a change in the database to Cursor objects that have registered content observers using the registerContentObserver method.
You may be thinking, “That’s nice, but the data I’m interested in is out there on the Internet.” As it happens, Android provides plenty of tools to make accessing that data simple. You have probably used some applications that access Internet-based data using Android’s network classes. Unfortunately, you can often recognize these applications because they take a noticeable amount of time to access and retrieve data from some server on the Internet. They might even show a progress indicator while you wait.
Wouldn’t it be nicer if you could harness the power of content providers to cache data locally, and the power of Android’s database-centric MVC architecture support to make fresh data appear on the user’s screen as it arrives? That’s what Chapter 13 is about. There you will learn how to combine user interfaces, content providers and related classes, Android’s network APIs, and MVC support in Android to create a REST client that takes advantage of the similarity of the content provider architecture to REST to free the user from staring at a progress indicator while your application fetches data.
BroadcastReceiver
The BroadcastReceiver class implements another variant of Android’s high-level inter-process communication mechanism using Intent objects. BroadcastReceiver has a simpler life cycle, than the other components we've covered. A broadcast receiver receives the action of Intent objects, similarly to an Activity, but does not have its own user interface. A typical use for a broadcast receiver might be to receive an alarm that causes an app to become active at a particular time. The system can broadcast an intent to multiple receivers.
Static Application Resources and Context
Applications may need to store significant amounts of data to control their runtime behavior. Some of this data describes the application environment: the app name, the intents it registers, the permissions it needs and so on. This data is stored in a file called the manifest. Other data might be images to display or simple text strings, indicating what background color or font to use. These data are called resources. Together, all this information forms the context of the application, and Android provides access to it through the Context class. Both Activity and Service extend theContext class, which means that all activities and services have access to Context data through the this pointer. In subsequent sections, we will describe how to use a Context object to access application resources at runtime.
Application Manifests
Android requires applications to explicitly describe their contents in an XML file called AndroidManifest.xml. Here, applications declare the presence of content providers, services, required permissions, and other elements. The application context makes this data available to the Android runtime. The manifest file organizes an Android application into a well-defined structure that is shared by all applications and enables the Android operating system to load and execute them in a managed environment. The structure encompasses a common directory layout and common file types in those directories.
As we’ve seen, the four components of Android applications—Activity, Service, ContentProvider, and BroadcastReceiver—provide the foundation of Android application development (see Figure 3-4). To make use of any of them, an application must include corresponding declarations in itsAndroidManifest.xml file.
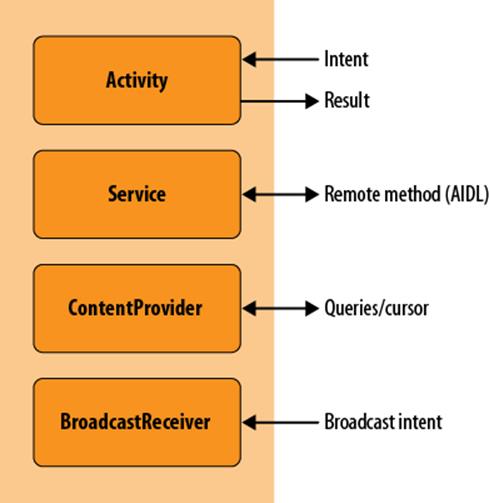
Figure 3-4. The four kinds of Android components
THE APPLICATION CLASS
There is a “fifth Beatle” of Android components: the Application class. But many Android applications do not subclass Application. Because, in most cases, subclassing Application is unnecessary, the Android project wizard doesn’t create one automatically.
A Typical Source Tree
The source code for Android applications almost always makes use of the following directory hierarchy:
AndroidManifest.xml
res/
layout/
... contains application layout files ...
drawable/
...contains images, patches, drawable xml ...
raw/
... contains data files that can be loaded as streams ...
values/
... contains xml files that contain string, number values used in code ...
src/
java/package/directories/
We’ll see in a minute how the res directory is particularly important for making application data accessible using a Context object.
Initialization Parameters in AndroidManifest.xml
The following code shows the Android manifest from our test application that we introduced in Chapter 1. The test application does not do anything beyond demonstrating the basic layout of an Android application. This manifest file contains basic elements that we have discussed:
<?xml version="1.0" encoding="utf-8"?>
<manifest xmlns:android="http://schemas.android.com/apk/res/android"
package="com.oreilly.demo.pa.ch01.testapp"
android:versionCode="1"
android:versionName="1.0">
<uses-permission android:name="android.permission.ACCESS_FINE_LOCATION" />
<uses-permission android:name="android.permission.CALL_PHONE" />
<uses-permission android:name="android.permission.ACCESS_MOCK_LOCATION" />
<uses-permission android:name="android.permission.INTERNET" />
<application android:icon="@drawable/icon"
android:label="@string/app_name"
android:debuggable="true">
<activity android:name=".TestActivity"
android:label="Test Activity">
<intent-filter>
<action android:name="android.intent.action.MAIN"/>
<category android:name="android.intent.category.LAUNCHER"/>
</intent-filter>
</activity>
<provider android:name=".TestProvider"
android:authorities= "com.oreilly.demo.pa.ch11.video.FinchVideo"
/>
<service android:name=".TestService"
android:label="Test Service"/>
<receiver
android:name=".TestBroadcastReceiver"
android:label="Test Broadcast Receiver"/>
</application>
<uses-sdk android:minSdkVersion="7" />
</manifest>
Like all good XML files, line 1 has the standard declaration of the version of XML and the character encoding used. We then define a few parameters and declare needed permissions for the whole application. The following list describes the tags we have used:
manifest
package="com.oreilly.demo.pa.ch01.testapp"
The default package where modules in the application can be found.
android:versionCode
An arbitrary integer denoting versions of the application. Every application should include a version code, and it should always increase for each version released to customers. This lets other programs (like the Android Market, installers, and launchers) easily figure out which version of an application is later than another. The filename of your .apk file should include this same version number so that it is obvious which version is contained in it.
android:versionName
A string intended to be more like the version numbers you usually see for applications, such as 1.0.3. This is the version identifier that will be displayed to a user (either by your application or by another application). The naming convention is up to you, but in general, the idea is to use a scheme like m.n.o (for as many numbers as you want to use), to identify successive levels of change to the application.
uses-permission android:name=...
Four declarations in the TestApp manifest declare that the application intends to use features of Android that require explicit permission from the user of the device running the application. The permission is requested when the application is installed. From then on, Android remembers that the user said it was OK (or not) to run this application and allow access to the secure features. Many permissions are already defined in Android, and all are described in the Android documentation (search for android.Manifest.permission). What’s more, you can define your own permissions and use them to restrict other applications’ access to functions in your application, unless the user grants the other application that permission. We have requested the following commonly used permissions as an example:
ACCESS_FINE_LOCATION
Required to obtain location information from a GPS sensor
CALL_PHONE
Allows a phone call on behalf of the user
ACCESS_MOCK_LOCATION
Allows us to get fake location information when we’re running under the emulator
INTERNET
Allows us to open Internet connections to retrieve data
application
label
Provides a human-readable application label.
icon="@drawable/icon"
The filename for a PNG file that contains the icon you’d like to use for your application. In this case, we’re telling the Android SDK to look for the icon file in the drawable subdirectory of the res (resources) directory under TestApp. Android will use this icon for your application in the Android Desktop.
activity
Turning our attention to the definition of TestActivity, we first define a few attributes. The most important are:
android:name
The name of the class for the Activity. The full name of the activity includes the package name (which in this application is com.oreilly.demo.pa.ch01.testapp), but since this file is always used in the context of the package’s namespace, we don’t need to include the leading package names: we strip the name down to just .TestActivity. Actually, even the leading period is optional.
android:label
The label that we want to appear at the top of the Android screen when the activity is on the screen. We’ve defined this in strings.xml to match our application.
intent-filter
Here we declare an intent filter that tells Android when this Activity should be run. When an app asks Android to fulfill an Intent, the runtime looks among the available activities and services to find something that can service it. We set two attributes:
action
This tells Android how to launch this application once the runtime has decided this is the application to run. Android looks for an activity that declares itself ready to resolve the MAIN action. Any application that is going to be launched by the Launcher needs to have exactly one activity or service that makes this assertion.
category
The Intent resolver in Android uses this attribute to further qualify the Intent that it’s looking for. In this case, the qualification is that we’d like this Activity to be displayed in the User menu so that the user can select it to start this application. Specifying the LAUNCHER category accomplishes this. You can have a perfectly valid application without this attribute—you just won’t be able to launch it from the Android desktop. Normally, again, you’ll have exactly one LAUNCHER per application, and it will appear in the same intent filter as the opening Activity of your application.
provider
Enables the declaration of a content provider. name specifies the name of the provider class and authorities specifies the URI authorities that the content provider should handle. A URI authority provides the domain section of a content provider URI and enables the Android content resolution system to locate a provider that should handle a particular type of URI. We’ll provide more detail on how clients use content providers a bit later in the chapter. We’ve declared a provider with the name TestProvider.
service
Enables the app to declare that it supports a given service, where name specifies the service class and label provides a human-readable label for the service. We’ve declared a service with the name .TestService.
receiver
Provides a way to declare an app’s support for a broadcast receiver. name again specifies the receiving class and label provides a human-readable label for the receiver. We’ve declared a receiver with the name TestBroadcastReceiver.
Resources
Android applications place images, icons, and user interface layout files into a directory named res. The res directory usually will contain at least four subdirectories, as follows:
layout
Contains Android user interface XML files, described in Chapter 7.
drawable
Contains drawing artifacts such as the application icon noted in the previous section.
raw
Holds files that may be read as streams during the execution of an application. Raw files are a great way to provide debug information to a running application without having to access the network to retrieve data.
values
Contains values that the application will read during its execution, or static data an application will use for such purposes as internationalization of UI strings.
Applications access resources in these directories using the method Context.getResources() and the R class.
To access the data in the res directory, a traditional Java developer might think about writing code to build relative resource file paths and then using the file API to open the resources. After loading resource bytes, the application developer might expect to parse an application-specific format to finally get access to the same items every app needs: images, strings, and data files. Anticipating each application’s need to load similar information, Android instead includes a utility that integrates with Eclipse, makes resources easily accessible to program logic, and standardizes program resources.
Eclipse and the Android SDK work together to create a directory called gen, which contains a class always named R, which resides in the Java application package named in the Android manifest. The R class file contains fields that uniquely identify all resources in the application package structure. A developer calls the Context.getResources method to obtain an instance of android.content.res.Resources that directly contains application resources. (Methods in the Context class can be called directly because Activity—and Service as well—extend Context.) Developers then call methods of the Resources object to obtain resources of the desired type as follows:
// code inside an Activity method
String helloWorld = this.getResources().getString(R.string.hello_world);
int anInt = this.getResources().getInteger(R.integer.an_int);
You will see that the R class is ubiquitous in Android, enabling easy access to resources such as the components in UI layout files.
The Android Application Runtime Environment
Android’s unique application component architecture is, in part, a product of the way Android implements a multiprocessing environment. In order to make that environment suitable for multiple applications from multiple vendors with a minimal requirement to trust each vendor, Android executes multiple instances of the Dalvik VM, one for each task. In Component Life Cycles, and in later chapters, we will explore how component life cycles enable Android to enhance the way garbage collection works within application heaps, and how it enables a memory recovery strategy across multiple heaps.
As a result of this simple and reliable approach to multiprocessing, Android must efficiently divide memory into multiple heaps. Each heap should be relatively small so that many applications can fit in memory at the same time. Within each heap, the component life cycle enables components not in use—especially currently inactive user interface components—to be garbage-collected when heap space is tight, and then restored when needed. This, in turn, motivates a database-centric approach to data models where most data is inherently persistent at all times, something you will read a lot more about throughout this book, and especially in Chapter 11.
The Dalvik VM
Android’s approach to multiprocessing, using multiple processes and multiple instances of a VM, requires that each instance of the VM be space-efficient. This is achieved partly through the component life cycle, which enables objects to be garbage-collected and recreated, and partly by the VM itself. Android uses the Dalvik VM to run a bytecode system developed specifically for Android, called dex. Dex bytecodes are approximately twice as space-efficient as Java bytecodes, inherently halving the memory overhead of Java classes for each process. Android systems also use copy-on-write memory to share heap memory among multiple instances of the same Dalvik executable.
Zygote: Forking a New Process
It would also be inefficient for each new process to load all the necessary base classes each time it started a new instance of the VM. Since Android puts each application in a separate process, it can take advantage of the fork operation in the underlying Linux operating system to spawn new processes from a template process that is in the optimal state for launching a new VM instance. This template process is called Zygote. It is an instance of the Dalvik VM that contains a set of preloaded classes that, along with the rest of the state of the Zygote process, are duplicated into copies of Zygote created by forking.
Sandboxing: Processes and Users
Android security relies heavily on security restrictions at the level of the Linux operating system, specifically on process and user-level boundaries. Since Android is designed for personal devices—that is, devices that are owned and used by one person—Android makes an interesting use Linux’s inherent multi-user support: Android creates a new user for each application vendor. This means each application runs with different user privileges (except for those signed by the same vendor). Files owned by one application are, by default, inaccessible by other applications.
The equivalent behavior on Windows would be as though you were running your word processor as your own user, and your web browser as a coworker’s user. You would have to log out and then switch users to see either the word processor or the web browser, but you would not be able to see both at once. Android allows a single logged-in phone user to see multiple applications that are running as different Linux-level users. The net effect is increased security as a result of each application running in its own “silo.”
Desktop operating systems have typically not taken application sandboxing to this extent—once an application is installed, it is trusted with all of a user’s data. Android’s designers envisioned a world of numerous small applications from numerous vendors who cannot all be vetted for trustworthiness. Hence applications don’t have direct access to other applications’ data.
A complete description of Android security can be found in the Android documentation at http://developer.android.com/guide/topics/security/security.html.
Component Life Cycles
Earlier we mentioned life cycles for components. For instance, onCreate starts an application.Component life cycles have two purposes: they facilitate efficient use of each application’s memory, or heap space, and they enable the state of entire processes to be preserved and restored so that the Android system can run more applications than can fit in memory.
The Activity Life Cycle
The most complex component life cycle is the activity life cycle. Here we will diagram it and take a look at how these state transitions are handled in code. In Figure 3-5, you see the states and state transitions in the activity life cycle. The key elements of handling life cycle state transitions are selecting which life cycle callbacks you need to implement, and knowing when they are called.
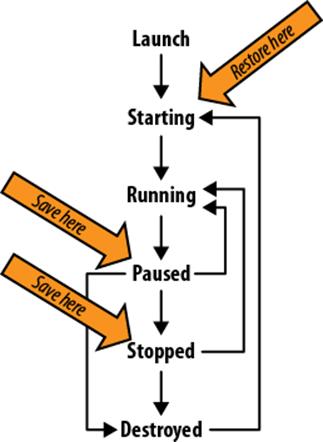
Figure 3-5. Activity life cycle states
In Chapter 11, we will revisit this topic in detail. For now, let’s look at two methods of the Activity class. The runtime calls the first to warn your application to save its state. It calls the second to allow a new Activity instance to restore the state of one that has been destroyed. The method implementations in the following code snippets are taken from Chapter 11, where you can see the full program listing, including the member variables to which the code refers:
@Override
protected void onSaveInstanceState(Bundle outState) {
// Save instance-specific state
outState.putString("answer", state);
super.onSaveInstanceState(outState);
Log.i(TAG, "onSaveInstanceState");
}
The runtime calls onSaveInstanceState method when it determines that it might have to destroy the activity, but wants to be able to restore it later. That’s an important distinction from other life cycle methods that are called on state transitions. If, for example, an activity is explicitly ending, there is no need to restore state, even though it will pass through the paused state, and have its onPause method called. As the previous code snippet shows, the work you need to do in your onSaveInstanceState method is to save any state that will let the user continue using the application later, hopefully not even aware that it might have been destroyed and restored since the previous use:
@Override
protected void onRestoreInstanceState(Bundle savedState) {
super.onRestoreInstanceState(savedState);
// Restore state; we know savedState is not null
String answer = savedState.getString("answer");
// ...
Log.i(TAG, "onRestoreInstanceState"
+ (null == savedState ? "" : RESTORE) + " " + answer);
}
The onRestoreInstanceState method is called when an activity that was destroyed is being recreated. A new instance of your application’s Activity is therefore running. The data you stored in the previous instance of the activity, through onSaveInstanceState, is passed to the new instance via theonRestoreInstanceState method.
You might think that, with such a complex life cycle and stringent requirements to adhere to heap utilization limitations, the Android activity life cycle would be readily apparent in Android application code, and that you will spend a lot of time and effort catering to activity life cycle requirements. Yet this is not the case.
In a lot of Android code, especially in small examples, very few life cycle callbacks are implemented. That is because the Activity parent class handles life cycle callbacks, the View class, and the children of the View class, and also saves their state, as shown in Figure 3-6. This means that in many situations the Android View classes provide all the necessary user interface functionality, and that Android applications do not need to explicitly handle most life cycle callbacks.
This is essentially good, because it makes Android programming a lot more convenient. All of what you see diagrammed in Figure 3-6 happens without you writing any code. But it has a bad side too, because it leads programmers down the path of ignoring the activity life cycle until they have coded themselves into a buggy mess. This is why we emphasize understanding life cycles here, and why, in Chapter 11, we show how to handle all life cycle callbacks and log them. Starting with complete awareness of the activity life cycle is probably the most important thing you can do to prevent bugs that are difficult to diagnose.
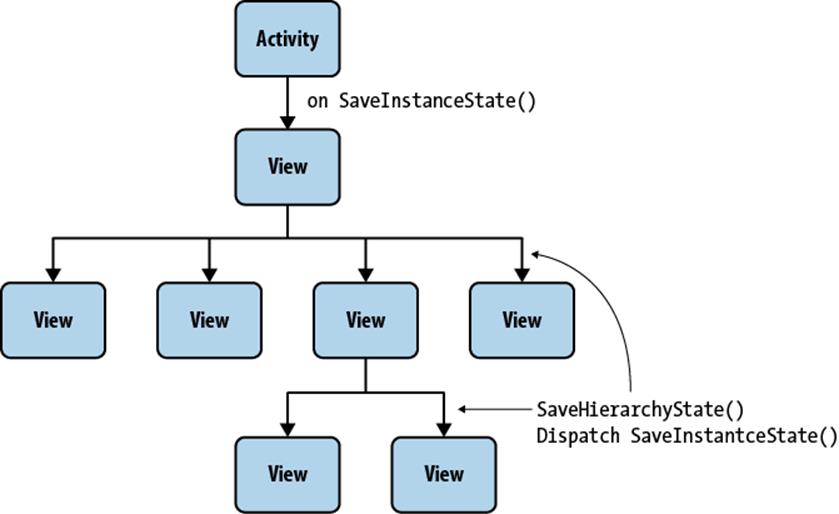
Figure 3-6. Saving the state of the user interface
Packaging an Android Application: The .apk File
Android provides an application called apkbuilder for generating installable Android application files, which have the extension .apk. An .apk file is in ZIP file format, just like many other Java-oriented application formats, and contains the application manifest, compiled application classes, and application resources. Android provides the utility aapt for packaging the files that make up an .apk file, but developers typically prefer to allow their development environment to use this utility to build their applications for them. Most users simply rely on their IDE to build their .apk.
Once a developer has created an .apk file, he can choose to make it available for installation onto a device in one of several ways:
§ Using the adb interface directory, or more commonly by using an IDE
§ Using an SD card
§ Making the file available on a web server
§ Uploading the file to the Android Market, and then selecting Install
On Porting Software to Android
In this chapter, you learned that Android has an application architecture radically different from the typical desktop application architecture and even quite different from most other systems on small devices, including the iOS operating system used in the iPhone, iPod Touch, and iPad. If you attempt to port software by subverting the Android application architecture and force-fitting a conventional application architecture into an Android application, in order to facilitate a method-by-method transliteration from Objective-C, C++, or C#, odds are the effort will come to grief.
If you want to port existing software to Android, first take it apart: the data model, the user interface, and major noninteractive modules and libraries should be ported or reimplemented in the Android application model depending on how they fit. Android does have similarities to other modern managed application runtime environments and language systems. Once you understand Android in greater depth, you will be equipped to see architectural analogies with other platforms and make better implementation choices when porting.
All materials on the site are licensed Creative Commons Attribution-Sharealike 3.0 Unported CC BY-SA 3.0 & GNU Free Documentation License (GFDL)
If you are the copyright holder of any material contained on our site and intend to remove it, please contact our site administrator for approval.
© 2016-2025 All site design rights belong to S.Y.A.