Programming Android (2011)
Part II. About the Android Framework
The Android Framework is the set of base classes that underlie Android applications and the parts of Android system software that comprise the Android userland. Here we organize our presentation of the Android APIs around the goal of enabling you to implement applications that take maximum advantage of the Android system architecture.
Chapter 7. Building a View
Android comes with many requirements that herald complexity in the user interface; it’s a multiprocessing system that supports multiple concurrent applications, accepts multiple forms of input, is highly interactive, and is flexible enough to support a wide range of devices now and in the future. The user interface is both rich and easy to use.
This chapter provides you with the techniques for implementing a graphical interface on Android. It explains the architecture of the Android UI toolkit, while showing you in practical terms how to use basic interface elements such as buttons and text boxes. It also covers event handling, using multiple threads to offload long-running tasks so that the UI doesn’t freeze, and other topics that make user interfaces pleasant and performant.
Android GUI Architecture
The Android environment adds yet another GUI toolkit to the Java ecosystem, joining AWT, Swing, SWT, LWUIT, and others. If you have worked with any of these, the Android UI framework will look familiar. Like them, it is single-threaded, event-driven, and built on a library of nestable components.
The Android UI framework is, like other Java UI frameworks, organized around the common Model-View-Controller pattern illustrated in Figure 7-1. It provides structure and tools for building a Controller that handles user input (like keypresses and screen taps) and a View that renders graphical information to the screen.
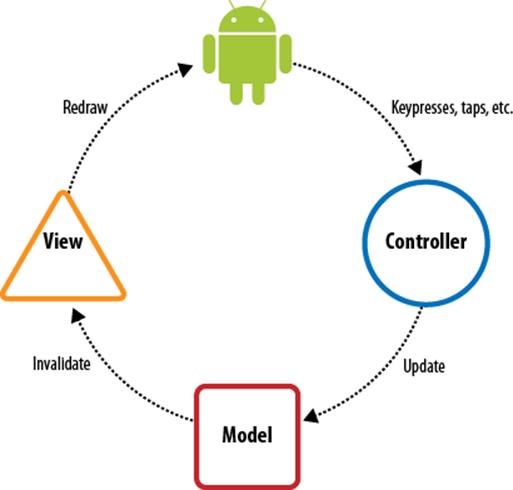
Figure 7-1. Model-View-Controller concept
The Model
The Model is the guts of your application—what it actually does. It might be, for instance, the database of music on your device and the code for playing the music. It might be your list of contacts and the code that places phone calls or sends IMs to them. It is the subject of a large part of the rest of this book.
While a particular application’s View and Controller will necessarily reflect the Model they manipulate, a single Model might be used by several different applications. Consider, for instance, an MP3 player and an application that converts MP3 files into WAV files. For both applications, the Model includes the MP3 file format. The former application, however, has the familiar Stop, Start, and Pause controls, and plays tunes. The latter may not produce any sound at all. Instead, it will have controls for things such as bit rate. The Model is all about the data.
The View
The View is the visualization of the Model. More generally, a view is the portion of the application responsible for rendering the display, sending audio to the speakers, generating tactile feedback, and so on. The graphical portion of the Android UI framework, described in detail in Chapter 9, is implemented as a tree of subclasses of the View class. Graphically, each object represents a rectangular area on the screen that is completely within the rectangular area represented by its parent in the tree. The root of this tree is the application window.
As an example, the display in a hypothetical MP3 player might contain a component that shows the album cover for the currently playing tune. Another View might display the name of the currently playing song while a third contains subviews such as the Play, Pause, and Stop buttons.
The UI framework paints the screen by walking the view tree, asking each component to draw itself in a preorder traversal. In other words, each View draws itself and then asks each of its children to do the same. When the whole tree has been rendered, the smaller, nested components that are the leaves of the tree—and that were therefore painted later—appear to be painted on top of the components that are nearer to the root and that were painted first.
The Android UI framework is actually more efficient than this simplified description. It does not paint an area of a parent View if it can be certain that some child will later paint the same area. It would be a waste of time to paint the background underneath an opaque object. It would also be a waste of time to repaint portions of a View that have not changed.
The Controller
The Controller is the portion of an application that responds to external actions: a keystroke, a screen tap, an incoming call, and so forth. It is implemented as an event queue. Each external action is represented as a unique event in the queue. The framework removes each event from the queue in order and dispatches it.
For example, when a user presses a key on her phone, the Android system generates a KeyEvent and adds it to the event queue. Eventually, after previously enqueued events have been processed, the KeyEvent is removed from the queue and passed as the parameter of a call to thedispatchKeyEvent method of the View that is currently selected.
Once an event is dispatched to the in-focus component, the component may take appropriate action to change the internal state of the program. In an MP3 player application, for instance, when the user taps a Play/Pause button on the screen and the event is dispatched to that button’s object, the handler method might update the Model to resume playing some previously selected tune.
This chapter describes the construction of the Controller for an Android application.
Putting It Together
We now have all the concepts necessary to describe the complete UI system. When an external action occurs—when the user scrolls, drags, or presses a button; a call comes in; or an MP3 player arrives at the end of its playlist—the Android system enqueues an event representing the action on the event queue. Eventually, the event is dequeued—first in, first out—and dispatched to an appropriate event handler. The handler, which is often code you write as part of your application, responds to the event by notifying the Model that there has been a change in state. The Model takes the appropriate action.
Nearly any change in Model state will require a corresponding change in the view. In response to a keypress, for instance, an EditText component must show the newly typed character at the insert point. Similarly, in a phone book application, clicking on a contact will cause that contact to be highlighted and the previously highlighted contact to have its highlighting removed.
When the Model updates it own state it almost certainly will have to change the current display to reflect the internal change. In order to update the display, the Model must notify the UI framework that some portion of the display is now stale and has to be redrawn. The redraw request is actually nothing more than another event enqueued in the same framework event queue that held the Controller event a moment ago. The redraw event is processed, in order, like any other UI event.
Eventually, the redraw event is removed from the queue and dispatched. The event handler for a redraw event is the View. The tree of views is redrawn; each View is responsible, exactly, for rendering its current state at the time it is drawn.
To make this concrete, we can trace the cycle through a hypothetical MP3 player application:
1. When the user taps the screen image of the Play/Pause button, the framework creates a new MotionEvent containing, among other things, the screen coordinates of the tap. The framework enqueues the new event at the end of the event queue.
2. As described in The Controller, when the event percolates through the queue, the framework removes it and passes it down the view tree to the leaf widget within whose bounding rectangle the tap occurred.
3. Because the button widget represents the Play/Pause button, the application button handling code tells the core (the model) that it should resume playing a tune.
4. The application model code starts playing the selected tune. In addition, it sends a redraw request to the UI framework.
5. The redraw request is added to the event queue and eventually processed as described in The View.
6. The screen gets redrawn with the Play button in its playing state and everything is again in sync.
UI component objects such as buttons and text boxes actually implement both View and Controller methods. This only makes sense. When you add a Button to your application’s UI, you want it to appear on the screen as well as do something when the user pushes it. Even though the two logical elements of the UI, the View and the Controller, are implemented in the same object, you should take care that they do not directly interact. Controller methods, for instance, should never directly change the display. Leave it to the code that actually changes state to request a redraw and trust that, later, calls to rendering methods will allow the component to reflect the new state. Coding in this way minimizes synchronization problems and helps to keep your program robust and bug-free.
There is one more aspect of the Android UI framework that is important to recall: it is single-threaded. A single thread removes events from the event queue to make Controller callbacks and to render the view. This is significant for several reasons.
The simplest consequence of a single-threaded UI is that it is not necessary to use synchronized blocks to coordinate state between the View and the Controller. This is a valuable optimization.
Another advantage of a single-threaded UI is that the application is guaranteed that each event on the event queue is processed completely and in the order in which it was enqueued. That may seem fairly obvious, but its implications make coding the UI much easier. When a UI component is called to handle an event, it is guaranteed that no other UI processing will take place until it returns. That means, for instance, that a component that requests multiple changes in the program state—each of which causes a corresponding request that the screen be repainted—is guaranteed that the repaint will not start until it has completed processing, performed all its updates, and returned. In short, UI callbacks are atomic.
The third reason to remember that only a single thread is dequeuing and dispatching events from the UI event queue is that if your code stalls that thread for any reason, your UI will freeze! If a component’s response to an event is simple—changing the state of variables, creating new objects, and so on—it is perfectly correct to do that processing on the main event thread. If, on the other hand, the handler must retrieve a response from some distant network service or run a complex database query, the entire UI will become unresponsive until the request completes. That definitely does not make for a great user experience! Long-running tasks must be delegated to another thread, as described in Advanced Wiring: Focus and Threading.
Assembling a Graphical Interface
The Android UI framework provides both a complete set of drawing tools with which to build a UI, and a rich collection of prebuilt components based on these tools. As we will see in Chapter 9, the framework graphics tools provide plenty of support for applications that need to create their own controls or to render special views. On the other hand, many applications may work very well using only canned views from the toolkit. In fact, the MapActivity and MyLocationOverlay classes make it possible to create extremely sophisticated applications without doing any custom drawing at all.
We’ve already used the term widget once or twice, without explicitly defining it. Recall that the screen is rendered by a tree of components. In the Android UI framework, these components are all subclasses of android.view.View. The views that are leaves or nearly leaves do most of the actual drawing and are, in the context of an application UI, commonly called widgets.
The internal nodes, sometimes called container views, are special components that can have other components as children. In the Android UI framework, container views are subclasses of android.view.ViewGroup, which, of course, is in turn a subclass of View. They typically do very little drawing. Instead, they are responsible for arranging their child views on the screen and keeping them arranged as the View changes shape, orientation, and so on. Doing this can be complex.
To create complex displays, you need to assemble a tree of containers for the views you want to use in your application. Example 7-1 shows an application with a view tree that is three layers deep. A vertical linear layout contains two horizontal linear layouts. Each horizontal layout, in turn, contains two widgets.
Example 7-1. A complex view tree
package com.oreilly.android.intro;
import android.app.Activity;
import android.graphics.Color;
import android.os.Bundle;
import android.view.Gravity;
import android.view.ViewGroup;
import android.widget.Button;
import android.widget.EditText;
import android.widget.LinearLayout;
public class AndroidDemo extends Activity {
private LinearLayout root;
@Override
public void onCreate(Bundle state) {
super.onCreate(state);
LinearLayout.LayoutParams containerParams
= new LinearLayout.LayoutParams(
ViewGroup.LayoutParams.FILL_PARENT,
ViewGroup.LayoutParams.WRAP_CONTENT,
0.0F);
LinearLayout.LayoutParams widgetParams
= new LinearLayout.LayoutParams(
ViewGroup.LayoutParams.FILL_PARENT,
ViewGroup.LayoutParams.FILL_PARENT,
1.0F);
root = new LinearLayout(this);
root.setOrientation(LinearLayout.VERTICAL);
root.setBackgroundColor(Color.LTGRAY);
root.setLayoutParams(containerParams);
LinearLayout ll = new LinearLayout(this);
ll.setOrientation(LinearLayout.HORIZONTAL);
ll.setBackgroundColor(Color.GRAY);
ll.setLayoutParams(containerParams);
root.addView(ll);
EditText tb = new EditText(this);
tb.setText(R.string.defaultLeftText);
tb.setFocusable(false);
tb.setLayoutParams(widgetParams);
ll.addView(tb);
tb = new EditText(this);
tb.setText(R.string.defaultRightText);
tb.setFocusable(false);
tb.setLayoutParams(widgetParams);
ll.addView(tb);
ll = new LinearLayout(this);
ll.setOrientation(LinearLayout.HORIZONTAL);
ll.setBackgroundColor(Color.DKGRAY);
ll.setLayoutParams(containerParams);
root.addView(ll);
Button b = new Button(this);
b.setText(R.string.labelRed);
b.setTextColor(Color.RED);
b.setLayoutParams(widgetParams);
ll.addView(b);
b = new Button(this);
b.setText(R.string.labelGreen);
b.setTextColor(Color.GREEN);
b.setLayoutParams(widgetParams);
ll.addView(b);
setContentView(root);
}
}
Note that the code preserves a reference to the root of the view tree for later use.
This example uses three LinearLayout views. A LinearLayout, just as its name implies, is a View that displays its children in a row or column, as determined by its orientation property. The child views are displayed in the order in which they are added to the LinearLayout (regardless of the order in which they were created), in the directions common for Western readers: left to right and top to bottom. The button labeled “Green”, for instance, is in the lower-right corner of this layout, because it is the second thing added to the horizontal LinearLayout view, which was, in turn, the second thing added to the root, vertical LinearLayout.
Figure 7-2 shows what the results might look like to the user. The seven views in the tree are structured as shown in Figure 7-3.
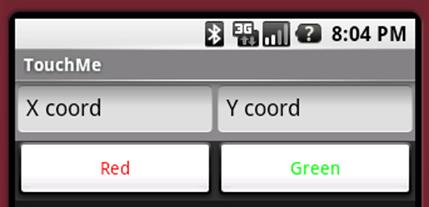
Figure 7-2. How panels appear to the viewer

Figure 7-3. Hierarchy of panels in the View
The Android Framework provides a convenient capability for separating data resources from code. This is particularly useful in building View layouts. The previous example can be replaced with the dramatically simpler code in Example 7-2 and the XML definition of the View layout inExample 7-3.
Example 7-2. A complex View using a layout resource
package com.oreilly.android.intro;
import android.app.Activity;
import android.os.Bundle;
/**
* Android UI demo program
*/
public class AndroidDemo extends Activity {
private LinearLayout root;
@Override public void onCreate(Bundle state) {
super.onCreate(state);
setContentView(R.layout.main);
root = (LinearLayout) findViewById(R.id.root);
}
}
Example 7-3. XML definition of a complex View layout resource
<LinearLayout xmlns:android="http://schemas.android.com/apk/res/android"
android:id="@+id/root"
android:orientation="vertical"
android:background="@drawable/lt_gray"
android:layout_width="fill_parent"
android:layout_height="wrap_content">
<LinearLayout
android:orientation="horizontal"
android:background="@drawable/gray"
android:layout_width="fill_parent"
android:layout_height="wrap_content">
<EditText
android:id="@+id/text1"
android:text="@string/defaultLeftText"
android:focusable="false"
android:layout_width="fill_parent"
android:layout_height="fill_parent"
android:layout_weight="1"/>
<EditText
android:id="@+id/text2"
android:text="@string/defaultRightText"
android:focusable="false"
android:layout_width="fill_parent"
android:layout_height="fill_parent"
android:layout_weight="1"/>
</LinearLayout>
<LinearLayout
android:orientation="horizontal"
android:background="@drawable/dk_gray"
android:layout_width="fill_parent"
android:layout_height="wrap_content">
<Button
android:id="@+id/button1"
android:text="@string/labelRed"
android:textColor="@drawable/red"
android:layout_width="fill_parent"
android:layout_height="fill_parent"
android:layout_weight="1"/>
<Button
android:id="@+id/button2"
android:text="@string/labelGreen"
android:textColor="@drawable/green"
android:layout_width="fill_parent"
android:layout_height="fill_parent"
android:layout_weight="1"/>
</LinearLayout>
</LinearLayout>
This version of the code, like the first one, also preserves a reference to the root of the view tree. It does this by tagging a widget in the XML layout (the root LinearLayout, in this case) with an android:id tag, and then using the findViewById method from the Activity class to recover the reference.
It is a very good idea to get into the habit of using a resource to define your view tree layout. Doing so allows you to separate the visual layout of a View from the code that brings it to life. You can tinker with the layout of a screen without recompiling. Most importantly, though, you can build your UI using tools that allow you to compose screens using a visual UI editor.
NOTE
At Google I/O 2011, the Android Tools team introduced a new layout editor that is really exciting. It can even preview animations and developer-created views; most developers should never need to look at XML, let alone inline code, for laying out views ever again.
Wiring Up the Controller
Assembling a Graphical Interface demonstrated a View with two buttons. Although the buttons look nice—they even become highlighted when clicked—they aren’t very useful. Clicking them doesn’t actually do anything.
The Controller described how the Android Framework translates external actions (screen taps, keypresses, etc.) into events that are enqueued and then passed into the application. Example 7-4 shows how to add an event handler to one of the buttons in the demo so that it does something when it is clicked.
Example 7-4. Wiring up a button
@Override public void onCreate(Bundle state) {
super.onCreate(state);
setContentView(R.layout.main);
final EditText tb1 = (EditText) findViewById(R.id.text1);
final EditText tb2 = (EditText) findViewById(R.id.text2);
((Button) findViewById(R.id.button2)).setOnClickListener(
new Button.OnClickListener() {
// mRand is a class data member
@Override public void onClick(View arg0) {
tb1.setText(String.valueOf(mRand.nextInt(200)));
tb2.setText(String.valueOf(mRand.nextInt(200)));
}
}
);
}
When run, this version of the application still looks a lot like Figure 7-2. Unlike the earlier example, though, in this version, every time a user clicks the button labeled “Green” the numbers in the EditText boxes change. This is illustrated in Figure 7-4.
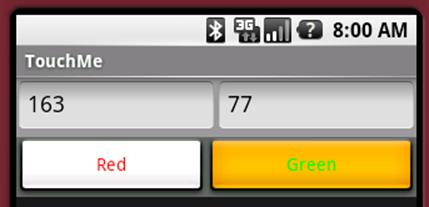
Figure 7-4. Working button
While simply changing numbers isn’t very interesting, this small example demonstrates the standard mechanism that an application uses to respond to UI events. It is important to note that, appearances notwithstanding, this example does not violate the MVC separation of concerns! In response to the call to setText, in this implementation of the OnClickListener, the EditText object updates an internal representation of the text it should display, and then calls its own invalidate method. It does not immediately draw on the screen. Very few rules in programming are absolute. The admonition to separate the Model, the View, and the Controller comes pretty close.
In the example, the instance of the Button class is wired to its behavior using a callback, as described in Overrides and callbacks. Button is a subclass of View, which defines an interface named OnClickListener and a method named setOnClickListener with which to register the listener. TheOnClickListener interface defines a single method, onClick. When a Button receives an event from the framework, in addition to any other processing it might do, it examines the event to see if it qualifies as a “click.” (The button in our first example would become highlighted when pressed, even before the listener was added.) If the event does qualify as a click, and if a click listener has been installed, that listener’s onClick method is invoked.
The click listener is free to implement any custom behavior needed. In the example, the custom behavior creates two random numbers between 0 and 200 and puts one into each of the two text boxes. Instead of subclassing Button and overriding its event processing methods, all that is necessary to extend its behavior is to register a click listener that implements the desired behavior. Certainly a lot easier!
The click handler is especially interesting because, at the heart of the Android system—the framework event queue—there is no such thing as a click event! Instead, View event processing synthesizes the concept of a “click” from other events. If the device has a touch-sensitive screen, for instance, a single tap is considered a click. If the device has a center key in its D-pad, or an Enter key, pressing and releasing either will also register as a click. View clients need not concern themselves with what exactly a click is, or how it is generated on a particular device. They need only handle the higher-level concept, leaving the details to the framework.
A View can have only one onClickListener. Calling setOnClickListener a second time, on a given View, will remove the old listener and install the new one. On the other hand, a single listener can listen to more than one View. The code in Example 7-5, for instance, is part of another application that looks exactly like Example 7-2. In this version, though, pushing either of the buttons will update the text box.
This capability can be very convenient in an application in which several actions produce the same behavior. Do not be tempted, though, to create a single, enormous listener in all of your widgets! Your code will be easier to maintain and modify if it contains multiple smaller listeners, each implementing a single, clear behavior.
Example 7-5. Listening to multiple buttons
@Override public void onCreate(Bundle state) {
super.onCreate(state);
setContentView(R.layout.main);
final EditText tb1 = (EditText) findViewById(R.id.text1);
final EditText tb2 = (EditText) findViewById(R.id.text2);
Button.OnClickListener listener = new Button.OnClickListener() {
@Override public void onClick(View arg0) {
tb1.setText(String.valueOf(rand.nextInt(200)));
tb2.setText(String.valueOf(rand.nextInt(200)));
} };
((Button) findViewById(R.id.button1)).setOnClickListener(listener);
((Button) findViewById(R.id.button2)).setOnClickListener(listener);
}
Listening to the Model
The Android UI framework uses the handler installation pattern pervasively. Although our earlier examples were all Button views, many other Android widgets define listeners. The View class defines several events and listeners that are ubiquitous, and which we will explore in further detail in a moment. Other classes, however, define other, specialized types of events and provide handlers for those events that are meaningful only for those classes. This is a standard idiom that allows clients to customize the behavior of a widget without having to subclass it.
This pattern is also an excellent way for your program to handle its own external, asynchronous actions. Whether responding to a change in state on a remote server or an update from a location-based service, your application can define its own events and listeners to allow its clients to react.
The examples so far have been elementary and have cut several corners. While they demonstrate connecting a View and a Controller, they have not had real models (Example 7-4 actually used a String owned by the implementation of EditText as a model). To continue, we’re going to have to take a brief detour to build a real, usable model.
The following two classes shown in Example 7-6 comprise a Model that will support extensions to the demo application. They provide a facility for storing a list of objects, each of which has x and y coordinates, a color, and a size. They also provide a way to register a listener, and an interface that the listener must implement. The common Listener model underlies these examples, so they are fairly straightforward.
Example 7-6. The Dots model
package com.oreilly.android.intro.model;
/** A dot: the coordinates, color and size. */
public final class Dot {
private final float x, y;
private final int color;
private final int diameter;
/**
* @param x horizontal coordinate.
* @param y vertical coordinate.
* @param color the color.
* @param diameter dot diameter.
*/
public Dot(float x, float y, int color, int diameter) {
this.x = x;
this.y = y;
this.color = color;
this.diameter = diameter;
}
/** @return the horizontal coordinate. */
public float getX() { return x; }
/** @return the vertical coordinate. */
public float getY() { return y; }
/** @return the color. */
public int getColor() { return color; }
/** @return the dot diameter. */
public int getDiameter() { return diameter; }
}
package com.oreilly.android.intro.model;
import java.util.Collections;
import java.util.LinkedList;
import java.util.List;
/** A list of dots. */
public class Dots {
/** DotChangeListener. */
public interface DotsChangeListener {
/** @param dots the dots that changed. */
void onDotsChange(Dots dots);
}
private final LinkedList<Dot> dots = new LinkedList<Dot>();
private final List<Dot> safeDots = Collections.unmodifiableList(dots);
private DotsChangeListener dotsChangeListener;
/** @param l the new change listener. */
public void setDotsChangeListener(DotsChangeListener l) {
dotsChangeListener = l;
}
/** @return the most recently added dot, or null. */
public Dot getLastDot() {
return (dots.size() <= 0) ? null : dots.getLast();
}
/** @return the list of dots. */
public List<Dot> getDots() { return safeDots; }
/**
* @param x dot horizontal coordinate.
* @param y dot vertical coordinate.
* @param color dot color.
* @param diameter dot size.
*/
public void addDot(float x, float y, int color, int diameter) {
dots.add(new Dot(x, y, color, diameter));
notifyListener();
}
/** Delete all the dots. */
public void clearDots() {
dots.clear();
notifyListener();
}
private void notifyListener() {
if (null != dotsChangeListener) {
dotsChangeListener.onDotsChange(this);
}
}
}
In addition to using this model, the next example also introduces a library widget used to view it, the DotView. Its job is to draw the dots represented in the model, in the correct color, at the correct coordinates. The complete source for the application is on the website for this book.
Example 7-7 shows the new demo application, after adding the new Model and view.
Example 7-7. The Dots demo
package com.oreilly.android.intro;
import java.util.Random;
import android.app.Activity;
import android.graphics.Color;
import android.os.Bundle;
import android.view.View;
import android.widget.Button;
import android.widget.EditText;
import android.widget.LinearLayout;
import com.oreilly.android.intro.model.Dot;
import com.oreilly.android.intro.model.Dots;
import com.oreilly.android.intro.view.DotView;
/** Android UI demo program */
public class TouchMe extends Activity {
public static final int DOT_DIAMETER = 6;
private final Random rand = new Random();
final Dots dotModel = new Dots();
DotView dotView;
/** Called when the activity is first created. */
@Override public void onCreate(Bundle state) {
super.onCreate(state);
dotView = new DotView(this, dotModel);
// install the View
setContentView(R.layout.main);
((LinearLayout) findViewById(R.id.root)).addView(dotView, 0);![]()
// wire up the Controller
((Button) findViewById(R.id.button1)).setOnClickListener(
new Button.OnClickListener() {![]()
@Override public void onClick(View v) {
makeDot(dots, dotView, Color.RED);![]()
} });
((Button) findViewById(R.id.button2)).setOnClickListener(
new Button.OnClickListener() {![]()
@Override public void onClick(View v) {
makeDot(dots, dotView, Color.GREEN);![]()
} });
final EditText tb1 = (EditText) findViewById(R.id.text1);
final EditText tb2 = (EditText) findViewById(R.id.text2);
dots.setDotsChangeListener(new Dots.DotsChangeListener() {![]()
@Override public void onDotsChange(Dots dots) {
Dot d = dots.getLastDot();
tb1.setText((null == d) ? "" : String.valueOf(d.getX()));
tb2.setText((null == d) ? "" : String.valueOf(d.getY()));
dotView.invalidate();
} });
}
/**
* @param dots the dots we're drawing
* @param view the view in which we're drawing dots
* @param color the color of the dot
*/
void makeDot(Dots dots, DotView view, int color) {![]()
int pad = (DOT_DIAMETER + 2) * 2;
dots.addDot(
DOT_DIAMETER + (rand.nextFloat() * (view.getWidth() - pad)),
DOT_DIAMETER + (rand.nextFloat() * (view.getHeight() - pad)),
color,
DOT_DIAMETER);
}
}
Here are some of the highlights of the code:
![]()
The new DotView is added to the top of the layout obtained from the XML definition.
![]()
onClickListener callbacks are added to the “Red” and “Green” buttons. These event handlers differ from those in the previous example only in that, here, their behavior is proxied to the local method makeDot. This new method creates a dot (item 5).
![]()
A call to makeDot is made within onClick (to take place when the button is clicked).
![]()
The most substantial change to the example, this is where the Model is wired to the View, using a callback to install a dotsChangeListener. When the Model changes, this new listener is called. It installs the x and y coordinates of the last dot into the left and right text boxes, respectively, and requests that the DotView redraw itself (the invalidate call).
![]()
This is the definition of makeDot. This new method creates a dot, checking to make sure it is within the DotView’s borders, and adds it to the model. It also allows the dot’s color to be specified as a parameter.
Figure 7-5 shows what the application looks like when run.
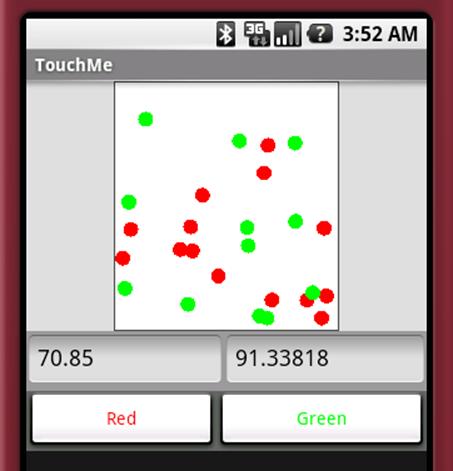
Figure 7-5. Running the Dots demo
Pushing the button labeled “Red” adds a new red dot to the DotView. Pushing the “Green” button adds a green one. The text fields contain the coordinates of the last dot added.
The basic structure of Example 7-2 is still recognizable, with some extensions.
Here is the chain of events that results from clicking, for instance, the “Green” button:
1. When the button is clicked, its onClickHandler is called.
2. This causes a call to makeDot with the color argument Color.GREEN. The makeDot method generates random coordinates and adds a new, green Dot to the Model at those coordinates.
3. When the Model is updated, it calls its onDotsChangeListener.
4. The listener updates the values in the text views and requests that the DotView be redrawn.
Listening for Touch Events
Modifying the demo application to handle taps, as you have surely guessed, is just a matter of adding a tap handler. The code in Example 7-8 extends the demo application to place a cyan dot in the DotView at the point at which the screen is tapped. This code would be added to the demo application (Example 7-7) at the beginning of the onCreate function right after the call to its parent method. Notice that, because the code that displays the x and y coordinates of the most recently added dot is wired only to the model, it continues to work correctly, no matter how the View adds the dot.
Example 7-8. Touchable dots
dotView.setOnTouchListener(new View.OnTouchListener() {
@Override public boolean onTouch(View v, MotionEvent event) {
if (MotionEvent.ACTION_DOWN != event.getAction()) {
return false;
}
dots.addDot(event.getX(), event.getY(), Color.CYAN, DOT_DIAMETER);
return true;
} });
The MotionEvent passed to the handler has several other properties in addition to the location of the tap that caused it. As the example indicates, it also contains the event type, one of DOWN, UP, MOVE, or CANCEL. A simple tap actually generates one DOWN and one UP event. Touching and dragging generates a DOWN event, a series of MOVE events, and a final UP event.
The gesture handling facilities provided by the MotionEvent are very interesting. The event contains the size of the touched area and the amount of pressure applied. That means that, on devices that support it, an application might be able to distinguish between a tap with one finger and a tap with two fingers, or between a very light brush and a firm push.
Efficiency is still important in the mobile world. A UI framework confronts the horns of a dilemma when tracking and reporting touch-screen events. Reporting too few events might make it impossible to follow motion with sufficient accuracy to do, for instance, handwriting recognition. On the other hand, reporting too many touch samples, each in its own event, could load a system unacceptably. The Android UI framework addresses this problem by bundling groups of samples together, reducing the load while still maintaining accuracy. To see all the samples associated with an event, use the history facility implemented with the methods getHistoricalX, getHistoricalY, and so on.
Example 7-9 shows how to use the history facility. It extends the demo program to track a user’s gestures when he touches the screen. The framework delivers sample x and y coordinates to the onTouch method of an object installed as the OnTouchListener for the DotView. The method displays a cyan dot for each sample.
Example 7-9. Tracking motion
private static final class TrackingTouchListener
implements View.OnTouchListener
{
private final Dots mDots;
TrackingTouchListener(Dots dots) { mDots = dots; }
@Override public boolean onTouch(View v, MotionEvent evt) {
switch (evt.getAction()) {
case MotionEvent.ACTION_DOWN:
break;
case MotionEvent.ACTION_MOVE:
for (int i = 0, n = evt.getHistorySize(); i < n; i++) {
addDot(
mDots,
evt.getHistoricalX(i),
evt.getHistoricalY(i),
evt.getHistoricalPressure(i),
evt.getHistoricalSize(i));
}
break;
default:
return false;
}
addDot(
mDots,
evt.getX(),
evt.getY(),
evt.getPressure(),
evt.getSize());
return true;
}
private void addDot(Dots dots, float x, float y, float p, float s) {
dots.addDot(
x,
y,
Color.CYAN,
(int) ((p * s * Dot.DIAMETER) + 1));
}
}
Figure 7-6 shows what the extended version of the application might look like after a few clicks and drags.
The implementation uses the size and pressure at a given location’s sample to determine the diameter of the dot drawn there. Unfortunately, the Android emulator does not emulate touch pressure and size, so all the dots have the same diameter. Size and pressure values are normalized across devices, as floating-point values between 0.0 and 1.0. It is possible, however, depending on the calibration of the screen, that either value may actually be larger than 1.0. The emulator always reports the event pressure and size as zero, their minimum value.
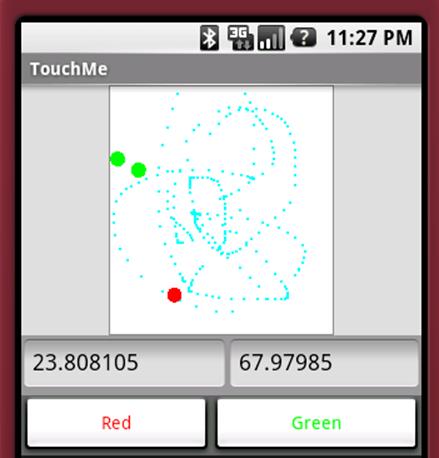
Figure 7-6. Running the Dots demo for an extended time
The loop that handles ACTION_MOVE events processes batched historical events. When touch samples change more quickly than the framework can deliver them, the framework bundles them into a single event. The MotionEvent method getHistorySize returns the number of samples in the batch, and the various getHistory methods get the subevent specifics.
Devices with trackballs also generate MotionEvents when the trackball is moved. These events are similar to those generated by taps on a touch-sensitive screen, but they are handled differently. Trackball MotionEvents are passed into the View through a call to dispatchTrackballEvent, not todispatchTouchEvent, which delivered taps. While dispatchTrackballEvent does pass the event to onTrackballEvent, it does not first pass the event to a listener! Not only are trackball-generated MotionEvents not visible through the normal tap handling machinery but, in order to respond to them, a widget must subclass View and override the onTrackballEvent method.
MotionEvents generated by the trackball are handled differently in yet another way. If they are not consumed (to be defined shortly) they are converted into D-pad key events. This makes sense when you consider that most devices have either a D-pad or a trackball, but not both. Without this conversion, it wouldn’t be possible to generate D-pad events on a device with only a trackball. Of course, it also implies that an application that handles trackball events must do so carefully, lest it break the translation.
Listening for Key Events
Handling keystroke input across multiple platforms can be very tricky. Some devices have many more keys than others, some require triple-tapping for character input, and so on. This is a great example of something that should be left to the framework—EditText or one of its subclasses—whenever possible.
To extend a widget’s KeyEvent handling, use the View method setOnKeyListener to install an OnKeyListener. The listener will be called with multiple KeyEvents for each user keystroke, one for each action type: DOWN, UP, and MULTIPLE. The action types DOWN and UP indicate a key was pressed or released, just as they did for the MotionEvent class. A key action of MULTIPLE indicates that a key is being held down (autorepeating). The KeyEvent method getRepeatCount gives the number of keystrokes that a MULTIPLE event represents.
Example 7-10 shows a sample key handler. When added to the demo program, it causes dots to be added to the display, at randomly chosen coordinates, when keys are pressed and released. A magenta dot is added when the space bar is pressed and released, a yellow dot when the Enter key is pressed and released, and a blue dot when any other key is pressed and released.
Example 7-10. Handling keys
dotView.setFocusable(true);
dotView.setOnKeyListener(new OnKeyListener() {
@Override public boolean onKey(View v, int keyCode, KeyEvent event) {
if (KeyEvent.ACTION_UP != event.getAction()) {
int color = Color.BLUE;
switch (keyCode) {
case KeyEvent.KEYCODE_SPACE:
color = Color.MAGENTA;
break;
case KeyEvent.KEYCODE_ENTER:
color = Color.YELLOW;
break;
default: ;
}
makeDot(dots, dotView, color);
}
return true;
} });
Alternative Ways to Handle Events
You’ve probably noticed that the on... methods of all the listeners introduced thus far—including onKey—return a boolean value. This is a pattern for listeners that allows them to control subsequent event processing by their caller.
When a Controller event is handed to a widget, the framework code in the widget dispatches it, depending on its type, to an appropriate method: onKeyDown, onTouchEvent, and so on. These methods, either in View or in one of its subclasses, implement the widget’s behavior. As described earlier, though, the framework first offers the event to an appropriate listener (onTouchListener, onKeyListener, etc.) if one exists. The listener’s return value determines whether the event is then dispatched to the View methods.
If the listener returns false, the event is dispatched to the View methods as though the handler did not exist. If, on the other hand, a listener returns true, the event is said to have been consumed. The View aborts any further processing for it. The View methods are never called and have no opportunity to process or respond to the event. As far as the View methods are concerned, it is as though the event did not exist.
There are, then, three ways that an event might be processed:
No listener
The event is dispatched to the View methods for normal handling. A widget implementation may, of course, override these methods.
A listener exists and returns true
Listener event handling completely replaces normal widget event handling. The event is never dispatched to the View.
A listener exists and returns false
The event is processed by the listener and then by the View. After listener event handling is completed the event is dispatched to the View for normal handling.
Consider, for instance, what would happen if the key listener from Example 7-10 were added to an EditText widget. Since the onKey method always returns true, the framework will abort any further KeyEvent processing as soon as the method returns. That would prevent the EditText key handling mechanism from ever seeing the key events, and no text would ever appear in the text box. That is probably not the intended behavior!
If the onKey method instead returns false for some key events, the framework will dispatch those events to the EditText widget for continued processing. The EditText mechanism will see the events, and the associated characters will be appended to the EditText box, as expected. Example 7-11shows an extension of Example 7-10 that, in addition to adding new dots to the model, also filters the characters passed to the hypothetical EditText box. It allows numeric characters to be processed normally but hides everything else.
Example 7-11. Extended key handling
new OnKeyListener() {
@Override public boolean onKey(View v, int keyCode, KeyEvent event) {
if (KeyEvent.ACTION_UP != event.getAction()) {
int color = Color.BLUE;
switch (keyCode) {
case KeyEvent.KEYCODE_SPACE:
color = Color.MAGENTA;
break;
case KeyEvent.KEYCODE_ENTER:
color = Color.YELLOW;
break;
default: ;
}
makeDot(dotModel, dotView, color);
}
return (keyCode < KeyEvent.KEYCODE_0)
|| (keyCode > KeyEvent.KEYCODE_9);
}
}
If your application needs to implement entirely new ways of handling events—something that cannot be implemented reasonably by augmenting behavior and filtering, using an onKeyHandler—you will have to understand and override View key event handling. To sketch the process: events are dispatched to the View through the DispatchKeyEvent method. DispatchKeyEvent implements the behavior described previously, offering the event to the onKeyHandler first, and then, if the handler returns false, to the View methods implementing the KeyEvent.Callback interface: onKeyDown, onKeyUp, and onKeyMultiple.
Advanced Wiring: Focus and Threading
As demonstrated in Example 7-7 and Listening for Touch Events, MotionEvents are delivered to the widget whose bounding rectangle contains the coordinates of the touch that generated them. It isn’t quite so obvious how to determine which widget should receive a KeyEvent. To do this, the Android UI framework, like most other UI frameworks, supports the concept of selection, or focus.
In order to accept focus, a widget’s focusable attribute must be set to true. This can be done using either an XML layout attribute (the EditText views in Example 7-3 have their focusable attribute set to false) or the setFocusable method, as shown in the first line of Example 7-10. A user changes which View has focus using D-pad keys or by tapping the screen when touch is supported.
When a widget is in focus, it usually renders itself with some kind of highlighting to provide feedback that it is the current target of keystrokes. For instance, when an EditText widget is in focus, it is drawn both highlighted and with a cursor at the text insert position.
To receive notification when a View enters or leaves focus, install an OnFocusChangeListener. Example 7-12 shows the listener needed to add a focus-related feature to the demo program. It causes a randomly positioned black dot to be added to the DotView automatically, at random intervals, whenever it is in focus.
Example 7-12. Handling focus
dotView.setOnFocusChangeListener(new OnFocusChangeListener() {
@Override public void onFocusChange(View v, boolean hasFocus) {
if (!hasFocus && (null != dotGenerator)) {
dotGenerator.done();
dotGenerator = null;
}
else if (hasFocus && (null == dotGenerator)) {
dotGenerator = new DotGenerator(dots, dotView, Color.BLACK);
new Thread(dotGenerator).start();
}
} });
There should be few surprises in the OnFocusChangeListener. When the DotView comes into focus, it creates the DotGenerator and spawns a thread to run it. When the widget leaves focus, the DotGenerator is stopped, and freed. The new data member dotGenerator (whose declaration is not shown in the example) is non-null only when the DotView is in focus. There is another important and powerful tool in the implementation of DotGenerator, and we’ll return to it in a moment.
Focus is transferred to a particular widget by calling its View method, requestFocus. When requestFocus is called for a new target widget, the request is passed up the tree, parent by parent, to the tree root. The root remembers which widget is in focus and passes subsequent key events to it, directly.
This is exactly how the UI framework changes focus to a new widget in response to D-pad keystrokes. The framework identifies the widget that will next be in focus and calls that widget’s requestFocus method. This causes the previously focused widget to lose focus and the target to gain it.
The process of identifying the widget that will gain focus is complicated. To do it, the navigation algorithm has to perform some tricky calculations that may depend on the locations of every other widget on the screen!
Consider, for instance, what happens when the right D-pad button is pressed and the framework attempts to transfer focus to the widget immediately to the right of the one that is currently in focus. It is may be completely obvious which widget that is when looking at the screen; in the view tree, however, it is not nearly so obvious. The target widget may be at another level in the tree and several branches away. Identifying it depends on the exact dimensions of widgets in yet other, distant parts of the tree. Fortunately, despite the considerable complexity, the Android UI framework implementation usually just works as expected.
When it does not, there are four properties—set either by application method or by XML attribute—that can be used to force the desired focus navigation behavior. They are nextFocusDown, nextFocusLeft, nextFocusRight, and nextFocusUp. Setting one of these properties with a reference to a specific widget will ensure that D-pad navigation transfers focus directly to that widget, when navigating in the respective direction.
Another complexity of the focus mechanism is the distinction that the Android UI framework makes between D-pad focus and touch focus, for devices with touch-sensitive screens. To understand why this is necessary, recall that, on a screen that does not accept touch input, the only way to push a button is to focus on it, using D-pad navigation, and then to use the center D-pad key to generate a click. On a screen that does accept touch events, however, there is no reason, ever, to focus on a button. Tapping the button clicks it, regardless of which widget happens to be in focus at the time. Even on a touch-sensitive screen, however, it is still necessary to be able to focus on a widget that accepts keystrokes—an EditText widget, for instance—in order to identify it as the target for subsequent key events. To handle both kinds of focus correctly, you will have to look intoView handling of FOCUSABLE_IN_TOUCH_MODE, and the View methods isFocusableInTouchMode and isInTouchMode.
In an application with multiple windows, there is at least one more twist in the focus mechanism. It is possible for a window to lose focus without notifying the currently in-focus widget, in that window, that its focus has been lost. This makes sense when you think about it. If the out-of-focus window is brought back to the top, the widget that was in focus in that window will again be in focus, with no other action.
Consider entering a friend’s phone number into an address book application. Suppose you momentarily switch back to a phone application to refresh your memory of the last few digits of her phone number. You’d be annoyed if, on returning to the address book, you had to again focus on theEditText box in which you’d been typing. You expect the state to be just as you left it.
On the other hand, this behavior can have surprising side effects. In particular, the implementation of the auto-dot feature presented in Example 7-12 continues to add dots to the DotView even when it is hidden by another window! If a background task should run only when a particular widget is visible, that task must be cleaned up when the widget loses focus, when the Window loses focus, and when the Activity is paused or stopped.
Most of the implementation of the focus mechanism is in the ViewGroup class, in methods like requestFocus and requestChildFocus. Should it be necessary to implement an entirely new focus mechanism, you’ll need to look carefully at these methods, and override them appropriately.
Leaving the subject of focus and returning to the implementation of the newly added auto-dot feature, Example 7-13 shows the implementation of DotGenerator.
Example 7-13. Handling threads
private final class DotGenerator implements Runnable {
final Dots dots;
final DotView view;
final int color;
private final Handler hdlr = new Handler();![]()
private final Runnable makeDots = new Runnable() {![]()
public void run() { makeDot(dots, view, color); }
};
private volatile boolean done;
// Runs on the main thread
DotGenerator(Dots dots, DotView view, int color) {![]()
this.dots = dots;
this.view = view;
this.color = color;
}
// Runs on the main thread
public void done() { done = true; }
// Runs on a different thread!
public void run() {
while (!done) {
try { Thread.sleep(1000); }
catch (InterruptedException e) { }
hdlr.post(makeDots);![]()
}
}
}
Here are some of the highlights of the code:
![]()
An android.os.Handler object is created.
![]()
A new thread that will run makeDot in item 4 is created.
![]()
DotGenerator is run on the main thread.
![]()
makeDot is run from the Handler created in item 1.
A naive implementation of DotGenerator would simply call makeDot directly within its run block. Doing this wouldn’t be safe, however, unless makeDot was thread-safe—and the Dots and DotView classes, too, for that matter. This would be tricky to get correct and hard to maintain. In fact, the Android UI framework actually forbids access to a View from multiple threads. Running the naive implementation would cause the application to fail with a RuntimeException similar to this:
11-30 02:42:37.471: ERROR/AndroidRuntime(162):
android.view.ViewRoot$CalledFromWrongThreadException:
Only the original thread that created a view hierarchy can touch its views.
We met this problem and one solution, the Handler, in Chapter 6. To get around the restriction, DotGenerator creates a Handler object within its constructor. A Handler object is associated with the thread on which it is created and provides safe, concurrent access to the canonical event queue for that thread.
Because DotGenerator creates a Handler during its own construction, the Handler is associated with the main thread. Now DotGenerator can use the Handler to enqueue from another thread a Runnable that calls makeDot from the UI thread. It turns out, as you might guess, that the canonical event queue to which the Handler points is exactly the same one that is used by the UI framework. The call to makeDot is dequeued and dispatched, like any other UI event, in its proper order. In this case, that causes its Runnable to be run. makeDot is called from the main thread, and the UI stays single-threaded.
It is worth reiterating that this is an essential pattern for coding with the Android UI framework. Whenever processing that is started on behalf of the user might take more than a few milliseconds to complete, doing that processing on the main thread might cause the entire UI to become sluggish or, worse, to freeze for a long time. If the main application thread does not service its event queue for a couple of seconds, the Android OS will kill the application for being unresponsive! The Handler and AsyncTask classes allows the programmer to avoid this danger by delegating slow or long-running tasks to other threads so that the main thread can continue to service the UI. This example demonstrates using a Thread with a Handler that periodically enqueues updates for the UI.
The demo application takes a slight shortcut here. It enqueues the creation of a new dot and its addition to the dot Model on the main thread. A more complex application might pass a main-thread Handler to the model, on creation, and provide a way for the UI to get a model-thread Handlerfrom the model. The main thread would receive update events enqueued for it by the model, using its main-thread Handler. The model, running in its own thread, would use the Looper class to dequeue and dispatch incoming messages from the UI. Before architecting anything that complex, though, you should consider using a Service or a ContentProvider (see Chapter 13).
Passing events between the UI and long-running threads in this way dramatically reduces the constraints required to maintain thread safety. In particular, recall from Chapter 6 that if an enqueuing thread retains no references to an enqueued object, or if that object is immutable, no additional synchronization is necessary.
The Menu
The final aspect of application control we’ll cover in this chapter is the menu. Example 7-14 shows how to implement a simple menu by overriding two Activity methods.
Example 7-14. Implementing a menu
@Override public boolean onCreateOptionsMenu(Menu menu) {
menu.add(Menu.NONE, CLEAR_MENU_ID, Menu.NONE, "Clear");
return true;
}
@Override public boolean onOptionsItemSelected(MenuItem item) {
switch (item.getItemId()) {
case 1:
dotModel.clearDots();
return true;
default: ;
}
return false;
}
When this code is added to the TouchMe class, clicking the device’s Menu key will cause the application to present a menu, as shown in Figure 7-7.
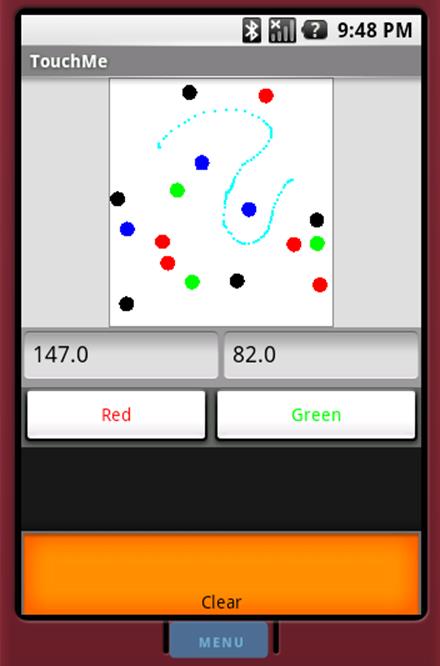
Figure 7-7. A simple menu
Clicking the Enter key, or tapping the menu item again, will clear the dot view.
Interestingly, if you run this application, you will find that while the added menu item works most of the time, it does not work when the DotView is in focus. Can you guess why?
If you guessed that the problem is caused by the OnKeyListener installed in the DotView, you are correct! As implemented in Example 7-15, the listener swallows the menu key event by returning true when it is clicked. This prevents the standard View processing of the menu key keystroke. In order to make the menu work, the OnKeyListener needs a new case.
Example 7-15. Improved key handling
switch (keyCode) {
case KeyEvent.KEYCODE_MENU:
return false;
// ...
The Android UI framework also supports contextual menus. A ContextMenu appears in response to a long click in a widget that supports it. The code required to add a contextual menu to an application is entirely analogous to that for the options menu shown earlier except that the respective methods are onCreateContextMenu and onContextItemSelected. One additional call is required. In order to support contextual menus, a widget must be assigned a View.OnCreateContextMenuListener by calling its View method setOnCreateContextMenuListener. Fortunately, since Activity implements the View.OnCreateContextMenuListener interface, a common idiom looks like the code shown in Example 7-16.
Example 7-16. Installing a ContextMenuListener
findViewById(R.id.ctxtMenuView).setOnCreateContextMenuListener(this);
Simply overriding the default, empty Activity implementations of the context menu’s listener methods will give your application a context menu.
This chapter showed how the Android Controller interface works overall, and gave you the tools to manipulate its basic components: windows, views, and events. The following two chapters show you how to do your own graphics programming.
All materials on the site are licensed Creative Commons Attribution-Sharealike 3.0 Unported CC BY-SA 3.0 & GNU Free Documentation License (GFDL)
If you are the copyright holder of any material contained on our site and intend to remove it, please contact our site administrator for approval.
© 2016-2026 All site design rights belong to S.Y.A.