Google Apps Script for Beginners
Chapter 5. Embedding Scripts in Google Sites
As you probably know, Google Sites is a free service included in every Google account that allows the creation of Google websites. These free websites have a URL such as https://sites.google.com/site/siteName/pageName, but if you have a Google Apps account (education or business) and a domain, you will be able to customize this URL and even create e-mail accounts with an @domain.xxx address.
We are going to consider only the standard accounts without domains as they will be use cases for most of us, and Google Apps for business is a subject for another book on its own.
This means that some methods will be unavailable; if that is the case, the documentation will always mention it clearly (https://developers.google.com/apps-script/reference/sites/sites-app).
To start with creating a site, log in to your Google account and go to the URL https://sites.google.com/site/ that will show you all your current sites, if you have some, and suggest that you should create one if you don't have any.
There are two main features of Google Apps Script with regard to Google Sites as follows:
· You can build a so-called "gadget" that you can insert into a site page, which will more or less work as usual web applications do
· You can use Google Scripts to create or modify the site's content itself
The first aspect about standalone web applications will be examined in more detail in the next chapter since it uses the same services (UiApp and HTML services), but let us have a quick peek at a simple example.
Site gadget's limitations/restrictions/use cases
Site-embedded web applications are a nice way to give access to your script functions because they enable easy page navigation and the possibility to add descriptions, directions for use, and illustrations, making your apps easier for other users to use.
If we think about the very first script example in Chapter 1, Enhancing Spreadsheets, that calculated my age in hours and that we tried in a spreadsheet, the same script modified to work as a site gadget would be much more fun and easy to make public without us needing to share any access to any of our documents. Moreover, even a user having no experience with spreadsheets would be able to use it without difficulty.
The code will need to be changed to create a small and basic user interface so that users can enter their birth date and time. This requires a few methods and a workflow, which we haven't talked about yet (it is for the next chapter), but for now you can simply copy it and follow the instructions and leave the "understanding" bit for later!
The code has two parts: one part that creates the user interface to enter values and a second that retrieves the values, does the calculations, and shows the result in the same UI.
The first part of the code is as follows; simply copy it as it is:
function doGet() {
var app = UiApp.createApplication().setTitle('Age In Hours');
var grid = app.createGrid(3,2);
var handler = app.createServerHandler('myAgeInHours').addCallbackElement(grid);
var time = app.createListBox().setName('time').addItem('Choose the hour',-1);
for(var n=0 ; n<24 ; n++){time.addItem(n+' h',n)};
var date = app.createDateBox().setName('date');
var button = app.createButton('Show me...',handler);
grid.setWidget(0,0,date).setWidget(0,1,time).setWidget(1,0,button);
app.add(grid);
return app;
}
And the part we took from our aforementioned example has a few modifications: the birth date was a predefined string and is now a pair of user-created values (the date and time) that we get from the UI; and the date value (var date) has an hour value equal to 0because the widget returns a value at midnight (00:00 Hrs), so we need to subtract the separate hour value from the result (var time that we get from the UI too, and convert it to a number) to get the count correctly.
The second part of the code is as follows:
function myAgeInHours(e){
var app = UiApp.getActiveApplication();
var myBirthDate = e.parameter.date.getTime();// the returned value for date (in milliseconds)
var time = Number(e.parameter.time) == - 1 ? 0 : Number(e.parameter.time);// the returned value in hours combined with a condition
myBirthDate = parseInt(myBirthDate/3600000, 10);
var today = parseInt(new Date().getTime()/3600000, 10);
app.add(app.createLabel().setText('there are '+(today-myBirthDate-time)+' hours between now and your birth date !'));// write the result in a 'label'
return app; // this tells the script to update the UI
}
If you don't feel like going through the whole process of publishing this script to get it as a web application that you can embed in your site (and I recommend that you either do this or read the next chapter before going further), you can simply use the URL of my copy that I have shared publicly at https://script.google.com/macros/s/AKfycbzB3J4BiI8E6IjuT3ddZOnpTL-0HhklULeLAzZ2jZnFDWHQA8q3/exec and insert it as a gadget on your site. There are, indeed, two ways to add a script gadget to a web page: by pasting the URL of a published (deployed) web app or writing the code in the site page's embedded script editor. In the latter case, it will be listed as a suggestion, but in both cases, the app has to be deployed first.
If you try to use the < insert script > tag from the page editor of your site without publishing beforehand, you'll see that error panel from Google telling you the file you requested does not exist, as shown in the following screenshot:
This seems logical since it looked for the HTML rendering of your script and not its text version.
Choosing between standalone apps and site-embedded, document-embedded, and spreadsheet-embedded scripts is really a matter of choice and depends mainly on how you will need to have or give access to the application.
In Google Sites, you can define authorizations and rights at two levels: on the site and at the page level. To manage access at the page level, you must activate the feature, and this will show you the warning Page-level permissions allow you to set different levels of access for different people on different pages. For example, you could allow all your friends to see one set of pages, allow your family to edit another set of pages, and then keep yet another set of pages private only to yourself..
We can learn more about page-level permissions at the following link:
https://support.google.com/sites/answer/1387384?ref_topic=1387383&rd=1
This is a very powerful feature that you can use when sharing a project with different people as you may have editors and readers/testers that have different access to different parts of the site.
Note
This is a hierarchical construction; each page you create under a shared page inherits from the parent's shared settings.
We'll see in the next section that these settings can be adjusted programmatically.
Also keep in mind that the sharing setting of the site is not linked to the authorization of the script. If you share a web page with an embedded script and forget to share the access to this app, the guest user won't be able to run it.
We will see more details on how to set up app access with standalone apps.
Creating and maintaining sites with Google Apps Script
As mentioned earlier, script gadgets are only a small part of Google Sites; the interesting feature of Apps Script in Google Sites is its ability to create and modify the site itself with a script.
Imagine you have a site for your restaurant and that you publish a new menu every day that follows a predefined scenario: pasta on Monday, beef on Tuesday, and so on. You would normally edit your menu page at the end of the day so that it is updated every morning with the right menu. This is a typical example of an annoying repetitive task that a script could easily do for you.
Create all of the daily menu's contents in some document, maybe a spreadsheet. For example, take the time to create a nice-looking template in a Google document and write a script that will update the site automatically every night based on the template and the spreadsheet data.
This might seem hard to do, but we'll use methods that we've already tried and proceed step-by-step. Refer to the following code:
// Document Ids as global variables
var sharedDocID = '1f4uW-0l3xsmQspsseipDcHIw_mUC1kpEQ6Js7rhFUxk'
var sharedSpreadSheetID = '1Sa9Mah6eFbjZBEq5t0GtyMo_NjHZfnJ-SXwW409xUD8'
function updateSite() {
var ss = SpreadsheetApp.openById(sharedSpreadSheetID);
var sh = ss.getSheetByName('Sheet1');
var data = sh.getDataRange().getValues();
var headers = data.shift();// Monday Tuesday Wednesday Thursday Friday Saturday Sunday
var todayInSheet = new Date().getDay() == 0 ? 7 : new Date().getDay();// in JS Monday is 1 and Sunday is 0 so we need a bit of logic there
var menuData = [];// the actual meal
var menuTitle = [];// starter, main course...
for(var n=0 ; n<data.length ; n++){
menuData.push(data[n][todayInSheet]);
menuTitle.push(data[n][0]);
}
Logger.log('\ndata = '+menuData+'\nTitle = '+menuTitle);
This first part simply reads the data from the spreadsheet, and instead of creating JS objects, we simply keep array elements. The spreadsheet ID is hardcoded in the script; you should modify this with the ID of your own spreadsheet.
var menuFolder = DriveApp.getFoldersByName('Menu online');
if(menuFolder.hasNext()){
var menuFolder = menuFolder.next();
}else{
menuFolder = DriveApp.createFolder('Menu online');
}
This code has already been used in the Boss mail example in Chapter 3, Managing an E-mail Account; if the folder already exists then use it, or create it to store the temporary document that contains daily data. This is shown in the preceding code.
var docCopy = DriveApp.getFileById(sharedDocID).makeCopy('menu['+headers[todayInSheet]+']');
menuFolder.addFile(docCopy);
DriveApp.getRootFolder().removeFile(docCopy);
We get the document's template through its ID (it is hardcoded here again, so you should change it to the value from your document). We copy the template to the folder and remove it from My Drive. We have to do so because there is no move method for files in Google Script. The preceding code snippet depicts this.
var docCopyId = docCopy.getId();
if(ScriptProperties.getProperty('docCopyId')!=null){
var fileToDelete = DriveApp.getFileById(ScriptProperties.getProperty('docCopyId')).setTrashed(true);// delete the old copy
}
ScriptProperties.setProperty('docCopyId', docCopyId);// and store the id of the new one
We store the ID of the copy so we can delete it when we don't need it anymore (that is, on the next run) using ScriptProperties, just like we did earlier in the "Boss mail" example. The following code snippet depicts the replacement of the placeholders:
var copy = DocumentApp.openById(docCopyId);
copy.getBody().replaceText('#day#',headers[todayInSheet]);
for(var n=0 ; n<menuTitle.length-1 ; n++){ // loop every item except image URL
copy.getBody().replaceText('#'+menuTitle[n]+'#',menuData[n]);
}
var image = DriveApp.getFileById(menuData[n].split('d/')[1].split('/')[0]).getBlob();// retrieve ID from URL
var imagePlace = copy.getBody().findText('#'+menuTitle[n]+'#').getElement().getParent();
imagePlace.asParagraph().appendInlineImage(image).setWidth(300).setHeight(200);
imagePlace.asText().deleteText(0, 22);
We replace all the placeholders we have in our master document. As you can notice, we use #name# to mark the placeholders. DocumentApp has a very convenient method especially designed for that purpose. The following line of code shows the method used to save and close the document:
copy.saveAndClose();
We need to make sure that every change is made as expected and the document gets updated.
var htmlContent = "<table class='sites-layout-name-one-column sites-layout-hbox' cellspacing='0'><tbody><tr><td class='sites-layout-tile sites-tile-name-content-1'><div dir='ltr'><div/><div><div class='sites-embed-align-left-wrapping-off'><div style='width:100%;' class='sites-embed-border-on sites-embed sites-embed-full-width'><h4 class='sites-embed-title'> </h4><div style='display:none;' class='sites-embed-object-title'> </div><div class='sites-embed-content sites-embed-type-writely'><iframe frameborder='0' title=' ' height='900' width='100%' src='http://docs.google.com/document/preview?hgd=1&id="+docCopyId+"'/></div></div></div></div><hr/></div></td></tr></tbody></table>"
The preceding lines of code are a bit tricky. We have copied the HTML content of our web page that has an embedded document in a frame, and we simply replaced the fixed document ID with the variable docCopyId, which is the ID of the document we just created. The site page will display this document and render it perfectly. It is, I admit, a workaround I use because there is no getContentAsHtml method available yet in DocumentApp (nor in DriveApp). The following piece of code shows methods for calling the site object:
// var site = SitesApp.getActiveSite();
var site = SitesApp.getSite('privategasexperiments');
Here, we have to choose either of the preceding methods; if we have embedded the HTML code on our site, we can use getActiveSite(). If we have attached it to the document or the spreadsheet, we have to get the site by its name. Both methods will return a site object.
var oldPage = site.getChildByName('menuoftheday')
if(oldPage!=null){oldPage.deletePage()};
In the preceding code, we check if the page exists before deleting it. If we didn't check, we might get an exception when trying to delete a page that doesn't exist.
And finally, in the following code, recreate the new page with the new content straight from the HTML string we built previously.
var newPage = site.createWebPage('Menu of the day', 'menuoftheday', htmlContent);
}
And that's it! You need to create a clock trigger that will execute the updateSite() function every day after midnight (and preferably after your restaurant has closed for the day) so that your site page is always up to date without any effort.
To change the menu, edit the spreadsheet's contents and add new meals. You can always run it manually as often as you like to see the result online.
We could have created that trigger in the script as we did for the other examples, but let us keep it as simple as possible. This trigger needs to be set just once—that's not too much work I guess.
The documents I used in the previous example are available as templates. Make your own copy to be able to change their contents.
The spreadsheet can be found at the following link:
https://docs.google.com/spreadsheets/d/1Sa9Mah6eFbjZBEq5t0GtyMo_NjHZfnJ-SXwW409xUD8/edit?usp=sharing
The document template can be found at the following link:
https://docs.google.com/document/d/1f4uW-0l3xsmQspsseipDcHIw_mUC1kpEQ6Js7rhFUxk/edit?usp=sharing
The following screenshot shows the spreadsheet:

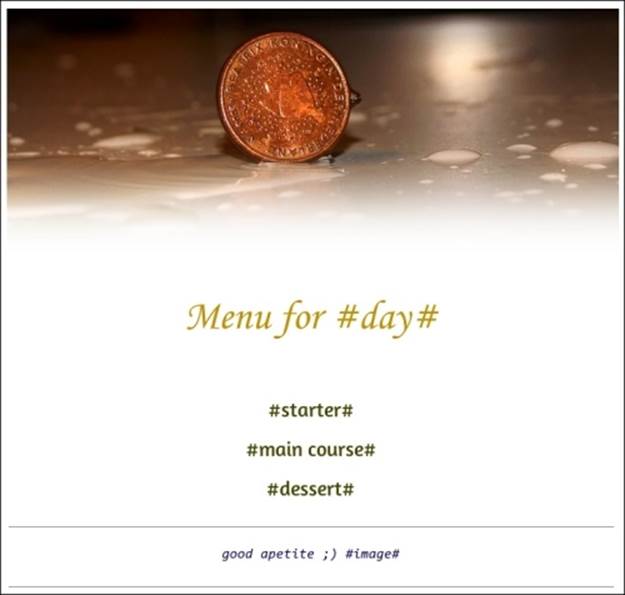
The following screenshot shows the template:
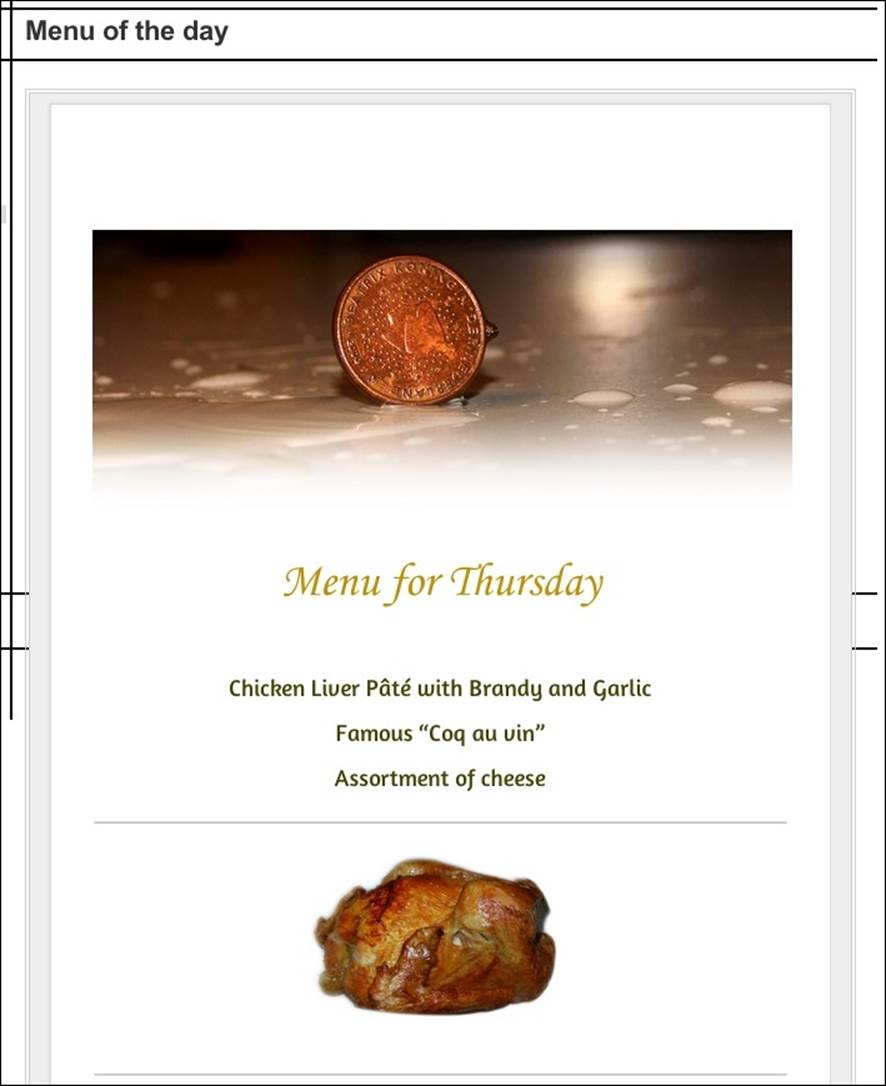
The following screenshot shows the site's page on a Thursday:
Creating pages
The previous example actually doesn't have many SiteApp service methods as it again makes use of a combination of sites, documents, and spreadsheets, which is one of the major interests of the Google platform. Google services are always available and tend to exchange data to and from each other (https://developers.google.com/apps-script/reference/sites).
We could have got almost the same result using a different approach and using only SiteApp methods.
In that workflow, we'll need to create a second website with restricted access rights in which we are going to create seven pages, one for each day of the week, with a menu description on each page.
In this case, we could have a different layout for each day, such as varying font styles and background images.
From there on, the only thing we have to do is copy the appropriate page to our public website every day, just like we did in the first example.
This can easily be achieved using the template feature in SiteApp. Each page will be published as a template on your private site, and this template will be used to create new pages on your public site.
The code is pretty short and is as follows:
// this script will be embedded in your public site so it is the active one
// change this global variable to yours
var privateSite = SitesApp.getSite('myPrivateSiteName');
function updateSite() {
var today = new Date().getDay();// in JS Sunday is 0
var pageNames =
['sunday','monday','tuesday','wednesday','thursday','friday','saturday'];// the page names in an array
var site = SitesApp.getActiveSite();
var pageToUse = privateSite.getChildByName(pageNames[today]+'_template')
if(pageToUse == null){ // if the page is not a template yet
pageToUse = privateSite.getChildByName(pageNames[today]).publishAsTemplate(pageNames[today]+'_template'); // then make it a template
privateSite.getChildByName(pageNames[today]).setName(pageNames[today]+'_draft');// and save the draft with a new name
}
var oldPage = site.getChildByName('menuoftheday')
if(oldPage!=null){oldPage.deletePage()};// delete the current page after checking it exists
var newPage = site.createPageFromTemplate('Menu for '+pageNames[today], 'menuoftheday', pageNames[today]+'_template');// and create the page with the right name and title from the template
}
The preceding code is really straightforward and includes comments that explain what we do in every step.
I'm not sure which approach is better. The only thing I can say is that I like to use different methods from different Google Apps Script services and make them work together, so I prefer the first approach; but, I'd agree that it's not a valid motivation.
Interactivity
The example shown here can be viewed online. A form can be filled in, and the site's user list will be updated. Feel free to have a look at the following link:
https://sites.google.com/site/gettingstartedwithgas/home
Different sources of data can be used to automatically update Google Sites as follows:
· Forms: These can be embedded, and their responses can be used to create or modify pages
· Calendars: These can be embedded, and it's easy to retrieve data from them to update a page
· Spreadsheets: These can be published to web pages, but when they are published, they don't work as spreadsheets anymore and are just visible as pages; if you have edit rights, you will be able to see a link to open them in the normal spreadsheet interface
· Text documents: The same comments apply to text documents, as we saw in our example of the restaurant menu
· Script gadgets: These can be embedded as well, and from there on, you will be able to perform any data manipulation and site update possible
Another feature that we haven't mentioned yet is the ability of Google Sites to change the sharing settings using a script.
A typical use case would be to automate edit access to a site after a user submits a form so that the user can post messages after logging in.
Let us try a simplified version of such a workflow that doesn't actually change the access right because it doesn't ask for an e-mail address (it's just a test!) but uses the same workflow and just displays a list, such as a list of names (or pseudo) and comments, on the site's page.
To make it a real logging site, you just have to ask for an e-mail and use that e-mail to add an editor to the site. You could even simply add a function that removes all the editors after some time so that access gets granted only for the current day.
The following script contains a few interesting elements that we can use in many other cases. I'll explain it step-by-step.
functionfunctionGrantAccess(eventInfo) {
Logger.log(JSON.stringify(eventInfo));
The preceding code is used to see the content of eventInfo, which is the event that gets triggered on form submission. Looking at the logger will show us how it is actually built. We'll need it a little later.
var time = eventInfo.namedValues['Timestamp'];
var userName = eventInfo.namedValues['user name'];
var comment = eventInfo.namedValues['a comment];
The preceding three lines retrieve values from the eventInfo object as documented at https://developers.google.com/apps-script/understanding_events.
var site = SitesApp.getSite('gettingstartedwithgas');
var userPage = site.getChildByName('login/users');
The preceding lines of code depict the site objects, which are the site and the page we want to write to.
var logUsers = 'Logged Users list :<br><br>';
The previous line of code depicts the logUsers variable that we shall fill with the user list to publish it on the page; <br> is the HTML tag that has been used to create a "new line".
var sheet = SpreadsheetApp.getActive().getSheetByName('Form Responses 2');
var data = sheet.getDataRange().getValues();// get data from sheet
var headers = data.shift();
We already used the preceding code to get data from the spreadsheet and get the header out of the array.
data.sort(function(x,y){// adding a function to sort
var xp = x[1]; // allows to sort on column B
var yp = y[1];
return xp == yp ? 0 : xp<yp ? -1 : 1;// sort 'ascending'
});
The preceding code is new and interesting. I wanted to sort the array on the second column because the first column is a timestamp and I didn't care about the time of form submission.
The sort() method has an optional function that returns 0, +1, or -1 depending on the order of xp and yp, and the sorting follows that rule. In this case, we take xp=x[1], which is the second column in the array (and in the sheet), and sort it in ascending order (replace< with > to get the descending order).
var unique = [];// create new array to store data without duplicates
unique.push(data[0]);// keep the first item
for(var n=1 ; n<data.length ; n++){ // loop through data
if(data[n][1]+data[n][2] != data[n-1][1]+data[n-1][2]){
unique.push(data[n]);// if different from previous then keep
}
}
With the preceding loop, we skip any duplicates in the list. It works because the data has been sorted and it doesn't care about column 1 in the spreadsheet, so a timestamp is not part of the comparison.
unique.unshift(headers);// add the header back on top of the array
for(var n=0 ; n<unique.length ; n++){
Logger.log(unique[n]);// just to check more easily the sorting and duplicate remove
logUsers+='<br>'+unique[n].join(' - ');
}
Build the output string with separators ( and ) and <br> tags as shown in the preceding code.
userPage.setHtmlContent(logUsers);
Write the logUser HTML string to the site page using the preceding line of code.
sheet.getDataRange().clear();// clear the sheet
sheet.getRange(1,1,unique.length, unique[0].length).setValues(unique);// and write the new values
}
After this, renew the values in the spreadsheet with the preceding code. To make it simple, we just wipe everything out and write it back.
Now, this function has to be triggered on form submission. We have already seen how to set up a trigger. Now we need to navigate to Resources | Current script triggers | add a new trigger and choose on form submit for that function. This is simple, but it means that the function can only be tested on submitting forms, which is annoying and time consuming, so let us see how we can work around that.
Using the logger service and the JSON.stringify(eventInfo) method, we can see how this eventInfo object looks; a typical example is as follows:
/* {"namedValues":{"user name":["test name"],"a comment":["gxfgxdfhdgfhjfgjhfgjxfgj"],"Timestamp":["1/2/2014 22:17:24"]},"values":["1/2/2014 22:17:24","test name","gxfgxdfhdgfhjfgjhfgjxfgj"],"source":{},"range":{"rowStart":2,"rowEnd":2,"columnEnd":3,"columnStart":1}}
*/
The braces mean that namedValues is a JavaScript object (we knew that already!), but the first property of this object has only one value that also starts with a brace. This means that it is also an object.
And the second object has the properties that interest us, user name and a comment, exactly how we created them in the form. It also has parameters for range and Timestamp.
With this knowledge, we can now build new objects with all the necessary properties and use them to test our function. The object eventInfo has only one property (namedValues) and its value, and the second object namedValues has our useful properties.
The code to create the "fake form answer" and also call our main function is as follows:
function testGrantAccess() {
var eventInfo = {};
var namedValues = {}; namedValues['Timestamp'] = '2010/03/12 15:00';
namedValues['user name'] = 'bob smith';
namedValues['a comment'] = 'Bla'Blablabla...';
eventInfo['namedValues'] = namedValues
GrantAccess(eventInfo);
}
The result of the preceding code is just the same as submitting a form. Magic, isn't it?
This code is embedded in a shared spreadsheet; it can be found at the following link:
https://docs.google.com/spreadsheets/d/10aKXGDxwCW6mDbp5ruIwpKXgRx3Hhibga4moghDxK3o/edit?usp=sharing
The following screenshot displays the page that was created:

Summary
Although this chapter was meant to be about Google sites, it actually demonstrates the multiple features and advantages of the communication and combination of multiple services provided by Google Apps Script.
A Google site on its own is not very different from other sites. In many aspects, it is limited in layout compared to other platforms. However, its ability to integrate scripts and exchange data with every other Google service makes it a lot more interesting.
We have also had the opportunity to use a few interesting JavaScript features that we will surely use multiple times, and it is definitely motivating that we have a chance to get our hands on the user interface tools in the next chapter.
All materials on the site are licensed Creative Commons Attribution-Sharealike 3.0 Unported CC BY-SA 3.0 & GNU Free Documentation License (GFDL)
If you are the copyright holder of any material contained on our site and intend to remove it, please contact our site administrator for approval.
© 2016-2026 All site design rights belong to S.Y.A.