SEO for WordPress: “How I hit page #1 of Google in 27 days!”
Chapter 6 - WordPress Optimization: Pages & Blog Posts
Writing search engine optimized articles for your website is a lot easier than you think. Some people spend hours trying to pick the best titles for their articles, and that’s a complete waste of time.
The best titles for your articles are within your keyword list that you saved earlier. If 12,000 people per month are searching for the keyword phrase “buy graphic design art”, then you should use that exact keyword phrase as the title of your article for three reasons:
![]() WordPress uses your title as an H1 tag. Search engines look at your H1 tag to determine what your entire article is about.
WordPress uses your title as an H1 tag. Search engines look at your H1 tag to determine what your entire article is about.
![]() You’ll increase your chances of showing up on page #1 of Google when your H1 tag matches a search query.
You’ll increase your chances of showing up on page #1 of Google when your H1 tag matches a search query.
![]() People are also more inclined to click on an article from Google search when it’s an exact match their search query.
People are also more inclined to click on an article from Google search when it’s an exact match their search query.
Permalinks
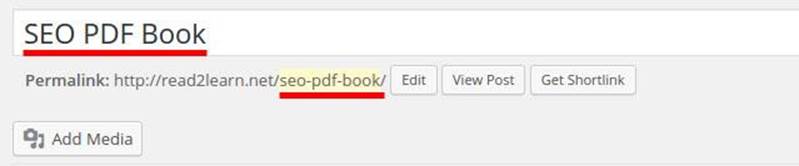
After you enter a title for your page/blog, your permalink should automatically populate below the title. You’ll notice that your permalink is an exact match to your title. If you delete your title and type a new one, then the permalink might not match your title.
If your permalink doesn’t match the title of your article, just click the “edit” button next to your permalink. Edit the permalink to make sure that it matches your title exactly. (See image below.)
Search engines will scan your permalinks, so you need to include your keywords there. If your permalinks match the title of your article (H1 tag), then you’ll get a bump above your competition.
H2 & H3 Tag
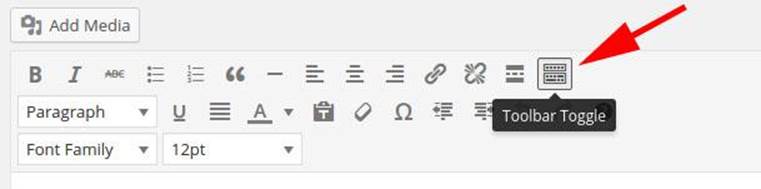
The next thing search engines look at is your H2 tag. To find the H2 tag option, you have to click the formatting drop down list on your toolbar. After you click the drop down list, you’ll see something that says “Heading 2” which is the H2 tag.
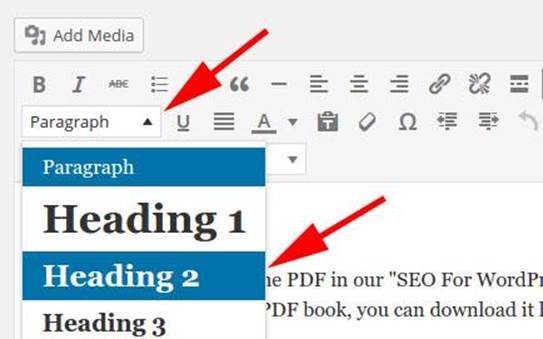
If you don’t see this formatting drop down list, then you need to click the icon that says “toolbar toggle.” WordPress hides these formatting options by default.
To use the H2 tag correctly:
1) Type the same keyword phrase that you have in your title and permalinks.
2) Select the text by dragging your mouse across the keyword phrase to highlight it.
3) Click the formatting toolbar and select “Heading 2” which is the H2 tag.
You’ll notice that the H2 option makes the text bigger and bold. You can also add an extra word or date at the end of the keyword phrase if you like. I usually add an extra word or phrase at the end of my keyword phrase in the H2 tag so it doesn’t look like I repeated the title for no apparent reason.
For example, if my main keyword phrase is, “buy graphic design art”, I’d set my H2 tag to say one of the following:
1) Buy graphic design art in 2016
2) Buy graphic design art – Exclusive Discounts
3) Buy graphic design art for cheap!
As you can see, the main keyword phrase is still there and you’re just expanding on it. This looks good to search engines and even better to your readers.
Do the same thing with the H3 tag. Use the H3 tag at least once in your article as a subheading to break up your text. For example, if your keyword is “buy graphic design art”, you could use a H3 subheading somewhere in your article like this:
Buy Graphic Design Art for Cheap at:
![]() Amazon.com/link-to-your-prodcuts
Amazon.com/link-to-your-prodcuts
![]() Ebay.com/link-to-your-products
Ebay.com/link-to-your-products
![]() DeviantART.com/link-to-your-prodcuts
DeviantART.com/link-to-your-prodcuts
First Paragraph
Your first paragraph should have your keyword phrase at least once! The best way to do this is by asking a question or making a statement. For example:
1) “Are you looking to buy graphic design art for cheap? We’ve got you covered!”
2) “Buy graphic design art for 50% off during the month of February!”
Make sure to Bold and Underline your keyword phrases. Search engines will acknowledge these phrases as important and give you extra “juice” for these keyword phrases.
It’s not that hard to write a sentence that makes sense using your keyword phrase. Just make sure that you don’t stuff your keywords into a paragraph if it doesn’t make sense.
If your article doesn’t make sense, then people will bounce off your page. That basically means that people will click on your link from Google, stay on your page for a couple seconds, and then hit the “back arrow” to go back to Google.
If you have a high “bounce rate” then Google will bounce you off the first page of the search results. Google wants to provide their users with relevant and useful information. So if people keep bouncing off your page, then obviously your content isn’t relevant to what people are looking for.
Keyword Density
A lot of SEO guys are really big on keyword density. SEO companies have figured out a certain percentage of times that they think your keyword phrase should show up within an article.
Keep in mind that you’re supposed to write for your READERS and not for search engines. Don’t randomly insert keywords into a paragraph just to meet a keyword density percentage. I personally think that’s going overboard.
Just sprinkle your keyword throughout your article and make sure it reads well. You need to impress your readers because they are more important. If your readers like your article, then they’ll share it on Facebook and Twitter, and Google will notice that. As a reward, Google will move you ahead of your competition.
If you’d still like to calculate your keyword density, here are some excellent WordPress plugins that you can use:
1) “SeoPressor” $47 limited, $97 Unlimited (http://seopressor.com)
2) “Blogger High” FREE (http://bloggerhigh.com)
You can also search for other alternatives within your WordPress dashboard. Just go to the plugins tab, click “add new”, and search for “keyword density” and see if you like any of the available options.
Last Paragraph
The last paragraph is very important. Make sure that you include your keyword phrase at least one more time in the last paragraph. Just make sure that it seems natural so it’s not obvious to your readers what you’re doing.
Using the same example, “buy graphic design art”, I would probably start off my last paragraph like:
“Buy graphic design art from us today and save 50% off the retail price! If you have a special request, please feel free to contact us using the contact form. You can also contact us using our toll free 800 number. We have over 15 years experience, and all of our clients are happy customers. Order from Amazon or contact us to request a custom order! ”
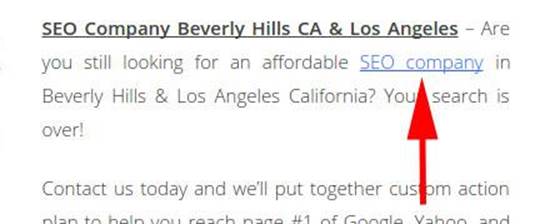
Lastly, you’ll want to add some anchor text at the end of the article that points back to the same article. Anchor text is just a hyperlink that contains your keyword phrase. For example:
Buy Graphic Design Art ← That’s anchor text. (see image below for another example..)
Upload Optimized Images
You need to add images to all your blog post and articles. Images break up the text and make your articles a lot easier to read.
You shouldn’t steal pictures from Google Images. Everybody does it, but you shouldn’t because you might run into copyright issues.
You can download images legally a few different ways:
1) Buy royalty free images. (http://www.gettyimages.com & http://www.istockphoto.com)
2) Use screenshots (Print screen option or http://www.techsmith.com/snagit.html)
3) Do a Google search for “free royalty free images.”
4) Ask users from http://www.Flickr.com or http://www.DeviantArt.com if you can use their images in your articles. A lot of people will agree, and they’ll just ask for credit for the image.
Before you upload your images to WordPress, you need to rename them with the same title as your article. Save your images to your desktop, right click on the image, and select the “Rename” option.
If you have more than one image, you can still use the same keyword phrase for all your images by adding a number or word at the end. For example:
![]() Buy graphic design art.
Buy graphic design art.
![]() Buy graphic design art 2016.
Buy graphic design art 2016.
![]() Buy graphic design art now.
Buy graphic design art now.
![]() Buy graphic design art at an discount.
Buy graphic design art at an discount.
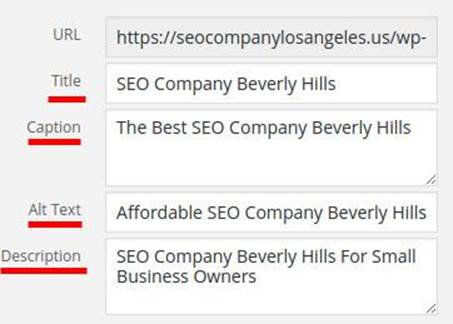
When you upload your images to WordPress, the optimized image name will automatically populate into the “Title” box. Now copy and paste that keyword phrase into the alternate text box, caption box, and description box.
You should alternate the keywords so it’s doesn’t seem like spam to the search engines. If you look at the screenshot below, you’ll see that I’m using the keyword “SEO Company Beverly Hills” in all the sections, but I’m building around the keyword so it’s not spam.
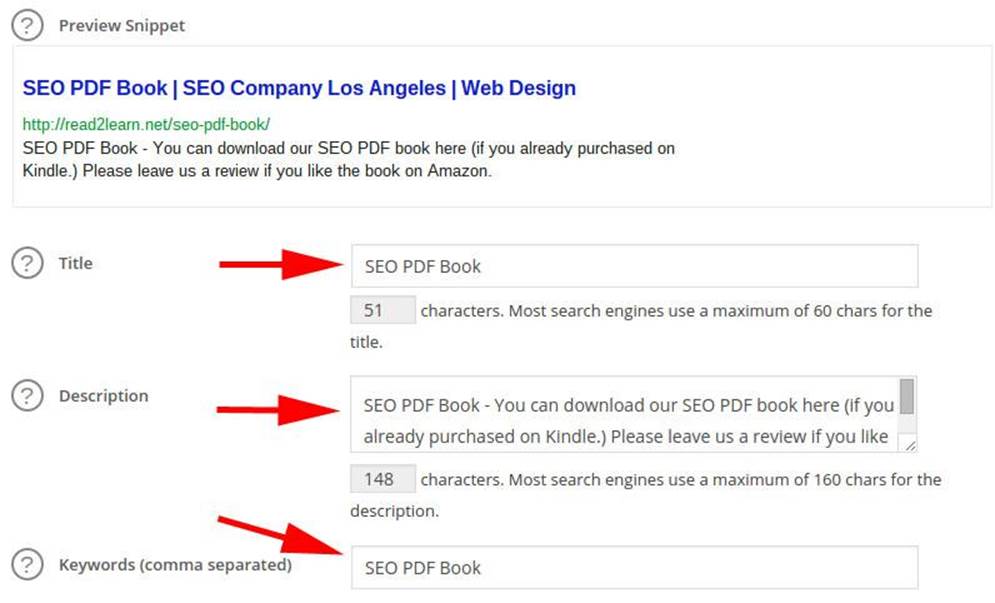
All in One SEO Pack Blog Settings
After you finish uploading your images, scroll down the page and you’ll see the “All in One SEO Pack.” There’s a section for a Title, Description, and Keywords. Whatever information you enter into this plugin will be the same information displayed on Google search.
Since we already optimized the blog post, you just need to copy the same information from your article into this plugin. So for the title, enter in the title of your article. For the description, enter your main keyword first, add a hyphen, and then enter the first 2 sentences from your article. For the keywords section, enter the title again and that’s it!
Categories & Tags
On the right column, you’ll notice a section that says categories. A lot of people ignore this section, but it’s very important.
All of your articles are unique and your categories should be unique too. Your category should be the same exact name as the title of your article. To add a new category, just click the link that says “+ Add New Category” under the category box.
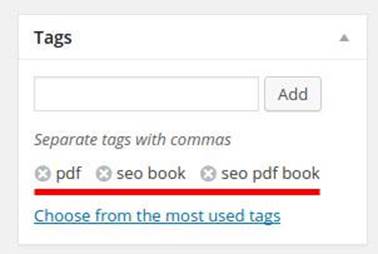
Below the category section, you’ll see a box that says “Tags.” Enter the same keyword phrase into that section too, and click the “Add” button.
Below the tag section, you’ll see a “Featured Image” section as well. Upload your main image there, and make sure that you use the same “image optimization” tips that we’ve discussed earlier. Done!
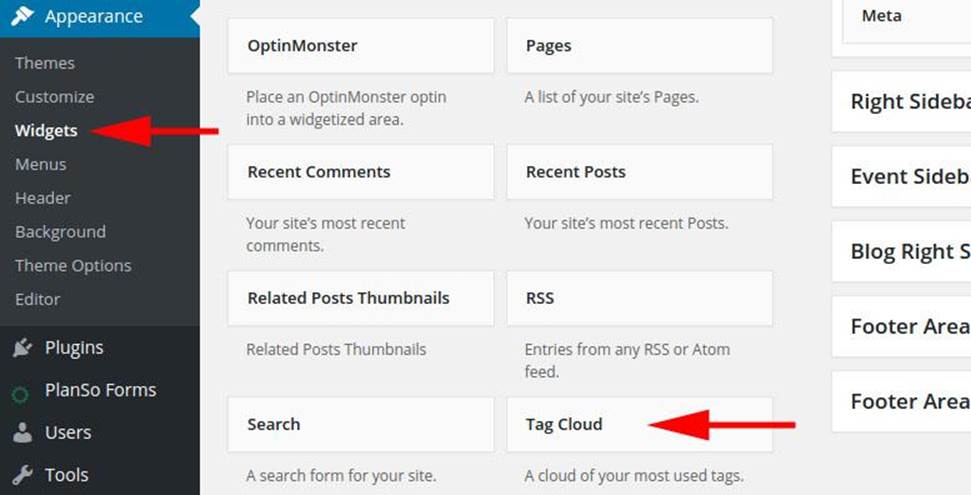
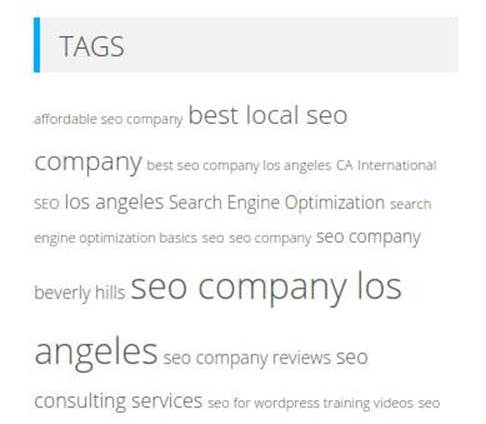
Tag Cloud Widget
Within your WordPress dashboard, navigate to the “widgets” section. You should see a widget for “tags” or “tag cloud.” You should add this widget to your sidebar because it will help search engines determine what your website is about.
When search engines crawl your page, they’ll see your tag cloud and follow the links to all your articles. Tag clouds are great for SEO.
Summary & Action Plan
![]() The H1 tag is the title of your article
The H1 tag is the title of your article
![]() Add your keyword to the H1, H2, and H3 tags within your article
Add your keyword to the H1, H2, and H3 tags within your article
![]() Make sure your keyword is in your permalink
Make sure your keyword is in your permalink
![]() Add your keyword to the first paragraph of your article
Add your keyword to the first paragraph of your article
![]() Bold, underline, or italicize your main keyword
Bold, underline, or italicize your main keyword
![]() Add your keyword to the last paragraph
Add your keyword to the last paragraph
![]() Add your keyword to the images (title, alternative tag, description)
Add your keyword to the images (title, alternative tag, description)
![]() Add your keywords to the “tag” and “categories” section.
Add your keywords to the “tag” and “categories” section.
![]() Customize the “All In One SEO” plugin for each article
Customize the “All In One SEO” plugin for each article
![]() Setup the “tag cloud” widget on your website
Setup the “tag cloud” widget on your website
All materials on the site are licensed Creative Commons Attribution-Sharealike 3.0 Unported CC BY-SA 3.0 & GNU Free Documentation License (GFDL)
If you are the copyright holder of any material contained on our site and intend to remove it, please contact our site administrator for approval.
© 2016-2026 All site design rights belong to S.Y.A.