Arduino: A Quick-Start Guide, Second Edition (2015)
Part II. Eleven Arduino Projects
Chapter 12. Creating Your Own Universal Remote Control
Remote controls add a lot of convenience to our lives, but they aren’t without annoyances. Sometimes remotes don’t have a certain function that you’d like, such as a sleep timer. Plus, remote controls seem to reproduce at the same rate as rabbits. They quickly occupy your whole coffee table, and you have to feed them with expensive batteries that you don’t have at home when you need them during a football game. Universal remote controls reduce the pain, but even the most expensive products aren’t perfect.
Although we use remote controls every day, few of us understand how they work. In this chapter, you’ll find out how remote controls work from the inside out, and then you’ll build your own universal remote control that’s better than a store-bought one because you can fully customize it to your needs. You can easily add all of your favorite functions, and you can add functions that other remotes don’t offer. If a commercial product doesn’t support a certain vendor, you’re usually stuck. With your own remote, you can easily add new protocols. You can even support not only infrared, but also more transmission technologies, such as Bluetooth or Wi-Fi.
We get started by learning the basics of infrared signaling. You’ll build an infrared circuit to grab control codes from any remote you have on hand. Once you grab the control codes, you can emit them using an infrared LED, and you’ll start to build your own universal remote control.
Then we’ll even take the idea of a remote control a step further. Once we have a universal remote, we’ll control the Arduino itself using the serial port or an Ethernet connection. This way, you can control the Arduino using a web browser, so you can control your TV set or DVD player using a web browser.
What You Need
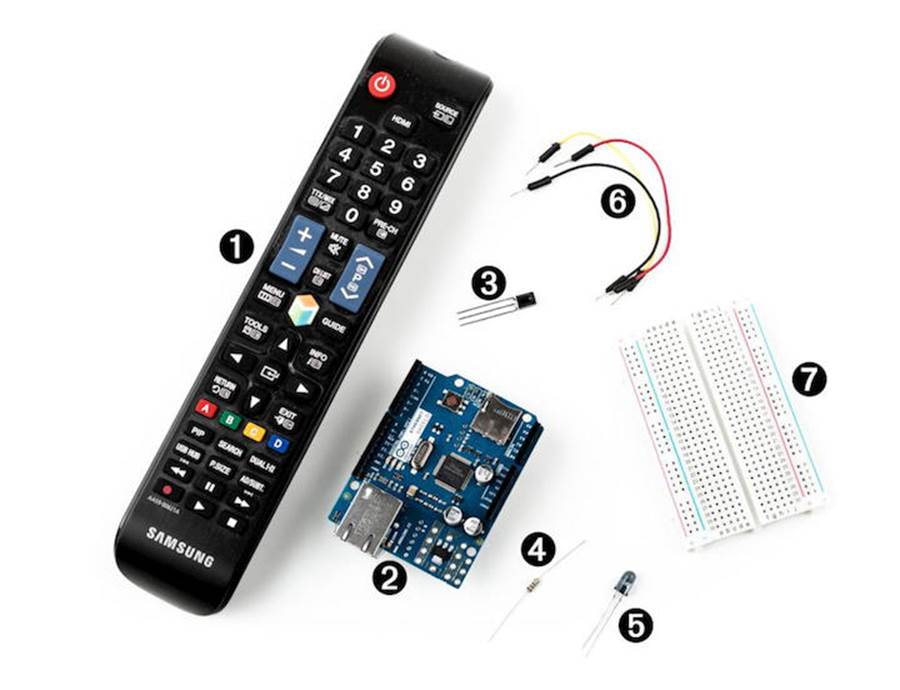
1. One or more infrared remote controls. They can be from your TV set or your DVD player, for example.
2. An Ethernet shield for the Arduino.
3. An infrared receiver, such as the PNA4602 or the TSOP38238.
4. A 100Ω resistor.
5. An infrared LED.
6. Some wires.
7. A breadboard.
8. An Arduino board, such as the Uno, Duemilanove, or Diecimila.
9. A USB cable to connect the Arduino to your computer.
Understanding Infrared Remote Controls
To wirelessly control a device such as a TV set, you need a sender and a receiver. The receiver usually is built into the device to be controlled, and the sender is part of a separate remote control. Although you can choose from a variety of technologies, such as Bluetooth or Wi-Fi, most modern remote controls still use infrared light for communication.
Using infrared to transmit signals has several advantages. It is invisible to human beings, so it won’t bother you. Also, you can generate it cheaply with infrared LEDs that can be integrated easily into electronic circuits. So, for many purposes, such as controlling devices in a typical household, it’s an excellent choice.
But infrared also has some drawbacks. It doesn’t work through walls or doors, and the distance between the remote control and the operated device is fairly limited. Even more importantly, the infrared signal is subject to interference from other light sources.
To keep possible distortions caused by other light sources to a minimum, the infrared signal has to be modulated. That means you turn the LED on and off at a certain frequency, usually somewhere between 36 kHz and 40 kHz.
That’s one of the problems that complicates building a robust infrared remote control. The biggest problem is that vendors have invented countless incompatible protocols. They all use different frequencies, and they all interpret data differently. Some interpret “light on” as a 1 bit, while others treat it as 0, and they all define their own commands that have different lengths. So, to work successfully with different remote control protocols, you need to know how to obtain all of these properties for a specific remote control.
To get this information, we’ll take a pragmatic approach. In the next two sections, you’ll learn how to read infrared signals from a commercial-grade remote control, and you’ll also learn how to reproduce them.
Grabbing Remote Control Codes
Because remote controls from different vendors rarely use the same protocol or even the same commands, before we start sending remote control codes ourselves, we should know what we have to send to achieve a certain result. We have to get as much information as possible about the remote control we’d like to emulate.
We have two options for obtaining remote control codes for a specific device: we could use a remote control database on the Internet, such as the Linux Infrared Remote Control project,[126] or we could use an infrared receiver to read them directly from our device’s remote. We’ll choose the latter approach because you can learn a lot from it.
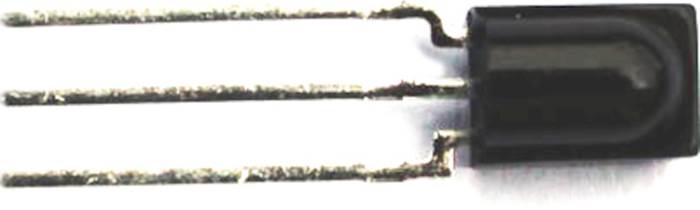
Infrared receivers are fairly complex on the inside, but they’re easy to use. They automatically observe the infrared light spectrum at a certain frequency (usually between 36 kHz and 40 kHz), and they report their observations using a single pin. So, when you’re using such a receiver, you don’t have to deal with all the complicated transmission details. You can focus on reading and interpreting the incoming signals.
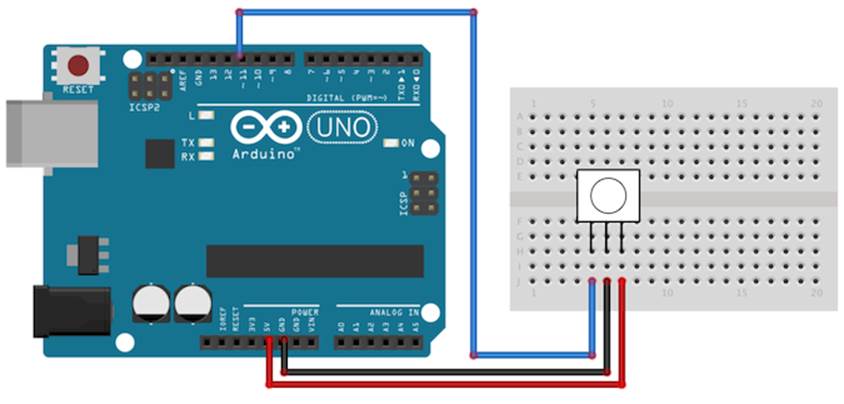
The image that follows shows how to connect a TSOP38238 receiver to an Arduino. It’s cheap, it’s easy to use, and it works at a frequency of 38 kHz, so it detects signals from a broad range of devices. Connect its ground connector to one of the Arduino’s GND pins, the power supply to the Arduino’s 5V pin, and the signal pin to digital pin 11.
You might be tempted to write a sketch that reads and outputs all incoming data on pin 11, and I won’t stop you. Call digitalRead in the loop method and output the results to the serial port. Point your TV set’s remote to the receiver and see what happens.
You’ll probably have a hard time understanding the data you see. The problem is that decoding the incoming data isn’t easy. Even if the receiver has already processed the data, it still has to be transformed and interpreted according to some complicated rules. Also, Arduino’s digitalReadmethod is too slow to deal with all types of incoming signals. You have to directly access the micro-controller to get the best results.
Fortunately, we don’t have to do this ourselves, because the IRremote library[127] hides the nasty details. It supports the most popular infrared protocols, and it can both receive and send data.
After you’ve downloaded and extracted the zip file,[128] rename the resulting directory to IRremote. Copy the directory IRremote to either ~/Documents/Arduino/libraries (on a Mac) or My Documents\Arduino\libraries (on a Windows box). Then restart your IDE.
If you’re using Arduino 1.6.0, IRremote collides with one of the Arduino IDE’s new standard libraries named RobotIRremote. In this case you have to delete RobotIRremote to make this chapter’s examples run. On a Mac you need to delete/Applications/Arduino.app/Contents/Resources/Java/libraries/RobotIRremote/. On a Windows machine, it’s something like C:\Program Files (x86)\Arduino\libraries\RobotIRremote‘.
With the following sketch, you can then decode incoming infrared signals, if the IRremote library supports their encoding:
|
RemoteControl/InfraredDumper/InfraredDumper.ino |
|
|
Line 1 |
#include <IRremote.h> |
|
- |
|
|
- |
const unsigned int IR_RECEIVER_PIN = 11; |
|
- |
const unsigned int BAUD_RATE = 9600; |
|
5 |
|
|
- |
IRrecv ir_receiver(IR_RECEIVER_PIN); |
|
- |
decode_results results; |
|
- |
|
|
- |
void setup() { |
|
10 |
Serial.begin(BAUD_RATE); |
|
- |
ir_receiver.enableIRIn(); |
|
- |
} |
|
- |
|
|
- |
void dump(const decode_results* results) { |
|
15 |
const int protocol = results->decode_type; |
|
- |
Serial.print("Protocol: "); |
|
- |
if (protocol == UNKNOWN) { |
|
- |
Serial.println("not recognized."); |
|
- |
} else if (protocol == NEC) { |
|
20 |
Serial.println("NEC"); |
|
- |
} else if (protocol == SONY) { |
|
- |
Serial.println("SONY"); |
|
- |
} else if (protocol == RC5) { |
|
- |
Serial.println("RC5"); |
|
25 |
} else if (protocol == RC6) { |
|
- |
Serial.println("RC6"); |
|
- |
} else if (protocol == DISH) { |
|
- |
Serial.println("DISH"); |
|
- |
} else if (protocol == SHARP) { |
|
30 |
Serial.println("SHARP"); |
|
- |
} else if (protocol == PANASONIC) { |
|
- |
Serial.print("PANASONIC ("); |
|
- |
Serial.print("Address: "); |
|
- |
Serial.print(results->panasonicAddress, HEX); |
|
35 |
Serial.println(")"); |
|
- |
} else if (protocol == JVC) { |
|
- |
Serial.println("JVC"); |
|
- |
} else if (protocol == SANYO) { |
|
- |
Serial.println("SANYO"); |
|
40 |
} else if (protocol == MITSUBISHI) { |
|
- |
Serial.println("MITSUBISHI"); |
|
- |
} else if (protocol == SAMSUNG) { |
|
- |
Serial.println("SAMSUNG"); |
|
- |
} else if (protocol == LG) { |
|
45 |
Serial.println("LG"); |
|
- |
} |
|
- |
Serial.print("Value: "); |
|
- |
Serial.print(results->value, HEX); |
|
- |
Serial.print(" ("); |
|
50 |
Serial.print(results->bits, DEC); |
|
- |
Serial.println(" bits)"); |
|
- |
} |
|
- |
|
|
- |
void loop() { |
|
55 |
if (ir_receiver.decode(&results)) { |
|
- |
dump(&results); |
|
- |
ir_receiver.resume(); |
|
- |
} |
|
- |
} |
First, we define an IRrecv object named ir_receiver that reads from pin 11. We also define a decode_result object that we’ll use to store the attributes of incoming infrared signals. In setup, we initialize the serial port, and we initialize the infrared receiver by calling enableIRIn.
Then we define the dump method that formats and outputs the content of a decode_result object to the serial port. decode_result is one of the core data types of the IRremote library. It encapsulates data such as the protocol type, the length of a command code, and the command code itself. In line 15, we read the protocol type that has been used to encode the incoming signal. When we receive a new signal, we output all of these attributes to the serial port.
The loop method is simple. We call decode to check whether we’ve received a new signal. If yes, we call dump to output it to the serial port, and then we call resume to wait for the next signal.
Compile and upload the sketch to your Arduino. Start the serial monitor and point a remote control at the receiver. Push some of the remote’s buttons and see what happens. Figure 30, Capture the IR codes of a Samsung remote shows happens when you point a recent Samsung remote at the receiver and press menu, up, down, left, right, and play.
If you’re using a remote from a different vendor, your results will differ. Nearly all modern remotes send a unique 32-bit value for each command, but there are exceptions, too. For example, Panasonic devices send not only a command value, but also an address. Also, remote control behavior differs regarding command repetition. If you press and hold a key on a Samsung remote, it will send the same code over and over again as long as you press the key. An Apple remote will send the key’s command code only once, and after that it sends the code 0xffffffff as long as you press the key.
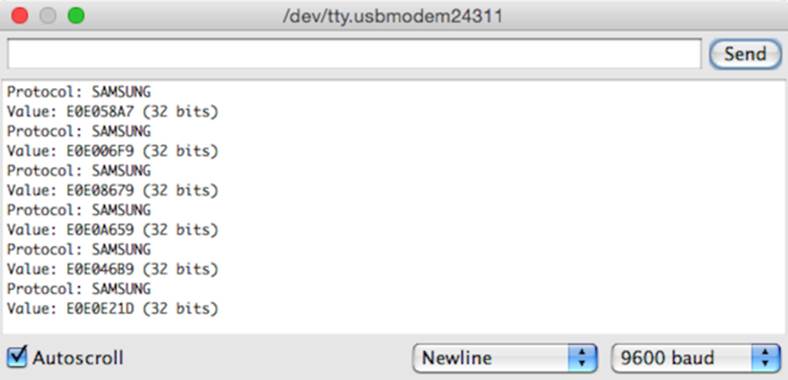
Figure 30. Capture the IR codes of a Samsung remote
After you’ve grabbed a remote’s control codes, you can use them to build your own remote. You’ll learn how to do that in the next section.
Cloning a Remote
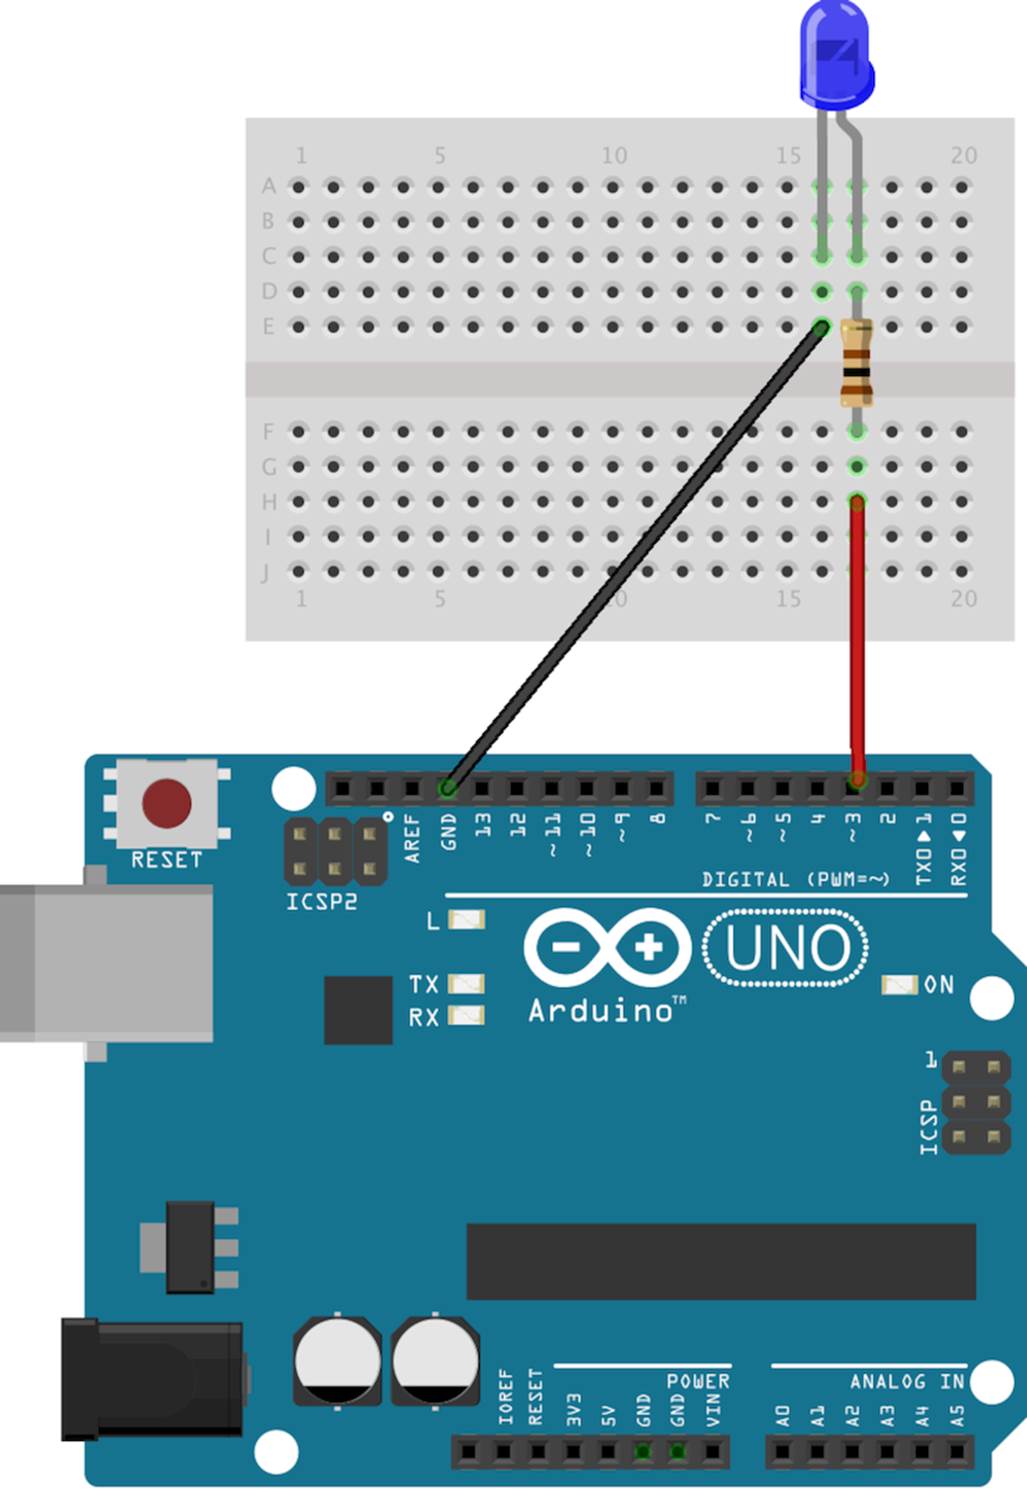
As soon as you know the protocol and the command codes a remote uses, you can clone it. You need only an infrared LED that doesn’t differ much from the LEDs we’ve used before. The only difference is that it emits “invisible” light. The figure shows how to connect it to pin 3 of an Arduino. (The library we’re using in this section expects the infrared LED to be connected to pin 3.) Note that you can’t use an LED without a resistor. (See Current, Voltage, and Resistance, to learn more about it.)
We could try to generate the infrared signals ourselves, but that’d be tedious and error-prone. It’s better to use the existing implementation in the IRremote library. We’ll use it to create our own TvRemote class that encapsulates all of the gory protocol details. Here’s the class:
|
RemoteControl/TvRemote/TvRemote.ino |
|
|
Line 1 |
#include <IRremote.h> |
|
- |
|
|
- |
class TvRemote { |
|
- |
|
|
5 |
enum { |
|
- |
CMD_LEN = 32, GUIDE = 0xE0E0F20D, |
|
- |
POWER = 0xE0E040BF, TOOLS = 0xE0E0D22D, |
|
- |
SOURCE = 0xE0E0807F, INFO = 0xE0E0F807, |
|
- |
HDMI = 0xE0E0D12E, OPTIONS = 0xE0E016E9, |
|
10 |
ONE = 0xE0E020DF, UP_K = 0xE0E006F9, |
|
- |
TWO = 0xE0E0A05F, LEFT_K = 0xE0E0A659, |
|
- |
THREE = 0xE0E0609F, RIGHT_K = 0xE0E046B9, |
|
- |
FOUR = 0xE0E010EF, DOWN_K = 0xE0E08679, |
|
- |
FIVE = 0xE0E0906F, RETURN = 0xE0E01AE5, |
|
15 |
SIX = 0xE0E050AF, EXIT = 0xE0E0B44B, |
|
- |
SEVEN = 0xE0E030CF, A = 0xE0E036C9, |
|
- |
EIGHT = 0xE0E0B04F, B = 0xE0E028D7, |
|
- |
NINE = 0xE0E0708F, C = 0xE0E0A857, |
|
- |
TXT = 0xE0E034CB, D = 0xE0E06897, |
|
20 |
ZERO = 0xE0E08877, PIP = 0xE0E004FB, |
|
- |
PRE_CH = 0xE0E0C837, SEARCH = 0xE0E0CE31, |
|
- |
VOL_UP = 0xE0E0E01F, DUAL = 0xE0E000FF, |
|
- |
VOL_DOWN = 0xE0E0D02F, USB_HUB = 0xE0E025DA, |
|
- |
MUTE = 0xE0E0F00F, P_SIZE = 0xE0E07C83, |
|
25 |
CH_LIST = 0xE0E0D629, SUBTITLE = 0xE0E0A45B, |
|
- |
PROG_UP = 0xE0E048B7, REWIND = 0xE0E0A25D, |
|
- |
PROG_DOWN = 0xE0E008F7, PAUSE = 0xE0E052AD, |
|
- |
MENU = 0xE0E058A7, FORWARD = 0xE0E012ED, |
|
- |
SMART_TV = 0xE0E09E61, RECORD = 0xE0E0926D, |
|
30 |
PLAY = 0xE0E0E21D, STOP = 0xE0E0629D |
|
- |
}; |
|
- |
|
|
- |
IRsend tv; |
|
- |
|
|
35 |
void send_command(const long command) { |
|
- |
tv.sendSAMSUNG(command, CMD_LEN); |
|
- |
} |
|
- |
|
|
- |
public: |
|
40 |
|
|
- |
void guide() { send_command(GUIDE); } |
|
- |
void power() { send_command(POWER); } |
|
- |
void tools() { send_command(TOOLS); } |
|
- |
void source() { send_command(SOURCE); } |
|
45 |
void info() { send_command(INFO); } |
|
- |
void hdmi() { send_command(HDMI); } |
|
- |
void zero() { send_command(ZERO); } |
|
- |
void one() { send_command(ONE); } |
|
- |
void two() { send_command(TWO); } |
|
50 |
void three() { send_command(THREE); } |
|
- |
void four() { send_command(FOUR); } |
|
- |
void five() { send_command(FIVE); } |
|
- |
void six() { send_command(SIX); } |
|
- |
void seven() { send_command(SEVEN); } |
|
55 |
void eight() { send_command(EIGHT); } |
|
- |
void nine() { send_command(NINE); } |
|
- |
void up() { send_command(UP_K); } |
|
- |
void left() { send_command(LEFT_K); } |
|
- |
void right() { send_command(RIGHT_K); } |
|
60 |
void down() { send_command(DOWN_K); } |
|
- |
void ret() { send_command(RETURN); } |
|
- |
void exit() { send_command(EXIT); } |
|
- |
void a() { send_command(A); } |
|
- |
void b() { send_command(B); } |
|
65 |
void c() { send_command(C); } |
|
- |
void d() { send_command(D); } |
|
- |
void txt() { send_command(TXT); } |
|
- |
void pip() { send_command(PIP); } |
|
- |
void pre_ch() { send_command(PRE_CH); } |
|
70 |
void search() { send_command(SEARCH); } |
|
- |
void vol_up() { send_command(VOL_UP); } |
|
- |
void vol_down() { send_command(VOL_DOWN); } |
|
- |
void dual() { send_command(DUAL); } |
|
- |
void usb_hub() { send_command(USB_HUB); } |
|
75 |
void mute() { send_command(MUTE); } |
|
- |
void p_size() { send_command(P_SIZE); } |
|
- |
void ch_list() { send_command(CH_LIST); } |
|
- |
void subtitle() { send_command(SUBTITLE); } |
|
- |
void prog_up() { send_command(PROG_UP); } |
|
80 |
void prog_down() { send_command(PROG_DOWN); } |
|
- |
void pause() { send_command(PAUSE); } |
|
- |
void rewind() { send_command(REWIND); } |
|
- |
void forward() { send_command(FORWARD); } |
|
- |
void menu() { send_command(MENU); } |
|
85 |
void smart_tv() { send_command(SMART_TV); } |
|
- |
void record() { send_command(RECORD); } |
|
- |
void play() { send_command(PLAY); } |
|
- |
void stop() { send_command(STOP); } |
|
- |
}; |
The code starts with an enumeration that contains all the constants we need: the length of each control code (CMD_LEN) and the control codes themselves. There’s one entry in the enumeration for each key on our remote control.
In line 33, we define an IRsend object named tv that we’ll use to send commands using the send_command method. send_command uses IRsend’s sendSAMSUNG method because in this example we’re using a Samsung remote control. If you’re using a device from Sony or Sharp, you have to adjust the code accordingly. Note that at the time of this writing, the IRremote library is able to decode remote controls from Sanyo, Mitsubishi, and LG, but it doesn’t support sending commands to devices from these manufacturers.
After we’ve established the basis, we can implement all commands with a single function call, so implementing power, menu, play, and so on is a piece of cake.
Using the TvRemote class is easy, too. In the following sketch, we use it to control a Samsung TV from the Arduino’s serial monitor:
|
RemoteControl/TvRemote/TvRemote.ino |
|
|
Line 1 |
const unsigned int BAUD_RATE = 9600; |
|
- |
|
|
- |
TvRemote tv; |
|
- |
String command = ""; |
|
5 |
boolean input_available = false; |
|
- |
|
|
- |
void setup() { |
|
- |
Serial.begin(BAUD_RATE); |
|
- |
} |
|
10 |
|
|
- |
void serialEvent() { |
|
- |
while (Serial.available()) { |
|
- |
const char c = Serial.read(); |
|
- |
if (c == '\n') |
|
15 |
input_available = true; |
|
- |
else |
|
- |
command += c; |
|
- |
} |
|
- |
} |
|
20 |
|
|
- |
void loop() { |
|
- |
if (input_available) { |
|
- |
Serial.print("Received command: "); |
|
- |
Serial.println(command); |
|
25 |
if (command == "guide") tv.guide(); |
|
- |
else if (command == "power") tv.power(); |
|
- |
else if (command == "tools") tv.tools(); |
|
- |
else if (command == "source") tv.source(); |
|
- |
else if (command == "info") tv.info(); |
|
30 |
else if (command == "hdmi") tv.hdmi(); |
|
- |
else if (command == "zero") tv.zero(); |
|
- |
else if (command == "one") tv.one(); |
|
- |
else if (command == "two") tv.two(); |
|
- |
else if (command == "three") tv.three(); |
|
35 |
else if (command == "four") tv.four(); |
|
- |
else if (command == "five") tv.five(); |
|
- |
else if (command == "six") tv.six(); |
|
- |
else if (command == "seven") tv.seven(); |
|
- |
else if (command == "eight") tv.eight(); |
|
40 |
else if (command == "nine") tv.nine(); |
|
- |
else if (command == "up") tv.up(); |
|
- |
else if (command == "left") tv.left(); |
|
- |
else if (command == "right") tv.right(); |
|
- |
else if (command == "down") tv.down(); |
|
45 |
else if (command == "ret") tv.ret(); |
|
- |
else if (command == "exit") tv.exit(); |
|
- |
else if (command == "a") tv.a(); |
|
- |
else if (command == "b") tv.b(); |
|
- |
else if (command == "c") tv.c(); |
|
50 |
else if (command == "d") tv.d(); |
|
- |
else if (command == "txt") tv.txt(); |
|
- |
else if (command == "pip") tv.pip(); |
|
- |
else if (command == "pre_ch") tv.pre_ch(); |
|
- |
else if (command == "search") tv.search(); |
|
55 |
else if (command == "vol_up") tv.vol_up(); |
|
- |
else if (command == "vol_down") tv.vol_down(); |
|
- |
else if (command == "dual") tv.dual(); |
|
- |
else if (command == "usb_hub") tv.usb_hub(); |
|
- |
else if (command == "mute") tv.mute(); |
|
60 |
else if (command == "p_size") tv.p_size(); |
|
- |
else if (command == "ch_list") tv.ch_list(); |
|
- |
else if (command == "subtitle") tv.subtitle(); |
|
- |
else if (command == "prog_up") tv.prog_up(); |
|
- |
else if (command == "prog_down") tv.prog_down(); |
|
65 |
else if (command == "pause") tv.pause(); |
|
- |
else if (command == "rewind") tv.rewind(); |
|
- |
else if (command == "forward") tv.forward(); |
|
- |
else if (command == "menu") tv.menu(); |
|
- |
else if (command == "smart_tv") tv.smart_tv(); |
|
70 |
else if (command == "record") tv.record(); |
|
- |
else if (command == "play") tv.play(); |
|
- |
else if (command == "stop") tv.stop(); |
|
- |
else Serial.println("Command is unknown."); |
|
- |
|
|
75 |
command = ""; |
|
- |
input_available = false; |
|
- |
} |
|
- |
} |
In lines 3 to 5, we define a global TvRemote object named tv, a string named command that holds the current command, and a Boolean flag named input_available that is true when the sketch has received a new command. As usual, we initialize the serial port in the setup function.
The Arduino calls the serialEvent function defined in line 11 when new data arrives at the serial port. (Learn more about serialEvent in Serial Communication Using Various Languages.) We append that data to the command variable, and when we encounter a newline character, we also set the input_available flag to true. This way, the loop function can determine whether a new command has been received and which command it was.
In loop, we wait for commands. When a new command arrives, we check whether it’s supported. If it is supported, we send the corresponding control code. Otherwise, we print an error message.
Compile and upload the sketch, and you can control the TV of your choice—a Samsung TV, in this example—using any serial monitor, which is quite cool already. The interface is still awkward for less geeky people, so in the next section, you’ll learn how to create a more user-friendly interface.
Controlling Infrared Devices Remotely with Your Browser
We’ve already created several projects that you can control using a serial monitor. For programmers, that’s a nice and convenient interface, but as soon as you want to present your projects to your nontechnical friends, you’d better have something more user-friendly and colorful.
Now we’ll implement a Google Chrome app to create a nice user interface for our cloned remote control. Before you proceed, you should read Appendix 4, Controlling the Arduino with a Browser, if you haven’t already.
The Chrome app’s manifest.json file contains no surprises. It defines the application name and grants the application access to the serial port.
|
RemoteControl/TvRemoteUI/manifest.json |
|
|
|
{ |
|
|
"manifest_version": 2, |
|
|
"name": "TV Remote Emulator", |
|
|
"version": "1", |
|
|
"permissions": [ "serial" ], |
|
|
"app": { |
|
|
"background": { |
|
|
"scripts": ["background.js"] |
|
|
} |
|
|
}, |
|
|
"minimum_chrome_version": "33" |
|
|
} |
The same is true for the application’s background.js file. It renders the following HTML file when the application is launched.
|
RemoteControl/TvRemoteUI/main.html |
|
|
|
<!DOCTYPE html> |
|
|
<html lang="en"> |
|
|
<head> |
|
|
<meta charset="utf-8"/> |
|
|
<link rel="stylesheet" type="text/css" href="css/style.css"/> |
|
|
<title>TV Remote Emulator</title> |
|
|
</head> |
|
|
<body> |
|
|
<div id="main"> |
|
|
<div> |
|
|
<button id="power" type="button">Power</button> |
|
|
<button id="hdmi" type="button">HDMI</button> |
|
|
<button id="source" type="button">Source</button> |
|
|
</div> |
|
|
<div> |
|
|
<button id="one" type="button">1</button> |
|
|
<button id="two" type="button">2</button> |
|
|
<button id="three" type="button">3</button> |
|
|
</div> |
|
|
<div> |
|
|
<button id="four" type="button">4</button> |
|
|
<button id="five" type="button">5</button> |
|
|
<button id="six" type="button">6</button> |
|
|
</div> |
|
|
<div> |
|
|
<button id="seven" type="button">7</button> |
|
|
<button id="eight" type="button">8</button> |
|
|
<button id="nine" type="button">9</button> |
|
|
</div> |
|
|
<div> |
|
|
<button id="txt" type="button">TXT</button> |
|
|
<button id="zero" type="button">0</button> |
|
|
<button id="pre_ch" type="button">PRE-CH</button> |
|
|
</div> |
|
|
<div> |
|
|
<button id="vol_up" type="button">V Up</button> |
|
|
<button id="mute" type="button">Mute</button> |
|
|
<button id="prog_up" type="button">Ch Up</button> |
|
|
</div> |
|
|
<div> |
|
|
<button id="vol_down" type="button">V Down</button> |
|
|
<button id="ch_list" type="button">CH LIST</button> |
|
|
<button id="prog_down" type="button">Ch Down</button> |
|
|
</div> |
|
|
</div> |
|
|
<script src="js/jquery-1.11.1.min.js"></script> |
|
|
<script src="js/serial_device.js"></script> |
|
|
<script src="js/remote.js"></script> |
|
|
</body> |
|
|
</html> |
This HTML document defines seven rows that contain three buttons each. Also, it loads several JavaScript files. It loads the jQuery library and the SerialDevice class we defined in Writing a SerialDevice Class. In addition, it loads a file named remote.js that defines what happens when a user clicks a button on our virtual remote.
|
RemoteControl/TvRemoteUI/js/remote.js |
|
|
Line 1 |
$(function() { |
|
- |
var BAUD_RATE = 9600; |
|
- |
var remote = new SerialDevice("/dev/tty.usbmodem24311", BAUD_RATE); |
|
- |
|
|
5 |
remote.onConnect.addListener(function() { |
|
- |
console.log("Connected to: " + remote.path); |
|
- |
}); |
|
- |
|
|
- |
remote.connect(); |
|
10 |
|
|
- |
$("[type=button]").on("click", function(event){ |
|
- |
var buttonType = $(event.currentTarget).attr("id"); |
|
- |
console.log("Button pressed: " + buttonType); |
|
- |
remote.send(buttonType + "\n"); |
|
15 |
}); |
|
- |
}); |
In remote.js, we use jQuery’s $ function in the first line to make sure all JavaScript code gets executed after the whole HTML page has been loaded. Then we define a new SerialDevice instance named remote and connect to it. Make sure you’re using the right serial port name here.
The rest of the code attaches callback functions to all of the buttons we’ve defined. We use jQuery’s $ function to select all elements having the type button. Then we call the on function for each button element and pass it the parameter click to add a callback function that gets called when the button gets clicked.
In the callback function for click events, we use the event’s currentTarget property in line 12 to determine which button has actually been clicked. We read the button’s ID attribute and use it as the command we send to the Arduino. If the user clicks the button with the ID one, the program will send the command one to the Arduino. The Arduino will then send the corresponding code via infrared. Using a consistent naming scheme for the button elements in the HTML page has really paid off. To add another button, you only have to modify the HTML page. Add a new button element and set its ID attribute to the name of the Arduino command that emits the corresponding remote control code.
To align the buttons of our virtual remote control and to make the Chrome app look nice, we use the following stylesheet:
|
RemoteControl/TvRemoteUI/css/style.css |
|
|
|
#main { |
|
|
width: 18em; |
|
|
margin-left: auto; |
|
|
margin-right: auto; |
|
|
} |
|
|
|
|
|
button { |
|
|
width: 6em; |
|
|
} |
The stylesheet mainly ensures that all buttons have the same width. Run the Chrome app, and you’ll see something like the following figure:
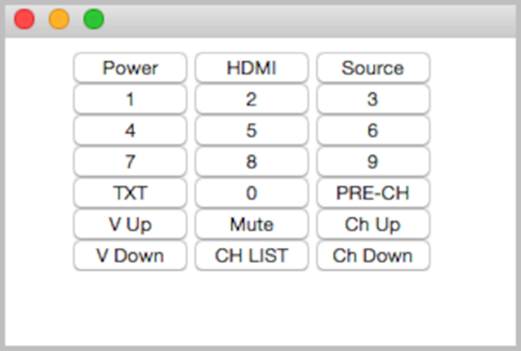
Upload the sketch from Cloning a Remote, to your Arduino and start the Chrome app. Click any button to perform the corresponding action. That’s an interface even your grandma could use, isn’t it?
You still need to connect the Arduino to your computer’s serial port to control it with a web browser. In the next section, you’ll learn how to overcome this and control an Arduino without a serial connection.
Building an Infrared Proxy
All of our previous remote control approaches have one major drawback: they all depend on a serial connection to a PC. In this section, you’ll learn how to replace this connection with an Ethernet connection, so you no longer need a PC but only Internet access. You will directly plug your Ethernet cable into an Ethernet shield connected to the Arduino, so it is available on your network. Then you’ll connect an infrared LED to the Ethernet shield using the same circuit as shown in Cloning a Remote.
You don’t necessarily have to use your PC’s web browser to access the Arduino. You could also use the browser on your PlayStation Portable or on your iPhone. Yes, you can now control your TV set using your game consoles or your smartphone. Oh, and you could replace the Ethernet shield with a Wi-Fi shield so you don’t have to connect your Arduino physically to your network router.
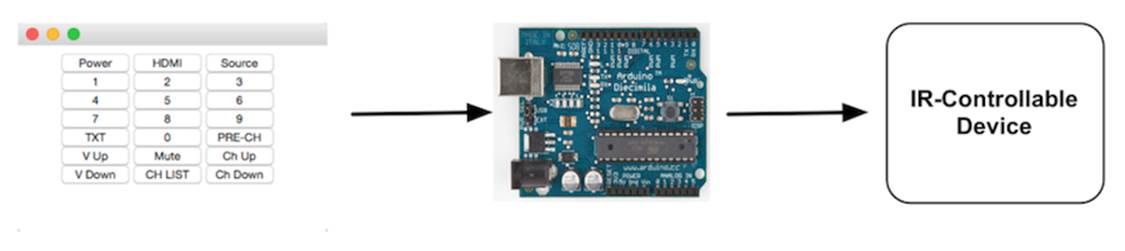
Before we dive into the code, we should do a little planning ahead and make clear what we’d like to achieve. We’ll build an infrared proxy—a device that receives commands via Ethernet and turns them into infrared signals. (See the image here.) To make it easy to integrate the device into a network, we’ll make it accessible via HTTP. This way, we can control it using a regular web browser.
We’ll implement only a very small portion of the HTTP standard on the Arduino—we’ll support only a certain URL scheme. The URLs we’ll support look as follows:
|
|
http://arduino-ip/protocol-name/command-length/command-code |
We’ll replace arduino-ip with the IP address of the Arduino’s Ethernet shield. The element protocol-name can be one of the supported protocols (“NEC,” “SONY,” “RC5,” “RC6,” “DISH,” “JVC,” or “SAMSUNG”). command-length specifies the length of the command code in bits, andcommand-code contains the command code itself as a hexadecimal number.
Note that the sketch currently doesn’t support Panasonic devices because they don’t fit our URL scheme.
Let’s assume we’d like to send the code for the power key on a Samsung remote, and our Arduino has the IP address 192.168.2.42. Then we’d have to point our web browser to the following URL:
http://192.168.2.42/SAMSUNG/32/E0E040BF
In this case, the protocol name is SAMSUNG, the length of the command code is 32 bits, and the command code is E0E040BF (the hexadecimal number we grabbed in Grabbing Remote Control Codes).
We already used the Arduino as a web client in Chapter 10, Networking with Arduino, but now we need to turn it into a web server. The server waits for new HTTP requests like the one shown previously, parses the URL, and emits the corresponding infrared signal.
We’ll hide all of these details in a class named InfraredProxy, and to keep things as easy and as concise as possible, we’ll make use of both the Ethernet and the IRremote library. The InfraredProxy class is still one of the book’s most sophisticated examples of Arduino code. Here’s its interface:
|
RemoteControl/InfraredProxy/infrared_proxy.h |
|
|
|
#include <SPI.h> |
|
|
#include <Ethernet.h> |
|
|
#include <IRremote.h> |
|
|
|
|
|
class InfraredProxy { |
|
|
private: |
|
|
IRsend _infrared_sender; |
|
|
|
|
|
void read_line(EthernetClient& client, char* buffer, const int buffer_length); |
|
|
bool send_ir_data(const char* protocol, const int bits, const long value); |
|
|
bool handle_command(char* line); |
|
|
|
|
|
public: |
|
|
void receive_from_server(EthernetServer server); |
|
|
}; |
After including all libraries needed, we declare the InfraredProxy class. We define a member variable named _infrared_sender that stores an IRsend object we need to emit infrared control codes. Then we declare three private helper methods and the receive_from_server method, which is the only public method of the InfraredProxy class.
Let’s have a look at the implementation of all methods. We’ll start with read_line:
|
RemoteControl/InfraredProxy/infrared_proxy.cpp |
|
|
|
void InfraredProxy::read_line( |
|
|
EthernetClient& client, char* buffer, const int buffer_length) |
|
|
{ |
|
|
int buffer_pos = 0; |
|
|
while (client.available() && (buffer_pos < buffer_length - 1)) { |
|
|
const char c = client.read(); |
|
|
if (c == '\n') |
|
|
break; |
|
|
if (c != '\r') |
|
|
buffer[buffer_pos++] = c; |
|
|
} |
|
|
buffer[buffer_pos] = '\0'; |
|
|
} |
read_line reads one line of data sent by a client. A line ends either with a newline character (\n) or with a carriage return character followed by a newline character (\r\n). read_line expects the EthernetClient object to read data from, a character buffer to store the data in (buffer), and the maximum length of the character buffer (buffer_length). The method ignores all newline and carriage return characters, and it sets the line’s last character to \0 so the buffer to be filled will always be a null-terminated string.
send_ir_data is responsible for sending infrared commands:
|
RemoteControl/InfraredProxy/infrared_proxy.cpp |
|
|
|
bool InfraredProxy::send_ir_data( |
|
|
const char* protocol, const int bits, const long value) |
|
|
{ |
|
|
bool result = true; |
|
|
if (!strcasecmp(protocol, "NEC")) |
|
|
_infrared_sender.sendNEC(value, bits); |
|
|
else if (!strcasecmp(protocol, "SONY")) |
|
|
_infrared_sender.sendSony(value, bits); |
|
|
else if (!strcasecmp(protocol, "RC5")) |
|
|
_infrared_sender.sendRC5(value, bits); |
|
|
else if (!strcasecmp(protocol, "RC6")) |
|
|
_infrared_sender.sendRC6(value, bits); |
|
|
else if (!strcasecmp(protocol, "DISH")) |
|
|
_infrared_sender.sendDISH(value, bits); |
|
|
else if (!strcasecmp(protocol, "SHARP")) |
|
|
_infrared_sender.sendSharp(value, bits); |
|
|
else if (!strcasecmp(protocol, "JVC")) |
|
|
_infrared_sender.sendJVC(value, bits, 0); |
|
|
else if (!strcasecmp(protocol, "SAMSUNG")) |
|
|
_infrared_sender.sendSAMSUNG(value, bits); |
|
|
else |
|
|
result = false; |
|
|
return result; |
|
|
} |
It emits an infrared command specified by a protocol type (protocol), the length of the code measured in bits (bits), and the code value to be sent (value). Depending on the name of the protocol, the method delegates all the real work to our IRsend instance.
handle_command implements one of the most difficult aspects of our InfraredProxy—it parses the URL addressed by the HTTP request:
|
RemoteControl/InfraredProxy/infrared_proxy.cpp |
|
|
Line 1 |
bool InfraredProxy::handle_command(char* line) { |
|
- |
strsep(&line, " "); |
|
- |
char* path = strsep(&line, " "); |
|
- |
|
|
5 |
char* args[3]; |
|
- |
for (char** ap = args; (*ap = strsep(&path, "/")) != NULL;) |
|
- |
if (**ap != '\0') |
|
- |
if (++ap >= &args[3]) |
|
- |
break; |
|
10 |
const int bits = atoi(args[1]); |
|
- |
const long value = strtoul(args[2], NULL, 16); |
|
- |
return send_ir_data(args[0], bits, value); |
|
- |
} |
To understand what this method does, you have to understand how HTTP requests work. If you wander up to your web browser’s address bar and enter a URL like http://192.168.2.42/SAMSUNG/32/E0E040BF, your browser will send an HTTP request that looks like this:
|
|
GET /SAMSUNG/32/E0E040BF HTTP/1.1 |
|
|
host: 192.168.2.42 |
The first line is a GET request, and handle_command expects a string containing such a request. It extracts all the information encoded in the given path (/SAMSUNG/32/E0E040BF) and uses it to emit an infrared signal. Parsing the information is tricky, but using C’s strsep function, it’s not too difficult. strsep separates strings delimited by certain characters. It expects a string containing several separated strings and a string containing all delimiters. To get the separated strings, you have to call strsep repeatedly until it returns NULL. That is, whenever you invoke strsep, it returns the next string or NULL.
We use strsep in two different contexts. In the first case, we extract the path from the GET command: we strip off the string “GET” and the string “HTTP/1.1.” Both are separated from the path by a blank character. In line 2, we call strsep to remove the “GET” at the beginning of the string. We don’t even store the function’s return value, because we know it’s “GET” anyway.
In line 3, we read the next separated string, which contains the actual path. If you were to pass the request GET http://192.168.2.42/SAMSUNG/32/E0E040BF HTTP/1.1 to handle_command, path would contain /SAMSUNG/32/E0E040BF now.
At this stage, we have a string consisting of three strings separated by a slash character (/). It’s time to use strsep again, and if you understand what happens in lines 6 to 9, then you can call yourself familiar with both C and the strsep function. In the end, the array args contains all three path elements. We can pass the protocol name directly to send_ir_data, but we have to turn the bit length and the value of the code into int and long values before. For the conversion, we use the atoi and strtoul functions. We use the latter one to convert a hexadecimal value to a decimal value.
Now we have defined all helper methods we need, and we only have to implement the only public method of the InfraredProxy class:
|
RemoteControl/InfraredProxy/infrared_proxy.cpp |
|
|
Line 1 |
void InfraredProxy::receive_from_server(EthernetServer server) { |
|
- |
const int MAX_LINE = 256; |
|
- |
char line[MAX_LINE]; |
|
- |
EthernetClient client = server.available(); |
|
5 |
if (client) { |
|
- |
while (client.connected()) { |
|
- |
if (client.available()) { |
|
- |
read_line(client, line, MAX_LINE); |
|
- |
Serial.println(line); |
|
10 |
if (line[0] == 'G' && line[1] == 'E' && line[2] == 'T') |
|
- |
handle_command(line); |
|
- |
if (!strcmp(line, "")) { |
|
- |
client.println("HTTP/1.1 200 OK\n"); |
|
- |
break; |
|
15 |
} |
|
- |
} |
|
- |
} |
|
- |
delay(1); |
|
- |
client.stop(); |
|
20 |
} |
|
- |
} |
The receive_from_server method finally implements the core logic of our InfraredProxy class. It expects an instance of the EthernetServer class that is defined in the Ethernet library. It waits for a client to connect using EthernetServer’s available method in line 4. Whenever the server is connected to a client, it checks whether the client has new data using EthernetClient’s available method in line 7.
receive_from_server reads the data sent by the client line by line, calling read_line. It prints each line to the serial port for debugging purposes, and for every line it checks whether the line begins with GET. If yes, it calls handle_command; otherwise, it checks whether the line is empty, because all HTTP messages are terminated by an empty line. In this case, receive_from_server sends back an “OK” response, waits for a millisecond to give the client some time to process the response, and then disconnects from the client by calling stop.
Admittedly, that was a lot of code, but the effort was well worth it. Using the InfraredProxy is really simple now:
|
RemoteControl/InfraredProxy/InfraredProxy.ino |
|
|
|
#include <SPI.h> |
|
|
#include <Ethernet.h> |
|
|
#include <IRremote.h> |
|
|
#include "infrared_proxy.h" |
|
|
|
|
|
const unsigned int PROXY_PORT = 80; |
|
|
const unsigned int BAUD_RATE = 9600; |
|
|
|
|
|
byte mac[] = { 0xDE, 0xAD, 0xBE, 0xEF, 0xFE, 0xED }; |
|
|
IPAddress ip(192, 168, 2, 42); |
|
|
|
|
|
EthernetServer server(PROXY_PORT); |
|
|
InfraredProxy ir_proxy; |
|
|
|
|
|
void setup() { |
|
|
Serial.begin(BAUD_RATE); |
|
|
Ethernet.begin(mac, ip); |
|
|
server.begin(); |
|
|
} |
|
|
|
|
|
void loop() { |
|
|
ir_proxy.receive_from_server(server); |
|
|
} |
As usual, we define the MAC and IP addresses we’d like to use. Then we define an EthernetServer object, passing it the port it should listen to, 80 (the standard HTTP port). Also, we initialize a new InfraredProxy object.
In the setup method, we initialize the serial port for debugging purposes. We also initialize the Ethernet shield, and we call EthernetServer’s begin method to start our server’s listener. In loop, we call only the InfraredProxy’s receive_from_server method, passing it our EthernetServerinstance.
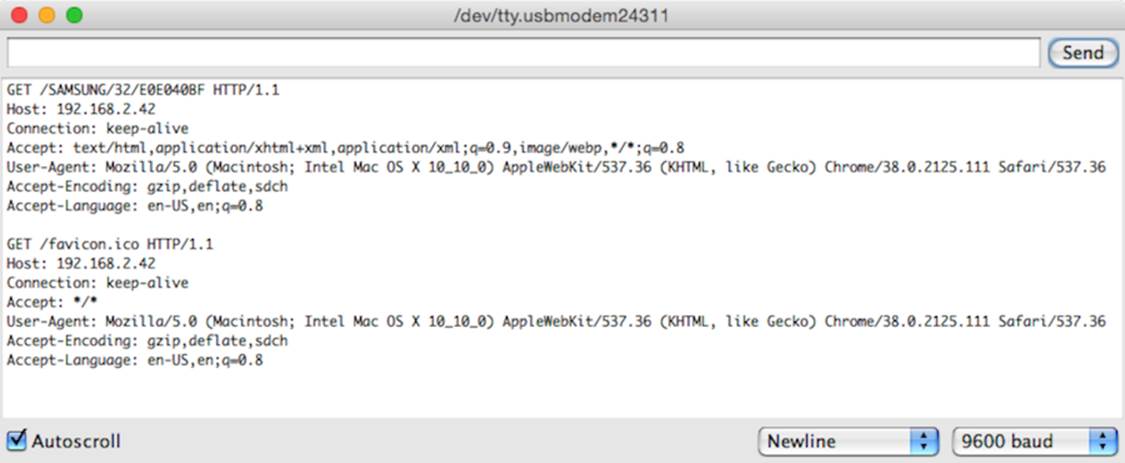
Let’s finally test the code! Attach the Ethernet shield to your Arduino, and attach the infrared LED circuit to the shield. Configure the MAC and IP addresses, compile the InfraredProxy sketch, and upload it to your Arduino. Point your web browser tohttp://192.168.2.42/SAMSUNG/32/E0E040BF (adjust the URL to your local settings!) and see what happens to your TV set or whatever device you want to control. In the following figure, you can see a typical output of the infrared proxy on the serial monitor. Note that the web browser sends not only one but two requests. The second one is for downloading the website’s Favicon,[129] and we can safely ignore it.
Although we’ve used only a minimal amount of hardware (a cheap and simple infrared LED), this chapter’s projects are very useful and fairly sophisticated, at least from a software development point of view. Now not only can we control any device that understands infrared signals, but we also can do it using a computer’s serial port or even a web browser.
Also, you no longer need to connect the Arduino to your computer’s USB port. The infrared proxy needs only the USB port to get some power. Plug an AC adapter into your Arduino, and you can get rid of your USB cable.
For the first time, we’ve controlled real-world devices using an Arduino. We’ll continue to do so in the next chapter, where you’ll learn how to control motors.
Control Everything
All of the projects in this chapter are based on devices you can control already using an infrared remote control. But you can also add an infrared receiver to existing devices or build completely new gadgets that come with an infrared receiver.
In principle, you could control your refrigerator or your microwave oven with a remote control. But have you ever thought about a remote-controlled lawnmower?[130] I bet not.
What If It Doesn’t Work?
If you cannot make this chapter’s code run, you should download the code from the book’s website and try to run it. Make sure you’re using the correct serial port in the code/RemoteControl/TvRemoteUI/js/remote.js file.
In this chapter, we mainly used LEDs and an Ethernet shield, so all of the advice from Chapter 3, Building Binary Dice, and Chapter 10, Networking with Arduino, also applies to this chapter.
In addition, you have to be careful of more things. The distance between an infrared LED and its receiver is important. To be on the safe side, you should position the LED near the receiver. It should also be placed right in front of the receiver, and you should make sure there’s not too much ambient light that might disturb the infrared signal.
For debugging purposes, it’s useful to replace an invisible infrared LED with a regular LED from time to time. This way, you can see whether your circuit works in principle.
If you’re trying to control a Mac, you should unpair any other remote controls in the Security area of the Mac’s System Preferences window.
Finally, you might be using a device that uses a protocol that isn’t supported by the IRremote library. In this case, you have to add it. This can be tricky, but IRremote is open source, so at least it’s possible.
Exercises
· Build an emulator for a remote control you find in your household. Make its commands available via serial port and via Ethernet.
· Instead of controlling the Arduino via a serial monitor or web browser, control it using a Nintendo Nunchuk. You could move the analog stick up and down to control your TV set’s volume, and you could move it left or right to change the channel.
· Design a real universal remote control based on an Arduino. Look for a touchscreen, a button pad, an SD card shield, and a Bluetooth module. I bet you didn’t think you could build a device like this—but you know everything you need to do it now.
Footnotes
|
[126] |
http://www.lirc.org/ |
|
[127] |
https://github.com/shirriff/Arduino-IRremote |
|
[128] |
https://github.com/shirriff/Arduino-IRremote/archive/master.zip |
|
[129] |
http://en.wikipedia.org/wiki/Favicon |
|
[130] |
http://www.instructables.com/id/Arduino-RC-Lawnmower/ |
All materials on the site are licensed Creative Commons Attribution-Sharealike 3.0 Unported CC BY-SA 3.0 & GNU Free Documentation License (GFDL)
If you are the copyright holder of any material contained on our site and intend to remove it, please contact our site administrator for approval.
© 2016-2026 All site design rights belong to S.Y.A.