Arduino: A Quick-Start Guide, Second Edition (2015)
Part II. Eleven Arduino Projects
Chapter 13. Controlling Motors with Arduino
So far, we’ve created projects that have had an impact on the real world. We’ve made LEDs shine, and we’ve controlled devices using infrared light. In this chapter, we’ll create an even more intense experience: we’ll control motors that will actually move things. We won’t go so far as to build a full-blown autonomous robot, but we’ll create a small device that does something useful and funny.
First, though, you’ll learn about the basics of different motor types and their pros and cons. Today you can choose from a variety of motor types for your projects, and this chapter starts with a brief description of their differences.
We’ll concentrate on servo motors, because you can use them for a wide range of projects and they’re cheap and easy to use. You’ll learn to use the Arduino servo library and to control a servo using the serial port.
Based on these first steps, we’ll then build a more sophisticated project. It’s a blaming device that uses nearly the same hardware as the first project in the chapter but more elaborate software. You’ll probably find many applications for it in your office!

What You Need
1. A servo motor, such as the Hitec HS-322HD
2. Some wires
3. A TMP36 temperature sensor (it’s optional, and you need it only for the exercises)
4. An Arduino board, such as the Uno, Duemilanove, or Diecimila
5. A USB cable to connect the Arduino to your computer
Introducing Motors
Depending on your project’s needs, you can choose from a variety of motors. For hobby electronics, you’ll usually use DC motors, servo motors, or stepper motors. (In the following figure, you see a few different types of motors.) They differ mainly in speed, precision of control, power consumption, reliability, and price.
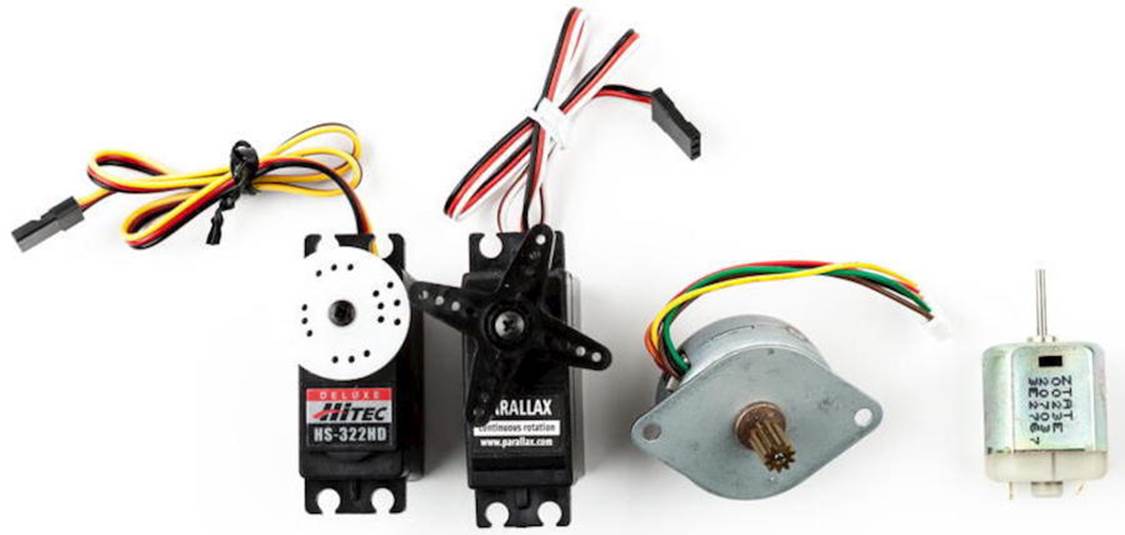
Figure 31. Motor types from left to right: standard servo, continuous rotation servo, stepper, DC motor
DC motors are fast and efficient, so you can use them in drill machines, electric bicycles, or remote-control cars. You can control DC motors easily, because they have only two connectors. Connect one to a power supply and the other to ground, and the motor will start to spin. Swap the connections, and the motor will spin the other direction. Add more voltage, and the motor will spin faster; decrease voltage, and it will spin slower.
DC motors aren’t a good choice if you need precise control. In such cases, it’s better to use a stepper motor, which allows for precise control in a range of 360 degrees. Although you might not have noticed it, you’re surrounded by stepper motors. You hear them when your printer, scanner, or disk drive is at work. Controlling stepper motors isn’t rocket science, but it is more complicated than controlling DC motors and servos.
Servo motors are the most popular among hobbyists, because these motors are a good compromise between DC motors and steppers. They’re affordable, reliable, and easy to control. You can move standard servos only in a range of 180 degrees, but that’s sufficient for many applications. With continuous rotation servos, you can increase the range to 360 degrees, but you lose the ease of control.
In the next section, you’ll learn how easy it is to control standard servo motors with an Arduino.
First Steps with a Servo Motor
The Arduino IDE comes with a library for controlling servo motors that we’ll use for our first experiments. The following figure shows a basic circuit for connecting an Arduino to a servo motor. Connect the ground wire to one of the Arduino’s GND pins, connect power to the Arduino’s 5V pin, and connect the control line to pin 9.
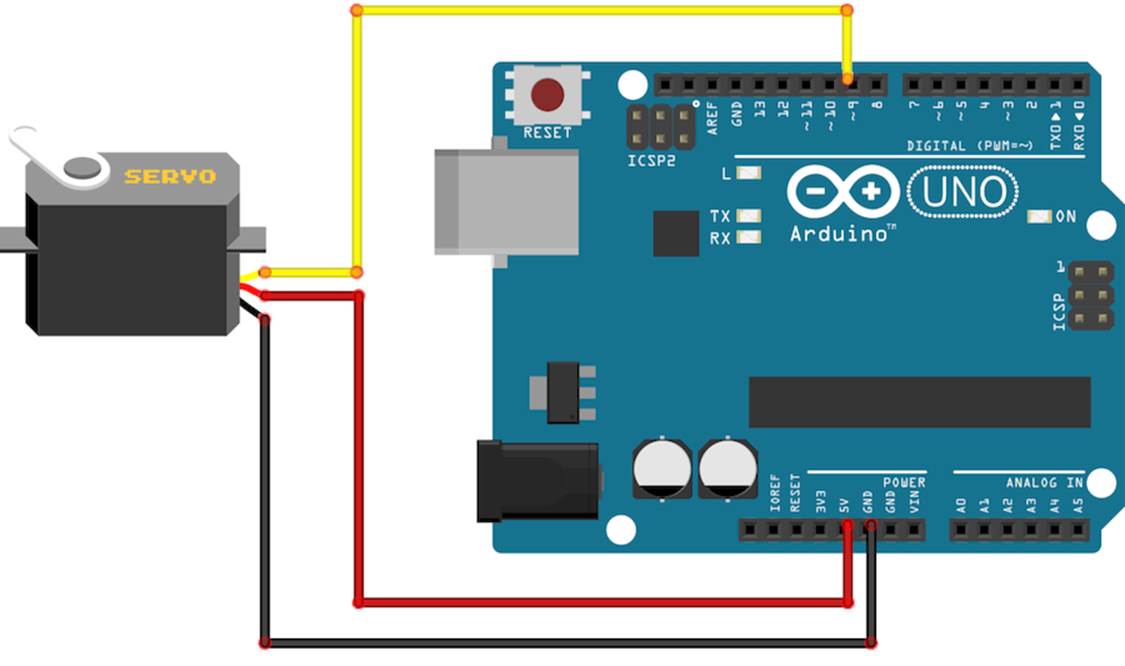
Please note that this works only for a 5V servo! Many cheap servos use 9V, and in that case you need an external power supply, and you can no longer connect the servo to the Arduino’s 5V pin. If you have a 9V servo, attach an external power supply, such as an AC-to-DC adapter or a DC power supply, to your Arduino’s power jack. Then connect the servo to the Vin pin.[131] You should also check the specifications of your Arduino board. For example, you should not use an Arduino BT[132] to control motors, because it can only handle a maximum of 5.5V.
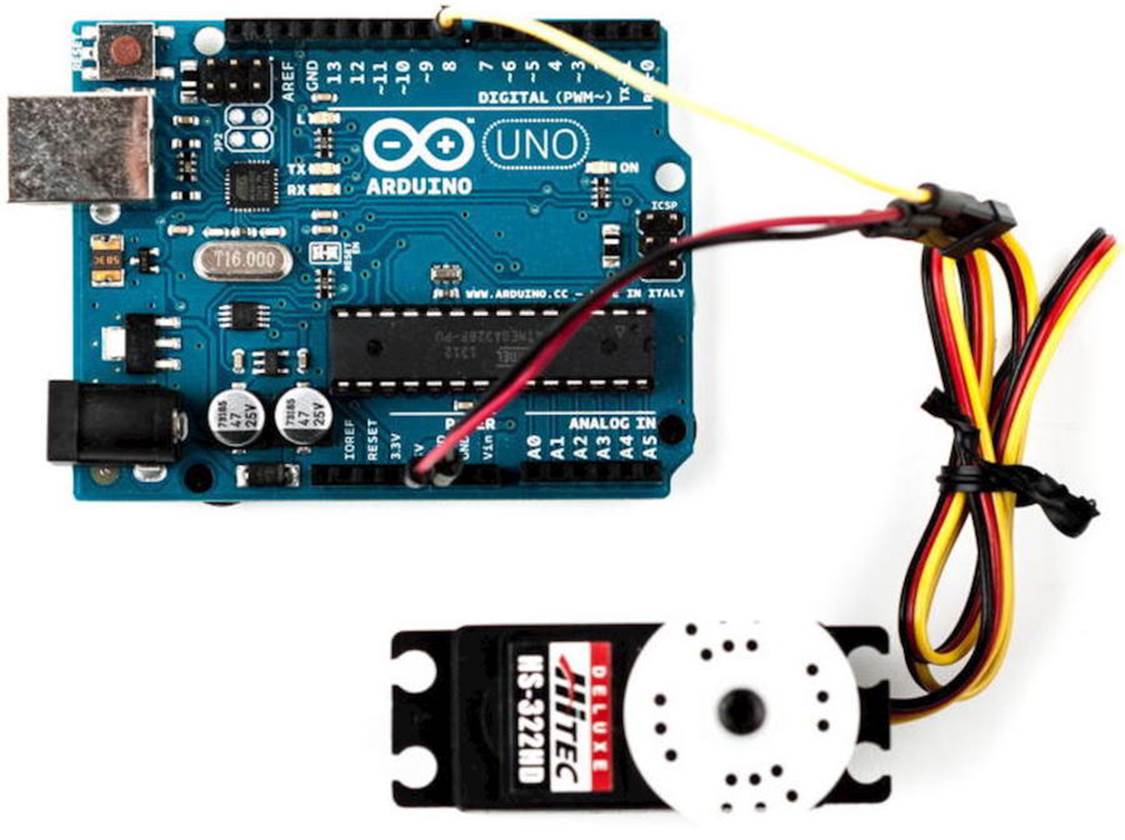
Here’s a picture of a servo motor connected to an Arduino using wires. You can also use pin headers, but wires give you more flexibility.
Controlling servo motors is convenient, because you can set the motor’s shaft to an angle between 0 and 180. With the following sketch, you can send a degree value via the serial port and move the servo motor accordingly:
|
Motors/SerialServo/SerialServo.ino |
|
|
Line 1 |
#include <Servo.h> |
|
- |
|
|
- |
const unsigned int MOTOR_PIN = 9; |
|
- |
const unsigned int MOTOR_DELAY = 15; |
|
5 |
const unsigned int SERIAL_DELAY = 5; |
|
- |
const unsigned int BAUD_RATE = 9600; |
|
- |
|
|
- |
Servo servo; |
|
- |
|
|
10 |
void setup() { |
|
- |
Serial.begin(BAUD_RATE); |
|
- |
servo.attach(MOTOR_PIN); |
|
- |
delay(MOTOR_DELAY); |
|
- |
servo.write(1); |
|
15 |
delay(MOTOR_DELAY); |
|
- |
} |
|
- |
|
|
- |
void loop() { |
|
- |
const unsigned int MAX_ANGLE = 3; |
|
20 |
char degrees[MAX_ANGLE + 1]; |
|
- |
|
|
- |
if (Serial.available()) { |
|
- |
int i = 0; |
|
- |
while (Serial.available() && i < MAX_ANGLE + 1) { |
|
25 |
const char c = Serial.read(); |
|
- |
if (c != -1 && c != '\n') |
|
- |
degrees[i++] = c; |
|
- |
delay(SERIAL_DELAY); |
|
- |
} |
|
30 |
degrees[i] = 0; |
|
- |
int value = atoi(degrees); |
|
- |
if (value == 0) |
|
- |
value = 1; |
|
- |
Serial.print(value); |
|
35 |
Serial.println(" degrees."); |
|
- |
servo.write(value); |
|
- |
delay(MOTOR_DELAY); |
|
- |
} |
|
- |
} |
Arduino Arts
You can use the Arduino not just for gadgets or fun projects, but also in artistic ways. Especially in the new-media art area, you will find many amazing projects built with the Arduino. One of them is Anthros,[133] a responsive environment that observes a small area using a webcam. The area contains some “tentacles,” and whenever a person crosses the area, the tentacles move in the person’s direction. Servos move the tentacles, and an Arduino controls the servos.
For all people interested in new-media art, Alicia Gibb’s thesis, “New Media Art, Design, and the Arduino Microcontroller: A Malleable Tool,”[134] is a must-read.
We include the Servo library, and in line 8, we define a new Servo object. In the setup function, we initialize the serial port, and we attach the Servo object to the pin we have defined in MOTOR_PIN. After that, we wait for 15 milliseconds so the servo motor has enough time to process our command. Then we call write to move the servo back to 1 degree. We could also move it back to 0 degrees, but some of the servos I’ve worked with make some annoying noise in this position.
The main purpose of the loop function is to read new degree values from the serial port. These values are in a range from 0 to 180, and we read them as ASCII values. So, we need a string that can contain up to four characters. (Remember, strings are null-terminated in C.) That’s why we declare the degrees string with a length of four in line 20.
Then we wait for new data to arrive at the serial port and read it character by character until no more data is available or until we have read enough. We terminate the string with a zero byte and print the value we’ve read to the serial port. Finally, we convert the string into an integer value using atoi and pass it to the write method of the Servo object in line 36. Then we wait again for the servo to do its job.
Compile and upload the sketch, then open the serial monitor. After the servo has initialized, send some degree values, such as 45, 180, or 10. See how the motor moves to the angle you’ve specified. To see the effect a bit better, form a wire or some paper into an arrow and attach it to the motor’s gear.
It’s easy to control a servo via the serial port, and the circuit we’ve built can be the basis for many useful and fun projects. In the next section, we’ll use it to build an automatic blaming device.
Building a Blaminatr
Finger-pointing isn’t nice, but it can be oddly satisfying. In this section, we’ll build a device that I call Blaminatr. Instead of blaming someone directly, you can tell the Blaminatr to do so. In the following figure, you can see the device in action. Tell it to blame me, and it moves an arrow so it points to “Maik.”

Blaminatrs are perfect office toys that you can use in many situations. For software developers, it can be a good idea to attach one to your continuous integration (CI) system. Continuous integration systems, such as Jenkins,[135] help you continuously check whether your software is in good shape.
Whenever a developer checks in changes, the CI automatically compiles the software and runs all tests. Then it publishes the results via email or as an RSS feed. You can easily write a small piece of software that subscribes to such a feed. Whenever someone breaks the build, you’ll find a notification in the feed, and you can use the Blaminatr to point to the name of the developer who has committed the latest changes.[136]
In the previous section, you learned all about the servo motor you need to build the Blaminatr. Now we need only some creativity to build the device’s display, and we need more elaborate software. We start with a class named Team that represents the members of our team; that is, the potential “blamees”:
|
Motors/Blaminatr/Blaminatr.ino |
|
|
Line 1 |
const unsigned int MAX_MEMBERS = 10; |
|
- |
|
|
- |
class Team { |
|
- |
const char** _members; |
|
5 |
unsigned int _num_members; |
|
- |
unsigned int _positions[MAX_MEMBERS]; |
|
- |
public: |
|
- |
Team(const char** members) { |
|
- |
_members = members; |
|
10 |
_num_members = 0; |
|
- |
const char** member = _members; |
|
- |
while (*member++) |
|
- |
_num_members++; |
|
- |
|
|
15 |
const unsigned int share = 180 / _num_members; |
|
- |
unsigned int pos = share / 2; |
|
- |
for (unsigned int i = 0; i < _num_members; i++) { |
|
- |
_positions[i] = pos; |
|
- |
pos += share; |
|
20 |
} |
|
- |
} |
|
- |
|
|
- |
int get_position(const char* name) const { |
|
- |
int position = 0; |
|
25 |
for (unsigned int i = 0; i < _num_members; i++) { |
|
- |
if (!strcmp(_members[i], name)) { |
|
- |
position = _positions[i]; |
|
- |
break; |
|
- |
} |
|
30 |
} |
|
- |
return position; |
|
- |
} |
|
- |
}; |
The code defines several member variables: _members contains a list of up to ten team member names, _num_members contains the actual number of people on the team, and we store the position (angle) of the team member’s name on the Blaminatr display in _positions.
The constructor expects an array of strings that contains the team members’ names and that is terminated by a NULL pointer. We store a reference to the list, and then we calculate the number of team members. We iterate over the array until we find a NULL pointer. All this happens in lines 10 to 13.
Then we calculate the position of each team member’s name on the Blaminatr’s display. Every team member gets his or her fair share on the 180-degree display, and the Blaminatr will point to the share’s center, so we divide the share by 2. We store the positions in the _positions array that corresponds to the _members array. That means the first entry of _positions contains the position of the first team member, and so on.
With the get_position method, we get back the position belonging to a certain name. We walk through the _members array and check whether we have found the right member using the strcmp function. As soon as we’ve found it, we return the corresponding entry of the _positions array. If we can’t find a team member with the name we are looking for, we return 0.
Implementing a Blaminatr class is easy now:
|
Motors/Blaminatr/Blaminatr.ino |
|
|
|
#include <Servo.h> |
|
|
const unsigned int MOTOR_PIN = 9; |
|
|
const unsigned int MOTOR_DELAY = 15; |
|
|
|
|
|
class Blaminatr { |
|
|
Team _team; |
|
|
Servo _servo; |
|
|
|
|
|
public: |
|
|
|
|
|
Blaminatr(const Team& team) : _team(team) {} |
|
|
|
|
|
void attach(const int sensor_pin) { |
|
|
_servo.attach(sensor_pin); |
|
|
delay(MOTOR_DELAY); |
|
|
} |
|
|
|
|
|
void blame(const char* name) { |
|
|
_servo.write(_team.get_position(name)); |
|
|
delay(MOTOR_DELAY); |
|
|
} |
|
|
}; |
A Blaminatr object aggregates a Team object and a Servo object. The constructor initializes the Team instance while we can initialize the Servo instance by calling the attach method.
The most interesting method is blame. It expects the name of the team member to blame, calculates his position, and moves the servo accordingly. Let’s put it all together now:
|
Motors/Blaminatr/Blaminatr.ino |
|
|
Line 1 |
const unsigned int MAX_NAME = 30; |
|
- |
const unsigned int BAUD_RATE = 9600; |
|
- |
const unsigned int SERIAL_DELAY = 5; |
|
- |
|
|
5 |
const char* members[] = { "nobody", "Bob", "Alice", "Maik", NULL }; |
|
- |
Team team(members); |
|
- |
Blaminatr blaminatr(team); |
|
- |
|
|
- |
void setup() { |
|
10 |
Serial.begin(BAUD_RATE); |
|
- |
blaminatr.attach(MOTOR_PIN); |
|
- |
blaminatr.blame("nobody"); |
|
- |
} |
|
- |
|
|
15 |
void loop() { |
|
- |
char name[MAX_NAME + 1]; |
|
- |
if (Serial.available()) { |
|
- |
unsigned int i = 0; |
|
- |
while (Serial.available() && i < MAX_NAME + 1) { |
|
20 |
const char c = Serial.read(); |
|
- |
if (c != -1 && c != '\n') |
|
- |
name[i++] = c; |
|
- |
delay(SERIAL_DELAY); |
|
- |
} |
|
25 |
name[i] = 0; |
|
- |
Serial.print(name); |
|
- |
Serial.println(" is to blame."); |
|
- |
blaminatr.blame(name); |
|
- |
} |
|
30 |
} |
We define a list of member names that is terminated by a NULL pointer. The list’s first entry is “nobody,” so we don’t have to deal with the rare edge case when nobody is to blame. Then we use members to initialize a new Team object and pass this object to the Blaminatr’s constructor.
More Motors Projects
Motors are fascinating. Search the Net, and you’ll find numerous projects combining the Arduino with motors. Most of them probably deal with robots[137] or remote-controlled cars.
You’ll also find useful and exciting project like the USB hourglass.[138] It uses an Arduino and a servo motor to turn a sand timer, and it observes the falling sand using an optical sensor. Whenever all the sand has fallen through, the device turns the timer automatically.
That’s all nice, but the device’s main purpose is to generate true random numbers. Falling sand is a perfect basis for generating true randomness (see Generating Random Numbers), and the USB hourglass uses the signals from its optical sensor to generate random numbers, sending them to the serial port.
In the setup function, we initialize the serial port and attach the Blaminatr’s servo motor to the pin we defined in MOTOR_PIN. Also, we initialize the Blaminatr by blaming “nobody.”
The loop function is nearly the same as in First Steps with a Servo Motor. The only difference is that we do not control a servo directly, but instead call blame in line 28.
That’s it! You can now start to draw your own display and create your own arrow. Attach them directly to the motor or—even better—put everything into a nice box. Compile and upload the software and start to blame.
Of course, you can use motors for more serious projects. You can use them to build robots running on wheels or similar devices. But you cannot attach too many motors to a “naked” Arduino, because it isn’t meant for driving bigger loads. So if you have a project in mind that needs a significant number of motors, you should consider buying a motor shield[139] or using a special shield, such as the Robotics Shield Kit.[140]
What If It Doesn’t Work?
Working with motors is surprisingly easy, but a lot of things still can go wrong. The biggest problem is that motors consume a lot of power, so you cannot simply attach every motor to an Arduino. Also, you cannot easily drive more than one motor, especially not with the small amount of power you get from a USB port. If your motor doesn’t run as expected, check its specification and attach an AC or DC adapter to your Arduino if necessary.
You also shouldn’t attach too much weight to your motor. Moving an arrow made of paper is no problem, but you might run into problems if you attach bigger and heavier things. Also, be careful not to put any obstacles in the motor’s way. The motor’s shaft always needs to move freely.
Some motors have to be adjusted from time to time, and usually you have to do that with a very small screwdriver. Refer to the motor’s specifications for detailed instructions.
Exercises
· Add an Ethernet shield to the Blaminatr so you can blame people via the Internet and not only via the serial port. Pointing your web browser to an address such as http://192.168.1.42/blame/Maik should blame me.
· Create a thermometer based on a TMP36 temperature sensor and a servo motor. Its display could look like the image below; that is, you have to move an arrow that points to the current temperature.

· Use an IR receiver to control the Blaminatr. You could use the channel key of your TV set’s remote control to move the Blaminatr from one name to the other.
Footnotes
|
[131] |
http://www.arduino.cc/playground/Learning/WhatAdapter |
|
[132] |
http://arduino.cc/en/Main/ArduinoBoardBluetooth |
|
[133] |
http://makezine.com/2010/04/19/arduino-powered-kinetic-sculpture/ |
|
[134] |
http://aliciagibb.com/thesis/ |
|
[135] |
http://jenkins-ci.org// |
|
[136] |
At http://urbanhonking.com/ideasfordozens/2010/05/19/the_github_stoplight/, you can see an alternative project. It uses a traffic light to indicate your project’s current status. |
|
[137] |
http://makezine.com/projects/building-a-simple-arduino-robot/ |
|
[138] |
http://makezine.com/2009/12/23/usb-hourglass-random-number-generat/ |
|
[139] |
You can find them at http://adafruit.com or http://makershed.com. |
|
[140] |
http://www.parallax.com/product/130-35000 |
All materials on the site are licensed Creative Commons Attribution-Sharealike 3.0 Unported CC BY-SA 3.0 & GNU Free Documentation License (GFDL)
If you are the copyright holder of any material contained on our site and intend to remove it, please contact our site administrator for approval.
© 2016-2026 All site design rights belong to S.Y.A.