Arduino: A Quick-Start Guide, Second Edition (2015)
Part II. Eleven Arduino Projects
Chapter 4. Building a Morse Code Generator Library
You now know enough about the Arduino development environment and about blinking LEDs to start a bigger project. In this chapter, we’ll develop a Morse code generator that reads text from the serial port and outputs it as light signals using an LED.
By building this project, you’ll deepen your understanding of serial communication between the Arduino and your computer. You’ll also learn a lot about the typical Arduino development process: how to use existing libraries and how to structure bigger projects into your own libraries. At the end, you’ll be able to create a library that is ready for publishing on the Internet.
What You Need
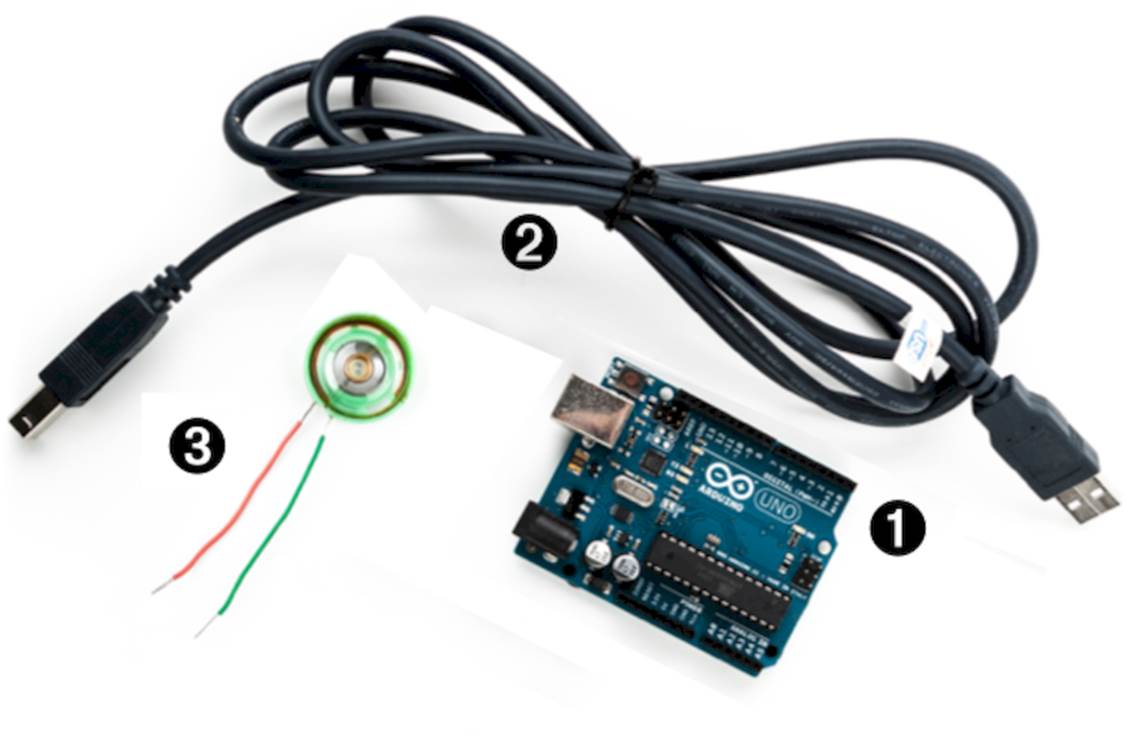
1. An Arduino board such as the Uno, Duemilanove, or Diecimila
2. A USB cable to connect the Arduino to your computer
3. A speaker or a buzzer (optional)
Learning the Basics of Morse Code
Morse code was invented to turn text into sounds.[50] In principle, it works like a character set encoding, such as ASCII. But while ASCII encodes characters as numbers, in Morse code they’re sequences of dots and dashes (also called dits and dahs). Dits are shorter in length than dahs. An Ais encoded as · – and – – · · is Z.
Morse code also specifies a timing scheme that defines the length of the dits and dahs. It specifies how long the pauses between symbols and words have to be. The base unit of Morse code is the length of a dit, and a dah is as long as three dits. You insert a pause of one dit between two symbols, and you separate two letters by three dits. You insert a pause of seven dits between two words.
To transmit a message encoded in Morse code, you need a way to emit signals of different lengths. The classic approach is to use sounds, but we will use an LED that is turned on and off for varying periods of time. Sailors still transmit Morse code using blinking lights.
Let’s implement a Morse code generator!
Building a Morse Code Generator
The main part of our library will be a C++ class named Telegraph. In this section, we’ll define its interface, but we will start with a new sketch that looks as follows:
|
TelegraphLibrary/TelegraphLibrary.ino |
|
|
|
void setup() { |
|
|
} |
|
|
|
|
|
void loop() { |
|
|
} |
This is the most minimalistic Arduino program possible. It doesn’t do anything except define all mandatory functions, even if they are empty. We do this so we can compile our work in progress from time to time and check whether there are any syntactical errors. Save the sketch asTelegraphLibrary, and the IDE will create a folder named TelegraphLibrary and a file named TelegraphLibrary.ino in it. All the files and directories we need for our library will be stored in the TelegraphLibrary folder.
Now open a new tab, and when asked for a filename, enter telegraph.h. Yes, we will create a good old C header file. (To be precise, it will even be a C++ header file.)
|
TelegraphLibrary/telegraph.h |
|
|
|
#ifndef __TELEGRAPH_H__ |
|
|
#define __TELEGRAPH_H__ |
|
|
|
|
|
class Telegraph { |
|
|
public: |
|
|
Telegraph(const int output_pin, const int dit_length); |
|
|
void send_message(const char* message); |
|
|
|
|
|
private: |
|
|
void dit(); |
|
|
void dah(); |
|
|
void output_code(const char* code); |
|
|
void output_symbol(const int length); |
|
|
|
|
|
int _output_pin; |
|
|
int _dit_length; |
|
|
int _dah_length; |
|
|
}; |
|
|
|
|
|
#endif |
Ah, obviously object-oriented programming is not only for the big CPUs anymore! This is an interface description of a Telegraph class that you could use in your next enterprise project (provided that you need to transmit some information as Morse code, that is).
We start with the classic double-include prevention mechanism; that is, the body of the header file defines a preprocessor macro named __TELEGRAPH_H__. We wrap the body (that contains this definition) in an #ifndef so that the body is only compiled if the macro has not been defined. That way, you can include the header as many times as you want, and the body will be compiled only once.
The interface of the Telegraph class consists of a public part that users of the class have access to and a private part that only members of the class can use. In the public part, you find two things: a constructor that creates new Telegraph objects and a method named send_message that sends a message by emitting it as Morse code. In your applications, you can use the class as follows:
|
|
Telegraph telegraph(13, 200); |
|
|
telegraph.send_message("Hello, world!"); |
In the first line, we create a new Telegraph object that communicates on pin 13 and emits dits that are 200 milliseconds long. Then we emit the message “Hello, world!” as Morse code. This way, we are able to send whatever message we want, and we can change easily the pin and the length of a dit.
Now that we have defined the interface, we will implement it.
Fleshing Out the Morse Code Generator’s Interface
Declaring interfaces is important, but it’s as important to implement them. Create a new tab and enter the filename telegraph.cpp.
This is the right place to explain why we’ve used TelegraphLibrary and not Telegraph as the sketch’ name, even though it’d be a more natural choice. The reason is that the Arduino IDE turns every sketch (ending with .ino) into a C++ file (ending with .cpp). For a sketch namedTelegraph.ino it generates a C++ file named Telegraph.cpp. In a case-insensitive file system, this conflicts with a file named telegraph.cpp, and it leads to some strange error messages.
Enter the following code now in the newly created tab:
|
TelegraphLibrary/telegraph.cpp |
|
|
|
#include <ctype.h> |
|
|
#include <Arduino.h> |
|
|
#include "telegraph.h" |
|
|
|
|
|
const char* LETTERS[] = { |
|
|
".-", "-...", "-.-.", "-..", ".", // A-E |
|
|
"..-.", "--.", "....", "..", ".---", // F-J |
|
|
"-.-", ".-..", "--", "-.", "---", // K-O |
|
|
".--.", "--.-", ".-.", "...", "-", // P-T |
|
|
"..-", "...-", ".--", "-..-", "-.--", // U-Y |
|
|
"--.." // Z |
|
|
}; |
|
|
|
|
|
const char* DIGITS[] = { |
|
|
"-----", ".----", "..---", "...--", // 0-3 |
|
|
"....-", ".....", "-....", "--...", // 4-7 |
|
|
"---..", "----." // 8-9 |
|
|
}; |
Like most C++ programs, ours imports some libraries first. Because we need functions such as toupper later, we include ctype.h, and we have to include telegraph.h to make our class declaration and its corresponding function declarations available. But what is Arduino.h good for?
Until now we haven’t thought about where constants such as HIGH, LOW, or OUTPUT came from. They are defined in several header files that come with the Arduino IDE, and you can find them in the hardware/arduino/cores/arduino directory of the IDE. Have a look at Arduino.h (in older Arduino versions this file was named WProgram.h). It contains all the constants we have used so far and many more. It also declares many useful macros and the Arduino’s most basic functions.
When you edit regular sketches, you don’t have to worry about including any standard header files, because the IDE does it automatically behind the scenes. As soon as you create more complex projects that contain “real” C++ code, you have to manage everything yourself. You have to explicitly import all the libraries you need, even for basic stuff such as the Arduino constants.
After importing all necessary header files, we define two string arrays named LETTERS and DIGITS. They contain the Morse code for all letters and digits, and we’ll use them later to translate regular text into Morse code. Before we do that, we define the constructor that is responsible for creating and initializing new Telegraph objects:
|
TelegraphLibrary/telegraph.cpp |
|
|
|
Telegraph::Telegraph(const int output_pin, const int dit_length) { |
|
|
_output_pin = output_pin; |
|
|
_dit_length = dit_length; |
|
|
_dah_length = dit_length * 3; |
|
|
pinMode(_output_pin, OUTPUT); |
|
|
} |
The constructor expects two arguments: the number of the pin the Morse code should be sent to and the length of a dit measured in milliseconds. Then it stores these values in corresponding instance variables, calculates the correct length of a dah, and turns the communication pin into an output pin.
You’ve probably noticed that all private instance variables start with an underscore. I like that convention personally, but it isn’t enforced by C++ or the Arduino IDE.
Outputting Morse Code Symbols
After everything has been initialized, we can start to output Morse code symbols. We use several small helper methods to make our code as readable as possible:
|
TelegraphLibrary/telegraph.cpp |
|
|
|
void Telegraph::output_code(const char* code) { |
|
|
const unsigned int code_length = strlen(code); |
|
|
|
|
|
for (unsigned int i = 0; i < code_length; i++) { |
|
|
if (code[i] == '.') |
|
|
dit(); |
|
|
else |
|
|
dah(); |
|
|
if (i != code_length - 1) |
|
|
delay(_dit_length); |
|
|
} |
|
|
} |
|
|
|
|
|
void Telegraph::dit() { |
|
|
Serial.print("."); |
|
|
output_symbol(_dit_length); |
|
|
} |
|
|
|
|
|
void Telegraph::dah() { |
|
|
Serial.print("-"); |
|
|
output_symbol(_dah_length); |
|
|
} |
|
|
void Telegraph::output_symbol(const int length) { |
|
|
digitalWrite(_output_pin, HIGH); |
|
|
delay(length); |
|
|
digitalWrite(_output_pin, LOW); |
|
|
} |
The function output_code takes a Morse code sequence consisting of dots and dashes and turns it into calls to dit and dah. The dit and dah methods then print a dot or a dash to the serial port and delegate the rest of the work to output_symbol, passing it the length of the Morse code symbol to be emitted. output_symbol sets the output pin to HIGH for the length of the symbol, and then it sets it back to LOW. Everything works exactly as described in the Morse code timing scheme, and only the implementation of send_message is missing:
|
TelegraphLibrary/telegraph.cpp |
|
|
Line 1 |
void Telegraph::send_message(const char* message) { |
|
- |
for (unsigned int i = 0; i < strlen(message); i++) { |
|
- |
const char current_char = toupper(message[i]); |
|
- |
if (isalpha(current_char)) { |
|
5 |
output_code(LETTERS[current_char - 'A']); |
|
- |
delay(_dah_length); |
|
- |
} else if (isdigit(current_char)) { |
|
- |
output_code(DIGITS[current_char - '0']); |
|
- |
delay(_dah_length); |
|
10 |
} else if (current_char == ' ') { |
|
- |
Serial.print(" "); |
|
- |
delay(_dit_length * 7); |
|
- |
} |
|
- |
} |
|
15 |
Serial.println(); |
|
- |
} |
send_message outputs a message character by character in a loop. In line 3, we turn the current character into uppercase, because lowercase characters are not defined in Morse code (that’s why you can’t implement a chat client using Morse code). Then we check whether the current character is a letter using C’s isalpha function. If it is, we use the character to determine its Morse code representation that is stored in the LETTERS array. To do that, we use an old trick: in the ASCII table, all letters (and digits) appear in the correct order—that is, A=65, B=66, and so on. To transform the current character into an index for the LETTERS array, we have to subtract 65 (or ’A’) from its ASCII code. When we have determined the correct Morse code, we pass it to output_symbol and delay the program for the length of a dah afterward.
The algorithm works exactly the same for outputting digits; we only have to index the DIGITS array instead of the LETTERS array, and we have to subtract the ASCII value of the character ’0’.
In line 10, we check whether we received a blank character. If yes, we print a blank character to the serial port and wait for seven dits. All other characters are ignored: we only process letters, digits, and blanks. At the end of the method, we send a newline character to the serial port to mark the end of the message.
Installing and Using the Telegraph Class
Our Telegraph class is complete, and we should now create some example sketches that actually use it. This is important for two reasons: we can test our library code, and for users of our class it’s good documentation for how to use it.
The Arduino IDE looks for libraries in two places: in its global libraries folder relative to its installation directory and in the user’s local sketchbook directory. During development, it’s best to use the local sketchbook directory. You can find its location in the IDE’s Preferences (see Figure 14,Find the sketchbook location in the Preferences). Create a new directory named libraries in the sketchbook directory.
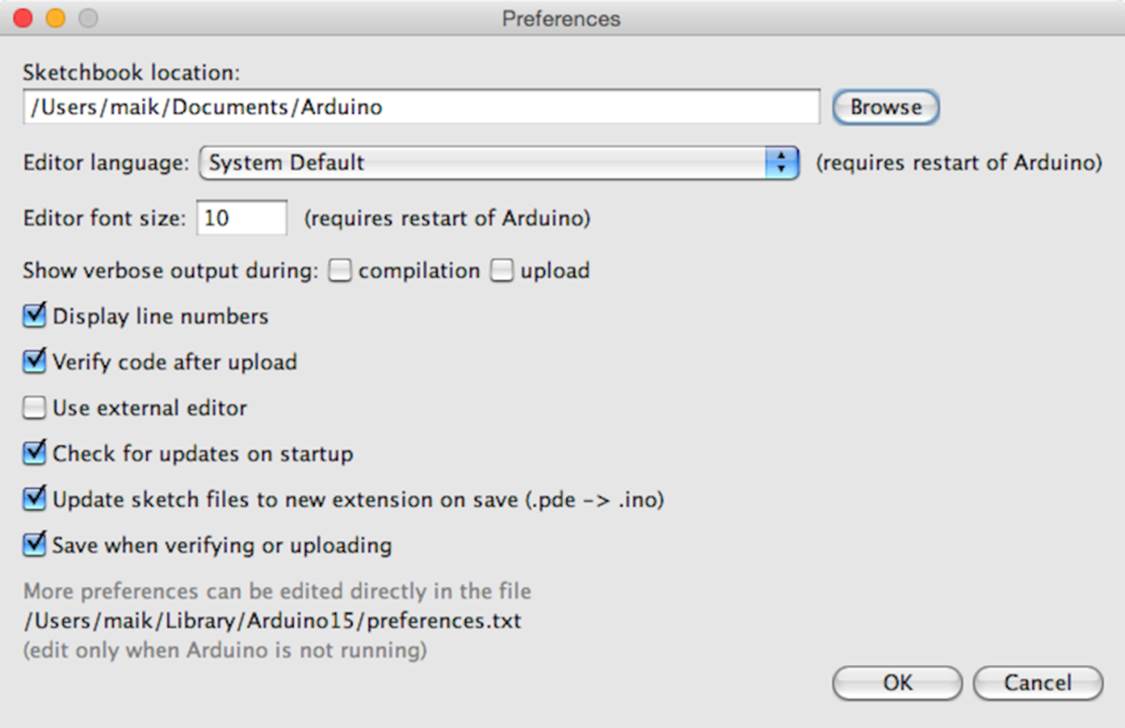
Figure 14. Find the sketchbook location in the Preferences.
To make the Telegraph class available, create a Telegraph subfolder in the libraries folder. Then copy telegraph.h and telegraph.cpp to the new libraries/Telegraph folder. (Do not copy TelegraphLibrary.ino.) Restart the IDE.
Let’s start with the mother of all programs: “Hello, world!” Create a new sketch named HelloWorld and enter the following code:
|
TelegraphLibrary/examples/HelloWorld/HelloWorld.ino |
|
|
|
#include "telegraph.h" |
|
|
const unsigned int BAUD_RATE = 9600; |
|
|
const unsigned int OUTPUT_PIN = 13; |
|
|
const unsigned int DIT_LENGTH = 200; |
|
|
|
|
|
Telegraph telegraph(OUTPUT_PIN, DIT_LENGTH); |
|
|
|
|
|
void setup() { |
|
|
Serial.begin(BAUD_RATE); |
|
|
} |
|
|
void loop() { |
|
|
telegraph.send_message("Hello, world!"); |
|
|
delay(5000); |
|
|
} |
This sketch emits the string “Hello, world!” as Morse code every five seconds. To achieve this, we include the definition of our Telegraph class, and we define constants for the pin our LED is connected to and for the length of our dits. Then we create a global Telegraph object and an emptysetup function. In loop, we then invoke send_message on our Telegraph instance every five seconds.
When you compile this sketch, the Arduino IDE automatically compiles the telegraph library, too. If you forgot to copy the library files to the libraries/Telegraph folder, you’ll get an error message such as “Telegraph does not name a type.” If you’ve copied the files but made any syntactical errors, you’ll also be notified now. If you have to correct some errors, make sure you change your original source code files. After you’ve fixed the errors, copy the files to the libraries folder again, and don’t forget to restart the IDE.
Turning a static string into Morse code is nice, but wouldn’t it be great if our program could work for arbitrary strings? So, let’s add a more sophisticated example. This time, we’ll write code that reads messages from the serial port and feeds them into a Telegraph instance.
Create a new sketch named MorseCodeGenerator and enter the following code:
|
TelegraphLibrary/examples/MorseCodeGenerator/MorseCodeGenerator.ino |
|
|
|
#include "telegraph.h" |
|
|
|
|
|
const unsigned int OUTPUT_PIN = 13; |
|
|
const unsigned int DIT_LENGTH = 200; |
|
|
const unsigned int MAX_MESSAGE_LEN = 128; |
|
|
const unsigned int BAUD_RATE = 9600; |
|
|
const char NEWLINE = '\n'; |
|
|
|
|
|
char message_text[MAX_MESSAGE_LEN]; |
|
|
int index = 0; |
|
|
|
|
|
Telegraph telegraph(OUTPUT_PIN, DIT_LENGTH); |
|
|
|
|
|
void setup() { |
|
|
Serial.begin(BAUD_RATE); |
|
|
} |
|
|
|
|
|
void loop() { |
|
|
if (Serial.available() > 0) { |
|
|
int current_char = Serial.read(); |
|
|
if (current_char == NEWLINE || index == MAX_MESSAGE_LEN - 1) { |
|
|
message_text[index] = 0; |
|
|
index = 0; |
|
|
telegraph.send_message(message_text); |
|
|
} else { |
|
|
message_text[index++] = current_char; |
|
|
} |
|
|
} |
|
|
} |
Again, we include the header file of the Telegraph class, and as usual we define some constants: OUTPUT_PIN defines the pin our LED is connected to, and DIT_LENGTH contains the length of a dit measured in milliseconds. NEWLINE is set to the ASCII code of the newline character. We need it to determine the end of the message to be emitted as Morse code. Finally, we set MAX_MESSAGE_LEN to the maximum length of the messages we are able to send.
Next we define three global variables: message_text is a character buffer that gets filled with the data we receive on the serial port. index keeps track of our current position in the buffer, and telegraph is the Telegraph object we’ll use to convert a message into “blinkenlights.”[51]
setup initializes the serial port, and in loop we check whether new data has arrived, calling Serial.available. We read the next byte if new data is available, and we check whether it is a newline character or whether it is the last byte that fits into our character buffer. In both cases, we set the last byte of message_text to 0, because strings in C/C++ are null-terminated. We also reset index so we can read the next message, and finally we send the message using our telegraph. In all other cases, we add the latest byte to the current message text and move on.
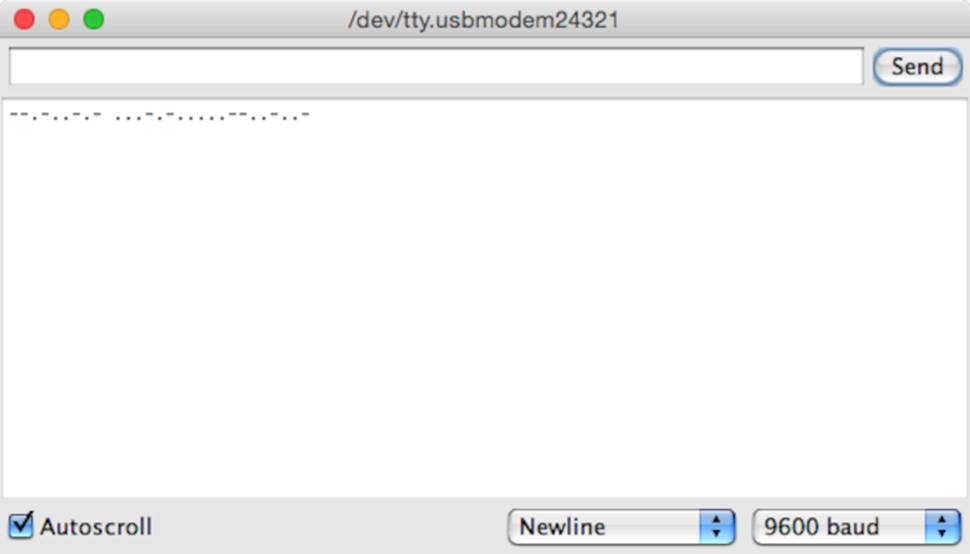
You should compile and upload the program now. Open the serial monitor and choose “Newline” from the line endings drop-down menu at the bottom of the window. With this option set, the serial monitor will automatically append a newline character to every line it sends to the Arduino. Enter a message such as your name, click the Send button, and see how the Arduino turns it into light. In the following figure, you can see what happens when you enter my name.
Because we’ve encapsulated the whole Morse code logic in the Telegraph class, our main program is short and concise. Creating software for embedded devices doesn’t mean we can’t benefit from the advantages of object-oriented programming.
Still, we have some minor things to do to turn our project into a first-class library. Read more about it in the next section.
Publishing Your Own Library
One of the nice features of the Arduino IDE is its syntax coloring. Class names, function names, variables, and so on all have different colors in the editor. This makes it much easier to read source code, and it’s possible to add syntax coloring for libraries. You only have to add a file namedkeywords.txt to your project:
|
TelegraphLibrary/keywords.txt |
|
|
|
# Syntax-coloring for the telegraph library |
|
|
|
|
|
Telegraph KEYWORD1 |
|
|
send_message KEYWORD2 |
Blank lines and lines starting with a # character will be ignored. The remaining lines contain the name of one of the library’s members and the member’s type. Separate them with a tab character. Classes have the type KEYWORD1, while functions have the type KEYWORD2. For constants, use LITERAL1.
To enable syntax coloring for the telegraph library, copy keywords.txt to the libraries/Telegraph folder and restart the IDE. Now the name of the Telegraph class will be orange, and send_message will be brown.
Before you finally publish your library, you should add a few more things:
· Store all example sketches in a folder named examples and copy it to the libraries/Telegraph folder. Every example sketch should get its own subdirectory within that folder.
· Choose a license for your project and copy its terms into a file named LICENSE.[52] You might think this is over the top for many libraries, but it will give your potential audience confidence.
· Add installation instructions and documentation. Usually, users expect to find documentation in a file named README, and they will look for installation instructions in a file named INSTALL. You should try to install your library on as many operating systems as possible and provide installation instructions for all of them.
· Publish your project on GitHub,[53] Google Code,[54] or any other popular sites for hosting open-source projects. This way, other people can contribute easily to your project.
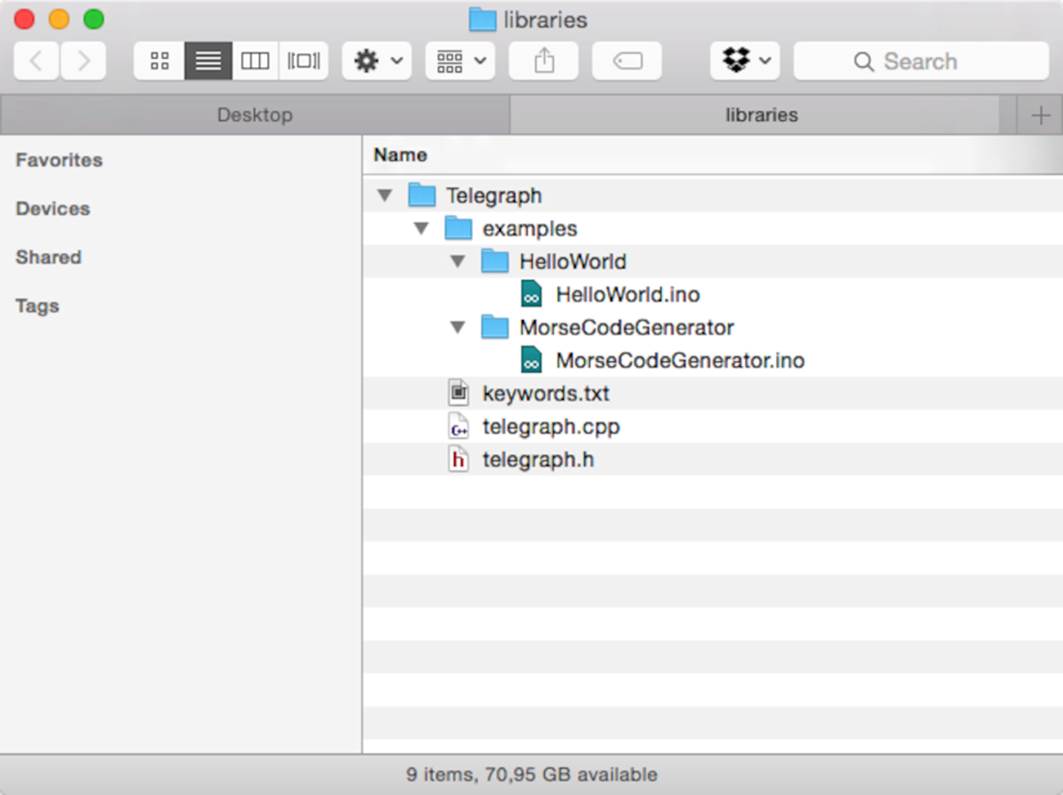
After you’ve done all this, your libraries/Telegraph folder should look like this:
Finally, create a zip archive containing all the files in your project. On most operating systems, it’s sufficient to right-click the directory in the Explorer, Finder, or whatever you are using and turn the directory into a zip archive. On Linux systems and Macs, you can also use one of the following command-line statements to create an archive:
|
|
maik> zip -r Telegraph Telegraph |
|
|
maik> tar cfvz Telegraph.tar.gz Telegraph |
The first command creates a file named Telegraph.zip, and the second one creates Telegraph.tar.gz. Both formats are widespread, and it’s best to offer them both for download.
Although you have to perform a lot of manual file operations, it’s still easy to create an Arduino library. So, there’s no excuse: whenever you think you’ve built something cool, make it publicly available.
Note that the structure for library projects has slightly changed in the Arduino IDE 1.5.x and later.[55] The biggest change is that all library source files (telegraph.h and telegraph.cpp, in our case) now have to be stored in a separate folder named src. The new specification is backwards compatible—that is, old libraries will still work in the new IDE.
Until now, our projects have communicated with the outside world using LEDs (output) and pushbuttons (input). In the next chapter, you’ll learn how to work with more sophisticated input devices, such as ultrasonic sensors. You’ll also learn how to visualize data that an Arduino sends to programs running on your computer.
What If It Doesn’t Work?
The Arduino IDE has a strong opinion on naming files and directories, and it was built for creating sketches, not libraries. So, you need to perform a few manual file operations to get everything into the right place. In the figure on the preceding page, you can see the final directory layout. If you have more than one version of the Arduino IDE installed, make sure you’re using the correct libraries folder.
Remember that you have to restart the IDE often. Whenever you change one of the files belonging to your library, restart the IDE.
If syntax coloring doesn’t work, make sure your keywords file is actually named keywords.txt. Double-check whether you have separated all objects and type specifiers by a tab character. Restart your IDE!
Exercises
· Morse code not only supports letters and digits, but it also defines symbols such as commas. Improve the Telegraph class so that it understands all characters of the Morse code.
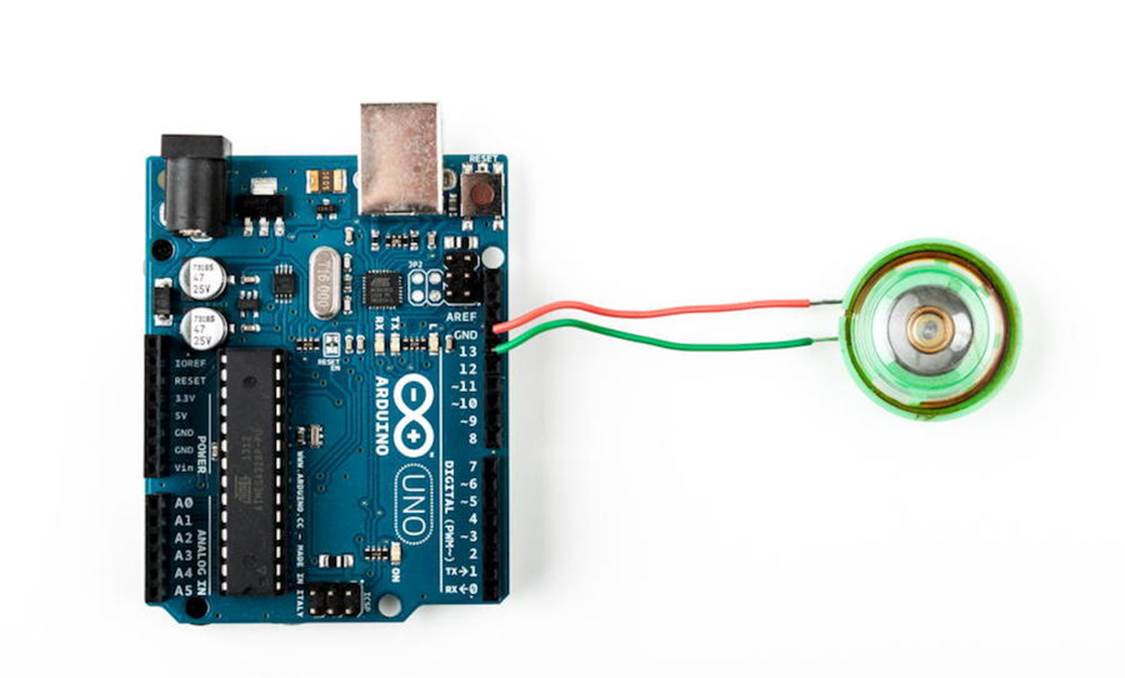
· Blinking LEDs are great, but when we think of Morse code, we usually think of beeping sounds, so replace the LED with a piezo speaker, which is cheap and easy to use. The following figure shows how you connect it to an Arduino. Piezo speakers have a ground pin and a signal pin, so connect the speaker’s ground to the Arduino’s ground, and connect the signal pin to Arduino pin 13.
Then replace the output_symbol method with the following code:
|
|
void Telegraph::output_symbol(const int length) { |
|
|
const int frequency = 131; |
|
|
tone(_output_pin, frequency, length); |
This sends a square wave to the speaker, and it plays a tone having a frequency of 131 Hertz. (Look at the example under File > Examples > 02.Digital > toneMelody that comes with the Arduino IDE to learn more about playing notes with a piezo speaker.)
· The Arduino IDE offers an alternative way to handle serial communication. Have a look at Serial Communication Using Various Languages, and rewrite the Morse code library so that it uses the new serialEvent function. Also, use String objects instead of character arrays.
· Improve the library’s design to make it easier to support different output devices. You could pass some kind of OutputDevice object to the Telegraph constructor. Then derive a LedDevice and a SpeakerDevice from OutputDevice. It could look as follows:
|
|
class OutputDevice { |
|
|
public: |
|
|
virtual void output_symbol(const int length); |
|
|
}; |
|
|
|
|
|
class Led : public OutputDevice { |
|
|
public: |
|
|
void output_symbol(const int length) { |
|
|
// ... |
|
|
} |
|
|
}; |
|
|
|
|
|
class Speaker : public OutputDevice { |
|
|
public: |
|
|
void output_symbol(const int length) { |
|
|
// ... |
|
|
} |
|
|
}; |
· You can then use these classes as follows:
|
|
Led led; |
|
|
Speaker speaker; |
|
|
OutputDevice* led_device = &led; |
|
|
OutputDevice* speaker_device = &speaker; |
|
|
|
|
|
led_device->output_symbol(200); |
|
|
speaker_device->output_symbol(200); |
· The rest is up to you.
· Try to learn Morse code. Let someone else type some messages into the serial terminal and try to recognize what that person sent. This isn’t necessary for learning Arduino development, but it’s a lot of fun!
Footnotes
|
[50] |
http://en.wikipedia.org/wiki/Morse_Code |
|
[51] |
http://en.wikipedia.org/wiki/Blinkenlights |
|
[52] |
At http://www.opensource.org/, you can find a lot of background information and many standard licenses. |
|
[53] |
http://github.com |
|
[54] |
https://code.google.com/ |
|
[55] |
https://github.com/arduino/Arduino/wiki/Arduino-IDE-1.5:-Library-specification |
All materials on the site are licensed Creative Commons Attribution-Sharealike 3.0 Unported CC BY-SA 3.0 & GNU Free Documentation License (GFDL)
If you are the copyright holder of any material contained on our site and intend to remove it, please contact our site administrator for approval.
© 2016-2026 All site design rights belong to S.Y.A.