Arduino Sketches: Tools and Techniques for Programming Wizardry (2015)
Part III. Device-Specifi c Libraries
Chapter 23. Bridge
This chapter discusses the following functions of the Bridge library:
· Bridge.begin()
· Bridge.put()
· Bridge.get()
· Process.begin()
· Process.addParameter()
· Process.run()
· Process.runAsynchronously()
· Process.running()
· Process.exitValue()
· Process.read()
· Process.write()
· Process.flush()
· Process.close()
· FileSystem.begin()
· FileSystem.open()
· FileSystem.exists()
· FileSystem.rmdir()
· FileSystem.remove()
· YunServer.begin()
· YunClient.connected()
· YunClient.stop()
The hardware needed to use these functions includes:
· Arduino Yún
· 1 x Breadboard
· 1 x LDR
· 1 x 10 kΩ resistor
· Wires
You can find the code download for this chapter at http://www.wiley.com/go/arduinosketches on the Download Code tab. The code is in the Chapter 23 folder and the filename is Chapter23.ino.
Introducing Bridge Library
There is often confusion as to the name of a microcontroller. A microcontroller (as the name implies) controls, whereas a microprocessor processes data. This becomes apparent for the Arduino Yún, where both are present.
In December 2002, Linksys released its WRT54G residential wireless router. It was a small device with two antennae behind a blue-and-black cover. Behind were four Ethernet LAN ports and an uplink port. It was an easy way to add high-speed Wi-Fi to a home network and was used by a large number of people, including myself. My WRT54G increased my wireless range at home and allowed me higher speeds than what my Internet modem provided. (The WRT54G provided Wi-Fi-G instead of the aging Wi-Fi-B.) It was also a device destined to be tinkered with.
These devices were based on a 125-MHz MIPS microprocessor with surprisingly good characteristics. With 16 MB of RAM and 4 MB of flash memory, it was more than capable of running a complete Linux distribution which shipped with the device. The Linux distribution was delivered under the GPL license, and as such, Linksys had to make the source code available on its site. This sparked a group of people to look at that code, and to modify it, allowing more and more features to be added. Within the space of a few months, a consumer-level router had functions reserved for top-of-the-line industry-level routers. Although most routers simply allowed home devices to connect, this new software allowed for advanced frequency scanning programs, traffic shaping, firewall, scheduling, and mesh networking, to name but a few. All that the user had to do was to overwrite the original firmware—something that could be undone later if needed. An entire generation of routers were designed around this initial product, and the new firmware was released under the name OpenWRT.
The power of OpenWRT was not only that it added advanced features, but it also contained a package manager, meaning users could install their own programs. The filesystem is also read/write-capable, meaning that users could create and update files. A simple WRT54G device could be placed anywhere, act as a sensor, and log the results to a data file. The router was no longer a router but a small computer.
Since its early days, OpenWRT has been under heavy development, becoming an extremely complex distribution, no longer limited to Linksys devices. One device to which the OpenWRT has been ported is the Arduino Yún. This board is actually two devices in one; on one side, it has an ATMega32u4, which is the “Arduino” side. The other side is based on an Atheros AR9331. This chip, with its corresponding RAM, Ethernet, and Wi-Fi chip, hosts an OpenWRT distribution called Linino. To allow the AVR to communicate with the Atheros, a library was created: Bridge.
NOTE
You can modify files on the root filesystem of the Yún; however, it is strongly advised to use external storage. The Arduino Yún has an on-board micro-SD slot to expand filesystem space.
Bridge
The Arduino side of the Yún can send commands and data requests to the Linux-side of the device; these instructions are interpreted by a Python 2.7 interpreter on OpenWRT. In order to begin communications, you must import the Bridge library. This can be done inside the Arduino IDE, by going to the menu Sketch ![]() Import Library
Import Library ![]() Bridge, or by adding the include lines manually:
Bridge, or by adding the include lines manually:
#include <Bridge.h>
#include <YunClient.h>
#include <Process.h>
#include <Mailbox.h>
#include <HttpClient.h>
#include <Console.h>
#include <YunServer.h>
#include <FileIO.h>
The first include, Bridge.h, is required for intersystem communication. The other includes are required only when using specific portions of the library. The YunClient.h include is required for HTTP client operations, similar to Ethernet client includes. Similarly,YunServer.h is required when the Arduino becomes an Ethernet server. The Process.h include is required when running processes (or commands) on the Linux side. The Mailbox.h include is required when using the mailbox interface system. The Console.h include is required when simulating a console on the Linux side, and FileIO.h is required when reading and writing files to the micro-SD card and when reading files from Linux.
To begin the Bridge library, use begin():
Bridge.begin();
This function does not take any parameters and does not return any values. It must be called in setup() and is a blocking function; it does not return until the operation has finished and stops the sketch until it has completed. It takes roughly 3 seconds to initialize the Bridge system.
To exchange information between the two devices, a put/get system exists. put() places data into a Python dictionary on Linino. It requires two elements: the key and a value. The key is a name; the value can be numerical or text but is stored in text format. Stored data may look like this:
username: john
age: 42
profession: programmer
highscore: 880
To place data on the Linux side, use put():
Bridge.put(key, value);
This function requires two parameters: the key and the value and does not return any data. This information is sent to the Atheros processor and placed inside the Python dictionary. If the key does not exist, it is created, and the contents of value are stored. If the key already exists, the contents of value are stored and replace whatever was previously there. To fetch values stored in the dictionary, use get():
int result = Bridge.get(key, buffer, buffer_length);
This function takes three parameters: key is the text key to search for in the dictionary; buffer is a char array that will be used to store the result; and buffer_length is the size of buffer. This function returns an int, the amount of bytes that have been placed into the buffer. If no data is available, this function returns 0.
The Bridge class is a simple way to transfer data to and from the Linux side, and includes features like error correction to ensure that data is always correctly transferred.
Process
The Process class runs and manages applications running on Linux. To begin using the Process class, you must first create a Process object:
Process p;
Next, you must specify the command to run. This is done with begin():
Process.begin(command);
The command parameter is a text representation of the command or program to execute; for example, cat, ls, curl, and such. To add one or more parameters, use addParameter():
Process.addParameter(param);
This function takes one parameter, a string with the parameter to add:
Process p; // Create a Process class
p.begin("cat"); // Prepare a program
p.addParameter("/proc/cpuinfo"); // Add a parameter
The final step is to run the application with the required parameters, which is done with run():
Process.run();
This function does not take any parameters and executes the program. This is a blocking function; the function does not return until the Linux program finishes. If you run a program that will not exit by itself, your sketch will freeze and will not continue. To run a program that does not exit, use runAsynchronously():
Process.runAsynchronously();
This function does not take any parameters, executes the Linux application, and returns immediately. The application may or may not be running. To check the status of a program, use running():
result = Process.running();
This function does not take any parameters and returns a boolean: true if the application is still running and false if it has terminated.
When an application terminates, it often returns a return code, which is a numerical value that can give information about the return conditions. (For example, curl will return 2 if the application failed to initialize, 3 if the URL was malformed, and 7 if it failed to connect to the host.) To get the return code, use exitValue():
result = Process.exitValue();
This function returns an unsigned int: the return code of the Linux application. It is not necessary to read the return code for every application. You can call this only when it's needed.
Some applications require text input to operate correctly, asking the user for certain parameters before executing actions. Before asking information from the user, applications normally display text information. To help exchange data, read-and-write functions are available.
To read data from a process, use read():
data = Process.read();
read()returns an unsigned int, the first byte of data available from the serial output of the process, or –1 if no data is available. To write serial data to a process, use write():
Process.write(val);
Process.write(str);
Process.write(buf, len);
The val parameter sends a single byte to the process. To send data as a String, use the str parameter. Finally, you can send data by specifying a char array as buf and the length of the buffer as len. This function returns a byte, the number of bytes written to the process.
To flush the buffer, that is, to delete any data waiting to be read, use flush():
Process.flush();
This function does not take any parameters and does not return any information. It flushes the incoming buffer after all pending output has been written.
To terminate a process, use close():
Process.close();
FileIO
The Arduino Yún has an integrated micro-SD slot, allowing users to expand the filesystem. This card is handled by Linux, but the FileIO library provides a convenient way to interact with files—creating, reading, writing, and deleting. These functions send instructions through the Arduino Yún bridge.
WARNING
The following functions work only with files on the SD card.
Before using filesystem instructions, you must first use begin():
// Setup File IO
FileSystem.begin();
This function must be called inside setup(). Next, you must create a File object. To do this, you must open() a file. If the file exists, it will be opened. If the file does not exist, it will be created, but the folder it is in must exist.
File datafile = FileSystem.open(filename);
File datafile = FileSystem.open(filename, mode);
The filename parameter is a String and indicates the file to open. It can include directories so long as they are separated by a forward slash (for example, "data/log.txt"). The optional mode parameter indicates how the file should be opened, in the default read-only mode (specified by FILE_READ), or in read/write mode (specified by FILE_WRITE). This function returns a File object and is used to perform read-and-write functions. If the file cannot be opened, the File object evaluates to false; it is therefore possible to test if the file was opened:
File datafile = FileSystem.open("/data/log.txt", FILE_WRITE);
if (!datafile)
Serial.println("ERROR: File could not be opened!");
File operations are exactly like the SD-card library; functions such as read(), write(), seek(), and flush() exist. This library is similar in structure to the SD library; only the underlying routines change. For more information, see Chapter 12.
However, not every function works on files. open() requires a folder to exist, but it does not work if the folder does not exist and does not create a folder if it is missing. To remedy this, various filesystem instructions exist that do not require a file to perform actions.
To check if a file exists without opening it (or creating a new one), use exists():
result = FileSystem.exists(filename);
The filename parameter is a String and is in the same format as open(). It returns a boolean: true if the file (or folder) exists and false if it does not exist.
To create a folder, use mkdir():
result = FileSystem.exists(filename);
This function returns a boolean: true if the folder were created, false otherwise. To delete a folder, use rmdir():
result = FileSystem.rmdir(folder);
This function returns a boolean: true if the folder were deleted, false if the function were unable to delete the folder. It requires the target folder to be empty; any files present must be removed. To remove files, use remove():
result = FileSystem.remove(filename);
This function, like the previous functions, returns a boolean: true if deleted, false otherwise. This function is a wrapper for the system command rm and as such can delete both files and folders.
YunServer
The YunServer class is used when creating a server on the Arduino Yún's Linux distro. This allows the Arduino side of the Yún to receive requests and to answer those requests.
To create a server, you must first create a YunServer object:
YunServer server;
When the object has been created, you must tell the Arduino who can connect. Contrary to most Arduino Ethernet shields, you will not want external connections, only local connections. The Arduino will wait for connections from the local host, but the local host is also the Linux side of the Arduino. This means that when incoming connections arrive, they will be routed through the Linux processor, leaving the AVR microcontroller side of the Arduino free to do what it does best—control your sketches. To do this, uselistenOnLocalhost():
server.listenOnLocalHost();
The last step, after the object has been created, is to use begin():
server.begin();
The server has now been created, and you can wait for clients to connect. The difference between the Arduino Yún and other models using Ethernet or Wi-Fi shields is the multitasking capacity. Although other Arduinos have to wait for a client to connect, the Yún doesn't need to wait, The Linux server can handle connections, and the Arduino can see how many clients are waiting and handle connections as required. Your sketch is free to continue between connections. All you have to do is wait for a client.
YunClient
The YunClient interface is used for all client-based calls on the Yún. Just like the server, you must first create a YunClient object:
YunClient client;
To accept an incoming connection, you can talk with the YunServer:
YunServer server;
YunClient client = server.accept();
if (client)
{
// Client has connected
}
You can verify if a client is still connected using connected():
result = client.connected();
This function returns a boolean: true if the client is still connected and false if it has disconnected.
When a client has connected, you can read and write using standard Stream functions:
String data = client.readString();
client.println("Thanks for connecting to my Yún");
When you finish talking to a client, you can terminate the connection using stop():
client.stop();
Example Application
In Chapter 12, you created a light sensor that was capable of logging data to an SD card. In this chapter, you again use a light sensor, but one that can log the temperature to a data file with a timestamp and that can be read over a wireless connection.
To do this, you need an Arduino Yún and a micro-SD card to use for data logging. A standard LDR will be connected to your Yún through the analog pin A3. The sketch will wait 20 seconds between each measurement. During this loop, the sketch will listen to connections from a web navigator.
Hardware
This sketch uses an Arduino Yún connected to a light-dependent resistor. One pin of the LDR is connected to +5 V, and the other one is connected to a 10-kΩ resistor that is connected to ground. The analog reading is made where the LDR and the fixed value resistor are connected. The breadboard example will look like Figure 23.1:
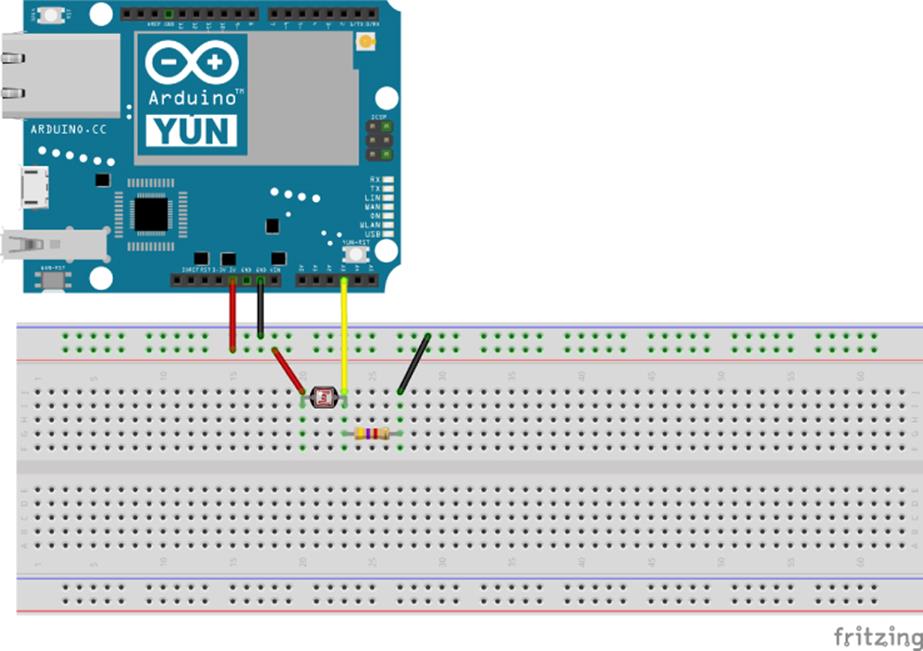
Figure 23.1 Project schematic (Image created with fritzing).
Sketch
The sketch will look like Listing 23.1.
Listing 23.1: Sensor sketch (filename: Chapter23.ino)
1 #include <Bridge.h>
2 #include <FileIO.h>
3 #include <YunServer.h>
4 #include <YunClient.h>
5
6 YunServer server;
7 String startString;
8
9 int iteration = 0;
10
11 void setup()
12 {
13 Serial.begin(9600);
14 Bridge.begin();
15 FileSystem.begin();
16
17 server.listenOnLocalhost();
18 server.begin();
19 }
20
21 void loop ()
22 {
23 String dataString;
24 YunClient client;
25
26 dataString += getTimeStamp();
27 dataString += ", ";
28
29 int sensor = analogRead(A3);
30 dataString += String(sensor);
31
32 Serial.println(dataString);
33
34 iteration++;
35 if (iteration == 20)
36 {
37 boolean result = logResults(dataString);
38 if (result == false)
39 {
40 // Uhoh, couldn't write!
41 Serial.println("ERR: Couldn't write data to file");
42 }
43 iteration = 0;
44 }
45
46 for (int i = 0; i < 20; i++)
47 {
48 client = server.accept();
49 if (client)
50 {
51 client.print(dataString);
52 client.stop();
53 }
54 delay(1000);
55 }
56 }
57
58 boolean logResults(String dataString)
59 {
60 File dataFile = FileSystem.open("/mnt/sd/log.txt", FILE_APPEND);
61
62 if (dataFile)
63 {
64 dataFile.println(dataString);
65 dataFile.close();
66 return true;
67 }
68 return false;
69 }
70
71 // This function return a string with the time stamp
72 String getTimeStamp() {
73 Process time; // The process instance
74 String result; // The String the result will be stored to
75
76 time.begin("date"); // The command to run is "date"
77 time.addParameter("+%D-%T"); // The parameters to add
78 time.run(); // Run the command
79
80 delay(50); // Give the instruction some time to run
81
82 // Get the output from the command line
83 while (time.available() > 0) {
84 char c = time.read();
85 if (c != '\n')
86 result += c;
87 }
88
89 return result;
90 }
On lines 1 to 4, you import the necessary header files. Bridge.h is used for almost everything on the Arduino Yún. FileIO.h is used for saving data to the SD card, and YunClient.h and YunServer.h are used to handle client/server operations. On line 6, an instance of the YunServer is created. This will be used later.
setup() is declared on line 11. First, the serial port is initialized, and then the Bridge and filesystem subsystems are initialized. Finally, the server starts.
loop() is declared on line 23, but before describing its functionality, let's look at the two other functions it calls. One is used to write data to the SD card, and the other retrieves the timestamp from Linux.
getTimeStamp() is declared on line 74. When it runs, it creates an instance of the Process class. It also creates a variable called result; this is the variable that holds the result of a Linux command. This command runs inside a process called time. The function that it calls is named date; when executing the date command, it returns something like this:
jlangbridge@desknux:˜$ date
Fri 29 Aug 15:01:00 UTC 2014
This contains a little bit too much information, you need only a short date and time. This is achieved by adding some parameters to the instruction:
jlangbridge@desknux:˜$ date +%D-%T
08/29/14-15:01:00
To call date, the sketch calls time.begin() on line 78 using date as an argument. To add parameters, addParameter() is used on line 79. The command is run on line 80. The next few lines wait for a fraction of a second and then read the output of the command. This data is placed in a String, which is then returned to the loop().
The second function is called logResults(), and it is declared on line 60. This function takes a String and places that data onto an SD card. It begins by attempting to open a file on the SD card in the FILE_APPEND mode. On line 64 a verification is made to see if the file were opened. If it were opened, the data is written, and the file is closed before returning true. If the file weren't opened, the function returns false.
Back to loop(). A variable called dataString is declared and then a YunClient object is created. The dataString variable holds the date, time, and light sensor reading. On line 28, the date and time is added from the return value of getTimeStamp(). Next, the analog value on pin A3 is read, converted to a String, and added to dataString. On line 36, the variable iteration is incremented. If the value equals 20, then the value is written to the data card. Finally, on line 50, the sketch checks to see if a client is connected. If it is, thedataString displays, and the connection is closed before returning the iteration value to zero.
Exercises
This sketch is the basis for a compact sensor, and together with a temperature sensor and barometer, it can be used to create a wireless weather station. Add some components to the device, and display their value on the web server.
Summary
In this chapter you have seen the Arduino Yún and the Bridge library used to exchange messages between the Arduino microcontroller and the Linux microprocessor. You have seen the different ways in which information can be exchanged, and how to issue commands and fetch data to and from the Linux operating system. In the next chapter, you will see how users and companies have added functionality to Arduinos in the form of user libraries, and how to import those libraries to add functionality to your own projects.
All materials on the site are licensed Creative Commons Attribution-Sharealike 3.0 Unported CC BY-SA 3.0 & GNU Free Documentation License (GFDL)
If you are the copyright holder of any material contained on our site and intend to remove it, please contact our site administrator for approval.
© 2016-2026 All site design rights belong to S.Y.A.