Arduino Sketches: Tools and Techniques for Programming Wizardry (2015)
Part II. Standard Libraries
Chapter 5. Serial Communication
After reading this chapter, you will be familiar with the following functions:
· if (Serial)
· available()
· begin()
· end()
· find()
· findUntil()
· parseFloat()
· parseInt()
· peek()
· print()
· println()
· read()
· readBytes()
· readBytesUntil()
· setTime-out()
· write()
The following hardware is required to complete the activities and examples presented in this chapter:
· Arduino Uno
· USB Cable
The code download for this chapter is found at http://www.wiley.com/go/arduinosketches on the Download Code tab. The code is in the Chapter 5 folder and the filename is chapter5.ino.
Introducing Serial Communication
The original IBM PC, introduced in 1981, came with two serial ports, physical connectors allowing the computer to connect to devices or another computer via the RS-232 protocol. For most people, this was the beginning of the serial port, but in reality, it started much earlier. Early computers had serial ports, and they have even been used on mainframes. They have been in use almost since the beginning of microprocessor-based computers.
The word serial comes from the way data is transmitted; serial devices send bits one at a time on a single wire. This is something that you have seen before; it is like a telephone call. Both users pick up the telephone and a single wire connects them together. Both users can talk at the same time (even if it is considered polite to listen while the other person talks), and words are sent one at a time. Both sides are free to start talking when they want, and also free to stop talking.
While serial devices send bits on a single wire, parallel devices send multiple bits on multiple wires. Although parallel communications can be faster than serial, they were often more expensive, requiring more wires. There are also speed limitations due to physical limitations of conductive wiring. Figure 5.1 shows the difference between serial and parallel communications.
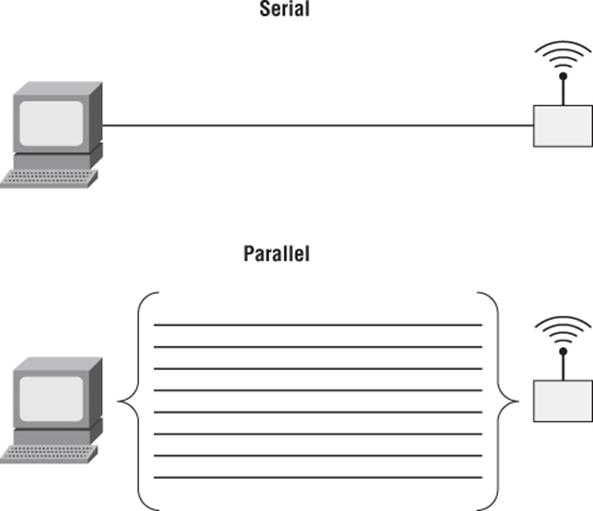
Figure 5.1 Serial versus parallel
A new standard was born: RS-232. RS-232 serial ports were a standard feature on computers allowing users to connect mice, modems, and other peripherals using a common connector. These connectors allowed computers to talk with peripherals, and even talk with other computers. Software was designed to send data between computers on serial links, but while RS-232 was fast enough for devices like mice and modems, it became too slow to handle large amounts of data.
The original serial ports have been removed from most modern computers in favor of a new standard: USB. USB is short for Universal Serial Bus, and even that, however advanced it may be, still uses the same principle: sending data through a serial line. USB does not use RS-232, instead it uses new techniques to send data serially. It can, however, connect to RS-232 hardware using a special converter, which is required when a computer does not have RS-232 but needs to connect to an RS-232 compatible device. Luckily, Arduinos use USB communications, so an adapter is not required.
Serial ports are extremely simple. This simplicity is one reason why they are used so often. Data is sent on one wire, the transmit wire (TX), and received on another, the receive wire (RX). On the other side of the cable, it is connected to another computer with a TX pin and an RX pin. Inside the cable itself, the TX and RX wires are inverted. The TX pin on one side is connected to the RX pin on the other side. This is illustrated in Figure 5.2.

Figure 5.2 Transmit and receive wires
With all the technological advances made over the years, you could ask the question: Why do systems still use RS-232? There are several reasons. First, it is a proven technology in that it has been used reliably for decades. Second, there are a large amount of cheap electronic components that communicate via RS-232. They are easy to use, requiring only a few lines of code to implement. Third there is the cable distance. Although not necessarily a big advantage for some systems, RS-232 low-capacitance cables can be 1,000 feet long, although most cables limit the distance to 50 feet.
Arduinos use serial ports for communicating with computers and other devices. The USB port of an Arduino is used for serial communication with a computer, with the added advantage that USB can also be used to power the device. USB also has the advantage of auto-configuring most of the parameters. Some Arduinos have other hardware serial ports, enabling communication with up to four other devices. The USB communication is sent to Arduino pins 0 and 1, meaning that those pins are reserved if your device must communicate with a computer.
UART Communications
A Universal Asynchronous Receiver/Transmitter (UART) is a piece of hardware that translates from serial and parallel forms. This is what is used to communicate on a serial interface. Data is sent to the UART device in parallel format, for example, a byte. The UART takes the byte and sends the data 1 bit at a time, adding any required information and line handling. On the receiving end, another UART device decodes the data and returns it to parallel form.
The native UART controller on all Arduinos has a buffer of 64 bytes, meaning the Arduino can receive up to 64 characters while busy with other tasks.
For UARTs to communicate, they must be configured in the same way. This information consists of the following:
· Baud rate
· Data bits
· Parity
· Stop bits
Baud Rate
Originally, the baud rate was the amount of times that a signal could be changed per second. Now, it commonly refers to the speed at which information can be transmitted. If you want to send a logical one several times in a row, you do not need to change the signal. The receiving device looks at the input line once every few microseconds or nanoseconds and samples the level. If your sender transmits a series of 1s every millisecond, the receiving device looks at the input line every millisecond. The receiver reads the value and then waits for a millisecond before the next reading. During this time, the sending device has the time to change the logical level (if needed) before the receiver re-samples the data.
It is important that both devices share the same baud rate. If one device is sending faster or slower than another device, the communications will be misinterpreted. If your serial terminal is showing lots of strange characters, then there is a chance that the baud rate is not the same between the two devices.
A baud rate of 1,000 baud is synonymous to a bit rate of 1,000 bits per second. However, that does not mean that 1,000 bits of data are sent. The data is encapsulated, placed inside other bits that help the computer identify the data being sent. RS-232 allows asynchronous communications, meaning that the communications line does not require a clock signal, and communications can begin and stop at any time instead of requiring a constant flow. RS-232 needs some way of telling the receiver that they are about to send data and that they have finished sending a packet. For this reason, RS-232 connections almost always have a start bit, 8 data bits, and a stop bit for a total of 10 bits. Some parameters allow for an extra parity bit, or two stop bits, for a total of 12 bits, while only transmitting 8 bits of data. An example data packet is illustrated in Figure 5.3.

Figure 5.3 A serial packet containing data
Various baud rates exist; most are either multiples of the original baud rate, 75 baud, or multiples of crystal oscillators. Most UART devices are capable of multiple speeds: 300, 1,200, 2,400, 4,800, 9,600, 19,200, 38,400, 57,600, and 115,200 are the most common. Some chips can go even faster. Other devices have nonstandard speeds; you need to find a speed supported by both the sender and the receiver. In embedded systems, 9,600, 19,200, and 115,200 are common values.
Data Bits
The number of data bits in each packet can be between 5 and 9 bits. Often this data is used to represent a character or symbol. Five data bits are typically used for Baudot code, a character table predating ASCII that gave baud its name. Seven data bits are used for pure ASCII characters. Most modern systems use 8 bits because that corresponds to 1 byte. Do not try to speed up data throughput by lowering the amount of data bits, even if you are sending only ASCII. It is best to remain compatible with as many devices as possible and to use 8 data bits, unless the other equipment does not let you use the default 8 bits.
Parity
Parity is used as error detection, attempting to detect transmission errors. A parity bit can be added to make the number of 1s in a packet even or odd. Receiving equipment can detect transmission errors and request the sending equipment to re-send data if the data has unexpected information. This was mainly used on older equipment because modern signaling technology no longer needs parity checking, but it is still available if needed.
Stop Bits
Stop bits are automatically sent at the end of every packet. They allow the receiving hardware to detect the end of a character and to resynchronize with the incoming stream. Modern electronic devices usually use 1 stop bit, but older systems can use 1 1/2 or 2 bits.
Debugging and Output
Systems developers have a wide variety of debugging techniques to help them. Programs can be run and “frozen,” allowing the developer to look inside the program and see what is happening. You can run a program line by line, watching variables change during a program. In some cases, you can even rewrite lines of code before they are executed, without having to restart your program.
Embedded systems offer an alternative, a physical port that connects directly to the processor that allows a hardware debugger to take control. Again, programs can be run step by step; variables can be examined and modified; and advanced debugging techniques can be used. All this comes at a cost; some debuggers can cost tens of thousands of dollars.
Arduinos forgo these complex and costly implementations for less expensive alternatives. The most common tool used for this purpose is the serial port.
Debugging with a serial port can be effective. It is possible to add a single line to a program, printing out information and simple statements:
Debug: We are about to enter the function connectServer()
Debug: Connected!
Debug: Leaving connectServer()
Debug: Connecting to a client…
Debug: Connected with status 2! (should be 1)
This is an example of a debug output. First, you can tell that the function connectServer() was called and that the program also cleanly exited the function. Don't laugh; this is still in use on lots of development projects!
The last line is where things get interesting. You can use the serial output to display values as shown here. If you can't use a debugger to look at a variable's content, then print it out. In a single line, the developer knows that a return value was not what he expected it to be, and now he has a good idea of where to look for the problem.
NOTE
Serial connections depend on correct parameters. If the speed parameter is wrong, the receiving UART device will receive garbled data. You will not get small portions of cleartext with a few wrong characters; the entire text will be unreadable. If your terminal is showing corrupted data, check your settings.
Starting a Serial Connection
All Arduinos have at least one serial port to communicate with a PC called Serial. Some boards have several UART devices. The Arduino Mega, for example, has three additional UART controllers called Serial1, Serial2, and Serial3.
The Arduino Leonardo's microcontroller has a built-in USB communication device, separating USB and Serial communication. On the Leonardo, the Serial class refers to the virtual serial driver, not the serial device on pins 0 and 1. These pins are connected toSerial1.
To do anything with a serial port, you must use the functions available to the Serial class.
To begin using a UART device, you must first do some basic configuration. You need to set at least one parameter; the baud rate, or speed. Optionally, you can set the data bits, parity, and stop bits if required. Arduinos, by default, require you to set the speed and set 8N1 as a default configuration. To do this, you use the begin function of the Serial object.
Serial.begin(speed);
Serial.begin(speed, config);
For Arduino Megas, you can also use the other serial objects (note that these are not connected to the USB port through the 16U2):
Serial1.begin(speed);
Serial1.begin(speed, config);
Serial2.begin(speed);
Serial2.begin(speed, config);
Serial3.begin(speed);
Serial3.begin(speed, config);
The speed parameter is a long and indicates the baud rate. To communicate with a PC, use one of the following: 300, 600, 1,200, 2,400, 4,800, 9,600, 14,400, 19,200, 28,800, 38,400, 57,600, or 115,200. Typically, 9,600 is an appropriate speed for communicating debug information. You are free to use just about any speed you want as long as both devices are operating at the same speed. For example, some Bluetooth devices can send serial data at speeds much faster than 115,200, in the order of one megabaud (one million baud). Be aware of what the device or computer is expecting.
Serial configuration is normally done in setup() because devices tend to not change the speed at which they communicate over time.
void setup()
{
Serial.begin(9600); // Opens the serial port, sets data
// rate to 9600 baud}
void loop() {}
For the Arduino Leonardo, you can detect if the USB serial communications channel is open. The Serial class can return true or false, depending on the communication state.
if(Serial) // Check to see if the channel is open
If you have a number of statements in your setup() that you want to send serially, it is useful to wait until the Leonardo's serial port has initialized before proceeding.
while(!Serial){ // while there is no serial connection
;; // do nothing
}
This works on the Leonardo, Micro, Esplora, and other 32U4-based boards. On all other boards, this function always returns true, even if the device is not connected to USB.
Writing Data
Now that you have established a connection, your Arduino can send data to a receiving device. For debugging, you will probably send ASCII a standard used to transmit text using the English alphabet and some punctuation, and use a terminal emulator for receiving messages. The Arduino IDE integrates a terminal emulator to easily access messages and debugging data. Terminal editors are used to ASCII but will get confused if receiving a non-ASCII character. If a terminal emulator receives a non-ASCII character, for example, something formatted as a raw byte, it will probably produce an unintelligible mess.
Sending Text
To send ASCII data, use print(). This function sends data to the serial device as human-readable ASCII format. The data to be printed can be in any format. It can print a single ASCII character or a complete string.
Serial.print("Hello, world"); // Output an entire string
Serial.print('!'); // Output a single character
It can also print number formats by converting those to ASCII.
Serial.print(42); // Outputs the ASCII string "42" to the serial port
Serial.print(1.2345); // Outputs "1.23"
By default, numbers are displayed in decimal and rounded to two decimal places. You can change both of these. To print a specific amount of decimal places, just specify the number of digits after the floating-point number to be displayed:
Serial.print(1.2345, 0); // Prints "1"
Serial.print(1.2345, 1); // Prints "1.2"
Serial.print(1.2345, 4); // Prints "1.2345"
To display numbers in different formats, you need to specify the numerical type constant after the number. There are four possibilities: BIN for binary, DEC for decimal, HEX for hexadecimal, and OCT for octal.
Serial.print(42, BIN); // Prints 0010 1010
Serial.print(42, DEC); // Prints 42
Serial.print(42, HEX); // Prints 2A
Serial.print(42, OCT); // Prints 52
print() prints data but does not append any special characters to the end of the text. In ASCII, there are a number of these reserved characters. These are escaped with a backslash ( \ ). For example, how would you print a quote that has to reside in another quote?
Serial.print(""He said "Captain", I said "what""); // Compiler error
As far as the compiler understands this line, the text starts at the first quotation mark, and ends at the second, so what is all this noise afterward? The compiler won't understand and will ask you to correct the problem. To show that this is a special character, you must first escape it.
Serial.print(""He said \"Captain\", I said \"what\"");
//reference intact!
You need to escape characters like quotation marks, backslashes, and single quotes.
There are also other special ASCII characters to be aware of. Consider the following code:
Serial.print("Imagination is more important than knowledge.");
Serial.print("Albert Einstein");
At first glance, everything looks good. However, computers are extremely good at doing exactly what you ask for, and nothing more. The result might not quite be what you expect when viewed in a terminal:
Imagination is more important than knowledge.Albert Einstein
Those lines of text were put on different lines; why didn't the second text start on the next line? Well, the compiler wasn't told to do this. To manually insert a new line, you must use the \n character, for a new line.
Serial.print("Imagination is more important than knowledge.\n");
Serial.print("Albert Einstein");
Now things look better. The text now appears like this:
Imagination is more important than knowledge.
Albert Einstein
That's more like it. Now this quotation is readable. Of course, inserting the new line escape sequence is going to get boring, especially if some are forgotten. Luckily, there is a function that can do this for you. The println function automatically adds a new line and a return at the end of the text.
Serial.println("Imagination is more important than knowledge.");
Serial.println("Albert Einstein");
With citations, the author is frequently added on the bottom of the text, but with an indentation. This too can be added by the tabulation sequence: \t.
Serial.println("Imagination is more important than knowledge.");
Serial.print("\tAlbert Einstein");
Tabulation can be important for data output, as shown in more detail in the chapter example.
Sending Data
Not all data can be sent as easily as ASCII. If you are trying to output the result of a sensor, it sometimes isn't practical to convert that data to an int and send it as text. It takes up more time and is just as easy to send that data as a byte onto the serial line. Because the default serial connection can send 8 bits of data per packet, you can send a byte in a single data packet. This is exactly what is done when flashing an Arduino; the Arduino IDE doesn't convert your sketch to ASCII before sending the data; it sends the data 1 complete byte at a time.
Luckily, sending data is just as easy as sending text and can be accomplished with the write() function. This function accepts either a single byte or a string to send. It can also accept a buffer as a parameter and a second parameter to indicate the length of the buffer.
Serial.write(byte);
Serial.write(string);
Serial.write(buffer, len);
Reading Data
It isn't all about sending data through a serial connection; Arduinos can also receive data. Receiving data can be used for many projects; computers can send data, for example, to control the brightness of an LED. Some wireless devices like Bluetooth also use serial ports to transmit data; maybe your telephone can send data to unlock a door or to open a window. Arduinos can also talk to each other over a serial connection, for example, a master Arduino telling a slave Arduino to turn on the lights in the room it controls.
When the UART device receives data, it stores it in an internal buffer. This buffer normally holds 64 characters; any more, and data will be lost. Don't worry; in practice, 64 is more than enough because interrupts can be put in place to tell the microcontroller to retrieve information from this buffer before too much data arrives.
Starting Communications
The first part of any communications is to initiate the connection. Each side must open up a serial port before being able to send and receive data. For the Arduino to initialize a serial communication, you must use the begin() function:
Serial.begin(speed);
Serial.begin(speed, config);
This function requires one or two parameters; the speed parameter is the baud rate for the serial communication. It must be the same on both devices, otherwise they will not be able to communicate. It is expressed as an int, and is the exact speed to use. By default, the Arduino IDE will use 9,600, but you are free to choose a different value, so long as both the Arduino serial monitor and the Arduino itself use the same speed.
Is Data Waiting?
You can check the number of bytes in the serial buffer by calling available(). This can also let you know if there is any valid data waiting to be read.
int bytes = Serial.available();
There are two ways people typically use available(). One way is to return the result to know the amount of bytes waiting to be read.
int inBytes = Serial.available();
You can also evaluate if there are a certain number of bytes with an if() statement:
if (Serial.available() > 0)
{
// Read in serial data
}
Trying to read the serial buffer if no data is available can waste time in your sketch. To avoid a sketch freezing while waiting for data, you can change the duration of the serial time-out, as explained here.
Reading a Byte
You can read a byte from the data buffer using the read() function. This function takes 1 byte from the UART buffer and returns it to the program. This function does not return a byte, instead, it returns an int. There is a good reason for this. What would happen if the buffer were empty? Would the function return 0? That might be the byte waiting for the user in the buffer; there is no way of telling. Instead, the read() function returns an int. The return values are in the range of 0 to 255, or –1 if no data is available. This function returns immediately and does not wait for data to arrive.
Reading Multiple Bytes
Reading in a single byte at a time can be tedious; fortunately there are other ways of getting data from a serial connection.
readBytes() reads multiple bytes from a serial port and places them into a buffer.
Serial.readBytes(buffer, length);
You must specify the amount of bytes to read, in which case the function stops when all the data has been received. There is also another reason why this function might stop; asking this function for more characters than is available could cause the Arduino to momentarily stall while waiting for data that may never arrive. To avoid this, there is a time-out for waiting to read serial data. The time-out is set by setTime-out(). It takes one parameter: a long that contains the number of milliseconds to wait for all the data to arrive. By default, serial ports time out after 1 second.
Serial.setTime-out(time);
You can now retrieve multiple bytes and time out if no data is available. However, the Arduino still has one trick left. Imagine working with a protocol that allows your computer to send messages to an Arduino: turn on the lights in the bedroom, turn off the TV, and other such instructions. These instructions are sent in small packets, and each packet ends with an exclamation mark. There is a function available that reads in serial data and stops either when all the data is read in, when there is a time-out, or when a special character is received. This function is called readBytesUntil() and accepts one argument: the character to wait for.
Serial.readBytesUntil(character, buffer, length);
Both readbytes() and readBytesUntil()return a byte of data: the amount of characters read from the serial port. This will be zero if no data was received because a time-out occurred, less than the expected length if some data was received and a time-out occurred while waiting for the full packet, or the same expected length if all the requested data were available. In the case of readBytesUntil(), non-zero values may also indicate that the terminator character was detected.
Taking a Peek
There is a way to get hold of the first byte of data from the UART buffer without modifying the buffer. There are several reasons why this might be useful to you. When you know that data has arrived, what does it contain? Is this ASCII data that needs to be put in a string? Or is this binary data that needs to be put in another buffer? Would it help to know what the first character is? Well, you can. Just like those who cheat when it is their birthday, there is a way to peek at data without changing anything. This will return the first byte from the buffer, but it will not remove the byte from the buffer. Again, it returns an int; it returns the first byte of data if it is available; otherwise it returns –1.
data = Serial.peek();
From here, you can read one or several bytes using the functions listed previously, and the first byte of data read with peek() will still be in the buffer.
Parsing Data
You have the data, but what do you do with it? Everything received is either ASCII text or binary data. If it is binary data, then your program must analyze the data and extract the data. ASCII, however, is received as text. This is great if you want to know the user's name, but what if you ask him for his age? What if the serial port receives an instruction to turn on an LED at a specific light setting? It might be text that represents an int or float, but how do you extract that data? The answer is simple: You parse it.
parseInt() and parseFloat() scan through text and extract the first int or float encountered. Any preceding text that is not a number is ignored. Parsing stops when the first non-numerical character is found after a numerical character, as shown in Figure 5.4.
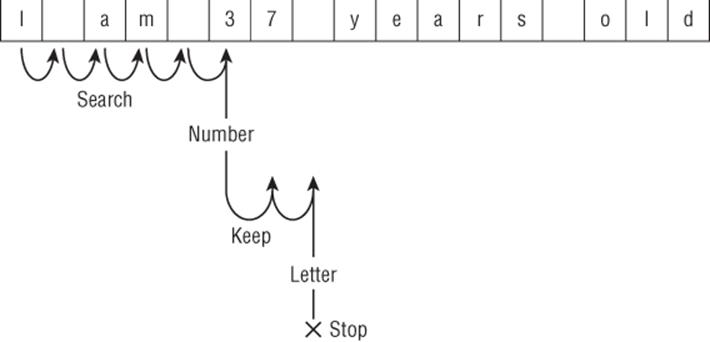
Figure 5.4 Finding numbers in a string
parseInt() would ignore the first letters and extract the number 37. The data before the number and the number itself will be removed from the buffer. The rest of the data remains intact.
You can run the parseInt() function repeatedly, which can be helpful if data is sent to the Arduino as comma-separated values (CSV). If sending a series of three numbers (127,255,64), parseInt() can be called three times to extract three numbers. For example, if you want to set the values of an RGB LED.
int red = Serial.parseInt(); // Will read 127
int green = Serial.parseInt(); // Will read 255
int blue = Serial.parseInt(); // Will read 64
Cleaning Up
The final part of any phone call is to hang up, and it is the same with serial connections. If your application requires you to terminate a serial connection, it can be done by calling end().
Serial.end()
Input from the USB serial connection is sent to pins 0 and 1, meaning that those pins cannot be used for anything else when a serial connection is established. After calling Serial.end(), any pins associated with that serial connection can be used for general input and output. If you need to restart a serial connection, call begin() again with the desired baud.
Example Program
For this example, you use an Arduino Uno. It connects via USB to your development PC and is powered via USB. No power supply is needed, and there will not be any components connected this time.
This program demonstrates the principles of a serial connection. The Arduino welcomes the user, asks for her name, and then presents itself. It asks for the user's age and then gives the age. Finally, it prints out a few ASCII characters using tabs.
Listing 5.1: Serial Connection (Filename:Chapter5.ino)
1 char myName[] = {"Arduino"};
2 char userName[64];
3 char userAge[32];
4 int age;
5 int i;
6
7 void setup()
8 {
9 // Configure the serial port:
10 Serial.begin(9600);
11
12 // Welcome the user
13 Serial.println("Hello! What is your name?");
14
15 //Wait for a few seconds, then read the serial buffer
16 delay(10000);
17 Serial.readBytes(userName, 64);
18
19 //Say hello to the user
20 Serial.print("Hello, ");
21 Serial.print(userName);
22 Serial.print(". My name is ");
23 Serial.print(myName);
24 Serial.print("\n");
25
26 //Ask for user's age
27 Serial.print("How old are you, ");
28 Serial.print(userName);
29 Serial.println("?");
30
31 //Wait for a few seconds, then read the serial buffer
32 delay(10000);
33 age = Serial.parseInt();
34
35 //Print out the user's age
36 Serial.print("Oh, you are ");
37 Serial.print(age);
38 Serial.println("?");
39 Serial.print("I am ");
40 Serial.print(millis());
41 Serial.println(" microseconds old. Well, my sketch is.");
42
43 //Now print out the alphabet
44 Serial.println("I know my alphabet! Let me show you!");
45 Serial.println("Letter\tDec\tHex\t");
46 for (i = 'A'; i <= 'Z'; i++)
47 {
48 Serial.write(i);
49 Serial.print('\t');
50 Serial.print(i);
51 Serial.print('\t');
52 Serial.print(i, HEX);
53 Serial.print('\t');
54 Serial.print('\n');
55 }
56 }
57
58 void loop()
59 {
60 // put your main code here, to run repeatedly:
61 }
Lines 1 to 5 declare the global variables in the program. The myName variable is declared and initialized with the name "Arduino"; the others are only declared.
On line 7, setup() is declared. Because the code runs only once, all the code in this example is placed in setup(). Even though there's nothing happening in loop(), it still needs to be there.
On line 10, the serial device is initialized. The default serial port, Serial, connects to pins 0 and on1e. On an Arduino Uno, these are connected to the USB port. The speed is set to 9,600 baud, and no other parameters are set; therefore the device defaults to 8 data bits, no parity, and 1 stop bit. On line 13, the Arduino greets the user through println(). The program waits for 10 seconds and reads the serial buffer with readBytes(). The data will be put into the userName variable and read up to the size of the buffer, 64 bytes. I hope your name isn't longer than 64 characters! Because it probably isn't, the function will read the bytes in your name and then wait for 1 second to see if there are up to 64 characters. After this, it returns what data it has.
On line 19, the sketch greets the user again, this time with her name. This is done by printing some default text and then printing a variable, the user's name. Again, it prints out some default text and then prints another variable, its own name. Finally, it prints out the new line character. These four lines of code are printed on a single line of text.
On line 27, the sketch again asks the user a question, and on line 32, it waits for another 10 seconds for the user to enter some text. On line 33, the sketch calls parseInt(), emptying the buffer looking for numbers. The result is stored in the age variable.
On line 36, the sketch again talks to the user, first confirming her age, and then on line 40 calls millis(). This function returns the number of milliseconds that the sketch has been running.
At line 43, the sketch prints out a formatted table, using tabs. The sketch tells the user that it knows its ABCs, and demonstrates its mastery of the alphabet. The first column will be the letter, the second will be the decimal value, and the third will be the hexadecimal value.
Line 46 is a loop that iterates through letters A to Z. These are chars and can be printed as such. In ASCII, capital letters are associated with values from 65 to 90. write()sends these as bytes. The Arduino's serial monitor interprets these as the ASCII equivalent. Ifprint() had been used, the decimal number would have been printed, as on line 50. On line 52, the sketch again prints the value but this time using hexadecimal notation.
The result of the sketch looks like this:
Hello! What is your name?
> Elena
Hello, Elena. My name is Arduino
How old are you, Elena?
> I am 8 years old.
Oh, you are 8?
I am 21001 microseconds old. Well, my sketch is.
I know my alphabet! Let me show you!
Letter Dec Hex
A 65 41
B 66 42
C 67 43
D 68 44
E 69 45
F 70 46
G 71 47
H 72 48
I 73 49
J 74 4A
K 75 4B
L 76 4C
M 77 4D
N 78 4E
O 79 4F
P 80 50
Q 81 51
R 82 52
S 83 53
T 84 54
U 85 55
V 86 56
W 87 57
X 88 58
Y 89 59
Z 90 5A
To run this sketch, simply upload it from the Arduino IDE. By pressing Ctrl+Shift+M, or by going to Tools ![]() Serial monitor menu item, you can access the serial monitor that enables you to read the serial data and to input values. Try this out and have fun with it.
Serial monitor menu item, you can access the serial monitor that enables you to read the serial data and to input values. Try this out and have fun with it.
This sketch is not perfect, there are a few flaws that were left in. For example, when reading from the serial port, the sketch first waits 10 seconds. This is not a particularly desirable interaction; the user doesn't know how long they have, and they may not react in time. How would you change the sketch so that it waits until data is available? The available() function might be useful. You could also try to accomplish the same with peek().
Secondly, the sketch does not check for any problems; it might not receive a name, or it might not receive a correct age. This is also left as an exercise; try to correct this, and re-ask the question if the sketch does not receive a good answer.
How could you add additional columns to display octal values? What about binary?
SoftwareSerial
When no more serial ports are physically available, the SoftwareSerial library can use software to emulate serial communications on other digital pins without the need for a UART. This allows you to have multiple serial ports on a device that would not normally allow it. Because transmission is handled by software and not hardware, only one SoftwareSerial port can receive data at any time. Also, speed is limited to 115,200 baud.
This introduces the concept of libraries. A library is software that can be added as required. It provides functionality and is often not something that you would need every time. If your sketch does not require a library, there is nothing else to do. If your sketch does require a library, you must first import it, that is to say tell the Arduino IDE that your sketch requires the functionality provided by a library. To see the list of libraries available, look at the Arduino IDE in the Sketch ![]() Import Library menu. There, you will see a list of available libraries. Clicking on one of these will automatically import the library.
Import Library menu. There, you will see a list of available libraries. Clicking on one of these will automatically import the library.
Before you can use a software serial implementation, you must first import the library and create an instance of the SoftwareSerial class called an object. When instantiating the object, it requires two parameters: the pin used for receiving data and the pin used to send data. Just like the Serial class, you typically call begin() in setup(). The methods used by SoftwareSerial are just like those used with Serial, so print(), println(), available(), and the rest work the same.
#include <SoftwareSerial.h>
#define rxPin 10
#define txPin 11
// set up a new software serial port instance
SoftwareSerial mySerial = SoftwareSerial(rxPin, txPin);
void setup()
{
mySerial.begin(4800);
mySerial.println("Hello, world!");
}
The SoftwareSerial object has its own internal buffer of 64 characters. If it receives any more characters, it will overflow. To check the overflow status of the buffer, the call overflow() function can be used:
bool result = mySerial.overflow();
This function checks the internal overflow flag and automatically resets it. Subsequent calls to this function will report no overflow, unless more data has been received, causing another overflow.
SoftwareSerial requires a pin that supports change interrupts, which, depending on your model, is not available on all pins. The Mega2560 can use pins 10 through 15, 50 to 53, and A8 to A15 for RX. On the Leonardo, pins 8 through 11 and 14 to 16 can be used. The transmit pin does not require interrupt support, so any digital pin can be used. For more information about interrupt pins on your Arduino, check Arduino's website for your specific board.
Summary
In this chapter you have seen how to open and close serial communications, allowing you to connect to your Arduino and how to exchange information. In the next chapter you will see how to store long-term data on your Arduino using the EEPROM library.
All materials on the site are licensed Creative Commons Attribution-Sharealike 3.0 Unported CC BY-SA 3.0 & GNU Free Documentation License (GFDL)
If you are the copyright holder of any material contained on our site and intend to remove it, please contact our site administrator for approval.
© 2016-2026 All site design rights belong to S.Y.A.