PIC32 Microcontrollers and the Digilent chipKIT: Introductory to Advanced Projects (2015)
Chapter 5. The MPIDE Programming Environment and Programming in C
Abstract
This chapter provides an introduction to the Multi-Platform Integrated Development Environment (MPIDE). The installation and use of this integrated development environment is described in detail. This chapter describes the features of the C programming language using the MPIDE environment. Various C language programming features such as variables, arrays, structures, unions, user functions, and built-in functions are described with examples.
Keywords
Integrated development environment
MPIDE
C compiler
Variables
Arrays
Structures
Unions
User functions
Built-in functions
The Digilent Multi-Platform Integrated Development Environment (MPIDE) is a modified version of the popular Arduino IDE. MPIDE is compatible with both native Arduino hardware and software and with Digilent‘s chipKIT PIC-32–based family of microcontrollers. The IDE is based on a simplified set of C/C++ language and libraries, with the aim of providing a microcontroller software development environment with less technically minded people.
In this chapter, we shall be looking at the basic features of the MPIDE development environment and see how we can develop simple programs using this language and the environment.
5.1. Installing MPIDE
MPIDE is available free of charge, and it can be downloaded from the Digilent web site. The steps to download and start the MPIDE are given below:
Step 1: Download MPIDE from the Digilent web site by following the link:
http://chipkit.net/started/
Step 2: The distribution files are zipped together, and they should be unzipped in a directory, preferably called MPIDE.
Step 3: MPIDE can be started by clicking on the executable called mpide.exe in unzipped installation directory (see Figure 5.1). It is advisable to create a shortcut to mpide.exe and place it on the desktop.
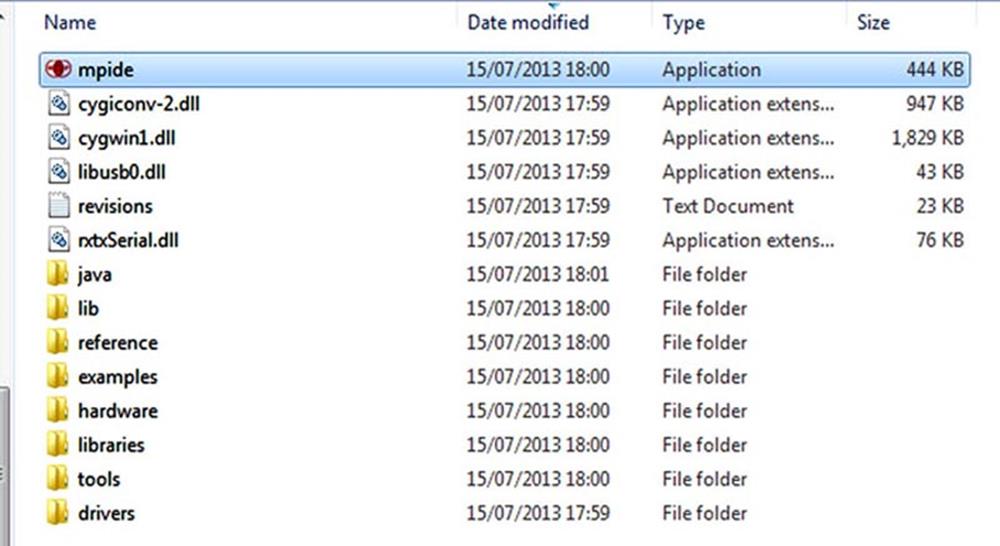
FIGURE 5.1 Double Click Executable mpide.exe
When MPIDE is started, the screen shown in Figure 5.2 will be displayed.
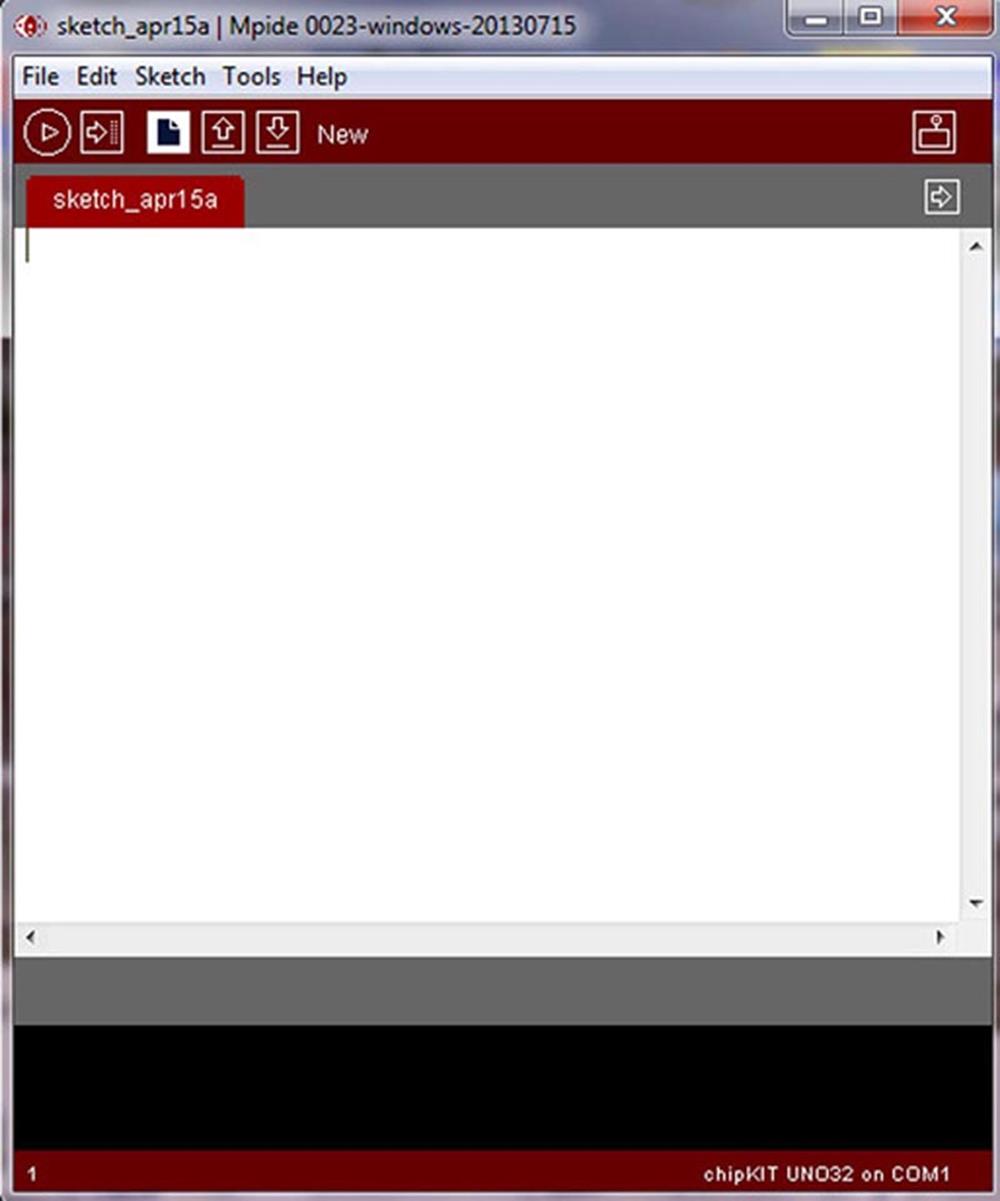
FIGURE 5.2 MPIDE Screen
5.2. The MPIDE
The MPIDE screen consists of the following parts:
Menu
Toolbar with buttons
Status line
Output window
The middle part of the screen is used to enter user programs.
5.2.1. The Menu
The menu has the following parts:
File
Edit
Sketch
Tools
Help
As shown in Figure 5.3, the File menu option is used to open an existing file, to create a new file, to look at the examples provided by the IDE, and for other file processing operations such as saving, closing, and printing files.
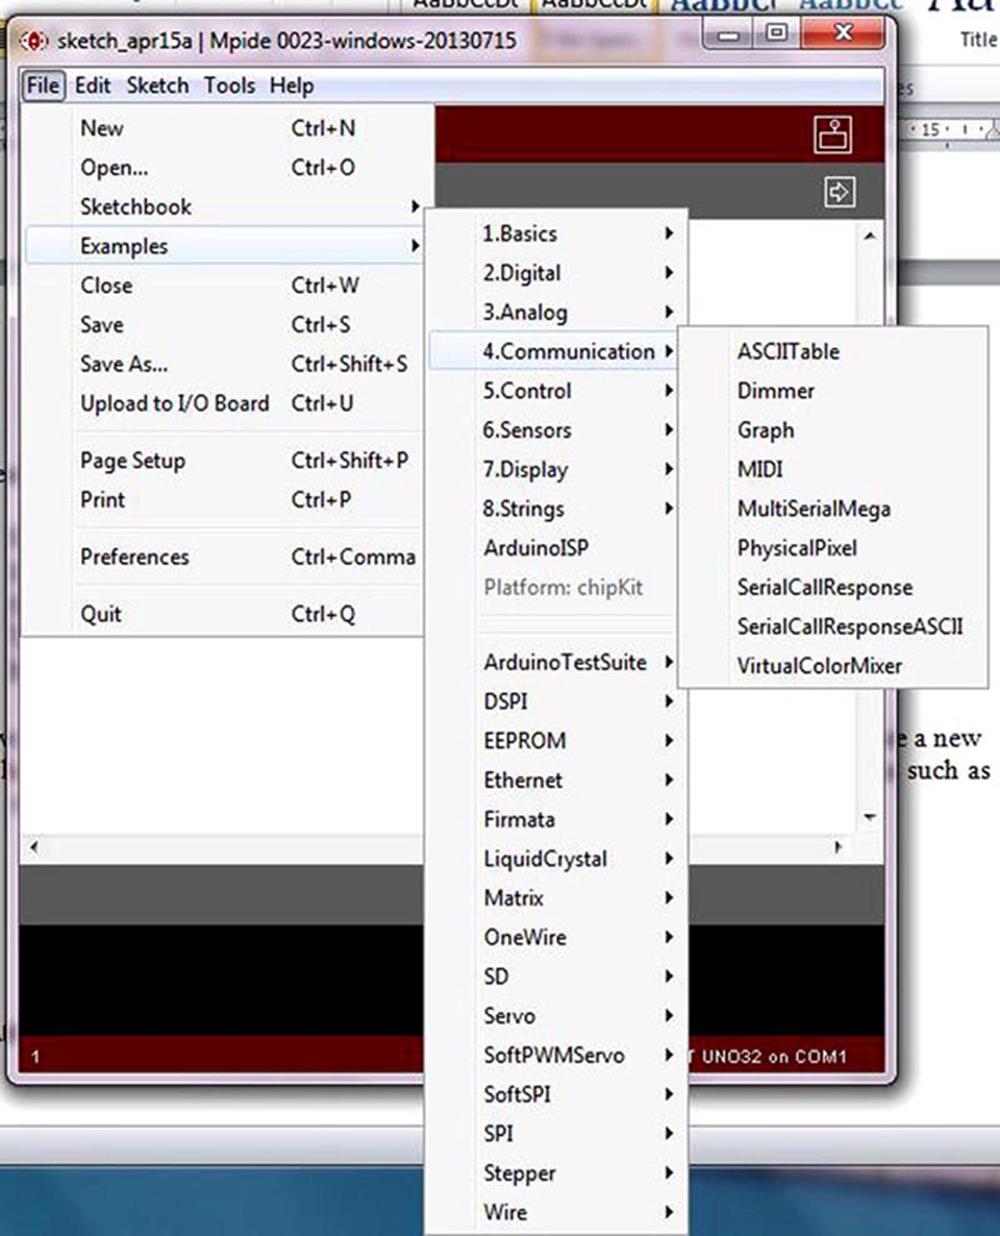
FIGURE 5.3 The File Menu Options
The Edit menu option is used for copy and paste operations and for finding text.
The Sketch option is used to verify/compile and to add a file or a library.
The Tools menu option is used to select a board, to select a programmer, or to configure the serial port.
The Help menu provides help on various aspects of the MPIDE environment.
5.2.2. The Toolbar
The toolbar consists of five buttons with the following functions:
Verify: Compiles and checks the code for errors
Upload: Uploads the compiled code to the target microcontroller chip
New: Creates a new file
Open: Opens an existing file
Save: Saves an already opened file
5.2.3. The Status Line
The status line just above the bottom of the screen shows the status of the current operation.
5.2.4. The Output Window
The output window displays various messages about the current operation, such as error messages.
5.3. The C LANGUAGE
In this section, we shall be looking at various features of the C programming language including the built-in functions and libraries and see how we can use them in our programs.
Figure 5.4 shows the simplest structure of a C program. This program flashes an LED connected to I/O pin 42 of the chipKIT MX3 development board. Do not worry if you do not understand the operation of the program at this stage as all will be clear as we progress through this chapter. Some of the programming concepts used in Figure 5.4 are described in the following sections.
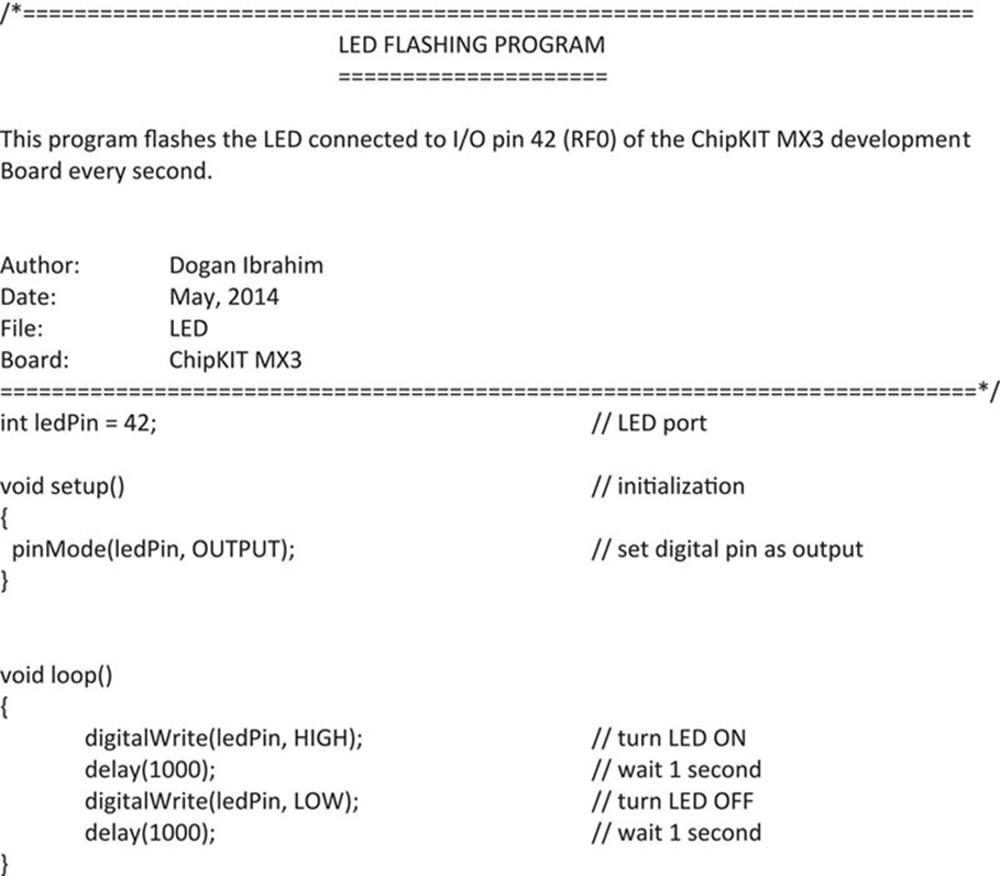
FIGURE 5.4 Structure of a Simple C Program
All programs consist of at least two functions: setup() and loop().
The setup() function is called automatically when a program starts. This function is used to initialise variables, modes of I/O pins, and various libraries. This function is run only once after each power-up or after the microcontroller is reset.
The loop() function is where the main program lies, and the program loops here continuously to perform the required tasks.
5.3.1. Comments
Comments are used by programmers to clarify the operation of the program or a program statement. Comment lines are ignored and not compiled by the compiler and their use is optional. Two types of comments can be used in a C program: long comments and short comments.
Long comments start with characters “/*” and end with characters “*/.” These comments are usually used at the beginning of a program to describe what the program does, the type of processor used, brief description of the algorithm, and the interface to any external hardware used. In addition, the name of the author, the date program was written, and the program filename are usually given in long comment lines to help make any future development of the program easier. As shown in Figure 5.4, long comment lines can extend over many lines.
Short comment lines start with characters “//” and are usually used at the end of statements to describe the operation performed by the statements. These comments can be inserted at any other places of programs as well, for example:
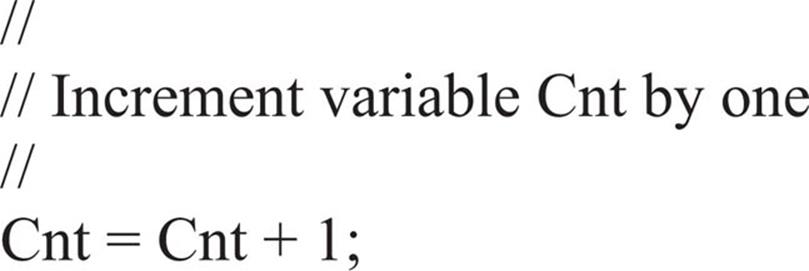
Short comments can occupy only one line, and there is no need to terminate them.
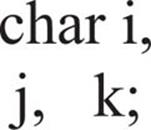
5.3.2. White Spaces
White spaces in programs are blanks, spaces, tabs, and new-line characters. All white spaces are ignored by the C compiler. Thus, the following statements are all identical:
![]()
or
![]()
or
or
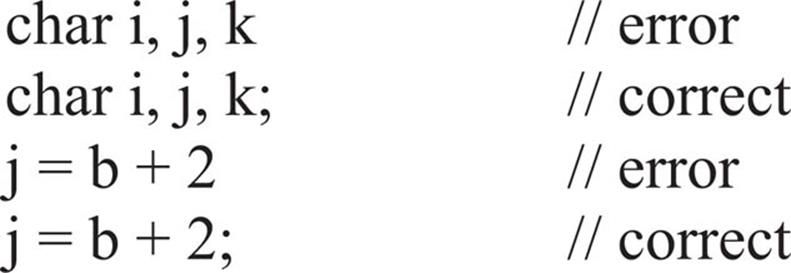
5.3.3. Terminating Program Statements
In C programs, all statements must be terminated with the semicolon “;” character; otherwise, a compilation error occurs:
5.3.4. Case Sensitivity
In C programs, all names are case-sensitive with variables with lowercase names being different from those with uppercase names. Thus, the following variables are all different and they represent different locations in memory:
![]()
5.3.5. Variable Names
In C programs, variable names can begin with an underscore character, or with an alphabetical character. Thus, valid variable names can start with characters a–z, A–Z, and the “_” character. Digits 0–9 can be used after valid characters. Variable names must be unique and can extend to up to 31 characters. Examples of valid variable names are:
![]()
Examples of invalid variable names are:
![]()
5.3.6. Data Types
The C language supports a large number of variable types. Table 5.1 gives a list of the supported variable types. Examples are given below to show how these variables can be used in programs:
Table 5.1
C language data types.
|
Type |
Size (bits) |
Range |
|
unsigned char |
8 |
0–255 |
|
unsigned short int |
8 |
0–255 |
|
unsigned int |
16 |
0–65,535 |
|
unsigned long int |
32 |
0–4,294,967,295 |
|
signed char |
8 |
-128 to 127 |
|
signed short int |
8 |
-128 to 127 |
|
signed int |
16 |
-32,768 to 32,767 |
|
signed long int |
32 |
-2,147,483,648 to 2,147,483,647 |
|
float |
32 |
±1.17549435082E-38 to ±6.80564774407E38 |
|
double |
32 |
±1.17549435082E-38 to ±6.80564774407E38 |
|
long double |
32 |
±1.17549435082E-38 to ±6.80564774407E38 |
boolean: This is a 1-bit variable that can take values 0 or 1. In the following example, variable flag is declared as a bit and is assigned 1:
boolean flag;
flag = 1;
Note that variables can be assigned values during their declarations. Thus, the above statement can also be written as:
boolean flag = 1;
unsigned char or byte: These are 8-bit unsigned character or integer variables ranging from 0 to 255 and occupying 1 byte in memory. In the following example, variable Sum is assigned value 125:
unsigned char Sum = 125;
or
byte Cnt = 250;
char: These are 8-bit signed character or integer variables ranging from −128 to +127 and occupying 1 byte in memory. In the following example, variable Cnt is assigned value −25:
char Cnt;
Cnt = −25;
int: These are 16-bit signed variables ranging from −32,768 to +32,767 and occupying 2 bytes in memory. In the following example, variable Total is assigned value −23,000:
int Total = −23000;
unsigned int or word: These are 16-bit unsigned variables ranging from 0 to 65,535 and occupying 2 bytes in memory. In the following example, variable Sum is assigned value 33,000:
unsigned int Sum;
Sum = 33000;
or
word Sum = 5000;
long: These are 32-bit signed variables ranging from −2,147,483,648 to +2,147,483,647 and occupying 4 bytes in memory. In the following example, variable Total is assigned value −200:
long Total = −200;
unsigned long: These are 32-bit unsigned variables ranging from 0 to 4,294,967,295 and occupying 4 bytes in memory. In the following example, variable x1 is assigned value 1250:
unsigned long x1 = 1250;
float or double: These are floating point numbers in the range −1.5 × 1045 to +3.4 × 1038 occupying 4 bytes in memory. In the following example, variable Max is assigned value 12.52:
float Max = 12.52;
5.3.7. Number Bases
C language supports the decimal, binary, hexadecimal, and octal number bases. Variables can be declared using any of these bases.
Decimal numbers are written as they are without any special symbols. Binary numbers are written by preceding the number with characters “0b” or “0B.” Hexadecimal numbers are written by preceding the number with characters “0x” or “0X.” Finally, octal numbers are written by preceding the number with number “0.” The following example shows how the decimal number 55 can be represented in different bases:
|
55 |
Decimal |
|
0b00110111 |
Binary |
|
0x37 |
Hexadecimal |
|
067 |
Octal |
5.3.8. Constants
Constants are predefined variables in programs that make it easier to read a program. The following types of constants are supported:
• HIGH, LOW
• INPUT, OUTPUT
• true, false
• Integer constants
• Floating point constants
HIGH, LOW, and INPUT, OUTPUT are usually used when I/O pins are defined or when the state of a pin is set high (logic 1) or low (logic 0).
true and false are used to define 1 and 0, respectively, in our programs.
Integer and floating point constants are variables with numbers assigned to them.
5.3.9. Escape Sequences
Escape sequences are commonly used in C languages to represent nonprintable ASCII characters. For example, the character combination “\n” represents the new-line character. An escape sequence can also be represented by specifying its hexadecimal code after a backslash character. For example, the new-line character can also be represented as “\x0A.” Table 5.2 gives a list of the commonly used escape sequences.
Table 5.2
Some commonly used escape sequences.
|
Escape Sequence |
Hexadecimal Value |
Characters |
|
\a |
0x07 |
BEL (bell) |
|
\b |
0x08 |
BS (backspace) |
|
\f |
0x0C |
FF (form feed) |
|
\n |
0x0A |
LF (line feed) |
|
\r |
0x0D |
CR (carriage return) |
|
\t |
0x09 |
HT (horizontal tab) |
|
\v |
0x0B |
VT (vertical tab) |
|
\nH |
String of hexadecimal digits |
|
|
\\ |
0x5C |
\ (backslash) |
|
\‘ |
0x27 |
‘ (single quote) |
|
\” |
0x22 |
“ (double quote) |
|
\? |
0x3F |
? (question mark) |
5.3.10. const Data Types
The const keyword is used to make a variable read-only. The value of such variables cannot be changed, and a compiler error will be generated if an attempt is made to change its value. An example is:
const float pi = 3.14159;
5.3.11. Arrays
Arrays are objects of the same type, collected under the same name. An array is declared by specifying its type, name, and the number of objects it contains. A pair of square brackets is used to specify the number of objects, starting from 0. For example:
unsigned char MyVector[5];
creates an array called MyVector of type unsigned char, having five objects (or elements). The first element of the array is indexed with 0. Thus, MyVector[0] refers to the first element of the array, and MyVector[4] refers to the last element of the array. The array MyVector occupies five consecutive bytes in memory as follows:
MyVector[0]
MyVector[1]
MyVector[2]
MyVector[3]
MyVector[4]
Data can be stored in an array by specifying the array name and the index. For example, to store 50 in the second element of the above array, we have to write:
![]()
Similarly, any element of an array can be copied to a variable. In the following example, the last element of the array is copied to variable Temp:
![]()
The elements of an array can be initialised either during the declaration of the array or inside the program.
The array initialisation during the declaration is done before the beginning of the program where the values of array elements are specified inside a pair of curly brackets, and separated with commas. An example is given below where array Months has 12 elements and each element is initialised to the length of a month:
unsigned char Months[12] = {31, 28, 31, 30, 31, 30, 31, 31, 30, 31, 30, 31};
Thus, for example, Months[0] = 31, Months[1] = 28, and so on.
The above array could also be initialised without specifying its size. The size is filled in automatically by the compiler:
unsigned char Months[ ] = {31, 28, 31, 30, 31, 30, 31, 31, 30, 31, 30, 31};
Character arrays are declared similarly with or without specifying the size of the array. In the following example, array Temp stores characters of letter “COMPUTER,” and the array size is set to 8 by the compiler:
unsigned char Temp[ ] = {‘C‘, ‘O‘, ‘M‘, ‘P‘, ‘U‘, ‘T‘, ‘E‘, ‘R‘};
Strings are special cases of characters arrays that are terminated by the NULL character. The NULL character is represented by characters “\0,” or by the hexadecimal number “0x0.” An example string named MyString is shown below that is initialised to string “COMPUTER”:
unsigned char MyString[ ] = “COMPUTER”;
or
unsigned char MyString[9] = “COMPUTER”;
Notice that the above string declarations are automatically terminated by the compiler with a NULL character, and they are equivalent to the following character array declaration:
unsigned char MyString[ ] = {‘C‘, ‘O‘, ‘M‘, ‘P‘, ‘U‘, ‘T‘, ‘E‘, ‘R‘, ‘\0‘};
In the case of string declarations, the size of the array is always one more than the number of characters declared in the string.
Arrays are normally one-dimensional, and such arrays are also known as vectors. In C language, we can also declare arrays with multiple dimensions. Two-dimensional arrays are also known as matrices. The declaration of arrays with multiple dimensions is similar to the declaration of arrays with single dimensions. For example, a two-dimensional array is declared by specifying the array type, array name, and the size of each dimension. In the following example, M is declared as an integer array having the dimension 2 × 2 (i.e., two rows, two columns):
![]()
The structure of this array is as follows, where the first element is M[0][0] and the last element is M[1][1]:
|
M[0][0] |
M[0][1] |
|
M[1][0] |
M[1][1] |
Similarly, a three-dimensional array of size 2 × 2 × 4 can be declared as:
![]()
The elements of a multidimensional array can be copied to a variable by using an assignment operator. In the following example, the data at row 1, column 2 of a two-dimensional array P is copied to variable Temp:
Temp = P[1][2];
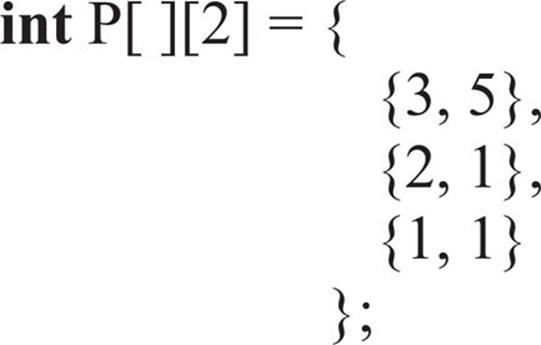
Multidimensional arrays are initialised as the single-dimensional arrays where the elements are specified inside curly brackets and separated by commas. In the following example, a 3 × 2 integer array named P is declared and its elements are initialised:
int P[3][2] = { {3, 5}, {2, 1}, {1, 1} };
The structure of this array is as follows:
|
3 |
5 |
|
2 |
1 |
|
1 |
1 |
The above array could also be declared by omitting the first dimension (number of rows):
int P[ ][2] = { {3, 5}, {2, 1}, {1, 1} };
or
An interesting and useful application of multidimensional arrays is in creating two-dimensional text strings. For example, as shown below, we can create a two-dimensional text string called wdays to store the names of the week:

Notice here that the first dimension (number of rows) of the array is not declared and we expect the compiler to make this dimension 7 as there are seven rows. The second dimension is set 10, because Wednesday is the longest string having 9 characters. If we allow 1 character for the string terminating NULL character, then a total of 10 characters will be required (each day name is terminated with a NULL character automatically).
5.3.12. Pointers
Pointers in C language are very important concepts, and they are used almost in all large and complex programs. Most students have difficulty in understanding the concept of pointers. In this section, we shall be looking at the basic principles of pointers and see how they can be used in C programs.
A pointer in C language is a variable that holds the memory address of another variable. Another simple definition of a pointer is the following: a pointer points to the memory address of a variable. Thus, by knowing where a variable is actually located in memory, we can carry out various types of operations on this variable.
Pointers in C language are declared same as any other variables, but the character “*” is inserted before the name of the variable. In general, pointers can be declared to hold the addresses of all types of variables, such as character, integer, long, and floating point, and even they can hold the addresses of functions.
The following example shows how a character pointer named Pnt can be declared:
char *Pnt;
When a new pointer is declared, its content is not defined, and, in general, we can say that it does not point to any variable. We can assign the address of a variable to a pointer using the “&” character. In the following example, character pointer Pnt holds the address of (or points to the address of) character variable Temp:
![]()
Assuming variable Temp is at memory location 1000, pointer Pnt contains the number 1000, which is the address where the variable Temp is located at. We can now assign value to our variable Temp using its pointer:
![]()
which is the same as the assignment
![]()
Similarly, the value of Temp can be copied to variable Total as:
![]()
which is the same as
![]()
In C language, we can perform pointer arithmetic that may involve the following operations:
• Adding or subtracting a pointer and an integer value
• Adding two pointers
• Subtracting two pointers
• Comparing two pointers
• Comparing a pointer with a NULL
For example, assuming that the pointer Pnt holds address 1000, the statement
Pnt = Pnt + 1;
will increment pointer Pnt so that it now points to address 1001.
Pointers can be very useful when arrays are used in a program. In C language, the name of an array is also a pointer to the array. Thus, for example, consider the array:
char Sum[5];
The name Sum is also a pointer to this array, and it holds the address of the first element of the array. Thus, the following two statements are equal:
Sum[2] = 100;
and
*(Sum + 2) = 100;
Since Sum is also a pointer to array Sum[ ], the following statement is also true:
&Sum[p] = Sum + p;
The following example shows how pointer arithmetic can be used in array-based operations. Assuming that P is a pointer, it can be set to hold the address of the second element of an array Sum:
P = Sum[2];
Suppose now that we want to clear second and third elements of this array. This can be done as:

or

or

5.3.13. Structures
Structures are similar to arrays where they store related items, but they can contain data with different data types. A structure is created using the keyword struct. The following example creates a structure called Family:
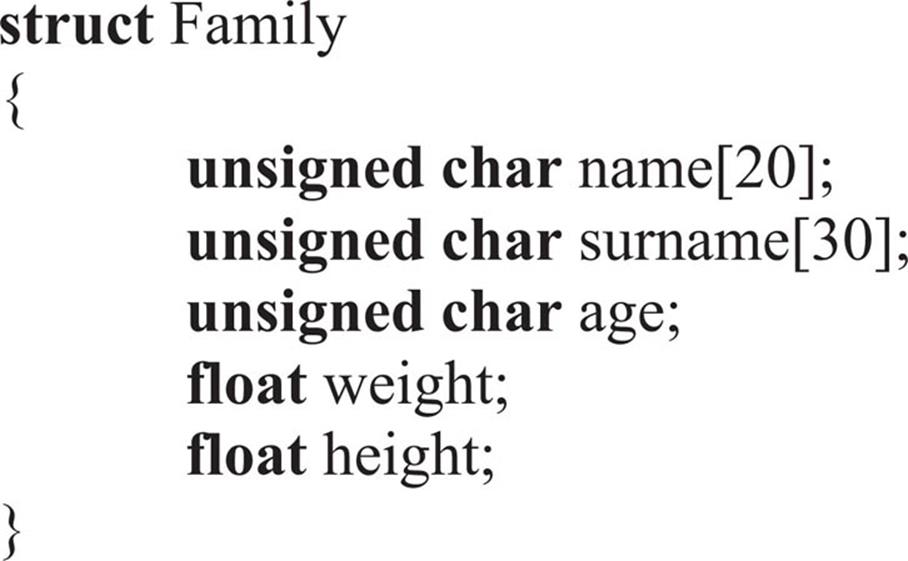
It is important to realise that the above is just a template for a structure and it does not occupy any space in memory. It is only when variables of the same type as the structure are created that the structure occupies space in memory. For example, variables Johnand Peter of type Family can be created by the statement:
struct Family John, Peter;
Variables of type structure can also be created during the declaration of the structure:

We can assign values to members of a structure by specifying the name of the structure, followed by a “.,” and the value to be assigned. In the following example, the age of John is set to 25 and his weight is set to 82.5:
John.age = 25;
John.weight = 82.5;
The members of a structure can also be initialised during the declaration of the structure, by specifying their values enclosed in a pair of curly brackets at the end of the structure definition, and separated with commas. In the following example, a structure calledCube is created with variable MyCube having sides A, B, and C, initialised to 2.5, 4.0, and 5.3, respectively:

It is also permissible to use pointers to assign values to members of a structure. An example is given below:
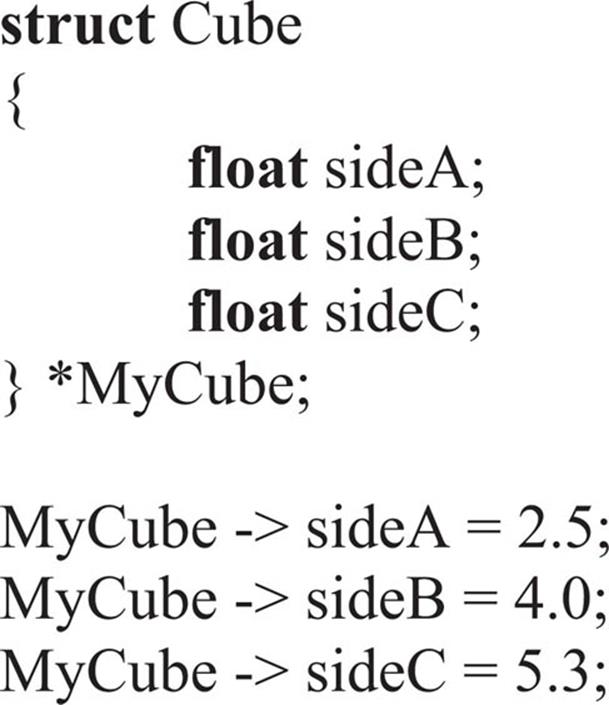
The size of a structure depends on the data types of its members. Although we can calculate the size by adding the known size of each data member, it is easier to use the operator sizeof to calculate the size of a structure. For example, the following statement stores the size of structure MyCube in variable z:
z = sizeof(MyCube);
Another use of structures, especially in microcontroller-based applications, is the separation of bits of a variable so that each bit or group of bits can be manipulated separately. This is also known as bit fields. With bit fields, we can assign identifiers to each bit, or to groups of bits, and then manipulate them easily. An example is given below where a byte variable called Flag is separated into three bit groups: the two least significant bits (bit 0 and bit 1) are called LSB2, the two most significant bits (bit 6 and bit 7) are calledMSB2, and the remaining bits (bits 2 to 5) are called Middle:

We can then assign values to bits of the variable:
Flag.LSB2 = 3;
Flag.Middle = 6;
5.3.14. Creating New Data Types
In C programming, we can create new data types by using the existing data types. This can be useful in many applications where we may want to give our own names to variable types. The keyword typedef is used to create new variable types. In the following example, a new data type called INTEGER is created from the data type unsigned int:
typedef unsigned int INTEGER;
which simply means that the new data type INTEGER is a synonym for the data type unsigned int and can be used whenever we wish to declare an unsigned int type variable. In the following example, x, y, and z are declared as INTEGER, which also means that they are of type unsigned int:
INTEGER x, y, z;
As another example, consider the following definition:
typedef char *string;
Here, string is a new data type, which is really a character pointer. We can now use this data type in our programs to create string arrays:
string Surname = “Jones”;
The typedef keyword can also be used in structures. For example, we can create a new structure called Person using typedef:
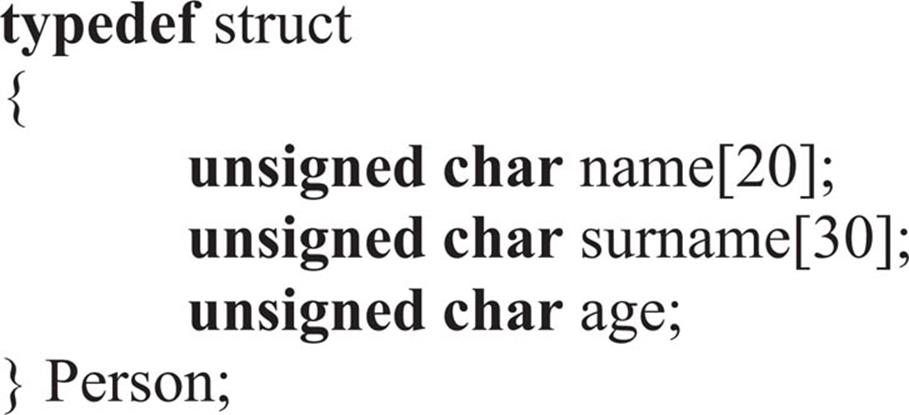
New variables of type Person can now be created:
Person John, Peter, Mary;
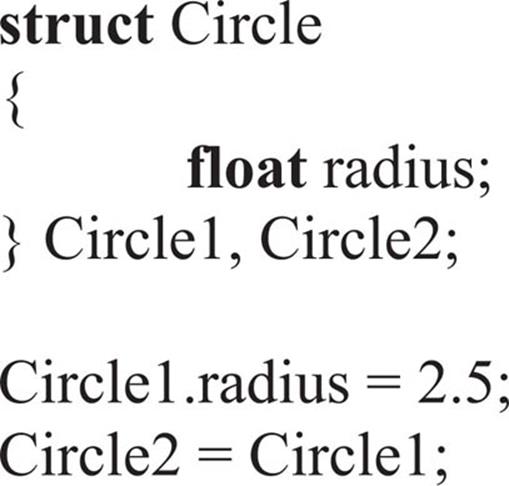
The contents of one structure can be copied to another one if both structures have been derived from the same template. An example is given below where a structure is created with two variables Circle1 and Circle2. Circle1 is initialised with data and is then copied to Circle2:
5.3.15. Unions
Unions are similar to structures, and they are even declared and used in a similar way. The difference of a union is that all the member variables in a union share the same memory space. For example, the following union declaration creates two member variables xand y. y is an unsigned integer and occupies 2 bytes in memory. x is an unsigned char and occupies only 1 byte in memory. Because the member variables share the same memory space, the low byte of y shares the same memory byte as x:
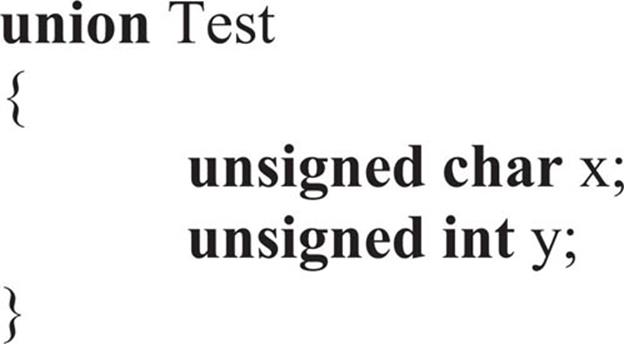
If, for example, y is loaded with the hexadecimal data 0x2EFF, then x will automatically be loaded with data 0xFF.
5.3.16. Operators in C Language
Operators are used in mathematical and logical operations to produce results. Some operators are unary where only one operand is required, some are binary where two operands are required, and one operator is tertiary where it requires three operands.
C language supports the following operators:
• Arithmetic operators
• Relational operators
• Bitwise operators
• Logical operators
• Conditional operators
• Assignment operators
• Preprocessor operators
Arithmetic operators
Arithmetic operators are used in mathematical expressions. Table 5.3 gives a list of the arithmetic operators. All of these operators, except the autoincrement and autodecrement, require at least two operands. Autoincrement and autodecrement operators are unary as they require only one operand.
Table 5.3
Arithmetic operators.
|
Operator |
Operation |
|
+ |
Addition |
|
− |
Subtraction |
|
* |
Multiplication |
|
/ |
Division |
|
% |
Remainder (integer division only) |
|
++ |
Autoincrement |
|
−− |
Autodecrement |
The arithmetic operators “+ − * /” are obvious and require no explanation. Operator “%” gives the remainder after an integer division is performed. Some examples are given below:
|
12 % 3 |
Gives 0 (no remainder) |
|
12 % 5 |
Gives 2 (remainder is 2) |
|
−10 % 3 |
Gives −1 (remainder is −1) |
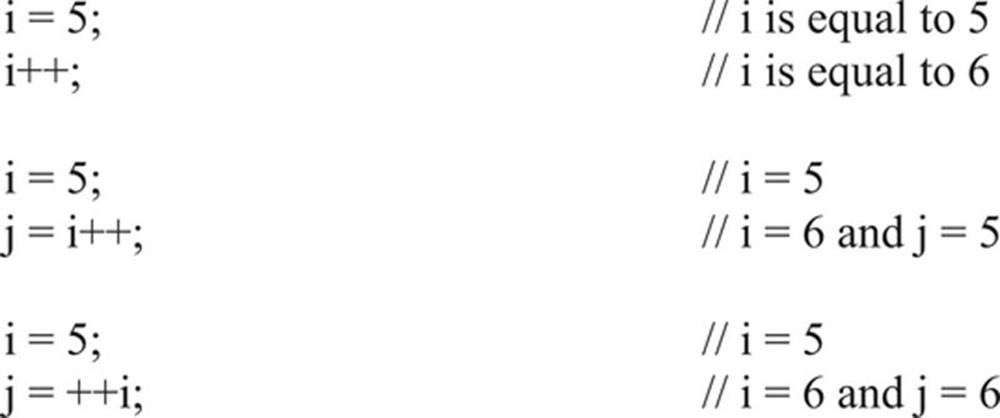
The autoincrement operator is used to increment the value of a variable by 1. Depending on how this operator is used, the value is incremented before (preincrement) or after (postincrement) an assignment. Some examples are given below:
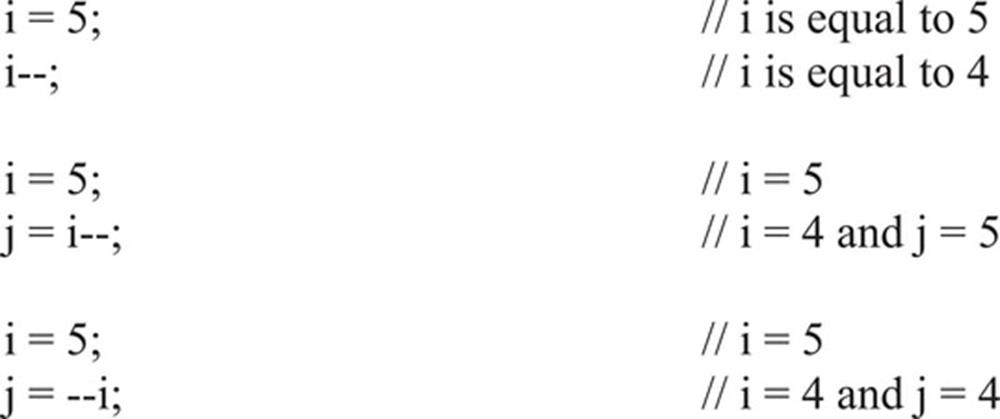
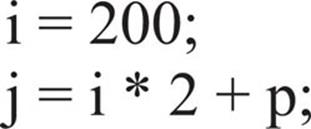
Similarly, the autodecrement operator is used to decrement the value of a variable by 1. Depending on how this operator is used, the value is decremented before (predecrement) or after (postdecrement) an assignment. Some examples are given below:
Relational operators
The relational operators are used in comparisons. All relational operators are evaluated from left to right, and they require at least two operands. Table 5.4 gives a list of the valid relational operators.
Table 5.4
Relational operators.
|
Operator |
Operation |
|
== |
Equal to |
|
!= |
Not equal to |
|
> |
Greater than |
|
< |
Less than |
|
>= |
Greater than or equal to |
|
<= |
Less than or equal to |
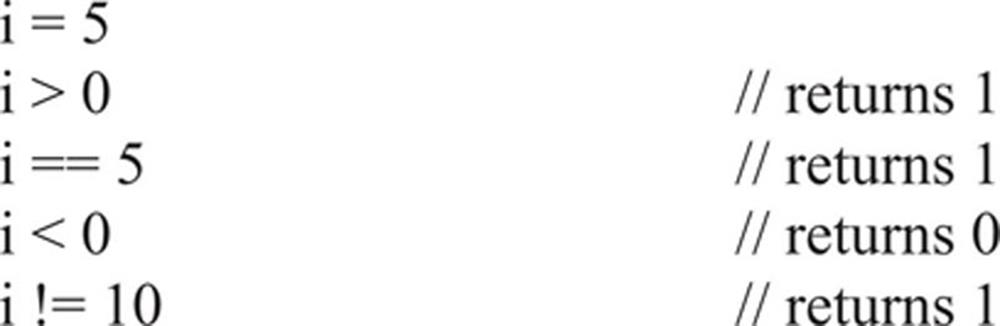
Notice that the equal operator is written with two equal signs, as “==,” and not as “=.” If an expression evaluates to TRUE, 1 is returned; otherwise, 0 is returned. Some examples are given below:
Bitwise operators
Bitwise operators are used to modify bits of a variable. These operators (except the bitwise complement) require at least two operands. Table 5.5 gives a list of the bitwise operators.
Table 5.5
Bitwise operators.
|
Operator |
Operation |
|
& |
Bitwise AND |
|
| |
Bitwise OR |
|
^ |
Bitwise Exclusive-OR |
|
∼ |
Bitwise complement |
|
<< |
Shift left |
|
>> |
Shift right |
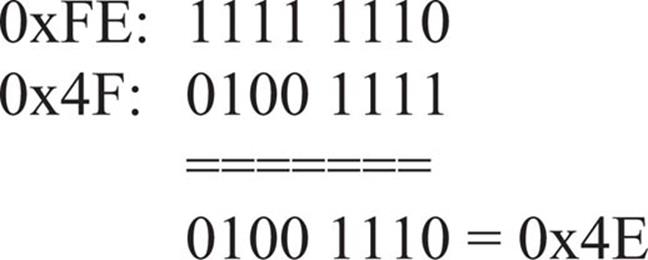
Bitwise AND returns 1 if the corresponding 1 bits of the variables are 1; otherwise, it returns 0. An example is given below where the first variable is 0xFE and the second variable is 0x4F. The result of the bitwise AND operation is 0x4E:
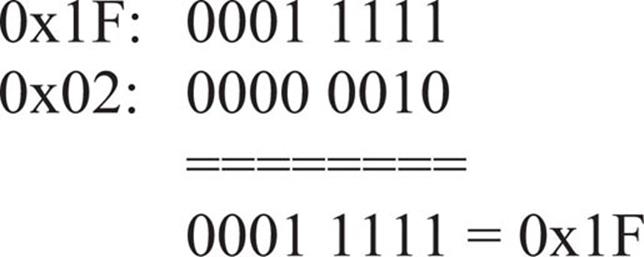
Bitwise OR returns 0 if the corresponding 2 bits of the variables are 0; otherwise, it returns 1. An example is given below where the first variable is 0x1F and the second variable is 0x02. The result of the bitwise OR operation is 0x1F:
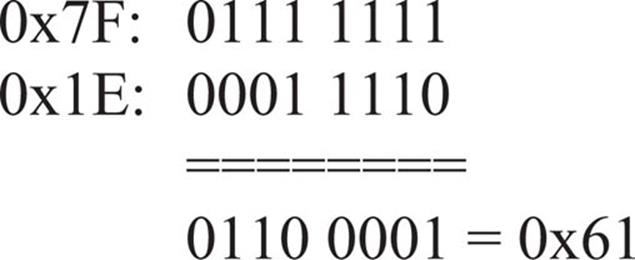
Bitwise exclusive-OR returns 0 if the corresponding 2 bits of the variables are the same; otherwise, it returns 1. An example is given below where the first variable is 0x7F and the second variable is 0x1E. The result of the exclusive-OR operation is 0x61:
The complement operator requires only one operand, and it complements all bits of its operand. An example is given below where variable 0x2E is complemented to give 0xD1:

The left shift operator requires two operands: the variable to be shifted and the count specifying the number of times the variable is to be shifted. When a variable is shifted left, 0 is filled into the least significant bit position. Shifting a variable left by one digit is same as multiplying the variable by 2. An example is given below where the variable 0x1E is shifted left by two digits to give the number 0x78:

The right shift operator requires two operands: the variable to be shifted and the count specifying the number of times the variable is to be shifted. When a variable is shifted right, 0 is filled into the most significant bit position. Shifting a variable right by one digit is same as dividing the variable by 2. An example is given below where the variable 0x1E is shifted right by one digit to give the number 0x0F:

Logical operators
The logical operators are used in comparisons, and they return TRUE (or 1) if the comparison evaluates to nonzero or FALSE (or 0) if the comparison evaluates to zero. Table 5.6 gives a list of the logical operators.
Table 5.6
Logical operators.
|
Operator |
Operation |
|
&& |
AND |
|
|| |
OR |
|
! |
NOT |
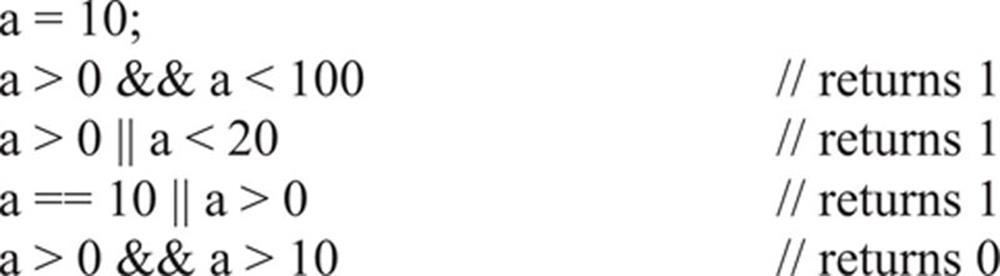
Some examples are given below to show how the logical operators can be used:
Conditional operator
C language supports a conditional operator with the following syntax:
![]()
Here, expression1 is evaluated, and if its value is TRUE (nonzero), then expression2 is assigned to result; otherwise, expression3 is assigned to result. An example use of the conditional operator is given below which assigns the larger of variables a or b to max. If a is greater than b, then a is assigned to max; otherwise, b is assigned to max:
![]()
Another common application of the conditional operator is to convert a lower case character to upper case as shown below. In this example, if the character c is lower case (between “a” and “z”), then it is converted to upper case by subtracting hexadecimal 0x20 from its value:
![]()
Similarly, we can write a conditional operator-based statement to convert an upper case character to lower case:
![]()
Assignment operators
The basic assignment operator is the “=” sign where a constant or an expression is assigned to a variable:
The C language also supports compound assignment operators in the following format:
result compound operator = expression
where the compound operator can be one of the following:

Some examples are given below to show how the compound operators can be used:

Preprocessor operators
The preprocessor operators are an important part of the C language as these operators allow a programmer to:
• Compile a program segment conditionally
• Replace symbols with other symbols
• Insert source files to a program
A preprocessor operator is identified by the character “#,” and any program line starting with this character is treated as a preprocessor operator. All preprocessor operator operations are handled by the preprocessor, just before the program is compiled. The preprocessor operators are not terminated with a semicolon.
Some of the commonly used preprocessor operators are the following:
#define
#undef
#include
#define preprocessor operator is a macro expansion operator where every occurrence of an identifier in a program is replaced with the specified value of the identifier. In the following example, MAX is defined to be number 1000, and everywhere MAX is encountered in the program it will be replaced with 1000:
#define MAX 1000
It is important to realise that an identifier that has been defined cannot be defined again before its definition is removed. The preprocessor operator #undef is used to remove the definition of an identifier. Thus, we could redefine MAX to be 10 as follows:
#undef MAX
#define MAX 10
The #define preprocessor operator can also be used with parameters, as in a macro expansion with parameters. These parameters are local to the operator, and it is not necessary to use the same parameter names when the operator is used (or called) in a program. An example is given below where the macro INCREMENT is defined to increment the value of its parameter by 1:
#define INCREMENT(a) (a + 1)
When this macro is used in a program, the value of the variable representing the parameter will be incremented by 1 as in the following example:
![]()
Similarly, we can define a macro to return the larger of two numbers as:
#define MAX(a, b) ((a > b) ? a: b)
And then use it in a program as:
p = MAX(x, y);
The above statement will be changed by the preprocessor to:
p = ((x > y) ? x: y);
It is important to make sure that the macro expansion is written with brackets around it in order to avoid confusion. Consider the following example that is written with no brackets:
#define ADD(a) a + 1
Now, if we use this macro in an expression as follows:
z = 2 * ADD(x);
The above statement will be expanded into z = 2 * a + 1, which is not same as z = 2 * (a + 1).
The #include preprocessor operator is used to include a sources file (text file) in a program. Usually program header files with extension .h are included in C programs:
#include <MyFile>
5.3.17. Modifying the Flow of Control
Statements in a program are normally executed in sequence one after the other until the end of the program is reached. In almost all programs, we wish to compare variables with each other, and then execute different parts of the program based on the outcome of these comparisons. We may also want to execute part of a program several times. C language provides several programming tools for modifying the normal flow of control in a program.
The following flow control statements are available in C language:
• Selection statements
• Iteration statements
• Unconditional modification of the flow of control statements
Selection statements
There are two basic selection statements: if and switch.
if statement
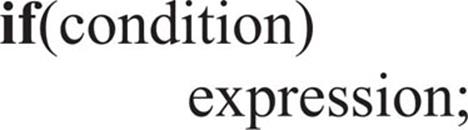
The if statement is used to carry out comparisons in a program and then force one or another part of the program to execute based on the outcome of the comparison. The basic format of the if statement is:
if(condition)expression;
Thus, the expression will be executed if the condition evaluates to TRUE:
or
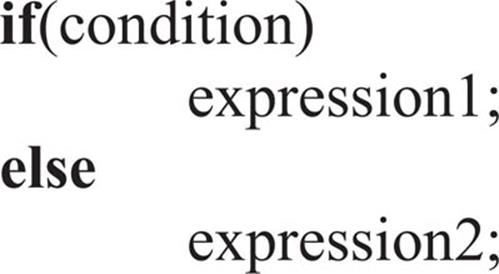
Thus, expression1 will execute if the condition evaluates to TRUE; otherwise, expression2 will be executed.
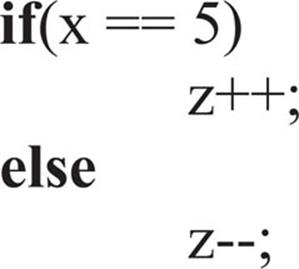
An example is given below where if x is equal to 5, then z is incremented by 1; otherwise, z is decremented by 1:
In many applications, we may wish to include more statements if a comparison evaluates TRUE or FALSE. This can be done by enclosing the statements in a pair of curly brackets as shown in the following example:
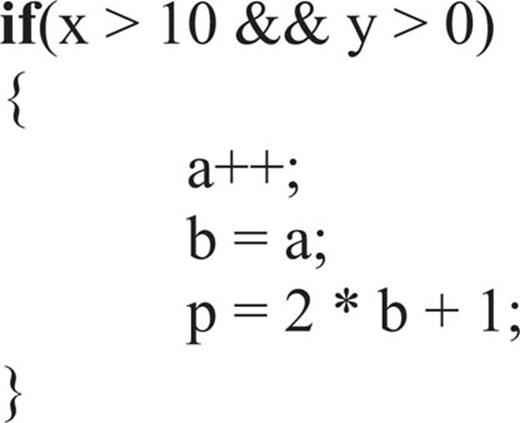
or
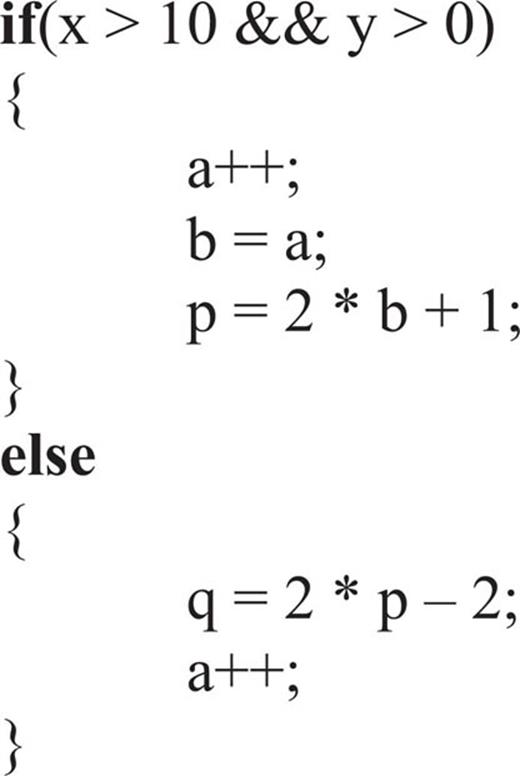
The if statements can be nested in complex comparison operations. An example is given below:
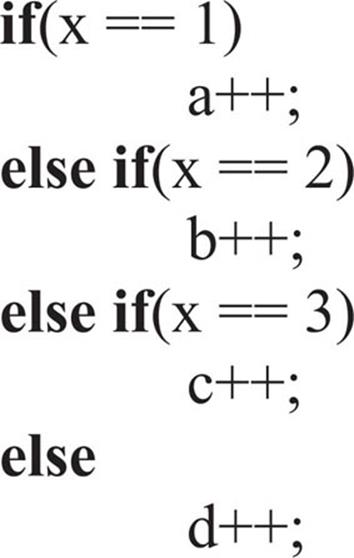
A more practical example is given below to illustrate how the if statements can be nested.
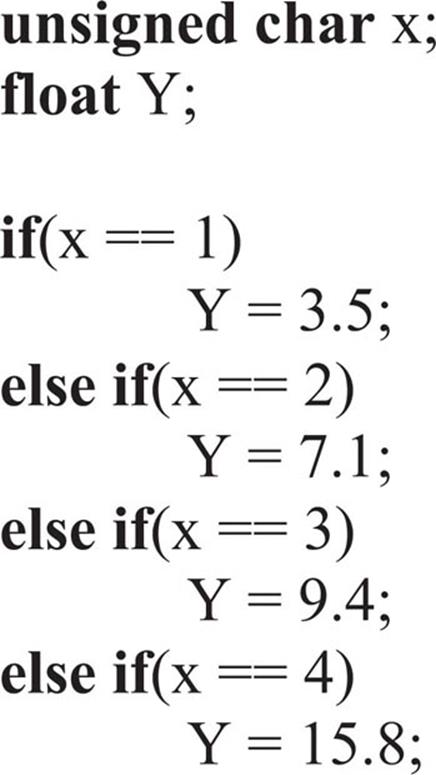
Example 5.1
In an experiment, it was observed that the relationship between X and Y is found to be as follows:
|
X |
Y |
|
1 |
3.5 |
|
2 |
7.1 |
|
3 |
9.4 |
|
4 |
15.8 |
Write the if statements that will return Y value, given the X value.
Solution 5.1
The required program code is:
switch statement
The switch statement is the second selection statement. This statement is used when we want to compare a given variable with a different number of conditions and then execute different codes based on the outcome of each comparison. The general format of the switch statement is:
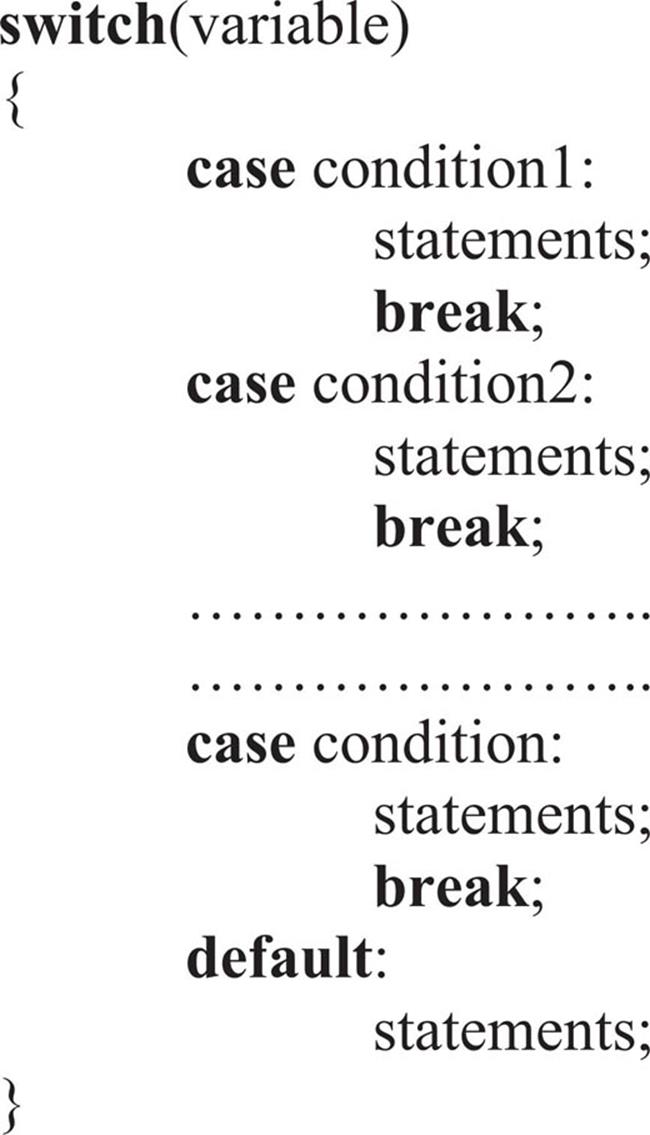
Here, the variable is compared with condition1, and if the result evaluates to TRUE, the statements in that block are executed until the break keyword is encountered. This keyword forces the program to exit the switch statement by moving to the statement just after the closing curly bracket. If the variable is not equal to condition1, then it is compared with condition2, and if the result is TRUE, the statements in that block are executed. If none of the conditions are satisfied, then the statements under the default keyword are executed and then the switch statement terminates. The use of the default keyword is optional and can be omitted if we are sure that one of the comparisons will always evaluate to TRUE.
Perhaps the easiest way to learn how the switch statement operates is to look at some examples.
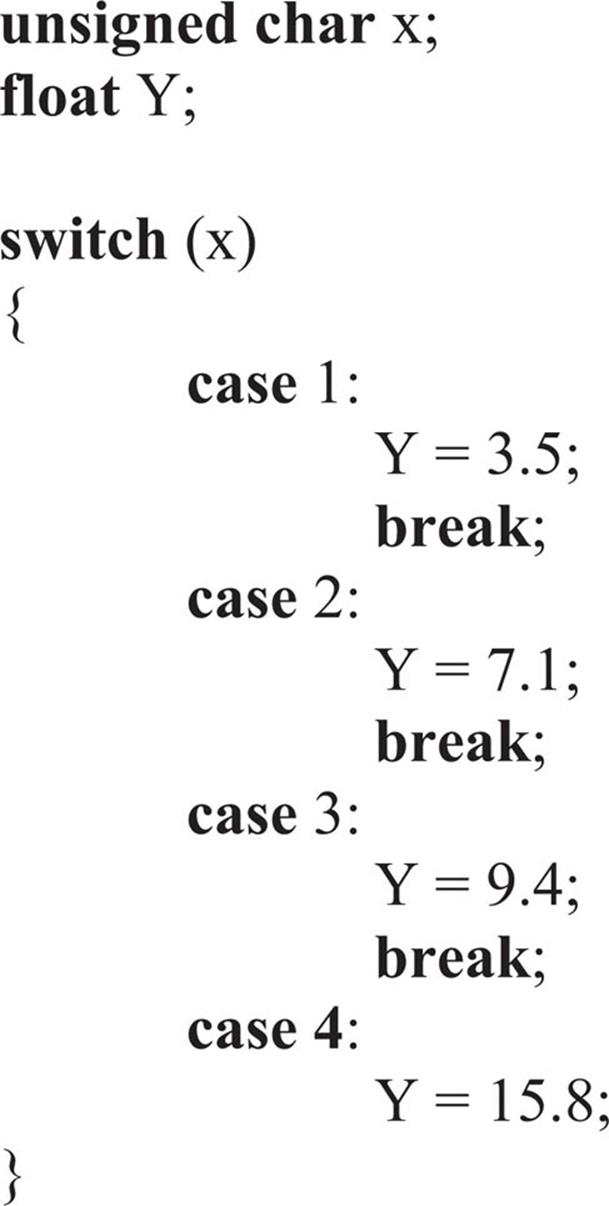
Example 5.2
Rewrite the program code in Example 5.1 using a switch statement.
Solution 5.2
The required program code is:
Example 5.3
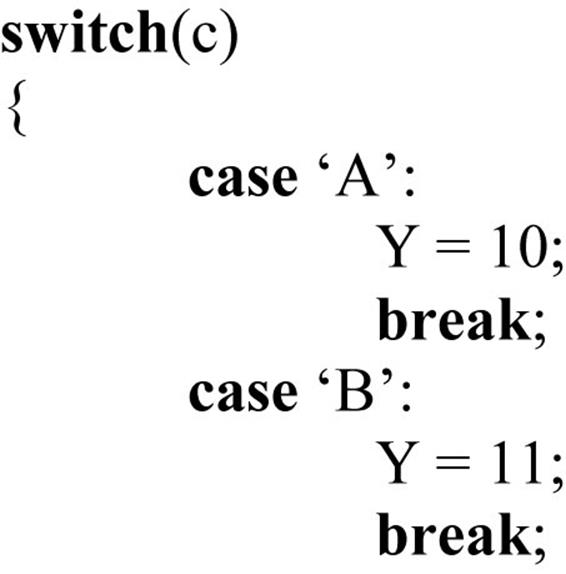
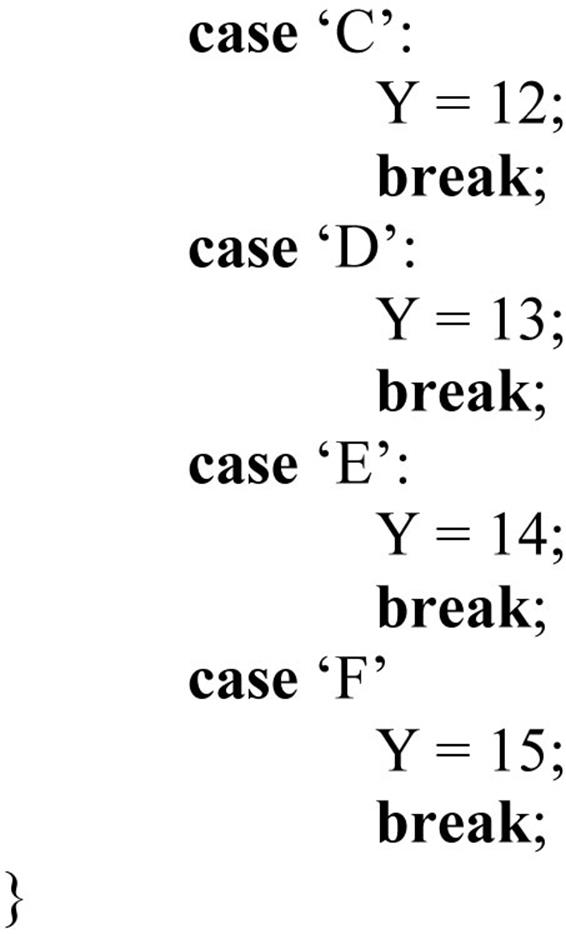
Write the program code to convert hexadecimal numbers A–F to decimal using a switch statement.
Solution 5.3
Assuming that the hexadecimal number (letter) is in variable c, the required program code is:
Iteration statements
Iteration statements are used in most programs as they enable us to perform loops in our programs and repeat part of the code specified number of times. For example, we may want to calculate the sum of numbers between 1 and 10. In such a calculation, we will form a loop and keep adding the numbers from 1 to 10. C language supports the following iteration statements:
• for statements
• while statements
• do while statements
• goto statements
for statements
The for statement is perhaps the most widely used statement to create loops in programs. The general format of this statement is:

A loop variable is used in for loops. The initial expression specifies the starting value of the loop variable, and this variable is compared with some condition using the conditional expression before the looping starts. The statements enclosed within the pair of curly brackets are executed as long as the condition evaluates to TRUE. The value of the loop counter is changed (usually incremented by 1) at each iteration. Looping stops when the condition evaluates to FALSE.
An example is given below where a loop is formed and inside this loop the statements are executed 10 times:
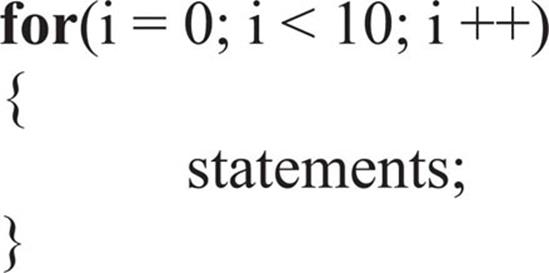
or
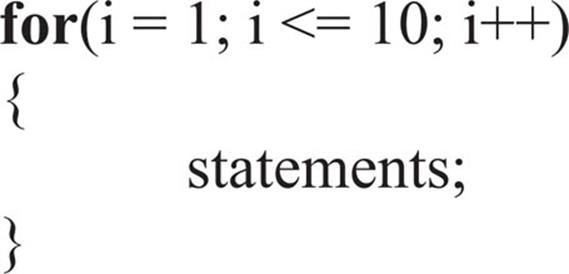
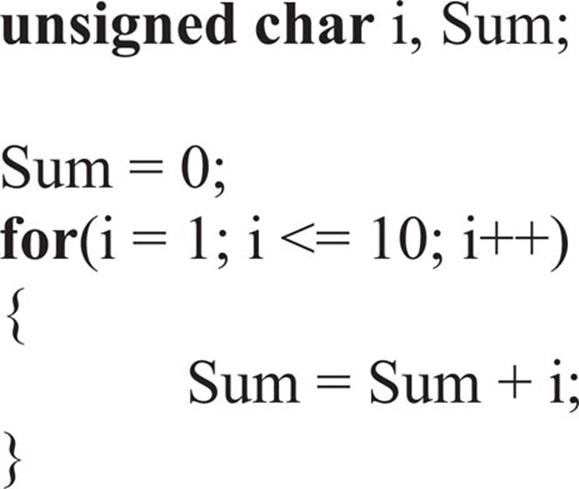
Example 5.4
Write the program code using the for statement to calculate the sum of integer numbers from 1 to 10. Store the result in an integer variable called Sum.
Solution 5.4
The required program code is given below:
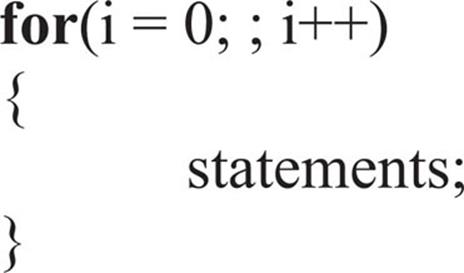
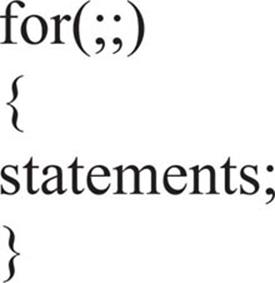
All the parameters in a for loop are optional and can be omitted if required. For example, if the condition expression (middle expression) is omitted, it is assumed to be always TRUE. This creates an endless loop. An example is given below where the loop never terminates and the value of i is incremented by 1 at each iteration:
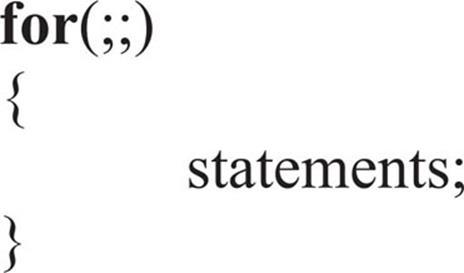
An endless loop can also be created if all the parameters are omitted as is in the following example:
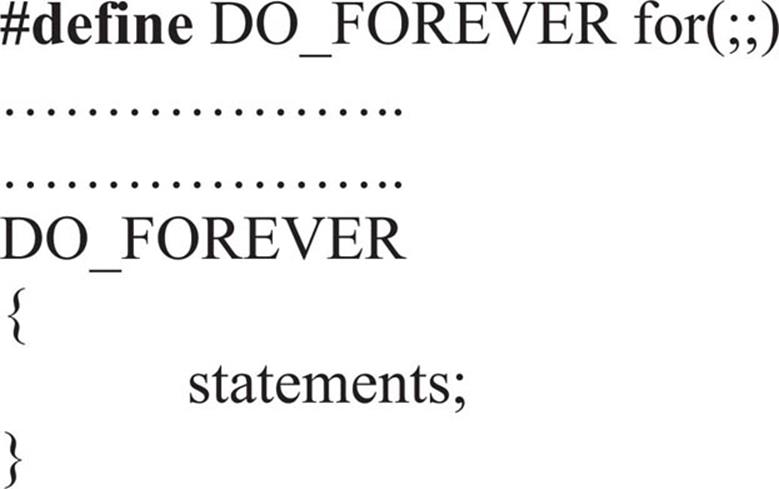
Endless loops are used frequently in microcontroller programs. An example of creating an endless loop using a preprocessor command and a for statement is given in the following example:
Example 5.5
Write the program code to create an endless loop using a for statement. Create a macro called DO_FOREVER to implement the loop.
Solution 5.5
The required program code is given below:
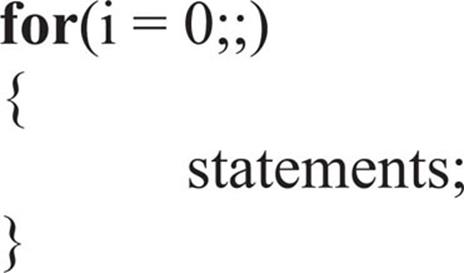
If we omit the second and third parameters of a for loop, then the loop repeats endless as in the earlier example, but the value of the initial loop counter never changes. An example is given below where the value of i is always 0:
for loops can be nested such that in a two-level loop the inner loop is executed for each iteration of the outer loop. Two-level nested loops are commonly used in matrix operations, such as adding two matrices and so on. A two-level nested for loop is given below. In this example, the statements in the inner loop are executed 100 times:

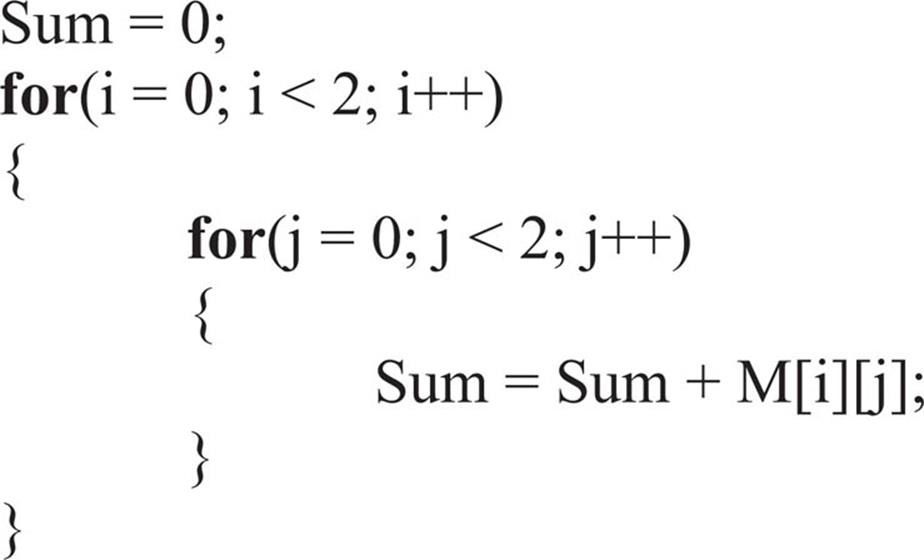
An example nested loop to add all the elements of a 2 × 2 matrix M is given below.
Example 5.6
Write the program code using for loops to add elements of a 2 × 2 matrix called M.
Solution 5.6
The required program code is given below:
while statement
The while statement is another statement that can be used to create loops in programs. The format of this statement is:
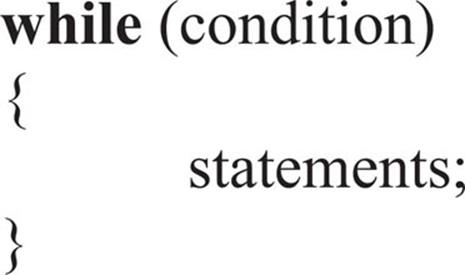
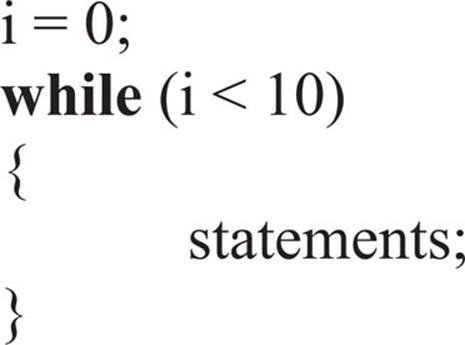
Here, the loop enclosed by the curly brackets is executed as long as the specified condition evaluates to TRUE. Notice that if the condition is FALSE on entry to the loop, then the loop never executes. An example is given below where the statements inside thewhile loop execute 10 times:

Here, at the beginning of the loop i is equal to 0, which is less than 10 and therefore the loop starts. Inside the loop, i is incremented by 1. The loop terminates when i becomes equal to 10. It is important to realise that the condition specified at the beginning of the loop should be satisfied inside the loop; otherwise, an endless loop is formed.
In the following example, i is initialised to 0, but is never changed inside the loop and is therefore always less than 10. Thus, this loop will never terminate:
It is possible to have a while loop with no statements. Such a loop is commonly used in microcontroller applications to wait for certain action to be completed, for example, to wait until a button is pressed. An example is given below where the program waits until variable CLK becomes 0:
while(CLK == 1);
or
while(CLK);
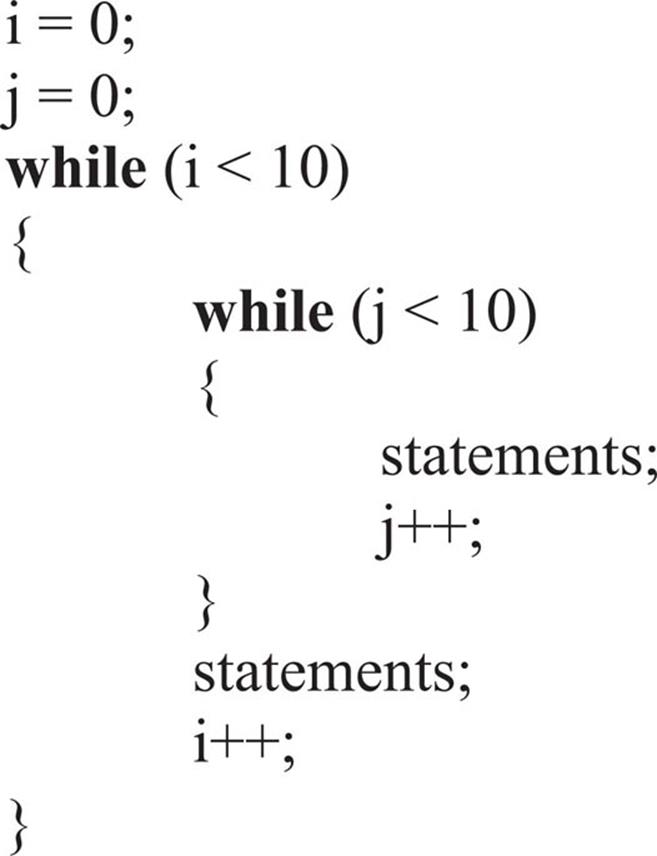
while loops can be nested inside one another. An example is given below:
do while statement
The do while statement is similar to the while statement, but here the condition for the existence of the loop is at the end of the loop. The format of the do while statement is:
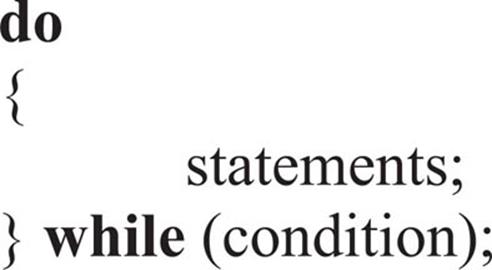
The loop executes as long as the condition is TRUE, that is, until the condition becomes FALSE. Another important difference of the do while loop is that because the condition is at the end of the loop, the loop is always executed at least once. An example of thedo while loop is given below where the statements inside the loop are executed 10 times:
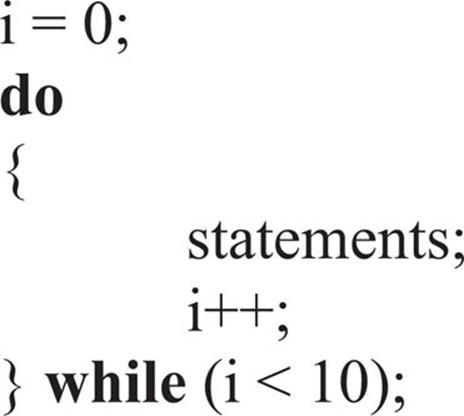
The loop starts with i = 0, and the value of i is incremented inside the loop. The loop repeats as long as i is less than 10, and it terminates when i becomes equal to 10.
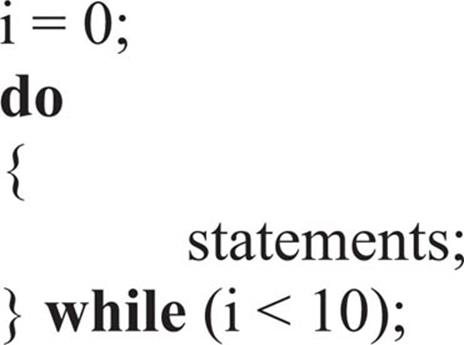
As with the while statement, an endless loop is formed if the condition is not satisfied inside the loop. For example, the following do while loop never terminates:
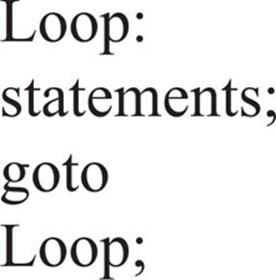
goto statement
The goto statement can be used to alter the flow of control in a program. Although the goto statement can be used to create loops with finite repetition times, use of other loop structures such as for, while, and do while is recommended. The use of the gotostatement requires a label to be defined in the program. The format of the goto statement is:
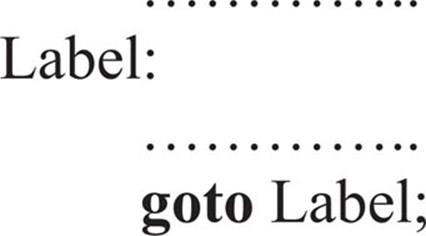
The label can be any valid variable name, and it must be terminated with a colon character. The following example shows how the goto statement can be used in a program to create a loop to iterate 10 times:
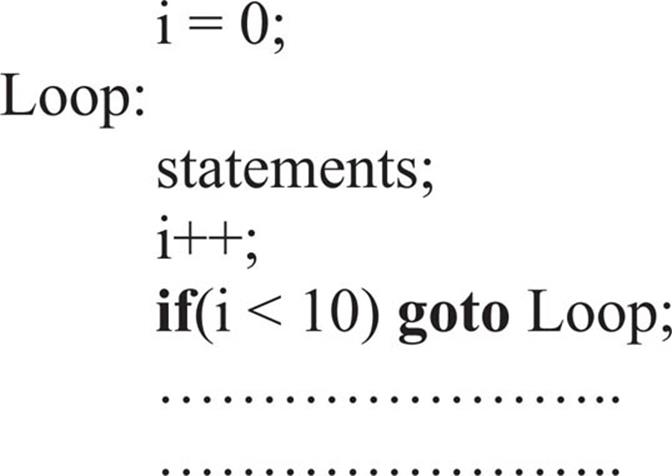
Here, label Loop identifies the beginning of the loop. Initially i = 0 and is incremented by 1 inside the loop. The loop continues as long as i is less than 10. When i becomes equal to 10, program terminates and continues with the statement just after the gotostatement.
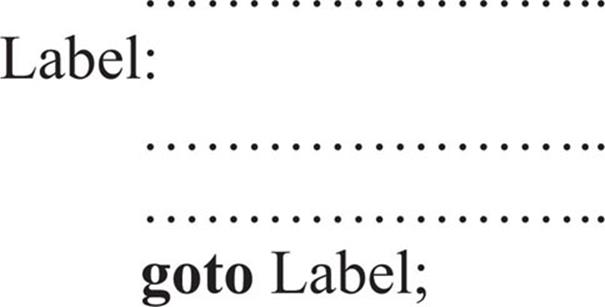
Unconditional modification of flow of control
As described above, the goto statement is used to unconditionally modify the flow of control in a program. Although use of the goto statement is not recommended as it may give rise to unreadable and unmaintainable code, its general format is as follows:
Creating infinite loops
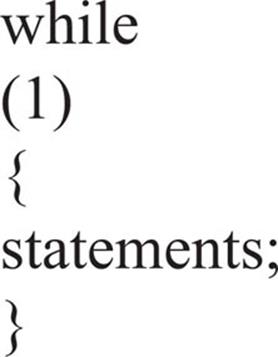
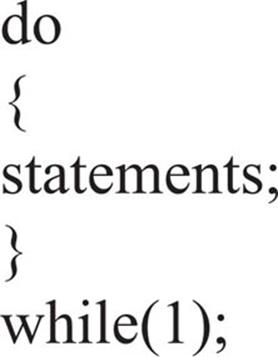
As discussed earlier in this chapter, infinite loops are commonly used in microcontroller-based applications. Such loops can be created using all of the flow control statement we have seen. Table 5.7 summarises the ways that an infinite loop can be created.
Table 5.7
Methods of creating an infinite loop.
|
for Loop |
while Loop |
do while Loop |
goto Loop |
|
|
|
|
|
Premature termination of a loop
There are applications where we may want to terminate a loop prematurely, that is, before the loop-terminating condition is satisfied. The break statement can be used for this purpose. An example is given below where the for loop is terminated when the loop counter i becomes equal to 10:
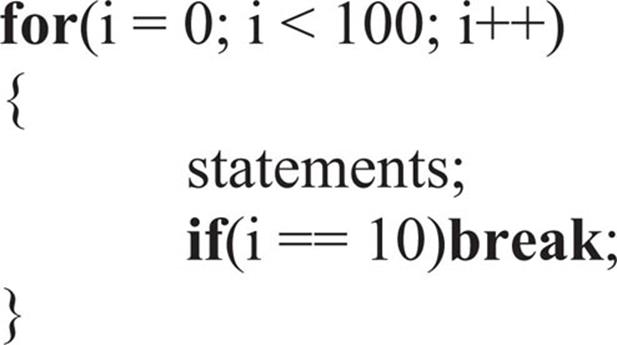
Another example is given below where the while statement is used to create the loop:
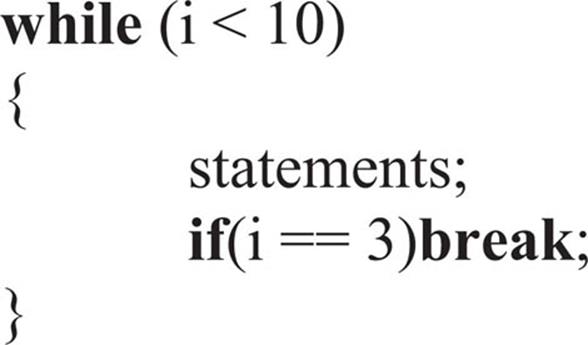
Skipping an iteration
The continue statement is used to skip an iteration inside a loop. This statement, rather than terminating a loop, forces a new iteration of the loop to begin, by skipping any statements left in that iteration. An example is given below using the for loop where iteration 3 is skipped:

5.4. Functions
It is widely accepted that a large program should, wherever possible, be expressed in terms of a number of smaller, separate functions. Each function should be a self-contained section of the code written to perform a specific task. Such an approach makes the programming, and more importantly the testing and maintenance of the overall program, much easier. For example, during program development, each function can be developed and tested independently. When the individual functions are tested and working, they can be included in the overall program. The main program can be a few lines long, and can consist of function calls to carry out the required operations.
In general, most functions perform some tasks and then return data to the calling program. It is not however a requirement that a function must return data. Some functions do only certain tasks and do not return any data. For example, a function to turn on an LED is not expected to return any data.
5.4.1. Functions in C Language
In C language, the format of a function is as follows:

At the beginning of a function declaration, we first declare the data type to be returned by the function. If the function is not expected to return any data, the keyword void should be inserted before the function name. Then, we specify the unique name of the function. A function name can be any valid C variable name. This is followed by a set of brackets where function parameters are specified, separated by commas. Some functions may not have any parameters, and empty brackets should be used while declaring such functions. The body of the function contains the code to be executed by the function, and this code must be enclosed within a pair of curly brackets.
An example function declaration with the name INC is shown below. This function receives a parameter of type int, multiplies the value of this parameter by 2, and then returns the result to the calling program:
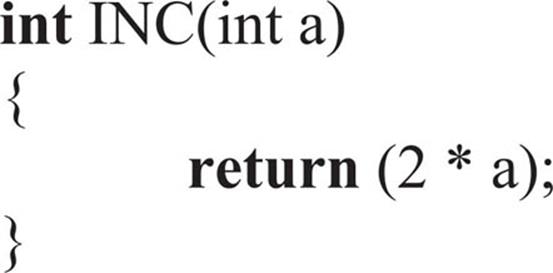
Notice that the keyword return must be used if it is required to return value to the calling program. The data type of the returned number must match with the data type specified before the function name.
The above function can be called from a program as follows:
z = INC(x);
which will increment the value of variable x by 1. Notice that the number of parameters supplied by the calling statement must match with the number of parameters the function expects. Also, the variables used in a function are local to the function and do not have any connection with variables with the same name in the main program. As a result of this, variable names used in the parameters do not have to be same as the names used while calling the function.
If a function is not expected to return any value, then the return statement can be omitted. In such an application, the function will automatically return to the calling program when it terminates. An example function with no return data is given below. This function simply sets LED1 to 1:
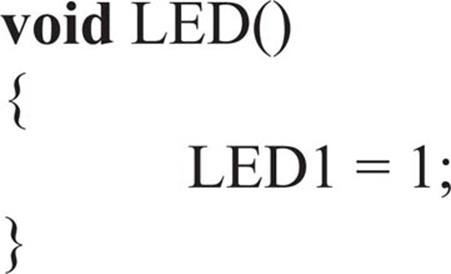
void functions are called with no parameters:
LED();
Although functions are usually declared before the main program, this is not always the case as we shall see later.
Some example programs are given below to illustrate how functions may be used in main programs.
Example 5.7
Write a program to calculate the area of a circle whose radius is 3.5 cm. The program should call a function named Area_Of_Circle to calculate and return the area. The radius of the circle should be passed as a parameter to the function.
Solution 5.7
The area of a circle with radius r is given by:
![]()
Since the radius and the area are floating point numbers, the function type and the parameter must be declared as float.
The required function is shown in Figure 5.5. This function is used in a main program as shown in Figure 5.6. Notice that comments are used throughout the program to clarify the operation of the program. The function is called with the parameter set to 5.6 to calculate the area of the circle. Notice that an endless loop is formed at the end of the program using the while(1) statement. This is because it is not required to repeat the main program.
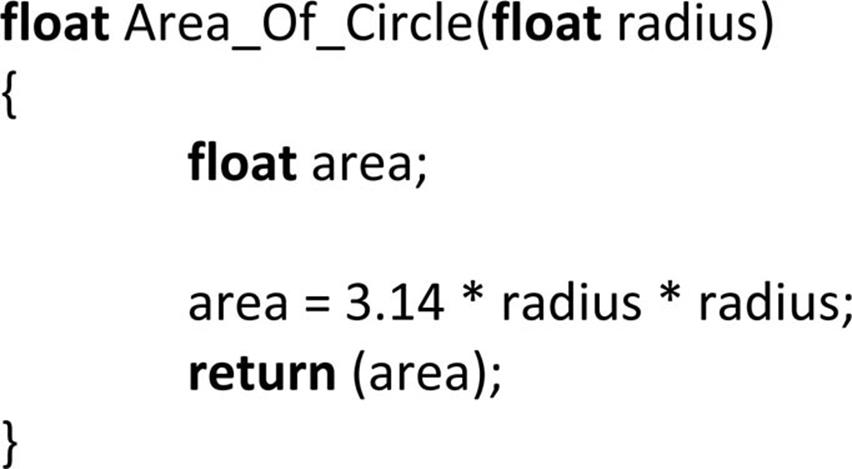
FIGURE 5.5 Function to Calculate the Area of a Circle
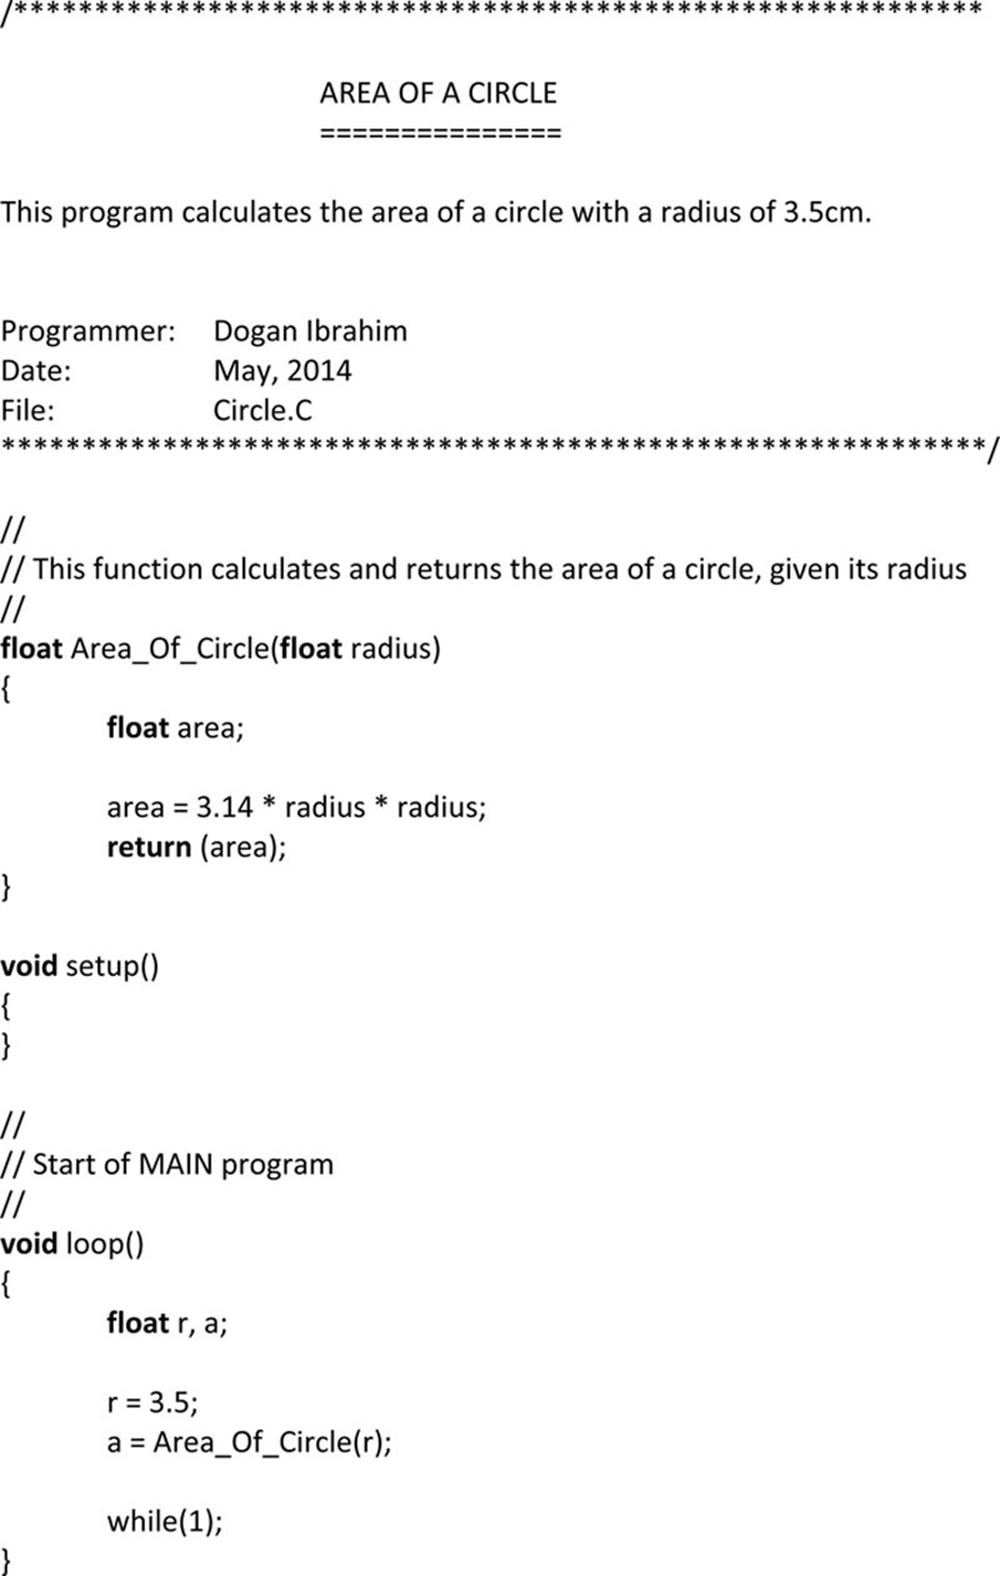
FIGURE 5.6 Program to Calculate the Area of a Circle
Example 5.8
Write a program to calculate the area and circumference of a rectangle whose sides are 2.4 and 6.5 cm. The program should call functions named Area_Of_Rectangle and Circ_Of_Rectangle to calculate and return the area and the circumference of the rectangle, respectively.
Solution 5.8
The circumference and the area of a rectangle with sides a and b are given by:
![]()
![]()
Since the inputs and outputs are floating point numbers, we shall be declaring the variable as float.
The required functions are shown in Figure 5.7. These functions are used in a main program as shown in Figure 5.8. Notice that comments are used throughout the program to clarify the operation of the program. The function is called with the sides of the rectangle set to 2.4 and 6.5 cm.
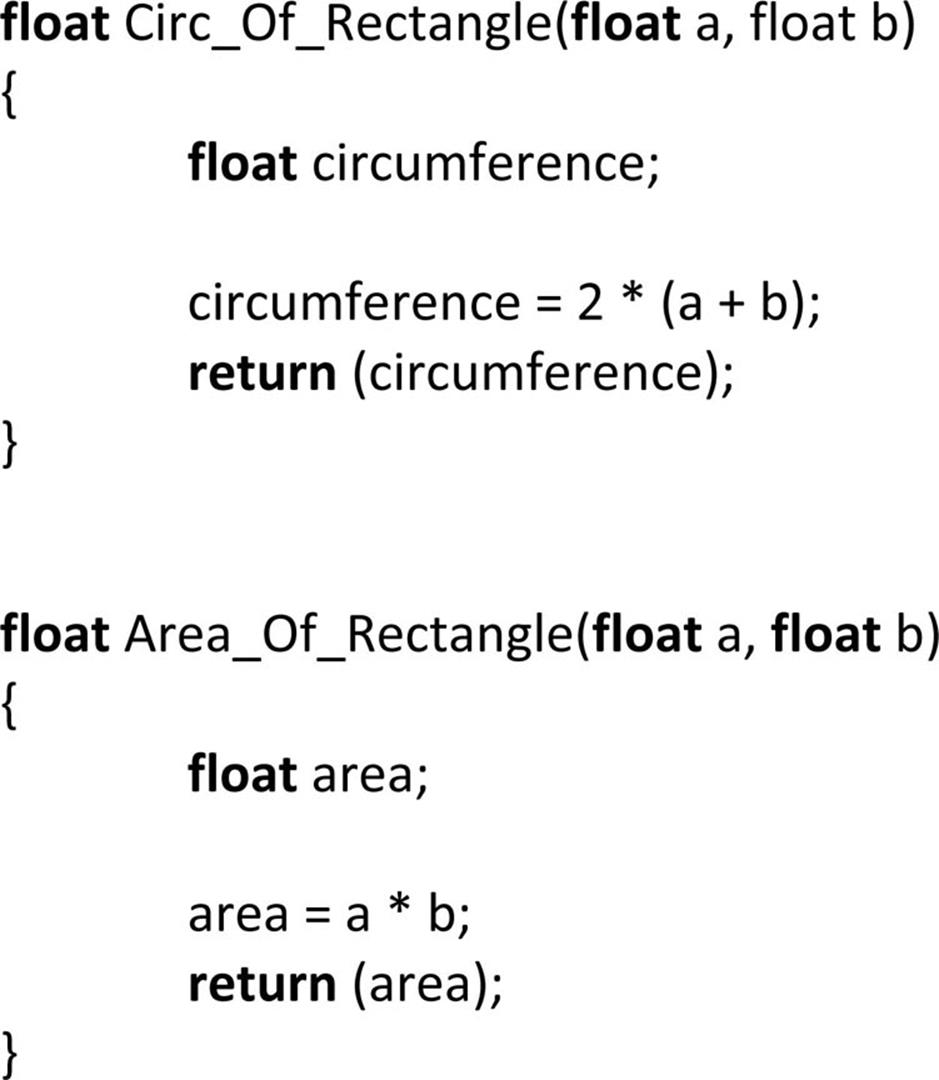
FIGURE 5.7 Function to Calculate the Circumference and Area of a Rectangle
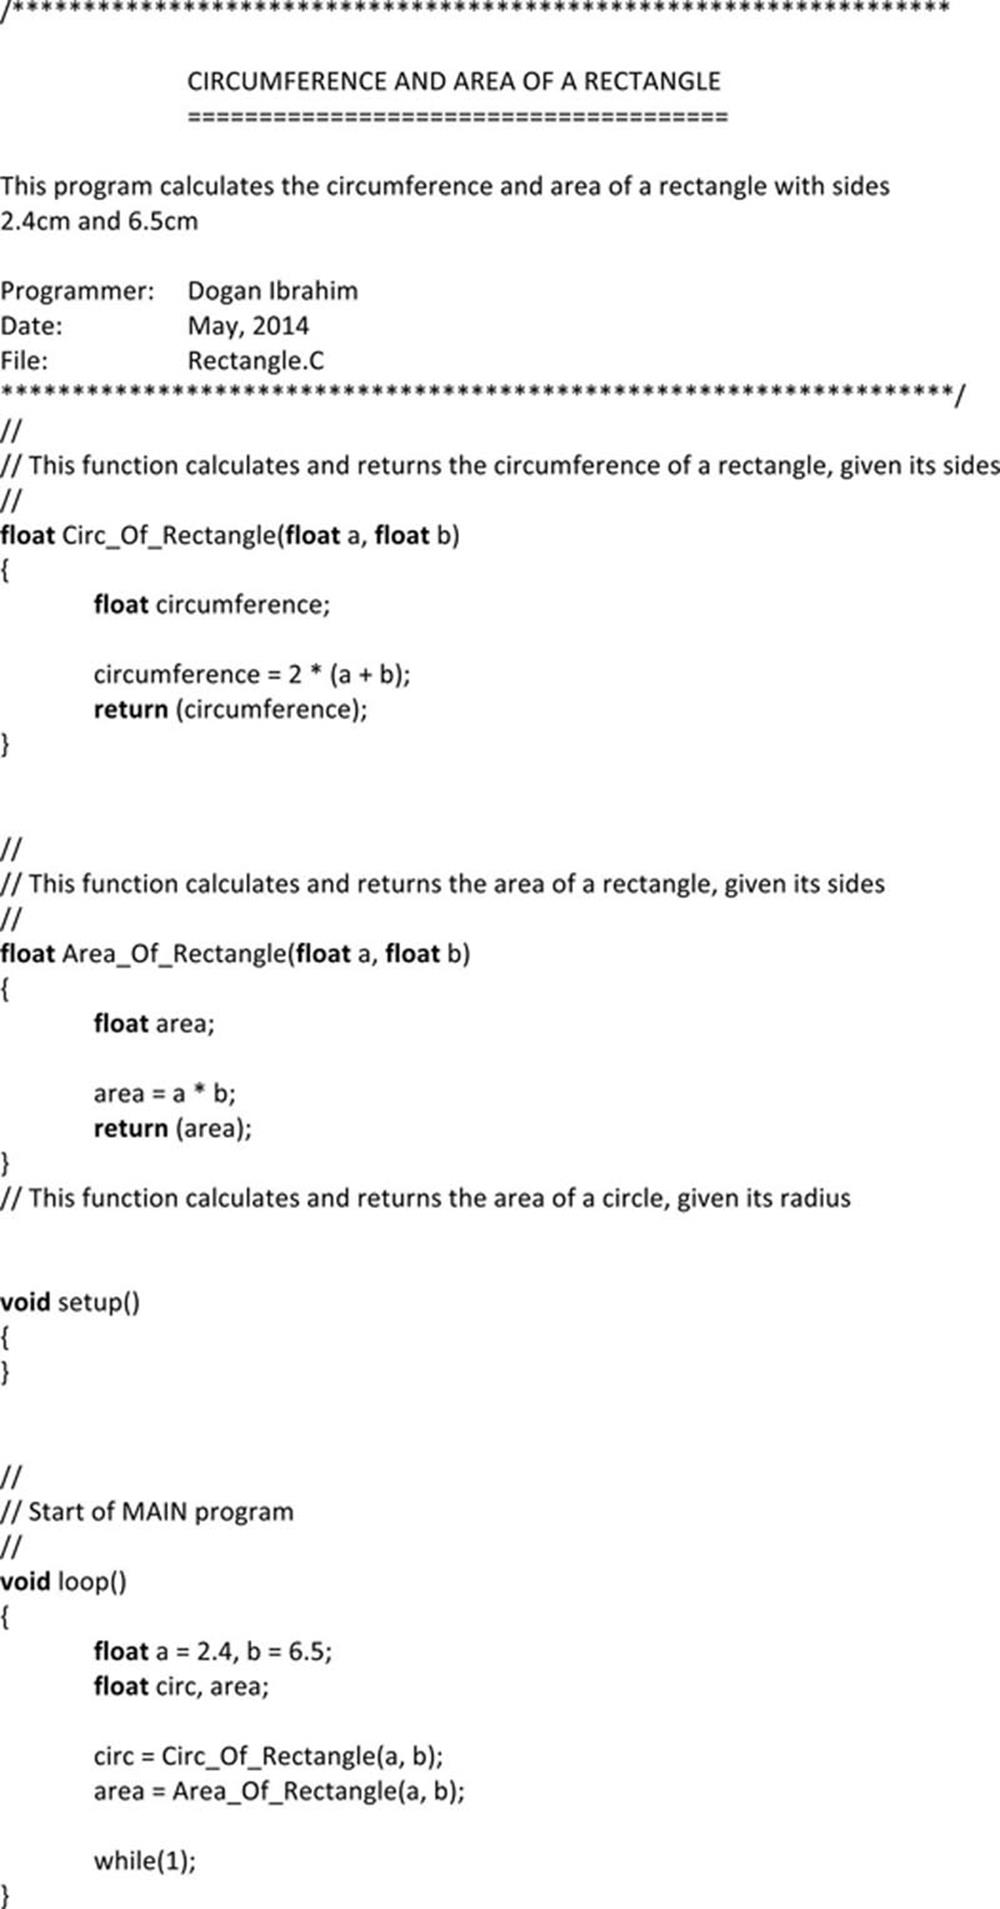
FIGURE 5.8 Program to Calculate the Circumference and Area of a Rectangle
Example 5.9
Write a function called HEX_CONV to convert a single-digit hexadecimal number “A” to “F” to decimal integer. Use this function in a program to convert hexadecimal “E” to decimal.
Solution 5.9
The required function code is shown in Figure 5.9. The hexadecimal number to be converted is passed as a parameter to the function. A switch statement is used in the function to convert and return the given single-digit hexadecimal number to decimal. The main program listing is given in Figure 5.10. Notice that hexadecimal number to be converted is passed as a parameter when calling the function HEX_CONV.
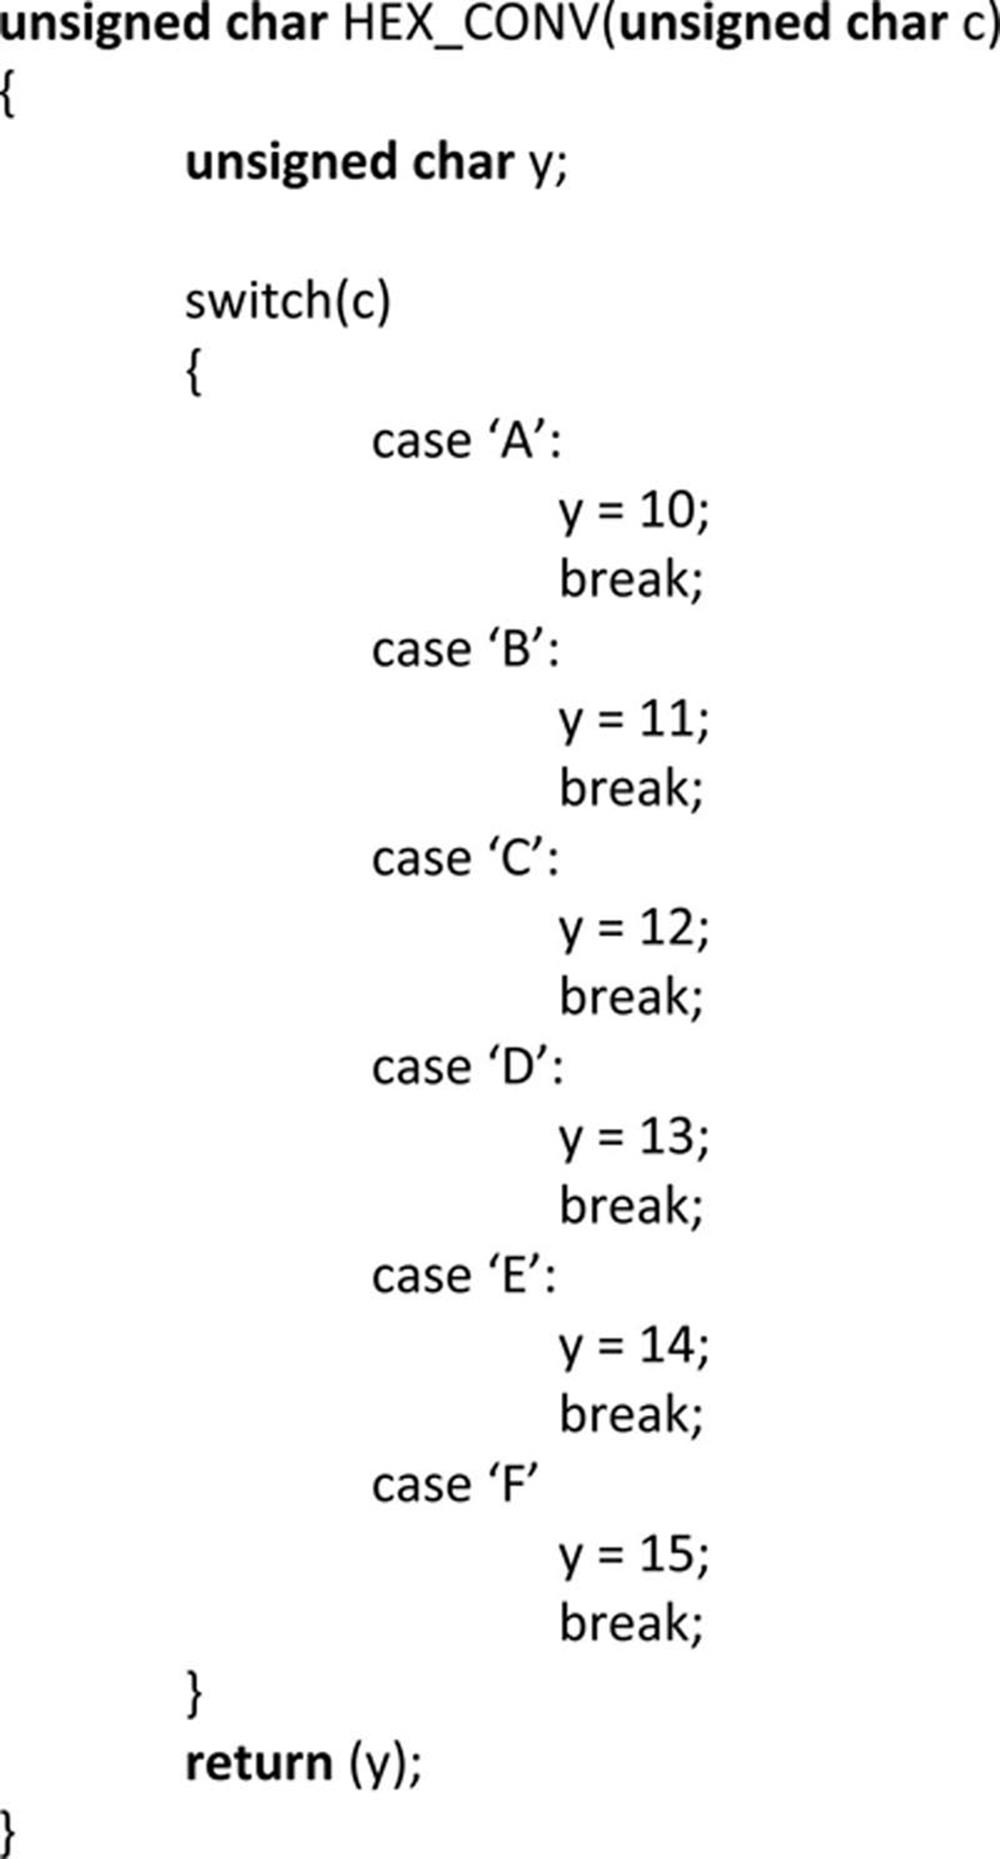
FIGURE 5.9 Function to Convert Hexadecimal to Decimal
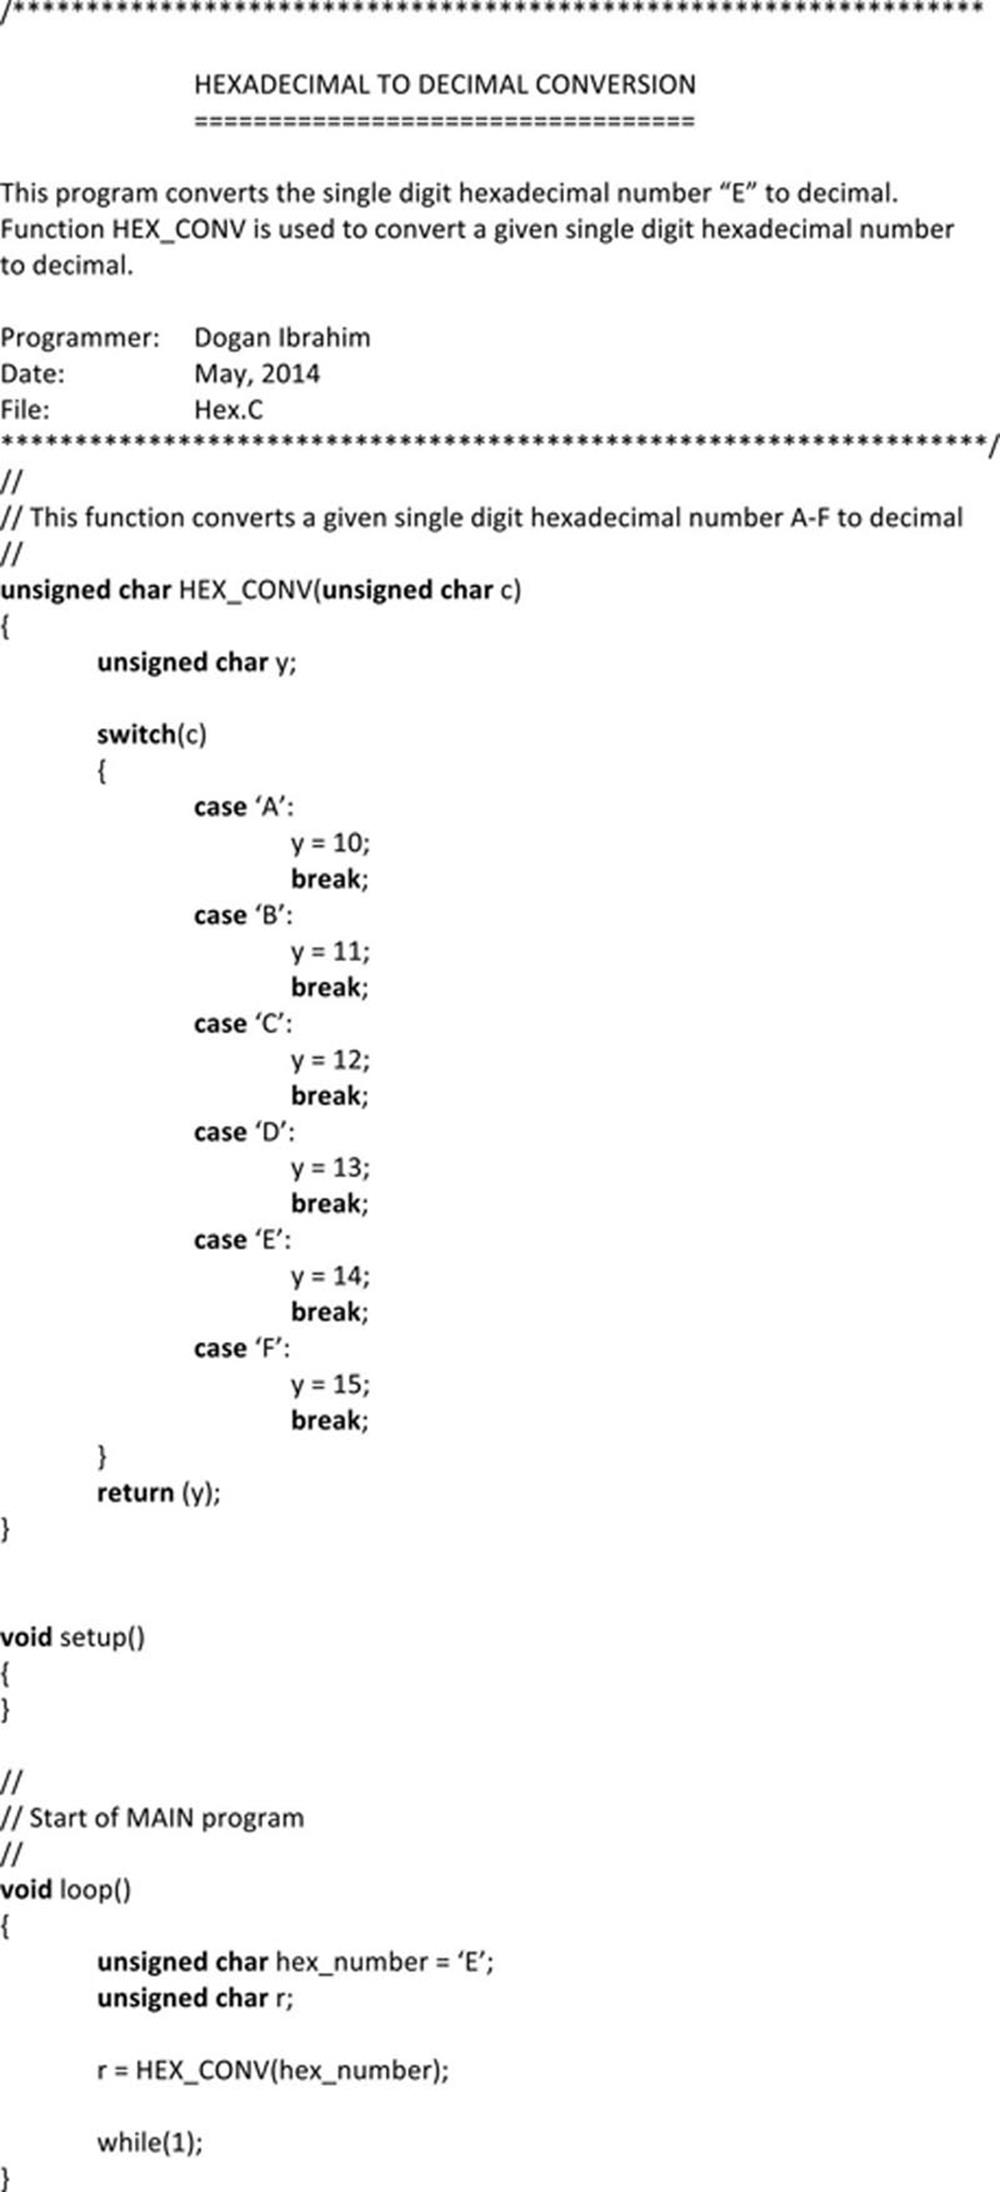
FIGURE 5.10 Program to Convert Hexadecimal Number “E” to Decimal
5.4.2. Passing Parameters to Functions
Functions are the building blocks of programs where we divide a large program into manageable smaller independent functions. As we have seen earlier, functions generally have parameters supplied by the calling program. There are many applications where we may want to pass arrays to functions and let the function carry out the required array manipulation operations.
Passing single elements of an array to a function is simple, and all we have to do is specify the required elements when calling the function. In the following statement, the second and third elements of array A are passed to a function called Sum, and the result returned by the function is assigned to variable b:
b = Sum(A[1], A[2]);
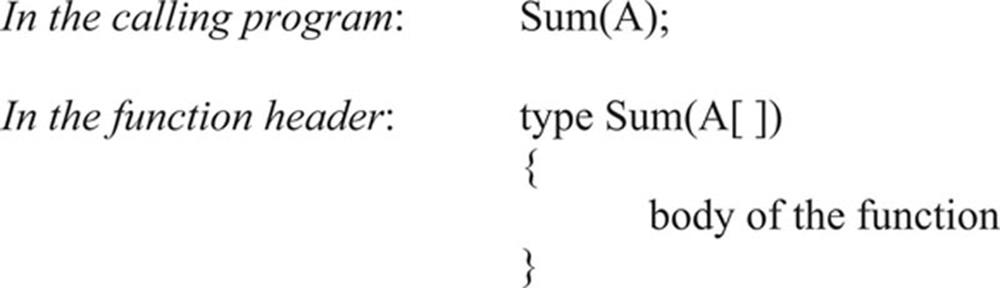
Passing an array by reference
In most array-based operations, we may want to pass an entire array to a function. This is normally done by specifying the address of the first element of the array in the calling program. Since the address of the first element of an array is same as the array name itself, we can simply specify the name of the array. In the function declaration, we have to specify the array name with a set of brackets where the size of the array is not specified. This way, all the elements of the array will be available to the function. Notice that here we are passing the entire array by reference, which means that the original array elements can be modified inside the function.
The following statements show how the entire array called A is passed to a function called Sum:
Some complete examples are given below.
Example 5.10
Write a program to store numbers 1–10 in an integer array called A. Then, call a function to calculate and return the sum of all the array elements.
Solution 5.10
The required program listing is shown in Figure 5.11. In the main program, a for loop is used to store integer numbers 1–10 in an array called A. Then, function Sum is called to calculate and return the sum of all the array elements. The returned value is stored in variable Sum_Of_Numbers. The array is passed to the function by specifying its starting address, that is, its name.
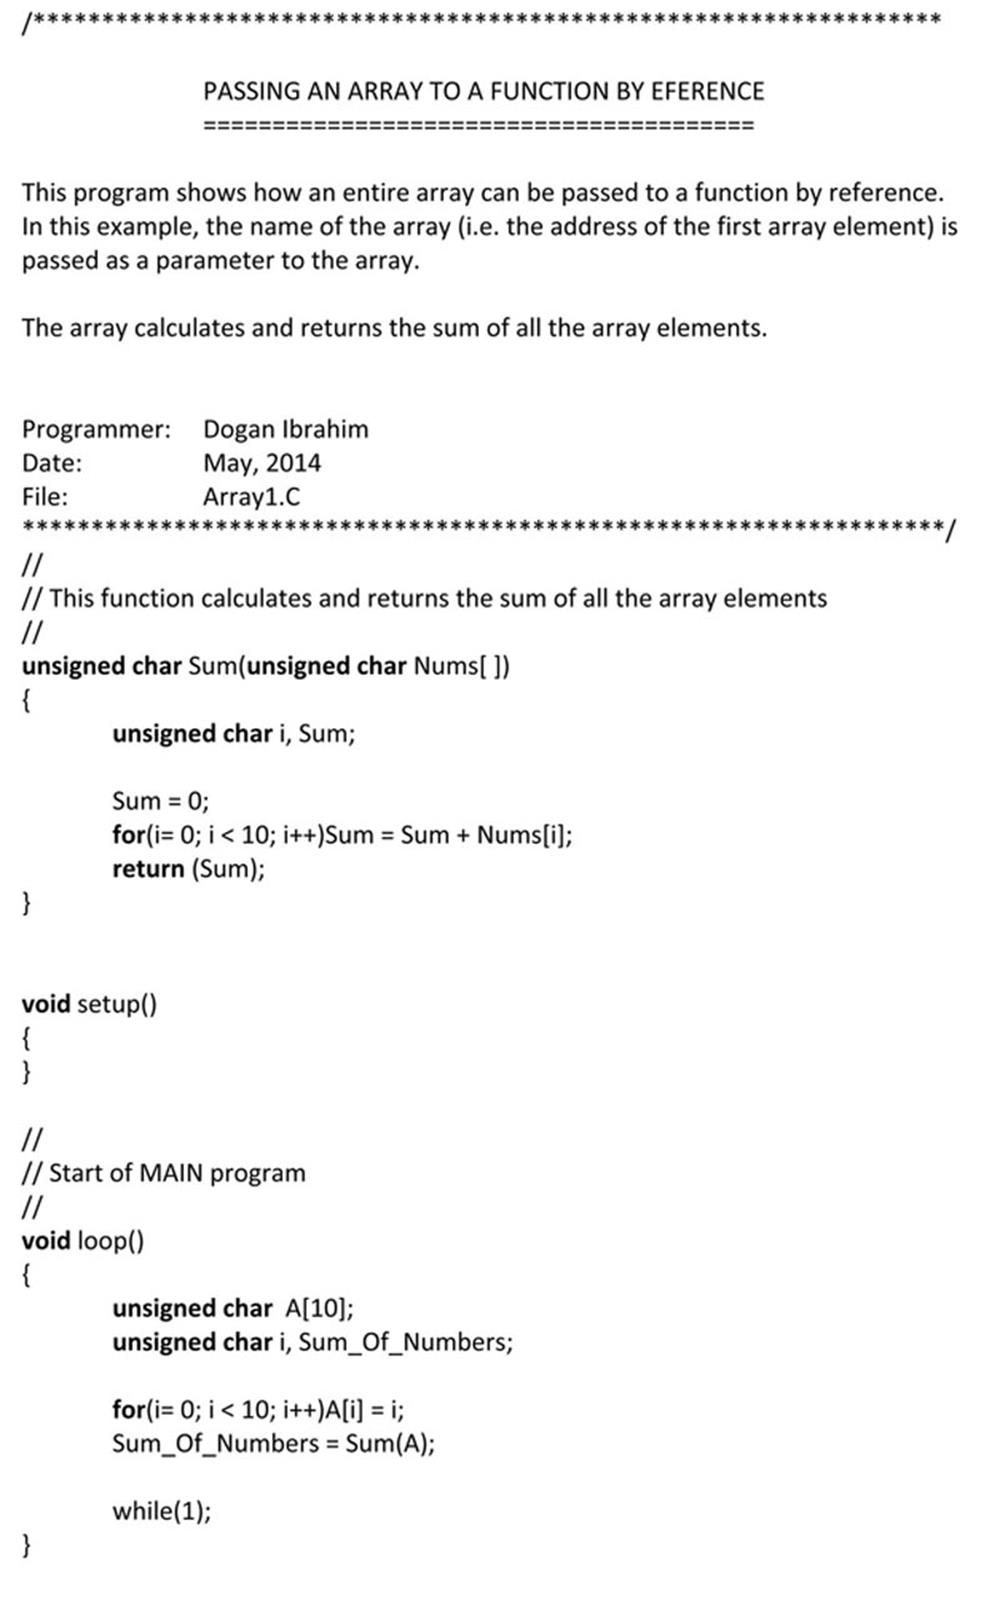
FIGURE 5.11 Program Passing an Array by Reference
Example 5.11
Repeat Example 5.10, but this time define the array size at the beginning of the program using the #define preprocessor operator and then pass both the array and its size to the function.
Solution 5.11
The required program listing is shown in Figure 5.12. Here, the array size is defined to be 50. Notice also that the data types are changed to unsigned integer as the sum could be larger than 255.
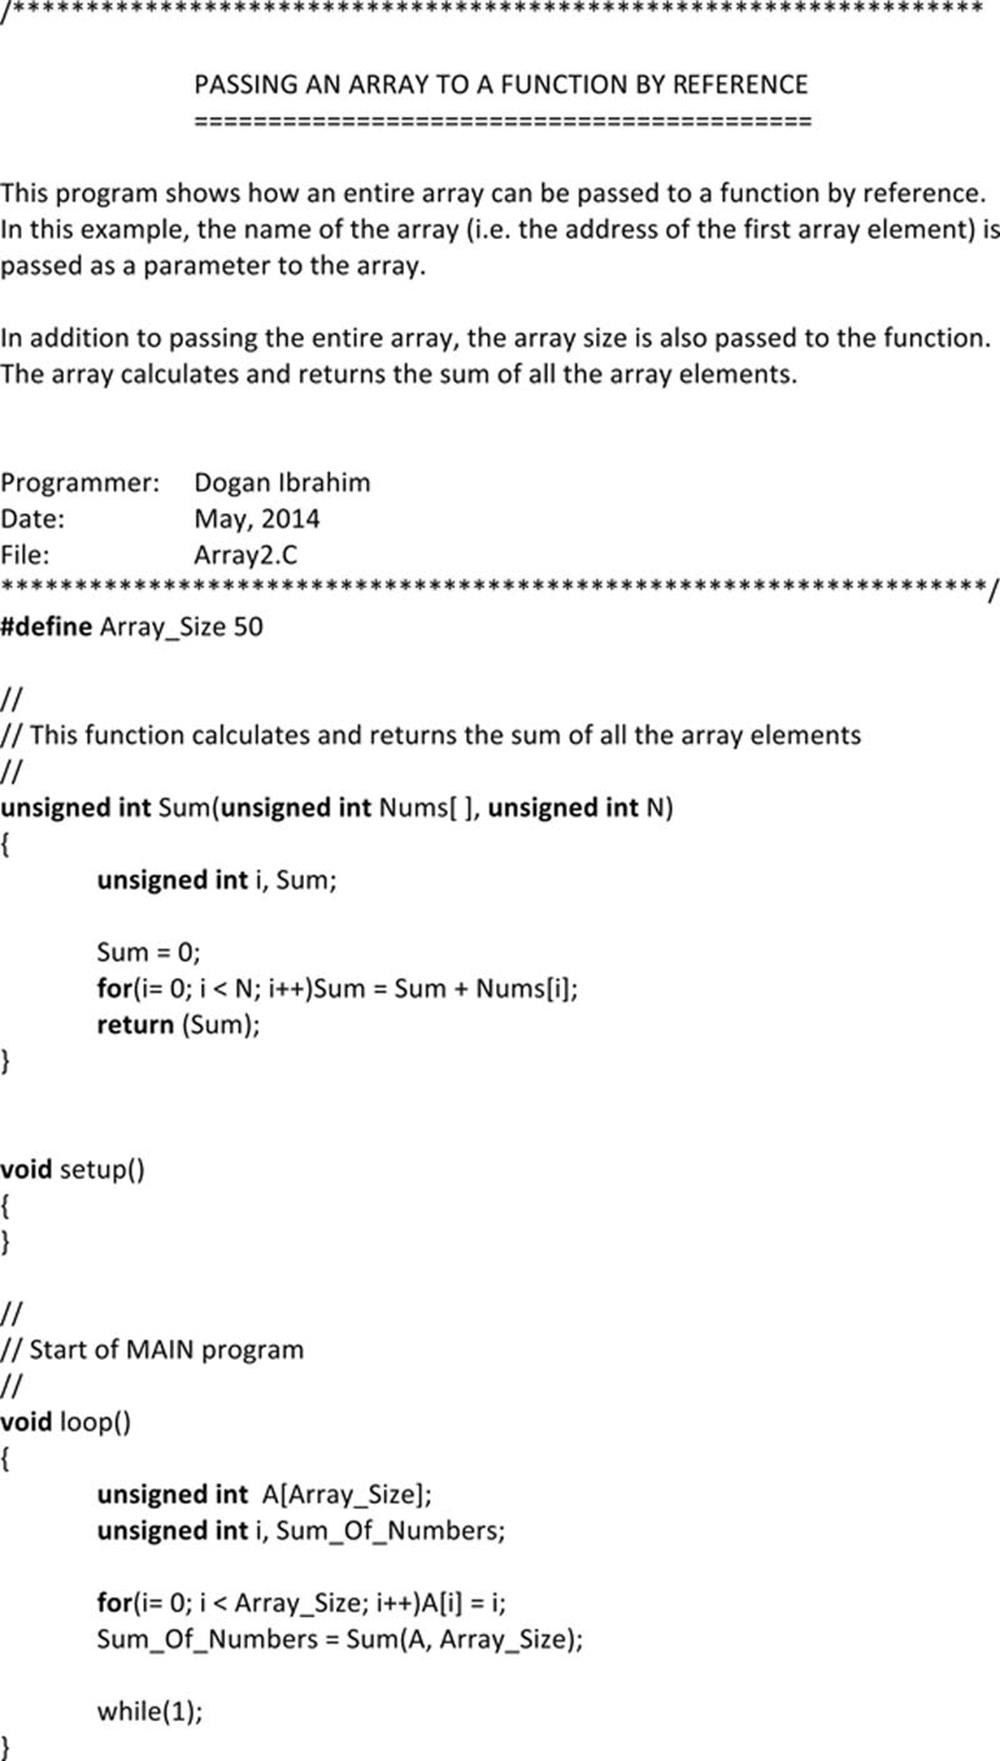
FIGURE 5.12 Another Program Passing an Array by Reference
Passing an array using pointers
It is also possible to pass an entire array to a function using pointers. In this method, the address of the array (i.e., its name) is specified in the calling program. In the function header, a pointer declaration is used and the elements of the array are manipulated using pointer operations as we have seen earlier. An example is given below to illustrate the concept.
Example 5.12
Repeat Example 5.11, but this time pass the array to the function using pointers.
Solution 5.12
The required program listing is given in Figure 5.13. Initially, array A is loaded with integer numbers 0–10. Then, function Sum is called to calculate and return the sum of all array elements. The address of array A is passed in the calling program by specifying its name. In the function header, a pointer declaration is made so that the elements of the array can be accessed in the function body using pointer operations.
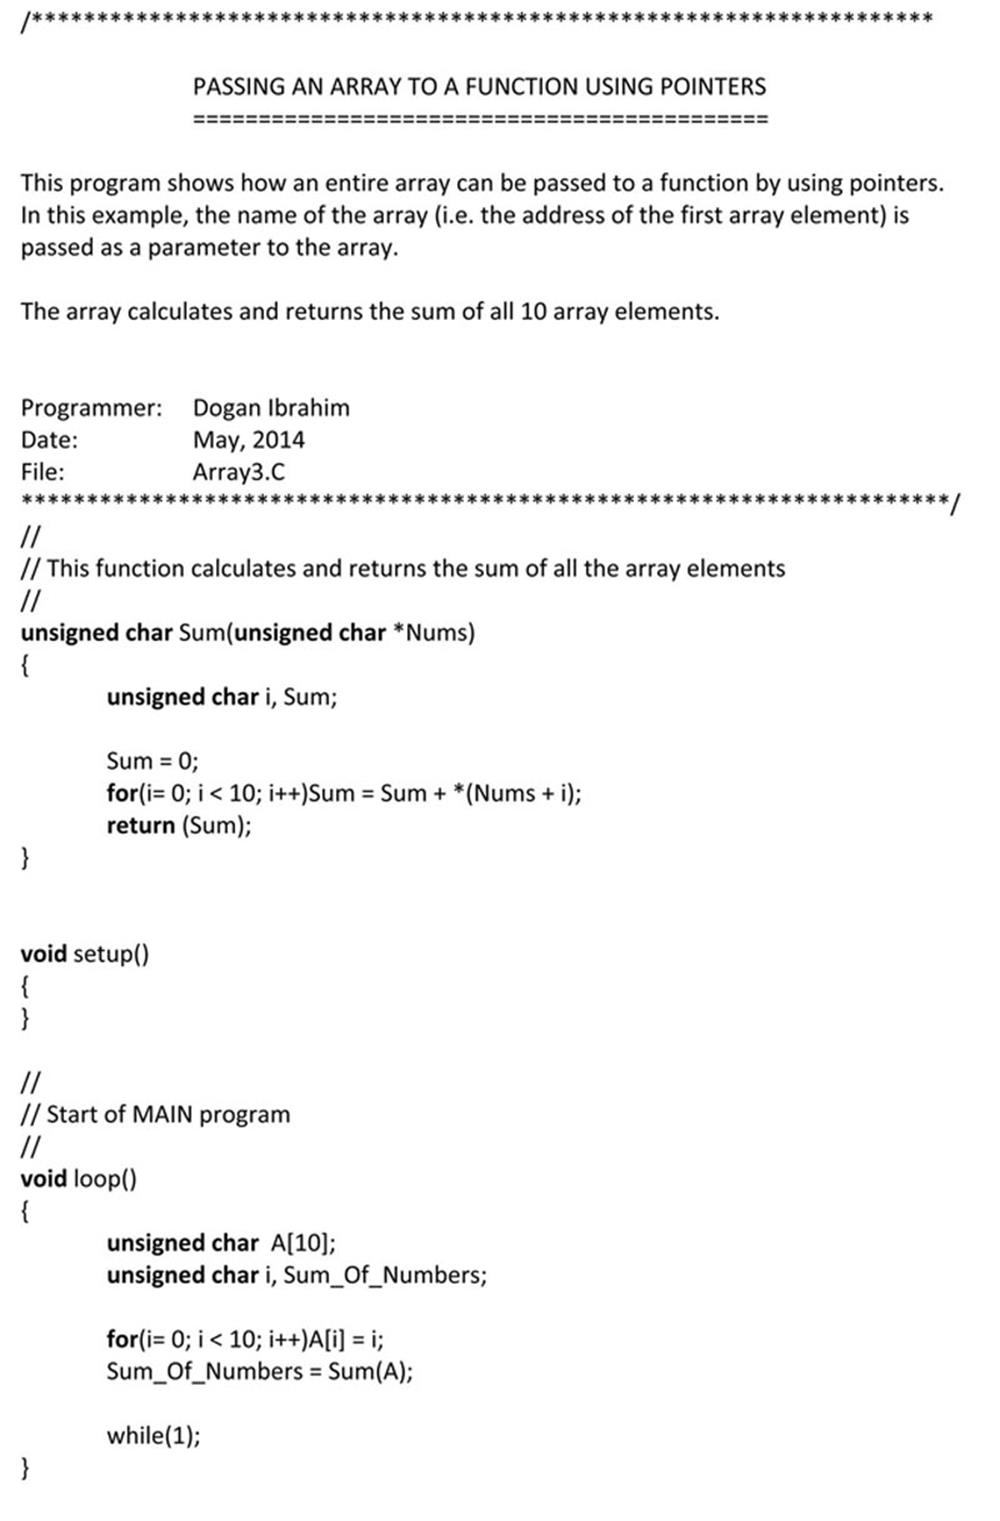
FIGURE 5.13 Program Passing an Array Using Pointers
Passing a string using pointers
As we have seen before, a string is a character array, terminated with a NULL character. An array can be passed to a function using pointers as in the earlier example. An example is given below to illustrate the concept.
Example 5.13
Write a program to declare a string with the text Learning to program in C in the main program. Then, call a function to calculate the number of times character a is used in the string and return this number to the main program.
Solution 5.13
The required program listing is given in Figure 5.14. The text is stored in a string called Txt. This string and the character to be matched are passed to a function called COUNT. Pointer operations are used inside the function to find out how many times the required character is used in the string. This count is returned to the main program and stored in variable Sum. Notice that in the main program the string is declared using a character array where the size of the array is automatically initialised by the compiler:
unsigned char Txt[ ] = “Learning to program in C”;
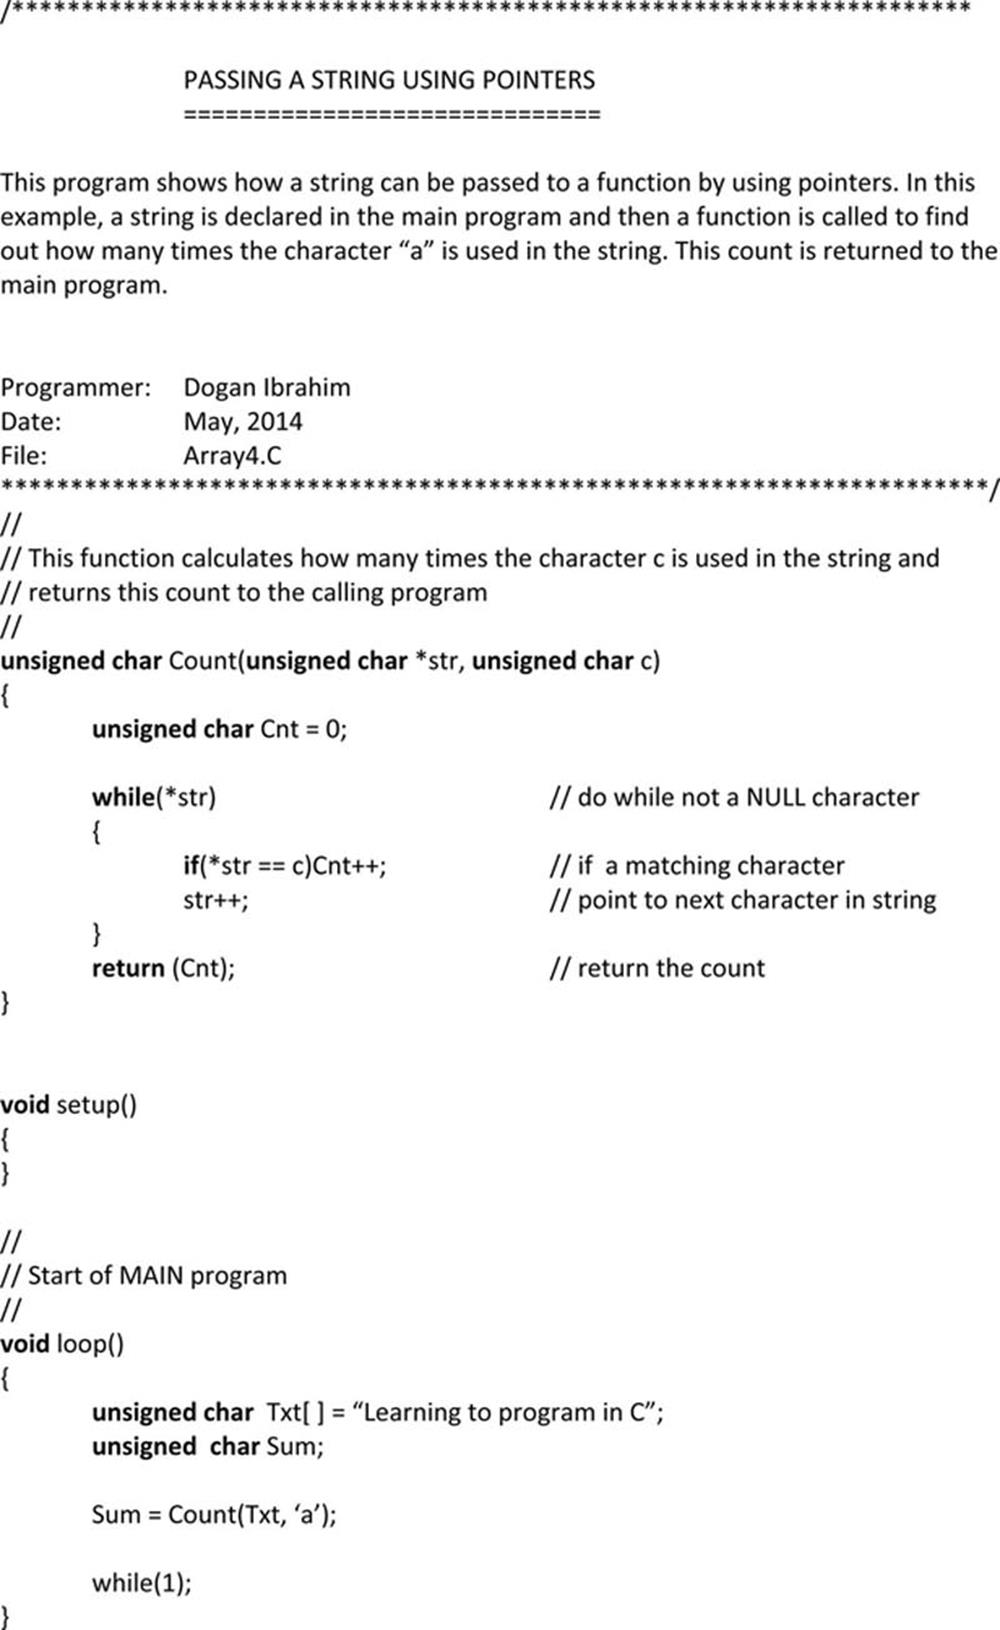
FIGURE 5.14 Passing a String to a Function
We could also have declared the same string using a pointer as:
unsigned char *Txt = “Learning to program in C”;
5.4.3. Passing Variables by Reference to Functions
In C language, when we call a function, the variables in function parameters are passed by value by default. This means that only the values of the variables are passed to the function and these values cannot be modified inside the function. There are applications, however, where we may want to modify the values of the variables passed as parameters. In such applications, we have to pass the parameters by reference. Passing a parameter by reference requires the address of the parameter to be passed to the function so that the value of the parameter can be modified inside the function. It is important to realise that such modifications are permanent and affect the actual variable in the main program that is used while calling the function. In order to pass parameters by reference, we have to use pointers. An example is given below to illustrate the concept of how a parameter can be passed to a function by reference.
Example 5.14
Write a function to receive an integer number and then increment its value by 1. Use this function in a program and pass the value to be incremented to the function by reference.
Solution 5.14
The required function listing is given in Figure 5.15. In the main program, the variable Total is initialised to 10. Function INCR is then called, and the address of Total is passed to the function. The function increments Total by 1. Notice that the function type is declared as void since it does not return any value to the calling program.
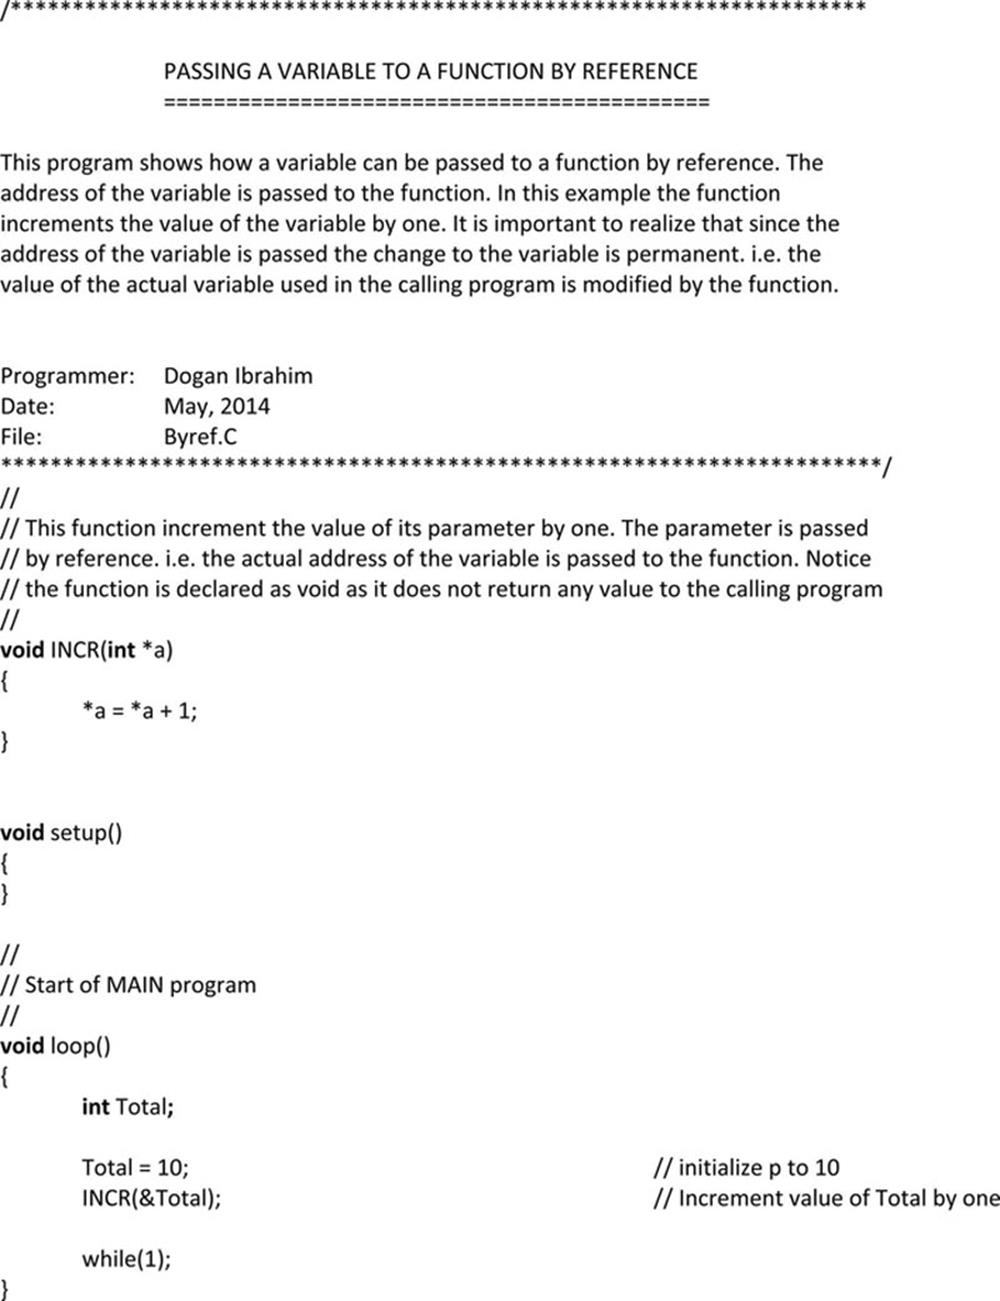
FIGURE 5.15 Passing a Variable by Reference
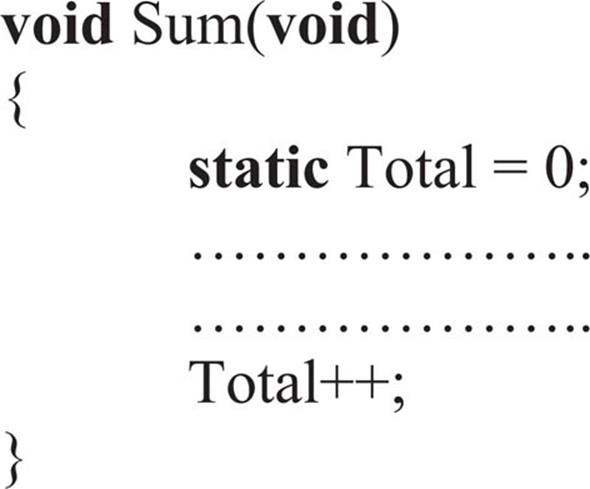
5.4.4. Static Variables in Functions
Normally, the variables used in functions are local to the function and they are re-initialised (usually to 0) when the function is called. There are some applications, however, where we may want to preserve the values of some or all of the variables inside a function declaration. This is done using the static statement. An example function code is given below. Here, variable Total is initialised to 0 using the static keyword. Notice that the variable is incremented by 1 before returning from the function. What happens now is that every time the function is called, variable Total will retain its previous value. Thus, on the second call, Total will be 2, on the third call it will be 3, and so on:
5.4.5. Function Prototypes
If a function is defined after a main program, then it is not visible to the compiler at the time the function is called first time in the main program. The same will happen if there are several functions in a program and a function makes call to another function that is defined at a later point in the program. In order to avoid compilation errors arising because of these compiler visibility issues, we construct function prototypes and declare them at the beginning of the program. A function prototype simply includes a function name and a list of the data types of its parameters. Function prototypes must be terminated with a semicolon. A typical function prototype statement is given below where the function is named Test and it has two integer and one floating point parameters:
int Test(int, int, float);
An example is given below to illustrate how function prototypes can be used in programs.
Example 5.15
Write a function to add two integer numbers and return the result to a calling program. Declare the function after the main program, and use function prototype declaration at the beginning of the program.
Solution 5.15
The required program listing is shown in Figure 5.16. Notice that the function prototype for function Add is declared at the beginning of the program and the function declaration is after the main program is declared.
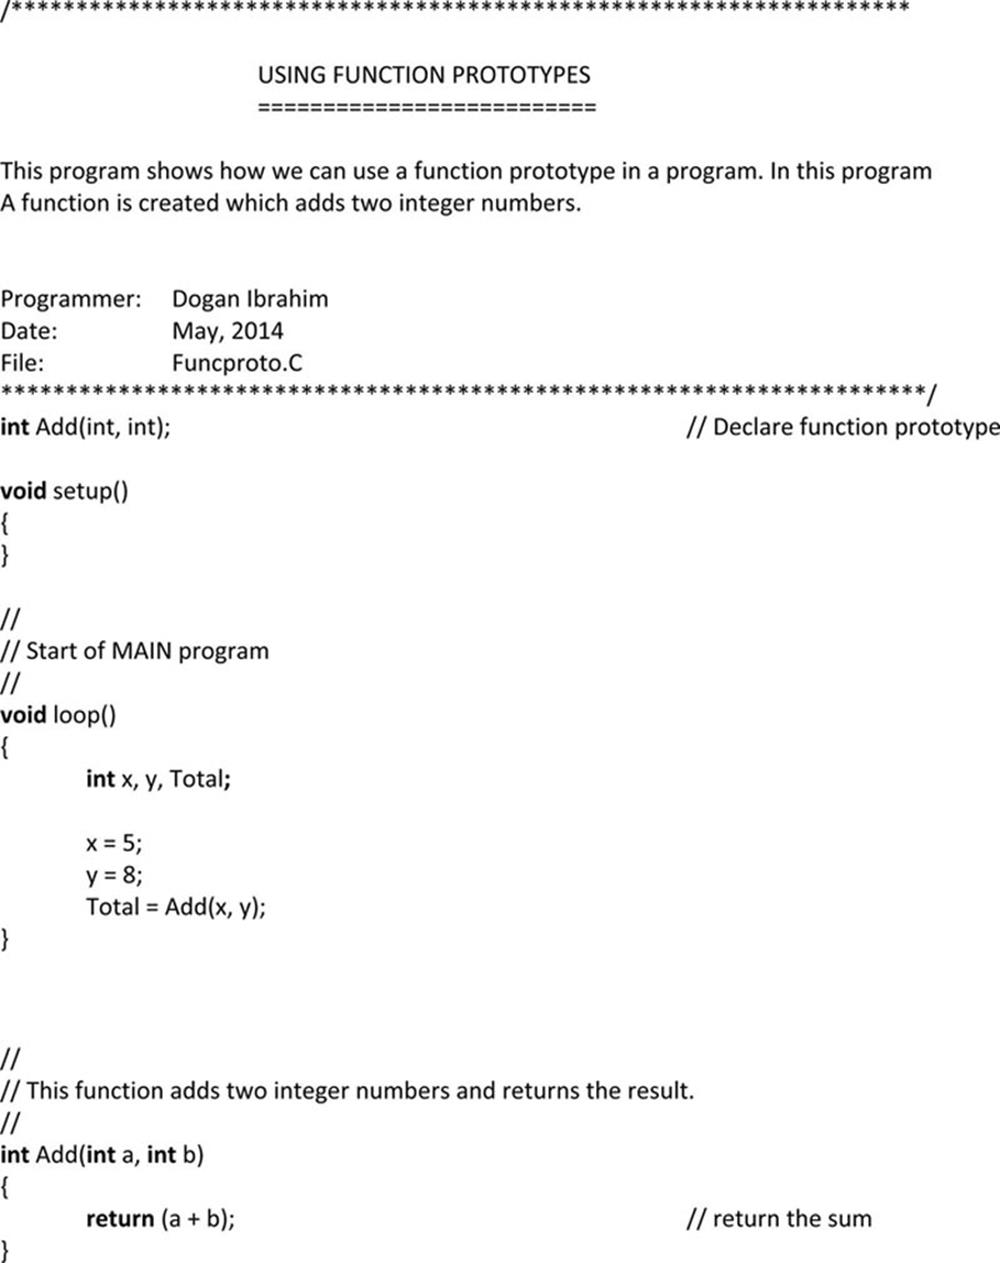
FIGURE 5.16 Declaring a Function Prototype
5.5. Microcontroller-Specific Features
It is important to know some of the microcontroller-specific features of the C language and the chipKIT MX3 development board before developing programs and projects.
5.5.1. Microcontroller Digital Inputs and Outputs
The chipKIT MX3 development board provides 40 general-purpose I/O pins via its Pmod connectors. In addition, two I2C bus pins are provided that are not available as general-purpose I/O pins. All of the I/O pins can be configured as inputs or outputs (analogue pins can only be analogue inputs or digital inputs/outputs).
Each PIC32 microcontroller port is 16-bits wide, and they are numbered A–G (depending on the microcontroller type, some ports may be absent).
The I/O ports are controlled using four registers: TRIS, LAT, PORT, and ODC. These registers are referenced by adding the port name letter to their end. For example, PORTA has registers TRISA, LATA, PORTA, and ODCA.
The TRIS register is used to set the I/O direction of a port pin. Setting a TRIS bit to 0 makes the corresponding port pin an output. Similarly, setting a TRIS bit to 1 makes the corresponding port pin an input.
The LAT register is used to write to a port pin. Reading from this register returns the last value written to the port pin (which may not necessarily be the current state of the port pin).
The PORT register is similar to the LAT register, and writing to this register sets the corresponding port pin as requested. Reading from the PORT register returns the current state of the port.
The ODC register is used to control the output type of a port pin. Setting this register to 0 makes the corresponding port pin a normal output pin (the default). Setting to 1 makes the port pin an open-drain output.
5.5.2. Logical I/O Port Pin Numbers
The MPIDE uses logical pin numbers to identify the I/O ports. These numbers start from 0 and are numbered up consecutively. On the chipKIT MX3, the 40 I/O port pins are numbered as 0–39 on the Pmod connectors. Pmod connector JA pin 1 (JA-01) is assigned I/O pin 0, JA-02 is pin 1, and so on. Table 5.8 shows the logical port pin numbers and the corresponding physical port pin names, organised in logical pin number order. Table 5.9 shows the logical and corresponding physical pin numbers, organised in port name order. Logical port pins 40 and 41 are used for the I2C bus.
Table 5.8
Logical and physical port pin names (in logical pin number order).
|
Logical Pin |
Physical Pin |
Logical Pin |
Physical Pin |
|
0 |
RE00 (JA-01) |
21 |
RB01 (JC-08) |
|
1 |
RE01 (JA-02) |
22 |
RD00 (JC-09) |
|
2 |
RE02 (Ja-03) |
23 |
RD01 (JC-10) |
|
3 |
RE03 (JA-04) |
24 |
RB02 (JD-01) |
|
4 |
RE04 (JA-07) |
25 |
RD02 (JD-02) |
|
5 |
RE05 (JA-08) |
26 |
RD10 (JD-03) |
|
6 |
RE06 (JA-09) |
27 |
RB09 (JD-04) |
|
7 |
RE07 (JA-10) |
28 |
RB12 (JD-07) |
|
8 |
RD09 (JB-01) |
29 |
RD03 (JD-08) |
|
9 |
RF03 (JB-02) |
30 |
RD11 (JD-09) |
|
10 |
RF02 (JB-03) |
31 |
RB13 (JD-10) |
|
11 |
RF06 (JB-04) |
32 |
RG09 (JE-01) |
|
12 |
RD06 (JB-07) |
33 |
RG08 (JE-02) |
|
13 |
RD05 (JB-08) |
34 |
RG07 (JE-03) |
|
14 |
RD04 (JB-09) |
35 |
RG06 (JE-04) |
|
15 |
RD07 (JB-10) |
36 |
RD08 (JE-07) |
|
16 |
RB08 (JC-01) |
37 |
RB05 (JE-08) |
|
17 |
RF05 (JC-02) |
38 |
RB04 (JE-09) |
|
18 |
RF04 (JC-03) |
39 |
RB03 (JE-10) |
|
19 |
RB14 (JC-04) |
42 |
RF00 (LD4) |
|
20 |
RB00 (JC-07) |
43 |
RF01 (LD5) |
Table 5.9
Logical and physical port pin names (in port name order).
|
Port Pins |
Logical Number |
Port Pins |
Logical Number |
|
RB00 (AN0) |
20 (JC-07) |
RD06 |
12 (JB-07) |
|
RB01 (AN1) |
21 (JC-08) |
RD07 |
15 (JB-10) |
|
RB02 (AN2) |
24 (JD-01) |
RD08 |
36 (JE-07) |
|
RB03 (AN3) |
39 (JE-10) |
RD09 |
8 (JB-01) |
|
RB04 (AN4) |
38 (JE-09) |
RD10 |
26 (JD-03) |
|
RB05 (AN5) |
37 (JE-08) |
RD11 |
30 (JD-09) |
|
RB06 (AN6) |
N/A (AN8) |
RE00 |
0 (JA-01) |
|
RB07 (AN7) |
N/A (AN7) |
RE01 |
1 (JA-02) |
|
RB08 (AN8) |
16 (JC-01) |
RE02 |
2 (JA-03) |
|
RB09 (AN9) |
27 (JD-04) |
RE03 |
3 (JA-04) |
|
RB10 (AN10) |
N/A |
RE04 |
4 (JA-07) |
|
RB11 (AN11) |
N/A |
RE05 |
5 (JA-08) |
|
RB12 (AN12) |
28 (JD-07) |
RE06 |
6 (JA-09) |
|
RB13 (AN13) |
31 (JD-10) |
RE07 |
7 (JA-10) |
|
RB14 (AN14) |
19 (JC-04) |
RF00 |
N/A (LD4) |
|
RB15 (AN15) |
N/A |
RF01 |
N/A (LD5) |
|
RC12 |
N/A |
RF02 |
10 (JB-03) |
|
RC13 |
N/A |
RF03 |
9 (JB-02) |
|
RC14 |
N/A |
RF04 |
18 (JC-03) |
|
RC15 |
N/A |
RF05 |
17 (JC-02) |
|
RD00 |
22 (JC-09) |
RF06 |
11 (JB-04) |
|
RD01 |
23 (JC-10) |
RG06 |
35 (JE-04) |
|
RD02 |
25 (JD-02) |
RG07 |
34 (JE-03) |
|
RD03 |
29 (JD-08) |
RG08 |
33 (JE-02) |
|
RD04 |
14 (JB-09) |
RG09 |
32 (JE-01) |
|
RD05 |
13 (JB-08) |
5.5.3. Controlling the I/O Ports Using MPIDE
Three built-in functions are available for controlling an I/O port when in digital mode: pinMode(), digitalRead(), and digitalWrite().
pinMode() function is used to set the I/O port pin direction, and it can take the values INPUT, OUTPUT, or OPEN. OPEN is similar to OUTPUT and is used for open-drain outputs.
digitalRead() function is used to read data from an I/O port. An I/O port can either be HIGH (logic 1) or LOW (logic 0).
digitalWrite() is used to set the state of an I/O port.
5.5.4. I/O Pin Voltage Levels
The PIC32 microcontroller family operates with 3.3 V supply, and the output voltage levels are 0–3.3 V. There are some applications where we may want to use 5 V signals. In general, the digital I/O pins of the PIC32 microcontroller are tolerant to 5 V inputs and we can apply 5 V signals directly to these inputs without damaging the microcontroller. The analogue inputs, on the other hand, are not 5 V-tolerant, and the maximum voltage that can be applied to these inputs is 3.3 V. In general, applying 5 V input to an input that is not tolerant to 5 V may damage the microcontroller circuitry. However, there are some techniques that can be used to overcome this problem. One simple technique is to use resistors (e.g., 200 Ω) in series and Schottky diodes in parallel with the input pins in order to limit the input voltages to safe levels.
The output high voltage level of the PIC32 microcontroller is typically 2.4 V, and this can be recognised as valid logic 1 by most logic families. If this voltage is not sufficient to cause a logic 1, a pull-up resistor (e.g., 5k) to 5 V can be used at the outputs of the pins that are tolerant to 5 V to increase the output voltage levels.
5.6. Built-In Functions
The C compiler contains a number of useful functions that can be used to simplify our programs. In this section, we shall be looking at some of these functions.
5.6.1. Data Conversion Functions
The following functions are available to convert one data type to another one:
char(): Converts into character data type
byte(): Converts into byte data type
int(): Converts into integer data type
word(): Converts into word data type
long(): Converts into long data type
float(): Converts into float data type
5.6.2. Digital I/O Functions
The following digital I/O functions are available. These functions are usually used in the setup() function at the beginning of a program:
pinMode(pin, mode): Used to set the direction of an I/O pin. Valid modes are INPUT and OUTPUT. An example is given below:
int led = 42;
pinMode(led, OUTPUT);
digitalWrite(pin, value): Used to set the output state of an output pin to LOW (logic 0) or HIGH (logic 1). The I/O pin must be configured as an output pin before this function is called. The value can be HIGH or LOW. An example is given below:
digitalWrite(led, HIGH);
digitalRead(pin): Used to read the state of an I/O pin. The I/O pin must be configured as an input pin before this function is called. The function returns HIGH or LOW. An example is given below:
stat = digitalRead(led);
5.6.3. Analogue I/O Functions
The following analogue I/O functions are available:
analogRead(pin): Used to read value from the specified analogue input pin. The function returns an integer between 0 and 1023 (10-bit A/D conversion is done). An example is given below:
int anapin = 5;
int anadata;
anadata = analogRead(anapin);
analogWrite(pin, duty-cycle): Used to send an analogue value in the form of a pulse-width-modulated (PWM) waveform to the specified pin. When this function is called, a square wave signal with a frequency of approximately 490 Hz is sent out of the pin with the specified duty cycle. The duty cycle is an unsigned character that can have values between 0 and 255. The PWM waveform is cancelled when a new operation is performed on the specified pin (e.g., digital read or write, or a new analogue write). An example is given below:
led = 22;
pwm = 120;
analogWrite(led, pwm);
This function is only available for the following I/O pins:
|
Pmod Connector |
Logical Pin Number |
Microcontroller I/O Pin |
|
JC-09 |
22 |
RD0 |
|
JC-10 |
23 |
RD1 |
|
JD-02 |
25 |
RD2 |
|
JD-08 |
29 |
RD3 |
|
JB-09 |
14 |
RD4 |
analogReference(mode): Used to set the reference voltage for the analogue input. The default value is +3.3 V.
5.6.4. Other I/O Functions
The other suitable I/O functions are as follows:
tone(pin, frequency, duration): Generates a square wave signal of the specified frequency (in hertz), with 50% duty cycle. The duration (in milliseconds) is optional, and if not specified the signal will continue until a call to noTone() is made. In the example below, a signal with a frequency of 1000 Hz is generated on pin 12 that lasts for 500 ms:
tone(12, 1000, 500);
noTone(pin): Used to stop an active tone on a pin.
shiftOut(dataPin, clockPin, bitOrder, value): This function is used to shift out a byte (value) of data from the specified pin. The shift operation can start either from the most significant bit or from the least significant bit. The clockPin is toggled once the dataPin has been set to the correct value. The bitOrder can take the values MSBFIRST or LSBFIRST. The dataPin and clockPin must be configured as outputs before using this function. In the example given below, character “A” is shifted out with the least significant bit sent first:

pulseIn(pin, value, timeout): This function is used to read a pulse present on a pin. If value is HIGH, then the function waits for the pin to become HIGH and starts timing when it becomes HIGH. The timing stops when the pin goes LOW. The length of the time is returned by the function as an integer number. The timeout (in microseconds) is optional, and it specifies for how long the function should wait. An example is given below that waits for pin 3 to go HIGH and the duration is stored in a variable called tim:
tim = pulseIn(3, HIGH);
5.6.5. Time Functions
The following built-in time functions are available:
micros(): This function returns (in microseconds) the number of microseconds since a program started running.
millis(): This function returns (in milliseconds) the number of milliseconds since a program started running.
delay(ms): This function pauses the program for the amount of milliseconds specified in the argument. In the following example, the program is paused for 1 s:
delay(1000);
delayMicroseconds(μs): This function pauses the program for the amount of microseconds specified in the argument.
5.6.6. Mathematical Functions
The following mathematical functions are available:
min(a, b): Returns the minimum of two numbers. An example is given below that returns 5:
Res = min(5, 10);
max(a, b): Returns the maximum of two numbers. An example is given below that returns 10:
Res = max(5, 10);
abs(x): Returns the absolute value of a number. An example is given below that returns number 10:
A = abs(-10);
constrain(x, min, max): This function returns x if x is between min and max, returns min if x is less than min, and returns max if x is greater than max.
pow(base, exp): This function calculates the value when a number is raised to a power. In the following example, number 2 is raised to power 3 and the returned value is 8:
r = pow(2, 3);
sqrt(n): Calculates and returns the square root of a number. An example is given below that returns number 4:
r = sqrt(16);
sq(n): Calculates the square of a number. An example is given below that returns number 16:
r = sq(4);
5.6.7. Trigonometric Functions
The following trigonometric functions are supported:
sin(n): Calculates the sine of an angle. The angle must be in radians. An example is given below that calculates and returns the sine of 30°:
a = 30.0*3.14159 / 180.0;
r = sin(a);
cos(n): Calculates the cosine of an angle. The angle must be in radians. An example is given below that calculates and returns the cosine of 60°:
a = 60.0*3.14159 / 180.0;
r = cos(a);
tan(n): Calculates and returns the tangent of an angle. The angle must be in radians. An example is given below that calculates and returns the tangent of 45°:
a = 45.0*3.14150 / 180.0;
r = tan(a);
5.6.8. Bit and Byte Functions
The bit and byte functions are useful when we want to extract bits and bytes from variables. The following functions are provided:
lowByte(n): Returns the low byte of a variable.
highByte(n): Returns the high byte of a variable.
bitRead(x, n): Reads a bit of a number starting from the least significant bit, which is bit position 0. Argument n specifies which bit to read. In the following example, bit 3 of number 15 (binary pattern “00001111”) is read and is returned as 1:
r = bitRead(15, 3);
bitWrite(x, n, b): Sets the specified bit of a variable. Argument n specifies the bit number to write to starting from the least significant bit, which is bit 0, and argument b specifies the value (0 or 1) to write to. In the following example, bit 3 of number 7 (binary pattern “00000111”) is changed to 1, making the number to be 15 (binary pattern “00001111”):
bitWrite(7, 3, 1);
bitSet(x, n): Sets bit n of variable x to 1. The bit numbering starts from the least significant bit position that is taken as 0. In the following example, bit 2 of variable tmp is set to 1:
bitSet(tmp, 2);
bitClear(x, n): Sets bit n of variable x to 0. The bit numbering starts from the least significant bit position that is taken as 0. In the following example, bit 2 of variable tmp is cleared:
bitClear(tmp, 2);
bit(n): This function returns the value (0 or 1) of a bit in a variable. The least significant bit (bit 0) is 1, bit 1 is 2, bit 2 is 4, and so on.
5.6.9. Interrupt Enable/Disable Functions
Function interrupts() is used to enable interrupts. Similarly, function noInterrupts() is used to disable interrupts.
5.7. Summary
This chapter presented an introduction to the C language. The basic structure of a C program is given with an explanation of the basic elements that make a C program.
The data types of the C language have been described with examples. Various data structures, such as arrays, structures, and unions, have been described with examples.
Functions are important building blocks of all complex programs. The creation and use of functions in programs have been described with many examples.
Various flow control statements such as if, switch, while, do, break, and so on, have been explained in the chapter with examples on their use in C programs.
Pointers are important elements of all professional C programs. The basic principles of pointers have been described with various examples to show how they can be used in programs and in functions.
Finally, the basic features of the C language, developed specifically for the PIC32 microcontroller series, have been explained briefly, including a brief description of the built-in functions.
5.8. Exercises
1. What does program repetition mean? Describe how program repetition can be created using for and while statements.
2. What is an array? Write statements to define arrays with the following properties:
(a) Array of 10 integers
(b) Array of 5 floating point numbers
(c) Array of 3 characters
3. Given that x = 10 and y = 0, list the outcome of the following expressions as either TRUE or FALSE:
(a) x > 0 && y > 0
(b) y <= 0
(c) x == 10 || y == 5
4. Assuming that a = 0x2E and b = 0x6F, determine the results of the following bitwise operations:
(a) a | b
(b) b & 0xFF
(c) a ^ b
(d) b ^ 0xFF
5. How many times does each of the following loops iterate?
(a) for(j = 0; j < 5; j++)
(b) for(i = 0; i <= 5; i++)
(c) for(i = 10; i > 0; i−−)
(d) for(i = 10; i > 0; i −= 2)
6. Write a program to calculate the sum of all positive integer numbers between 1 and 5.
7. Write a program to calculate the average of all the numbers from 1 to 100.
8. Derive equivalent if–else statements for the following:
(a) (x > y) ? 1: 0
(b) (x > y) ? (a − b) : (a + b)
9. What can you say about the following while loop?
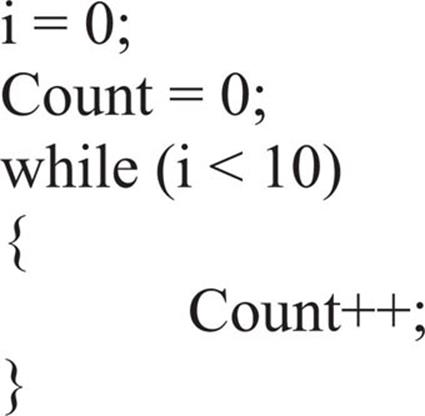
10. What will be the value of Sum at the end of the following do while loop?
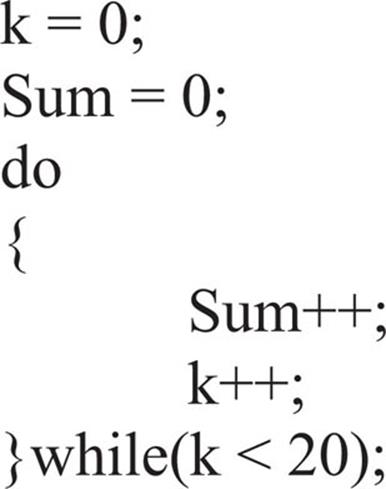
11. What can you say about the following program?
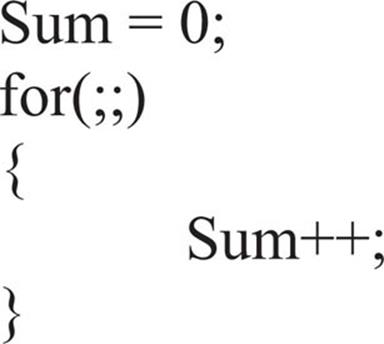
12. Rewrite the following code using a while statement:
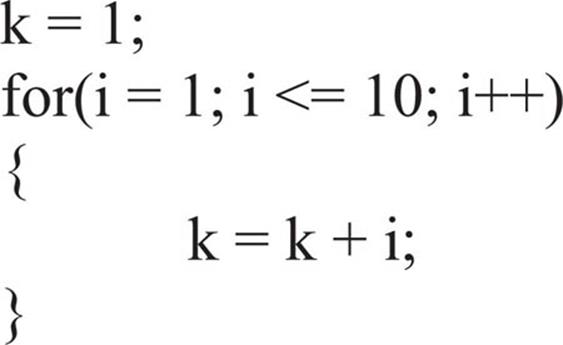
13. Write a function to receive two integer parameters and to return the larger one to the calling program.
14. Write a program to store the even numbers between 0 and 20 in an integer array. Then call a function to calculate and store the square of each array element in the same array.
15. Write a function to convert inches to centimetres. The function should receive inches and return the equivalent centimetres. Show how you can call this function in a main program to convert 5.2 into centimetres.
16. Write a program to add two matrices A and B, having dimensions 2 × 2, and store the result in a third matrix called C.
17. Write a function to receive three matrices A, B, and C. Perform the matrix operation C = A × B. Show how the function can be called from a main program.
18. Explain what a function prototype is. Where can it be used?
19. Write a function to convert a two-digit hexadecimal number 0x00 to 0xFF into decimal. Show how you can call this function to convert 0x1E into decimal.
20. In an experiment, the relationship between the x and y values is calculated to be as in the following table:
|
x |
y |
|
1.2 |
4.0 |
|
3.0 |
5.2 |
|
2.4 |
7.0 |
|
4.5 |
9.1 |
Write a function using the switch statement to find y, given x. Show how the function can be called from a main program to return the value of y when x is 2.4.
21. Explain how you can pass variable number of arguments to a function. Write a function to find the average of the numbers supplied as parameters. Assume that the first parameter is the number of parameters to be supplied. Show how this function can be called from a main program to calculate the average of numbers 2, 3, 5, and 7.
22. Repeat Exercise 19 using if–else statements.
All materials on the site are licensed Creative Commons Attribution-Sharealike 3.0 Unported CC BY-SA 3.0 & GNU Free Documentation License (GFDL)
If you are the copyright holder of any material contained on our site and intend to remove it, please contact our site administrator for approval.
© 2016-2026 All site design rights belong to S.Y.A.