Raspberry Pi Hacks (2014)
Chapter 2. Hacking Linux for the Raspberry Pi
While there are many available operating systems for the Raspberry Pi, the most supported one is Linux. The Raspberry Pi Foundation maintains a Linux kernel source tree with support for the Raspberry Pi hardware.
Linux is famous for its flexibility and support for a large number of devices. Whether you are just interested in learning Linux, or if you need to make some modifications in order to enable an awesome hack, this chapter will help you through the process.
Hack 21. Build a Cross-Compiler Toolchain
The Raspberry Pi is well-suited for many things, but compile speed is not one of them. To build anything of consequence from source in a reasonable amount of time, you’ll need to to use a cross-compiler running on a faster computer.
A cross-compiler is a compiler (and dependent libraries) built to run on one architecture but that generates binaries for a different architecture, usually an incompatible one. In this case, you need a cross-compiler that will allow you to build binaries optimized for the Raspberry Pi Linux environment.
Like most tasks in Linux, you can generate a cross-compiler in a few ways, but to ensure that you end up with a toolchain optimized for the best performance on the Raspberry Pi, we suggest not installing prepackaged cross-compilers that come with your Linux distribution. Instead, the following sections will walk you through the process of using crosstool-ng to build it from scratch.
Install crosstool-ng
crosstool-ng is designed to assist you in the complicated task of generating a compiler toolchain. It provides a powerful frontend and build scripts that let you choose what you need your toolchain to do, then automate the build, while keeping you from needing to understand exactly how the numerous pieces of the toolchain hook together. Compared to building cross-compilers manually, this is a lifesaver.
crosstool-ng is built using the same configuration frontend technology as the Linux kernel source, so the menu structure that it uses will likely be familiar to you. Just like the Linux kernel, many options might not make sense to you or might seem confusingly similar. Never fear, brave hackers! You’ll need to change only a few of these options from their defaults.
You can put your Raspberry Pi aside; you won’t need it. Instead, start with an x86-based system running your preferred Linux distribution. Any distribution you are comfortable working with that includes a working compiler will be fine. As far as the system goes, the bigger, the better. More CPU cores and more memory will result in faster builds, and x86_64 is always preferred. Also, you’ll want to have a healthy amount of available disk space (10 GB should be more than sufficient).
To build the cross-compiler toolchain, you first need to make sure you have some development components. Specifically, you’ll need a native compiler (in this case,GCC with support for C & C), libstdc (standard C++ libraries, both shared and static), libtool and make (for the build infrastructure), GNU MP (for fast precision mathematics), gperf (a perfect hash function generator), bison (a C grammar parser), flex (a lexical pattern recognition engine), ncurses (a terminal graphics library), sed (a stream editor), subversion (client tooling for accessing SVN code repositories), and texinfo (a documentation generation and parsing tool).
Don’t worry too much about these pieces: you do not need to know how they work (or even why you need them), just know that you do. Really, all you need to do is install them, and you accomplish that by running the following commands.
On Fedora, enter:
$ su -c 'yum install gcc gcc-c++ bison make ncurses-devel texinfo flex gperf \
libtool sed subversion gmp-devel libstdc++-devel libstdc++-static'
For Ubuntu, enter:
$ su -c 'apt-get install gcc g++ bison make ncurses-dev texinfo flex gperf \
libtool sed subversion libgmp-dev libstdc++-dev'
Next, download a copy of the crosstool-ng source code. At the time of this writing, the latest version is 1.18.0.
Unpack the crosstool-ng source tarball into your home directory:
$ tar xvfj crosstool-ng-1.18.0.tar.bz2
FIX FOR PPL BUG
The version of the Parma Polyhedra Library (PPL) that crosstool-ng uses (0.11.2) has a bug in it. Specifically, it is not compatible with newer versions of the GNU Multiple Precision Arithmetic Library (GMP). We have provided a fix for this, to allow PPL to compile properly against more recent versions of GMP. There is a patch file named101-gmp-build-fix.patch in our GitHub repository. First, clone a local copy of our GitHub tree into your home directory, then copy the patch file into the crosstool-ng source directory:
$ cd ~
$ git clone https://github.com/spotrh/rpihacks
Cloning into 'rpihacks'...
remote: Counting objects: 247, done.
remote: Compressing objects: 100% (190/190), done.
remote: Total 247 (delta 75), reused 206 (delta 37)
Receiving objects: 100% (247/247), 251.84 KiB | 0 bytes/s, done.
Resolving deltas: 100% (75/75), done.
$ cp -a rpihacks/101-gmp-build-fix.patch ~/crosstool-ng-1.18.0/patches/ppl/0.11.2/
By placing this patch file in the crosstool-ng-1.18.0/patches/ppl/0.11.2/ directory, it allows crosstool-ng to apply this fix to PPL 0.11.2 before it builds it.
On systems with older GMP versions, this patch may not be necessary, but applying it will not cause any problems. We strongly recommend that you copy this patch into the crosstool-ng patches tree before proceeding.
Configure crosstool-ng
Go into the crosstool-ng-1.18.0 source directory and run configure. The only option you will need to pass to it is a prefix value for where you want to install crosstool-ng. We strongly recommend that you use /opt/crosstool-ng-1.18.0, just to give it a space that is guaranteed to be far, far away from the rest of your Linux system:
$ ./configure --prefix=/opt/crosstool-ng-1.18.0
This configure script, like virtually every configure script ever created, will check your Linux system to ensure that all of crosstool-ng’s dependencies are present and accounted for. If it fails, simply use your Linux distribution tools (yum or apt-get, as appropriate) to install the missing packages. Once this completes successfully, it will create a Makefile. To build the crosstool-ng code, run:
$ make
This should result in success, because crosstool-ng isn’t difficult to build. Once it finishes, you just need to make install it into its new home (/opt/crosstool-ng-1.18.0). Don’t forget to run this as root:
$ su -c 'make install'
Add crosstool-ng to Your PATH
Now that you have the crosstool-ng software installed and configured, add it to your PATH. This will allow you to run commands specifically for crosstool-ng without needing to type a long command string.
The easiest way to accomplish this varies by Linux distribution and shell choice. On Fedora, using the default bash shell, you need to make a change to the ~/.bash_profile. On Ubuntu, edit ~/.profile. What you’re looking for is a configuration (or dot) file that lives in your home directory and sets the PATH. Usually, this file will contain a line that explicitly exports the PATH variable, like this:
export PATH
Just above that line, add this line:
PATH=$PATH:/opt/crosstool-ng-1.18.0/bin
This will append /opt/crosstool-ng-1.18.0/bin to the end of the existing value of PATH ($PATH). Save the file, and then you can either open a new shell instance or source the modified file. Since we’re brave hackers, we’ll just source the new file like this:
$ source ~/.bash_profile
These directions will vary if you’re using a shell other than bash, but if you have made that choice, most of the previous section is common sense to you, and you should be able to add a directory to your PATH in the shell of your choice.
Configure the Cross-Compiler
Now it is time to actually build the Raspberry Pi cross-compiler. In the process of doing so, crosstool-ng will download quite a lot of source files from the Internet. To keep things clean, you should make a temporary home (a sandbox) and work in that directory:
$ mkdir ~/cross-sandbox
$ cd ~/cross-sandbox
Now you can safely launch the crosstool-ng configuration utility by running:
$ ct-ng menuconfig
crosstool-ng supports a wide variety of different toolchains and subvariants of toolchains. For the best optimization, we recommend using the Linaro variant of the GCC compiler. Linaro is a nonprofit organization that specializes in optimizing and improving open source technologies for the ARM platform, and they tend to make the nicest ARM Linux compilers.
On that recommendation, next you’re going to build a Linaro GCC cross-compiler specifically optimized for the hardware inside the Raspberry Pi.
In GCC language, this is an arm-bcm2708hardfp-linux-gnueabi toolchain. The bcm2708 describes the specific CPU type (Broadcom 2708), hardfp means that it is using a hardware floating point unit (specifically, it means that values are being passed to functions in the floating-point registers), linux is the OS, and gnueabi means that it supports the GNU Embedded Application Binary Interface (EABI). The EABI allows for different compilers to generate compatible code.
While most of the crosstool-ng settings are fine at their default values, you will need to double-check some of them. When you launch ct-ng menuconfig, it will open a Text User Interface (or TUI for short) in your terminal window. It will present you with a series of menus that you can navigate using the arrow keys, the Enter key (to select an item or menu), and the spacebar (to enable or disable specific items). Items which are enabled have either an asterisk or a set value next to them.
The top menu looks like Figure 2-1.
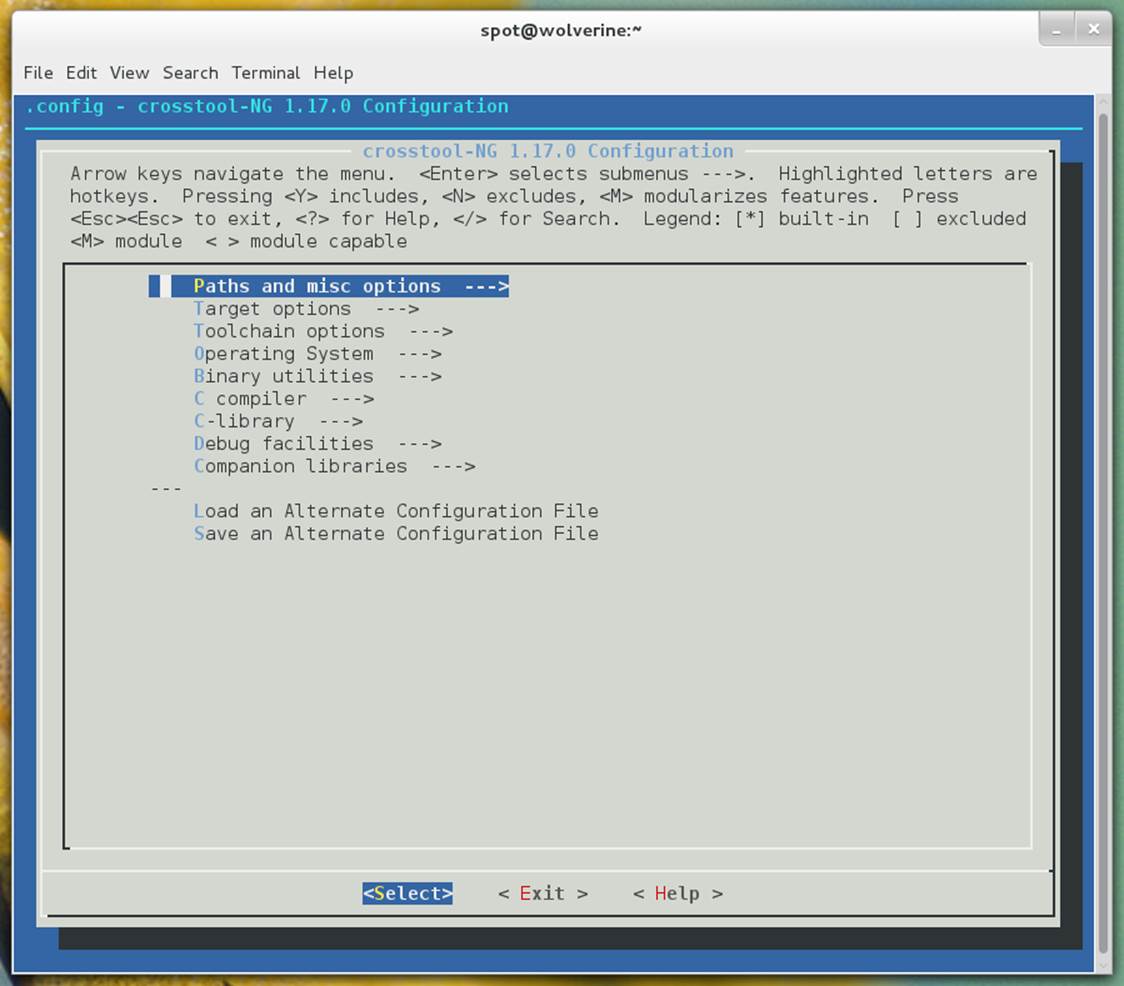
Figure 2-1. Main configuration menu
The following sections describe the changes you’ll need to make, grouped by menu sections from the top down.
Paths and Misc Options
In this section of the crosstool-ng menu (shown in Figure 2-2), make the following changes:
§ Enable “Try features marked as EXPERIMENTAL”.
§ Set “Prefix directory” to the location where you want your cross-compiler toolchain to be installed. We suggest putting this either in its own subdirectory in /opt or your home directory to ensure you don’t get your cross-compiler toolchain confused with your system native toolchain. We leave this at the default value of ${HOME}/x-tools/${CT_TARGET}, which evaluates to ~/x-tools/arm-rpi-linux-gnueabi/.
§ Set “Number of parallel jobs”. This value will be passed to make to accelerate the build time for the cross-compiler toolchain. Setting this value too low will make the build take longer than it needs to, but setting it too high will result in the CPU resources being spread too thin (and will also make the build take longer than it needs to). The magic value seems to be the number of CPU cores in your system multiplied by 1.5. On our 8 core laptop, this is 12. If you’re not sure how many CPU cores your system has, run:
$ cat /proc/cpuinfo |grep processor
Count the number of lines, as each CPU core will appear to Linux as a unique processor.
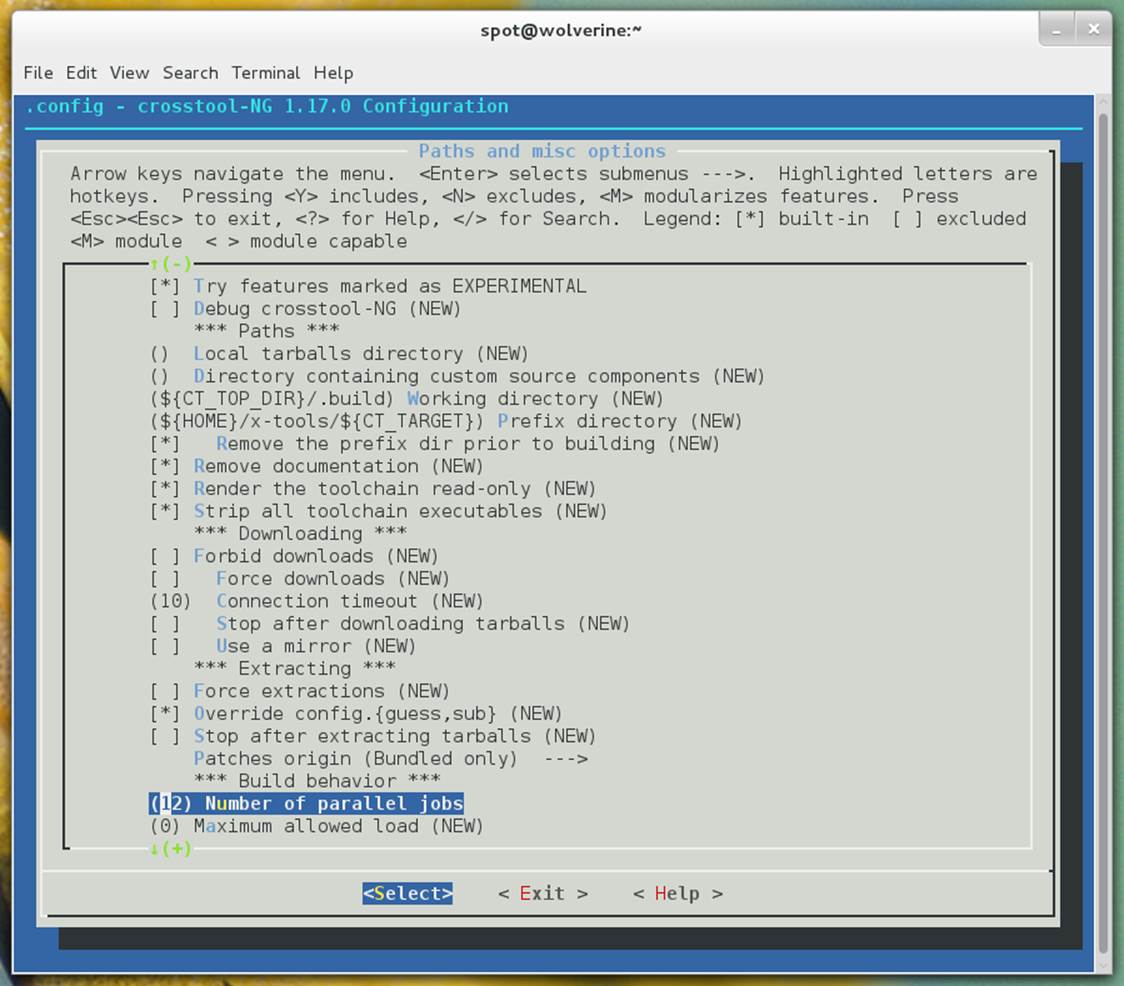
Figure 2-2. Paths and misc options configuration submenu
Target Options
In this menu (shown in Figure 2-3), make sure the following settings are set:
§ Set “Target architecture” to arm.
§ Set “Endianness” to Little endian.
§ Set “Bitness” to 32-bit.
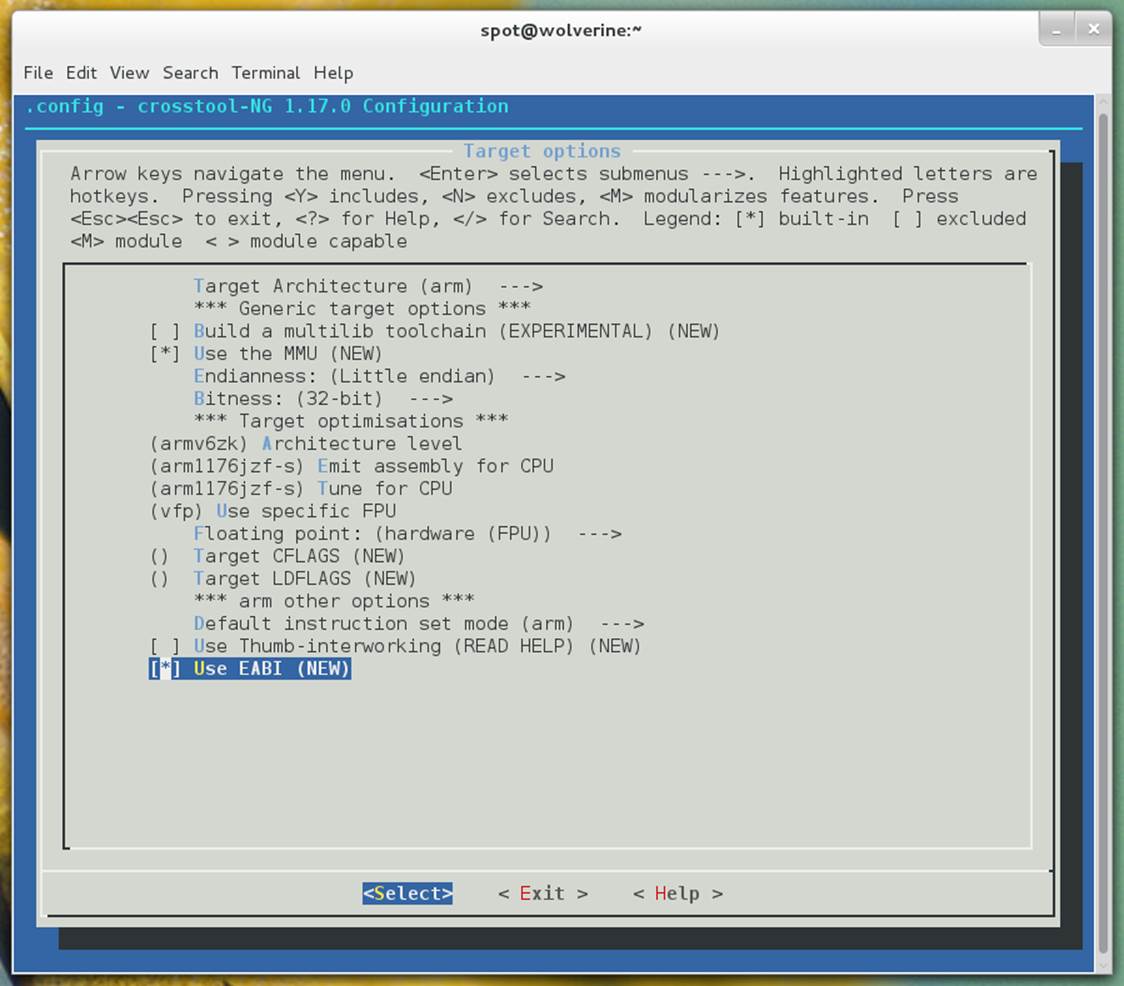
Figure 2-3. Target options configuration submenu
All of these should be the defaults, but the settings that follow are probably not. Making the following changes will tune the cross-compiler toolchain to generate the best possible binaries for the Raspberry Pi:
§ Set “Architecture level” to armv6zk. This is the specific ARM architecture revision of the Raspberry Pi ARM CPU.
§ Set “Emit assembly for CPU” to arm1176jzf-s.
§ Set “Tune for CPU” to arm1176jzf-s.
§ Set “Use specific FPU” to vfp.
§ Set “Floating point” to hardware (FPU).
§ Set “Default instruction set mode” to arm.
§ Enable “Use EABI”.
Toolchain Options
Make the following change to the Toolchain options (shown in Figure 2-4):
§ Set “Tuple’s vendor string” to rpi. Really, we could put anything we wanted in here. We strongly recommend doing this to ensure that you know you’re using the Raspberry Pi cross-compiler toolchain.
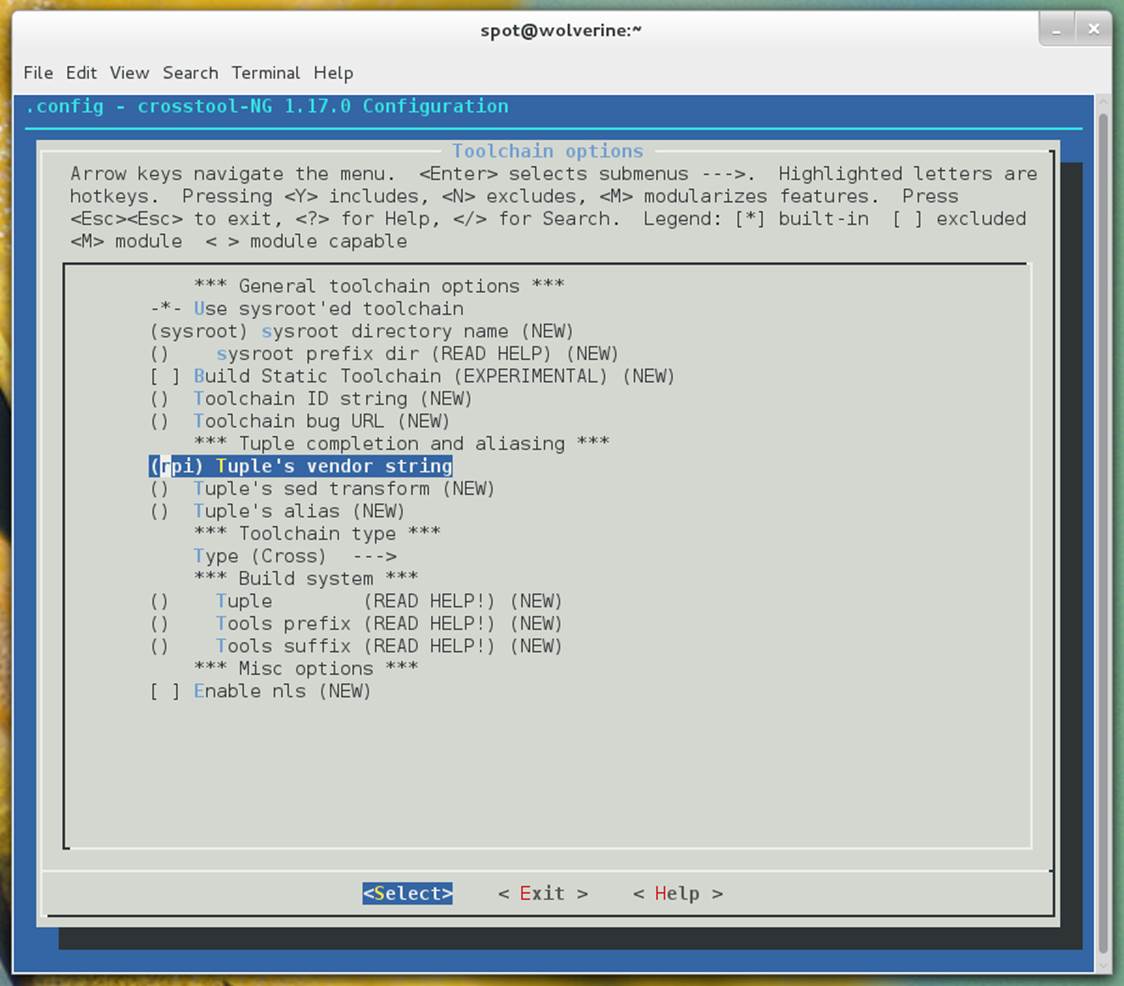
Figure 2-4. Toolchain options configuration submenu
Operating System Options
Make the following changes to the Operating Systems Options (shown in Figure 2-5):
§ Set “Target OS” to linux.
§ Set “Linux kernel version” to 3.6.11. (Your Raspberry Pi might not be running the 3.6.11 kernel yet, but this is a safe value.)
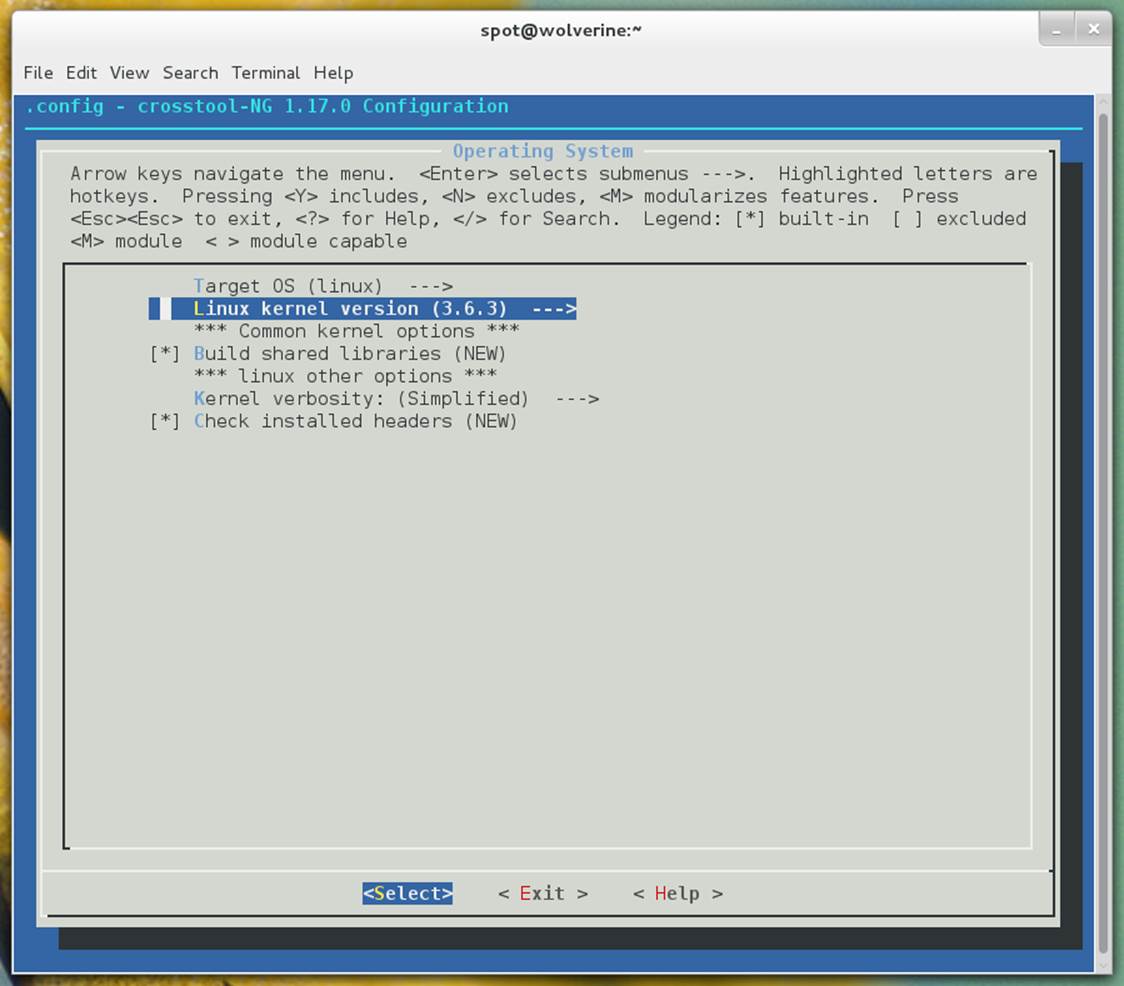
Figure 2-5. Operating system configuration submenu
Binary Utilities Options
Make the following changes to the Binary Utilities (shown in Figure 2-6):
§ Set “Binary format” to ELF.
§ Set “binutils version” to 2.22
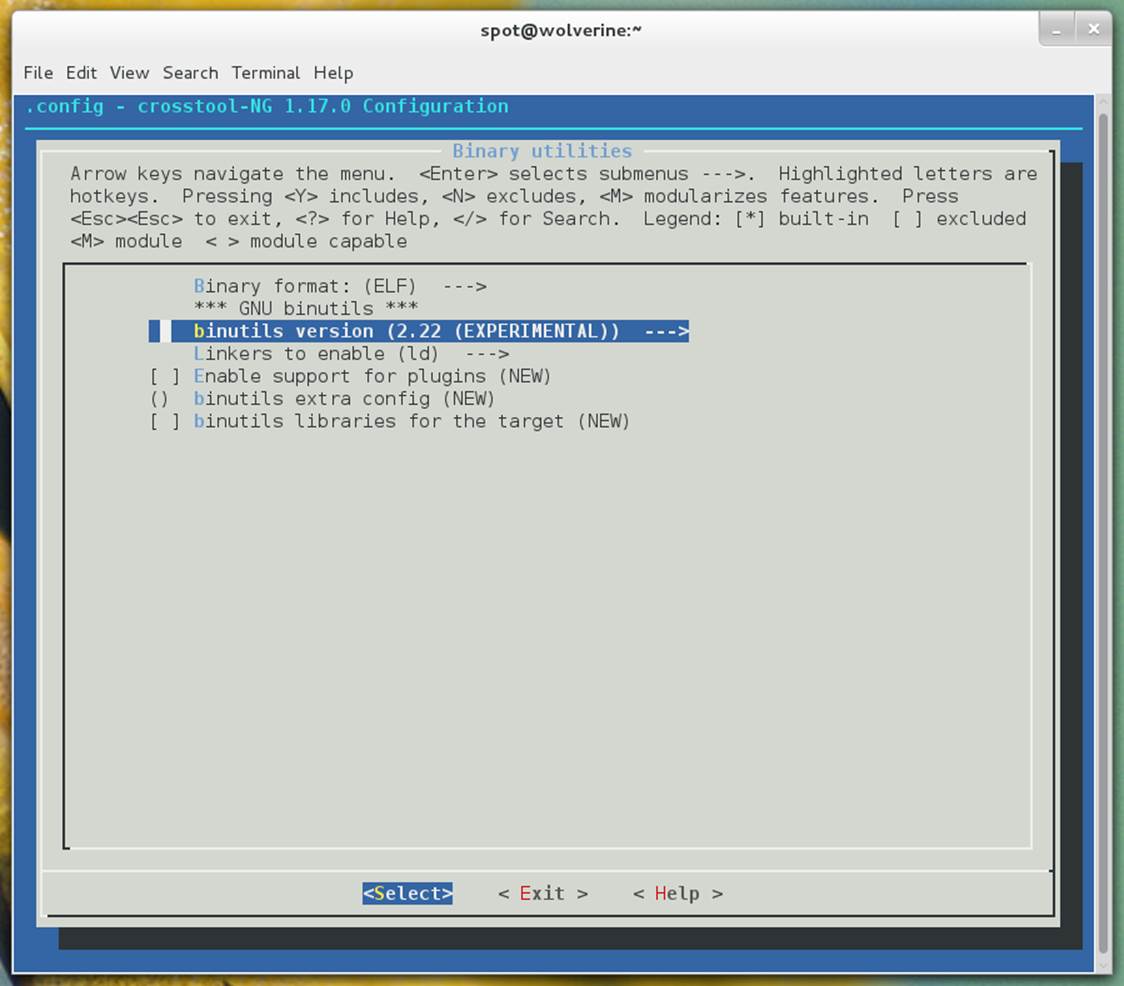
Figure 2-6. Binary utilities configuration submenu
C Compiler Options
Make the following changes to the C Compiler options (shown in Figure 2-7):
§ Enable “Show linaro versions”.
§ Set “gcc version” to linaro-4.7-2013.01. (Feel free to try newer ones if they are available when you are reading this.)
§ Enable “C++”.
§ Set “gcc extra config” to --with-float=hard.
§ Enable “Link libstdc++ statically into gcc binary”.
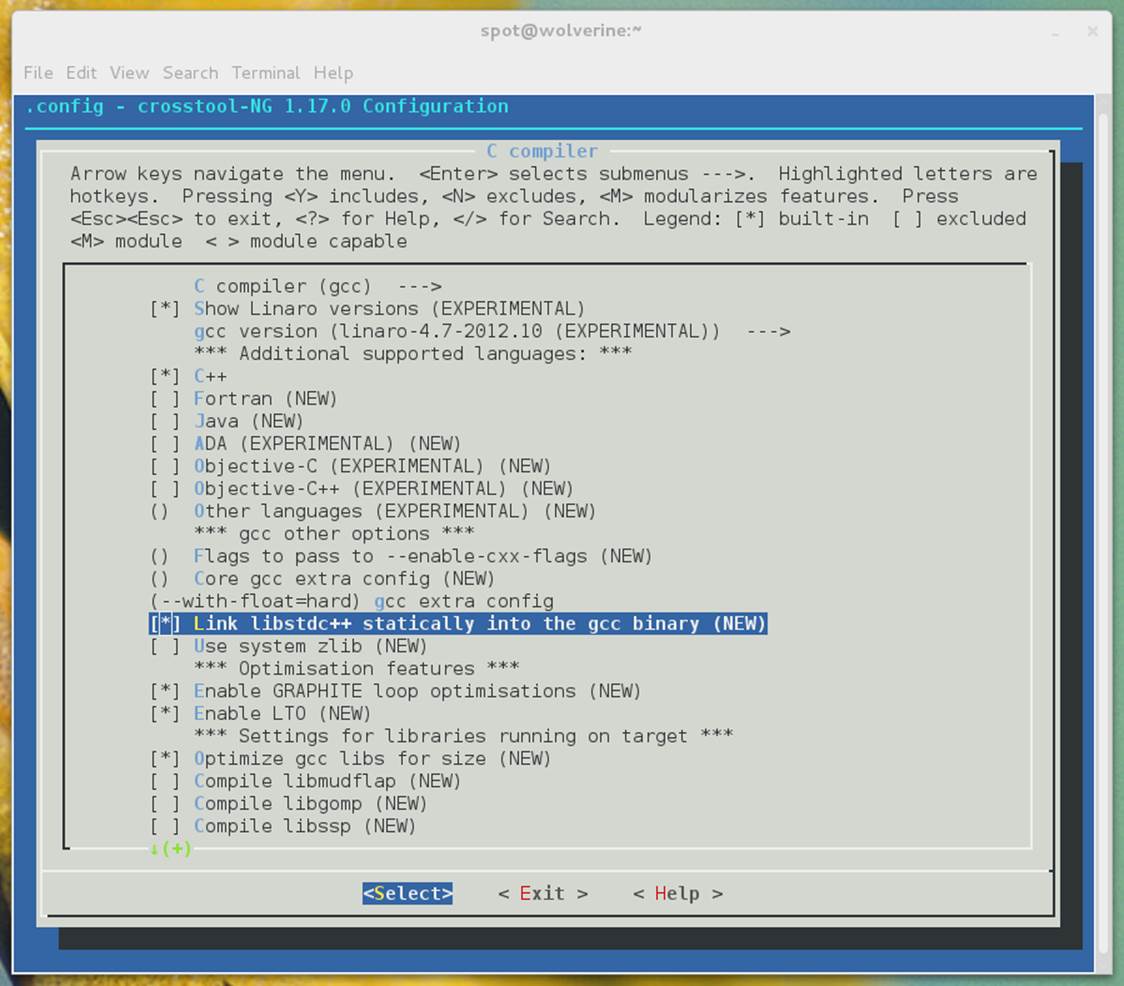
Figure 2-7. C compiler configuration submenu
C-library Options
Make the following changes to the C-library options (shown in Figure 2-8):
§ Set “C library” to “eglibc”.
§ Set “eglibc version” to “2_13”.
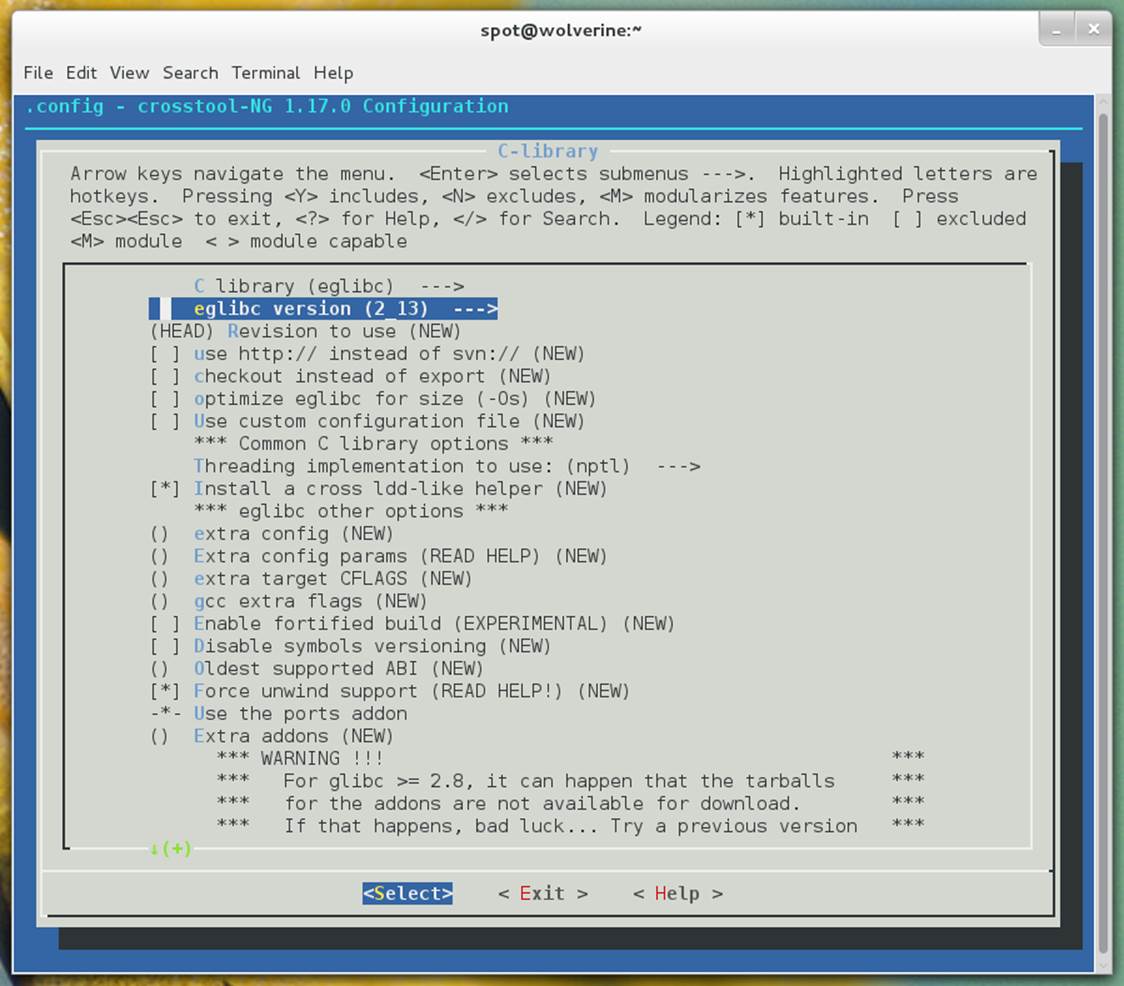
Figure 2-8. C-library configuration submenu
That completes the configuration portion. Go to the main screen, exit, and save the configuration file when prompted.
DISABLE CT_WANTS_STATIC_LINK
On some systems, crosstool-ng sets the CT_WANTS_STATIC_LINK value to Y, even though you didn’t select that. This will cause it to fail early in the build process, but you can use sed to ensure it is disabled. Run this command:
$ sed -i 's|CT_WANTS_STATIC_LINK=y|# CT_WANTS_STATIC_LINK is not set|g' .config
This command might look complicated, but all it is doing is disabling the CT_WANTS_STATIC_LINK feature in the crosstool-ng configuration file by searching for the string that exactly matches the CT_WANTS_STATIC_LINK option when it is enabled and, if found, replacing it with the string that disables it.
Begin the Build
Now you just need to kickoff the build process:
$ ct-ng build
It will then download everything it needs and build your Raspberry-Pi-optimized cross-compiler toolchain. This is the longest part. The time will vary depending on your system specifications and Internet speeds, but 45 minutes to an hour or more on a powerful laptop is not unreasonable.
When this completes successfully, you will now have a cross-compiler toolchain in the ~/x-tools/arm-rpi-linux-gnueabi/bin directory. You will want to add this directory to your PATH, in the same manner that you added the crosstool-ng directory previously. Change the line you added from:
PATH=$PATH:/opt/crosstool-ng-1.18.0/bin
to:
PATH=$PATH:$HOME/x-tools/arm-rpi-linux-gnueabi/bin:/opt/crosstool-ng-1.18.0/bin
Save the file, and then source it again to update the PATH value. Now you can test your toolchain by running:
$ arm-rpi-linux-gnueabi-gcc -v
It will return a lot of information on how gcc is configured and optimized, along with printing the compiler version. If you see that, your Raspberry Pi cross-compiler toolchain is ready to go.
Hack 22. Build a Custom Kernel
For many hacks, the standard prebuilt Linux kernel images are sufficient, but some require options or drivers that are not enabled. This hack turns on some additional options that will be useful for other hacks in this book.
The Linux kernel is a fantastic operating system core for a number of reasons, starting with its versatility, its native support for a large number of architectures and devices, and its open source code base. The Raspberry Pi Foundation provides prebuilt Linux kernel images customized to support the Raspberry Pi hardware, as well as the corresponding source code tree, so that you can build a custom kernel image of your own that will work on the Raspberry Pi. This is necessary, because not all of the code needed for the Linux kernel to work on the Raspberry Pi is yet merged into the official Linux kernel source tree.
The first step to building your own kernel is to decide whether you want to do so natively from within the Linux instance running on the Raspberry Pi or to build it on an x86 Linux system with a properly configured cross-compiler toolchain. We strongly recommend the latter approach, because it will go much much faster (several hours faster) and it is not that much more complicated.
We’ll assume that you’re building your new kernel with a cross-compiler toolchain—specifically, the one described in [Hack #21]. You will also need to have the make and ncurses-dev (or ncurses-devel) packages installed on your x86 Linux system.
If you really prefer to build the kernel natively on the Raspberry Pi, make sure that you have the gcc, make, and libncurses-dev (or ncurses-devel) packages installed. Then, simply omit the ARCH=arm CROSS_COMPILE=arm-rpi-linux-gnueabi- flags from each command-line invocation. You will also need to have a copy of the Raspberry Pi Linux kernel source tree present in the running Linux filesystem.
Download the Kernel Source Tree
First you’ll need to download a copy of the Raspberry Pi Linux kernel source tree. There are currently several branches under development:
rpi-3.2.27
This was the original kernel source that the first Raspberry Pi Linux distributions were using, but it is rather out of date at this point.
rpi-3.6.y
This is the active development kernel source tree, based on the kernel indicated (3.6.11 as of this writing).
rpi-3.8.y, rpi-3.9.y, rpi-3.10.y, and rpi-3.11.y
These branches were created to track the various newer kernels. If you need something specific with a newer branch, these might help you out.
The instructions in this hack will work for any kernel branch, but we strongly recommend that you start with the rpi-3.6.y source tree, because it is still getting new functionality and has the added advantage of several additional upstream releases’ worth of bug fixes and features.
Either way, you need to check out the Raspberry Pi Linux kernel source tree from Git. We recommend you put this checkout in your ~/raspi working directory on your Linux laptop (which you created in [Hack #4]), but if it doesn’t exist, just run mkdir ~/raspi):
$ cd ~/raspi
$ git clone git://github.com/raspberrypi/linux.git
This currently defaults to a 3.6.y checkout, but you can always confirm that by trying to manually switch to the rpi-3.6.y branch:
$ cd ~/raspi/linux
$ git checkout rpi-3.6.y
If you want to use a different version of the source tree (e.g., 3.2.27-based), manually switch to the rpi-$VERSION branch using the same method, but substitute rpi-$VERSION for the Git checkout.
Alternatively, you can download a tarball from the GitHub website, which contains a current copy of the code tree:
§ rpi-3.2.27: https://github.com/raspberrypi/linux/archive/rpi-3.2.27.tar.gz
§ rpi-3.6.y: https://github.com/raspberrypi/linux/archive/rpi-3.6.y.tar.gz
These links should never go stale, because GitHub generates these tarballs each time you request them. This method has the advantage of being slightly faster, but we usually prefer to checkout the full Git source tree, because we can then use the Git tools to apply the latest changes from the upstream repository without needing to download a new Linux kernel source tree again.
If you download these tarballs (into ~/raspi), simply unpack them using the following tar command:
$ cd ~/raspi
$ tar xvfz rpi-3.6.y.tar.gz
This will create a linux-rpi-3.6.y/ (or linux-rpi-$VERSION) directory in ~/raspi (the Git checkout will create a linux/ directory instead).
Next, you need to make sure you have a clean working kernel source tree. Change into your Raspberry Pi Linux kernel source directory and run:
$ make mrproper
LINUX KERNEL TRIVIA
The Linux kernel contains a make clean target as well as the make mrproper target. The make mrproper target is a sort of “super clean,” as it does everything that the clean target does, but a whole lot more (the clean target leaves generated artifacts behind, while mrproper brings the kernel source tree back to a pristine state).
But why is it called mrproper? It’s named after Mr. Proper, the internationally used name of a well-recognized mascot for cleaning products. In the United States, he is known as Mr. Clean.
Configure the Linux Kernel
Now you’re ready to start configuring the Linux kernel. This can be a daunting task if you have never done it before, but that doesn’t mean you shouldn’t give it a shot! (That’s the whole reason you bought a book called Hacks, right?)
The key to success is to start with a good default configuration that is known to work properly on the Raspberry Pi. A base default configuration file is included in the Linux kernel source checkout. This config file has the options enabled to support the hardware embedded within the Raspberry Pi. Just copy it to the top-level Raspberry Pi Linux kernel source directory (as .config):
$ cp arch/arm/configs/bcmrpi_defconfig .config
We recommend this approach, because it will minimize the number of questions that you have to answer later.
OTHER SOURCES FOR KERNEL CONFIG FILES
There are other places to get kernel config files. If you have an active Raspberry Pi Linux instance that you just want to make minor kernel changes to, you can get a copy of the configuration file that corresponds to that running kernel image. To do this, type the following from within the Raspberry Pi Linux instance:
$ zcat /proc/config.gz > ~/.config
Then, copy ~/.config from the Raspberry Pi Linux instance onto your Linux laptop and place that copy in your Raspberry Pi Linux kernel source directory (as .config).
You should be aware that if you take this .config file from a kernel that is of a different version than the source tree you are working on, this .config file will not match up with the same configuration options that those kernels have. It will still work, but you will end up having to answer a lot of questions about these missing options in a later step.
We’ve also placed a copy of our Raspberry Pi kernel configuration file here into the GitHub repository for this book. You should be able to use it as a starting point if nothing else works. To download it, simply clone our repository:
$ git clone https://github.com/spotrh/rpihacks
In the new rpihacks directory, you will see a file named kernel-book.config. Copy this file into your top-level Raspberry Pi Linux kernel source directory (as .config).
From here onward, you will need to specify the ARCH=arm CROSS_COMPILE=arm-rpi-linux-gnueabi- options to all of the make invocations. This tells the Linux kernel code that you are building for a non-native architecture (ARM) and with a specific cross-compiler toolchain. The “-” at the end of the arm-rpi-linux-gnueabi- string is important, because the Makefiles will append the necessary binary commands (e.g., gcc, ar, ld) to the end.
Now you need to make sure that this base configuration file is brought up to date:
$ make ARCH=arm CROSS_COMPILE=arm-rpi-linux-gnueabi- oldconfig
This command will ask you to provide answers to any values that are not defined in the config file, and you’re likely to have more than a few blanks to fill in. For the vast majority, you should simply hit Enter to accept the default, but there are a few that we recommend you set if prompted:
Cross-compiler tool prefix (CROSS_COMPILE) [] (NEW)
Set this to arm-rpi-linux-gnueabi-. This is not entirely necessary, but it is better to be safe than sorry here.
Local version - append to kernel release (LOCALVERSION) [] (NEW)
Set this to something unique. This will help you differentiate your custom kernel from the prebuilt kernel images. We suggest using something that you will identify easily as it relates to your project, or something containing the build date.
Those two settings will come early on (usually as the first two you see). After they’re set, you just need to hit Enter several hundred times over the span of about 10 minutes. Don’t worry too much about reading or changing these other options, as there is a better way to find and make configuration changes in the next step. Just keep hitting Enter until it says:
#
# configuration written to .config
#
Once that has happened, you should be back at a shell prompt. Now you can use the better, more intuitive menuconfig option to make specific configuration changes:
$ make ARCH=arm CROSS_COMPILE=arm-rpi-linux-gnueabi- menuconfig
This will present you with an ncurses-based Text User Interface (TUI) menu configuration system, as shown in Figure 2-9.
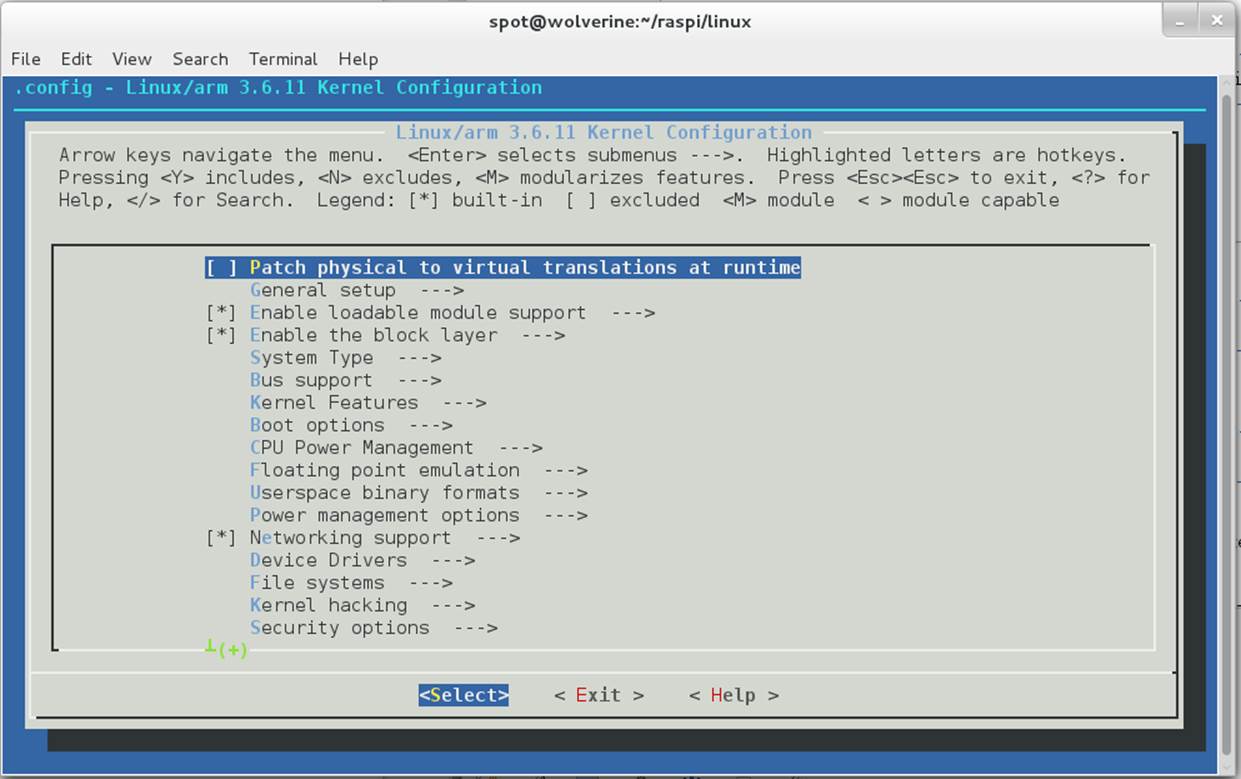
Figure 2-9. TUI menu configuration system
You can navigate through this system with the arrow keys and the Enter button.
Here you can make all sorts of configuration changes. Generally, if you’re doing this, you’re enabling drivers or specific kernel features that you need for a hack. While we can’t possibly list every option in the Linux kernel configuration universe (that would be an entirely different book), we do point out options that need to be enabled in several hacks in this book.
If you aren’t sure about an option, the TUI will let you see more information about any specific configuration option by using the right arrow to move to Help (when an option is highlighted) and then pressing Enter. The following screen presents a short summary of the option (usually in English, although sometimes in kernel-hacker dialect) beneath the Kconfig syntax name for the option.
There are usually two ways to enable an option:
Compiled-in
If you opt to compile in a feature or driver, it will appear in the TUI with an asterisk. You can select to compile in an item by hitting the spacebar when it is highlighted. The upside to compiling things into the Linux kernel is that the feature/driver will always be active. The downside is that the kernel becomes bigger and will use more memory.
Modular
To enable a feature or driver as a module, just hit the M key when the item is highlighted. Not everything can be built as a module, but most things can.
PINMUX
One advantage to modularizing drivers is that it simplifies PinMux control on the Raspberry Pi. PinMux is short for Pin-Multiplexing. The Broadcom BCM2835 system-on-chip used in the Raspberry Pi uses PinMux to select which signals will be present on the pins of the chip. The multiplexing is necessary because the number of available signals exceeds the number of available pins. Or, to put it simply, some of the GPIO pins can be connected to different things within the BCM2835 at different times. If your drivers which affect the GPIO pins or devices are built as modules, you can switch the PinMux by simply loading/unloading the module.
You should also be aware that some items, when enabled in the TUI, will expose additional items (or even new submenus).
Quite a few of the hacks in our book connect to the Raspberry Pi across the I2C bus, so you will definitely want to enable “I2C Support” (CONFIG_I2C). This option is under the Device Drivers menu, and you will want to compile it into your kernel.
Additionally, you will need to go into the I2C Support submenu, and enable compiled-in support for the “I2C device interface” (CONFIG_I2C_CHARDEV) and “Autoselect pertinent helper modules” (CONFIG_I2C_HELPER_AUTO). Figure 2-10 shows the menu with these options properly enabled.
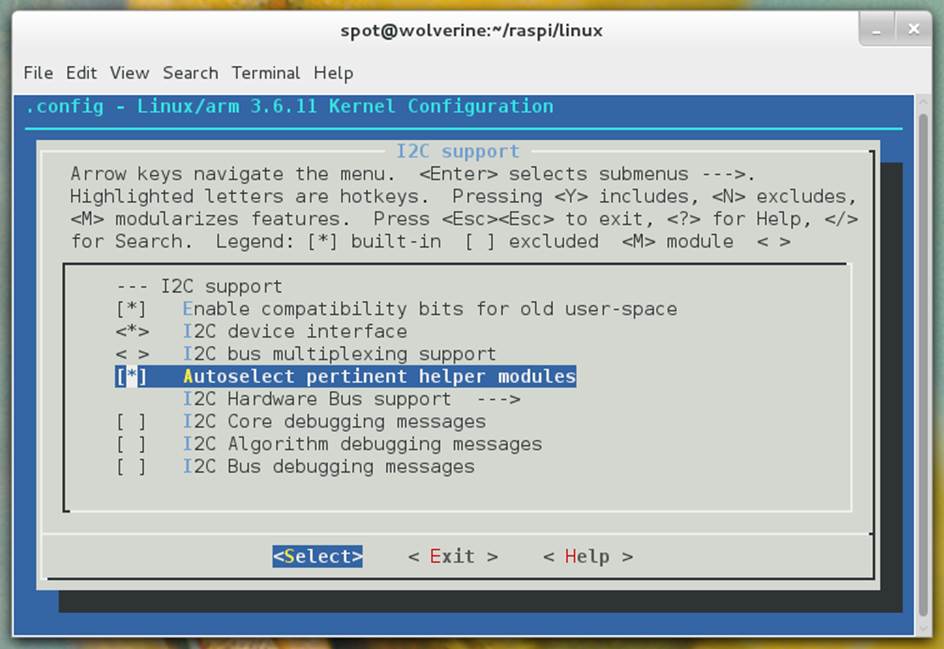
Figure 2-10. I2C support options properly enabled
Then, in the “I2C Hardware Bus support” submenu, enable the BCM2708 BSC (CONFIG_I2C_BCM2708) driver (again, as compiled-in, not as a module). This is the hardware driver for the Raspberry Pi’s I2C bus controller. The BCM2708 I2C baud rate defaults to 100000, and that is fine. It should look like Figure 2-11.

Figure 2-11. BCM2708 BSC driver enabled to be compiled-in to the kernel
It is almost never risky to enable something as a module (“M”), unless it is marked as EXPERIMENTAL or DANGEROUS. However, it is rather risky to disable something that is enabled in the default configuration. Unless you know what you are doing, you are probably better off leaving all of the default settings alone.
That said, do not be overwhelmed by the sheer volume of configuration choices. Feel free to explore by navigating through menus and reading the help entries. You just might find something interesting.
When you’re done configuring your kernel, return to the top-level menu and select Exit. The TUI will prompt you to save your new configuration. It will exit and leave you at a shell prompt, at which point you’re ready to build the kernel image.
Build the Kernel Image
To speed up the build, you can parallelize the compilation by passing the -j flag to make. You’ll need to know how many CPU cores are present on your build system to determine the ideal value.
[Hack #21] provides a longer explanation of this concept, but the basic formula we recommend trying is the number of CPU cores you have multiplied by 1.5. For example, on an eight-core laptop, it would be 12. Using that example with this flag, the command to kickoff the build is:
$ make ARCH=arm CROSS_COMPILE=arm-rpi-linux-gnueabi- -j12
If you do not want to run a parallel compilation, simply omit the -j## flag from the command (note, however, that this will cause the build to take significantly longer).
At this point, your laptop is cross-compiling the core Linux kernel image. Depending on the options you have selected, this might take a while, but if all goes well, it will finish compiling without errors. Next, you’ll need to build the matching kernel modules.
To keep the size of the core Linux kernel image small, many of the drivers for devices, filesystems, and optional functionality are normally configured to be built as Linux kernel modules. These make up a large tree of files, where each file is an individually loadable device driver.
Most Linux distributions (including Pidora and Raspbian) contain support for auto-loading appropriate kernel modules as they are needed, but you might find some situations in which you’ll want to load a kernel module manually. This model also helps with memory management and boot object size. The default configuration we provide with this book modularizes as much as possible.
To start the Linux kernel modules build, run:
$ make ARCH=arm CROSS_COMPILE=arm-rpi-linux-gnueabi- modules -j12
This will also take some time, but it should finish without errors. If a module fails to build, you might need to disable it in the kernel configuration file and restart the whole process, but this is unlikely. Now, you just need to install your new kernel.
Install a New Kernel
The core Linux kernel image for the Raspberry Pi is a specially formatted copy of the zImage binary, compiled as an ARM boot executable. This image contains the primary functions of the Linux kernel, and it contains all the necessary code for booting into the Linux operating system.
This is the file that is booted by the Raspberry Pi GPU firmware. It is not usually a large file (slightly less than 3 MB). If you’ve built a custom Linux kernel from source as described in the previous sections, you can find a copy of the core Linux kernel image atarch/arm/boot/Image within that kernel source tree.
To install a new kernel, you will need to copy files onto the SD card containing your Raspberry Pi Linux distribution. If you have not already mounted your SD card on your Linux laptop, go ahead and do so by following the directions in [Hack #2]. Make sure that both the root and boot partitions are mounted, because you will need to copy files to both partitions.
Go ahead and copy the new core Linux kernel image into the mounted boot partition on the SD card:
$ su -c 'cp -a arch/arm/boot/Image /mnt/raspi-boot/new-kernel.img'
By default, the Raspberry Pi GPU firmware attempts to boot kernel.img from the boot partition. Since you are installing a new kernel, you probably want to override this behavior.
If you want it to boot a different filename, you can specify that by adding a line to config.txt (also found on the boot partition). If for some reason config.txt is not present on the boot partition (it is not necessary for the Raspberry Pi to boot Linux), simply create a new file with that filename.
To boot a specific file, edit /mnt/raspi-boot/config.txt and add a line like this:
kernel=new-kernel.img
In this example, the Raspberry Pi GPU will now look for new-kernel.img on the boot partition of the SD card and try to execute it at boot time. Conveniently, this is the name we used when we copied over the new kernel image. We used a new name here to avoid conflicts with the stock Linux kernel image file kernel.img that came with your Raspberry Pi Linux distribution. From here on, we will assume that the Raspberry Pi Linux distribution is configured to boot your new kernel image file (as specified by kernel=).
The second set of files that you need to copy over are the prebuilt Linux kernel modules that match the new kernel image file. If you built a new Linux kernel from source, you’ll need to install your new modules into a temporary directory. To do this, simply run these commands from the top level of your kernel source code tree:
$ mkdir ~/modules
$ make ARCH=arm CROSS_COMPILE=arm-rpi-linux-gnueabi- \
INSTALL_MOD_PATH=~/modules modules_install
Unlike the core Linux kernel image (which has to be on the boot partition), the kernel modules live in the root partition—specifically, in the /lib/modules directory. All you need to do to install them is to copy the whole versioned directory (or directories) into/lib/modules on the mounted root SD card partition. For your custom-built kernel, these commands will copy over the proper modules:
$ cd ~/modules
$ su -c 'cp -a lib/modules/* /mnt/raspi-root/lib/modules/'
Post-Installation Tasks
When the last of these modules finishes copying onto the root partition, make sure you have config.txt on the mounted boot SD card partition configured to boot the new kernel image (or unconfigured, so that kernel.img is booted). Then run the sync command a few times to ensure the data has all arrived onto the SD card:
$ sync;sync;sync
Now it should be safe to unmount the SD card partition(s) and eject the SD card. You can unmount these partitions either from the GUI interface of your Linux laptop, or you can manually unmount them from the terminal by running these commands:
$ cd ~
$ su -c 'umount /mnt/raspi-boot'
$ su -c 'umount /mnt/raspi-root'
Make sure to change into a directory that is not in either of the mounted partitions before attempting to run the umount command, or that command will not succeed.
Next, put your SD card into your Raspberry Pi and plug it in. You should see it boot into the Linux kernel successfully. Once you’ve logged in, you can now run:
$ uname -a
Linux myrpi 3.6.11+ #24 PREEMPT Sun Aug 19 21:28:36 BST 2013 armv6l GNU/Linux
This will print out a list of system information, but the most important one is the version of the running Linux kernel. It should match the version of the modules directory (or directories) that you just copied over. You can also confirm that the build date printed out for the running kernel matches the date that you built your new kernel.
Hack 23. Update to the Latest Prebuilt Kernel
Want the latest Linux kernel features for your Raspberry Pi? Of course you do, and there is a way to get them without having to build it from source.
The nice folks at the Raspberry Pi Foundation are regularly hard at work adding new features to their Linux kernel source tree. They also go one step beyond and regularly update a copy of a prebuilt Linux kernel image. This kernel is configured with a set of options and modules intended specifically for the Raspberry Pi. Using this kernel means that you can be sure that all of the hardware built into the Raspberry Pi will be properly enabled, along with any Raspberry-Pi-specific functionality.
DISTRIBUTION SPECIFIC FEATURES
Some Linux distributions may assume the presence of features which are not enabled or supported in the Raspberry Pi Foundation prebuilt kernel images. Examples include SELinux, some extended filesystem attributes, and some typos of cryptography. This is one of the reasons we recommend that you keep a backup copy of the distribution provided kernel image around, just in case.
The Raspberry Pi Foundation offers prebuilt binary kernel images in the same Git repository that they use for firmware. To get a copy of this Git tree, see the instructions in [Hack #4].
Remember that this Git tree has two branches: master, which is targeted for the Raspberry Pi Linux kernel 3.2-based source tree, and next, which is targeted for the Raspberry Pi Linux kernel 3.6-based source tree. You need to make sure that your kernel and firmware revision versions match; otherwise, your kernel might not boot (or features might not work the way that you expect). The file locations for the prebuilt kernel files are identical for both branches of the Git repository.
The Raspberry Pi Foundation’s prebuilt Linux kernel is handy, having been designed for use with the Pi, and it contains a wide range of common device driver modules. However, it is missing some modules that you might need when connecting peripherals. If this is the case, you will want to build a custom Linux kernel from source, as covered in [Hack #22].
Get the Prebuilt Linux Kernel
The prebuilt Linux kernel images come in two parts:
§ The core Linux kernel image (firmware/boot/kernel.img)
§ The prebuilt Linux kernel modules that correspond to that image (firmware/modules)
You can view the history of builds for the core Linux kernel image via the GitHub website. If you want to see the history for the next branch, just change the branch via the drop-down on the website, or replace master with next in the URL.
ALTERNATIVE PREBUILT KERNEL VARIANTS
The Raspberry Pi foundation also provides two alternative variants of this prebuilt kernel:
kernel_cutdown.img
This is the smallest possible Linux kernel that can be booted on the Raspberry Pi. It contains minimal peripheral support outside of what is absolutely needed to use the embedded devices on the Raspberry Pi. It comes with a much smaller set of kernel modules than the standard kernel image.
kernel_emergency.img
This is a Linux kernel image that contains a wide range of support compiled directly into the Linux kernel. Because so much support is compiled directly into this kernel, it can be treated as a “safe mode” kernel, and it should boot properly even if the Raspberry Pi Linux userspace has problems. The downside to this kernel image is that it is large in comparison (9.2 M) and thus will have a performance impact. Also, it does not come with any kernel modules, as all of the device drivers are compiled into the kernel image!
Both of these alternative kernel images are built from the same source tree as the normal kernel image and are present in the Git checkout (firmware/boot). You can copy these to the boot partition using the same methods described for the usual image. Simply change directory into the mounted boot partition, rename any existing copies of these files to serve as backups, and then copy the new files from the Git checkout into the mounted boot partition.
Remember, if you want to boot into one of these kernels (or one of your backup kernel images), just add an appropriate kernel= line to config.txt. You might want to add multiple lines to correspond to different kernel images, but be sure to comment out any entries that you are not using by prepending a \# character to the beginning of the line.
Now you can safely copy the new core Linux kernel image from your Git checkout onto the boot partition (as root). You’ll want to rename this file from kernel.img when you do this (or rename the existing kernel.img in the SD card boot partition).
Install the Prebuilt Kernel Modules
Next, it is time to install the matching prebuilt kernel modules. You can find these modules under the firmware/modules directory from your Git checkout. There will be at least two directories here, and each will contain a version that corresponds to the version of the Linux kernel used to build these images (and modules). At the time of this writing, this version was 3.6.10, which shows as:
$ ls -l
total 8
drwxrwxr-x 3 spot spot 4096 Dec 12 21:57 3.6.10+
drwxrwxr-x 3 spot spot 4096 Dec 12 21:57 3.6.10-cutdown+
WHAT’S UP WITH THAT +?
You might have noticed that the versioned directories here have a \+ appended to them. This is a custom identifier that the Raspberry Pi Foundation uses for their kernel builds, mostly to prevent conflicts with custom kernel builds (which by default, do not contain a custom identifier).
The prebuilt core Linux kernel images will be looking for their modules in these exact directory names (including the +), so do not rename them. If there is an existing directory with the same name, it is reasonably safe to overwrite it (assuming that you have also copied the matching kernel image file from the same firmware checkout), but you can always rename the directory to act as a backup.
Just be aware that even if you boot the older kernel image via kernel= in config.txt, it will not know how to look in the renamed modules directory and will try to load its modules from the original versioned directory.
The 3.6.10+ directory contains the modules that are built for kernel.img, while the 33.6.10-cutdown+ directory contains the modules that are built for kernel_cutdown.img. Makes sense, right? If you have copied kernel_cutdown.img into the boot partition of your SD card, you will want the corresponding modules, but if you have copied only kernel.img, you can leave them alone. It will not hurt anything to also copy the cutdown kernel modules, but it will eat up about 15 MB more on your SD card.
For the prebuilt kernel, this will copy the proper modules:
$ cd ~/raspi/firmware/modules
$ su -c 'cp -a 3.6.10+ /mnt/raspi-root/lib/modules/'
From here on out, you will need to complete the same post-installation tasks that you would do for a kernel installed from source, as described in Post-Installation Tasks.
MERGING RASPBERRY PI CHANGES INTO UPSTREAM LINUX KERNEL SOURCE
At some point, ideally, the Raspberry Pi Foundation will be able to merge all of its Raspberry Pi (and BCM2835 system-on-chip) changes into the upstream Linux kernel source. This will mean that it is no longer necessary to have a separate Raspberry-Pi-specific Linux kernel source tree, and it is possible that the Raspberry Pi Foundation will stop providing new prebuilt kernel images as a result.
This is just speculation, though, because while the Raspberry Pi Foundation has indicated a desire for merging its patches into the upstream Linux kernel tree, and there are various kernel hackers working toward this goal, it has not yet happened. To date, the Foundation has not given any indication that it will stop making prebuilt kernel images. This should not be too big of a problem if it does happen, because the Linux distributions will easily be able to produce prebuilt Raspberry-Pi-specific Linux kernel images that they maintain from the upstream “Linus” source tree.
We point this out only so that if you are reading this book at a future time when this has indeed occurred and you are not seeing recently updated prebuilt kernel images in their GitHub firmware repository, you might have an idea why.
Hack 24. Split Memory Between the GPU and Linux Userspace
The performance that you get from your Raspberry Pi is tightly coupled to the amount of memory that you allocate to its core components. Because this isn’t a system you can just drop more RAM into, you should consider the needs of your project and the best way to split the available memory.
In the embedded hardware universe, memory is almost always a precious and scant commodity. The performance of the system is usually tightly coupled to the amount of present (and accessible) memory. Additionally, most embedded systems do not have any user-serviceable method to increase the amount of physical memory, and the Raspberry Pi is no different.
When the Raspberry Pi Model B was first released, it came with 256 MiB of memory (either Hynix MobileDDR2 or Samsung Mobile DRAM, depending on when it was produced). The memory rests physically on top of the Broadcom media processor in the BCM2835 system-on-chip. This is known as package on package (PoP). PoP allows for an embedded system to combine multiple ball grid array (BGA) packages in a vertical stack.
The Raspberry Pi system-on-chip uses a mixed logic-memory stack, which is useful to save space and allows the hardware vendor to choose from a wide range of compatible options (and helps them to keep costs down). This design decision allowed them to easily upgrade the amount of on-board memory on the Model B from 256 MiB to 512 MiB (all Model B units sold after October 15, 2012 have the larger amount).
HOW TO TELL WHICH PI YOU HAVE
If you have a Pi that’s been sitting around for a while, and you’re not sure which one it is, you can use cat /proc/cpuinfo to find out. The results look like this:
Processor : ARMv6-compatible processor rev 7 (v6l)
BogoMIPS : 795.44
Features : swp half thumb fastmult vfp edsp java tls
CPU implementer : 0x41
CPU architecture: 7
CPU variant : 0x0
CPU part : 0xb76
CPU revision : 7
Hardware : BCM2708
Revision : 000e
Serial : 0000000011185abc
The part after Revision tells you which board you have. Refer to this table:
|
Revision code |
Model |
Rev number |
RAM (MB) |
|
0002 |
B |
1.0 |
256 |
|
0003 |
B |
1 |
256 |
|
0004 |
B |
2 |
256 |
|
0005 |
B |
2 |
256 |
|
0006 |
B |
2 |
256 |
|
0007 |
A |
2 |
256 |
|
0008 |
A |
2 |
256 |
|
0009 |
A |
2 |
256 |
|
000d |
B |
2 |
512 |
|
000e |
B |
2 |
512 |
|
000f |
B |
2 |
512 |
This significantly improved the performance of the Raspberry Pi. Unfortunately, making a change to the amount of memory is a decision that can really be made only at fabrication time, and it’s not one that a user can easily hack. Stacking these tiny BGA units is best done by robots, not clumsy human hands.
Even with the newer 512 MiB of memory, it’s a precious resource. Because of how the BCM2835 system-on-chip works, some of this memory must go to the GPU. You might have seen this sort of behavior on lower-end GPU cards for x86 computers, which do not include dedicated on-GPU memory and dedicate some system memory for GPU usage. The Raspberry Pi firmware allows for you to customize the amount of memory that is allocated to the GPU.
Before the 512 MiB Raspberry Pi Model B units existed, customizing memory allocation was accomplished by choosing a start.elf file corresponding to the splits shown in Table 2-1.
Table 2-1. Memory allocation on 256 MiB Raspberry Pi Model B
|
ARM CPU |
Videocore GPU |
Filename |
|
128 MiB |
128 MiB |
arm128_start.elf |
|
192 MiB |
64 MiB |
arm192_start.elf |
|
224 MiB |
32 MiB |
arm224_start.elf |
|
240 MiB |
16 MiB |
arm240_start.elf |
This worked well when the Raspberry Pi Model B firmware had only one possible memory size (256 MiB) to support, but when they started producing the 512 MiB Model B units, this approach no longer made sense. Among other reasons this didn’t work, the most obvious is that twice as many splits are possible on the 512 MiB units (even if some of them are pretty ludicrous). They also wanted the firmware to be able to support both units, and the split-out start.elf model was very much hardcoded to the 256 MiB size.
Allocate Memory with config.txt
The current firmware (necessary for the 512 MiB units) abandons the separate start.elf file approach and adds support for start.elf to read in a variable (gpu_mem) from config.txt that specifies exactly the amount the user wants to allocate to the GPU in chunks of 16 MiB, with 16 MiB as the minimum and 448 MiB as the maximum.
To set this, open config.txt (on the boot partition of the SD card containing the Raspberry Pi Linux image) in the editor of your choice and use the following syntax (where value is an integer representing the total MiB to dedicate to the GPU, in chunks of 16 MiB, 16 to 128 MiB):
gpu_mem=(value)
The Raspberry Pi firmware sets gpu_mem=64 as the default. But just how much memory should you allocate to the GPU? The answer depends on what your Raspberry Pi will be used for.
If you’re using it in a headless mode (see [Hack #11]), you can set gpu_mem to the minimum value of 16. If you do this, you will need to be sure that start_cd.elf and fixup_cd.elf are present, because they will be used instead. Be careful with this, because video will not work at all at this minimal setting, but on the upside, it will leave 496 MiB for the ARM CPU (this gets used by Linux userspace).
For an only slightly video-friendly option, at gpu_mem=32, the Linux kernel can drive the framebuffer at 1080p, but 3D and video processing will not work properly. At gpu_mem=128, you will get excellent 3D and video decoding performance, but you will leave the Linux userspace with only 384 MiB.
In the middle of the road with a 256 MiB/256 MiB split, you will give the GPU enough memory to handle big textures, but the Linux userspace will really struggle. It is possible to increase this value up to 448 MiB, but we don’t recommend exceeding 128 MiB unless you have an exceptionally GPU-intensive use case.
While the core Linux kernel is capable of running in memory-starved environments, most userspace applications (especially graphical ones) rely on the availability of tens of MiB of memory to run properly. The Raspberry Pi contains less memory than most popular smartphones (for example, the Galaxy Nexus and iPhone 5 have 1 GiB, and the Nexus 4 has 2 GiB).
Also keep in mind that Linux aggressively pre-caches available memory that is not currently being used by applications to improve system performance. This means that the more memory you can allocate to the ARM CPU, the better performance you’ll get from Linux.
MAKE A CONFIG.TXT COMPATIBLE WITH 256 OR 512 MIB MODELS
It is possible to make a config.txt that works on both 256 MiB and 512 MiB Raspberry Pi Model B units. To set the GPU memory to be compatible with both units, you need to use the gpu_mem_256 and gpu_mem_512 parameters. The gpu_mem_256 parameter is used on the 256 MiB Raspberry Pi Model B, overrides any value set in gpu_mem=, and is ignored entirely on the 512 MiB Raspberry Pi Model B.
The same is true of the gpu_mem_512 setting, except that it is used on the 512 MiB unit and ignored on the 256 MiB unit. gpu_mem_256 has a max value of 192, and gpu_mem_512 has a max value of 448.
On Raspbian, it is also possible to configure an explicit memory split by using the raspi-config utility. Launch raspi-config as root, and select the Memory Split option.
For most of the hacks and projects in this book, gpu_mem=128 should be a good place to start. It’s the setting that has given us the best possible overall performance in most of our tinkering. Feel free to experiment, though, as the only real damage you can do is to the Raspberry Pi’s performance, and you can always change it back.
Automatically Share Memory
While you might be able to guess how much memory you want to split between the CPU (OS) and the GPU (graphics), there are a lot of situations where you probably will not know for sure. In cases like this, you really want to be able to configure your Raspberry Pi to split the memory on the fly, allocating it between the CPU and the GPU as needed.
As of the post-November 2012 firmware and 3.6 Linux kernel updates, there is a better way to manage the GPU/CPU memory split. Called the Contiguous Memory Allocator (CMA), it enables a dynamically managed memory split between the GPU and the ARM CPU by setting low- and high-water marks for the GPU.
The config.txt parameter for the GPU low-water mark is cma_lwm, and cma_hwm is the parameter for the GPU high-water mark. In order to use these parameters, you also must pass some options to the Linux kernel at boot time. You can do this by adding these options to cmdline.txt (on the boot partition of the SD card):
coherent_pool=6M smsc95xx.turbo_mode=N
This change to cmdline.txt also has the side-effect of disabling the turbo mode for the built-in ethernet controller on the Raspberry Pi, but you might not mind too much unless you have a network-intensive use case. Disabling turbo mode also sometimes improves wireless network performance (and eliminates a lot of DEBUG noise in the system logs in some cases).
In this configuration, you will also need to set the following values in config.txt:
gpu_mem_256=112
gpu_mem_512=368
cma_lwm=16
cma_hwm=32
cma_offline_start=16
Once you have rebooted the Raspberry Pi with these settings in place, it will result in 466 MiB memory free (212 MiB on the 256 MiB Model B unit) for the Linux userspace by default, with more allocated to the GPU as needed (within the watermarks).
While this CMA support is comparatively new, we highly recommend trying it instead of hardcoding the split for most common use cases. It will improve things like web browser performance while still allowing for high GPU memory utilization cases on-demand.
Hack 25. Update the Firmware and Prebuilt Binary Kernel the Easy Way
Everything’s easier when there’s a tool for it, and fortunately, Liam McLoughlin (a.k.a. “Hexxeh”) has created one for updating your Raspberry Pi firmware and kernel.
rpi-update is a shell script that automates the process of updating the firmware, prebuilt binary kernel, and prebuilt VideoCore SDK files on an SD card containing a Raspberry Pi Linux distribution image.
First, make sure that you have the readelf and git binaries installed in your chosen Raspberry Pi Linux distribution. You will need these commands for successful use of the rpi-update script. On most Linux distributions, readelf is in the binutils package andgit is in the git package.
To install it, run the following (as root) on Pidora:
$ su -c 'yum install binutils git'
or Raspbian:
$ su -c 'apt-get install binutils git-core'
To use this script, download it from within your running Raspberry Pi Linux Distribution image with the following command:
$ wget https://raw.github.com/Hexxeh/rpi-update/master/rpi-update
You will need to put it in your $PATH and set it executable. The simplest way to do this is to run the following commands (as root):
$ su -c 'cp rpi-update /usr/bin/'
$ su -c 'chmod +x /usr/bin/rpi-update'
Then, to update the firmware, prebuilt binary kernel, and VideoCore SDK libraries all at once, simply run (as root):
$ su -c 'rpi-update'
There are, however, a few caveats to using this shortcut tool:
§ It does require you to run the script from within the running Linux environment. Make sure that the time is set properly within the environment, or you might get script failures relating to clock drift.
§ The script does not let you perform fine-grained update operations (e.g., just update the firmware). It is an all-or-nothing experience.
§ The script assumes that the VideoCore files are located under /opt/vc. Some Raspberry Pi Linux distributions (such as Pidora) place the VideoCore files in a different location or include them in the system library directories, so this script will not work well for them.
The rpi-update script does not use the official GitHub repository for prebuilt files because of the size of that repository. Instead, Hexxeh keeps a copy of those files in a separate GitHub repository with a different filesystem layout.
While this separate repository seems to be manually synced with the official repository on a regular basis, keep in mind that it is possible that you will not be getting the absolute latest available revisions of these files. Sometimes, that’s how it goes when you try to take shortcuts.
Hack 26. Emulate the Pi
Whether you’re travelling without your Pi, need to test something in a hurry, or your kids have taken over the Pi while you weren’t looking, it can sometimes be convenient to emulate it on another machine. QEMU can help.
QEMU (short for Quick EMUlator) is an open source, hosted hypervisor. That means that you can use it to run a Linux distro that was made for your Raspberry Pi (which uses ARM hardware) on your usual computer (an x86 laptop, for example).
It has two modes. The first is user-mode emulation, which lets you run single programs that weren’t compiled for your machine. But this hack focuses on QEMU’s full-system emulation, which lets you emulate an entire computer—in this case, a Raspberry Pi.
First install QEMU, by running this command on Fedora:
$ su -c 'yum install qemu'
Or, you can run this on Debian/Ubuntu:
$ su -c 'apt-get qemu-system-arm'
Download kernel-qemu from http://xecdesign.com/downloads/linux-qemu/kernel-qemu. You can also compile your own kernel.
WHY IS THIS KERNEL SPECIAL?
You might have noticed that we have not pointed you to the hack in this book ([Hack #22]) that covers building a custom kernel for booting on the Raspberry Pi. This is intentional, because that kernel will not work on qemu_. Qemu emulates a wide range of hardware environments, but the exact hardware found in the Raspberry Pi is not yet one of them.
The kernel-qemu file uses the closest match available in qemu and provides the same level of ARM optimization and runtime support. This allows you to use almost everything in your Raspberry Pi Linux distribution userspace as is. The most notable exception is the videocore libraries (and any applications which use them). Because qemu has no BCM2835 system-on-chip hardware emulation, these applications will fail to operate properly in qemu emulation.
Create a directory to work in, and put a copy of your distro’s image and kernel-qemu in it. The rest of this example will use the Pidora 18 image (pidora-18-r1c.img) and qemu as that directory, though you can replicate these instructions for other distros and of course name your directories whatever you like.
Run file on the image:
$ file pidora-18-r1c.img
pidora-18-r1c.img: x86 boot sector; partition 1: ID=0xc, active, starthead 32, startsector 2048, 102400 sectors; partition 2: ID=0x83, starthead 32, startsector 104448, 3389858 sectors, code offset 0xb8
Take the startsector number from partition 2 (bold in the previous output) and multiply it by 512 to use as the offset number when you mount the image:
$ sudo mount qemu/pidora-18-r1c.img -o offset=53477376 /mnt/pidora
Now open /mnt/pidora/etc/ld.so.preload in a text editor and comment out the one line you find there by adding a # in front of it and saving the file. You can now unmount:
$ sudo umount /mnt/pidora
And you’re ready to start Pidora in QEMU:
$ qemu-system-arm -kernel kernel-qemu -cpu arm1176 -m 256 -M versatilepb -serial stdio -append "root=/dev/sda2 panic=1" -hda pidora-18-r1c.img
These are the options you’re setting:
-kernel
You’re telling it to use the kernel-qemu kernel file you downloaded. If you created your own, specify its name+/path+ here instead.
-cpu
The Raspberry Pi contains an ARM1176 core, which you specify here. To see the complete list of options QEMU offers, use the command qemu-system-arm -cpu help.
If you have an older QEMU installation or acquire it from a package that hasn’t been updated, you might encounter a problem with the -cpu option, because older versions didn’t support ARM1176. You might be able to make this work by substituting arm1136-r2, but it would be better to update your version of QEMU.
-m
This sets the virtual RAM in megabytes. It is unlikely to work with more than 256.
-M
This sets the emulated machine type. (We’re specifying the Versatile PB platform here.)
-serial
This redirects the virtual serial port. The default is vc in graphical mode and stdio in non-graphical mode.
-append
This option gives the kernel command-line arguments.
-hda
This is the location of the image of the distro you’re emulating.
You can read further documentation of QEMU’s options at http://qemu.org.
This will take you to the first boot screen, and you can go through that process just like you would on an actual Pi. It will reboot at the end, but QEMU will close, and you’ll have to start it again. Just press the up arrow once to get to the previous qemu-system-armcommand and run it again.
This time you’ll boot through to the login screen and can use it as if you were on an actual Raspberry Pi.
Hack 27. Try Occidentalis: The Raspberry Pi Distro for (Advanced) Education
If you’re interested in using the Pi for hardware-hacking education (or learning!), Adafruit’s Raspberry Pi Educational Linux Distro (a.k.a. Occidentalis), is a great place to start.
Raspbian was one of the first Linux distributions designed specifically for the Raspbery Pi, and it was based on Debian 7.0, nicknamed “Wheezy.” Thus the Raspberry Pi version was named with the portmanteau “Raspbian Wheezy.” But online electronics shopAdafruit found that Raspbian Wheezy didn’t have some of the features it most wanted for hacking through the Raspberry Pi’s breakout pins, so it decided to create its own. It’s called Occidentalis and is based on Raspbian Wheezy with hardware SPI, I2C, and WiFi support built in, among other things.
Occidentalis is recommended for those with Linux experience who are interested in taking full advantage of the hardware. Despite the “for education” aspect, it’s not meant for beginners. That doesn’t mean it’s useless for kids; rather, it means that this is a do-it-together sort of project.
Occidentalis is worth mentioning in this book, because it is intended for use with electronics. This means that it comes preconfigured in kernel and userspace to access and control some commonly available sensors and components. This is especially true if they come from Adafruit. Using Occidentalis will save you some time if you’re attempting [Hack #37].
As of this writing, the current version of Occidentalis is v0.2, based on Raspbian Wheezy from August 16, 2012. Version 0.1 includes:
§ Firmware updating: Liam McLoughlin (“Hexxeh”) created a tool called rpi-updater to update the Raspberry Pi’s firmware. We talk about it in more detail in [Hack #25].
§ I2C and hardware SPI supported and initialized at boot.
§ Ready-to-go sshd at first boot: At boot, the ssh keys are generated with a username and password of pi/raspberry on raspberrypi.local.
§ Support for WiFi through the Realtek RTL8188CUS USB module, a tiny 802.11b/g/n WLAN controller, which you can purchase from Adafruit and other vendors for about $12.
§ One-wire support on GPIO 4. See this GitHub page.
Version 0.2 includes those features as well as:
§ Removed persistent wlan0 entry
§ RTC, lm-sensors
§ Kernel modules DS1307, AD626 I2C digipots, HMC6352, BMP085, and ADS1015, which support common sensors, like weather sensors
§ Custom PWM/Servo kernel module
OCCIDENTALIS AND HYNIX
If your CPU says “Hynix” in a handwriting-style font on it, that indicates that you have Hynix RAM. It will not work with Occidentalis as of version 0.2. The next version is expected to be compatible.
Download the most recent version of Occidentalis at http://learn.adafruit.com/. It is only a 99 MB download, which decompresses to a 2.6 GB image, so you only need a 4 GB card, unless you want extra room for storage. As of v0.2, you should see the raspi-config tool at boot. If not, or if you’d like to return to it later, enter:
$ sudo raspi-config
WHAT’S WITH THE CRAZY NAME?
For starters, it’s a lot quicker to type “Occidentalis” than “Adafruit Raspberry Pi Educational Linux Distro.” But if you go to http://learn.adafruit.com, you’ll notice that the Occidentalis logo looks a lot like the Raspberry Pi logo, but a bit darker.
Rubus occidentalis is a particular species in the rose family more commonly known as “black raspberry,” hence the name and the logo.
Your options in raspi-config should look familiar if you’ve used Raspbian, upon which Occidentalis is based. Here are the ones you’ll most likely want to use or change up front:
expand_rootfs
Clicking this will give you no further options; it will simply expand the root partition to fill the available space on the SD card, which will be available after the next reboot.
change_pass
Since the pi user’s password is publicly known, it’s a good idea to change it at first boot.
boot_behaviour
Tell it whether you want to boot to the command line or to the GUI desktop.
update
Update to the latest packages.
Of course, for update, you’re going to need to be online, which is easy if you plugged into a wired connection. But if you’re using a WiFi dongle, you’ll have to set up the wireless connection first. Though Raspbian offers a GUI tool on the desktop to do so, Occidentalis does not. Open the network interfaces file in a text editor:
$ sudo vi /etc/network/interfaces
Edit the last two lines for your network configuration:
auto lo
iface lo inet loopback
iface eth0 inet dhcp
allow-hotplug wlan0
auto wlan0
iface wlan0 inet dhcp
wpa-ssid "Change this to your network SSID"
wpa-psk "Change this to your network password"
Remember to leave the quotation marks intact. Reboot, and your wireless connection should be working.
It’s also worth noting, particularly if you’re using the Raspberry Pi with your kids, that Occidentalis (and generally anything on the Pi) is not going to be up to the speed they expect. In fact, it’s almost certain that at some point you’re going to assume that something’s not working when really it’s just taking much, much longer than you expect—even “simple” things, like opening a Midori browser window or going to a web page. Patience is the key with the Pi.
Hack 28. Monitor the Pi’s IP Address
Sure, you can ifconfig every time you need to know your Pi’s IP address. Or you could see it at a glance any time.
This hack is all about knowing the IP address on your Pi. Unless you keep your Pi connected to a monitor and a keyboard all of the time, or have its IP statically assigned, you might not be able to easily determine its IP address. With a little bit of hardware and a little bit of software, you’ll be able to answer that question whenever you want to, simply by taking a look at your Pi, as shown in Figure 2-12.
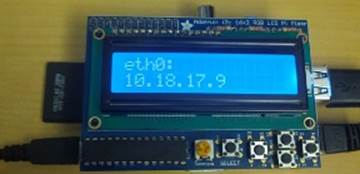
Figure 2-12. Raspberry Pi showing the eth0 IP
How do we perform this magical feat? Well, the trick is in another Adafruit project kit: the LCD Pi Plate. The lovely and talented folks over at Adafruit have designed a simple way to stack an 16 x 2 LCD and a simple keypad right on top of a Raspberry Pi. It comes as an unassembled kit, but putting it together is simple.
Build the LCD Pi Plate
To assemble the LCD Pi Plate, you will need:
§ A soldering iron (and solder)
§ A LCD Pi Plate Kit (it includes a 16x2 Blue LCD, but Adafruit sells other colors)
§ Fine wire cutters
§ A narrow-tipped Phillips screwdriver
§ Tall stacking header (optional)
There are many different ways to connect an LCD to a Raspberry Pi, but the LCD Pi Plate has some notable advantages for this hack. The LCDs that Adafruit uses require a lot of digital pinouts (six to nine, depending on the functionality of the LCD device). If you attached this device directly to your Raspberry Pi, you’d take up a lot of GPIO pins simply to add an LCD.
But the LCD Pi Plate provides a stackable way to add an LCD (think Arduino shield) that uses only two pins, the I2C pins. Also, because of how the I2C bus works, you can attach additional devices to those pins and they will appear on the I2C bus (as long as they do not have conflicting addresses). On top of that, you get five push buttons that you can use to interact with the LCD.
Adafruit has a fantastic tutorial that walks you through the process of assembling the LCD Pi plate. But if you’re unable to view it for some reason, the kit is very straightforward.
Basically, you solder in the two 220 ohm resistors (labeled Red, Red, Brown, Gold) in the slots labeled RED and BLUE, and the 1 remaining resistor (330 ohm, labeled Orange, Orange, Brown, Gold) goes in the slot labeled GREEN. Trim the excess leads away after soldering. Then, insert all of the push buttons in the marked button slots (all the way flush with the board) and solder them in.
Next, solder in the potentiometer (it has three “legs”) in the slot marked Contrast, and the MCP23017 i2c port expander chip gets soldered into the slot marked (MCP23017). Just make sure you align the notch in the chip with the notch in the silkscreened outline, or it will not work.
At this point, we recommend deviating from the Adafruit kit a bit. It comes with a normal height header connector (looks like a black plastic rectangle with holes and pins on the other side), which will work fine, but if you want to be able to connect other devices through the LCD Pi Plate (specifically, the Pi Cobbler), you should buy one of the extra-tall stacking headers. Either way, put the header in the underside of the board so that the pins stick up through the top. The header is where it will connect to the Raspberry Pi GPIO pins. Solder it in (on the top).
Then, stick the rubber bumper to the underside of the board, right above where you soldered in the buttons, sitting flat, as close as you can get it to the buttons and the left edge without overlapping or going off the board.
Break off a 16 pin length of the header pins (or 18, if you bought a different LCD that requires more), and insert it into the top of the LCD Pi Plate with the long pins sticking up. Put the LCD into position, setting into to the long header pins. Solder each of the header pins on the underside of the board and on the top of the LCD.
At this point, it should be completely assembled (and sturdy). You can push it onto your Raspberry Pi, inserting the GPIO pins into the connector so that it lines up neatly on top of the Raspberry Pi.
Again, if any of these steps are unclear, the Adafruit online tutorial is excellent, so you should refer to it if you get confused along the way.
Install Software to Control the LCD Pi Plate
Adafruit is also worthy of respect because it writes open source software to drive the hardware that it sells. The LCD Pi Plate has a Python library written for it that you can use to access and program the LCD and buttons. You can get a copy from their GitHub repository, but we have also included a copy in the GitHub repository for this book (along with some additional code that we wrote to monitor the IP address on the Pi).
Go ahead and clone our GitHub repository on your Raspberry Pi (if you haven’t done it already):
$ git clone https://github.com/spotrh/rpihacks
In order for any of this software to work, you need to enable the I2C support in the Linux kernel. If you’re using a custom kernel (on any Linux flavor), configured as described in [Hack #22], you don’t need to do anything here. If you’re running Pidora or Occidentalis without a custom kernel, you also have everything you need need preconfigured.
But if you’re running a Raspbian instance running your kernel, you will need some additional configuration to enable I2C support. Specifically, you need to run the following command:
$ su -c 'modprobe i2c-bcm2708'
To make that persistent, you will also want to edit /etc/modules and add these lines to the end of the file:
i2c-bcm2708
i2c-dev
On any distro, you’ll need to install some software to add a Python module for System Management Bus (SMBus) support (you can think of SMBus as a stricter version of I2C), the python-rpi, the I2C utilities, and the python-netifaces module (this is how you will get the IP address information).
Pidora doesn’t have a packaged version of python-smbus in release 18 (the current release as of this writing), so we’ve included a RPM package for you in the book’s GitHub repository.
On Pidora, run:
$ su -c 'yum install i2c-tools python-rpi.gpio python-netifaces -y'
$ su -c 'yum install rpihacks/i2c-tools-python-3.1.0-5.fc18.armv6hl.rpm --nogpgcheck'
On Raspbian/Occidentalis, run:
$ su -c 'apt-get install python-dev python-rpi.gpio python-smbus i2c-tools python-netifaces'
Run the Code
With this software installed, you can scan the I2C bus (bus 1) for the LCD Pi Plate:
$ su -c 'i2cdetect -y 1'
0 1 2 3 4 5 6 7 8 9 a b c d e f
00: -- -- -- -- -- -- -- -- -- -- -- -- --
10: -- -- -- -- -- -- -- -- -- -- -- -- -- -- -- --
20: 20 -- -- -- -- -- -- -- -- -- -- -- -- -- -- --
30: -- -- -- -- -- -- -- -- -- -- -- -- -- -- -- --
40: -- -- -- -- -- -- -- -- -- -- -- -- -- -- -- --
50: -- -- -- -- -- -- -- -- -- -- -- -- -- -- -- --
60: -- -- -- -- -- -- -- -- -- -- -- -- -- -- -- --
70: -- -- -- -- -- -- -- --
Sure enough, you can see the Adafruit LCD Pi Plate on the I2C bus, as device number 20.
Now, go ahead and change into the Adafruit_CharLCDPlate/ directory within your checkout of our GitHub repository:
$ cd rpihacks/Adafruit_CharLCDPlate
In that directory, you will see a few Python files. Most of these provide the library of functions necessary to access the LCD Pi Plate. If you just want to test proper operation of your wiring and soldering work, you can run the Adafruit test script:
$ su -c 'python ./LCDtest.py'
This will cycle through the background colors and print text strings to the LCD when you press the buttons on the Pi Plate. If you are using the Blue 16x2 LCD that normally comes with this kit, it does not support different background colors, so this program will seem to dim the background depending on which button you press. Don’t get scared if this happens.
If no visible text appears, but you can see the LCD blinking, you probably just need to adjust the contrast. Use your fine-tipped Phillips screwdriver to turn the potentiometer (it’s the round knob next to the buttons with a Phillips-shaped slot in it) until text appears.
When you’re satisfied with the test script, it’s time to get to the good stuff. We’ve written a different Python script that, when executed, will run a simple program that displays the IP addresses for eth0 and wlan0. It also has a crude menu structure, so that you can push the Up and Down button on the LCD Pi Plate to switch between displaying the IP address for eth0 and wlan0, respectively. The other buttons will return you to the menu screen.
To run that program, simply run:
$ su -c 'python ./LCD-pi-plate-demo.py'
If you want that program to run in the background, just add a & after ./LCD-pi-plate-demo.py (but within the '' marks for the su -c invocation).
You should see this on the LCD panel:
Pi IP Addrs
UP:eth0 DN:wlan0
If you press the Up button on the LCD Pi Plate, it will try to display the address for eth0 (if any).
If you press the Down button on the LCD Pi Plate, it will try to display the address for wlan0 (if any).
While we know that the Raspberry Pi does not have built-in wireless networking support, it is common for people to add that support by connecting a USB wireless device.
While eth0 and wlan0 devices are hardcoded in our script, you can easily change them if you’d prefer to display other networking devices. This code is simple: if you have a basic understanding of Python, you should be able to figure out how it works. Feel free to take what we’ve made and improve upon it!
Hack 29. Run Android on the Raspberry Pi
Read through this chapter and got tired of all the Linux? Or maybe you just love Android. Either way, it’s not impossible to run Android rather than a Linux distribution on your Raspberry Pi, but this is a project for the dedicated hackers.
The good news is that there is a community based around running Android on the Raspberry Pi, which means if you’ve decided to give it a shot, there are people to whom you can turn. They gather information on a wiki athttp://androidpi.wikia.com/wiki/Android_Pi_Wiki. For a quick status check, log into their IRC channel, #razdroid, on Freenode.
The bad news is that this isn’t one of the faster moving communities you’ll find. This isn’t a reflection on the community at all. Rather, the Raspberry Pi was simply not designed for Android. In July 2012, Eben Moglen posted on the Raspberry Pi blog about the progress on a port of Android 4.0 (Ice Cream Sandwich) for the Pi. Unfortunately, that was well over a year ago as of this writing, and it is also the last update on the subject. The Razdroid wiki now states “Very doubtful that any Android that will be usable will ever be released.”
But even a nonfunctional system is an opportunity for learning, and learning is what the Raspberry Pi was designed for. So if Android and Raspberry Pi both interest you, there’s no harm in giving it a shot. The worst outcome is that you say, “Well, that didn’t work,” which you expected from the beginning anyway. The best outcome is that you learn something about the Android, the Pi, or both in the process.
Since that official Android built by Broadcom hasn’t appeared yet, the working builds are based on CyanogenMod, a popular replacement firmware for Android-based phones and tablets. CyanogenMod isn’t the only such replacement, but it is one of the most popular ones.
ANOTHER ODD NAME
“Cyanogen” was the screen name of developer Steve Kondik, whose replacement firmware for the HTC Dream was built on one by a developer who stopped work on his popular mod and directed its users to Cyanogen’s.
The short way to go about this is to download one of the images that others have built and install it to your SD card. CyanogenMod 9 (based on Android 4.0)is so useless as to be considered unusable. Thus the available images are built on CyanogenMod 7.2 (based on Android 2.3).
If you’re an Android phone or tablet user who enjoys CyanogenMod, you recognize that the current version is well past either of these.
The wiki describes this version as “Boots, very slow, barely usable.” However, there are more than a few blog posts from people who enjoy it for some purpose or another, so don’t let that deter you.
The bottom of the main page of the Android Pi wiki includes several download links. The first has notes that state it may or may not work only on Model A Raspberry Pis. We used cm7_img_24-7-2012.tar.gz, the image for CyanogenMod 7.2.
Download the ZIP file and extract the image using dd, replacing /dev/mmcblk0 with the location of your SD card and the img filename with the correct one if you’re using a different image:
$ dd bs=4M if=cm7_img_24-7-2012.img of=/dev/mmcblk0
Then put your SD card in the Pi, power it on, and you’ve got Android on Pi, as shown in Figure 2-13.
If you have never built Android (or Cyanogenmod, or perhaps anything else) before, you will need to install quite a few packages. You should also follow the steps in [Hack #21] before proceeding.

Figure 2-13. Android running on the Raspberry Pi
The Android Pi wiki offers a set of instructions for compiling CyanogenMod to run on your Raspberry Pi. We have run them several times on multiple systems with varied results—mostly of the negative sort. It’s a learning exercise if this is unfamiliar territory for you, and that is always a worthwhile venture. We offer this information largely as fair warning to those who might get excited about the possibility but disappointed with the result.
Note that if you do want to compile CyanogenMod yourself for the Raspberry Pi on Fedora, you’ll need a slightly different set of packages installed from the instructions on the wiki:
$ su -c 'yum install make curl gnupg git bison unzip zip flex gperf gcc-c++ libstdc++-devel glibc-devel.i686 zlib-devel.i686 ncurses-devel.i686 libX11-devel.i686 mesa-libGL-devel.i686 readline-devel.i686'
Other than that, the build instructions are the same. Ideally you will end up with usable files you can flash to your SD card. Don’t be too frustrated if it doesn’t successfully finish—you’re certainly not alone, and this is a complicated problem. Take what you’ve learned from the experience, and then if you still want to try Android on the Pi, simply use the image offered on the wiki.
All materials on the site are licensed Creative Commons Attribution-Sharealike 3.0 Unported CC BY-SA 3.0 & GNU Free Documentation License (GFDL)
If you are the copyright holder of any material contained on our site and intend to remove it, please contact our site administrator for approval.
© 2016-2026 All site design rights belong to S.Y.A.