Raspberry Pi: A Quick-Start Guide, 2nd Edition (2014)
Chapter 11. Control the Pi Camera
One of the greatest advantages of the Pi’s homogeneous hardware is that it’s easy to build new accessories for it. The Raspberry Pi team has had a CSI (Camera Serial Interface) slot on the board from the beginning, and they recently released a camera module.
The camera is tiny but powerful. You can use it to take high-definition photos and record videos. Its small size, low weight, and modest power consumption make it an ideal candidate for many interesting projects. For example, you can attach it to a remote-controlled quadcopter to record some videos of your latest maneuvers.
In this chapter, you’ll learn how to connect the camera to the Pi and how to get it up and running. You’ll use simple command-line tools to take photos and record videos. Also, you’ll build an automatic burglar alarm using the camera and a PIR sensor.
Meet the Camera’s Hardware
The Pi camera module is very small: 24mm x 25mm. Its height is 9mm, and it weighs only about 3 grams. Like the Pi, it doesn’t look very pretty (see Figure 57, The camera's design is similar to the Pi's), but like the Pi it’s surprisingly powerful and versatile.
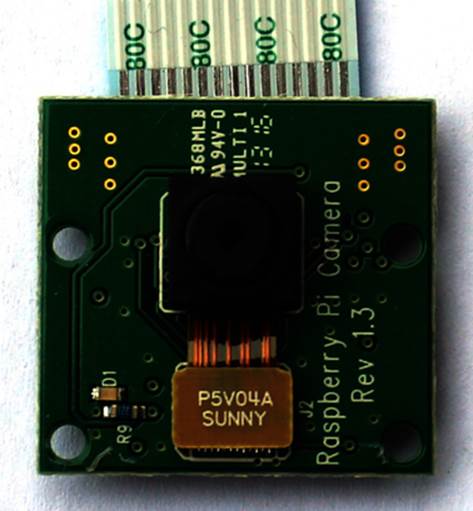
Figure 57. The camera’s design is similar to the Pi’s.
In most regards, the camera is similar to the cameras you can find in modern smartphones. It has a fixed-focus lens that captures photos at a resolution of 2592 x 1944 pixels. It supports three video modes with different resolutions and frame rates: 1080p at 30 FPS, 720p at 60 FPS, and 640 x 480 at 60 or 90 FPS.
Connect the Camera to the Pi
Connecting the camera module to the Pi isn’t difficult, but working with the CSI port is a bit unusual compared to connecting USB devices, for example. Before you can plug in the camera, you have to open the CSI connector by pulling it up a little bit. Hold the Raspberry Pi board with one hand, grasp the connector between the thumb and forefinger of your other hand, and pull it up a few millimeters. Then insert the camera’s cable carefully while the cable’s contacts point to the HDMI connector. Finally, close the CSI connector by pressing it firmly from above. In Figure 58,Connecting the camera is easy but a bit unusual, you can see how to connect the camera module correctly.
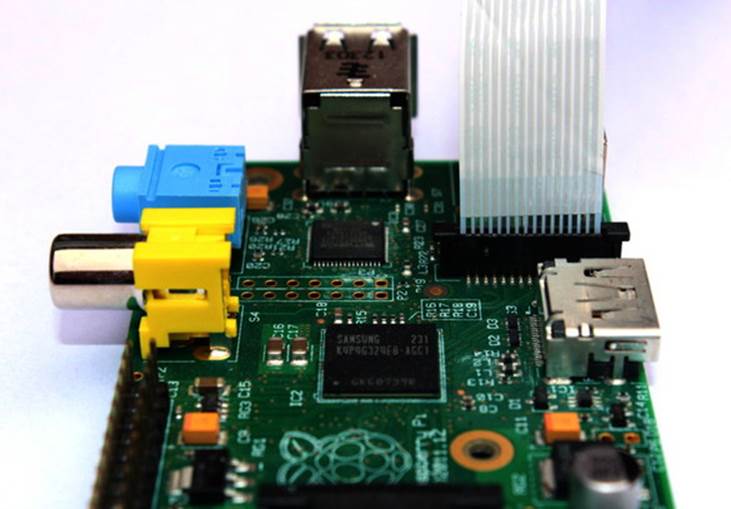
Figure 58. Connecting the camera is easy but a bit unusual.
To make the camera work, you have to install some drivers; you’ll learn how to do that in the next section.
Install the Camera Drivers
The latest version of Raspbian includes all the camera drivers. If you don’t run the latest version, you’ll have to update your software stack. Issue the following commands:
|
|
$ sudo apt-get update |
|
|
$ sudo apt-get upgrade -y |
|
|
$ sudo apt-get install git-core -y |
|
|
$ sudo wget http://goo.gl/1BOfJ -O /usr/bin/rpi-update |
|
|
$ sudo chmod +x /usr/bin/rpi-update |
|
|
$ sudo rpi-update |
These commands install the latest firmware and camera drivers for your Pi. Also, you have to run raspi-config to enable the camera (see Enable the Pi Camera) and set the GPU memory to 128MB (see Adjust the Pi’s Memory Layout).
In addition to the drivers, you get a few useful command-line tools for taking photos and videos. In the next sections, you’ll learn how to use them.
Take Some Photos
After you’ve connected the camera and installed the drivers, it’s easy to take some photos. The tool for the job is raspistill. When you call it without any arguments, it prints a long list of options.
|
|
$ raspistill |
Before we play with the options, let’s take an initial test photo. Run the following command and point the camera to something that looks interesting.
|
|
$ raspistill -o first.jpg |
This command will take a photo and write it to a file named first.jpg. Before the camera actually captures the photo, it’ll show a preview on the screen for five seconds. Note that you don’t have to start a graphical desktop environment to work with the camera. It will work just fine using a plain text terminal.
If you’d like to take a photo immediately—that is, without a five-second delay—you have to run the following command:
|
|
$ raspistill -t 0 -o first.jpg |
With the -t option, we can set the delay in milliseconds. When we set it to 0, raspistill doesn’t show a preview window. If you’d like to have a delay but you want to disable the preview window, you have to set the -n option.
|
|
$ raspistill -t 2000 -n -o first.jpg |
In this case, raspistill will wait for two seconds before taking a photo, but it won’t show the preview window. We can adjust the preview window’s size in a couple of ways. We can make it occupy the entire screen, and we can set it to an arbitrary size.
You might’ve noticed that the photos you’ve taken so far have been flipped horizontally. Using -hf , we can change this 'padding:0cm .75pt 0cm .75pt'>
$ raspistill -hf -o first.jpg
Setting the -vf option flips the photo vertically. Note that raspistill doesn’t show a preview when we’re using the flipping options. It only shows the final result before writing it to a file.
Usually the JPEG format is a good choice for storing photos, but sometimes you might need a different format. Using the -e option, we can set the output file encoding to JPG, PNG, BMP, or GIF. For example, the following command stores a photo in PNG format:
|
|
$ raspistill -e PNG -o first.png |
In addition, you can choose from various effects that you’re probably used to from your regular camera. Using the options -ex, -ifx, and -awd, you can adjust the camera to different lightings and generate popular effects.
Create Time-Lapse Videos
One of the greatest advantages of the Pi camera module over most regular cameras is that you can automate it. For example, it’s very easy to use it to create time-lapse videos. Although you could write a program that automatically calls raspistill every few seconds, raspistill supports time-lapsing right out of the box.
|
|
$ mkdir photos |
|
|
$ raspistill -n -tl 3000 -t 600000 -o photos/photo%04d.jpg |
The preceding command takes a photo every three seconds (3,000 milliseconds) for ten minutes (600,000 milliseconds). It stores all photos in a folder named photos, and all filenames start with the prefix “photo” followed by a four-digit number. raspistill does the numbering automatically, so in the photos folder, you’ll find files named photo0001.jpg, photo0002.jpg, and so on.
Now we have to combine the photo files into a single video file. Several free tools are available for this job. FFmpeg[128] and avconv[129] are very popular because they’re extremely powerful.
In theory, you can install and run both tools on the Pi, but it’s usually best to install just avconv, for a couple of reasons. To install FFmpeg, you have to compile it yourself, which is a bit inconvenient. Also FFmpeg and avconv are very similar because avconv is a fork of the FFmpeg project.
|
|
$ sudo apt-get install libav-tools |
Then we can create a time-lapse video using the following command:
|
|
$ cd photos |
|
|
$ avconv -r 4 -i photo%04d.jpg -r 4 -vcodec libx264 -crf 20 -g 15 video.mp4 |
avconv has a huge number of command-line options, and we can control every single aspect of the generated video file. Run man avconv to read the program’s manual.
Generating videos consumes a lot of resources, and it literally takes hours to generate a video on the Pi itself. The best solution is to copy the photo files to a more powerful computer. Then you can use ffmpeg to generate the video:
|
|
$ cd photos |
|
|
$ ffmpeg -qscale 5 -r 4 -b 9600 -i photo%04d.jpg video.mp4 |
After running this command, you’ll find a video file named video.mp4 in the photos folder. Like avconv, ffmpeg supports a vast number of options, and you can look them up by running man ffmpeg.
raspistill is an amazingly versatile tool, and even though you’ve learned about many of its options, there are still more to explore. Don’t be shy—go ahead and play around with them.
Record High-Definition Videos
raspistill is probably all you’ll ever need to take photos with the Pi camera module, but you can’t use it to record videos. That’s what raspivid is for, and it supports nearly the same set of options as raspistill.
To record one minute (60,000 milliseconds) of high-definition video using 25 frames per second, run the following command:
|
|
$ raspivid -t 60000 -fps 25 -o video.h264 |
This results in a file named video.h264 that contains the video data encoded using the H.264 codec. This codec is popular, but to make it work with most video players we have to put it into a suitable container, like MP4:
|
|
$ avconv -r 25 -i video.h264 -vcodec copy video.mp4 |
Now video.mp4 contains an MP4 version of our video that we can play using nearly any video player in the world.
All in all, the Pi camera produces good videos. The only thing that’s missing is a microphone. Still, you can create many useful and fun projects with it. In the next section, you’ll learn how to build a burglar alarm using the camera and a motion detector.
Build a Burglar Alarm
In Detect Motion with the Pi, you learned how to control a motion sensor with the Pi. The controlling software only printed messages to the console—which is fine for demonstration purposes, but in real life it’s not very useful. In this section, you’ll learn how to build an actual burglar alarm that takes photos automatically as soon as someone moves, and then sends an email with the latest photo attached.
Disable the Camera’s LED
A burglar alarm should work as unobtrusively as possible, and one feature of the Pi camera contradicts this principle. Whenever the camera takes a photo or records a video, it turns on a bright-red LED. Usually this is good because it shows that the camera is working and it prevents you from taking pictures of people secretly. However, for a burglar alarm we should disable the LED.
We could simply hide it under some duct tape, but that wouldn’t be very elegant. The Raspbian team provided an option to disable the camera LED completely. Open the file /boot/config.txt using the nano text editor, for example:
|
|
$ sudo nano /boot/config.txt |
Add the following line at the end of the file:
|
|
disable_camera_led=1 |
Finally, reboot the Pi:
|
|
$ sudo reboot |
Now the Pi camera won’t turn on the LED when it takes pictures or records videos. We can still control the LED via our own software, as you’ll learn in the next paragraphs.
Control the Camera Using Python
For the burglar alarm, we need to find a way to take photos programmatically. That is, we need to write some software to control the camera.
In Detect Motion with the Pi, we wrote the code for controlling the PIR sensor in Python, so it’s advantageous to write the code for controlling the camera in Python, too. It would also be great if we could reuse the raspistill code so we don’t have to reinvent the wheel.[130]
The easiest way to integrate raspistill with Python is to execute the command-line utility using Python’s subprocess module. in most cases, invoking command-line tools from programming languages isn’t an ideal solution because of poor performance. In this case it’s OK, because taking pictures takes some time, so the overhead of creating a subshell is negligible. All we need is the following Camera class:
|
camera/camera.py |
|
|
Line 1 |
import RPi.GPIO as GPIO |
|
- |
from subprocess import call |
|
- |
|
|
- |
CameraLedPin = 5 |
|
5 |
|
|
- |
class Camera: |
|
- |
def __init__(self): |
|
- |
GPIO.setmode(GPIO.BCM) |
|
- |
GPIO.setwarnings(False) |
|
10 |
GPIO.setup(CameraLedPin, GPIO.OUT, initial = False) |
|
- |
|
|
- |
def led_on(self): |
|
- |
GPIO.output(CameraLedPin, True) |
|
- |
|
|
15 |
def led_off(self): |
|
- |
GPIO.output(CameraLedPin, False) |
|
- |
|
|
- |
def take_photo(self, filename): |
|
- |
call(['raspistill -n -t 0 -hf -o {0}'.format(filename)], shell = True) |
It’s not a lot of code, and its most complicated parts don’t deal with taking pictures, but instead with controlling the camera’s LED. The _ _init_ _ method prepares the LED’s control pin in lines 7 to 10. The LED is hardwired to GPIO pin number 5, so we can easily turn it on and off usingled_on and led_off, respectively.
Using the take_photo method, we can take a new photo, and the method will delegate its work to raspistill. It sets a few reasonable defaults that we can change easily. The following program shows how to use the Camera class:
|
camera/camera_demo.py |
|
|
|
from camera import * |
|
|
camera = Camera() |
|
|
camera.led_off() |
|
|
camera.take_photo('photo.jpg') |
This small demo program includes the Camera class and creates a new instance named camera. Then it turns off the camera’s LED and takes a new photo. It stores the photo in a file named photo.jpg.
Now that we can control the camera from a Python program, we need a way to send an email with a photo attachment. You’ll learn how to do that in the next section.
Send an Email
Sending emails programmatically is no big deal using modern programming languages, and Python is no exception. It has great support for SMTP,[131] and it supports email attachments in various forms. The following EmailNotification class provides all the functionality for sending emails with photo attachments:
|
camera/email_notification.py |
|
|
|
import smtplib |
|
|
from email.mime.image import MIMEImage |
|
|
from email.mime.multipart import MIMEMultipart |
|
|
|
|
|
class EmailNotification: |
|
|
def __init__(self, server, user, pwd): |
|
|
self.server = server |
|
|
self.user = user |
|
|
self.pwd = pwd |
|
|
self.subject = 'INTRUDER ALERT!' |
|
|
self.from_addr = 'me@example.com' |
|
|
self.to_addr = 'alert@example.com' |
|
|
|
|
|
def send(self, image_file): |
|
|
msg = MIMEMultipart() |
|
|
msg['Subject'] = self.subject |
|
|
msg['From'] = self.from_addr |
|
|
msg['To'] = self.to_addr |
|
|
msg.preamble = self.subject |
|
|
msg.attach(self.__read_image(image_file)) |
|
|
self.__send_email(msg) |
|
|
|
|
|
def __read_image(self, image_file): |
|
|
attachment = open(image_file, 'rb') |
|
|
image_data = MIMEImage(attachment.read()) |
|
|
attachment.close() |
|
|
return image_data |
|
|
|
|
|
def __send_email(self, msg): |
|
|
server = smtplib.SMTP(self.server) |
|
|
server.ehlo() |
|
|
server.starttls() |
|
|
server.login(self.user, self.pwd) |
|
|
server.sendmail(self.from_addr, self.to_addr, msg.as_string()) |
|
|
server.quit() |
The _ _init_ _ method initializes the name of your SMTP server, its username, and its password. Also, it defines the default subject of your email, its origin address, and its recipient. You’re free to change all of them.
Using the send method, we can send an image file via email. The method creates a new MIMEMultipart object containing all of the email’s properties, including an image file that has been created using the Pi camera.
Finally, _ _send_email sends an email using Python’s smptlib. Depending on your current email provider, you might have to adjust this method. For example, some providers insist on the call to ehlo and others don’t.
Build the Final Product
We now have software to control the PIR sensor and the Pi camera, and we’re able to send emails. The only thing left to do is to combine all the single parts into a complete burglar alarm.
Using the PassiveInfraredSensor, Camera, and EmailNotification classes, it’s easy to build a burglar alarm:
|
camera/burglar_alarm.py |
|
|
Line 1 |
from pir import * |
|
- |
from camera import * |
|
- |
from email_notification import * |
|
- |
import time |
|
5 |
|
|
- |
PIR_PIN = 23 |
|
- |
PREFIX = 'photos/alert' |
|
- |
EMAIL_SERVER = 'smtp.gmail.com:587' |
|
- |
EMAIL_USER = 'me@example.com' |
|
10 |
EMAIL_PWD = 't0p$ecret' |
|
- |
|
|
- |
pir = PassiveInfraredSensor(PIR_PIN) |
|
- |
camera = Camera() |
|
- |
notifier = EmailNotification(EMAIL_SERVER, EMAIL_USER, EMAIL_PWD) |
|
15 |
i = 0 |
|
- |
last_state = False |
|
- |
while True: |
|
- |
if (pir.motion_detected() == True): |
|
- |
if (last_state == False): |
|
20 |
print 'INTRUDER ALERT!' |
|
- |
image_file = PREFIX + '{0}.jpg'.format(i) |
|
- |
camera.take_photo(image_file) |
|
- |
notifier.send(image_file) |
|
- |
i = i + 1 |
|
25 |
last_state = True |
|
- |
else: |
|
- |
if (last_state == True): |
|
- |
time.sleep(1) |
|
- |
last_state = False; |
In lines 7 to 10, we define the most important attributes of the burglar alarm. Simply insert your email provider’s SMTP server, your username, and your password.
The rest of the program works exactly like the motion detector in Detect Motion with the Pi. Instead of simply printing a message to the console, it takes a photo and sends it via email in lines 21 to 23.
What If It Doesn’t Work?
If you have any problems with the PIR sensor, take a look at What If It Doesn’t Work?. Attaching the camera is unusual but not a big deal. Still, if it isn’t working, check to be sure you’ve plugged in the cable correctly.
The Pi camera is a great tool and toy for many purposes. Its main advantage is that you can easily control it programmatically. It’s a perfect tool for creating time-lapse videos of your latest birthday party or for turning it into a dashboard camera in your car. It also can be the basis for a burglar alarm, but it works best in well-lighted environments.
Where to Go from Here
At this point you have learned what a versatile tool the Raspberry Pi is. You’ve learned how to install various operating systems and how to use the Pi as a day-to-day computer. In addition, you turned the Pi into a web server, and then you turned it into a multimedia center. On top of that, you’ve used it as a basis for electronics projects and attached digital and analog sensors.
The Pi is a much more open platform than most regular PCs. For example, you can easily create your own hardware extensions using the Pi’s GPIO parts. Along with its friendly and active community, the Pi will be one of the most popular, useful, and fun gadgets in the years ahead. People publish useful projects every day, and there’s no reason why you shouldn’t create something special with the Pi, too.
Footnotes
|
[128] |
http://www.ffmpeg.org/ |
|
[129] |
http://libav.org/avconv.html |
|
[130] |
You can find a Python library for the Pi camera at https://github.com/waveform80/picamera/. |
|
[131] |
http://en.wikipedia.org/wiki/Simple_Mail_Transfer_Protocol |
All materials on the site are licensed Creative Commons Attribution-Sharealike 3.0 Unported CC BY-SA 3.0 & GNU Free Documentation License (GFDL)
If you are the copyright holder of any material contained on our site and intend to remove it, please contact our site administrator for approval.
© 2016-2026 All site design rights belong to S.Y.A.