Raspberry Pi: A Quick-Start Guide, 2nd Edition (2014)
Chapter 1. Meet the Raspberry Pi
Before you start the Raspberry Pi for the first time, you should get familiar with its connectors and its capabilities. This will help you decide what kind of projects you can use the Pi for, and it will help you understand what kind of additional hardware you’ll need. For example, you’ll need a power supply, a keyboard, a mouse, and a display. In this chapter, you’ll learn which devices work best.
Get to Know the Hardware
Unboxing a new Pi is exciting, but it certainly is not comparable to unboxing a new Apple product. Usually, the Pi comes in a plain cardboard box with one or two sheets of paper containing the usual safety hints for electronic devices and a quick-start guide.
The first version of the Pi looks attractive only to real geeks. It is a single-board computer without a case, and it’s the size of a credit card. It somewhat resembles the innards of the many electronic devices you might have opened when you were a child. Later versions of the Pi might have a case, but until then we have to focus on its inner values, and that’s what counts, isn’t it?
What’s on the Pi
The Pi is available in two flavors: Model A and Model B. Model B has been revised and is available in two slightly different versions now: Model B (Revision 1) and Model B (Revision 2). Model A is a bit cheaper and does not have as many connectors as Model B. I’ll explain their differences and the differences between the two Model B revisions in detail in the following text.
I’ll mostly cover Model B in the rest of this book, because it’s much more popular than Model A. You can see it in Figure 1, The front side of a Model B (Revision 1).
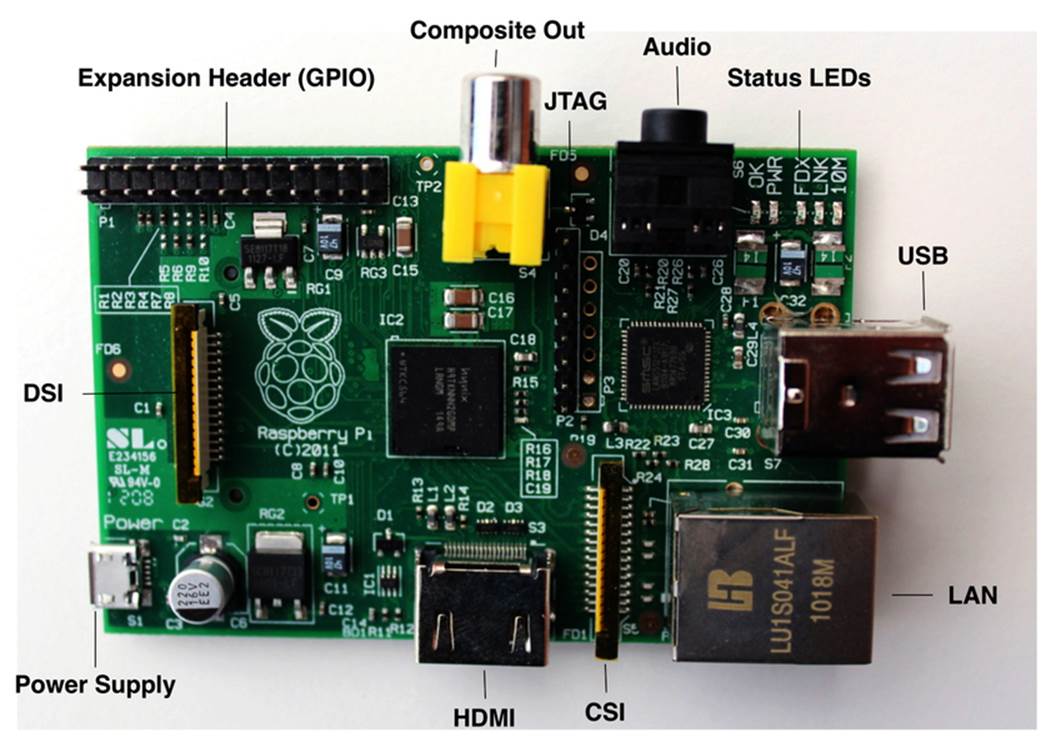
Figure 1. The front side of a Model B (Revision 1)
All Raspberry Pi models have the same heart and brain: a system on a chip (SoC) named BCM2835[12] that you can find in many mobile phones. It’s cheap, it’s powerful, and it does not consume a lot of power. These characteristics made it a perfect choice for the Raspberry team.
In contrast to a typical PC architecture, a SoC integrates a processor (CPU), a graphics processing unit (GPU), and some memory into a single unit. The BCM2835 contains an ARM1176JZF-S processor running at 700MHz, 512MB of RAM, and a GPU named VideoCore IV. First-generation devices and Model A boards have only 256MB of RAM. If you buy a new Pi, make sure it has 512MB of RAM.
For purists, the GPU is a bit problematic because its design and firmware are proprietary; that is, their source code is not publicly available. This probably will not affect you in your daily work with the Pi, but it is a problem for some strong proponents of free software. At least Broadcom has released the source code for the whole graphics stack under the BSD license.[13] By the time you read this, the Pi will probably be completely open source.
The Pi has many connectors, and most of them look familiar. On a Model B board, you’ll find two regular-sized USB ports that you can use to connect a keyboard and a mouse, for example. You’ll also find a micro-USB port, but you’ll need it to power the Pi, and you cannot use it to connect more devices. If you need to connect more devices, you have to connect them to a USB hub. The Model A board has only a single USB port, so you’ll probably always need a USB hub.
You can connect the Model B to a network directly using its Ethernet (LAN) port. Model A does not have an Ethernet port, but you can add one by attaching a USB-to-Ethernet converter. Interestingly, Model B uses its internal USB hardware for networking, too, so there’s no difference in networking performance between a Model B and a Model A with a USB-to-Ethernet adapter.
To connect the Pi to a display or a TV set, you have two options; the Pi has ports for connecting both HDMI and composite video. The digital HDMI standard is much more powerful than its much older brother, the analog composite standard. With HDMI, you can transmit high-definition video in crystal-clear quality, while the composite output is limited to what older geeks know as “the childhood TV.” Using composite video, you cannot display high-definition graphics, and the output usually flickers a bit. Its biggest advantage is that many TV sets still have a composite connector, but HDMI is gaining ground quickly. By the way, the Raspberry team did not add a VGA connector, because it thinks that VGA is at the end of its life. Of course, you can use an adapter to connect the Pi’s HDMI output to a DVI or VGA display.
With HDMI you can also transmit both video and sound, but if you’re using composite video, you’ll need a separate connector for sound output. That’s what the audio jack is for—you can connect it to headphones, to speakers, or to your audio receiver using a standard 3.5mm plug.
To the left of the composite video connector, you’ll see an expansion header that consists of two rows of pins. Most of these pins are general-purpose input/output pins (GPIOs), and you can use them to connect the Pi to other electronic devices. As you might have guessed from their name, they do not have a special purpose, so you can do many different things with them. For example, you can use them to connect your good old Atari VCS 2600 game controllers to the Pi so you can run your favorite 8-bit games in an emulator. In Chapter 9, Tinker with the GPIO Pins, you’ll learn how to use the expansion header, and you’ll build a small hardware project.
On the board you can find several other connectors. The CSI connector[14] is meant for connecting a camera to the Pi (see Chapter 11, Control the Pi Camera). With the DSI connector,[15] you can connect a display, and the JTAG headers[16] help you debug your hardware projects.
Every board has a few status LEDs. Model A boards have two LEDs, labeled ACT and PWR. Model B boards have five LEDs with slightly different labels depending on the board’s revision. On Revision 1.0 boards, the LEDs are labeled OK, PWR, FDX, LINK, and 10M. On Revision 2.0 boards, their names are ACT, PWR, FDX, LNK, and 100. The LEDs have the following meanings:
· The OK/ACT LED indicates SD card access; it blinks whenever the Pi tries to access the SD card. You can control this LED by software, so it’s not completely accurate.
· As soon as you connect a power supply to the Pi, the PWR LED turns on.
· The FDX LED shows whether your LAN is running full duplex.
· At every LAN activity, the LINK/LNK LED blinks.
· The 10M/100 LED indicates whether the Pi’s Ethernet link is running at 10Mbit/s or 100Mbit/s. When this LED is on, the Pi runs at 100Mbit/s.
In the following figure, you can see the back side of a Pi, and you can also see a slot for an SD card on the right side.
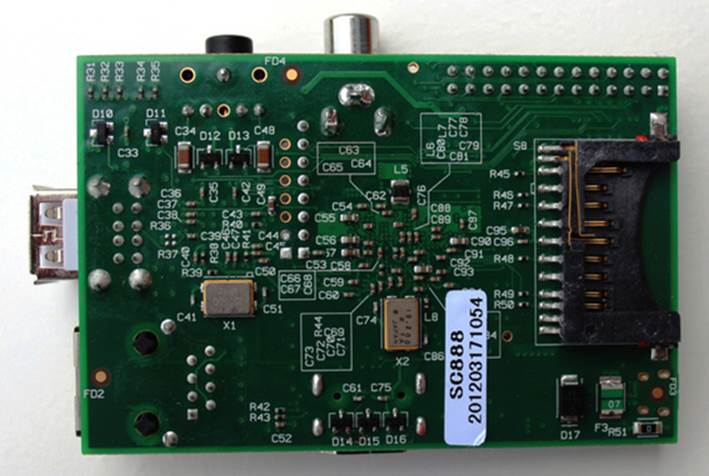
Figure 2. The back side of a Model B
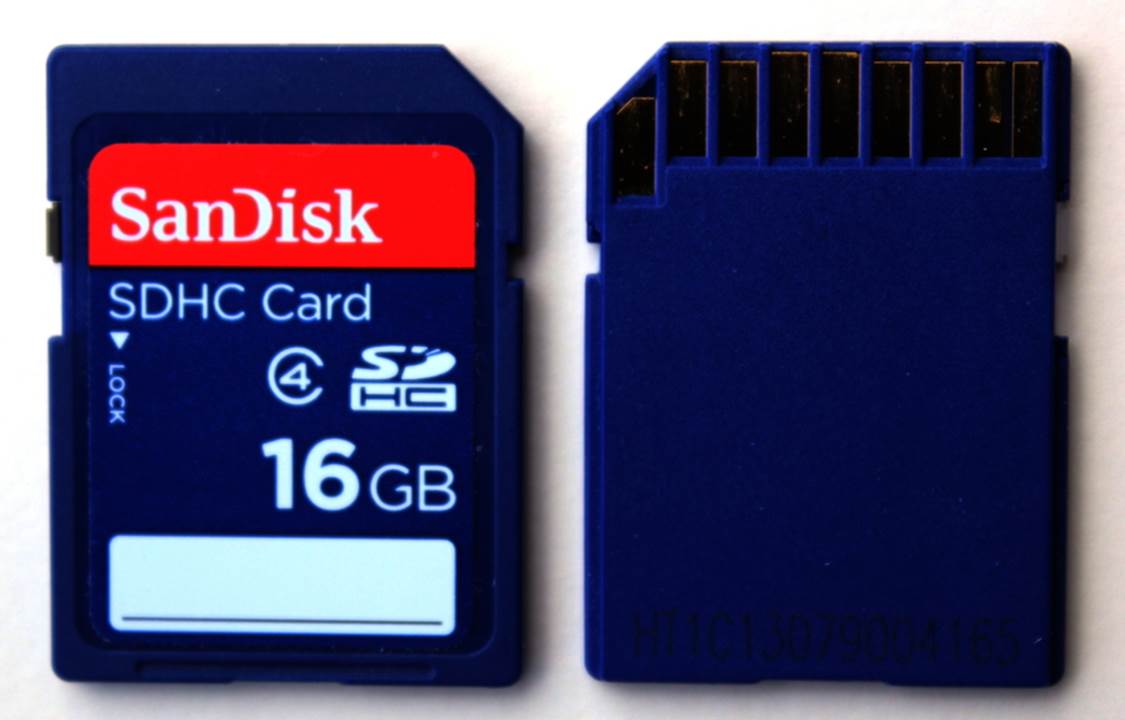
Figure 3. SD cards come in various sizes.
The Pi has no persistent internal memory, so you have to boot it from an SD card. You might have worked with SD cards before, because they are very popular as storage media in cameras, cell phones, and portable game consoles. They are available in different sizes and with different capacities, usually ranging from 1GB to 64GB (see the figure here).
What the Pi Does Not Have
Taking its cheap price into account, the Pi comes with a lot of nice things already, but it also lacks some useful features. For example, the Pi does not have a real-time clock (RTC) with a backup battery, and it does not have a Basic Input Output System (BIOS).[17] You can easily work around the missing clock using a network time server, and most operating systems do this automatically, but the lack of a BIOS is a bit more serious.
Simply put, a BIOS is a program stored in read-only memory (ROM) that runs on a PC at startup. Among other things, it’s responsible for configuring new devices and for determining the boot order. For example, using the BIOS, you can specify whether you’d like to boot from your hard drive or from a DVD. The Pi has no BIOS, so it always boots from an SD card. Even if you have a perfectly valid installation of an operating system on a USB stick or an external hard drive, you cannot boot it. Of course, you can still use external storage devices, but you cannot use them to boot the Pi.
The Pi does not support Bluetooth or Wi-Fi out of the box, but you can add support for both of them using USB dongles. Unfortunately, most Linux distributions are still a bit picky about their hardware, so you should first check whether your flavor of Linux supports your particular device. (See Where Can I Get a Raspberry Pi and Additional Hardware?, for some advice about where to get compatible hardware.) All this is true for other types of hardware, such as microphones or webcams. As long as your operating system and your applications support your devices, you’ll be fine. Otherwise, you’d better look for an alternative that is known to work on your operating system.
You now know what all the connectors on the Pi are for, and in the next section, you’ll learn what devices you can actually connect to the Pi.
What Else You Need
After unboxing the Pi for the first time, you’ll quickly realize that the Raspberry team obeys the BYOP mantra—Bring Your Own Peripherals. The box contains nothing but the board; you’ll need a couple of other things to get it up and running. You’ll probably already have most of them at home.
Choose a Power Supply
First you need a power supply with a Micro USB connector, because currently the Pi does not ship with one. According to the Pi’s specification, both models need a power supply that outputs 5V. The power supply should source 300mA for a Model A and 700mA for a Model B. Depending on the devices you connect to the Pi, it might have to source even more.

Figure 4. A USB wall charger
Many cell-phone chargers meet the Pi’s requirements, and this is not a coincidence. The Raspberry team wanted the Pi to work with cell-phone chargers because of their ubiquity. I used the charger of a Samsung Galaxy S II for a couple of days, and it worked well for my first experiments. When I started to add more devices, it was no longer sufficient, and I replaced it with a wall charger from Belkin (see the figure here). It outputs 1A and works better, but for some hardware setups, you still need more power.
The Pi’s biggest limitation regarding the power supply is that no external device should draw more than 100mA from any of its USB ports. So, as long as your keyboard and your mouse need 100mA each, everything works fine. Usually, you can find a small sticker with the power characteristics on the back of a device. If one device draws more than 100mA, sooner or later you’ll observe strange effects.[18] To be on the safe side, use a power supply that delivers 1A to 1.2A for the Model B. For Model A it should be between 500mA and 700mA.
You can unburden the Pi with a powered USB hub, but it doesn’t work with every product. So, before you buy something for your Pi, it’s best to take a look at the project’s wiki.[19]
Choose an SD Card
Even with a perfect power supply, a Pi will not do much when you start it, because it needs an SD card with an operating system. You can buy preloaded SD cards,[20] but you can also start with an empty card and prepare it yourself. (See Prepare a Bootable SD Card, for how to do this.) Usually this is the better approach, because it ensures that you get the latest and greatest software for your Pi.
Some users have reported problems with incompatible SD cards, so when in doubt, you should take a look at Where Can I Get a Raspberry Pi and Additional Hardware?. In theory, you can use a card of any size. Of course, the minimum size depends on your operating system, on the applications you’re going to install, and on the data you’re going to create on the Pi later. As often in life, bigger is better, and you should use a card with a capacity of at least 4GB for the most convenient Pi experience.
Connect a Keyboard and a Mouse
Unless you’re planning to use the Pi as a headless system,[21] you’ll need a keyboard and a mouse. You probably have a spare keyboard and mouse at home, and as long as they have a USB connector, they’ll likely work with the Pi. Note that sometimes keyboards with an internal USB hub cause problems because they steal some current from the Pi that it might need for other things. If you experience strange effects, such as an unresponsive keyboard or infinite repetitions of keystrokes, try another keyboard or connect the keyboard to the Pi using a powered USB hub. It’s best if your keyboard and mouse consume only 100mA each.
Some wireless keyboards and mice will not work properly because Linux does not support them all. In the beginning, be conservative and use wired equipment until everything works as expected. Then start to replace components one by one. If you run into problems, check to see whether your operating system supports your particular keyboard or mouse.
Often you’ll need even more than two USB devices (or one, if you have a Model A), so you’ll have to connect them to the Pi using a USB hub. Make sure the hub delivers enough current to power all connected devices. In nearly all cases, you’ll need a hub that has its own power supply.
Choose a Display
Depending on the display you’re going to use, you need an HDMI cable or a composite-video cable. If you’re using HDMI and your display also has audio output, you’re finished. Otherwise, you have to connect the Pi’s audio jack to your sound system using a cable with a standard 3.5mm TRS connector. It’s the same connector you’ll find at the end of your iPod’s headphones, and of course you can use those, too.
Choose the Right Network Equipment
If you want to connect a Model B to a network, you need only an Ethernet cable. The Model A does not have an Ethernet port, so to connect a Model A to a network, you need a USB-to-Ethernet converter or a Wi-Fi dongle.
Add a Case
Future releases of the Pi might come with a case, but until then you have to protect it yourself. Like every electronics device, the Pi is sensitive to dust and conductive surfaces, so sooner or later you should put your Pi in a case.
The Pi community is very creative, and people have already created cases using Legos[22] and even paper.[23] One of the biggest problems with most self-made cases is that they usually don’t offer convenient access to the Pi’s connectors. So, the best solution is often to buy a professional case—for example, from Adafruit[24] or ModMyPi.[25]
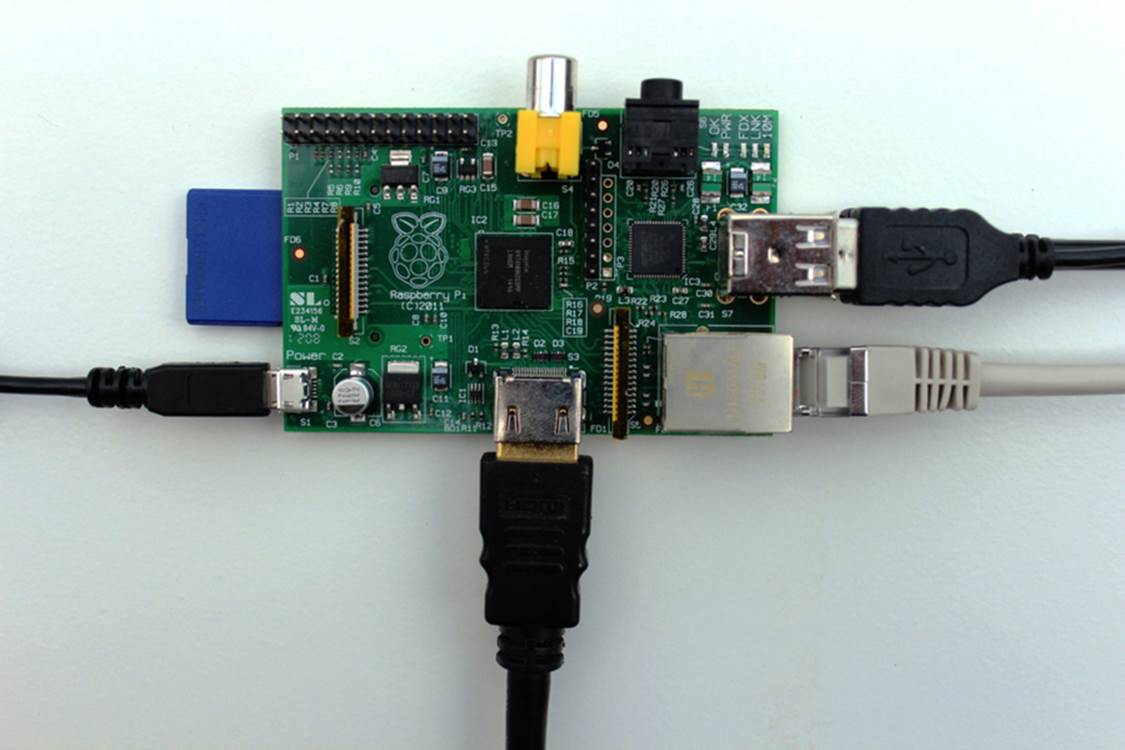
Figure 5. A wired Pi
In addition to all the devices mentioned, you need a separate PC for some tasks, such as copying an image to an SD card or cross-compiling applications. So, all in all, setting up a Pi is not as cheap as it sounds at first.
A typical Pi setup looks quite messy on your desk after you’ve connected all cables (see the figure here). But despite its look, the hardware is ready for a first test run!
Next Steps
In this chapter, you learned what all the connectors on the Pi are for, and you learned what additional devices you need and how to choose the right ones. In theory, you could start your Pi for the first time, but it won’t do much without an operating system. In the next chapter, you’ll learn what your options are and how to install a full-blown Linux system.
Footnotes
|
[12] |
http://www.broadcom.com/products/BCM2835 |
|
[13] |
See http://www.raspberrypi.org/archives/6299 |
|
[14] |
http://en.wikipedia.org/wiki/Camera_interface |
|
[15] |
http://en.wikipedia.org/wiki/Display_Serial_Interface |
|
[16] |
http://en.wikipedia.org/wiki/Jtag |
|
[17] |
http://en.wikipedia.org/wiki/BIOS |
|
[18] |
http://elinux.org/RPi_Hardware#Power |
|
[19] |
http://elinux.org/RPi_VerifiedPeripherals |
|
[20] |
http://uk.farnell.com/raspberry-pi-accessories#operatingsystem or http://uk.rs-online.com/web/p/flash-memory/7631030/? |
|
[21] |
http://en.wikipedia.org/wiki/Headless_system |
|
[22] |
http://www.raspberrypi.org/archives/1515 |
|
[23] |
http://squareitround.co.uk/Resources/Punnet_net_Alpha3.pdf |
|
[24] |
https://www.adafruit.com/products/859 |
|
[25] |
http://modmypi.com |
All materials on the site are licensed Creative Commons Attribution-Sharealike 3.0 Unported CC BY-SA 3.0 & GNU Free Documentation License (GFDL)
If you are the copyright holder of any material contained on our site and intend to remove it, please contact our site administrator for approval.
© 2016-2026 All site design rights belong to S.Y.A.