Hacking Raspberry Pi (2014)
Part II. Software Foundations
Chapter 5. Debian Linux Fundamentals-Terminal
In general, people tend to be afraid of the Linux operating system. In my experience, the following represent the most common complaints:
![]() Linux is at least partially command line, and that is intimidating.
Linux is at least partially command line, and that is intimidating.
![]() Linux uses all these wacky commands with strange syntax.
Linux uses all these wacky commands with strange syntax.
![]() Even the Linux graphical environments are nothing like what we are used to with Windows or OS X.
Even the Linux graphical environments are nothing like what we are used to with Windows or OS X.
Certainly there is some truth to these concerns. Until a few years ago, Linux was in fact a seemingly impenetrable operating system to all but the most propeller-headed of computer geeks. However, the twenty-first century brought with it Linux distributions like Ubuntu and Raspbian, which are aimed at the ordinary computer user.
Sure, you need to learn some funky command-line syntax in order to get around Debian Linux on your Raspberry Pi. Nevertheless, I believe that you’ll be much better off for it. You might even find yourself turning to the command line in Windows and OS X when you see how much quicker you can get work done via the keyboard.
Baby Steps
Before you can begin using the Debian Linux command line, you need to arrive at a command prompt on your Raspberry Pi. If you connect directly to your Pi (that is to say, by using a monitor, keyboard, and mouse), you should land at a command prompt by default.
You’ll be required to log into your Raspberry Pi: The default username is pi, and the default password is raspberry. Press Enter after inputting each part of your logon.
Note: On Case Sensitivity
Raspbian, like all Linux distributions, is case-sensitive. You might already be accustomed to the fact that passwords are case-sensitive, but it may take some getting used to things like having two files named File.txt and file.txt co-existing in the same directory!
If you connect to your Pi remotely using SSH or VNC (procedures covered fully in Chapter 7, “Networking Raspberry Pi”), you must establish that remote connection before accessing the Debian command prompt.
Finally, if you booted your Pi into the LXDE graphical environment, you can open a command prompt (formally called the Terminal) by double-clicking the LXTerminal icon on the Desktop. This is shown in Figure 5.1.
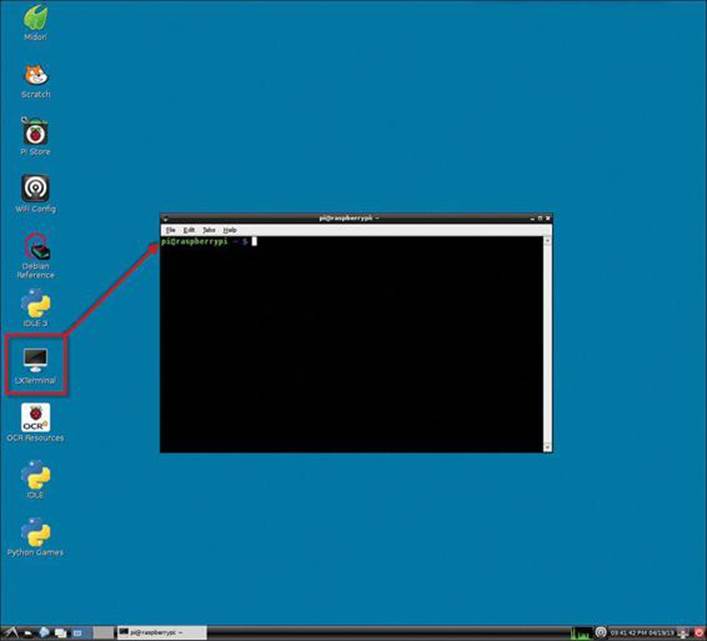
FIGURE 5.1 You can start a Terminal session from within the LXDE desktop environment.
Regardless of you how you get to the Raspbian command prompt, the end result is the same; namely, you see an input area that looks like the following:
pi@raspberrypi ~ $
The command prompt itself actually yields highly valuable system information. Let me break it down for you element by element:
![]() pi: This is the name of the default Raspbian user account.
pi: This is the name of the default Raspbian user account.
![]() @: This denotes the link between the currently logged on user and the computer name.
@: This denotes the link between the currently logged on user and the computer name.
![]() raspberrypi: This is the default hostname (computer name) for your Raspberry Pi.
raspberrypi: This is the default hostname (computer name) for your Raspberry Pi.
![]() ~: This denotes your current location in the Debian filesystem. The tilde (~) represents a shortcut representation of the user’s home directory, which has the full path /users/raspberrypi in Raspbian.
~: This denotes your current location in the Debian filesystem. The tilde (~) represents a shortcut representation of the user’s home directory, which has the full path /users/raspberrypi in Raspbian.
![]() $: The dollar sign denotes a nonadministrative user account. By contrast, when you switch your user identity to the root (superuser) account, the prompt changes to the octothorpe (#) character.
$: The dollar sign denotes a nonadministrative user account. By contrast, when you switch your user identity to the root (superuser) account, the prompt changes to the octothorpe (#) character.
Note: On Naming Conventions
You’ll notice that in this chapter I use the terms Debian and Raspbian interchangeably. Don’t be confused! Everything you learn in this chapter works 100% in any distribution of Debian Linux. Therefore, it doesn’t matter whether you are testing these procedures in Raspbian, Debian, Ubuntu, or another Debian-derived Linux distribution.
Linux provides the operator full control over the environment. To that end, you can customize the format of the command prompt in myriad ways. If you’d like more information on this, please read this post from the Lindesk blog: http://is.gd/xFxt2f.
The Linux command-line interface (CLI, pronounced see-ehl-eye) is what is called a command shell, or simply shell. Specifically, Debian employs the Bourne Again Shell (Bash) by default. As with anything and everything else in Linux, you can swap out the Bash shell for another more to your liking. For our purposes in this book, I stick to Bash.
Essential Terminal Commands
When you are logged into a Raspbian Terminal, where can you go from there? Before we go any further, I want to provide you with the core Terminal commands that you should know in Raspbian (Debian) Linux.
Having these commands in your tool belt immunizes you against getting “stuck” with your Raspberry Pi. A good example of this is the common newcomer situation of not knowing how to go from the Bash shell to the LXDE graphical environment (and vice versa).
startx
Many Raspberry Pi enthusiasts don’t want to mess with the command shell any more than they absolutely have to, instead preferring to work in the GUI environment. To jump from the command line to the GUI, simply type startx and press Enter.
When you are in the LXDE GUI environment, you can open the LXTerminal application as previously mentioned to spawn a new command-line Bash session. If you want to unload the GUI and return to a fully character-based interface, simply click the Logout button in the bottom-right corner of the LXDE Desktop. Next, in the message box that appears, click Logout (see Figure 5.2).
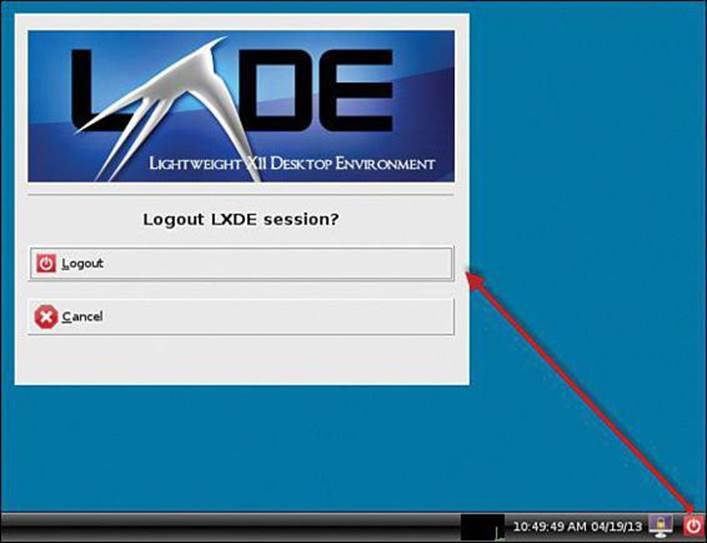
FIGURE 5.2 You can easily return to a full-screen Bash prompt by using the Logout command in LXDE.
pwd
The present working directory (pwd) command answers the question “Exactly where am I in the Raspbian file system?”
I suppose it would be helpful to provide a brief description of the Linux file system. Your Raspberry Pi hard drive is represented as a hierarchical tree of directories (folders) and files. The top level of the file system is denoted with a slash (/) character.
Beneath the root are a bunch of standard directories, some of which are more important to the end user than others. Here’s a quick breakdown:
![]() bin: Essential programs
bin: Essential programs
![]() boot: Boot loader programs (that is, files necessary to boot the Pi)
boot: Boot loader programs (that is, files necessary to boot the Pi)
![]() dev: Hardware device drivers and information
dev: Hardware device drivers and information
![]() etc (pronounced etsy or ee-tee-see): System-wide configuration files
etc (pronounced etsy or ee-tee-see): System-wide configuration files
![]() home: Users’ home directories (personal settings, data files, and so forth)
home: Users’ home directories (personal settings, data files, and so forth)
![]() lib (pronounced lihb): Code libraries that are used by the system programs in /bin and /sbin
lib (pronounced lihb): Code libraries that are used by the system programs in /bin and /sbin
![]() lost+found: File fragments picked up by file system repair tools like fsck
lost+found: File fragments picked up by file system repair tools like fsck
![]() media: Mount points for removable media (DVDs, flash drives, USB portable drives)
media: Mount points for removable media (DVDs, flash drives, USB portable drives)
![]() mnt: Temporarily mounted file systems
mnt: Temporarily mounted file systems
![]() opt: Optional application software packages
opt: Optional application software packages
![]() proc (pronounced prock): Dynamically changing system status information
proc (pronounced prock): Dynamically changing system status information
![]() root: Home directory for the root user account
root: Home directory for the root user account
![]() run: Supplemental runtime data stored by installed applications
run: Supplemental runtime data stored by installed applications
![]() sbin (pronounced ess-bin): Executable program files that are reserved for administrative use
sbin (pronounced ess-bin): Executable program files that are reserved for administrative use
![]() selinux: Working directory for Security Enhanced Linux, a security enhancement toolset
selinux: Working directory for Security Enhanced Linux, a security enhancement toolset
![]() srv: Temporary storage for some services such as File Transfer Protocol (FTP)
srv: Temporary storage for some services such as File Transfer Protocol (FTP)
![]() sys: Stores Linux operating system files
sys: Stores Linux operating system files
![]() tmp: Temporary files that are purged during every system reboot
tmp: Temporary files that are purged during every system reboot
![]() usr (pronounced user or you-ess-arr): Read-only user data; multiuser utilities and applications
usr (pronounced user or you-ess-arr): Read-only user data; multiuser utilities and applications
![]() var: (pronounced vahr). Variable data whose values change over time (logs, spool files, temporary files, and so forth)
var: (pronounced vahr). Variable data whose values change over time (logs, spool files, temporary files, and so forth)
Note: Watch Your Pronunciation!
The main reasons I offer you pronunciations for many of these Linux-oriented terms is because (a) The acronyms are often difficult to pronounce at any rate; (b) Some Linux power users get awfully persnickety about correct pronunciations; and (c) I want to equip you with all the tools, physical, logical, and verbal, to become a proficient Linux user.
ls
After you’ve figured out where you “live” in the Raspbian file system, you probably want to see the contents of that present working directory. That’s what the ls command does; it runs a directory listing.
In my experience, ls will be one of your most frequently used commands. After all, you need some mechanism of visualizing directory contents from a command prompt.
Terminal commands often employ switches or parameters to customize how the command works. For instance, try running the following:
ls -la
This changes the output quite a bit, doesn’t it? Take a look at Figure 5.2 to see the command output on my Pi. The l switch gives you a columnar (or long; hence the l) listing. The a switch shows all files, even hidden and system files.
You can even run directory listings for other directories on your Linux system (or, for that matter, attached storage devices). You simply append the relevant directory path to the ls command. For instance, check out the following example, the output for which is shown in Figure 5.3.
ls -la /usr/bin
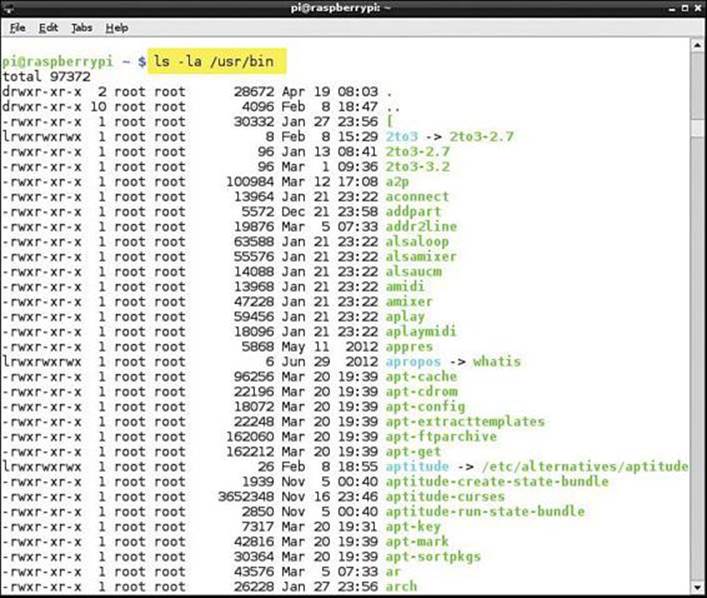
FIGURE 5.3 The ls command will be one of your most frequently-run Linux Terminal commands.
The previous command shows you the contents of the /usr/bin directory no matter what your present working directory might be.
cd
The cd, or change directory, command is used to navigate the Linux file system from a command prompt.
If you know your destination ahead of time, simply supply the full path:
cd /Users/raspberrypi/Downloads
You can also use relative paths, which are partial file/directory paths that are built on the present working directory location.
For instance, type cd with no additional arguments to quickly return to your home directory. Then try the following:
cd Downloads
Be sure not to include a leading slash (/) before Downloads and remember that Downloads is case-sensitive.
Tip: Tab Completion
As you type commands, paths, and file/program names in Raspbian, try hitting TAB to see if the Linux autocompletion feature is attractive to you. Believe me, tab completion comes in handy when you need to type in super-long and super-cryptic file names!
From the ~/Downloads folder, type the following to move up one level from your present working directory:
cd ..
Make sure to put a space between the cd and the two periods. Also, the tilde (~) character is a shortcut representation of the currently logged-on user’s home directory path. Thus, for the Pi user the following paths can be used:
cd ~/Downloads
cd /Users/raspberrypi/Downloads
Don’t be ashamed to run the pwd command frequently as you cd your way throughout the Raspbian (Debian) Linux file system. It’s easy to get lost even if you do have an informative command prompt configured!
sudo
The sudo (pronounced sue-doo) command is one of the most important commands for you to know, not only for Raspbian, but for any Linux or Unix operating system (and that includes Apple OS X).
It is widely (and correctly) considered to be a security problem to actually run Linux under the context of the root (superuser) account; therefore, while remaining under standard account privileges, you can use sudo to temporarily elevate them and run administrative-level commands while remaining under standard account privilege otherwise.
To use sudo, you simply prepend the word before the command you want to run. The following example opens the hosts system configuration file in the nano editor as root:
sudo nano /etc/hosts
Historically, sudo as a command name is a portmanteau (word mashup) of two other words:
![]() su: This is a Linux command that means substitute user and is used to change the current user account associated with the current Terminal session.
su: This is a Linux command that means substitute user and is used to change the current user account associated with the current Terminal session.
![]() do: This is nothing more than a reference to the verb do, which means to perform a particular action.
do: This is nothing more than a reference to the verb do, which means to perform a particular action.
passwd
You use the passwd command to change the password for a user account. To change the default pi account password, issue the following Terminal command:
sudo passwd pi
You’ll be asked to (1) authenticate with the current password; (2) define a new password; and (3) confirm said password.
If you have root privileges on the computer (which the pi account does by default), you can change the password for any user on the system as well.
Note: Becoming Root
You can customize which Raspbian user accounts can employ the sudo command by making or editing entries in the /etc/sudoers system configuration file.
Note: Taking the Next Step(s) with Linux
Although I do my best in this book to give Linux newcomers what they need to become at least moderately proficient users, there is only so much space to work with. Therefore, I suggest you pick up a good book on Linux end user fundamentals (such as A Practical Guide to Linux Commands, Editors, and Shell Programming, 3rd Edition, by my Pearson colleague Mark Sobell: http://is.gd/NWMLHz).
nano
Linux distributions generally include several different text editors, although some long-time Linux users will balk at my suggesting nano (pronounced NAH-noh) instead of vi (pronounced vee-eye or vie).
Note: Linux Humor
Linux program names often have colorful and/or ironic histories. For our purposes, nano is a recursive acronym for Nano’s ANOther Editor. Historically, nano is a more user-friendly successor to an ancient Linux email client application named pico (pronounced pee-koh).
To open an existing file (such as /etc/hosts), run the following command:
sudo nano /etc/hosts
If you want read/write access to system configuration files like hosts, you should always prepend your nano command with sudo.
You can create a new, blank text file by running nano with the name of your new, as-yet-uncreated file. For instance, the following command creates a new file named test.txt in the present working directory and opens the document for editing in nano:
sudo nano test.txt
One thing I like about nano is that the primary interface commands appear in the footer of the user interface (see Figure 5.4).
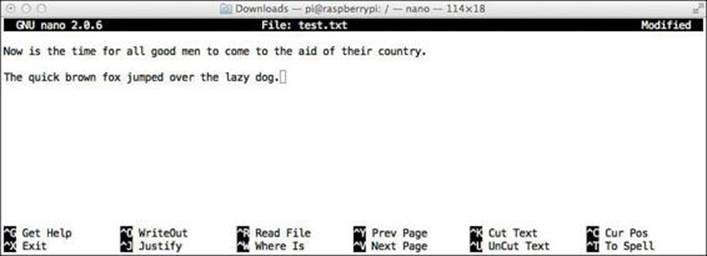
FIGURE 5.4 The nano text editor’s user interface includes onscreen navigation help.
In a nutshell, you use the arrow keys to navigate and the Control key to issue shortcuts. The most common of these shortcuts are Control+O to write out (save) your file, and Control+X to exit nano.
man
Any self-respecting Linux distribution includes a local library of manual (man) pages that describe the full purpose and syntax of Linux commands. Raspbian is no different!
To look up syntax for a particular Linux command (let’s start with ls as an example), try this:
man ls
The man pages open by default in the page viewer less (run man less to learn more about this program!). You can see the screen output in Figure 5.5.
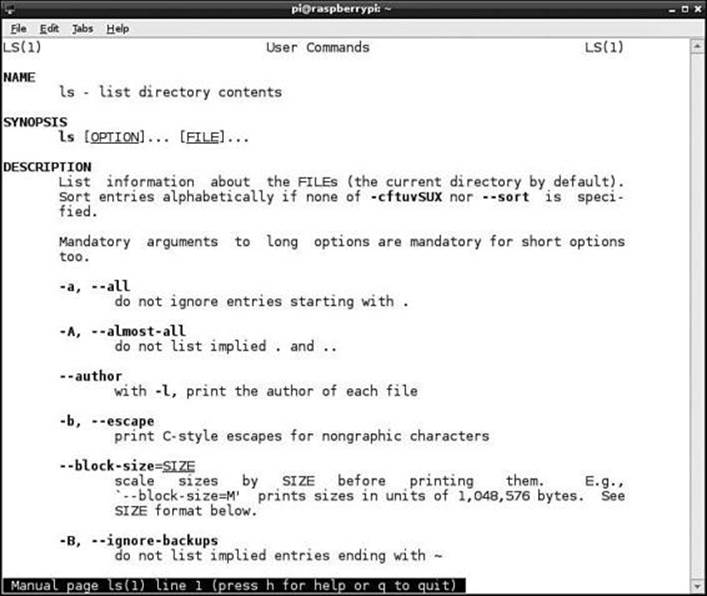
FIGURE 5.5 Raspbian man pages open in the less page viewer by default.
You can actually run man man to learn more about the man command itself.
To navigate a man page in the less viewer, use the spacebar to move one screen at a time and press Enter to scroll one line at a time. To exit the viewer, simply type q.
shutdown
In Debian, the shutdown command is my preferred way for not only shutting down the Pi, but also for performing reboots.
To initiate an immediate shutdown on your Pi, simply issue the following command:
sudo shutdown -h now
The -h parameter instructs Raspbian to halt the system as opposed to simply putting the system in a standby state. To halt Linux means to power off the machine entirely.
Somewhat ironically, you can also use the shutdown command to restart the Raspberry Pi. To do this, include the -r parameter as shown here:
sudo shutdown -r now
You will observe my use of sudo for any issuance of the shutdown command. In Linux, shutting down or restarting the system is a privilege reserved only for those with superuser (root) abilities.
The now parameter can be substituted with a time value if, for whatever reason, you want to delay a halt or a reboot. Consider the following example, which employs a 10-minute delay as well as a pop-up message to all connected users. Please note that the following code should be typed on a single line; this isn’t two separate statements.
sudo shutdown -h +10 "Server is going down for maintenance. Please save your
work and logoff. Thank you."
You might have wondered, “Hey, Tim—where are the other file-management commands?” Those of you with some previous Linux experience probably have used one or more of the following Terminal commands:
![]() cp: Copy file
cp: Copy file
![]() mkdir: Make a directory
mkdir: Make a directory
![]() mv: Move or rename a file
mv: Move or rename a file
![]() rm: Remove a file
rm: Remove a file
![]() rmdir: Remove a directory
rmdir: Remove a directory
In my experience, most file management tasks are more easily accomplished from the GUI shell as opposed to from the command line. That said, both methods are covered in the next chapter.
Updating Your Software
In Chapter 4, “Installing and Configuring an Operating System,” you learned how to flash your SD card with the Raspbian operating system. More specifically, you observed post-flash that the disk contained not one but two partitions. The first partition contains the Raspberry Pi firmware, and the second contains the Raspbian operating system proper. You can see this disk layout in Figure 5.6.
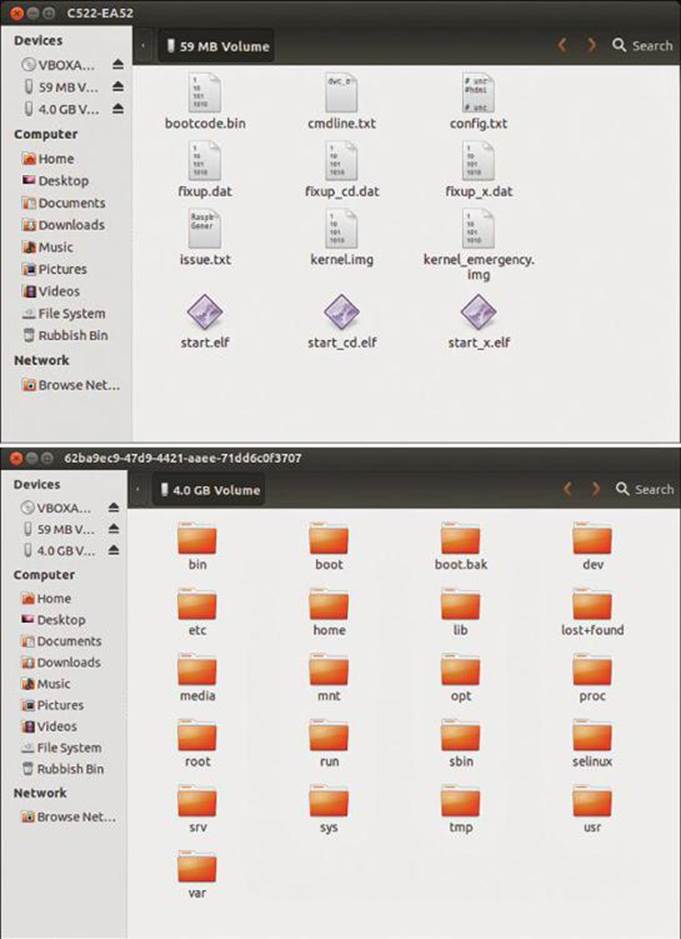
FIGURE 5.6 A Raspbian SD card contains two partitions: one for the Linux firmware and the other for the OS itself. The firmware files are shown in the top window, and the OS files are shown in the bottom window.
For security and stability reasons, it is important that you periodically run an update check not only for the operating system, but also for the firmware itself.
Updating Raspbian
Two Terminal commands need to be issued to update this Raspbian distribution. Here’s the first command:
sudo apt-get update
Debian Linux distributions use the Advanced Packaging Tool, or APT, to locate, download, install, and remove application and OS software. The statement apt-get update fetches the latest updates to the Pi’s configured software repository list.
In Linux parlance, a software repository is an online location where you can search for and install software for your computer. It’s important to note that apt-get update does not actually update anything; it simply makes sure that your system has the latest and greatest info regarding software versions in the software repositories.
To perform an update operation, issue the following Terminal command:
sudo apt-get upgrade
To make this process more convenient, you can use the double ampersand (&&) concatenation operator to chain the two commands into one:
sudo apt-get update && sudo apt-get upgrade
We revisit the concepts of software repositories and the APT system in Chapter 6, “Debian Linux Fundamentals—Graphical User Interface.”
Updating the Pi Firmware
As it happens, a member of the Raspberry Pi community named Hexxeh created a tool called rpi-update (http://is.gd/Rrh2bS) to automate the firmware update process. Here’s the procedure:
1. Get to a Terminal prompt on your Raspberry Pi.
2. Run the following commands:
sudo dpkg-reconfigure tzdata
sudo apt-get install git-core
The dpkg statement checks the system’s currently configured time zone. Git is an open source software version control application that is very popular among Linux developers.
3. Run the following command:
sudo wget http://goo.gl/1BOfJ -O /usr/bin/rpi-update && sudo chmod +x /usr/bin/
rpi-update
Wow—that was a long, honkin’ command, wasn’t it? Let’s break down what it does:
![]() wget (pronounced double yew get): This is a Linux tool you use to retrieve web server content from Terminal (as opposed to from a web browser).
wget (pronounced double yew get): This is a Linux tool you use to retrieve web server content from Terminal (as opposed to from a web browser).
![]() http://goo.gl/1BOfj: This is simply a shortened Uniform Resource Locator (URL) to where the rpi-update program lives on github.com.
http://goo.gl/1BOfj: This is simply a shortened Uniform Resource Locator (URL) to where the rpi-update program lives on github.com.
![]() &&: The double ampersand is a Linux concatenation operator that allows you to run one statement immediately after the preceding one completes.
&&: The double ampersand is a Linux concatenation operator that allows you to run one statement immediately after the preceding one completes.
![]() chmod (pronounced see-aych-mod): This is a Linux command you use to edit the permissions and attributes on files and directories. In this case, you are allowing rpi-update to run as an executable program file.
chmod (pronounced see-aych-mod): This is a Linux command you use to edit the permissions and attributes on files and directories. In this case, you are allowing rpi-update to run as an executable program file.
4. To perform a firmware update check/install, simply run the following command:
sudo rpi-update
If you do get a firmware update, you’ll need to reboot your Pi. Remember that you can do that from the Terminal prompt by using the following statement:
shutdown -r now
Revisiting Raspi-Config
By far the easiest way to perform initial setup of your Raspberry Pi is to use the built-in Raspi-Config utility. You can start Raspi-Config from the full-screen Bash environment or from the LXTerminal simply by typing the following:
sudo raspi-config
Doing so presents you with the Raspi-Config text-based interface you saw in Chapter 4. Raspi-Config is actually a user-friendly front end to the config.txt configuration file located in the /etc directory. Figure 5.7 shows you what the Config.txt file looks like.
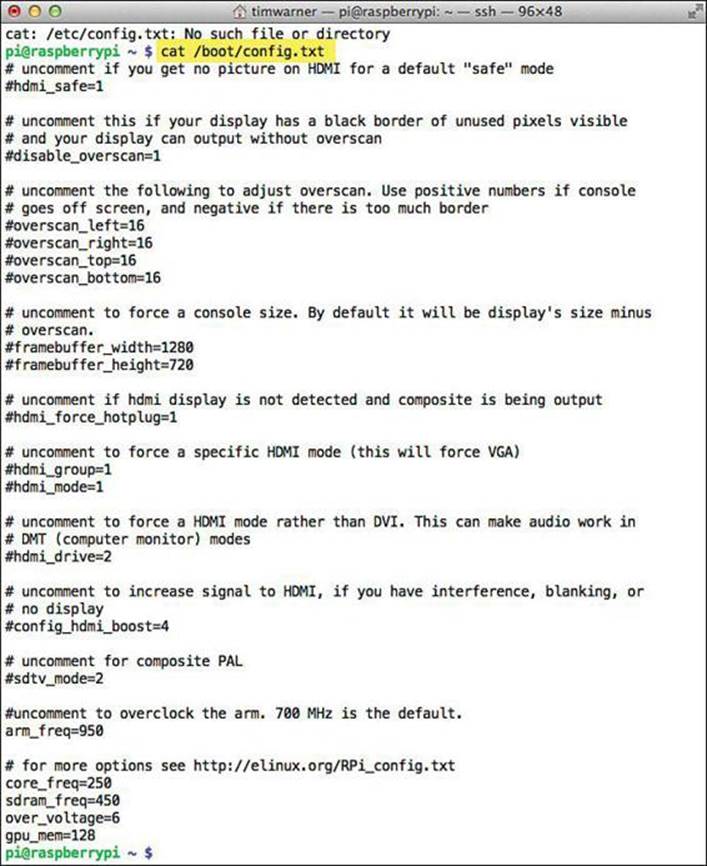
FIGURE 5.7 The Raspi-Config utility makes “under the hood” changes to the Config.txt file.
You can see the Raspi-config interface proper in Figure 5.8.
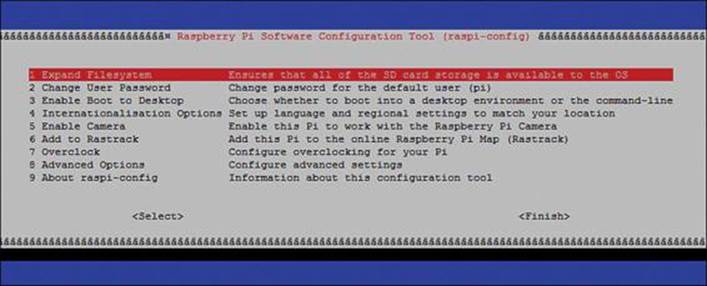
FIGURE 5.8 The Raspberry Pi Software Configuration Tool (Raspi-Config).
You can navigate through Raspi-Config utility by using the keyboard and can use your Up and Down arrow keys or the Tab key to move through the options; press Enter to make a selection.
To leave the main menu and leave Raspi-Config, use the Right Arrow or Tab until you’ve highlighted Finish, and then press Enter.
Let’s close this chapter by walking through each Raspi-config option in greater detail.
Expand Filesystem
You should run this option as soon as possible after flashing your Raspbian SD card. Doing so makes the full space of your SD card available to Raspbian. If you don’t expand the root file system, your Raspbian OS will be limited to a 2GB partition. This result is, of course, quite undesirable if you are using a 32GB SD card!
Change User Password
Everybody with any degree of familiarity with the Raspberry Pi knows that the default username is pi and the default password is raspberry. Thus, if you have any notion of storing confidential data on your Pi, you are best advised to change the password for the pi account immediately.
Remember you can also change the current user’s password at any time by issuing the passwd Terminal command.
You learn how to create additional user accounts in the next chapter.
Enable Boot to Desktop
This option can be used to instruct the Pi to book directly into LXDE instead of stopping at the Terminal prompt. Of course, you need to perform some additional work if you habitually connect to your Pi remotely like I do. At any rate, Chapter 7 gives you the full skinny on Raspberry Pi connectivity options.
Internationalisation Options
This option opens a submenu that enables you to localize your Pi to its corresponding geographic location. Inside this submenu are three options:
![]() Change Locale: This option enables you to choose your default language and corresponding character set. The Pi is configured for UK English by default, but if you want to make a change, you can do so here. For instance, users located in the United States should select the en_US.UTF-8 locale.
Change Locale: This option enables you to choose your default language and corresponding character set. The Pi is configured for UK English by default, but if you want to make a change, you can do so here. For instance, users located in the United States should select the en_US.UTF-8 locale.
![]() Change Timezone: The Foundation cut some financial and production corners by not including a real-time clock on the Raspberry Pi PCB. Accordingly, the Pi needs some help in determining the current time and date. Please be sure to select your proper timezone here, and then as long as the Pi is connected to the Internet, the Pi will periodically synchronize system time with one of the world’s atomic time clock servers.
Change Timezone: The Foundation cut some financial and production corners by not including a real-time clock on the Raspberry Pi PCB. Accordingly, the Pi needs some help in determining the current time and date. Please be sure to select your proper timezone here, and then as long as the Pi is connected to the Internet, the Pi will periodically synchronize system time with one of the world’s atomic time clock servers.
![]() Keyboard Layout: By default, Raspbian is configured for the UK English keyboard layout. This makes sense because Raspberry Pi is a UK product. However, you’ll want to change the keyboard layout to match your locale so that you don’t see any unexpected behavior in your typing results. Most commonly, this “unexpected behavior” manifests in, for instance, a US user typing @ and seeing “ (double quote) instead, or typing # and instead seeing the pound sterling symbol.
Keyboard Layout: By default, Raspbian is configured for the UK English keyboard layout. This makes sense because Raspberry Pi is a UK product. However, you’ll want to change the keyboard layout to match your locale so that you don’t see any unexpected behavior in your typing results. Most commonly, this “unexpected behavior” manifests in, for instance, a US user typing @ and seeing “ (double quote) instead, or typing # and instead seeing the pound sterling symbol.
Note: Internationalisation?
Given the Raspberry Pi is a product of the UK, if you are an American who is accustomed to using Zs instead of Ss (“internationalization” versus “internationalisation”), you should just jolly well get with the global program, wot?
Enable Camera
This option loads the Raspberry Pi camera module drivers and packages, enabling you to make use of the camera board. We’ll spend a lot of time with the Raspi camera in Chapter 16, “Raspberry Pi Portable Webcam.”
Add to Rastrack
This option enables you to add your Raspberry Pi to the Rastrack (http://is.gd/sGStJL) database. Rastrack is a live map that shows you the geographic distribution of Raspberry Pi computers. It’s really cool—check it out!
We’ll actually learn how to use Rastrack and address any privacy-related concerns you may have in Chapter 17, “Raspberry Pi Security and Privacy Device.”
Overclocking
Overclocking refers to tweaking the CPU operating parameters to force the processor to run at a higher speed than it was originally designed for. The Foundation provides us with helpful overclocking levels to afford us the opportunity to turbo-charge our Pi while at the same time reducing the possibility of frying the chip. Again, this option is discussed in great detail in Chapter 18, “Raspberry Pi Overclocking.”
In the meantime, let me at least let the proverbial cat out of the bag by showing you the overclock levels in Figure 5.9. I’m sure the wording in the dialog “Chose overclock preset” will be fixed in a future firmware update (at least I hope so; sometimes the Pi reveals the lack of spit and polish inherent in grassroots community projects).
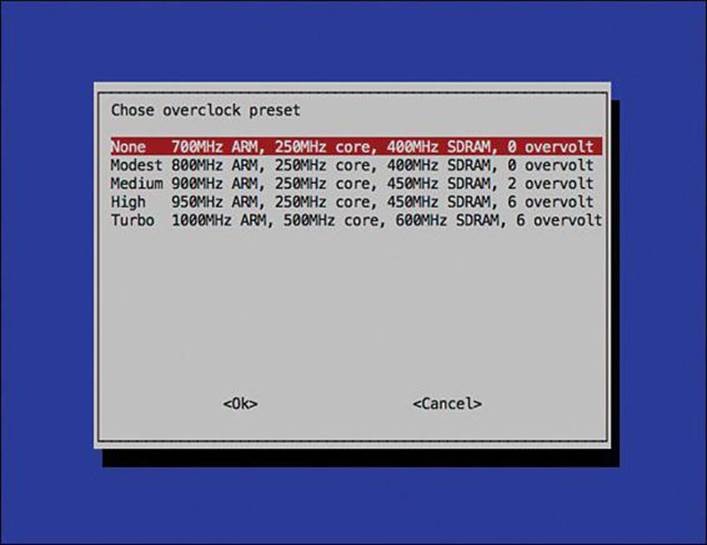
FIGURE 5.9 The Foundation makes it pretty easy to overclock the Raspberry Pi CPU.
Advanced Options
This is a submenu that contains the following options:
![]() Overscan: The overscan option enables you to manually adjust the Raspbian screen image. I’ve never had a problem with the display spilling off the outer border of my monitor, but it’s nice to have correction capability built into the OS.
Overscan: The overscan option enables you to manually adjust the Raspbian screen image. I’ve never had a problem with the display spilling off the outer border of my monitor, but it’s nice to have correction capability built into the OS.
![]() Hostname: This option enables you to change the name of your Raspberry Pi from its default name of raspberrypi to something of your choosing. I’ve found this option helpful when I’m dealing with a busy network that consists of more than one Raspberry Pi.
Hostname: This option enables you to change the name of your Raspberry Pi from its default name of raspberrypi to something of your choosing. I’ve found this option helpful when I’m dealing with a busy network that consists of more than one Raspberry Pi.
Changing any default value in a computer is a recommended security practice because an attacker’s first task is to breach your security by capitalizing upon defaults that were never changed by the owners.
![]() Memory Split: The Pi’s SoC consists of two processing centers: the CPU and the GPU. You can adjust how much memory should be reserved for the GPU by accessing this option. This can have a great impact on system performance depending upon what application you use. This option is also discussed in great detail in Chapter 18.
Memory Split: The Pi’s SoC consists of two processing centers: the CPU and the GPU. You can adjust how much memory should be reserved for the GPU by accessing this option. This can have a great impact on system performance depending upon what application you use. This option is also discussed in great detail in Chapter 18.
![]() SSH: Secure Shell (SSH) provides a secure and reliable means of establishing a command prompt session on a remote computer. The SSH server functionality is enabled in Raspbian by default, so you should not need to do anything here.
SSH: Secure Shell (SSH) provides a secure and reliable means of establishing a command prompt session on a remote computer. The SSH server functionality is enabled in Raspbian by default, so you should not need to do anything here.
You learn all about SSH connectivity in Chapter 7.
![]() Update: This option performs an update check for the Raspi-Config script itself.
Update: This option performs an update check for the Raspi-Config script itself.
![]() About raspi-config: This is purely an informational dialog.
About raspi-config: This is purely an informational dialog.
Raspi-Config Under the Hood
If you’d like to view the Raspi-Config script source for intellectual curiosity’s sake, run the following Terminal command:
nano /usr/bin/raspi-config
From inspection of the previous command you can draw the following conclusions:
![]() Raspi-Config is actually a Bash shell script (Linux script files typically have the file extension .sh).
Raspi-Config is actually a Bash shell script (Linux script files typically have the file extension .sh).
![]() The Raspi-Config.sh script is located in the Raspbian file system in the /usr/bin directory.
The Raspi-Config.sh script is located in the Raspbian file system in the /usr/bin directory.
Just for grins, I show you the partial contents of Raspi-Config.sh in Figure 5.10.
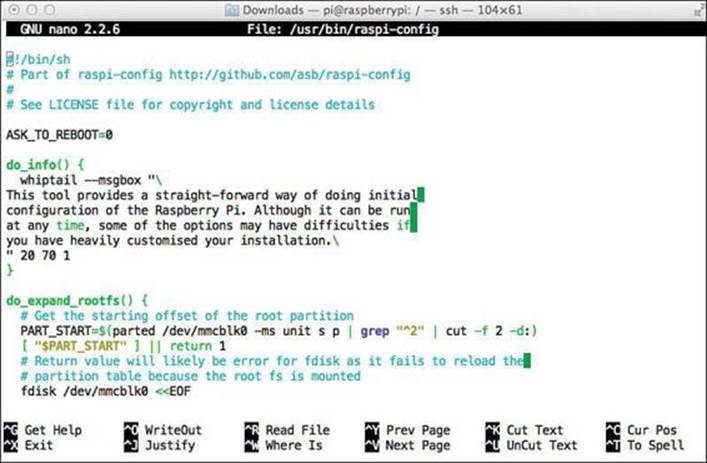
FIGURE 5.10 The Raspi-Config utility is actually the product of a Bash shell script.
Please note that as the Raspberry Pi Foundation adds new features to the Pi, they accordingly update the Raspi-Config utility. Therefore, don’t be surprised if, after running an apt-get upgrade, you see a new Raspi-Config option or a slightly changed menu organization.
Next Steps
At this point I hope you now have enough familiarity with the Linux command-line environment and Raspi-Config utility that you can set up your Raspberry Pi and get into and out of the graphical shell.
In the next chapter, I formally introduce the LXDE graphical environment; doing so should answer some questions that probably popped into your head regarding this interface.
All materials on the site are licensed Creative Commons Attribution-Sharealike 3.0 Unported CC BY-SA 3.0 & GNU Free Documentation License (GFDL)
If you are the copyright holder of any material contained on our site and intend to remove it, please contact our site administrator for approval.
© 2016-2026 All site design rights belong to S.Y.A.