Raspberry Pi Projects (2014)
Part III. Hardware Projects
Chapter 12. Door Lockby Dr. Andrew Robinson
In This Chapter
• Learn about computer security
• Create a door lock controlled by RFID tags
• Extend your knowledge of OOP
• Discover more about computer authentication
• Use Python’s dictionary object to store key/value pairs
I’m forever forgetting things – usually important documents. Luckily with computers and the cloud, I can go online and access my documents whenever and wherever I need to. Unfortunately, I can’t download physical objects, such as a door key, particularly when the door has swung shut behind me. Luckily, the Raspberry Pi can come to the rescue.
In this chapter you’ll build a computer-controlled door lock that will unlock the door when you prove to it who you are. You’ll take advantage of the general-purpose nature of the Raspberry Pi, so you can extend it to have a range of different ways of unlocking your door. This chapter shows you how use an RFID reader, but you could go on to modify it to unlock using your mobile phone; lucky for me, as I’m just as bad at remembering passwords as keys.
If you don’t have a door lock, you can instead use the Raspberry Pi to activate and deactivate an alarm – it won’t physically prevent entry, but it can warn you that someone has been in your room without permission.
There’s a bit of an art to designing computer programs, and hopefully, after this chapter you’ll also appreciate the need to design things modularly – that is, in a way that allows chunks to be easily switched out for another one. You’ll also see that it can be easier to design with a simple block, get the system working and then go back later to make it more complicated. In this chapter you’ll see how to break the task down into separate aspects, and then switch out one block and switch in another.
The System Overview
When starting work on a new system, computer scientists will often sketch out a system diagram showing how the main components will work together – it would be far too complicated to try and design everything all at once.
Figure 12.1 shows the system diagram for the door lock. It shows how the system needs to get input (this could be from a code pad) and check whether the input is valid, and if it is, then it unlocks the door. You should recognise that Figure 12.1 maps well to the familiar “input, process, output” of computers.
Figure 12-1: The system diagram of the door lock.

Safety-Critical Systems
This project also introduces an important aspect in computing, that of safety-critical systems. If your desktop computer crashes, you might lose hours of work, which probably at worst is just frustrating. If a computer flying a plane malfunctions, it may lead to death or serious damage. This is a safety-critical system, in which computers can cause harm if they do not function correctly. There are particular tools, techniques and standards that apply to try to safeguard the public. This is relevant to the project at hand because you should make sure that you have a manual override for the door lock – because you don’t want to be locked in a room by your Raspberry Pi. Typically, most electric door lock systems can also be opened with a mechanical key.
Furthermore, just as a mechanical lock can be picked, computers can be hacked, so it’s important to be aware of how secure your system and code are. You don’t want someone opening your door because you didn’t design your program properly.
![]()
Don’t rely on your Raspberry Pi keeping your house secure unless you know what you’re doing. Also, have a manual override, so you don’t get locked in, or out!
How Are Computers Hacked?
Most hacking incidents work by sending the computer data it is not expecting – too much or the wrong format perhaps. In the C language, if the programmer is not careful, the program will continue to accept input, which will overflow from the area of memory that had been put aside for it. Think of this like filling in a form and going off the end of one line and continuing onto the next. Sometimes the extra input data can overwrite something else in the program. Programs are just a series of instructions the computer obeys that are held in memory, and these instructions can be overwritten. If the attacker sends the right data, it’s possible to change the instructions to make the program do something else.
This particular type of attack is called a buffer overflow – the buffer being the area reserved for input data. Luckily, Python manages the size of its buffers for you, so this shouldn’t happen. You should still be careful, and whenever you take input from a user expect the unexpected!
The Door Lock Hardware
You need a door lock that the Raspberry Pi can control through an electric signal. There are two main types:
• Electromagnetic locks – Use an electric current to create a magnetic field to hold the door shut. When the current is switched off the field collapses, and there is nothing to hold the door shut. Typically, a flat metal plate is attached to the door that is held by the electromagnet attached to the frame.
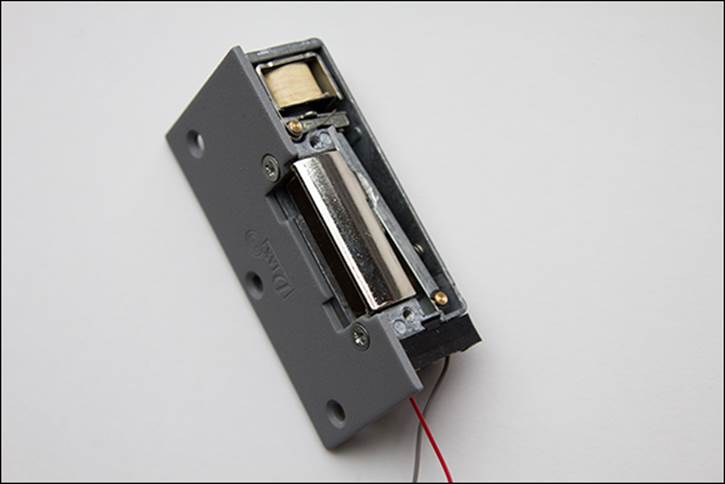
• Electromechanical keepers (as shown in Figure 12.2) – Tend to work in conjunction with traditional locks. They are typically fitted to the doorframe and accept the bolt from the door. A small spring holds a plate in place that stops the bolt from escaping. If a voltage is applied to a small coil, the keeper allows the bolt to pull out and the door to open. When the current stops flowing, the bolt will be captured again when the door is closed.
Figure 12-2: An electromechanical keeper door lock.
Clearly, the Raspberry Pi needs to produce a different signal for each type of lock – the electromagnetic lock needs a voltage continually applied to keep the door shut, whereas the electromechanical keeper needs voltage supplied only to open the door. You will use a relay on PiFace Digital to control the door lock, and because it has a changeover contact, you can use the same software to control both types of locks – you just need different wiring.
At this stage it’s also worth thinking about the default state of the outputs. What happens if the Raspberry Pi crashes; would the door stay locked, or would it open? This too will be considered when wiring up the lock.
The Initial High-Level Software Simulation
If you tried to write your entire door-lock controller all at once, chances are it wouldn’t work the first time. Furthermore, with lots of code, there would be many places for bugs to hide. Instead you should limit the number of places to look by writing something very simple, and testing it. Only then should you add more complexity, step by step. Also, before working with pesky real-world hardware that makes it harder to see what’s going on (and so harder to find bugs) you’ll first simulate the hardware in software.
Figure 12.1, earlier, identified the major blocks needed for your door controller system. The first step is to implement it in Python. Enter Listing 12.1 in a new file called door_controller.py.
Listing 12.1 The Initial Code for the Door Controller
#!/usr/bin/env python
"""Door Lock: System to control an electric door lock
class AuthToken:
def __init__(self, id, secret):
self.id=id
self.secret=secret
class TestDoorController:
def send_open_pulse(self):
print "unlock the door"
class BasicAuthenticator:
id = "Andrew"
secretPassword = "1234"
def check(self,token):
print "checking input of '" + token.id + "', ![]()
password: " + token.secret + ", against secret password ![]()
'" + self.secretPassword +"'"
result = (token.secret == self.secretPassword) & ![]()
(token.id == self.id)
print "authentication is: " + str(result)
return result
class TestInput:
def getInput(self):
print "checking for input"
authToken = AuthToken("Andrew","1234")
return authToken
def main():
authInput = TestInput()
authenticator = BasicAuthenticator()
doorController = TestDoorController()
if(authenticator.check(authInput.getInput())):
doorController.send_open_pulse()
if __name__ == '__main__':
main()
Run the program in Listing 12.1, and you’ll see it print the following messages that describe what is happening in that part of the program. Note that at the moment the test data is hard coded into the program so it is not interactive, but it shows how the blocks work together.
checking for input
checking input for 'Andrew', password: 1234 against ![]()
secret password '1234'
authentication is: True
unlock, wait and relock
Change the value returned by the getInput() function to something other than 1234 and rerun the program. Check that you don’t see the message about unlocking the door.
By now, much of the code should be familiar as functions, if statements, variables, print statements and delays are covered in earlier chapters. Not covered so far are the keywords class and self, which are concerned with object-orientated programming, or OOP for short. In this example OOP is used as a means to break the task into manageable objects that represent the blocks in your system diagram. Later in the chapter you’ll swap out one object for another, which makes it very easy to modify your programs, and reuse objects in other projects. You’ll learn more about OOP later in the section “Testing the Program and Fitting the Lock”.
Your simulated system may not appear very exciting at the moment, but building up a system with firm foundations can save hours of debugging later. The next steps are to start expanding the blocks that actually take input and control the door.
The Output Block
Having a simple system complete means that you don’t always have to start coding “at the beginning” of a system – that is, you don’t have to complete the getting-input stage first. Instead, you can write the code that controls the door (which is much more fun!).
![]()
If you don’t have a door lock, you can still follow along by wiring up an LED instead of the lock to show when the door would be locked.
Connecting the Door Control Circuit
You want the door to stay locked even if the Raspberry Pi crashes, yet in the case of the electromagnetic lock, a current needs to flow to hold the door shut. This functionality is provided by a changeover relay on the PiFace Digital interface.
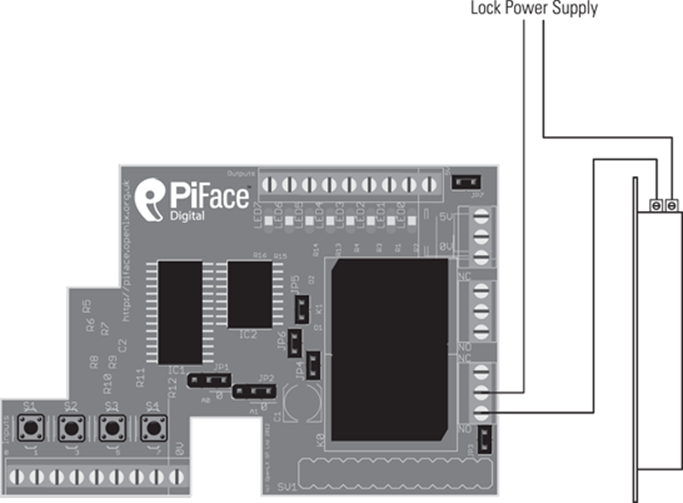
Wire the door lock up as shown in Figure 12.3 or Figure 12.4. You will need an appropriate power supply for your lock. You can buy plug-in power adapters for a range of voltages. Check the voltage and current required by your lock. Connect your lock to either the normally open or normally closed contacts, depending on whether it needs current to unlock the door, or hold the door locked.
Figure 12-3: The door lock circuit diagram for an electromagnetic lock.
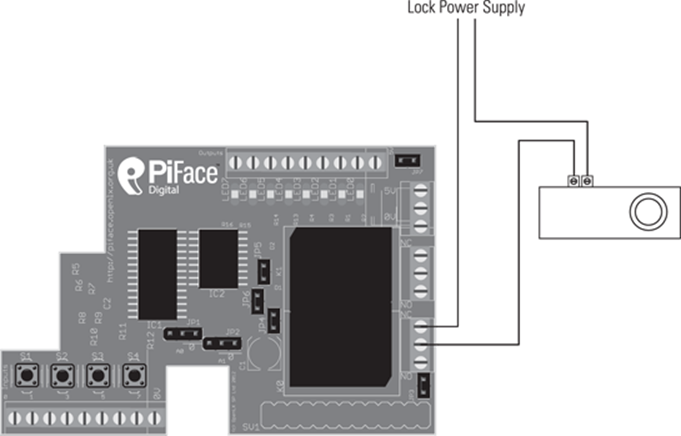
Figure 12-4: The door lock circuit diagram for an electromechanical keeper.
A Reminder About Relays
Relays are switches that are operated electrically. They have contacts that are moved by passing an electric current through a coil of wire. Relays are available with different configurations of contacts. The relays you will use here are changeover, or sometimes called double throw. This means that with no current flowing through the coil, the centre contact is connected to one pin on the relay. When current flows the centre contact changes-over and becomes connected to the other pin.
In line with a test-as-you-go strategy, now is a good time to check whether you have control of the door lock. Connect up the power supply for the door lock and use the PiFace emulator (as described in Chapter 9, “Test Your Reactions”) to check the lock holds and releases when you change output 0.
Programming the Door Control Block
With the door lock connected to the interface, it is time to write the software. The function of the door controller is to send a short signal to unlock the door. You will edit the TestDoorController class.
Open the file door_controller.py and edit the code to add the following lines.
Add these statements to the beginning of the program:
import piface.pfio as piface
from time import sleep
Add this before the main function:
class DoorControllerPiFace:
def send_open_pulse(self):
piface.digital_write(0,1)
sleep(5)
piface.digital_write(0,0)
Update the main function to make use of this class. Change
doorController = TestDoorController()
to
doorController = DoorControllerPiFace()
Run the entire program, and check that instead of printing unlock the door, the door lock is released for five seconds and then locks again.
Now that you’ve successfully built and tested the output stage, it’s time to get the input from the user when he or she wants to open the door.
The Input Block
Continuing with the theme of keeping things simple at first, you will start with the input block asking the user to type a password on a standard USB keyboard.
Getting Input
Edit the door_controller.py code by adding the following class:
class KeyboardInput:
def getInput(self):
print "checking for input"
id = raw_input("please enter your name: ")
password = raw_input("please enter your password: ")
authToken = AuthToken(id,password)
return authToken
You need to tell the program to use this class to get input rather than the TestInput class. Change the line
authInput = TestInput()
to
authInput = KeyboardInput()
Check that the code works; the door should open only if you type the name Andrew and the password 1234.
The next step is to implement the authentication block.
The Authentication Block
Authentication is about checking that someone is who he or she claims to be. You will probably use authentication systems many times a day. For example, you need to authenticate yourself to use websites such as Facebook and Twitter.
The class you have written so far to do authentication is very simple; it checks to see if the string passed to it matches a hard-coded value. This has a number of drawbacks, including the following:
• If anyone looks at the source code, it is possible for him or her to read your password.
• Changing the password requires you to edit the source code.
A better solution is to store the password information separately, which is what you will do next.
Storing Secrets in a File
One of the simplest ways to store data is in a flat file. This is nothing more than a list of entries in a basic text file. To read a username and password pair of values from a file, change the door_controller.py code by adding the following FileAuthenticator class before the main function:
class FileAuthenticator:
filename = "secrets.txt"
def readFile(self):
secrets = open(self.filename, 'r')
print "reading from file"
for line in secrets:
line = line.rstrip('\n')
self.id, self.secretPassword = line.split(',')
def check(self,token):
self.readFile()
print "checking input of '" + token.id + "', ![]()
password: " + token.secret + ", against secret password ![]()
'" + self.secretPassword +"'"
result = (token.secret == self.secretPassword) & ![]()
(token.id == self.id)
print "authentication is: " + str(result)
return result
Now tell the main part of the program to use the new FileAuthenticator class instead of BasicAuthenticator. Change the line
Authenticator = BasicAuthenticator()
to
Authenticator = FileAuthenticator()
The file secrets.txt will hold the your secret authentication information. Use a text editor to create the file secrets.txt in the same folder as your program file and add the following sample line:
Andrew,9876
Run your program and enter your name as Andrew and the password as 1234. You will see the following output:
checking for input
please enter your name: Andrew
please enter your password: 1234
reading from file
checking input of 'Andrew', password: 1234, against ![]()
secret password '9876'
authentication is: False
Notice how the password 9876 is read from the file. Add more usernames and passwords (commas separated) to the file secrets.txt, one per line. Test the program with different usernames and passwords to check that the door opens when it should, and more importantly, that it doesn’t when it shouldn’t! For the full code listing, go to the book’s website at www.wiley.com/go/raspberrypiprojects.
![]()
It is tempting to think that your program works when it gives the behaviour you want – such as in the case of the door lock, if the door is unlocked when the correct password is entered. However, it is just as important to test programs for other cases; for the door lock example, you need to test that the door isn’t opened if the incorrect password is entered. In industry, testing is very important, and programmers aim for high levels of code coverage – that is, that much of the code has been tested. This may mean running the program with a wide range of sample inputs.
Unlocking Doors Without Touching
You may have seen door locks for which you can wave a card or plastic fob against a reader. These work using radio frequency identification (RFID) technology. The Raspberry Pi makes it easy to incorporate an RFID reader into your door lock.
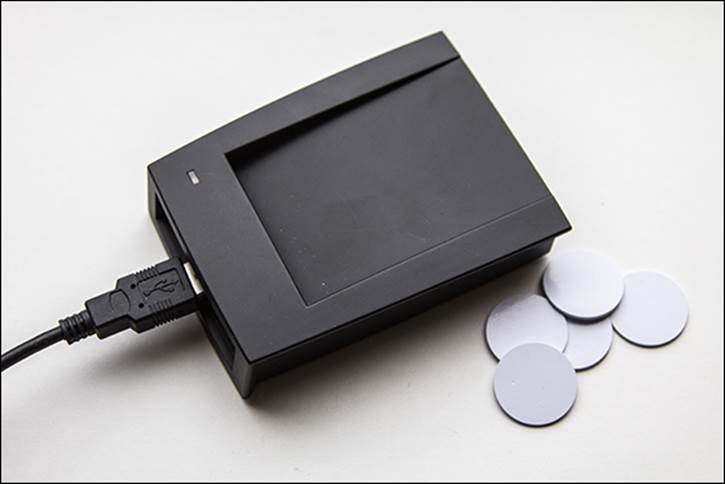
You will need to buy a USB RFID reader and matching tags, similar to those shown in Figure 12-5. Although these are available from the major component distributors, you may find online auction sites to be cheaper. USB RFID readers can appear in different ways to the computer – for example, as an HID USB device (which sends input as if it were a keyboard typing in characters from the tag) or as a serial port. The USB RFID reader used in this chapter is an HID USB device as it is simplest to program. You could use a USB serial RFID reader, but you would have to modify the code yourself.
Figure 12-5: An RFID reader and tags.
![]()
There are two main frequencies used by RFID systems, 13.56MHz and 125kHz. These frequencies are incompatible with each other, so whichever reader you get make sure that you buy matching tags. 13.56MHz is more commonly found in industrial systems, so with a 13.56MHz reader you may find that you can use a staff/student ID badge, or even a biometric passport or prepaid travel card. Near field communications (NFC) on some smartphones also use 13.56MHz tags.
There are different levels of security offered by RFID with the cost of increased complexity, and more expensive hardware. As this is your first RFID system, it is best to start with the simple version of RFID, which offers a basic level of security (comparable with the cheaper commercial systems). As you become a more accomplished programmer, you could upgrade to a more sophisticated system.
Connecting the RFID Reader
In this subsection you will check if your RFID reader works with your Raspberry Pi and read your first RFID tag. As the Raspberry Pi has only two USB ports, you will need to use a USB hub or unplug the mouse before plugging in additional USB devices. Linux is designed so that it can be used without a mouse from the command line. Follow these steps to test the reader from a command line:
1. If you are running a graphical X environment, choose Logout from the program menu. You will be returned to the command line.
2. Unplug your mouse and plug in the RFID reader into the USB port.
3. Start the text-based editor nano (or your preferred text-based text editor) by typing nano on the command line.
4. Bring an RFID tag near to the reader. It should bleep, and you will see a string of characters are typed to the screen. Bring a different tag near to the reader and check that a different string of characters is displayed on the next line.
![]()
Remember that whenever you present a tag to your reader it will type its serial number wherever the cursor is, followed by a new line. So don’t present a tag when you’re in the middle of typing something else!
5. Now is a good time to create the data file that will contain the tags that you want to grant access to open the door. Still in nano, add the name of the person who will be given the tag followed by the ID from the tag separated by a comma. There should be a separate line for each tag. Save the file by typing Ctrl + X, followed by Y to confirm that you want to save the buffer, followed by the filename tag.txt and then Enter. Your tags and reader may produce codes that look slightly different, but the file should look similar to this:
Andrew,1c477cd5
Mike,54bfc314b
![]()
If your RFID reader does not send any data, check that it works with your tags with a desktop computer. To check that the Raspberry Pi has recognised your USB reader, type dmesg into a terminal shortly after plugging it in and look for a reference to RFID and USB HID.
![]()
Experiment with reading other items containing RFID tags, such as ID cards, payment cards, travel passes and biometric passports. If successful, you should notice that a string of characters is printed.
How RFID works
RFID works by exchanging messages between a reader and tag by radio waves. RFID tags consist of an aerial (a loop of wire), a capacitor to store electricity and a small silicon chip. The silicon chip is actually a small computer processor! This demonstrates just how small computers have become and how they are everywhere!
An ingenious feature of the system is that the tags do not need their own power source to transmit. They can receive their energy by radio waves from the reader when they are first placed nearby. The radio waves also contain a message from the reader that it wants to read the tag. The tag stores the energy and uses it to compute a response and then transmit it back to the reader. In the simple case this message is a fixed number, but more sophisticated tags contain read/writable nonvolatile memory (memory that stores state even without power) to store data. In the most sophisticated tags, their computer processor performs a calculation in the tag. This allows the tag to perform challenge-response authentication.
Challenge-Response Authentication
One problem with authentication is the threat of replay attacks – that is, that an attacker may copy the secret reply given to a system. An example of this might be watching a user type in a password, and then typing it in to impersonate that user. A solution is never to reveal the secret information. This may seem impossible at first, but can be implemented if a challenge is set that can be achieved only if the subject possesses the secret information. In everyday life you might want to know if someone knows the same secret you do but don’t want to reveal the secret to him or her. In this situation you find a question that a person can only answer if he or she knows the secret, yet the two of you don’t actually share the secret itself. In computing this is known as challenge-response authentication.
The more sophisticated RFID tags have a processor to answer questions posed by the reader. In this case the question is usually numbers that the tag has to do a sum with together with the secret number it is storing. If the tag transmits the correct number back, the reader is sure that the tag knows the secret. The next time the tag is presented to the reader a different challenge will be issued, which makes it very difficult to copy the tag.
Using the RFID Reader in Python
You will need to write a new input block and an authentication block for the RFID tag reader.
The RFID Input Block
As the RFID reader inputs data from tags as if it had been typed on a keyboard, you will use the raw_input function in Python. Add the following code (before the main function) to get input from the RFID reader to your door_controller.py program:
class RfidInput:
def getInput(self):
print "waiting for tag"
tag = raw_input()
return AuthToken(None,tag)
The RFID Authentication Block
The RFID authentication block looks up the value from the tag to see if it is valid. It does this by checking if it is in the tags.txt file you created earlier. Add the following code to the door_controller.py program so that you can check if the value read from the tag is valid:
class RfidFileAuthenticator:
filename = "tags.txt"
tags = dict()
def __init__(self):
self.readFile()
def readFile(self):
secrets = open(self.filename, 'r')
print "reading from " + self.filename + " file"
for line in secrets:
line = line.rstrip('\n')
id, tag = line.split(',')
self.tags[tag] = id
def check(self,token):
print "checking if " + token.secret + " is valid"
if token.secret in self.tags:
print "tag found belonging to: " + ![]()
self.tags[token.secret]
return True
else: "tag not found"
return False
You will notice that the RfidFileAuthenticator class uses a dict – a dictionary. A dictionary in Python is a way of storing a set of values that have a unique identifier. The unique identifier is called the key. A value is stored with its associated key. For example, the following example creates a dictionary stored in the variable ages and then associates the value 21 with the key jim and 43 with the key tony:
ages = dict()
ages["jim"] = 21
ages["tony"] = 43
The following code looks up the value for the key jim in the ages dictionary:
print ages["jim"]
This prints the value 21.
![]()
Open up an interactive Python session and try it yourself. Create a dictionary, add some key- value pairs and then retrieve them.
In the RfidFileAuthenticator class a dictionary is used to store who has which RFID tag. The RFID tag is used as the key (which is unique), and the name of the tag owner is stored as the associated value. The dictionary is populated by reading each line in the file in a for loop when the object is initialised.
self.tags[tag] = id
The check function checks if the tag that has been read is present in the dictionary with the following line:
if token.secret in self.tags:
If the key is present, the associated value is looked up so that the name of the owner can be printed.
![]()
Other languages may call a dictionary an associative array, a hash, a hash table or key/value pairings, but they all have similar functionality. They are very useful in computing.
Putting It All Together
With the new input and authentication blocks written, the next step is to use them in the main function.
Update the main function to use the new classes by changing the authInput and authenticator variable initialisations to
authInput = RfidInput()
authenticator = RfidFileAuthenticator()
Run the program and bring a tag that is listed in tags.txt near the reader. The program will print
reading from tags.txt file
waiting for tag
1c477cd5
checking if 1c477cd5 is valid
tag found belonging to: Andrew
unlock, wait and relock
Rerun the program and check that a tag that is not listed in tags.txt doesn’t open the door. If your program works successfully, you need to add a while loop to the main function so that you do not have to keep running it each time a tag is presented. Do this by wrapping the if statement with an unconditional while loop, as shown here:
while(True):
if(authenticator.check(authInput.getInput())):
doorController.send_open_pulse()
Testing the Program and Fitting the Lock
Now is the time to test the complete program. Run the program and check that the electric door lock is locked. Wave a valid tag at the reader and check that the door lock unlocks for a few seconds and then relocks. Wave the valid tag again to check whether the sequence is repeated. Finally, use an invalid tag and make sure that the door doesn’t open.
If the system appears to work, it’s time to fit the electric lock to the door and the tag reader. You should secure the wiring running to the door lock; otherwise, an attacker could tamper with it to unlock it. As mentioned earlier, it’s a good idea to be able to manually unlock the door if you have an error in your program that means it fails to unlock the door! If your Raspberry Pi is on the inside of your door, it can be useful to have remote access to it so that you can stop or edit your program. Look up how to SSH into your Raspberry Pi online for more information.
Object-Orientated Programming
You have seen how easy it is to swap blocks out with OOP. OOP allows programmers to structure their code by creating and using objects as they may do with real-world objects.
Think of a real-world object – it has a set of properties (characteristics, such as its colour) and a set of things that you can ask it to do. As an example, think of a balloon – there is data about the balloon, properties that it has – for example, it may have the colour red and be inflated. There are actions you can cause the balloon to do, such as inflate or pop. These actions may affect the balloon’s properties; causing a balloon to pop will cause its is Inflated property to change from true to false.
The key thing to notice about OOP is that it organises functions and variables together. In the door lock example the variable tags is only useful to the RFID authentication part of the program, so it is part of the RfidFileAuthenticator class. The alternative would be to have all the variables together, which would be more confusing as you would not know which part of the program needed them. If you were working as a part of a team on a program, OOP would provide a way to split the code into fairly independent parts that can be worked on separately and eventually assembled.
OOP is there to help you write programs by providing a framework for structure. Objects can be swapped out as you have seen. You can also build more complex objects from component objects, just as you can in the real world. As you become more advanced, you can learn about another feature of OOP, inheritance, which enables you to create child objects that inherit the behaviour and variables of their parents, but with additions.
You don’t have to write in an OOP style, but using it can be a great help. In the code lock example it allows you to change behaviour by swapping an object in one line. This is only easy because the OOP helps manage abstraction, breaking a problem into manageable parts.
Networking Multiple Doors
Now that you have one door lock working it’s time to think about expansion. Imagine in the future that you have lots of door locks, and want to allow access to some of the doors to other users. With the current system you would have to visit each door controller and set the same password. It might also be hard to keep track of who has access to each door.
![]()
Do not confuse a user directory with a filesystem directory – although they use the same word, they are separate unrelated concepts.
A better solution would be to keep all the information stored in one place, on a central server. With this approach, when a user requests access to a resource (that is, he or she wants to open the door) his or her credentials are sent to the directory server over the network, which grants access or not. A similar process is used online to allow users to log in to other websites using their Twitter or Facebook accounts.
Authentication and Directories in Industry
The standard way to share and store authentication information is the lightweight directory access protocol (LDAP). Its history can be traced back to the 1980s around the time of the birth of the Internet. Nowadays it is the basis for Active Directory, the system used for network user management on Microsoft Windows. Linux supports running LDAP servers and user logon through open-source implementations of LDAP. The main version for Raspbian is OpenLDAP.
If you own multiple Raspberry Pis, you could network them and manage who can log in to them centrally. You could perhaps manage a classroom of Raspberry Pis for a school this way. There would be no difference between this setup and the way large institutions such as banks, universities or offices manage all their machines and users. There are tutorials online that show how to set up an OpenLDAP server and client specifically on Raspberry Pis.
In your door lock program, because the authentication is separated into a class, you can easily replace it with a network version that would look the user’s input up in a directory or other authentication service. You could even replace it with code that sends the user’s input to validate against Facebook. Clearly putting a Raspberry Pi next to every door in your house starts becoming expensive, but there are a number of other fun ways you can expand the project which do not require additional hardware.
Over to You
This project, like all the others in this book, has many opportunities for extensions. Why not try swapping out one or more input, authentication and output blocks to implement some of the following:
• You could have the lock greet the user and announce that access has been granted. Make use of the code for text-to-speech in Chapter 10, “The Twittering Toy”.
• Write a log of who is granted access so that you know who enters your room. You could reuse the code from Chapter 17, “The Techno–Bird Box, a Wildlife Monitor”. A variation on this would be to send an e-mail or tweet when access was granted or attempted. You could trigger the Raspberry Pi camera too to record a photograph of a person trying to gain access. Using the other outputs on PiFace Digital, you could trigger an electric water pistol to deter unauthenticated access.
• The authentication block could be extended so that access was granted only at certain times of day.
• If you’re familiar with web programming, you could set up a web server on the Raspberry Pi and unlock your door by sending a password via a web page on your smartphone.
• You could experiment with different input devices, such as a biometric scanner if you can afford one. Barcode and magstripe readers are more affordable alternatives.
• If you are feeling really ambitious, you could find code online to do image recognition and use the Raspberry Pi camera. OpenCV is a useful library.
• Another ambitious extension would be to use Asterisk or Twilio to unlock the door when you dial a telephone number or send a text.
• You could be really creative and come up with your own authentication method.
The Art of Programming
This chapter should have shown you an important feature about computer programs – that they change. Requirements change during the life of a program, which means parts need to be swapped out or rewritten. Part of the art of programming is structuring code so that it is easy to maintain later, particularly when you start working with other programmers.
Managing software development is difficult; for more information about how large, complicated programs are written in industry, search online for “extreme programming” or “agile methodologies” such as “scrum”.
![]()
Programmers may talk about refactoring. Refactoring is basically the matter of tidying up code to improve its structure without changing its behaviour. It requires discipline, but makes maintaining code easier in the long term.
You should have seen that a good approach is to build a simple system with limited features that works, and then add more features later. The goal is to write code in such a way that you’re always fairly close to having a program that runs, even if parts of it are massively simplified, rather than have an unmanageable mass of uncompleted features, which show no sign of working!
Most importantly, to master writing code takes practise. So, if you haven’t already, get your Raspberry Pi working for you. As you’ve seen in this chapter, if you’re forever forgetting your keys, the Raspberry Pi can provide a solution. Why not create a new gadget to solve a problem for you or your friends?
All materials on the site are licensed Creative Commons Attribution-Sharealike 3.0 Unported CC BY-SA 3.0 & GNU Free Documentation License (GFDL)
If you are the copyright holder of any material contained on our site and intend to remove it, please contact our site administrator for approval.
© 2016-2026 All site design rights belong to S.Y.A.