Raspberry Pi Projects (2014)
Part II. Software Projects
Chapter 7. Minecraft Maze Makerby Sean McManus
In This Chapter
• Installing Minecraft
• Exploring the Minecraft world
• Manipulating the Minecraft world in Python
• Generating a random Minecraft maze in Python
Minecraft appeals to the Lego fan in everyone. It enables you to build immersive 3D worlds from blocks of materials, and it’s fired up imaginations to the extent that an estimated 20 million copies have been sold across platforms including the PC and Xbox.
An early development version of Minecraft is available for the Raspberry Pi. It features only the creative mode, where you can build things peacefully without the threat of monster attacks or starvation, but it has one neat twist: You can program it using multiple languages, including Python. This means that you can build a grand palace without having to manually place every block, and can write programs that can invent original new structures for you to roam around and explore, as you’ll see in this chapter.
This project uses a Python program to build a maze in Minecraft. Each time you run the program, it will build a new maze for you, and you can control how big you want it to be and which materials you want it to be made of. During the course of this project, you’ll learn how to place and remove blocks in Minecraft using Python, so you’ll have the skills to write your own programs that supercharge your construction work.
At the time of writing, Minecraft: Pi Edition is alpha software, which means that it’s a very early test version (less well developed than a beta version). I had only a couple of minor issues with it: The window and its content were strangely aligned using a screen resolution of 1024 x 768 (so I switched to 1280 x 1024), and the cursor misbehaved when I maximised the window. Nevertheless, I recommend that you always back up any important data on your Raspberry Pi when you use any alpha software, just in case something goes wrong.
![]()
The easiest way to back up files on your Raspberry Pi is to connect a USB storage device and use the File Manager in the desktop environment to copy them across.
You can download the code for this chapter from my website at www.sean.co.uk.
Installing Minecraft
Although Minecraft is distributed commercially on other platforms, the Raspberry Pi alpha version is free to download. To use it, you’ll need to have the Raspbian Wheezy version of Linux on your Raspberry Pi. It’s the operating system version recommended by the Raspberry Pi Foundation, and you can install it using the New Out of Box Software (NOOBS) image available through the Downloads section at www.raspberrypi.org. For help with installing the operating system, see Chapter 1, “Getting Your Raspberry Pi Up and Running”.
To install Minecraft, follow these steps:
1. Make sure that your Raspberry Pi is connected to the Internet. You’ll be downloading Minecraft over your web connection.
2. Start your Raspberry Pi, type startx and press Enter to go into the desktop environment.
3. Double-click the Midori icon on the desktop or use the Programs menu in the bottom left to start your browser.
4. Visit http://pi.minecraft.net and click the link to download Minecraft. When prompted, click Save As to check that you’re saving into your pi folder. In the file browser, it should be highlighted in your Places on the left. Click the Save button. Close Midori. (You don’t need it any more.)
5. Double-click the LXTerminal icon on the desktop to open a terminal session.
6. Enter the command tar -zxvf minecraft-pi-0.1.1.tar.gz to uncompress the file you downloaded. Linux is case sensitive, so make sure that you type everything in lowercase. The last bit of that command is the name of the file you just downloaded, so it is likely to change as new versions of Minecraft are released, especially the numbers near the end of it. You need to type only the first few letters of the filename and then press the Tab key to have it automatically completed for you, though. As the files are uncompressed, you’ll see a list of them on-screen. You can see the files in your pi directory by typing in ls.
7. Enter the command cd mcpi to go into the folder containing the uncompressed Minecraft files.
8. Type in ./minecraft-pi and press Enter to start Minecraft.
If all has gone according to plan, you should see the Minecraft title screen appear.
Starting Minecraft
After you’ve installed Minecraft, the next time you want to play you can start it by going into the desktop environment (step 2 in the installation instructions in the section “Installing Minecraft”), opening a terminal session (step 5), and typing in the commands cd mcpi and ./minecraft-pi. It won’t work if you try to run Minecraft from the command line without first going into the desktop environment.
![]()
If you close your LXTerminal window, you’ll close your Minecraft session immediately too, so try to ignore that window that doesn’t look as if it’s doing anything. It is!
Playing Minecraft
When you start Minecraft on the Raspberry Pi, the title screen gives you two options:
• Start Game: This is the option you’ll be using in this chapter to generate your own game world to explore. You can also use this option to choose a previously generated world to revisit, when you replay Minecraft later. To choose between the different worlds, click and drag them left and right to position your chosen one in the middle, and then click it to open it.
• Join Game: This option is used if you want to join other players in a game on a local network. It’s outside the scope of this chapter, but can enable collaborative or competitive play in a Minecraft world.
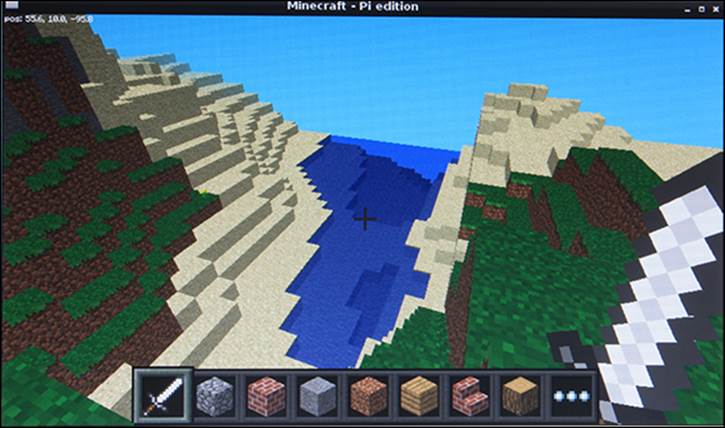
Click Start Game, and then click Create New, and Minecraft will generate a new world for you, with its own distinctive terrain of mountains, forests and oceans. When it’s finished, you’ll see a first-person view of it (see Figure 7.1).
Figure 7-1: Minecraft on the Pi.
![]()
You can change your perspective to show the player’s character in the game. Press the Esc key to open the game menu, and then click the icon beside the speaker icon in the top left to change the perspective.
When you’ve finished playing, you can quit the game by pressing the Esc key to open the game menu.
Moving Around
Minecraft is easiest to play using two hands, one on the mouse and one on the keyboard. Use the mouse to look around you and change your direction, sliding it left and right to turn sideways, and forwards and backwards on the desk to look up and down. To move, you use the keys W and S for forwards and backwards, and A and D to take a sidestep left and right. Those keys form a cluster on the keyboard, which makes it easy to switch between them.
You character will automatically jump onto low blocks if you walk into them, but you can deliberately jump by pressing the spacebar.
For the best view of your world, take to the skies by double-tapping the spacebar. When you’re flying, hold the spacebar to go higher, and the left Shift key to go lower. Double-tap the spacebar to stop flying and drop to the ground. There’s no health or danger in this edition of Minecraft, so you can freefall as far as you like.
Making and Breaking Things
To break blocks in your world, use your mouse to aim your crosshair at the block you want to destroy and click and hold the left mouse button. Some blocks are easier to break than others. There’s a limit as to how far away you can be, so move closer if you can’t see chips flying off the blocks as you attempt to smash them.
The panel at the bottom of the window shows the blocks you can place in the world (refer to Figure 7.1). You choose between them using the scroll wheel on your mouse, or by pressing a number between 1 and 8 to pick one (from left to right). Press E to open your full inventory, and you can use the movement keys (W, A, S, D) to navigate around it and Enter to choose a block, or simply click your chosen block with the mouse.
To position a block, right-click where you would like to place it. You can put a block on top of another one only if you can see the top of it, so you might need to fly to make tall structures.
![]()
You can build towers and rise into the air on them by looking down and repeatedly jumping and placing a block under you.
Although Python makes it much easier to build things, I recommend that you spend some time familiarising yourself with how players experience the world. In particular, it’s worth experimenting with how blocks interact with each other. Stone blocks will float in the air unsupported, but sand blocks will fall to the ground. Cacti can’t be planted in grass, but can be placed on top of sand. If you chip away at the banks of a lake, the water will flow to fill the space you made. You can’t place water and lava source blocks within the game, although you can program them using Python and they can cascade down and cover a wide area. When they come into contact with each other, water sometimes cools lava into stone.
Preparing for Python
One of the peculiarities of Minecraft is that it takes control of your mouse, so you have to press Tab to stop it from doing that if you want to use any other programs on your desktop. To start using the mouse in Minecraft again, click the Minecraft window. You’ll soon become used to pressing Tab before you try to do any programming. Press Tab now to leave Minecraft running, but bring the mouse cursor back into the desktop.
To make your Minecraft programs, you’re going to use IDLE, so double-click its icon on the desktop to start it. You might have to click the top of the Minecraft window and drag it out of the way first.
One of the first things you’ll notice is that Minecraft sits on top of other windows, and your IDLE window might well be underneath it, so a certain amount of reorganisation is necessary. To move a window, you click and drag the title bar at the top of it, and you click and drag the edges or corners of a window to resize it. I recommend that you arrange your windows so that you can see them all at once. On my reasonably standard size monitor, I have room for Minecraft in the top left, a small box for the Python shell in the top right, and the window I’m writing my program in the bottom half of the screen. I don’t recommend resizing the Minecraft window: In the version I’m running, the mouse controls became unresponsive when I did that. You can ignore (but not close) the LXTerminal window.
Using the Minecraft Module
You’re now ready to write your first Python program for Minecraft, which will send a message to the chat feature in the game.
From the Python shell, click the File menu and choose New to open your programming window. Enter the following in the window, use the File menu to save it in your pi directory and press F5 to run it. You must have a Minecraft game session running for this to work.
import sys, random
sys.path.append("./mcpi/api/python/mcpi")
import minecraft
mc = minecraft.Minecraft.create()
mc.postToChat("Welcome to Minecraft Maze!")
The first line imports the sys and random modules. The random module you’ll need later to build a random maze as you develop this program. Use the sys module straight away to tell IDLE where it can find the Minecraft Python module, which enables you to pass commands to Minecraft to carry out. After telling IDLE where it is, you import the module.
To issue Python commands to Minecraft, you use minecraft.Minecraft.create() and then add the command at the end. For example, to put a greeting in the chat window, you might use the following:
minecraft.Minecraft.create().postToChat("Welcome to ![]()
Minecraft Maze!")
That soon gets hard to read, so in the previous program, you set up mc so that you can use it as an abbreviation for minecraft.Minecraft.create(). As a result, you can use the shorter line that you see in the program to post a message.
![]()
If your code isn’t working, pay particular attention to the case. Python is case sensitive, so you have to use upper- and lowercase exactly as shown here. Look out for the camel case in postToChat, and the capital M in minecraft.Minecraft.create().
Understanding Coordinates in Minecraft
As you might expect, everything in the Minecraft world has a map coordinate. Three axes are required to describe a position in the game world:
• x: This axis runs parallel to the ground. The values run from -127.7 to 127.7.
• y: This axis runs vertically and could be described as the height. You can fly at least as high as 500, but you can’t see the ground from higher than about 70, so there’s not much point. Sea level is 0. You can break blocks to tunnel under the sea too. I made it down to about -70 before I fell out of the world and died. This is the only way I’ve seen that you can die in Minecraft on the Pi.
• z: This is the other axis parallel to the ground. The values run from -127.7 to 127.7.
I put them in that order deliberately because that’s the order that Minecraft uses. If, like me, you often use x and y to refer to positions in 2D, such as points on the screen, it takes a short while to get your head around the fact that y represents height. Most of the time in this chapter, you’ll be using the x and z coordinates to describe a wall’s position (which differs depending on the wall), and the y coordinate to describe its height (which doesn’t).
As you move in the game, you can see the player’s coordinates in the top left of the Minecraft window change. If you try to move outside the game world, you hit a wall of sky that you can’t penetrate, like in the Truman Show (except that he had a door).
Repositioning the Player
You can move your character to any position in the Minecraft world, using this command:
mc.player.setTilePos(x, y, z)
For example, to parachute into the middle of the world, use
mc.player.setTilePos(0, 100, 0)
![]()
You don’t have to put this command into a program and run it. If you’ve already run the program to set up the Minecraft module, you can type commands to move the player and add blocks in the Python shell.
Assuming that you are not in flying mode, you’ll drop from the sky into the middle of the world. If you are in flying mode, click the Minecraft window and double-tap the spacebar to turn it off and start your descent.
You can put the player anywhere in the game world, and sometimes that means they’ll appear in the middle of a mountain or another structure, where they can’t move. If that happens, reposition the player using code. Putting them somewhere high is usually a reasonably safe bet because they can fall to the highest ground from there.
Adding Blocks
To add a block to the world, you use this command:
mc.setBlock(x, y, z, blockTypeId)
blockTypeId is a number that represents the material of the block you’re adding. You can find a full list of materials at www.minecraftwiki.net/wiki/Data_values_(Pocket_Edition). (Take the number from the Dec column in the table on that page. You want the decimal number, rather than the hexadecimal one.) Any number from 0 to 108 is valid, and a few higher numbers are as well. Table 7.1 shows some of the materials you might find most useful for this project and for experimentation.
Table 7-1 Materials in Minecraft: Pi Edition
|
blockTypeId |
Block Type |
|
0 |
Air |
|
1 |
Stone |
|
2 |
Grass |
|
3 |
Dirt |
|
5 |
Wooden plank |
|
8 |
Water |
|
10 |
Lava |
|
12 |
Sand |
|
20 |
Glass brick |
|
24 |
Sandstone |
|
41 |
Gold brick |
|
45 |
Brick |
|
47 |
Bookshelf |
|
53 |
Wooden stairs |
|
57 |
Diamond block |
|
64 |
Wooden door |
|
81 |
Cactus |
![]()
If you use the water and lava blocks, you could flood your world, so create a new world to experiment with.
There is another command you can use to create a large cuboid shape built of blocks of the same material. To use it, you provide the coordinates of two opposite corners, and the material you’d like to fill the space with, like this:
mc.setBlocks(x1, y1, z1, x2, y2, z2, blockTypeId)
You can quickly build a brick shelter by making a large cuboid of brick, and then putting a cuboid of air inside it. Air replaces any other block, effectively deleting it from the world. Here’s an example:
mc.setBlocks(0, 0, 0, 10, 5, 7, 45) #brick
mc.setBlocks(1, 0, 1, 9, 5, 6, 0) #air
These lines build a shelter that is 10 × 7 blocks in floor space, and 5 blocks high, starting at coordinate 0, 0, 0. The walls have a thickness of 1 block because you fill the space from 1 to 9 on the x axis, 1 to 6 on the z axis, and 0 to 5 on the vertical axis with air, leaving 1 block of brick from the original cuboid intact on four sides, and the roof open.
![]()
Remember that the # symbol represents a comment that’s just there as a reminder for you. The computer ignores anything on the same line after the #.
Although players can have coordinate positions with decimal portions (such as 1.7), when you place a block, its position is rounded down to the nearest whole number.
Stopping the Player from Changing the World
I know you wouldn’t cheat, but there’s no fun in a maze that you might accidentally just hack your way through, is there? To stop players from being able to destroy or place blocks in the world, use the following:
mc.setting("world.immutable",True)
The word immutable is often used in programming, and just means “unchangeable”.
Setting the Maze Parameters
Now that you know how to place blocks in the world and use the air block to remove them again, you’re ready to start making the maze program. In this program, you’ll use a number of constants to keep track of important information about the maze. Constants are just variables which youdecide not to change the values of as the program is running, so their values are always the same. It’s conventional to use uppercase for the names of constants to signal your intent to others reading the program, and to remind yourself that you’re not supposed to be letting the program change these values. Replacing numbers in your program with constants makes it easier to customise your program later, but also makes it much easier to read your program and understand what different numbers represent.
![]()
Variable names are case sensitive, so Python would think SIZE and size were two different variables. You’d be mad to use both in the same program, though!
The program starts by setting up these constants:
SIZE = 10
HEIGHT = 2
MAZE_X = 0
GROUND = 0
MAZE_Z = 0
MAZE_MATERIAL = 1 #stone
GROUND_MATERIAL = 2 #grass
CEILING = False
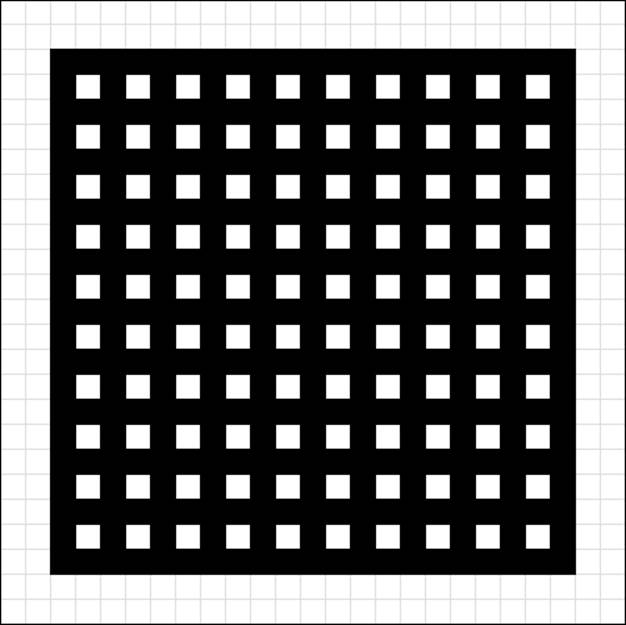
To build the maze, you will start with a grid of walls with one-block spaces (or cells) between them, which looks a bit like a potato waffle (see Figure 7.2). Each cell starts with four walls, and the program knocks walls down to create paths between them and build the maze. The maze is square, and its SIZE is measured in cells. A maze with a SIZE of 10 will have 10 cells in the x and z dimensions, but will occupy double that space in the Minecraft world (that is, 20 blocks by 20 blocks) because there is a one-block wall between each cell. This will become clearer as you start to build the maze. I’ve tried mazes as big as 40, but they take some time to build and ages to explore. 10 is big enough for now. The program will stop with an error if there isn’t enough room for all of the maze in your world.
The HEIGHT is how many blocks tall the maze walls are. I chose 2 because a value of 1 means that the player can just walk over the maze. (The player automatically steps up onto blocks 1 unit high.) Higher values obscure any mountains in the distance that can otherwise give a nice visual hint to the player.
The constants MAZE_X, GROUND and MAZE_Z are used for the starting coordinates of the maze. The MAZE_MATERIAL is stone (1), and the GROUND_MATERIAL is grass (2). I’ve added an option for a ceiling, to stop players from just flying out of the top of the maze, but I’ve turned it off for now so that you can freely explore the maze as you’re building it.
![]()
A maze of bookshelves (MAZE_MATERIAL=47) looks great!
Laying the Foundations
One of the first things you need to do is make sure that you’re building on solid land. Because Minecraft worlds are dynamically generated, you might find that you’re building a maze inside a mountain or in the sea, otherwise.
As well as the area the maze will occupy, you’ll clear an area of 10 blocks all the way around it, so the players can approach it easily and walk around the outside of it. First you clear the area by filling it with air blocks, which will wipe out anything else in that space.
Figure 7-2: The starter grid.
The maze occupies a ground space measured in blocks from MAZE_X to MAZE_X+(SIZE*2), and from MAZE_Z to MAZE_Z+(SIZE*2). The number of blocks is twice the number of cells (SIZE) because each cell has a wall on its right and below it. The middle of the maze in the Minecraft world is MAZE_X+SIZE, MAZE_Z+SIZE.
You need to clear 10 blocks further in each direction. The following code clears everything as high as 150 above the ground level of the maze to stop the risk of any remaining mountain blocks falling from the sky into the maze and lays the floor:
mc.setBlocks(MAZE_X-10, GROUND, MAZE_Z-10, ![]()
MAZE_X+(SIZE*2)+10, GROUND+150, MAZE_Z+(SIZE*2)+10, 0)
mc.setBlocks(MAZE_X-10, GROUND, MAZE_Z-10, MAZE_X+ ![]()
(SIZE*2)+10, GROUND, MAZE_Z+(SIZE*2)+10, GROUND_MATERIAL)
I recommend adding a block to indicate the starting corner of the maze (where MAZE_X and MAZE_Z are). You will find it useful when writing and debugging the program because it will enable you to tell which way around the maze is as you fly around it. To do so, use the following:
mc.setBlock(MAZE_X, GROUND+HEIGHT+1, MAZE_Z, MAZE_MATERIAL)
Put your player character above the middle of the maze, too, so you can watch it being built by looking down, as follows. If you’re not flying, you’ll fall onto the maze wall, but you can just fly up again.
mc.player.setTilePos(MAZE_X+SIZE, GROUND+25, MAZE_Z+SIZE)
Placing the Maze Walls
To make the potato waffle-like grid, use the following code:
for line in range(0, (SIZE+1)*2, 2):
mc.setBlocks(MAZE_X+line, GROUND+1, MAZE_Z, ![]()
MAZE_X+line, GROUND+HEIGHT, MAZE_Z+(SIZE*2), MAZE_MATERIAL)
mc.setBlocks(MAZE_X, GROUND+1, MAZE_Z+line, ![]()
MAZE_X+(SIZE*2), GROUND+HEIGHT, MAZE_Z+line, MAZE_MATERIAL)
The for loop gives the variable line the values of even numbers starting at 0 and finishing at SIZE*2, in turn. You have to add 1 to SIZE before doubling it because the range function doesn’t include the last number in the sequence. If you use range(1, 10), for example, you get the numbers 1 to 9. The number 2 at the end of the range function is the step size, so it adds 2 each time it goes around the loop, and only gives you the even numbers. That means you leave a gap for the cell between each wall. Each time around the loop, it uses cuboids to draw two walls that stretch across the maze from edge to edge in the x and z dimensions. It doesn’t matter that the same block is set twice where those lines intersect. You build the wall starting at GROUND+1, so the grass is still underneath when you knock down the walls to make paths.
![]()
Don’t forget the colon at the end of the for statement, and that the next two lines should each be indented to tell Python that they belong to the loop.
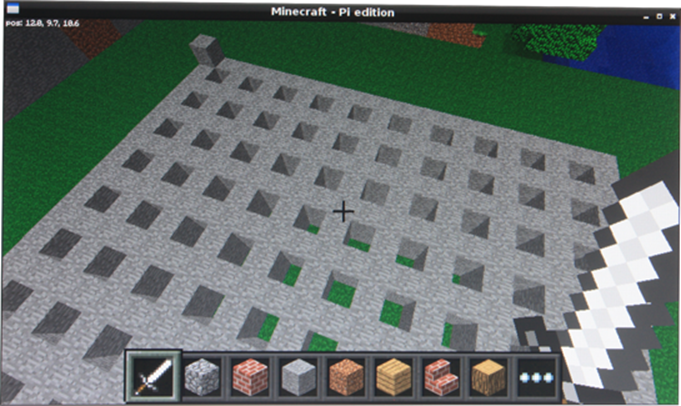
You should now have a grid that looks like Figure 7.3.
Figure 7-3: Your grid in Minecraft.
Understanding the Maze Algorithm
Before you dig into the code that turns your waffle into a maze, let me tell you how it works. You’re going to make what’s known as a “perfect maze” (that’s a technical term, not me bragging). That means there are no loops in it, and no parts of the maze you can’t get into. There is only one path between any two points in the maze.
Here’s how the program works:
1. You start with the “waffle” you’ve built, with every cell having all four walls.
2. You pick a random cell in the maze to start at.
3. You look at your current cell’s neighbours, and make a list of all those that have all four walls intact. These are the cells that have not yet been visited.
4. If you found some unvisited neighbours, you pick one at random, knock down the wall between it and your current cell, and then move into that cell, making it your current cell.
5. If your current cell has no unvisited neighbours, you go back one cell in the path you’ve taken, and make that your current cell.
6. You repeat steps 3 to 5 until you’ve visited every cell.
Setting Up the Variables and Lists
To implement this algorithm, you’ll use the following variables:
• numberOfCells: This is the total number of cells in the maze, which will be SIZE*SIZE. (* is the symbol for multiplication.)
• numberOfVisitedCells: This keeps track of how many cells you’ve visited so far. When this is the same as the numberOfCells, every cell has been visited and had a wall demolished, and is therefore reachable. The maze is finished.
• xposition: This remembers your x position as you move through the maze generating it. It’s measured in cells, and starts as a random number between 1 and the maze SIZE.
• zposition: This remembers your z position as you move through the maze generating it, also measured in cells, and also starting as a random number.
• cellsVisitedList[]: This is a list that stores the path you’ve taken, so the program can retrace its steps. When you set it up, you put your starting position into it using the append() list method.
• playerx and playerz: These are used to remember the starting position, so you can put the player there when the maze has been built.
When an algorithm like this is implemented (it’s called a depth-first maze generation algorithm), it often requires a list or similar data structure to be used to store the locations of walls. You don’t need that because you have actual walls in Minecraft you can look at. The game world stores your maze, if you like.
The following code lines set up your starting variables:
numberOfCells = SIZE*SIZE
numberOfVisitedCells = 1
cellsVisitedList = []
xposition = random.randint(1, SIZE)
zposition = random.randint(1, SIZE)
playerx = xposition
playerz = zposition
cellsVisitedList.append((xposition, zposition))
Creating the Functions
There are a number of basic functions you will need for your program:
• realx(x) and realz(z): These convert coordinates in the maze (measured in cells) into coordinates in the Minecraft world (measured in blocks, and offset from the maze’s starting position).
• showMaker(x,z) and hideMaker(x,z): These functions use a gold block to show which cell the program has reached as it builds the maze. It’s fun to watch from above, and is useful while building and debugging the program.
• demolish(realx,realz): This knocks down a wall in the maze, and takes a real coordinate in the Minecraft world as its parameters.
• testAllWalls(cellx, cellz): This checks whether the four walls on a cell are intact. If all of them are, it returns True. Otherwise, it returns False. It uses the command mc.getBlock(x, y, z), which tells you the blockTypeId at a particular location. You use two equals signs, as usual, to test whether a block in a wall position is the same as the MAZE_MATERIAL, which means that there’s a wall there.
Add these function definitions at the start of your program, after where you set up the Minecraft module:
def realx(x):
return MAZE_X+(x*2)-1
def realz(z):
return MAZE_Z+(z*2)-1
def showMaker(x, z):
mc.setBlock(realx(x), GROUND+1, realz(z), 41) # 41=gold
def hideMaker(x, z):
mc.setBlock(realx(x), GROUND+1, realz(z), 0)
def demolish(realx, realz):
mc.setBlocks(realx, GROUND+1, realz, realx, ![]()
HEIGHT+GROUND, realz, 0)
def testAllWalls(cellx, cellz):
if mc.getBlock(realx(cellx)+1, GROUND+1, ![]()
realz(cellz))==MAZE_MATERIAL and mc.getBlock![]()
(realx(cellx)-1, GROUND+1, realz(cellz))==MAZE_MATERIAL ![]()
and mc.getBlock(realx(cellx), GROUND+1, realz(cellz)+1)== ![]()
MAZE_MATERIAL and mc.getBlock(realx(cellx), GROUND+1, ![]()
realz(cellz)-1)==MAZE_MATERIAL:
return True
else:
return False
![]()
If you have an error, check for missing colons at the end of your def and if statements.
Creating the Main Loop
Your maze algorithm runs until you’ve visited every cell, so it starts with the following statement:
while numberOfVisitedCells < numberOfCells:
You need to test whether your current cell’s neighbour cells have all their walls intact. To do that, you check each direction in turn, using the testAllWalls(x, z) function. When you find a cell with all the walls intact, you add its direction to the list possibleDirections[] using theappend() list method. This implements step 3 in the algorithm (remember it’s all indented underneath the while statement):
possibleDirections = []
if testAllWalls(xposition-1, zposition):
possibleDirections.append("left")
if testAllWalls(xposition+1, zposition):
possibleDirections.append("right")
if testAllWalls(xposition, zposition-1):
possibleDirections.append("up")
if testAllWalls(xposition, zposition+1):
possibleDirections.append("down")
The values of up, down, left and right are somewhat arbitrary in 3D space, but I’ve used them because they’re easy to understand. If you fly into the air and look down on the maze as it’s being generated and you have the block identifying the starting corner of the maze (MAZE_X, MAZE_Z) in the top left, these directions will look correct to you.
Incidentally, you might have noticed that there’s no check for whether these cell positions are inside the maze borders. What happens if you look for a cell off the left edge of the maze, or off the bottom edge? No problem. The program implementation automatically respects the borders of the maze because when it looks at “cells” outside the borders, they don’t have all four walls (their only wall is the maze’s border), so they are never visited.
Step 4 in the algorithm is to pick a random direction if you found any unvisited neighbours, knock down the wall in that direction and move into that cell. To decide whether you found any possible directions, you check the length of the possibleDirections list and act if it is not equal to 0 (!=0). All of this should be indented under the while loop. If you get lost in the indenting, consult the full code in Listing 7.1 near the end of this chapter.
Before you start moving your position, you hide the gold brick that shows where you are in the maze:
hideMaker(xposition, zposition)
if len(possibleDirections)!=0:
directionChosen=random.choice(possibleDirections)
if directionChosen=="left":
demolish(realx(xposition)-1, realz(zposition))
xposition -= 1
if directionChosen=="right":
demolish(realx(xposition)+1, realz(zposition))
xposition += 1
if directionChosen=="up":
demolish(realx(xposition), realz(zposition)-1)
zposition -= 1
if directionChosen=="down":
demolish(realx(xposition), realz(zposition)+1)
zposition += 1
After you’ve moved into a new cell, you need to increase your tally of cells visited by one, and add the new cell to the list that stores the path taken. This is also a good time to show the gold block in the cell to highlight how the maze is being built:
numberOfVisitedCells += 1
cellsVisitedList.append((xposition, zposition))
showMaker(xposition, zposition)
The way you’ve stored the list of cells visited deserves some explanation. You’ve put the xposition and zposition in parentheses, which are used to indicate a tuple. A tuple is a data sequence, a bit like a list, with a key difference being that you can’t change its values. (It’s immutable.) SocellsVisitedList is a list that contains tuples, which in turn contain pairs of x and z coordinates. You can use the Python shell to take a look inside this list. Here’s an example from one run of the program, showing a path taken through the maze:
>>> print cellsVisitedList
[(6, 6,), (6, 7), (6, 8), (5, 8), (4, 8), (3, 8), (3, 7)]
For step 5 in the algorithm, you go back to the previous position in the path if your cell has no unvisited neighbours. This involves taking the last position out of the list. There’s a list method called pop() you can use to do that. It takes the last item from a list and deletes it from that list. In your program, you put it into a variable called retrace, which then stores a tuple for the x and z positions in the maze. As with a list, you can use index numbers to access the individual elements in a tuple. The index numbers start at 0, so retrace[0] will hold your previous x position, andretrace[1] will hold your previous z position. Here’s the code, including a line to show the gold block in its new position:
else: # do this when there are no unvisited neighbours
retrace = cellsVisitedList.pop()
xposition = retrace[0]
zposition = retrace[1]
showMaker(xposition, zposition)
Note that your else statement should be in line with the if statement it’s paired with, in this case the one that tests whether you found any possible directions to move in.
Step 6 in the algorithm has already been implemented because the while loop will keep repeating the indented code underneath it until every cell has been visited.
Adding a Ceiling
Personally, I think it’s more fun to leave the ceiling open and be free to fly up and marvel at your maze, and drop into it at any point. If you wanted to build a game around your maze, though, and stop people from cheating, you can add a ceiling using the following code. Just change the variable CEILING to True at the start of the program. I’ve made the ceiling out of glass bricks, so it doesn’t get too dark in there:
if CEILING == True:
mc.setBlocks(MAZE_X, GROUND+HEIGHT+1, MAZE_Z, ![]()
MAZE_X+(SIZE*2), GROUND+HEIGHT+1, MAZE_Z+(SIZE*2), 20)
Positioning the Player
Finally, let’s place the player at the random position where you started generating the maze. You could put the player anywhere, but this seems as good a place as any, and it uses random numbers you have already generated:
mc.player.setTilePos(realx(playerx), GROUND+1, realz(playerz))
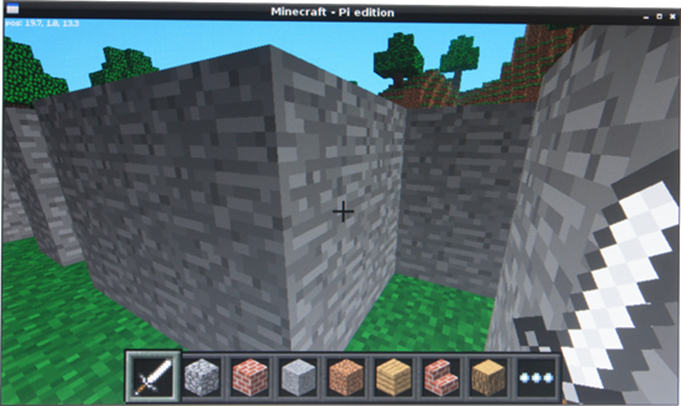
Now you’re ready to play! Figure 7.4 shows the maze from the inside.
Figure 7-4: Finding your way around the maze.
The Final Code
Listing 7.1 shows the final and complete code.
Listing 7.1 The Minecraft Maze Maker
#!/usr/bin/env python
"""
Minecraft Maze Maker
By Sean McManus
From Raspberry Pi Projects
"""
import sys, random
sys.path.append("./mcpi/api/python/mcpi")
import minecraft
mc = minecraft.Minecraft.create()
mc.postToChat("Welcome to Minecraft Maze!")
def realx(x):
return MAZE_X+(x*2)-1
def realz(z):
return MAZE_Z+(z*2)-1
def showMaker(x, z):
mc.setBlock(realx(x), GROUND+1, realz(z), 41) # 41=gold
def hideMaker(x, z):
mc.setBlock(realx(x), GROUND+1, realz(z), 0)
def demolish(realx, realz):
mc.setBlocks(realx, GROUND+1, realz, realx,![]()
HEIGHT+GROUND, realz, 0)
def testAllWalls(cellx, cellz):
if mc.getBlock(realx(cellx)+1, GROUND+1, ![]()
realz(cellz))==MAZE_MATERIAL and mc.getBlock![]()
(realx(cellx)-1, GROUND+1, realz(cellz))==MAZE_MATERIAL ![]()
and mc.getBlock(realx(cellx), GROUND+1, realz(cellz)+1)==![]()
MAZE_MATERIAL and mc.getBlock(realx(cellx), GROUND+1, ![]()
realz(cellz)-1)==MAZE_MATERIAL:
return True
else:
return False
mc.setting("world_immutable", True)
# Configure your maze here
SIZE = 10
HEIGHT = 2
MAZE_X = 0
GROUND = 0
MAZE_Z = 0
MAZE_MATERIAL = 1 # 1=stone
GROUND_MATERIAL = 2 # 2=grass
CEILING = False
mc.setBlocks(MAZE_X-10, GROUND, MAZE_Z-10, MAZE_X+![]()
(SIZE*2)+10, GROUND+150, MAZE_Z+(SIZE*2)+10, 0) # air
mc.setBlocks(MAZE_X-10, GROUND, MAZE_Z-10, MAZE_X+![]()
(SIZE*2)+10, GROUND, MAZE_Z+(SIZE*2)+10, GROUND_MATERIAL)
# lay the ground
mc.setBlock(MAZE_X, GROUND+HEIGHT+1, MAZE_Z, MAZE_MATERIAL)
# origin marker
mc.player.setTilePos(MAZE_X+SIZE, GROUND+25, MAZE_Z+SIZE)
# move player above middle of maze
mc.postToChat("Now building your maze...")
# build grid of walls
for line in range(0, (SIZE+1)*2, 2):
mc.setBlocks(MAZE_X+line, GROUND+1, MAZE_Z, ![]()
MAZE_X+line, GROUND+HEIGHT, MAZE_Z+(SIZE*2), MAZE_MATERIAL)
mc.setBlocks(MAZE_X, GROUND+1, MAZE_Z+line, MAZE_X+![]()
(SIZE*2), GROUND+HEIGHT, MAZE_Z+line, MAZE_MATERIAL)
# setup of variables for creating maze
numberOfCells = SIZE*SIZE
numberOfVisitedCells = 1 # 1 for the one you start in
cellsVisitedList = []
xposition = random.randint(1, SIZE)
zposition = random.randint(1, SIZE)
playerx = xposition
playerz = zposition
showMaker(xposition, zposition)
cellsVisitedList.append((xposition, zposition))
while numberOfVisitedCells < numberOfCells:
possibleDirections = []
if testAllWalls(xposition-1, zposition):
possibleDirections.append("left")
if testAllWalls(xposition+1, zposition):
possibleDirections.append("right")
if testAllWalls(xposition, zposition-1):
possibleDirections.append("up")
if testAllWalls(xposition, zposition+1):
possibleDirections.append("down")
hideMaker(xposition, zposition)
if len(possibleDirections)!=0:
directionChosen=random.choice(possibleDirections)
#knock down wall between cell in direction chosen
if directionChosen=="left":
demolish(realx(xposition)-1, realz(zposition))
xposition -= 1
if directionChosen=="right":
demolish(realx(xposition)+1, realz(zposition))
xposition += 1
if directionChosen=="up":
demolish(realx(xposition), realz(zposition)-1)
zposition -= 1
if directionChosen=="down":
demolish(realx(xposition), realz(zposition)+1)
zposition += 1
numberOfVisitedCells += 1
cellsVisitedList.append((xposition, zposition))
showMaker(xposition, zposition)
else: # do this when there are no unvisited neighbours
retrace = cellsVisitedList.pop()
xposition = retrace[0]
zposition = retrace[1]
showMaker(xposition, zposition)
if CEILING == True:
mc.setBlocks(MAZE_X, GROUND+HEIGHT+1, MAZE_Z, ![]()
MAZE_X+(SIZE*2), GROUND+HEIGHT+1, MAZE_Z+(SIZE*2), 20)
mc.postToChat("Your maze is ready!")
mc.postToChat("Happy exploring!")
mc.player.setTilePos(realx(playerx), GROUND+1, realz(playerz))
Over to You
When the maze is built, the gold brick is left showing, so you could try to solve the maze to find the brick. You could also plant other objectives in the maze, and time how long it takes the player to find them. The mc.player.getTilePos() command checks where the player is in the Minecraft world, and gives you a result in the form x, y, z. Code to create a timer can be found in Chapter 9, “Test Your Reactions”.
You could add an entrance and exit in a random position in the border of the maze, so the goal is to travel from one side to the other. You could make huge mazes more playable by adding landmarks. (Try using different wall materials, or putting blocks on top of some walls.) After the maze has been generated, you could knock out random walls, so there are some shortcuts through the maze. Or maybe just replace them with glass blocks, to provide a tantalising glimpse into another corridor. What about a multistorey maze, with stairs between the levels? The possibilities are . . . ahem! . . . amazing.
All materials on the site are licensed Creative Commons Attribution-Sharealike 3.0 Unported CC BY-SA 3.0 & GNU Free Documentation License (GFDL)
If you are the copyright holder of any material contained on our site and intend to remove it, please contact our site administrator for approval.
© 2016-2025 All site design rights belong to S.Y.A.