Learning Raspbian (2015)
Chapter 6. The Console
Behind the pretty graphical interfaces of a Linux-based operating system such as Raspbian, is the console.
The console is the most basic way of communicating with the innards of the Raspbian operating system. The console's history started at the very beginning of computing where the interface to a computer was a keyboard and a teletype machine. At that time, operators would type a command and the result would be printed in front of them.
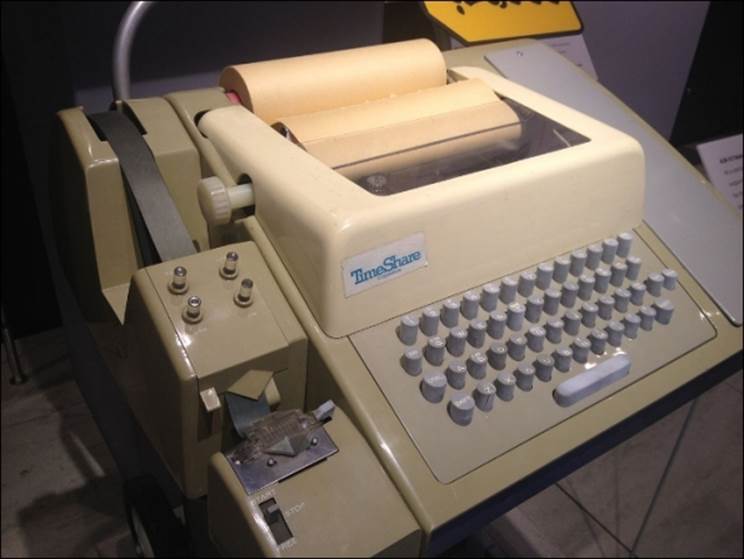
A teletype machine
Fortunately, with the development of computer monitors, we no longer need a typewriter to communicate with our computer and there are many different ways in which this can be done. You already learned how to use the Raspberry Pi's graphical user interface Xfce, and this chapter will run you through how you can use the built-in console terminal application called bash.
Bash
The Bourne again shell (bash) is a console shell developed by the GNU project that was released in 1989. Originally written by Brian Fox, it has become the de facto standard and is used by default in almost all Linux operating systems, OS X, Novell NetWare, Android, as well as on Windows. The bash was inspired by the sh shell, which was extremely popular around the time bash was created.
The bash shell was written as an open source replacement to the Bourne shell that was the default command-line interpreter for Unix. The bash supports many features, including the autocompletion of commands and filename wildcards.
Launching the bash command interpreter
The bash command interpreter is made available to us in the Xfce environment through the LXTerminal application. Other terminal clients such as Yakuake can be installed using apt-get. If you have configured Raspbian to not start the Xfce desktop environment, bash will be automatically started after you log in.
You can launch LXTerminal by double-clicking on its icon on the desktop.
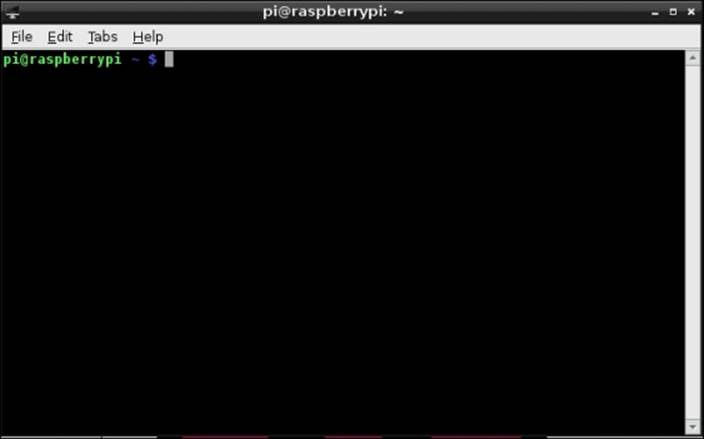
LXTerminal
You can launch and run as many instances of LXTerminal as you like, but don't forget that your Raspberry Pi doesn't have unlimited resources.
Note
If you are not using the Xfce desktop environment, bash will be launched when you log in.
The first thing that you will notice is that you have Command Prompt. By default, this Command Prompt will show you the current directory that you are working in, your Raspberry Pi's hostname (by default raspberrypi), and your username (by default this is pi).
As you move around the filesystem, you will see the name of the directory that you are in.
To run a command using the bash command interpreter, simply type the command and press the Enter key. The command will run and the results will be displayed. While a command is running, you won't be able to run other commands until it is finished.
Tip
If you wish to let a command run in the background, all you need to do is add an & operator to the end of the command. This will let the command run in the background.
Linux is a full multiprocessing system and you can run as many instances of LXTerminal as you want. To see which processing commands are running in the background on your Raspberry Pi, simply run ps –a.
Basic bash commands
The best way to start learning bash is to start using it. Remember that if you really make a mess of things, all you need to do is reimage your SD card and away you go!
It is easy to get more information about any of the commands that are referred to in this chapter. You can do this using the man command.
The man command launches the built-in documentation system for Linux. Almost every command available has documentation in the man system.
For example, to find out more information about the ls command, simply run the following command:
man ls
This will launch the man program and display every bit of information that you need to know about the ls program.
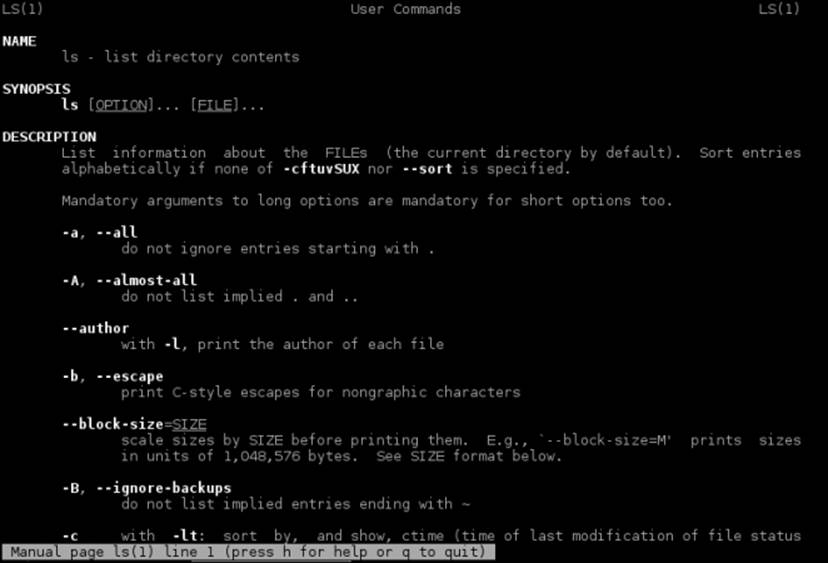
The man ls command
To move around the man program, you can use the arrow keys on your keyboard. If you wish to skip the whole page, you can press the spacebar key. When you have finished reading the information, you can exit by pressing the q key.
Tip
Don't forget that Linux is a case-sensitive operating system and it is extremely important that you use the correct case when you are running the command.
The autocompletion of commands
One of the most useful features of bash is its ability to autocomplete the name of the command that you are typing. This is as easy as pressing the Tab key.
For example, if you want to run the command nano in order to launch the nano text editor, simply type the following command:
nan
Now press the Tab key. The bash will automatically autocomplete the command and display this:
nano
This can be a real timesaver. If there is more than one possible combination of autocompletion, you will need to press the Tab key twice. This will cause bash to list all the different possibilities.

The bash's autocomplete system
Running commands as root
Linux is an inherently secure operating system. Every part of the operating system has been configured to be secure by default. Every file is owned by a particular user, and that user is able to allocate permissions to that file in order to restrict other users and groups from accessing the file.
By default, all commands that are run in bash are run as the current user. The current user is normally the Pi user. This user is a standard user, and this means that you will not be able to run any commands that can affect other users, such as installing software or changing the network configuration of your Raspberry Pi.
Fortunately, it is easy to run commands as the root or superuser. This user has unlimited access to every part of the operating system and must be used with caution.
To run a command as the superuser, you can use use the sudo utility. The sudo utility lets you run a command as a different user from what you are logged in as.
In order to use the sudo utility to run a command as root, all you need to do is prepend the command that you want to run with sudo.
Take an example of the following command:
sudo apt-get moo
It will run the apt-get application as root. This particular command will invoke apt-get Easter egg, proving that computer programmers sometimes do have a sense of humor!

Running a command as root that can make your Raspberry Pi moo!
Moving around the filesystem using bash
The most basic part of using a command interpreter, such as bash, is to be able to move around the Linux filesystem. It is important to understand how bash lets you represent directories. This is done in two different ways: using absolute paths and relative paths.
Absolute paths
An absolute path is a path that describes the location of a file or folder starting from / (root). This is easy to spot as it will always start with /.
An example of an absolute path is /home/pi/Desktop. This path is the folder that contains all the items on your desktop.
Relative paths
A relative path is a path to the file or folder that is described based on where you are in the filesystem.
An example of a relative path is ../Desktop. This means that a folder called Desktop is stored in a folder that is one level above the one you are in.
There are several special paths that you should know of in bash, as follows:
|
Path |
Description |
|
/ |
This is the root of the Linux filesystem and the highest path that you can have. |
|
./ |
This represents the directory that you are currently in. |
|
../ |
This is the directory one level below the one you are in. |
|
~ |
This represents your home directory. When you are logged in as the Pi user, this will be /home/pi. If you are running a command as the root, this will be /root. |
Tip
If you don't have a keyboard with the ~ key, you can press F12 instead.
Manipulating files
Now that you have an understanding of how paths are represented in bash, it is time to learn how to manipulate them.
There are many commands that you can use to manipulate files in bash, which include the commands in the following table:
|
ls |
cd |
pwd |
cat |
head and tail |
|
cp |
mv |
rm |
mkdir |
touch |
|
adduser |
addgroup |
passwd |
chmod |
chown |
ls
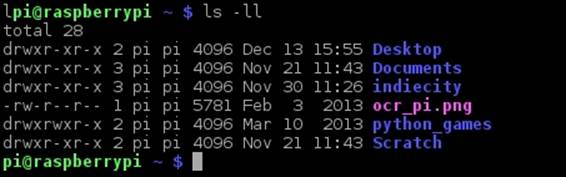
ls is perhaps the most common basic function, and is used regularly to see which files are present in the directory that you are in. This is done using the list (ls) command. By default, this is the current folder that you are in. If you want to see the contents of another folder, simply append the path to the end of the ls command.

The contents of the home directory
Tip
ls doesn't display any files or folders that begin with (.). The reason for this is that any file or directories beginning with (.) are hidden.
The ls command has many different options that change the output on your screen. Some common ls parameters are as follows:
|
Option |
Description |
|
-a |
This shows hidden files and folders |
|
-l |
This uses the long list format. This will show file sizes, file permissions, and the owners of the files |
|
-h |
This shows all the files sized in a human-readable format |
cd
The Linux filesystem is made up of many different files and folders. When using bash, it is really important to be able to move around the filesystem. This is done using the cd (change directory) command.
cd is easy to use. All you need to do in order to change the current directory is to run cd followed by the path of the folder you want to move into. This can either be an absolute directory or a relative directory.

Changing between directories
The directory that you are in after you run cd is called the current working directory. Unless you specify, a directory bash will look for any commands that you run and any files that you are using in the current working directory. If the command is not in the current folder, bash will look in several other predefined folders for the command. These folders are specified in the PATH environment variable in bash.
pwd
Sometimes, when navigating the Linux filesystem, you might need to find out which directory you are in. You can do this using the pwd (print working directory) command.
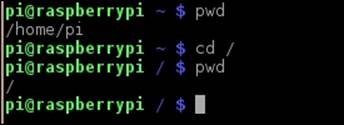
The pwd command
cat
When you are working with files, sometimes it's very handy to quickly view the contents of a file. The cat command does exactly this. When you run the cat command followed by a filename, it will display the contents of that file on the screen.
The cat command
cat has several options that you can use to customize the format of the file on the screen. Some of the cat command's parameters are as follows:
|
Option |
Description |
|
-n |
This shows line numbers in the file |
|
-E |
This adds $ at the end of every line so that you can see where it is |
Tip
Remember that everything in Linux is a file. Using the cat command, you can read in data from the device on your Raspberry Pi, including its serial port and camera. By running cat /dev/video0 > video.record, you can record the video coming in from your camera.
head and tail
Another handy set of commands that you can use to see the contents of a file are head and tail. The head and tail commands go together and show the start of the end of a file. The head command is extremely useful if you want to see whether a big file is the file that you are looking for and it is too big to be shown using cat. The tail command is extremely handy if you want to look at the last few entries in a log file.
The head and tail commands
The head and tail commands have many different options that you can use in order to customize the output format of the file on the screen. The most important is the –n option. The –n option followed by a number will display n lines of the file. You can find the other options by running man head or man tail.
cp
cp is another important command in bash. cp copies a file or folder from one folder to another. By default, cp will overwrite a file in the destination folder if it already exists, so beware!
To use cp, you first need to specify the file or folder that you want to copy followed by the destination folder. If you select a directory, it will copy just this directory. If you want to make an exact copy of the directory, you need to use the –r command. The –r command recursively copies the folder.
Basically, what this command does is it makes an exact copy of the folder you are copying, so you will most likely want to use this option whenever you are copying a directory.

Copying a file and a folder
The cp command has many different options that change how it copies a file or directory, as shown in the following table:
|
Option |
Description |
|
-r |
This recursively copies a file or directory |
|
-f |
If an existing file in the destination directory can't be opened, this removes it and copies it again |
|
-p |
This preserves the owner and timestamp of the files that you are copying |
|
-v |
This indicates verbose mode, it shows the names of the files that are being copied |
mv
Sometimes, you don't want to copy a file or directory, but instead you want to move it around. The mv command does exactly that. Its syntax is exactly the same as the syntax of cp. To move a file or folder, it is simply a matter of doing as shown in the following screenshot:
![]()
Moving a file
Unlike cp, mv automatically moves the whole file or folder and it doesn't have an –r option. There are several other options available in mv, shown as follows:
|
Option |
Description |
|
-f |
This overwrites any files and folders that are in the destination location |
|
-u |
This only moves the file if it is newer that the file in the destination folder |
rm
Sometimes, a file or directory is no longer required and needs to be deleted. To do this, the rm command is used.
To delete a file or folder, simply run the rm command followed by the file or directory that you want to delete. Raspbian and most other Linux distributions don't contain any sort of recycle bin functionality. This means that when you delete something, it is permanently deleted.
![]()
Removing a file
Tip
There are very few things that you can do to destroy a Linux distribution. The sudo rm –rf / command is one of them. This command will start at the root directory and delete every file on your device, including any files on any removable and network drives attached to your Raspberry Pi. Needless to say, be very careful when using the –r and–f flags.
By default, when removing a directory, rm will stop if there are any files in the directory. To delete the directory, you will need to use the –f flag in order to force the deletion of the folder. Some of the rm command's parameters are as follows:
|
Option |
Description |
|
-f |
This never prompts when deleting any files |
|
-i |
This prompts before deleting each and every file |
|
-r |
This recursively deletes the files and folders |
mkdir
You will often need to create a new folder in order to keep your files organized. The purpose of using mkdir (make directory) is exactly that. To use mkdir, all you need to do is run mkdir followed by the name of the directory that you want to create.
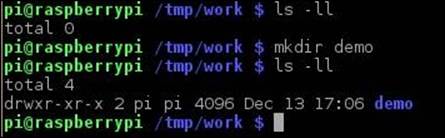
Using mkdir
Once you have created the directory, it is immediately ready for use. You can use it to keep your files organized. Some of the mkdir parameters of are as follows:
|
Option |
Description |
|
-p |
This creates any parent directories, if necessary—for example, mkdir new/directory/with/parents –p |
|
-v |
This displays a message for every directory that is created |
touch
touch is a simple command that creates an empty file if a file doesn't exist. If the file exists, it updates the access time to when the command is run.
touch is often used when a file needs to exist. Some examples of this include creating empty log files. In order to use touch, run touch followed by the filename that you want to create or update the access time of.
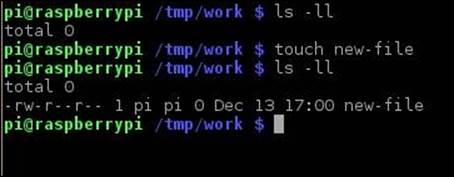
Using touch
adduser
Every file in Linux is owned by a user. This helps to keep everything secure. By default, everything in the /home/pi directory is owned by the Pi user. All users also belong to a group. You can allocate permissions depending on the owner and group of the user who owns the file.
You can add users to your Raspbian installation using the adduser command. To do this, run adduser followed by the username of the user that you want to create. Because adduser is a system command, you will need to add sudo before it.
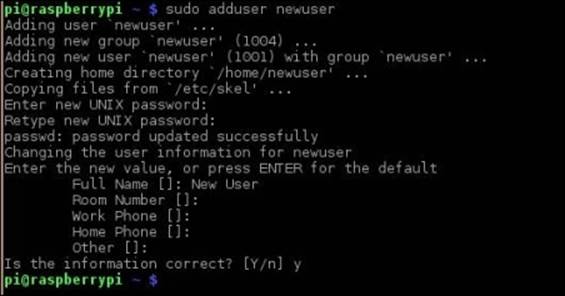
Creating a user
You will be asked a couple of questions by adduser, including the username and password. If you don't want to provide your name or phone number, simply press the Enter key. The adduser command will also create a new group with the same name as your new user.
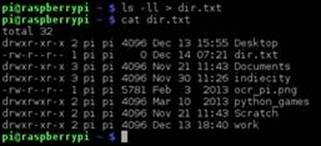
You can easily see which users you have in your Raspbian system by running the following command:
cat /etc/passwd
The /etc/passwd file contains all the users that are in Raspbian.
addgroup
Sometimes, you need to create a new group in order to organize your file permissions as required. To do this, use the addgroup command.
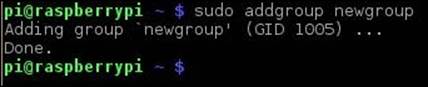
Creating a new group
The addgroup command is simple to use. All you need to do is to add the name of the group after the addgroup command.
The new group will be created along with a new ID. To see the groups that are there in Raspbian, run the following command:
cat /etc/group
passwd
As the system administrator of your very own Linux system, you have a lot of power. You can use this power to change users' passwords using the passwd command. There are a couple of different ways in which you can use passwd. One of them is to change your own password. Another way in which you can use passwd is to change the password of another user on your system.
Changing your password
To change your own password, run the passwd command as shown in the following screenshot:

Changing your password
This will ask you to enter your current password. After you enter this, you will need to enter the new password twice.
Changing another user's password
Changing another user's password is just as easy as changing your password. To do this, add the username of the user after the passwd command. This command needs to be run as root, so add sudo before it.

Changing another user's password
This is really useful if you need to change someone else's password. By default, there is no root password set in Raspbian. To set it, run sudo passwd.
chown
As mentioned previously, Linux is a multiuser system and all the files have an owner. Sometimes, the owner needs to be changed. To do this, use the chown command. chown can change the user of a file or directory.
A good example of permissions in use is the Apache web server. All the configuration files in the /etc/apache2 directory are owned by the Apache2 user, along with the files located in the /var/www directory where the website that Apache2 is serving.
Sometimes, when you add a file to this directory, you need to change the owner to be the Apache2 web server. If you don't do this, Apache2 won't be able to serve the file to anyone who wants to take a look at it.
chown needs several parameters. They are the new owner and the group of the file or directory that you want to change the owner of.
![]()
Changing the owner of all the files in Apache2's web root
The owner and group need to be separated by a (:). In the preceding example, the user and group are both Apache2.
There are several different options that you can add to the chown command, as follows:
|
Option |
Description |
|
-R |
This changes the owner of all the files and folders in the folder recursively |
|
-v |
This displays a message for every file that is processed |
Some of the chown command's parameters
chmod
The other part of a file's properties in Linux are its permissions. These permissions describe who can do what to files and directories. The following permissions are available:
|
Owner (o) |
Read |
Write |
Execute |
|
Group (g) |
Read |
Write |
Execute |
|
All users (a) |
Read |
Write |
Execute |
Linux file permissions
Each of these permissions is represented by a letter, as shown in the following table:
|
Read |
r |
|
Write |
w |
|
Execute |
x |
If you run the ls –ll command, you will be able to see what the permissions are for the file and directory that you are in:
The default permissions of the /home/pi directory
Permissions are grouped together in groups of three. The first three describe the users' permission for the file, the next three describe the group's permissions, and the last three describe permissions of all users.
The rw-r—r— permissions of the ocr_pi.png file are as follows:
|
Permissions |
|
|
Owner |
Read and write |
|
Group |
Read |
|
All users |
Read |
Permissions for ocr_pi.png
Octal representation of permissions
Permissions can also be described using an octal representation. This is a little more complicated but very flexible.
|
Octal notation |
Permissions |
|
0 |
No permissions |
|
1 |
Execute |
|
2 |
Write |
|
3 |
Write and execute |
|
4 |
Read |
|
5 |
Read and execute |
|
6 |
Read and write |
|
7 |
Read, write, and execute |
To describe the permissions of a file, simply work out what permissions you want to give. In the following example, we want the demo.txt file to have the following permissions:
|
Permissions |
|
|
Owner |
Read and write |
|
Group |
Read only |
|
All Users |
No permissions |
A demo of the permissions
To work out the permissions, we start with the owner and find the read and write permissions. We then do the same for the group and all users' permissions. These permissions work out as follows:
|
Permissions |
|
|
Owner |
6 |
|
Group |
4 |
|
All Users |
0 |
Octal permissions for the file
These permissions are put together to be 640. The chmod command uses this representation to set the permissions of the file or folder.
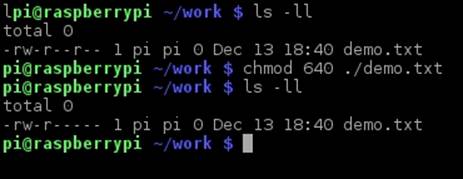
Changing the permissions of the demo.txt file
It is also possible to individually add and remove permissions from a file or folder. To do this, the user can use the notations described in the previous two tables.
We have the demo.txt file with the permissions as shown in the screenshot (The default permissions of the /home/pi directory) given earlier in this chapter. The permissions are as follows:
|
Permissions |
|
|
Owner |
Read and write |
|
Group |
Read |
|
All Users |
No permissions |
If we want to add the write permission to members of the same group, we do as shown in the following screenshot:
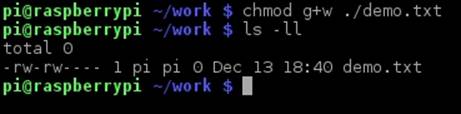
Changing the permissions of the demo.txt file
The + symbol adds permissions and the – symbol removes permissions from files.
We can see that the file now has group permissions to read and write. The disadvantage of using this method is that you need to separately set the permissions of the file for the owner, group, and all users.
There are several other command-line parameters for chmod, as follows:
|
Parameter |
Description |
|
-R |
This changes all the permissions for all the directories and files |
|
-v |
This displays a message for every file that is processed |
|
-c |
This only displays files that have their permissions changed |
Command-line parameters for chmod
Redirection in bash
One of the more advanced features of bash are the redirection operators. These operators allow you to divert the input or output of a command to another command or file. While this sounds simple, it is an extremely powerful feature. There are several redirection operators built into bash, as shown here:
|
Operator |
Description |
|
| |
This is a general-purpose command that chains similar to > |
|
> |
This redirects the output of a command to a file |
|
< |
This reads a file and passes it to the command |
|
>> |
This appends the output of the command to a file |
Redirection operators
The | operator is a general-purpose command-changing tool. A simple example of this is to use it with cat and the program more. The more program is a simple program that lets you move backward and forward throughout a file on the screen in order to read it. Themore command gets the data that you want to read from the cat command. The | operator connects two programs together.
The more and cat commands connected using the | operator
> and >>
The > and >> operators are really powerful operators that take the data that is output by a program and write it to a file. The > operator replaces the file and the >> operator appends it to a file.
Remember that everything in Linux is a file, so you can use the > and >> operators to direct the output to a serial port or a printer.
The > operator writes the result of an ls command to a file
<
The < operator is similar to the > operator, except that it reads the contents of a file and feeds it to a program. This can be used in a lot of ways and is in some ways similar to using <.
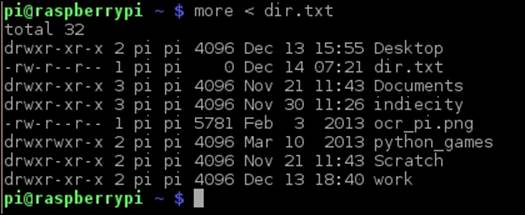
Using the < operator to send the contents of dir.txt to the more application
Environmental variables
Another powerful feature of bash is the use of environmental variables. Environmental variables are values that are stored in memory and can be used to temporarily store information and settings. One example of this is the PATH variable. The PATH variable tells bash where to look for any programs if they aren't in the current directory.
All the current environmental variables set can be displayed using the printenv command. They are loaded into memory automatically when your Raspberry Pi boots up.
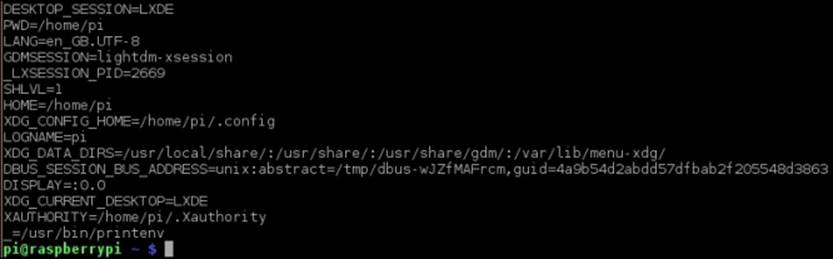
Some of the environmental variables set up by default in Raspbian
You can define your own environmental variables easily in bash. By convention, in bash, all environmental variables are defined using capital letters.
To define an environmental variable, you can do as shown in the following screenshot:
![]()
Defining the MY_VARIABLE environmental value
Environmental variables can be used just as easily. To use an environmental variable, simply add $ before it.
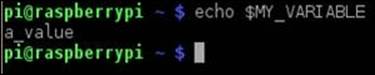
Using the MY_VARIABLE environmental value
Environmental variables are often used in shell scripts to store information and results.
Note
Do you know that a bug called Shellshock was discovered in 2014 in bash's handling of environmental variables? This bug allowed the execution of arbitrary commands and presented a huge risk to many of the web servers running on the Internet.
It is easy to add an environmental variable. To do this, you use the export command as follows:
export VARIABLE=value
An environmental variable's name can't contain a space and must contain capital letters.
Basic scripting
All the commands that you have seen so far are just single commands. The bash has the ability to execute multiple commands together in one go. Commands can be stored in a file called a shell script.
A shell script has its execute attribute set. It can then be run by simply changing into the directory that the script is in and typing its name.
These shell scripts can be run as normal program a on your Raspberry Pi.
Rebooting and shutting down your Raspberry Pi
You can reboot and shut down your Raspberry Pi using the built-in commands. To reboot your Raspberry Pi, all you need to do is run the reboot command.
![]()
Rebooting your Raspberry Pi
Sometimes, you will want to shut down your Raspberry Pi completely. To do this, you can use the shutdown command.
The shutdown command takes two different parameters: the first parameter is the type of shutdown that you want to do, and the second parameter is the time at which you want to do the shutdown.
|
Parameter |
Description |
|
-r |
This reboots your Raspberry Pi. |
|
-h |
This powers off the system after the shutdown is complete. You will still need to disconnect the power to your Raspberry Pi when the shutdown is complete. |
|
-k |
This doesn't really shut down the system, it just sends a warning message. |
The second parameter is normally the word now, which tells your Raspberry Pi that we want to shut down immediately.
![]()
Shutting down your Raspberry Pi!
The halt command can also be used if you want to shut down your Raspberry Pi. Simply run the following command:
halt
Your Raspberry Pi will immediately shut down.
Text editors
Sometimes, you might need to edit a file on your Raspberry Pi: perhaps to edit the /etc/network/interfaces file in order to reconfigure your Raspberry Pi network interfaces, or you might need a text editor to write a document.
Fortunately, there are several text editors installed with Raspbian. The most commonly used text editors are:
· nano
· vim
nano
Originally created in 1999 by Chris Allegretta, nano is the easiest text editor to use included on the Raspberry Pi.
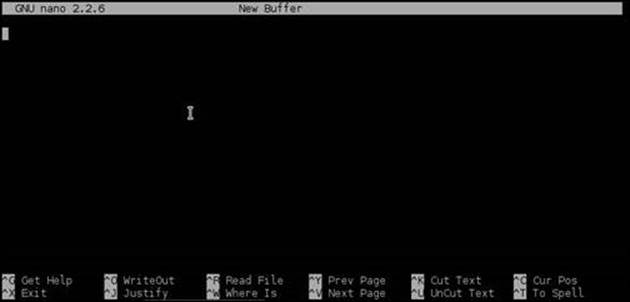
The nano text editor
To edit a file in nano, you simply need to start typing. Once you have made changes, you need to save them and exit. The commands that you see at the bottom of the screen can be accessed by pressing the Ctrl key on your keyboard followed by the letter.
1. For instance, to exit after you have made changes, press Ctrl + x.
2. You will then be asked whether you want to save these changes. To do so, press y.

Saving changes in nano
3. You now need to enter the filename that you want in order to save the file. Once you have done this, simply press Enter and your file will be saved.

Confirming the filename of the file you are saving
4. To load the file you have just saved, just run the nano command as shown in the following screenshot:
![]()
Selecting the filename that you want to save the file as
vim
The other text editor installed on your Raspberry Pi is the vi text editor. The vi editor was originally created for Unix-based operating systems by Bill Joy in 1976.
The name vi is derived from the shortened abbreviation of the word visual. The vi editor is one of the most widely used text editors in Linux.

The vi text editor
The vim (improved vi) editor is a bit more complicated to use than nano. The vi editor is designed to stay out of your way, and as such, you won't see any menus or unnecessary information on the screen.
The vim editor has several different modes that you use to operate it. One of the modes is insert mode. When you are in insert mode, you can use vi like you would use the nano text editor, but here you simply type the text and use the arrow keys to navigate the file. To get into insert mode, press the Insert key or type a capital I.
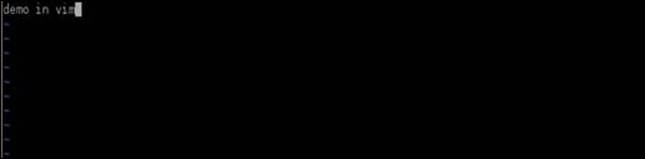
The vi text editor in insert mode
In order to save the file, we need to enter in the command mode. To do this, press the Esc key followed by the : key. This will bring up a command prompt at the bottom of the vim window.

The vi text editor in command mode
There are many different commands available in vim, as follows:
|
Command |
Description |
|
w |
This writes the file to disk |
|
q |
This is used to quit vim |
|
dd |
This deletes the current line of text |
|
x |
This deletes the character where the cursor is |
These commands can be entered in Command Prompt, or when you are navigating the text and are not in insert mode.
An example of these commands is the wq command. This command saves and quits vim when you press Enter. You won't be asked whether you want to save your changes, as vim knows what you want, based on the command you give!
If you don't want to save your changes, simply enter the q! command.
There are many other text editors that can be installed onto your Raspberry Pi, such as geany.
Summary
In this chapter, you learned about the bash shell, file permissions, and many of bash's built-in commands. Remember that if you need to find out any more information, all that you need to do is add the man command in front of the command for which you want to find out more information. You will be able to find out as much information as you could ever need!
Remember, don't be scared to experiment with the different commands that are built into Raspbian. The worst thing that could happen is that you might need to image your SD card again.
All materials on the site are licensed Creative Commons Attribution-Sharealike 3.0 Unported CC BY-SA 3.0 & GNU Free Documentation License (GFDL)
If you are the copyright holder of any material contained on our site and intend to remove it, please contact our site administrator for approval.
© 2016-2026 All site design rights belong to S.Y.A.