HTML5, 20 Lessons to Successful Web Development (2015)
PART I Basic HTML
LESSON 6 Links, Forms, and Frames

To view the accompanying video for this lesson, please visit mhprofessional.com/nixonhtml5/.
The great thing about the Internet is the way documents located anywhere in the world can be linked to each other so that you can navigate to them with a single mouse click. This interconnectedness even extends to the ability to embed pages or portions of pages from the same or any other website, anywhere at all, within the current page.
The same goes for sending data to websites and web pages, which is often achieved using forms. The data in a form can be posted to a web server for processing or, if it is sent in the correct way, a simple JavaScript can receive the data and act on it, without recourse to the web server.
In this lesson I show how all these things work and how you can use them to their best effect.
Using Hyperlinks
To create a link to another document, you must first know where this new document resides; in other words, whether it is on the local server or another one. An external web address (on a different server) uses what is known as an absolute URL (Uniform Resource Locator), which usually begins with http:// (or https:// for secure sites that use encryption), such as:
http://bbc.co.uk
It can be more complicated than that simple URL, by including the folder structure (and sometimes a filename too) within which a web page resides, like this, which accesses the folder/weather:
http://bbc.co.uk/weather/
Some organizations distinguish different servers by adding a prefix before the domain name, the most common of which is www, like this:
http://www.bbc.co.uk
Because typing www. involves an extra four characters, most good websites allow you to ignore this prefix (but not all). But when it is used, it denotes the organization’s main web server. Alternative servers may use prefixes such as news, like this (which leads to the BBC’s news service):
http://news.bbc.co.uk
The Query String
Many websites support the use of a query string, which is a string of data placed after the URL to provide additional information to a web server. For example, the following URL passes the value html5 to the field name q on Google’s search page, the result of which is shown in Figure 6-1:
https://google.com/search?q=html5
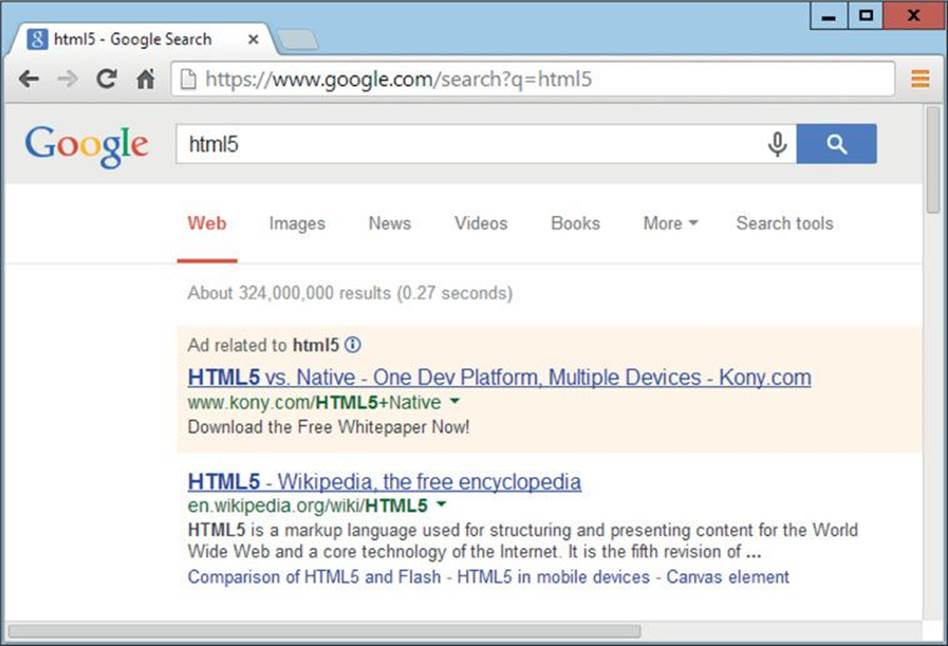
FIGURE 6-1 The Google search engine returning results for “html5”
Query strings begin with a ? character, followed by a field/value pair that is separated by an = sign. Further field/value pairs may follow if preceded by a & character, like this:
https://google.com/search?q=html5&hl=fr
Here the field name hl is set to the value fr, which has the result of changing Google’s default language for this session to French, as shown in Figure 6-2. I cover query strings in more detail in the section on forms.
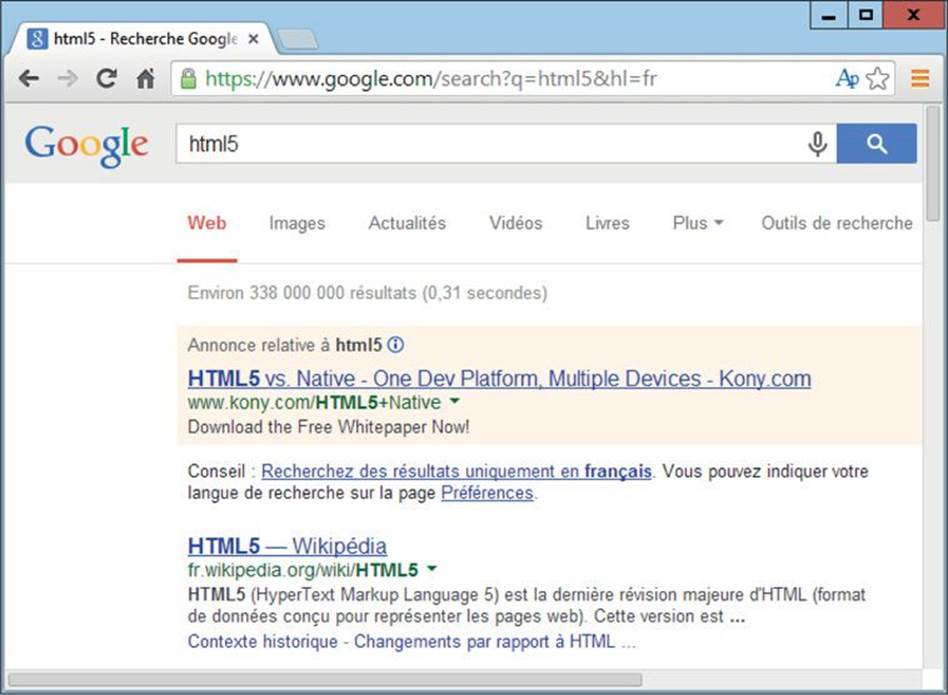
FIGURE 6-2 Like Figure 6-1, but presented in French due to the query string used
Relative URLs
When documents reside on the current server, you can access them more easily and make them more portable by using relative instead of absolute URLs. For example, if you need to link to the file agenda.htm in the current folder, you can simply use its name as the URL, like this:
agenda.htm
Or, if the document is in the subfolder meetings, you could refer to it like this:
meetings/agenda.htm
Alternatively, if the file is in the parent folder of the current one, you can use the special token ../ which simply specifies that the document can be found one directory higher up, like this:
../agenda.htm
There again, if the file is in a sister folder, perhaps called misc, you can easily refer to it by referencing the folder from the parent one, like this:
../misc/agenda.htm
Finally, to refer to the root, or uppermost, folder of the current drive or web location, you use the / symbol. So if the file is in the root folder, it can be accessed like this:
/agenda.htm

This form of accessing is not fully relative to the current folder since it includes a jump all the way to the root folder, and the distance between the root and current folder is not indicated in this form of URL.
Creating Links
To create a link within an HTML document, you apply the <a> tag, supplying a value to an attribute called href (for hypertext reference), like this:
<a href=′http://google.com′>Visit Google</a>
The final </a> tag closes the pair of tags, which encompass the text to be displayed for the link, which in the preceding case simply looks like this:
Visit Google
If linking relatively to the file agenda.htm, discussed in the previous section, you might use one of the following forms of HTML depending on the file’s location:

All of these display in the same way, like this:
View the agenda here.
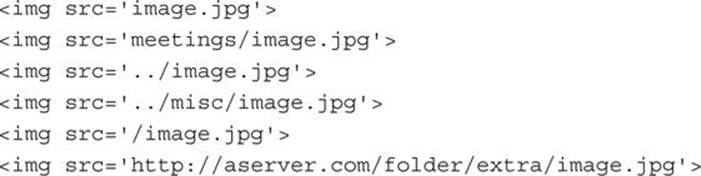
URLs in Images
In Lesson 4 I showed how to embed images in documents, but assumed that the pictures resided in the current folder. But, in fact, they can reside almost anywhere on the current server, or elsewhere on the Internet, and all of the following are valid HTML for displaying an image located in different places:
The target Attribute
You can specify whether a linked URL should replace the current web page or open in a new one by supplying a value for the target attribute. For example, if you would like a web page to open in a new blank window (or tab, according to how the user’s web browser is configured), you can add the specifier target=′_blank′, like this:
<a href=′http://google.com′ target=′_blank′>Visit Google</a>
There are three other reserved words you can also supply to the target attribute: _self to replace the current page (the default), _parent to replace the parent page or frame (if the current document resides in a frame), or _top to ignore any and all frames and replace the entire contents of the current browser window with the new document.
Additionally, if you have already named a frame, window, or tab using the relevant HTML or JavaScript, you can specify that name as the target in place of one of the four reserved words.
Creating an Anchor
It is even possible to link to a section of a web page by first specifying an anchor using the name attribute of the <a> tag, like this:
<a name=′anchorname′></a>
Now you can link directly to that section of the web page using a query string referring to the anchor name, preceded by a # symbol, like this:
Click <a href=′http://server.com/page.htm#anchorname′>this link</a>
When it is passed this URL, the web browser will load in the specified page and then scroll it so that the section beginning with the anchor name is at the top of the browser window. In HTML5 the name attribute has been obsoleted in favor of id.
A good example of anchors in action is the Wikipedia page on the subject. Go to the website at wikipedia.org and enter the search term html anchor. You will then be taken to the Wikipedia HTML Element page, and then scrolled down automatically to the section about anchors, as shown in Figure 6-3.
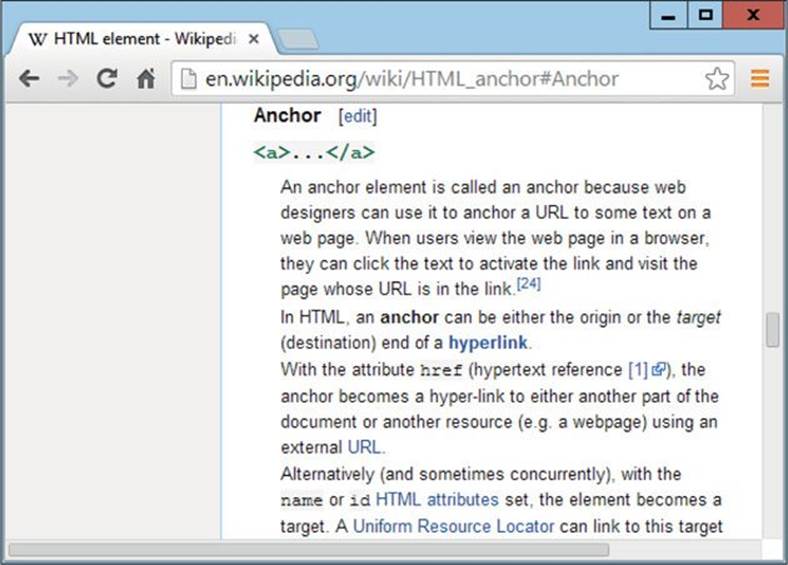
FIGURE 6-3 The Wikipedia Anchor section is itself an anchor.
Building Forms
Web forms are the means with which you can request input from the user of a web page. Historically, web form data has been posted to the web server and then processed, but nowadays form data can be preprocessed using JavaScript to ensure that it is in the form required and all fields are correctly completed. Additionally, through the use of Ajax, a technology whereby JavaScript communicates behind the scenes with a web server, modern forms can check for the availability of a username you prefer, before you even submit a form.
In fact JavaScript can incrementally submit all parts of a form as you fill it in, avoiding the need to use a submit button at all. And where input is used only to control the current web page (and no interaction is required with the web server), JavaScript can read from and write to form fields, and retrieve data from a query string.
An HTML form begins with the <form> tag and is closed with </form>, and the tag supports three commonly used attributes, as follows:
• method There are two values accepted by this attribute: post or get. When you select post, all the form data is sent to the web server invisibly (using headers), but when using get, the data is appended to an HTML request in a query string. This can result in messy-looking URLs but, among other possibilities, it does enable a form to be posted to a JavaScript program rather than a web server.
• action This attribute should contain the URL to which the form is to be submitted. If the form is sent using a get request and then a ? followed by the form, data (as a query string) will be tacked onto this value.
• enctype This attribute tells the program that will receive the form what type of data to expect, out of: application/x-www-form-urlencoded, multipart/form-data, and text/plain. The first encodes all characters before transmitting the form. The second is used when a file is also (or only) being uploaded to a web server. In the last form, text is transmitted, with spaces converted into + symbols for use in a query string. By default, if no encoding is specified, application/x-www-form-urlencoded is used.
Figure 6-4 shows a range of form elements all incorporated into a single form, using the following HTML:
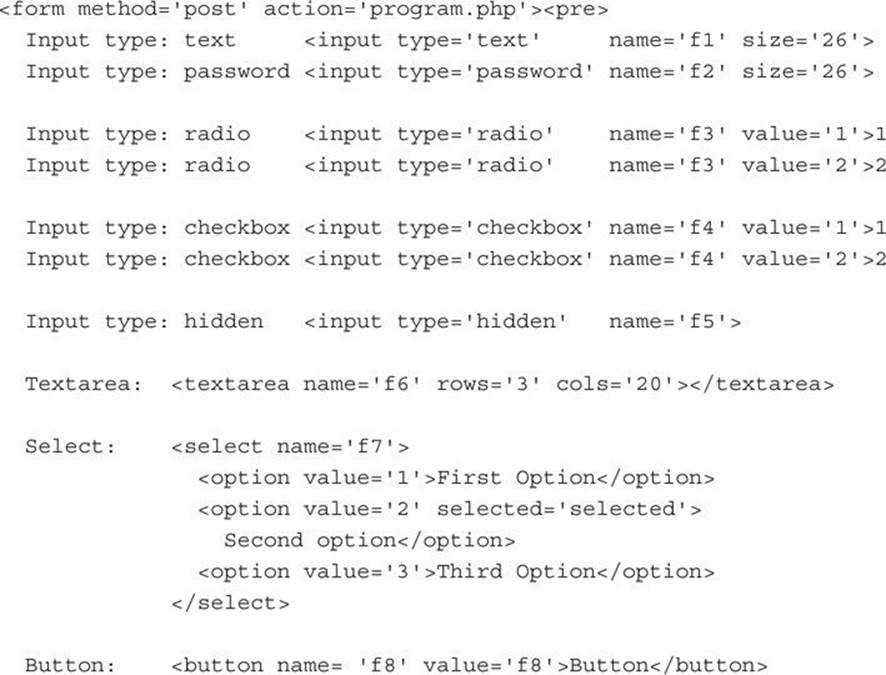
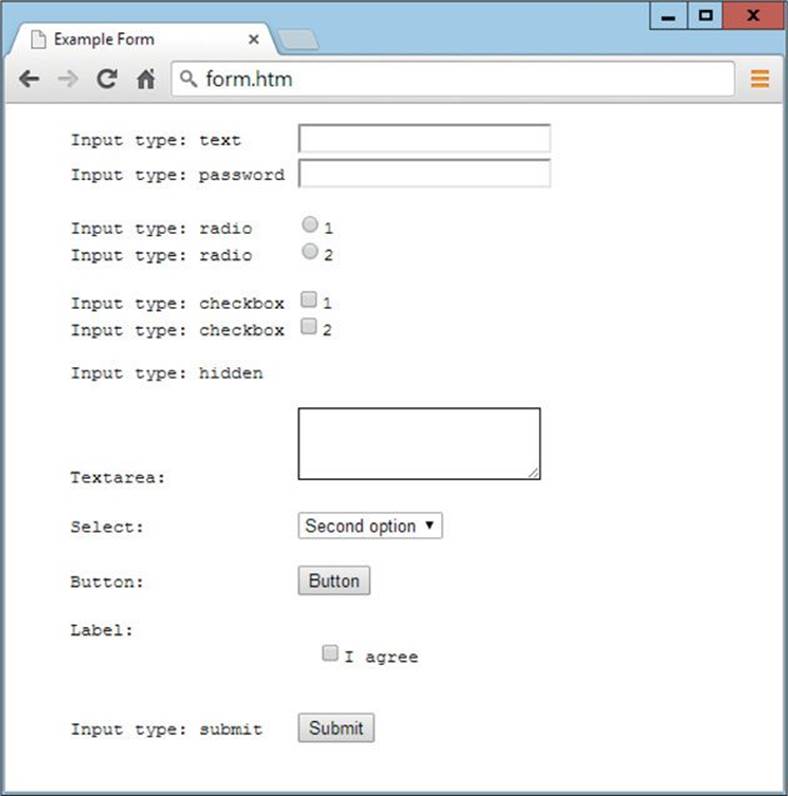
FIGURE 6-4 A form incorporating a variety of elements
The <pre> and </pre> tags are used here simply to help space out the form without having to use CSS or several HTML tags. It tells the browser to display all spaces within the tags as it encounters them, and not to treat them as collapsible whitespace.
The <input> Tag
The code in the preceding section makes use of the following type attribute values of the <input> tag:
• text This value creates an input field suitable for entering text. You can change the width of the input field with the size attribute and limit the number of characters allowed with the maxlength attribute.
• password This value creates an input field suitable for entering passwords in that all typed characters are replaced with the * character when displayed, but are properly stored internally. You can change the width of the input field with the size attribute and limit the number of characters allowed with the maxlength attribute.
• radio Each form may have any number of radio buttons, but only one can be active at a time. When another radio button is clicked, the previously selected one is deselected. Radio buttons are round.
• checkbox You use this value to create checkboxes, which are like radio buttons but are square, and more than one may be selected at a time.
• hidden Sometimes you may wish to pass a value in a web form that the user shouldn’t see, such as an identifying token or other data, and doing so is accomplished by passing this value. In this case, you will also have to provide the value to be posted in the value attribute (see the section “The value Attribute”).
• submit This value creates a button that will submit the form. By default the button will read Submit or Submit Query.
The name Attribute
When sending data using a form, you need to give each item of data a name so that both your form and the receiving program know which piece of data is for what. To do this you use the name attribute, like this:
<input type=′text′ name=′firstname′>
Here the field’s name is firstname and therefore it is clear that this will be used for the input of a person’s first name.
The value Attribute
You can specify a predefined value for any form field by assigning it using the value attribute, like this:
<input type=′text′ name=′firstname′ value=′Guest′>
Here a default value of Guest is given to the input field, which could be useful, for example, if allowing guests to make posts in a guestbook or comment. Such predefined fields can be overwritten or edited by the user, so the value is not fixed.
The <textarea> Tag
Sometimes the single line of input supplied by the <input> tag is insufficient in size, in which case you can use the <textarea> tag, which supports adjustable width and height, over more than one line of input. Unlike the <input> tag, however, predefined data is not passed through a value=attribute. Instead, whatever you place between <textarea> and </textarea> tags becomes the predefined input, which can then be edited or replaced by the user.
Therefore the following lines provide an empty and a predefined textarea input with a default width of 20 characters and height of two lines:

You can specify the number of rows and columns to use for the textarea with the rows and cols attributes, like the following, which creates an area 30 characters wide and five lines high:
<textarea name=′summary′ rows=′5′ cols=′30′></textarea>
The <select> Tag
If you need a drop-down list of options from which a user can select one, you can use the <select> tag in conjunction with a secondary tag, <option>. Together these tags let you create a list of values and names to display, that will pop down when clicked, like this:
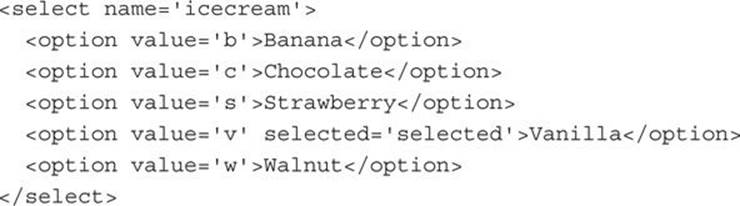
The fourth element in the list has been set as the default by using the attribute selected=′selected′. When the list is popped down, this option will be the one shown as selected and will stay so, unless the user chooses a different element. If your HTML will not be repurposed in XHTML format, you can omit the =′selected′ assignment, and simply apply the keyword selected like this: <option value=′v′selected>Vanilla</option>.
The <button> Tag
This tag displays a clickable button but, depending on your target audience, you may choose not to use it because Internet Explorer versions 7 or lower will submit the contents between the <button> and </button> tags, while other browsers submit the contents of its value attribute. If you are certain your users will be on IE 8 or higher (or another browser), this tag will be safe to use.
The <label> Tag
This tag is especially handy for use with radio buttons or checkboxes (which are small) because you can place one of these elements alongside some explanatory text, and if you surround them both with <label> and </label> tags, the user can click either the text or the radio button or checkbox to activate it. Here’s a common example:

This example displays as follows, and clicking any part of it (not just the checkbox) will check or uncheck the box:
![]() I agree to these terms and conditions.
I agree to these terms and conditions.
Frames and Iframes
There are two ways in which you can embed entire web pages within other pages: frames and iframes. The first way to do this, and the least recommended, is to use frames to split a web page into the multiple parts and then place them all in frames within the <frameset> tag, like this (although it is obsolete in HTML5):
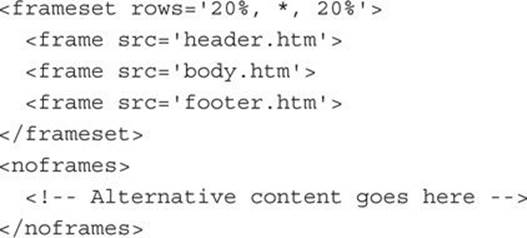
Note the use of the <noframes> and </noframes> tags in the example to display alternative content to users whose browser doesn’t support frames. Although all modern mainstream browsers do support frames, some specialist ones such as audio browsers for blind people, or text-only browsers, may benefit from the use of these tags.
This results in a top frame that takes up 20 percent of the browser height and which is pulled in from the file header.htm. Then there’s the main frame, which (due to the * attribute in the rows attribute) will expand to fit whatever space there is after the fixed-size frames are in place. It is loaded in from the file body.htm. And finally the footer frame is loaded in from footer.htm and placed in the bottom 20 percent of the web page.
The problem with this method is that the entire web page is made up of frames and there is no content on the page itself. This is obviously not ideal and is not good for ranking in search engines, which will not find such a page very interesting.
Instead I recommend that when you need a frame you use an <iframe> tag, as shown in Figure 6-5 (in which a Wikipedia page has been embedded within another web page), because you can drop a frame of any width and height anywhere in a document as easily as if it were an image, like this:

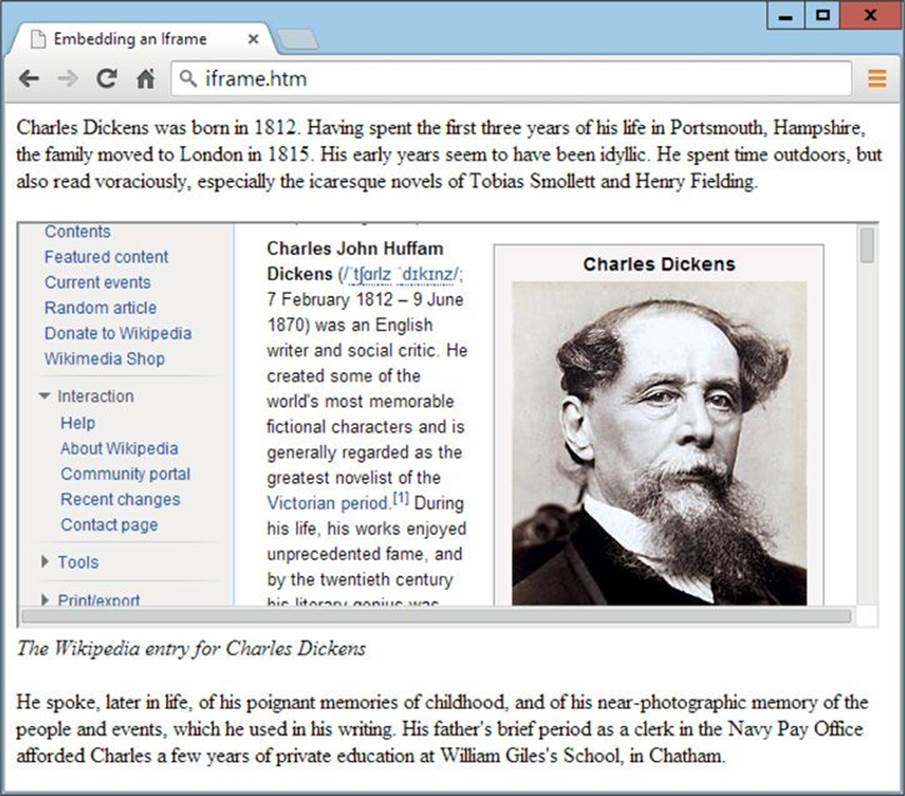
FIGURE 6-5 A Wikipedia page is embedded in another web page.
Summary
This lesson completes most of your introduction to HTML. The following lesson takes you through the remaining HTML 4.01 tags which (combined with this chapter) you can use as a reference if you are new to HTML, or as a refresher if you are a seasoned user.
Self-Test Questions
Test how much you have learned in this lesson with these questions. If you don’t know an answer, go back and reread the relevant section until your knowledge is complete. You can find the answers in the appendix.
1. HyperText Transfer Protocol uses the string http:// to preface insecure Internet URLs, but how do you access encrypted, secure URLs?
2. If http://mydomain.com calls up the root of a web server, how can you access a subfolder from this root called folder?
3. How would you format a link to the website mydomain.com in HTML?
4. Without mentioning a domain by name, what URL will take the user to the root document of a domain?
5. How can you make a destination URL from a hyperlink load into a frame or window other than the current one?
6. How can you hyperlink directly to a section within a web document?
7. What HTML tag is used to create a form?
8. How can you request a single text input line from a user?
9. How can you provide more than a single line of space to input text?
10. What tag can you use to embed another document within the current one?
All materials on the site are licensed Creative Commons Attribution-Sharealike 3.0 Unported CC BY-SA 3.0 & GNU Free Documentation License (GFDL)
If you are the copyright holder of any material contained on our site and intend to remove it, please contact our site administrator for approval.
© 2016-2026 All site design rights belong to S.Y.A.