ASP.NET MVC 5 with Bootstrap and Knockout.js (2015)
Part IV. A Practical Example
Chapter 15. Implementing the Layout
The shopping cart project is now fully prepared and ready to be implemented. This chapter will implement the two common elements that will be on each page of the site. The first is the menu of book categories, and the second is the cart summary that will allow the users to see a snapshot of what is in their cart.
The Shared Layout
When the shopping cart project was created by Visual Studio, it also created a HomeController (along with the accompanying views) and a shared layout view. Example 15-1 contains an updated Views/Shared/_Layout.cs file that includes the two common elements.
Example 15-1. Shared layout
<!DOCTYPE html>
<html>
<head>
<meta charset="utf-8" />
<meta name="viewport" content="width=device-width, initial-scale=1.0">
<title>@ViewBag.Title - My ASP.NET Application</title>
@Styles.Render("~/Content/css")
@Scripts.Render("~/bundles/modernizr")
</head>
<body>
<div class="navbar">
<div class="container">
<div class="navbar-header">
<button type="button" class="navbar-toggle"
data-toggle="collapse" data-target=".navbar-collapse">
<span class="icon-bar"></span>
<span class="icon-bar"></span>
<span class="icon-bar"></span>
</button>
@Html.ActionLink("Jamie's Shopping Cart", "Index", "Home",
new { area = "" }, new { @class = "navbar-brand" })
</div>
<div class="navbar-collapse collapse">
<ul class="nav navbar-nav">
<li>@Html.ActionLink("Home", "Index", "Home")</li>
<li>@Html.ActionLink("About", "About", "Home")</li>
<li>@Html.ActionLink("Contact", "Contact", "Home")</li>
</ul>
<div class="navbar-right" id="cart-details">
@Html.Action("Summary", "Carts")
</div>
</div>
</div>
</div>
<div class="container body-content">
<div class="well well-lg col-lg-3">
@Html.Action("Menu", "Categories",
new { selectedCategoryId = ViewBag.SelectedCategoryId != null ?
ViewBag.SelectedCategoryId : 0 })
</div>
<div class="col-lg-9">
@RenderBody()
</div>
<hr />
<footer>
<p>© @DateTime.Now.Year - My ASP.NET Application</p>
</footer>
</div>
@Scripts.Render("~/bundles/shoppingCart")
@RenderSection("scripts", required: false)
</body>
</html>
The cart summary has been added to the top menu. After the three scaffolded links for Home, About, and Contact, the cart summary is aligned on the far right. It is implemented by using the HtmlHelper and calling the Action method. The input to this function is the action and controller name that should be called by the MVC framework. The resulting view will be rendered inside the containing div. This is a good method to separate code properly. As you can see, the controller that will be executed is the CartsController (this will be created shortly) and the action ofSummary.
Similar to the cart summary, the menu of categories is included the same way, this time calling the CategoriesController and the Menu action. This time, additional data is passed into the Action function. A new dynamic object is created with a property called selectedCategoryId. This property is set by checking if there is a ViewBag variable named SelectedCategoryId. The CategoriesController will use this variable to be able to highlight the category the user has selected.
The category menu is placed inside the main container, which has been split into two columns. The first column will use up 3/12ths of the screen to display the categories. The second column will use the remaining 9/12ths to display the body of the page being rendered.
The Cart Summary
Several different pieces need to be created and put together to make the fully functional interactive cart summary. Example 15-2 is the CartsController, which is a new controller that should be added to the Controllers folder.
Example 15-2. CartsController
using ShoppingCart.Models;
using ShoppingCart.Services;
using ShoppingCart.ViewModels;
using System;
using System.Collections.Generic;
using System.Linq;
using System.Web;
using System.Web.Mvc;
namespace ShoppingCart.Controllers
{
public class CartsController : Controller
{
private readonly CartService _cartService = new CartService();
public CartsController()
{
AutoMapper.Mapper.CreateMap<Cart, CartViewModel>();
AutoMapper.Mapper.CreateMap<CartItem, CartItemViewModel>();
AutoMapper.Mapper.CreateMap<Book, BookViewModel>();
AutoMapper.Mapper.CreateMap<Author, AuthorViewModel>();
AutoMapper.Mapper.CreateMap<Category, CategoryViewModel>();
}
[ChildActionOnly]
public PartialViewResult Summary()
{
var cart = _cartService.GetBySessionId(HttpContext.Session.SessionID);
return PartialView(
AutoMapper.Mapper.Map<Cart, CartViewModel>(cart)
);
}
protected override void Dispose(bool disposing)
{
if (disposing)
{
_cartService.Dispose();
}
base.Dispose(disposing);
}
}
}
The CartsController defines one public action called Summary, which is tagged with the attribute ChildActionOnly. This attribute, in combination with the layout loading this method via the HtmlHelper and the Action method, lets me use the MVC framework without the overhead of a full request.
The CartsController also instantiates a private variable to the CartService (shown in Example 15-3). This variable is then disposed of at the end of the request life cycle. The Summary method uses the CartService to get the cart by the user’s SessionID, which is stored in the HttpContext.
Inside a new folder called Services, add the CartService class shown in Example 15-3
Example 15-3. CartService
using ShoppingCart.DAL;
using ShoppingCart.Models;
using System;
using System.Collections.Generic;
using System.Data.Entity;
using System.Linq;
namespace ShoppingCart.Services
{
public class CartService : IDisposable
{
private ShoppingCartContext _db = new ShoppingCartContext();
public Cart GetBySessionId(string sessionId)
{
var cart = _db.Carts.
Include("CartItems").
Where(c => c.SessionId == sessionId).
SingleOrDefault();
cart = CreateCartIfItDoesntExist(sessionId, cart);
return cart;
}
private Cart CreateCartIfItDoesntExist(string sessionId, Cart cart)
{
if (null == cart)
{
cart = new Cart
{
SessionId = sessionId,
CartItems = new List<CartItem>()
};
_db.Carts.Add(cart);
_db.SaveChanges();
}
return cart;
}
public void Dispose()
{
_db.Dispose();
}
}
}
Just like I did with the previous service I created, a private variable is instantiated to the EF DbContext. This service implements the IDisposable interface, which will then dispose of the ShoppingCartContext when the controller’s Dispose function is called to dispose of the CartService.
The GetBySessionId function searches the Carts DbSet for a cart with a matching sessionId. The CartItems collection is also included because this will be used by the view to show all of the items. Inside the GetBySessionId function is a private function named CreateCartIfItDoesntExist, which will create a new cart with the sessionId when there is not an existing cart.
Next up is the view. If a Carts folder was not created automatically under the Views folder, you should create it now. Once created, add a new view called Summary. Be sure to check that this is a partial view. Example 15-4 contains the finished Summary view.
Example 15-4. Carts/Summary.cshtml
@model ShoppingCart.ViewModels.CartViewModel
<a id="cart" href="@Url.Action("Index", "Carts")" data-bind="click: showCart">
<span class="glyphicon glyphicon-shopping-cart"></span>
<span class="badge" data-bind="text: cart.cartItems().length">
@Model.CartItems.Count</span>
</a>
<div id="cart-summary" style="display: none">
<span data-bind="visible: cart.cartItems().length == 0">
You currently have no items in your cart.
</span>
<div data-bind="visible: cart.cartItems().length > 0">
<ul>
<!-- ko foreach: { data: cart.cartItems, afterAdd: fadeIn } -->
<li data-bind="text: book.title"></li>
<!-- /ko -->
</ul>
<p><strong>Total:</strong> $<span data-bind="text: cart.total"></span></p>
<br /><a href="@Url.Action("Index", "Carts")" class="btn btn-primary">
View cart details</a>
</div>
</div>
<script>
var cartSummaryData = @Html.HtmlConvertToJson(Model);
</script>
The Summary view is bound to the CartViewModel that was created in Chapter 14. Remember that this view is included in the shared layout inside a class that aligns to the far right. So this view defines an HTML link with an id of cart and a Knockout data binding for the click event to the function showCart. Inside this link are two span tags. The first one displays a shopping cart glyphicon. The second defines a badge that is data bound via the text binding to the cart.cartItems array.
Beneath the link is a div with the id of cart-summary. It is hidden by default. When the user clicks the shopping cart icon, this div will be displayed inside a popover. Inside the div, a span tag is created and is data bound to the visible binding to show when there are no items in the cart. Beneath this span tag is a div that is data bound to the visible binding to only show when there are items in the cart. An unordered list (ul) contains a foreach data binding, which creates a list item (li) with the title of the book that is in the cart.
You might have noticed that the foreach binding looks different than some of the previous bindings. I’ve indicated that after an item is added to the cartItems array, an event will be triggered by Knockout and call the fadeIn function that will be defined in the Knockout ViewModel. This will provide the ability to perform a little animation when items are added to the cart.
Beneath the list of items in the cart is the cart’s total and a link to view the full cart details.
A global JavaScript variable is defined at the bottom of this view that serializes the CartViewModel. Normally, the ViewModel would be instantiated here as well; however, here is a minor downside to using a partial view. Partial views don’t support sections, so I’m unable to define the scripts section that would be rendered at the bottom of the shared layout. Instead, when the CartSummaryViewModel is defined (as shown in Example 15-5), it will use this global variable that I’ve defined in this view.
I personally am not the biggest fan of using global JavaScript variables; however, in this scenario I think the pros of separating my code with a partial view and controller outweigh having to use a global JavaScript variable.
The Summary view is leveraging the HtmlHelperExtension that was created in Example 5-4. In the root of the project, create the Extensions folder and copy the previously created HtmlHelperExtension to this folder.
The cart summary is starting to come together, and now it’s time to create the Knockout ViewModel. Inside the Scripts folder, create a new folder called ViewModels. Then create a new CartSummaryViewModel.js file as shown in Example 15-5.
Example 15-5. CartSummaryViewModel
function CartSummaryViewModel(model) {
var self = this;
self.cart = model;
for (var i = 0; i < self.cart.cartItems.length; i++) {
var cartItem = self.cart.cartItems[i];
cartItem.quantity = ko.observable(cartItem.quantity)
.extend({ subTotal: cartItem.book.salePrice });
}
self.cart.cartItems = ko.observableArray(self.cart.cartItems);
self.cart.total = self.cart.cartItems.total();
self.showCart = function () {
$('#cart').popover('toggle');
};
self.fadeIn = function (element) {
setTimeout(function () {
$('#cart').popover('show');
$(element).slideDown(function () {
setTimeout(function () {
$('#cart').popover('hide');
}, 2000);
});
}, 100);
};
$('#cart').popover({
html: true,
content: function () {
return $('#cart-summary').html();
},
title: 'Cart Details',
placement: 'bottom',
animation: true,
trigger: 'manual'
});
};
if (cartSummaryData !== undefined) {
var cartSummaryViewModel = new CartSummaryViewModel(cartSummaryData);
ko.applyBindings(cartSummaryViewModel, document.getElementById("cart-details"));
} else {
$('.body-content').prepend('<div class="alert alert-danger">
<strong>Error!</strong> Could not find cart summary.</div>');
}
The CartSummaryViewModel is defined as a function that accepts the CartViewModel that was serialized in the view. This is assigned to a local cart variable. After this, the cartItems array is looped through, and the quantity property of the CartItemViewModel is converted to an observable variable. This is required because if the same item is added multiple times, the quantity will be updated, and this will allow the cart total to be recalculated. The cartItems array is also converted to an observableArray because items will be added and removed from this array.
When the quantity is defined as an observable, it is extended with a subTotal property that passes in the book’s salePrice. The subTotal is a custom Knockout extension that I created (shown in Example 15-6) that can be used to extend any observable property that will take the variable passed in and multiply it by the property that is being extended.
The total property on the cart variable is defined as a custom function on the observableArray cartItems. The total extension function is also shown in Example 15-6 below.
After the observables are created, the showCart function is defined. This function is bound to the click event for the cart icon and will toggle the display of the cart summary popover (i.e., if it is hidden, it will be shown, and when it is clicked again, it will be closed).
The next function is the fadeIn function. It accepts an element parameter that is passed by Knockout when the new item is added to the cartItems array. A setTimeout is defined that will be executed 100 milliseconds after the function is called. This is done to ensure that the new element has been added to the list by Knockout. Once the 100 milliseconds have passed, the popover is shown (if it is not already being shown), and the jQuery UI slideDown effect will show the new item. After 2,000 milliseconds, the popover is then hidden. This provides a nice effect that shows the cart summary for roughly two seconds, and then disappears providing visual feedback to the user that the new item was added to the cart.
The final thing the CartSummaryViewModel function does is instantiate the link with the id of cart to be a popover. The popover is created with the title Cart Details, and the content is loaded from the div with the id of cart-summary.
Outside of the CartSummaryViewModel function, there is an if statement that ensures that the global JavaScript variable that was defined in the view exists. If it does exist, it creates the view model and applies the Knockout bindings limited to the element with the id of cart-details. Thecart-details ID was added in the shared layout to the element that wraps the Html.Action method call. Limiting the Knockout bindings to only the content within the cart-details div allows you to add multiple Knockout bindings on the same page.
If the global variable doesn’t exist, an error alert is written on-screen. This will help any future developer if this variable is not defined.
The next thing that needs to be created is the custom subTotal Knockout extension and total custom function. I’ve placed these in a file called knockout.custom.js inside the Scripts folder. Example 15-6 defines these functions.
Example 15-6. knockout.custom.js
ko.extenders.subTotal = function (target, multiplier) {
target.subTotal = ko.observable();
function calculateTotal(newValue) {
target.subTotal((newValue * multiplier).toFixed(2));
};
calculateTotal(target());
target.subscribe(calculateTotal);
return target;
};
ko.observableArray.fn.total = function () {
return ko.pureComputed(function () {
var runningTotal = 0;
for (var i = 0; i < this().length; i++) {
runningTotal += parseFloat(this()[i].quantity.subTotal());
}
return runningTotal.toFixed(2);
}, this);
};
The subTotal is defined as function under the ko.extenders. By default, the function will have one parameter, the target observable. This extender also includes a second property of multiplier. The function adds a new observable property called subTotal to the target observable. Then a function is defined called calculateTotal. This will be called each time the target observable’s value changes. The calculateTotal function is called on first load and will be called automatically each time the value changes.
The total function is defined slightly differently. It is defined as a function on the ko.observableArray. By adding it here, it will be available to any observableArray. If it were added to the ko.observable, the function would be available to both observable and observableArray variables.
A pureComputed function is defined inside the function definition. This function loops through the observableArray and adds the results of the previously defined subTotal function to the runningTotal variable. At the end of this function, the runningTotal is returned fixed to two decimal places.
This pureComputed function will be recalculated when either the cartItems array changes or when the quantity within the cartItem changes.
Why Custom Functions?
Instead of creating an extension, the subTotal and total could be calculated with a computedObservable. I’ve gone with the extension approach because when I create the cart details page, it also needs to calculate the same subTotal and total for each cart item. This is a great way to avoid duplicating the calculation across multiple ViewModels.
The final thing that needs to be done is to include the new JavaScript files that have been created. This can be accomplished one of two ways. The first would be to include the scripts in the layout after the bundle created in Chapter 13 is added. The second way would be to update the previously created bundle to include these new files. Because these files are required on every page, I think it makes more sense to update the bundle with them. Example 15-7 contains an updated BundleConfig with the two additional files.
Example 15-7. Updated BundleConfig
using System.Web;
using System.Web.Optimization;
namespace ShoppingCart
{
public class BundleConfig
{
// For more information on bundling, visit http://go.microsoft.com/fwlink
public static void RegisterBundles(BundleCollection bundles)
{
bundles.Add(new ScriptBundle("~/bundles/shoppingCart").Include(
"~/Scripts/jquery-{version}.js", "~/Scripts/jquery.validate*",
"~/Scripts/jquery-ui.js", "~/Scripts/bootstrap.js",
"~/Scripts/respond.js", "~/Scripts/knockout-{version}.js",
"~/Scripts/knockout.custom.js",
"~/Scripts/ViewModels/CartSummaryViewModel.js"));
bundles.Add(new StyleBundle("~/Content/css").Include(
"~/Content/bootstrap.css",
"~/Content/site.css"));
// Set EnableOptimizations to false for debugging. For more information,
// visit http://go.microsoft.com/fwlink/?LinkId=301862
BundleTable.EnableOptimizations = true;
}
}
}
At this point, the application can be run. Clicking the cart icon will display the popover with the message, “You currently have no items in your cart” (as shown in Figure 15-1).
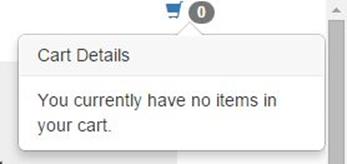
Figure 15-1. The cart summary
The Categories Menu
The list of categories is implemented in a similar fashion to the cart summary with far fewer pieces to put together. To begin, create a new CategoriesController in the Controllers folder. Example 15-8 contains its definition.
Example 15-8. CategoriesController
using ShoppingCart.Models;
using ShoppingCart.Services;
using ShoppingCart.ViewModels;
using System.Collections.Generic;
using System.Web;
using System.Web.Mvc;
namespace ShoppingCart.Controllers
{
public class CategoriesController : Controller
{
private readonly CategoryService _categoryService = new CategoryService();
[ChildActionOnly]
public PartialViewResult Menu(int selectedCategoryId)
{
var categories = _categoryService.Get();
AutoMapper.Mapper.CreateMap<Category, CategoryViewModel>();
ViewBag.SelectedCategoryId = selectedCategoryId;
return PartialView(
AutoMapper.Mapper.Map<List<Category>, List<CategoryViewModel>>(categories)
);
}
protected override void Dispose(bool disposing)
{
if (disposing)
{
_categoryService.Dispose();
}
base.Dispose(disposing);
}
}
}
The CategoriesController is following the same methodology of creating a service and ensuring that it is disposed of when the request is finished. The Menu action is also tagged as a ChildActionOnly like the Summary action in the CartsController.
Using the CategoryService (shown in Example 15-9), all categories are retrieved. These are then automapped and passed to the partial view (shown in Example 15-10). If you recall in the shared layout, when the Html.Action method was called, a new dynamic object was created to pass in the selectedCategoryId property. This value is set in the ViewBag to be used by the view to identify the selected category (if one is selected).
Example 15-9 contains the CategoryService. This file should be created in the Services folder.
Example 15-9. CategoryService
using ShoppingCart.DAL;
using ShoppingCart.Models;
using System;
using System.Collections.Generic;
using System.Linq;
namespace ShoppingCart.Services
{
public class CategoryService : IDisposable
{
private ShoppingCartContext _db = new ShoppingCartContext();
public List<Category> Get()
{
return _db.Categories.OrderBy(c => c.Name).ToList();
}
public void Dispose()
{
_db.Dispose();
}
}
}
The CategoryService follows the same paradigm as other services where it creates a new ShoppingCartContext, implements the IDisposable interface, and disposes of the DbContext when the class is disposed of from the controller.
The Get function simply returns the DbSet of Categories ordered alphabetically by their name.
The final piece to the category menu is the view. Inside the Views folder, if a Categories folder was not automatically created with the controller, add it now. Inside of this folder create a new view called Menu. Once again, ensure that the partial view is checked. Example 15-10 contains the view.
Example 15-10. Categories/Menu
@model List<ShoppingCart.ViewModels.CategoryViewModel>
@{
var selectedCategoryId = ViewBag.SelectedCategoryId;
}
<div class="list-group">
<h4 class="list-group-item-heading">Categories</h4>
@foreach (var category in Model)
{
<a href="@Url.Action("Index", "Books", new { categoryId = category.Id })"
class="list-group-item @if (selectedCategoryId == category.Id) {
@Html.Raw("active") }">@category.Name</a>
}
</div>
The view is data bound to a list of CategoryViewModels and the ViewBag.SelectedCategoryId is stored in a local variable. A Razor foreach statement is placed within a div with the class of list-group. A new HTML link is created for each category. The link is assigned the class list-group-item, and if the ID of the category matches the selectedCategoryId, a secondary class of active is added. This class will highlight the selected menu. This is shown in Figure 15-2.
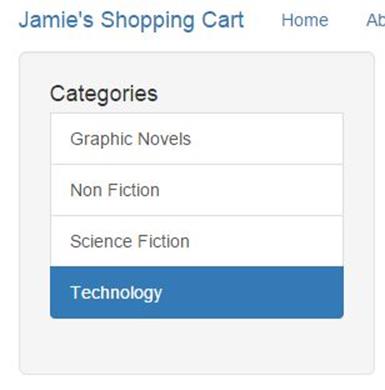
Figure 15-2. The categories
Where’s the Knockout?
It’s a good question. I have chosen Knockout to perform my client-side data binding; however, because I know the categories will not change when a user interacts with them, there is no need to add the additional override of Knockout bindings.
You will notice throughout the remainder of these examples that Knockout is only used when dynamic user interaction is required; otherwise, a standard MVC view with Razor will do the trick just fine.
Summary
The shopping cart layout is now complete. The list of book categories will be displayed on the left, and the cart summary will be displayed in the upper-right corner. These items will appear on every page. The cart summary contains a nice mix of MVC, Bootstrap, and Knockout to style it as a popover and include some simple animations when new items are added to the cart. The next chapter will build the home page to include a list of featured books.
All materials on the site are licensed Creative Commons Attribution-Sharealike 3.0 Unported CC BY-SA 3.0 & GNU Free Documentation License (GFDL)
If you are the copyright holder of any material contained on our site and intend to remove it, please contact our site administrator for approval.
© 2016-2026 All site design rights belong to S.Y.A.