ASP.NET MVC 5 with Bootstrap and Knockout.js (2015)
Part I. Getting Started
Chapter 3. Introduction to Knockout.js
Knockout.js is an open source JavaScript library that allows you to create dynamic and rich web applications. It is built with the Model-View-ViewModel (MVVM) pattern. Knockout makes it really simple to implement a complex user interface that responds to user interactions.
I like Knockout because it is one of the most lightweight JavaScript libraries available today. It also doesn’t try to be an all-in-one framework. It serves a single purpose: data binding your ViewModel to your user interface.
Implementing Knockout involves three distinct things: a view that contains HTML and CSS elements that get data-bound to it, a ViewModel that contains the data to bind to the view, and telling Knockout to perform the data binding to the view with the ViewModel.
Installing Knockout.js
Knockout.js can be installed in one of two ways:
§ Downloading the latest version from the Knockout downloads page.
§ Installing Knockout via the NuGet Package Manager.
My preference is the NuGet Package Manager because it makes it easier to update to a new version if/when a newer version is available.
The NuGet Package Manager is integrated directly into Visual Studio and allows developers to easily install (or create their own) packages to install and manage third-party dependencies.
To install Knockout, perform the following operations:
1. Click the Tools menu.
2. Click the NuGet Package Manager submenu.
3. Click the NuGet Packages for Solution menu.
4. On the left, click Online if it is not already selected.
5. In the search box on the top right, type knockoutjs.
6. The first package is the Knockout framework. Click the Install button for this package (see Figure 3-1).
7. Next, choose which project to install it on. Assuming that you have just the one project, the default option of “All” is OK. If, in the future, you have multiple projects, be sure to select the project that contains your MVC application.
8. Once the package is installed, click the Close button on the NuGet Package Manager.
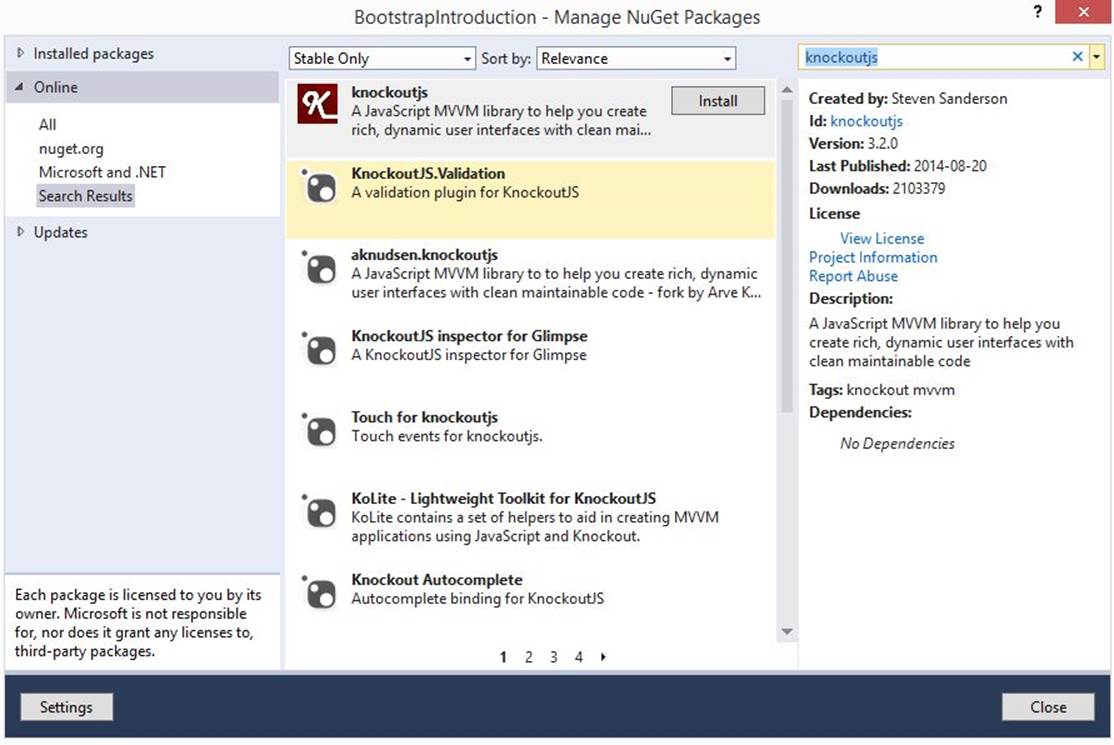
Figure 3-1. Installing the Knockout package
With the Knockout library downloaded and added to the project, it becomes a simple matter of including the script.
In the Views/Shared/_Layout.cshtml file, add the code from Example 3-1 just above the @RenderSection located just above the ending body tag (</body>).
Example 3-1. Including the Knockout library
<script src="~/Scripts/knockout-3.2.0.js" type="text/javascript"></script>
You may notice that right above this line there is Razor code that starts with @Scripts.Render. This is another way of including JavaScript files; however, it requires creating a JavaScript bundle. Bundling and minification of JavaScript files will be covered in Chapter 12.
NuGet Package Updates
If you reopen the NuGet Package Manager and select the Updates menu option on the left, you will see a long list of packages that require updating.
These packages were installed by default when the project was created through the Visual Studio template. Because the template uses fixed versions of the package and was created many months ago, it’s possible that the referenced libraries have been updated.
Before beginning a new project, it’s a great idea to update any packages that you will be using. Likewise, if there are dependencies that you will not be using, it’s a good idea to remove them and clean up the included packages.
A Basic Example
Now that the Knockout library is installed, let’s get right to an example of using it. Knockout works with ViewModels, which are comprised of JavaScript code that is executed by Knockout and bound to the view. Many different ViewModels will be created throughout this book.
Example 3-2 creates a new Razor view called Basic.cshtml and is placed inside the Views/Home folder.
Example 3-2. A basic ViewModel
@{
ViewBag.Title = "Basic";
}
<h2>Hello <span data-bind="text: name"></span></h2>
@section Scripts {
<script>
function ViewModel() {
this.name = 'Eric McQuiggan';
};
var viewModel = new ViewModel();
ko.applyBindings(viewModel);
</script>
}
I mentioned in the introduction that there are three important pieces that make Knockout work:
§ HTML and CSS that contain elements that are data bound to it from the ViewModel. This example is using a span tag that contains an HTML attribute called data-bind with the contents of text: name.
§ The ViewModel that contains the properties and/or functions that are used in the data binding. In this example, it is a function called ViewModel that contains a single variable called name that is set to the value of Eric McQuiggan.
§ The final piece is to tell Knockout to execute the bindings on the View with a specific ViewModel. In this example, the ViewModel function is instantiated like a class and stored in a variable called viewModel. This variable is then passed to the ko.applyBindings function, which takes the name variable from the ViewModel and replaces the contents within the span tag with the contents of the variable.
@section Scripts
You might have noticed that the JavaScript was placed inside the following Razor code: @section Scripts { }. This is a good code practice within a view because inside the shared layout right below where the Knockout library was included in Example 3-1 is the @RenderSection of this section. When the view is executed, the Razor engine will extract the JavaScript and place it there when the view is rendered in the browser.
Before this example can be run, the HomeController must be updated to call the newly created view. Example 3-3 contains an updated controller with a new action that will render the view.
Example 3-3. Updated HomeController
using System;
using System.Collections.Generic;
using System.Linq;
using System.Web;
using System.Web.Mvc;
namespace BootstrapIntroduction.Controllers
{
public class HomeController : Controller
{
public ActionResult Index()
{
return View();
}
public ActionResult About()
{
ViewBag.Message = "Your application description page.";
return View();
}
public ActionResult Contact()
{
ViewBag.Message = "Your contact page.";
return View();
}
public ActionResult Basic()
{
return View();
}
}
}
You can now debug the project by pressing the default shortcut key of F5. Visual Studio will compile your project and launch your default web browser with a URL that will look something like http://localhost:50955/. Adding Home/Basic to the end of the URL will display the newly created view and execute the Knockout code as shown in Figure 3-2.

Figure 3-2. Hello world example
What Is MVVM?
The Model-View-ViewModel (MVVM) design pattern is based largely on the Model-View-Controller (MVC) pattern. In fact, the MV is shared between them. It’s the ViewModel that really separates the two.
MVVM was designed to implement (as shown in Figure 3-3) data binding between your ViewModel and your View. This is what Knockout does for you, and it does it very well. It is accomplished using some simple-to-implement HTML attributes and a JavaScript ViewModel as shown in Example 3-2.
The most important thing to remember when you are building ViewModels is that they should be organized to make it easy to represent how your View uses the data. This is an important distinction because Models in MVC are typically represented in how they are stored in the database.
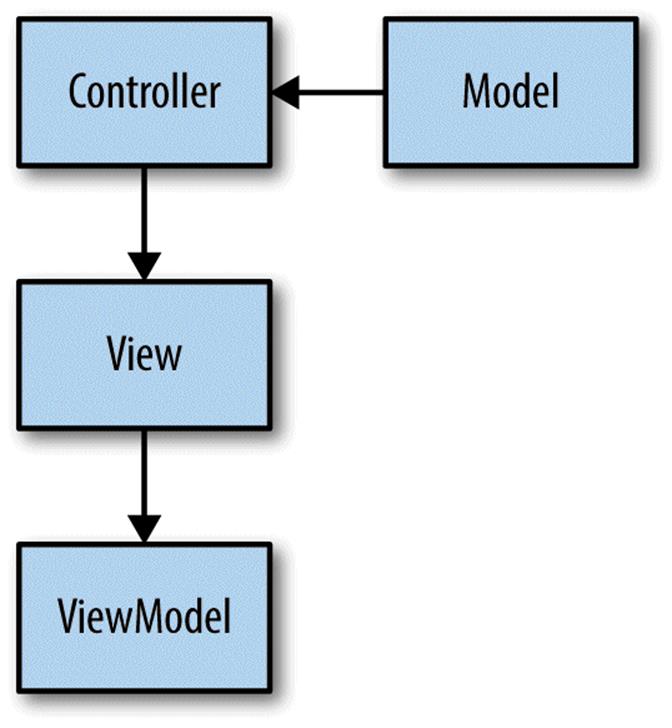
Figure 3-3. Understanding MVVM
The most common example of this is a name. As shown in Example 3-2, a single name variable contains both the first and last name of the person. However, if we were to collect a person’s name with a form, I would separate it into two fields. If the name was left as two fields when used for display, it would require maintaining two variables and rendering them both on-screen instead of amalgamating them into a single variable representing the user’s full name.
In this example, the Model (in MVC) would contain a first and last name, whereas the ViewModel would contain a single field created from the two fields.
Creating ViewModels
A ViewModel can be any type of JavaScript variable. Example 3-4 demonstrates this by replacing the ViewModel that was created in Example 3-2 with a simple JavaScript variable that contains the same property name.
Example 3-4. Another ViewModel
<script>
var viewModel = {
name: 'Eric McQuiggan'
};
ko.applyBindings(viewModel);
</script>
Running this example will output the same result as Figure 3-2. Typically, when I create ViewModels, I create simple or complex JavaScript classes that allow me to leverage an object-oriented style of programming (functions, properties, abstraction, etc.).
Object-Oriented Programming with JavaScript
JavaScript is a fully object-oriented programming (OOP) language based on prototyping. It doesn’t contain class statements like C++, C#, or PHP; however, JavaScript functions can be used to simulate the same behavior.
It also offers full support of OOP language features such as namespaces, objects, properties, inheritance, abstraction, etc.
If you are new to JavaScript or object-oriented programming, the Mozilla Developer Network (MDN) offers a great introductory article.
In the previous examples, the name property was hardcoded inside the ViewModel. It’s more common that this data would be populated from the MVC application. Example 3-5 will create a new view called Advanced.cshtml and place it within the same Views/Home folder.
Example 3-5. ViewModel that accepts the name as input
@model BootstrapIntroduction.Models.Person
@{
ViewBag.Title = "Advanced";
}
<h2>Hello <span data-bind="text: getName()"></span></h2>
@section Scripts {
<script>
function ViewModel(firstName, lastName) {
var self = this;
self.name = firstName + ' ' + lastName;
self.getName = function () {
return self.name;
};
};
var viewModel = new ViewModel('@Model.FirstName', '@Model.LastName');
ko.applyBindings(viewModel);
</script>
}
Once again, executing Knockout requires three important steps:
1. HTML and CSS contain elements that are to be data bound from the ViewModel. Similar to Example 3-2, a span tag is used, but this time the text binding is calling the getName function in the ViewModel. This function is a wrapper to the name property.
2. The ViewModel that contains the variables and functions that will be bound to the HTML. Example 3-5 is slightly different from Example 3-2 because it accepts the first name and last name as variables in the constructor to the ViewModel. This is then concatenated and stored to thename property and accessed by the getName function.
3. And finally, the ViewModel is executed by Knockout when the ko.applyBindings function is called with the ViewModel.
When the ViewModel is created, it is populating the name with Razor code to access the Model that is associated with this view (the person model). This will be set in Example 3-6 when the HomeController is updated. It’s important that the Razor syntax is contained within quotes because when this is parsed by Razor, it will be rendered as JavaScript code. Because it is contained within quotes, it will be executed as a JavaScript string instead of a variable, which would cause an error because it doesn’t exist.
Self = This
You may be wondering why the first line of my ViewModel is var self = this;. By creating a variable called self and assigning it the variable this, it provides me with a property that I can use inside methods of my class and easily reference other methods or properties in my class.
Before running this example, the HomeController must be updated to add a new function called Advanced (as shown in Example 3-6). This function creates a new Person model (shown in Example 3-7) and provides this object as a parameter to the View function. The data in this model is used by the view when the ViewModel is constructed in the JavaScript.
Example 3-6. Advanced function to be placed in HomeController
public ActionResult Advanced()
{
var person = new Person
{
FirstName = "Eric",
LastName = "McQuiggan"
};
return View(person);
}
And finally, a Person.cs file should be created inside of the Models folder that contains the code from Example 3-7.
Example 3-7. The Person model
namespace BootstrapIntroduction.Models
{
public class Person
{
public string FirstName { get; set; }
public string LastName { get; set; }
}
}
Running this example will produce the same output as Figure 3-2.
Summary
This introduction to Knockout only demonstrated one type of data binding that Knockout supports (the text binding). Knockout contains many other data-binding types that will be explored throughout the rest of this book.
All materials on the site are licensed Creative Commons Attribution-Sharealike 3.0 Unported CC BY-SA 3.0 & GNU Free Documentation License (GFDL)
If you are the copyright holder of any material contained on our site and intend to remove it, please contact our site administrator for approval.
© 2016-2026 All site design rights belong to S.Y.A.