HTML5, JavaScript and jQuery (Programmer to Programmer) - 2015
Part IV HTML5 APIs
Lesson 31 IndexedDB
As mentioned in the previous lesson, HTML5 includes specifications for three distinct APIs that allow data to be stored inside the browser. This lesson introduces the IndexedDB API.
The IndexedDB API is considerably more advanced than the web storage API. Therefore, if the web storage API meets all your needs, you may opt to skip this lesson.
The IndexedDB API does, however, offer the following benefits over the web storage API:
· It allows various data types to be stored rather than simple strings. For example, it is possible to store JavaScript objects directly in IndexedDB.
· It allows more sophisticated retrieval mechanisms. For example, it is possible to query IndexedDB for a specific record, such as a single contact, based on its unique ID.
· It allows create, update, and delete operations to be included in transactions. This means you can perform a set of operations and guarantee that they will either all succeed or all fail. If you are familiar with relational databases, this will be a familiar concept.
· It is capable of automatically generating unique keys for records. This will mean you do not need to rely on mechanisms such as the current time in milliseconds, as you saw in the previous lesson.
· Browsers typically allow far more data to be stored in IndexedDB as opposed to web storage.
Note
Unlike the web storage API, the IndexedDB specification does not state how much storage space must be allocated to each domain. Browsers typically either place no limitations on IndexedDB (beyond what the hard drive will support) or place an upper limit in the gigabytes.
Although these features can be enormously useful in some web applications, they do complicate the API. The IndexedDB API is further complicated by the fact that it relies heavily on callbacks for virtually all operations: Rather than simply invoking a method and receiving a response, the IndexedDB API relies on you to register callbacks for various scenarios. These callbacks will then be invoked when the specified event occurs.
The main reason the API relies on callbacks is to allow operations to be performed on background threads if necessary. This means that if you are performing an intensive operation, the browser may be able to perform this without impacting the user experience.
As you will see, the use of callbacks will significantly complicate the code you need to write because it will often be necessary to ensure one operation has completed before performing the next operation.
This lesson will provide an alternative implementation for the functionality added in Lesson 30. Therefore, if you want to complete the exercises in this lesson, you should start with a version of the CRM web application as it stood at the start of Lesson 30.
Creating a Database
In order to start using the IndexedDB API for the first time, you need to explicitly create a database, and tell the API the types of data you wish to store in this database. Requesting to open a non-existent database automatically creates a database.
You will add two distinct sets of data to the database. In addition to contacts, you will add a list of companies to the database, allowing the companies associated with contacts to be displayed correctly in the table (currently a number is displayed).
Note
As you will see, IndexedDB is accessed via a browser-supplied object called indexedDB. In Firefox, this must currently be referenced as mozIndexedDB, and in IE it must be accessed via msIndexedDB. It is easy enough to create your own alias to this object that will work in all browsers as follows:
myIndexedDB = indexedDB || msIndexedDB || mozIndexedDB;
The code you will use for creating the database is as follows. This should be placed at the end of the init method in contacts.js to ensure it executes every time the page is loaded:
var request = indexedDB.open('contactsDB');
request.onsuccess = function(event) {
}
request.onupgradeneeded = function(event) {
}
Note
Do not run this code yet. You need to provide implementations for these functions, or an empty database will be created.
As you can see, you specify that you wish to open a database with a specific name, contactsDB in this case. If the database has already been created inside the browser (this is not the first time the user has accessed the web application), the callback function registered for the onsuccess event will be invoked.
If the database has not previously been created, or if you provide an optional version number as the second parameter to open, the function registered against onupgradeneeded will be invoked. It is within this function that you can define the structure of your database.
Before providing implementations for these callbacks, in order to interact with the opened database you will need a reference to it. Therefore, create a private variable called database as follows:
var initialized = false;
var database = null;
Now, provide the following implementations for the callback functions:
var request = indexedDB.open('contactsDB');
request.onsuccess = function(event) {
database = request.result;
}
request.onupgradeneeded = function(event) {
database = event.target.result;
var objectStoreContacts = database.createObjectStore("contacts",
{keyPath: "id", autoIncrement: true });
var objectStoreCompanies = database.createObjectStore("companies",
{keyPath: "id", autoIncrement: true });
}
The onsuccess callback is reasonably straightforward. This function simply records a reference to the database, which you will start using shortly.
The onupgradeneeded callback is more complicated. In this callback, you begin by obtaining a reference to the database and then create two object stores in the database. Each object store must be given a unique name, and in each case you have also specified that you would like IndexedDB to generate unique IDs for records via the autoIncrement property.
You have also specified that the unique ID for each record can be obtained from the id property, so this is the property that will be automatically generated and assigned a unique ID when records are stored.
Note
If you are familiar with relational databases, you can think of each object store as a table. The main difference is that you do not need to specify the structure of the data that you will store; you simply need to state how each record can be uniquely identified.
If you now open the Resources tab of the Chrome developer tools, you will see that a database has been created, and that it contains two object stores (see Figure 31.1).
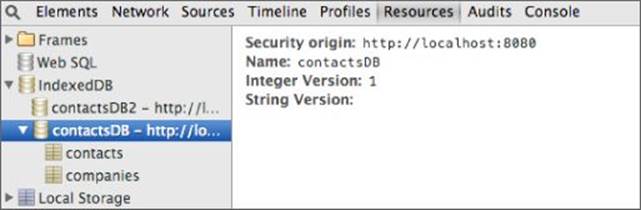
Figure 31.1
You can also see that the database has a version number. If you ever need to change the structure of the database, you need to open it and provide a different version number. This will ensure that the onupgradeneeded callback is invoked.
Storing Data
You will begin by adding functionality to store data. Start by adding the following method to contacts.js just after the save method:
store: function(contact) {
var tx = database.transaction(["contacts"], "readwrite");
var objectStore = tx.objectStore("contacts");
var request = objectStore.put(contact);
request.onsuccess = function(event) {
console.log("Added a new contact " + event.target.result);
}
},
This method begins by instructing the database that you wish to create a transaction. You provide parameters specifying the object stores that will be involved in the transaction and you identify that you wish to read and write data in the transaction.
All data access with IndexedDB needs to be performed in the context of a transaction. A transaction can then consist of one or more requests. In this case, a single request is added to the transaction, and this simply adds the contact to the relevant object store.
Note
IndexedDB transactions exhibit the four important properties, usually abbreviated to the acronym ACID:
1. Atomic: Either all the operations in the transaction succeed (commits), or all the operations fail (roll back).
2. Consistent: The database will remain in a valid state at the end of the transaction as defined by the rules of the database.
3. Isolation: The changes made by the transaction are isolated from other transactions until all the changes have been successfully committed.
4. Durable: Once the changes are committed, they remain committed, even if the database crashes immediately afterwards.
As you can see, you can register an onsuccess callback with the request. This callback simply outputs the ID that has been assigned to the newly stored contact.
Although it is not shown here, you can also add an onsuccess callback to the transaction itself, and this will be invoked after all requests in the transaction have completed. It is important to note that the records added will not be available to other transactions until the transaction (rather than the individual request) has succeeded.
Additionally, it is always possible to register an onerror callback along with an onsuccess callback. This provides you with an opportunity to handle any unexpected events.
Once the store method has been defined, you need to invoke it during the save operation, just as you saw in the previous lesson. For example:
row = bind(row, contact);
this.store(contact);
If you now save a contact, the following message should be displayed in the console:
Added a new contact with the ID = 1
Additionally, you should be able to see the saved data in the Resources tab, as shown in Figure 31.2.

Figure 31.2
Each time you add a new contact, the ID automatically assigned will increase by 1.
Reading Data
Now that you have stored data, you can add functionality to read it every time the web application is opened. This functionality will perform the exact same operations as the loadContacts method in the previous lesson, except it will read the data from IndexedDB.
Reading data from IndexedDB introduces a new concept called a cursor. A cursor is a mechanism for holding a set of records. It is then possible to traverse through the cursor one record at a time and process its contents.
Start by adding the following method to contacts.js immediately after the store method:
loadContacts: function() {
var tx = database.transaction("contacts");
var objectStore = tx.objectStore("contacts");
objectStore.openCursor().onsuccess = function(event) {
var cursor = event.target.result;
if (cursor) {
var contact = cursor.value;
var fragment = $(screen).find('#contactRow' )[0].content.cloneNode(true);
var row = $('<tr>');
row.data().id = contact.id;
row.append(fragment);
row = bind(row, contact);
$(row).find('time').setTime();
$(screen).find('table tbody').append(row);
cursor.continue();
}
}
},
As you can see, this method begins by specifying that you wish to create a transaction, but this time you do not specify that you need to write data. By default, transactions are always capable of reading data.
Once the transaction is created, you can simply open the relevant object store and open a cursor on the object store. By default, this cursor will provide a result set containing all the records in the object store.
You then add an onsuccess callback to the cursor. This will automatically be passed the first record in the cursor, which can be accessed from cursor.value and processed.
When you have finished processing the record, you invoke cursor.continue(). This automatically causes the onsuccess callback to be invoked again with the next record in the result set. When the value of cursor is null, you know that all the records have been processed.
You need to be careful to only invoke loadContacts after the database has been opened. In order to achieve this, add the following code to the logic that opens the database.
var request = indexedDB.open('contactsDB');
request.onsuccess = function(event) {
database = request.result;
this.loadContacts();
}.bind(this);
Notice that you only attempt to read data from the database after IndexedDB has confirmed it has been successfully opened.
If you wish to access a specific record from the object store, you can achieve this without processing all the records in a cursor. For instance, the following code will find the contact with the ID of 2:
var request = objectStore.get(2);
request.onsuccess = function(event) {
var contact = event.target.result;
}
This will provide a significant performance boost as the object store increases in size because IndexedDB optimizes this operation by creating an index on the ID.
Note
It is also possible to index any of the other properties on an object (such as emailAddress), allowing them to be searched directly and efficiently. This subject will not be discussed in this lesson, but information is available on the Internet if you wish to use this approach.
Deleting Data
The final subject I will cover is deleting data. You will delete data records via their id, which, as you will remember, is made available via a data attribute on the tr element.
In order to delete contacts, the delete method can be augmented as follows:
delete: function(evt) {
var contactId = $(evt.target).parents('tr').data().id;
$(evt.target).parents('tr').remove();
this.updateTableCount();
var tx = database.transaction("contacts", "readwrite");
var objectStore = tx.objectStore("contacts");
var request = objectStore.delete(contactId);
},
This code snippet begins by obtaining a reference to the id of the contact that is being deleted. It then performs the familiar operations of creating a transaction (which needs to be readwrite) and accessing the relevant object store.
Once a reference to the object store is obtained, the delete method can be invoked and passed the relevant id.
Try It
In this Try It, you will enhance the functionality added in this lesson by providing functionality to store a static list of companies. When a contact is stored, you will obtain a reference to the relevant company and store this against the contact. Finally, when the contact is displayed in the table, you will display the appropriate company name.
Lesson Requirements
To complete this lesson, you will need a text editor for writing code and Chrome for running the completed web page. It is also assumed that you have completed the steps in the body of the lesson before starting this Try It.
Step-by-Step
1. To begin, you will store a static list of company names in IndexedDB. You will perform this in a new method called configureData, so start by adding this method immediately after the init method in contacts.js.
2. You only need to add companies once (the first time the web application is used), so start by determining if there are any records in the companies object store. You can determine this by opening a cursor on the companies object store and determining whetherevent.target.result evaluates to false in the onsuccess callback. If the first record in the cursor evaluates to false, the object store is empty.
3. If there are no companies, you need to add three companies. These should be stored as objects with a single property called name. The name should be set to the following value in each record:
· ABC Incorporated
· XZY Ltd
· ACME International
· Remember that you can use a single transaction and add three requests to it in order to store these three companies. IndexedDB will automatically add id properties to these objects.
4. You need to ensure that the configureData function is only invoked after the database has initialized so invoke this immediately before the call to loadContacts.
5. Refresh the web page and ensure three contacts are created in the companies object store. Once verified, refresh the page again to ensure it does not create duplicate entries.
6. You now need to change the save operation so that it finds the company object that matches the companyName property on the saved contact.
The code for finding the relevant company should be placed immediately after the following line:
var contact = this.serializeForm();
Use the IndexedDB get method to find the company object with the appropriate id, and set this as the companyName.
Remember also to use parseInt to convert the original companyName string into a number because the get method expects a number.
7. There is now a complication: The remainder of the code in the save method needs to occur in the onsuccess callback of get. This ensures that the company is actually set on the contact before it is saved and displayed.
8. If you create a new contact now, it will display in the table as you see in Figure 31.3. This is because the bind method simply converts the company object to a string.
Figure 31.3
This can be circumvented by adding additional logic to the bind method. One possible approach is to use “programming by convention” and assume that if a field is of type “object,” it will have a name property that can act as the display value:
if (typeof obj[field] == "object") {
$(val).text(obj[field].name);
} else {
$(val).text(obj[field]);
}
An alternative approach would be to override the toString method on company objects and have this return the name field.
9. After the loadContacts adds contacts to the table you need to invoke updateTableCount to ensure the correct count of contacts is listed below the table. This will involve using the bind function.
Note
Although not shown in this Try It, you may also choose to populate the options in the companyName select box from the companies stored in IndexedDB. This will ensure that if you add new companies to IndexedDB, they will automatically be available in the select box.
Reference
Please go to the book's website at www.wrox.com/go/html5jsjquery24hr to view the video for Lesson 31, as well as download the code and resources for this lesson.