Your First $1000 online (2014)
Chapter 6: Creating HTML Frames
“Always code as if the guy who ends up maintaining your code will be a violent psychopath who knows where you live.”-Martin Golding
Some web developers divide the browser into different frames. This makes it easier for them to load separate HTML documents at the same time. Loading HTML documents can be time-consuming and inefficient.
So, a window is divided into various frames much like dividing a sheet of paper into columns and rows. Most people are discouraged from using frames because:
1. Frame technology is not supported by all browsers.
2. Different screen resolutions are used on different computers. This means that the web page would appear to be different on every computer.
3. Some devices aren’t big enough to be divided into rows and columns.
However, it is important to know the basics about these even if you choose not to use them.
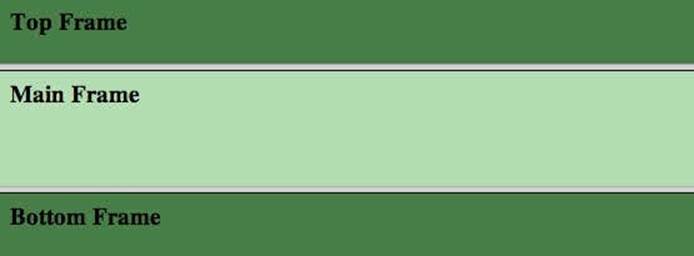
When making the frame replace the <body> tag with the <frameset>tag. This tells the computer how to divide the screen. Therowsandcolsattributes will be used with the <frameset> tag, too. Therowsattributes describes the number of horizontal frames that will be used while thecolsattribute will describe the number of vertical frames to be introduced. The following will be used to make 3 horizontal frames:
|
<!DOCTYPE html> <html> <head> <title>HTML Frames</title> </head> <frameset rows="10%,80%,10%"> <frame name="top" src="/html/top_frame.htm" /> <frame name="main" src="/html/main_frame.htm" /> <frame name="bottom" src="/html/bottom_frame.htm" /> <noframes> <body> Your browser does not support frames. </body> </noframes> </frameset> </html> |
This is what the browser would like:
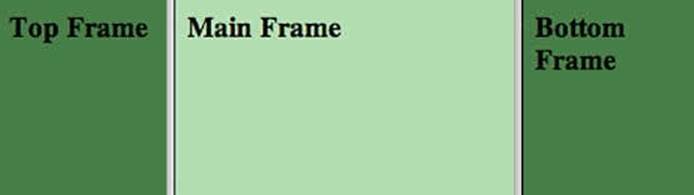
Now, let’s create vertical rows columns instead:
|
<!DOCTYPE html> <html> <head> <title>HTML Frames</title> </head> <frameset cols="25%,50%,25%"> <frame name="left" src="/html/top_frame.htm" /> <frame name="center" src="/html/main_frame.htm" /> <frame name="right" src="/html/bottom_frame.htm" /> <noframes> <body> Your browser does not support frames. </body> </noframes> </frameset> </html> |
All you need to do is to replace therowsattribute withcolsinstead. Here’s how the browser will look now:
Let’s look at the utility of various <frameset> tag attributes:
Cols
This enables you to manage the number and size of the columns in the frameset. This can be done by using absolute values. This can be done by setting cols to 100,500,100.
You can also control the width of the column by specifying the percentage of the browser window you would like to use for each column. This can be done by setting the values to 20%,60%,20%.
If you would prefer using relative widths, instead of percentages, this can be done too. For this you can set the cols to "3*,2*,1*" or“4*,3*,1*”.
Rows
You can set this attribute the same way you were taught to manage the cols attribute (above). The only difference is that while the cols attribute enables you to handle the size and number of columns, this attribute enables you to control the size and number of rows instead.
Border
This attribute specifies the width of the border. If you set it to zero, there would be no border.
Frameborder
You can use this attribute to decide if there should be 3 dimensional boarders between the frames. You can set it to zero (0) for no borders or to 1 if you would like to insert such borders.
Framespacing
Adjusting this attributes enables you to decide the space you would like to put between the frames in the frameset. Setting this value to 5 means you want the frames to be 5 pixels apart from each other.
Now let’s consider the attributes for the <frame> tag:
Src
This attribute is used in order to insert the file name to be loaded and made visible on the frame. In the example given above, the URL src="/html/top_frame.htm" was used to name the first row and column Top Frame.
Name
This allows you to determine the frame that a document should show in.
Frameborder
This allows you to determine whether the borders of a certain frame should show. However, the value of the frameborder in the <frameset> tags will be overridden. Set it 0 if you if you don’t want the borders to show or to 1 if you want borders to show.
Marginwidth
This attribute can be used to specify how much space you would like to see between the left and right sides of a frame’s borders.
Marginheight
You can use this attribute to decide how much space you would like to see between the top and bottom of your frame’s borders. In other words you can control the frame’s length.
Noresize
The noresize attribute prevents users from changing the values of the attributes shown above.
Scrolling
This attribute can be used to display scrollbars on the web page.
Longdesc
With this attribute you can use links that would take users to another page.
Some browsers don’t support frames and in such instances insert the <body> element within the <noframes> element instead.
You can also place the navigation bars in one frame and main pages in another.
Here’s an example:
|
<!DOCTYPE html> <html> <head> <title>HTML Target Frames</title> </head> <frameset cols="200, *"> <frame src="/html/menu.htm" name="menu_page" /> <frame src="/html/main.htm" name="main_page" /> <noframes> <body> Your browser does not support frames. </body> </noframes> </frameset> </html> |
What this does is this it creates 2 columns and two frames. The navigation menu bar will be placed in the first frame that is 200 pixels wide. Themenu.htm file was inserted to implement this. Here is the content for this file:
|
<!DOCTYPE html> <html> <body bgcolor="#4a7d49"> <a href="http://www.google.com" target="main_page">Yahoo</a> <br /><br /> <a href="http://www.microsoft.com" target="main_page">Microsoft</a> <br /><br /> <a href="http://news.bbc.co.uk" target="main_page">Al-Jazeera</a> </body> </html> |
The remaining space will be filled by the second column due to the inserting of themain.htmfile. Here’s the content for the main.htm file:
|
<!DOCTYPE html> <html> <body bgcolor="#b5dcb3"> <h3>This is main page.</h3> <p>So now click any link and see the result.</p> </body> </html> |
Load the test.htm file. When you do so you would see the contents of the menu.htm file in the left column and“This is the main page” in the right one.
All materials on the site are licensed Creative Commons Attribution-Sharealike 3.0 Unported CC BY-SA 3.0 & GNU Free Documentation License (GFDL)
If you are the copyright holder of any material contained on our site and intend to remove it, please contact our site administrator for approval.
© 2016-2026 All site design rights belong to S.Y.A.