HTML5 APPLICATIONS DEVELOPMENT MANUAL (2016)
35 - Weather application development
Let’s create an application that will show the weather at the user's current location.
There are 2 keywords here, weather and local. To get the geographical position of a user we will use a free lookup API, to quickly and simply integrate IP geolocation into our script. For the weather will use a weather API.
Type on Google weather api and click on the first link.
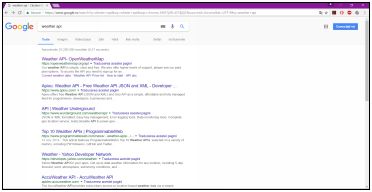
This is a free weather API that we will use on our application.
https://openweathermap.org/api
As we are interested to show on our application the current weather, click on the first option.

On the right at the page we can see, that we can access the current weather data of one location, after geographic coordinates.

If we open the example provided we can see the url and the arguments that will be read by the api server when we will call it.

As we see, we will need the latitude, longitude and another argument called appid.
As we will use https://openweathermap.org/api for our weather app, in order to access the API freely we need to sign up for an API key, as they are sayng on their documentation. This API key is in fact the appidargument.

In the API keys tab you will find your unique key for this API.

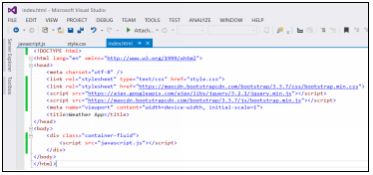
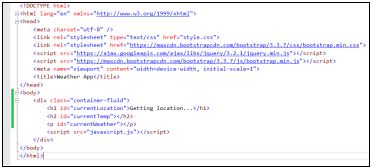
Let's build a container for our application first.
Let’s create in the same location a index.html file and a css file, for which we will include a reference in the head of our html file.
Because we want our application to be dynamic and responsive we will use Bootstrap including it from a CDN.
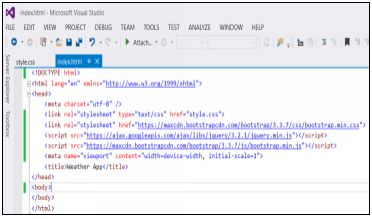
In the body,we will create a container for our app with the<div id="container-fluid"></div> so we can add some style to it.
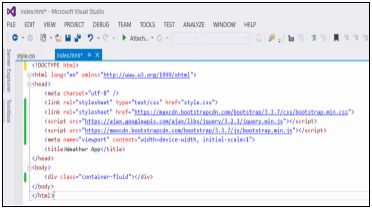
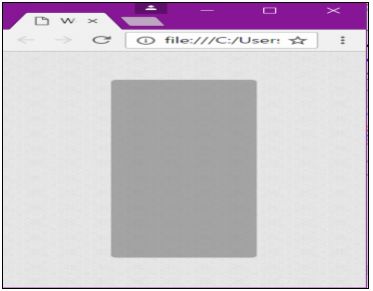
Let’s add a background to the page. I’m using a free pattern that I downloaded from google, and let’s style the container.

We have now a basic responsive container for our application.
We will use javascript to build our app, so we will create an external javascript file, in the same location with the name javascript.js that we will insert in our container with:
<script src="javascript.js"></script>
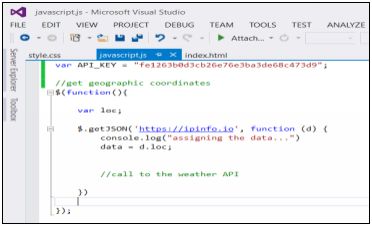
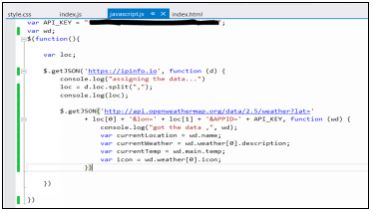
First we will get the geographic coordinates of the user. Since all this will be inside jQuery we will start by declaring a function inside a jQuery wrapper, so this will execute when the document is ready.
$(function () {
// jQuery methods go here...
});
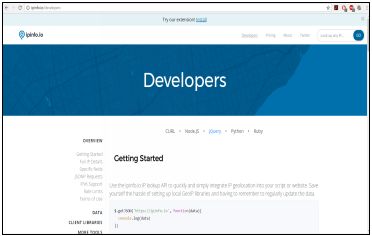
Inside this function we are going to use the http://ipinfo.io/ ,where on Developers tab, we have a section for jQuery, to get the user’s geolocation.

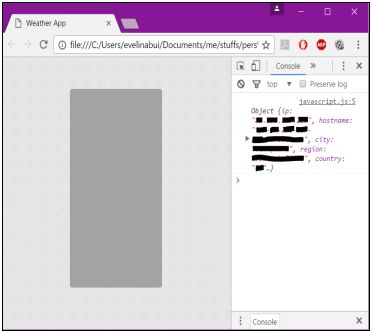
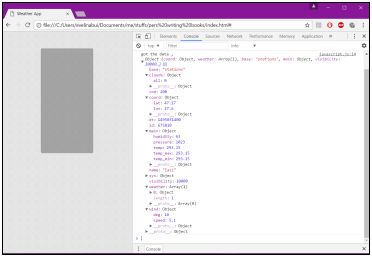
If we run our app in the browser, on the Inspect element console, we can see the application is retrieving our location.
Now that we have that call all set, the data logged, we want to take this outside of the call function. Remember that this beeing inside of a call back, data variable isn’t available.
Let’s declare a variable outside of the getJSON. Delete the console log, change the parameter to d, and assign that data we get to a larger data variable.
We need to change the lat to an actual latitude and the lon to an actual longitude. We can do that manually.

Let’s test the API key. From the example provided on the current call weather data for one location by geographic coordinates, we can see the form of the url to call the api.
api.openweathermap.org/data/2.5/weather?lat={lat}&lon={lon}&appid={apikey}
Let’s replace the lat, lon and the appid, each one of you with his own current location coordinates, and his own API key.
I am replacing the coordinates with my curent location Iasi latitude 47.151726 and longitude 27.587914 and my API default key.
lat=47.151726&lon=27.587914&appid=xxxxxxxxxxxxxxxxxxxxxxxxx
!Note: make sure to take in copy the url and open it in a new tab
In my case:
http://api.openweathermap.org/data/2.5/weather?lat=47.151726&lon=27.587914&appid=xxxxxxxxxxxxxxxxxxxx

We can see the data that we can use for our app. Now we need to wire this url in our script.
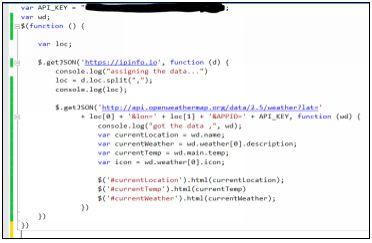
Let’s create a variable outside of the function for our API key called
var API_KEY = "xxxxxxxxxxxxxxxxxxxxxxxxxxxxxxxx";
Use the key each one of you has on his account.
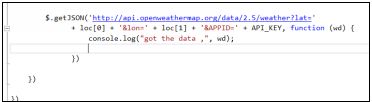
Let’s make now the call to the weather api using a$.getJSON().Inside of the parenthesis we will put the url till before our unique key, where will need to change the values for lat, lon and appid.

As the location returns from the ipinfo.io as a string with to values, let’s split the string at the comma (,), that will make it an array with the exact values that we need.

Now we can modify in the url, the values for lat with loc[0] (the first element of the array we just created by splitting the location string ), for lonwith loc[1] (the second element of the array) and for the appid our API_KEYvariable.

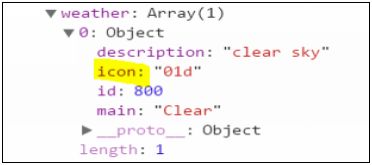
Now that we have this call, let’s add our function, let’s call it wd from weather data, and get it with a console.log.
We can see in the console we have now a bunch of data we can use.
Let’s say we want to display the current location, the current weather description, the temperature and a nice icon to reflect the weather. Let’s create some variables for that.
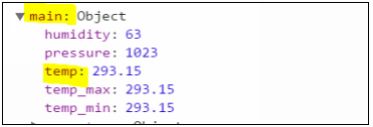
For the var currentLocation = wd.name; we can see what value to give from the data in the console.
For example for the location the data is name, so will give for currentLocation variable equal to wd our function .name

Same logic for :
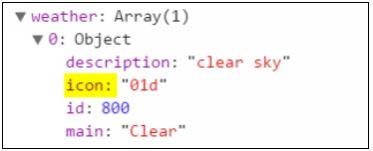
var currentWeather = wd.weather[0].description;
We have an array from the first element, the description.

For the temperature we will use var currentTemp = wd.main.temp;
And for the icon, from the weather array, the first element: the icon data.
var icon = wd.weather[0].icon;
So now we have in our script:
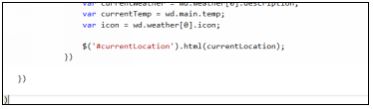
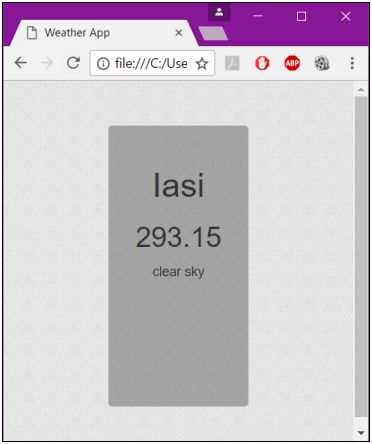
Let’s go now on the html file. Let’s say we want to display in our container, first, the location. So,we will add a<h1 id="currentLocation">Getting location...</h1>

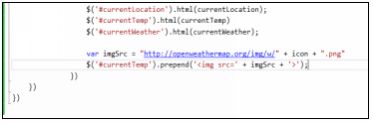
Let’s select the idcurrentLocation and update the html in our script using$('#currentLocation').html(currentLocation);
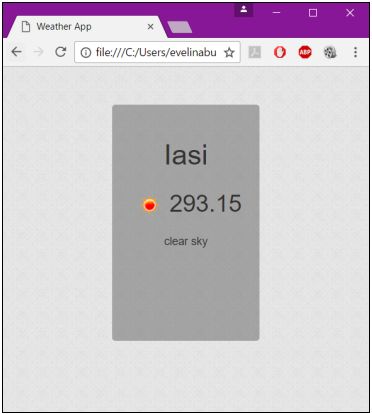
So now we have on our app the location:

We will do the same for the temperature and the weater description. Let’s create <h2 id="currentTemp"></h2> <p id="currentWeather"></p>
Then sellect them and update the html in the javascript with:
$('#currentTemp').html(currentTemp)and $('#currentWeather').html(currentWeather);
We will have now in our app almost all the informations we want.
For the icon, on the api page at http://openweathermap.org/weather-conditions we can find how to get the icon url.

The icons images are linked to an url, so to get them, we will select the currentTemp and prepend the html we want (in this case the icon using the img tag).
$('#currentTemp').prepend('<img src= >');

Because we have a string as the image source we cannot put a string within a string.Let’s declare a local variablevarimgSrcand give it the vale of the url till the icon data:
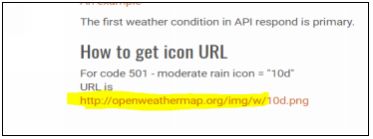
Then the data name from the console + icon +
And the format".png"
"http://openweathermap.org/img/w/" + icon + ".png"
So now this local variable will be our img source.
Now we have also an icon for our wheater app.
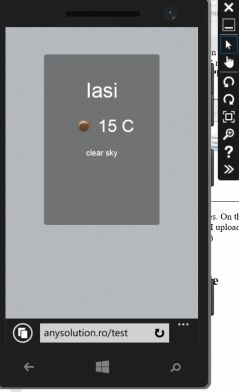
Finally, we want to display the temperature in Celsius degrees not Kelvin.
Let’s replace the value of variablevar currentTemp with a function calledvar currentTemp = toCelsius(wd.main.temp); that we will define globally. That will return the temp data -273.15. I also added the “C” letter from Celsius.

Now our app is displaying all the informations we wanted.

I will style a bit more our app.


If you remember from the beginning of this book, creating an app requires several steps:
- Planning your project
- Designing the user interface (UI)
- Updating the app manifest
- Writing the code
- Building the app
- Debugging and testing the app
- Packaging the app
- Validating the app
- Deploying the app
O big part of them we already done. Let’s create now the app manifest.
A manifest can have three distinct sections: CACHE, NETWORKand FALLBACK.
CACHE:
This is the default section for entries. Files listed under this header (or immediately after the CACHE MANIFEST) will be explicitly cached after they're downloaded for the first time.
NETWORK:
Files listed in this section may come from the network if they aren't in the cache, otherwise the network isn't used, even if the user is online. You can white-list specific URLs here, or simply "*", which allows all URLs. Most sites need "*".
FALLBACK:
An optional section specifying fallback pages if a resource is inaccessible. The first URI is the resource, the second is the fallback used if the network request fails or errors. Both URIs must from the same origin as the manifest file. You can capture specific URLs but also URL prefixes. "images/large/" will capture failures from URLs such as "images/large/whatever/img.jpg".
We will create a new file in the same location calledmysite.appcache and will put in the html tag themanifest="mysite.appcache"
On the file we just created we will put:
CACHE MANIFEST
DATE 2017-05-17
CACHE:
NETWORK:
*
FALLBACK:
#static.html

Debugging and testing the app
Visual Studio has many tools to debug and test your app. You can deepen more on them on you own. To debug you can use from the DEBUG menu Other Debug Targhets, Debug Windows Phone Internet Explorer.

We can choose from different devices. On the url, type the location of your index.html file (I uploaded all files on my website so I am using that url)
Packaging the app
To package our app, you can use http://phonegap.com/ . You can find all instruction on how to do this on their website.
After this you will need to “sign” your application to be able to distribute it on app stores. There are different ways available on google on how to do that.
After that you will need to create a developer account on the stores you want to publish you app.
All materials on the site are licensed Creative Commons Attribution-Sharealike 3.0 Unported CC BY-SA 3.0 & GNU Free Documentation License (GFDL)
If you are the copyright holder of any material contained on our site and intend to remove it, please contact our site administrator for approval.
© 2016-2026 All site design rights belong to S.Y.A.