Multiplayer Game Development with HTML5 (2015)
Chapter 2. Setting Up the Environment
The goal of the last chapter was to introduce you to multiplayer game programming in JavaScript using current HTML5 technologies. Although we went over the implementation of a real multiplayer game, there was no mention made of how you might manage a more complex project.
Along with new technologies such as WebSockets, we can also attribute the great advance that has taken place within the web platform to the supporting tools that have been created to support project management and workflow of HTML5 and JavaScript development.
In this chapter, we will discuss the following principles and concepts:
· Developing JavaScript applications in Node.js
· Writing modular JavaScript applications
· Managing Node.js packages with npm
· Managing client-side packages with Bower
· Automating JavaScript development
JavaScript outside the browser with Node.js
It wasn't too many years ago when a so-called web developer used JavaScript on the rare occasion when a web form needed client-side validation. Since CSS wasn't as advanced as it is today, or at least it wasn't widely supported, JavaScript was also used in order to create image rollover effects. Not many years ago, the words JavaScript and programmer would not have gone well together.
However, times change and technologies evolve. Today, qualified JavaScript programmers are sought after and compensated very competitively relative to programmers of other programming languages. This is a reflection of how popular and powerful the JavaScript language has become.
As a result, JavaScript is steadily going from being The World's Most Misunderstood Programming Language (Crockford, Douglas (2001). http://javascript.crockford.com/javascript.html) to becoming an enterprise-level language, which is used in applications both inside the browser as well as in standalone programs, including server applications. As explained and illustrated in the last chapter, JavaScript is used in different ways when it is employed for the client-side build of your game as well as the game server.
You may remember that a game server doesn't have to be written in JavaScript. In fact, the game client has absolutely no idea what language the server is written in since all of its communication with the server takes place through the WebSocket protocol. However, since we want to maximize the amount of code that we can share between client and server, while reducing the overall amount of code that we write at the same time, we will write our games in a way where this sharing of code is possible. That is where Node.js comes into play.
Node.js
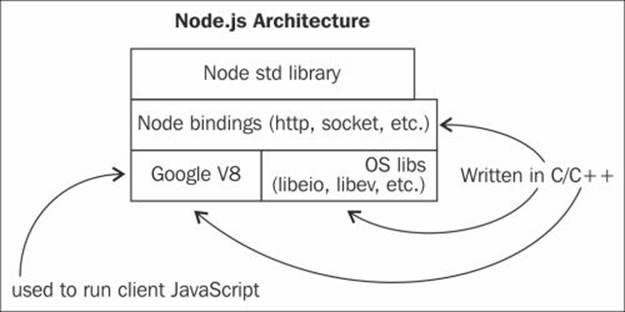
Without doubt, you've heard of Node.js by now. For those who are not exactly sure what Node actually is, it is simply a runtime environment built on Google Chrome's JavaScript engine (also known as V8). In other words, Node is neither a special version of JavaScript nor is it a standaloneJavaScript engine, but rather, it is an entire ecosystem that happens to leverage Google's open source JavaScript engine, which happens to be, arguably, one of the seven wonders of the world today.
Two characteristics of Node.js that are worth mentioning are that Node.js is not tied to the browser, and every I/O operation is asynchronous.
As for it not being a browser environment, you will not find a window object like you do in a browser. In addition, since none of the restrictions that are imposed by a browser exist in the Node.js environment, you can take full advantage of the underlying operating system. First, think of whatever server-side language you have been using so far, or whatever programming language you were considering using to write your game servers that we discussed in Chapter 1, Getting Started with Multiplayer Game Programming. Then, replace that language in your mind with JavaScript. This is the big offer that Node.js makes.
Some of the benefits that you will find in using JavaScript on both ends of the stack (server side and client side) include the following:
· You can share a lot of the code that you write for the server and client
· You only need to master one language
· JavaScript is a powerful language that solves many of the problems that exist in other languages
· Since JavaScript is single threaded, you will never have deadlocks or many of the issues associated with multi-threaded programming
By now, I hope that you are able to see how fundamental Node.js can be in HTML5 multiplayer game development, or at least how crucial it will be in this book. Before we dive too deeply into some of the fundamental concepts, let us ensure that you can install and run it on your system.
Installing Node.js
The two recommended ways to install Node.js on your system are to download an executable file from the official website at http://www.nodejs.org or to install it manually by compiling the source code. Depending on your operating system of choice, you may also be able to install it via some package management system or a similar tool. Whatever method you decide to pursue, be sure to install the latest stable version, which, as of this writing, is Version 0.12.0.
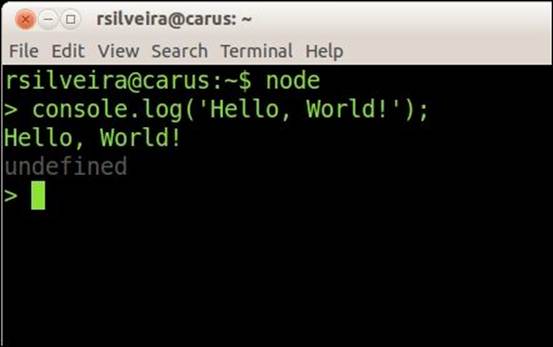
Once you have installed Node.js on your system, you can take it for a test run by opening a terminal window and typing in the following commands:
node
console.log('Hello, World!');
If all goes well during the installation process, you should see an output similar to the one displayed in the following screenshot:
You can check the version of Node.js that you have installed by running the following command on your terminal:
node --version
Even though the latest version available today (as of this writing, in early 2015) is 0.12.0, all scripts described in this book are written in and tested against Version 0.10.25. For backward-and forward-compatibility issues and questions, be sure to reference Node.js's official backlogs.
Writing modular JavaScript
Before the advent of Node.js, given all of JavaScript's infamous restrictions, probably the biggest complaint that it received from developers was the lack of built-in support for a modular development process.
The best practice for modular JavaScript development was creating your components inside a literal object, which, in its own way, behaved somewhat like a namespace. The idea was to create an object in the global scope, then use the named properties inside that object to represent specific namespaces where you would declare your classes, functions, constants, and so on (or at least the JavaScript equivalent).
var packt = packt || {};
packt.math = packt.math || {};
packt.math.Vec2 = function Vec2(x, y) {// …
};
var vec2d = new packt.math.Vec2(0, 1);
vec2d instanceof packt.math.Vec2; // true
In the previous code snippet, we create an empty object in case the packt variable doesn't exist. In case it does, we don't replace it with an empty object, but we assign a reference to it to the packt variable. We do the same with the math property, inside which we add a constructor function named Vec2d. Now, we can confidently create instances of that specific vector class, knowing that, if there is some other vector library in our global scope, even if it's also named Vec2, it won't clash with our version since our constructor function resides inside the packt.math object.
While this method worked relatively well for a long time, it does come with three drawbacks:
· Typing the entire namespace every time needs a lot of work
· Constantly referencing deeply nested functions and properties hurts performance
· Your code can easily be replaced by a careless assignment to a top-level namespace property
The good news is that today there is a better way to write modules in JavaScript. By recognizing the shortcomings of the old way of doing things, a few proposed standards have emerged to solve this very problem.
CommonJS
In 2009, the folks at Mozilla created a project that was aimed at defining a way to develop JavaScript applications that were freed from the browser. (refer to http://en.wikipedia.org/wiki/CommonJS.) Two distinct features of this approach are the require statement, which is similar to what other languages offer, and the exports variable, from where all the code to be included on a subsequent call to the require function comes. Each exported module resides inside a separate file, making it possible to identify the file referenced by the require statement as well as isolate the code that makes up the module.
// - - - - - - -
// player.js
var Player = function(x, y, width, height) {
this.x = x;
this.y = y;
this.width = width;
this.height = height;
};
Player.prototype.render = function(delta) {
// ...
};
module.exports = Player;
This code creates a module inside a file named player.js. The takeaways here are as follows:
· The contents of your actual module are the same old, plain JavaScript that you're used to and are in love with
· Whatever code you wish to export is assigned to the module.exports variable
Before we look at how to make use of this module, let us expound on the last point mentioned previously. As a result of how JavaScript closures work, we can reference values in a file (within the file) that are not directly exported through module.exports, and the values cannot be accessed (or modified) outside the module.
// - - - - - - -
// player.js
// Not really a constant, but this object is invisible outside this module/file
var defaults = {
width: 16,
height: 16
};
var Player = function(x, y, width, height) {
this.x = x;
this.y = y;
this.width = width || defaults.width;
this.height = height || defaults.height;
};
Player.prototype.render = function(delta) {
// ...
};
module.exports = Player;
Note that the Player constructor function accepts a width and height value, which will be assigned to a local and corresponding width and height attribute on instances of that class. However, if we omit these values, instead of assigning undefined or null to the instance's attributes, we fallback to the values specified in the defaults object. The benefit is that the object cannot be accessed anywhere outside the module since we don't export the variable. Of course, if we make use of EcmaScript 6's const declaration, we could achieve read-only named constants, as well as through EcmaScript 5's Object.defineProperty, with the writable bit set to false. However, the point here still holds, which is that nothing outside an exported module has direct access to values within a module that were not exported through module.exports.
Now, to make use of CommonJs modules, we need to be sure that we can reach the code locally within the filesystem. In its simplest form, a require statement will look for a file (relative to the one provided) to include, where the name of the file matches the require statement.
// - - - - - - -
// app.js
var Player = require('./player.js');
var hero = new Player(0, 0);
To run the script in the app.js file, we can use the following command within the same directory where app.js is stored:
node app.js
Assuming that the app.js and player.js files are stored in the same directory, Node should be able to find the file named player.js. If player.js was located in the parent directory from app.js, then the require statement would need to look like the following:
// - - - - - - -
// test/player_test.js
var Player = require('./../player.js');
var hero = new Player(0, 0);
As you'll see later, we can use Node's package management system to import modules or entire libraries very easily. Doing so causes the imported packages to be stored in a methodical manner, which, as a result, makes requiring them into your code much easier.
The next way of requiring a module is by simply including the exported module's name in the require statement, as follows:
// - - - - - - -
// app.js
var Player = require('player.js');
var hero = new Player(0, 0);
If you run the previous file, you will see a fatal runtime error that looks something like the following screenshot:
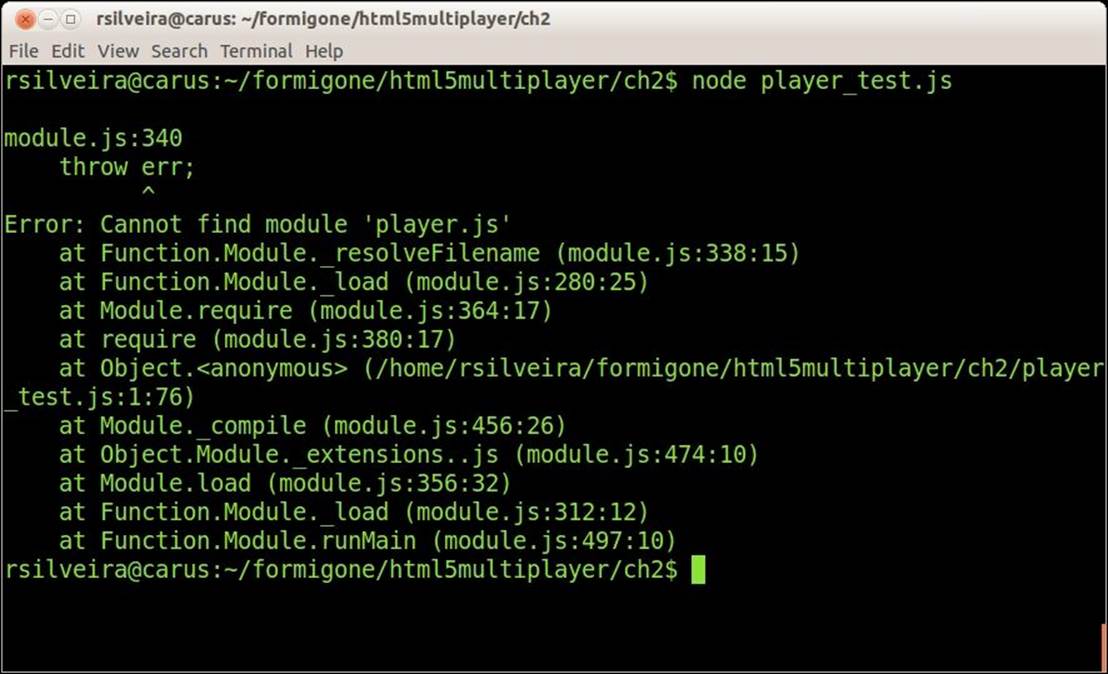
The reason Node can't find the player.js file is because, when we don't specify the name of the file with a leading period (this means that the file included is relative to the current script), it will look for the file inside a directory named node_modules within the same directory as the current script.
If Node is unable to find a matching file inside node_modules, or if the current directory does not have a directory that is so named, it will look for a directory named node_modules along with a file with the same name, similar to the require statement in the parent directory of the current script. If the search there fails, it will go up one more directory level and look for the file inside a node_modules directory there. The search continues as far as the root of the filesystem.
Another way to organize your files into a reusable, self-contained module is to bundle your files in a directory within node_modules and make use of an index.js file that represents the entry point to the module.
// - - - - - - -
// node_modules/MyPlayer/index.js
var Player = function(x, y, width, height) {
this.x = x;
this.y = y;
this.width = width;
this.height = height
};
module.exports = Player;
// - - - - - - -
// player_test.js
var Player = require('MyPlayer');
var hero = new Player(0, 0);
console.log(hero);
Note that the name of the module, as specified in the require statement, now matches the name of a directory within node_modules. You can tell that Node will look for a directory instead of a filename that matches the one supplied in the require function when the name doesn't start with characters that indicate either a relative or absolute path ("/", "./", or "../") and the file extension is left out.
When Node looks for a directory name, as shown in the preceding example, it will first look for an index.js file within the matched directory and return its contents. If Node doesn't find an index.js file, it will look for a file named package.json, which is a manifest file that describes the module.
// - - - - - - -
// node_modules/MyPlayer/package.json
{
"name": "MyPlayer",
"main": "player.js"
}
Assuming that we have renamed the node_modules/MyPlayer/index.js file as node_modules/MyPlayer/player.js, all will work as before.
Later in this chapter, when we talk about npm, we will dive deeper into package.json since it plays an important role in the Node.js ecosystem.
RequireJS
An alternative project that attempts to solve JavaScript's lack of native script importing and a standard module specification is RequireJS. (refer to http://requirejs.org/.) Actually, RequireJS is a specific implementation of the Asynchronous Module Definition (AMD) specification. AMD is a specification that defines an API for defining modules such that the module and its dependencies can be asynchronously loaded [Burke, James (2011). https://github.com/amdjs/amdjs-api/wiki/AMD].
A distinctive difference between CommonJS and RequireJS is that RequireJS is designed for use inside a browser, whereas CommonJS doesn't have a browser in mind. However, both methods can be adapted for the browser (in the case of CommonJS) as well as for other environments (in the case of RequireJS).
Similar to CommonJS, RequireJS can be thought of as having two parts: a module definition script and a second script that consumes (or requires) the modules. In addition, similar to CommonJS but more obvious in RequireJS, is the fact that every app has a single entry point. This is where the requiring begins.
// - - - - - - -
// index.html
<script data-main="scripts/app" src="scripts/require.js"></script>
Here, we include the require.js library in an HTML file, specifying the entry point, which is indicated by the data-main attribute. Once the library loads, it will attempt to load a script named app.js that is located in a directory named scripts, which is stored on the same path as the hostindex.html file.
Two things to note here are that the scripts/app.js script is loaded asynchronously, as opposed to the default way all scripts are loaded by the browser when using a script tag. Furthermore, scripts/app.js can itself require other scripts, which will in turn be loaded asynchronously.
By convention, the entry point script (scripts/app.js in the previous example) will load a configuration object so that RequireJS can be adapted to your own environment and then the real application entry point is loaded.
// - - - - - - -
// scripts/app.js
requirejs.config({
baseUrl: 'scripts/lib',
paths: {
app: '../app'
}
});
requirejs(['jquery', 'app/player'], function ($, player) {
// ...
});
In the previous example, we first configure the script loader, then we require two modules—first the jQuery library and then a module named player. The baseUrl option in the configuration block tells RequireJS to load all the scripts from the scripts/lib directory, which is relative to the file that loaded scripts/app.js (in this case, index.html). The path's attribute allows you to create exceptions to that baseUrl, rewriting the path to scripts whose require name (known as the module ID) starts with, in this case, the app string . When we require app/player, RequireJS will load a script, which is relative to index.html, scripts/app/player.js.
Once those two modules are loaded, RequireJS will invoke the callback function that you passed to the requirejs function, adding the modules that were requested as parameters in the same order as specified.
You may be wondering why we talked about both CommonJS and RequireJS since the goal is to share as much code as possible between the server and the client. The reason for covering both methods and tools is for completeness and information purposes only. Since Node.js already uses CommonJS for its module-loading strategy, there is little reason to use RequireJS in the server. Instead of mixing RequireJS for use in the browser, what is commonly done (this will be the approach of choice for the rest of the book) is to use CommonJS for everything (including client-sidecode) and then run a tool called Browserify over the client code, making it possible to load scripts in the browser that make use of CommonJS. We'll cover Browserify shortly.
Managing Node.js packages with Npm
Npm is a package manager for JavaScript and is similar to Composer for PHP or Pip for Python. (go to https://www.npmjs.com/.) Some people may assure you that npm stands for Node Package Manager, but although it has been Node.js's default package manager since version 0.6.3, npm is not an acronym. Thus, you will often see npm spelled in lowercase.
To quickly check if you have npm installed, you can use a terminal window to query the version of npm that you have installed.
npm -v
For instructions on how to install npm on your particular operating system, ensure that you follow the guidelines on npm's official website. The version used in the sample codes and demo applications in this book is version 1.3.10.
When using npm to install third-party packages, you can choose to install them either locally for your project, or globally so that the package will be visible anywhere in your system.
npm install watch
By default, when you install a package (in the previous example, we install a package named watch that watches directories and files for changes) with no flags, the package is installed locally (assuming a package.json file also exists) and saved to a node_modules directory relative to where the command was executed.
To install a package globally or system-wide, just append the -g flag to the install command:
npm install watch -g
By convention, if you need a package that is used within your code through require statements, you will want to save the package locally. If the intent is to use the package as an executable code from your command line, then you will normally want to install it globally.
If you want to build on your package.json manifest so that the local packages your project depends on can be shared and easily installed, you can either edit the manifest file manually, adding the dependency to the json object under the "dependencies" key, or you can let npm do that for you, but without forgetting to specify the --save flag:
npm install watch --save
Note that running the previous command will download the code that makes up the requested package into your working directory as well as update your package.json manifest so that you can later update the packages or install them anew, as needed. In other words, you can always use your existing package.json file to rebuild your development environment as far as your third-party dependencies are concerned.
Once you have one or more dependencies specified in your package.json file, you can install them by running npm, as follows:
npm install
This will download all the dependencies in your manifest file and save them into node_modules.
Similarly, you can update packages through npm by using the update command:
npm update
If you don't know how to get started to create a package.json manifest file, you can let npm help you to fill in the blanks for the most common attributes.
npm init
This will load an interactive utility that asks you to enter values for the various attributes for the manifest, such as the package name, version, author name, and so on. It also offers some same default values so that you can either ignore attributes you don't know what they do, or you can trust npm with whatever fallback option it offers you, making it easy for you to quickly get a manifest file going.
npm init
// … assume all proposed default values
// - - - - - - -
// package.json
{
"name": "npm",
"version": "0.0.0",
"description": "ERROR: No README data found!",
"main": "index.js",
"scripts": {
"test": "echo \"Error: no test specified\" && exit 1"
},
"author": "",
"license": "BSD-2-Clause"
}
Once you have a generic package.json manifest, you can add your dependencies to it with npm install commands.
npm install browserify --save
// - - - - - - -
// package.json
{
"name": "npm",
"version": "0.0.0",
"description": "ERROR: No README data found!",
"main": "index.js",
"scripts": {
"test": "echo \"Error: no test specified\" && exit 1"
},
"author": "",
"license": "BSD-2-Clause" ,
"dependencies": {
"browserify": "~9.0.3"
}
}
Of course, you can always edit the file manually to change values or remove attributes that you feel are unnecessary, such as license, description, or version. Some attributes are only meaningful if you plan to share your package privately or with the global npm registry. Other values, such as scripts, are used for convenience during development. For example, we can register a script to be executed when we run npm <script value>.
// - - - - - - -
// package.json
{
"scripts": {
"test": "node test.js"
}
}
// - - - - - - -
// test.js
console.log('testing npm scripts');
Thus, we can have Node run a script named test.js through npm with the following command:
npm test
While you may not be saving a lot of typing by using npm in this case, you do make it more standard for others to know, for example, how to run your tests, even if your test runner scripts are not named or executed in any particular standard form.
Managing frontend packages with Bower
If you're not impressed enough with npm as a backend JavaScript package manager, perhaps Bower will take you to the next level of joy. (Refer to http://bower.io/.) Bower works very similarly to npm. In fact, most commands and conventions that we've just discussed for npm work verbatim in Bower.
In fact, Bower itself is a Node.js module that is installed through npm:
npm install bower -g
We can interact with Bower the same way we've interacted with npm so far.
bower init
// … using all proposed defaults
// - - - - - - -
// bower.json
{
name: 'npm',
version: '0.0.0',
homepage: 'https://github.com/formigone',
authors: [
'Rodrigo Silveira <webmaster@rodrigo-silveira.com>'
],
license: 'MIT',
ignore: [
'**/.*',
'node_modules',
'bower_components',
'test',
'tests'
]
}
Bower makes use of a bower.json manifest file, which by now should look somewhat familiar to you. To install dependencies, either edit the manifest by hand or leverage Bower.
bower install jquery –save
// - - - - - - -
// bower.json
{
name: 'npm',
version: '0.0.0',
homepage: 'https://github.com/formigone',
authors: [
'Rodrigo Silveira <webmaster@rodrigo-silveira.com>'
],
license: 'MIT',
ignore: [
'**/.*',
'node_modules',
'bower_components',
'test',
'tests'
],
"dependencies": {
"jquery": "~2.1.3"
}
}
The main difference between Bower and npm, as should be apparent by now, is that Bower deals with frontend dependencies, which can be JavaScript, CSS, HTML, font files, and so on. Bower will save dependencies inside a bower_components directory, similar to npm's node_dependencies.
Browserify
Finally, let us use this very handy npm package to leverage our CommonJS modules (as well as Node's native modules) for use in the browser. This is exactly what Browserify does: it takes an entry point script, follows all require statements recursively from that file down, then inlines all files in the dependency tree that it builds, and returns a single file. (Refer to http://browserify.org/.) This way, when a browser runs across a require statement in one of your scripts, it doesn't have to fetch the file from the filesystem; it fetches the file from within the same file.
sudo npm install browserify -g
Once we have installed Browserify (again, since this is intended to be used as a command line tool, we install it globally), we can bundle all of our CommonJS files in one.
// - - - - - - -
// app.js
var Player = require('MyPlayer');
var hero = new Player(0, 0);
console.log(hero);
// - - - - - - -
// node_modules/MyPlayer/index.js
var defaults = {
width: 16,
height: 16
};
var Player = function(x, y, width, height) {
this.x = x;
this.y = y;
this.width = width || defaults.width;
this.height = height || defaults.height;
};
Player.prototype.render = function(delta) {
// ...
};
module.exports = Player;
Browserify will take care of requiring all of the dependencies as needed so that the output file will have all of its dependencies ready to be used, as shown in the preceding code sample.
Browserify takes the name of the entry point as the first argument and prints the output to standard output by default. Alternately, we can specify a filename where the bundle will be saved.
browserify app.js -o bundle.js
Browserify will now create a file named bundle.js, which we can include in an HTML file and use in the browser. Additionally, we can compress the output file with any of the many available tools that are found in npm's registry.
sudo npm install uglify-js -g
uglifyjs bundle.js -o bundle.min.js --source-map bundle.min.js.map
Running the preceding code will install a node package named UglifyJS, which parses, mangles, compresses, and shrink-wraps our bundle.js file very smartly. (Refer to https://github.com/mishoo/UglifyJS.) The output will be both very small in size and not at all readable by humans. As a bonus, it creates a source map file, which allows us to debug the minified file by mapping it back to the original bundle.js file in its original form.
Automating your workflow
So far, we have learned how to perform the following tasks:
· Writing modular JavaScript code that can be imported into other modules
· Reusing modules in client and server code through CommonJS and Browserify
· Managing node packages with npm
· Managing client packages with Bower
Now we're ready to bring this all together in a way that takes the burden of running all these commands away from us. Picture for a moment what it would be like if you had to write a few lines of code, save your work, skip over to the command line, run Browserify, then run Uglify-js, then run your unit tests, followed by a handful of other npm tools, and then finally hop over to a browser, refresh the browser, and see the updated app working. Oh, wait! You forgot to restart the game server, which is a Node.js app, and needs to be restarted after you change those files. So, you go back to the terminal, run a few more commands, and eventually, you see the new code in the browser.
If that mental exercise just made all those wonderful tools that we covered earlier in the chapter look like a lot of work, remain calm. There is yet another set of tools that we can count on to make our lives easier, and JavaScript development is a thing of beauty (as opposed to what it is commonly called, particularly by those who do not use the tools that we'll now discuss).
Grunt
Grunt is a popular task runner tool that automates repetitive tasks you may need to do, such as running unit tests, bundling components, minifying bundles, creating API documentation from your source file comments, and so on. (Refer to http://gruntjs.com/.)
Grunt uses the concept of plugins, which are specific task configurations that can be shared and reused. For example, it is likely that you will want a plugin that watches a directory for changes, then runs Browserify when a change is triggered. (In other words, every time you save a file, a task will be run.)
You can write your own plugins by hand; although this is a straightforward process, it is verbose enough, so we will not get into it in this book. Thankfully, Grunt has a vast plugin listing with a plugin for just about everything that you will ever need, or at least everything that we will need for the purpose of this book.
npm install grunt-cli -g
No surprise here! We install Grunt through npm. Next, we need to install Grunt plugins using npm and package.json; the only thing is that we list them under devDependencies and not dependencies.
npm install grunt --save-dev
npm install grunt-browserify --save-dev
npm install grunt-contrib-watch --save-dev
npm install grunt-contrib-uglify --save-dev
Next, we create a Gruntfile.js to configure our tasks. This file specifies targets and defines the behavior of each target. Most of the time, you will simply look at sample configuration files for whatever plugin you use and then tweak it to fit your needs.
In the specific case of using watch and Browserify, we need to simply tell the watch plugin to run the Browserify task when a change is observed, and in the Browserify task, we need to specify the most basic settings: an entry point file and an output bundle file.
The four parts that make up the Gruntfile are as follows:
· A boilerplate wrapper function
· The configuration for each task
· Manual loading of each plugin that is used by the task
· Registration of each task so that Grunt can execute them
· // - - - - - - -
· // Gruntfile.js
· module.exports = function(grunt) {
·
· grunt.initConfig({
· browserify: {
· client: {
· src: ['./app.js'],
· dest: 'bundle.js'
· }
· },
· watch: {
· files: ['**/*'],
· tasks: ['browserify'],
· }
· });
·
· grunt.loadNpmTasks('grunt-browserify');
· grunt.loadNpmTasks('grunt-contrib-watch');
·
· grunt.registerTask('default', ['watch']);
·
};
Inside grunt.initConfig, you configure each task, with the attribute name matching the name of the task. You then load each plugin calling the loadNpmTasks function and loading the corresponding dependency. Finally, you specify default tasks as well as any custom tasks and map them to their dependencies. Using the name used in the task registration will run that particular task.
grunt browserify
The preceding command will run the browserify task, which has been configured and loaded as shown previously. If you run the grunt command with no task specified will run the default task, which, in this case, will run the watch task.
Gulp
Gulp is a popular alternative to Grunt, which claims to improve on Grunt by offering simpler configuration. (Refer to http://gulpjs.com/.) Whichever tool you use is up to you. Much like the kind of car you drive or the fast food restaurant you visit, using Gulp or Grunt is all about taste and personal preference.
npm install gulp -g
npm install gulp-uglify --save-dev
npm install gulp --save-dev
Gulp uses gulpfile.js as its configuration file.
// - - - - - - -
// gulpfile.js
var gulp = require('gulp');
var uglify = require('gulp-uglify');
gulp.task('minify', function () {
gulp.src('app.js')
.pipe(uglify())
.pipe(gulp.dest('build'))
});
The preceding configuration should look much more straightforward as compared to Grunt. If looking at it you guess that a task named minify is registered, taking a source file called app.js that is first uglified, then saved to a build directory, you guessed right.
To run the task, you can specify a default task or explicitly run the previously mentioned one with the following command:
gulp minify
Summary
In this chapter, we covered a lot of ground, explaining the opportunity we have with Node.js bringing JavaScript to the server. We saw ways to build manageable modules in JavaScript, share and reuse these modules on both ends of the stack, and use management and workflow tools, such as npm, Bower, Grunt, and Gulp, to automate the development process.
Now, we are ready to take full advantage of the Node.js ecosystem along with the powerful supporting workflow tools that are available. From here, we will get back to writing games by building a fun multiplayer snake game. We will discuss concepts that will allow us to match players together in the same game world, which is a fundamental part of bringing players into your game.
All materials on the site are licensed Creative Commons Attribution-Sharealike 3.0 Unported CC BY-SA 3.0 & GNU Free Documentation License (GFDL)
If you are the copyright holder of any material contained on our site and intend to remove it, please contact our site administrator for approval.
© 2016-2026 All site design rights belong to S.Y.A.