HTML5 Games: Creating Fun with HTML5, CSS3, and WebGL (2012)
part 2
Creating the Basic Game
Chapter 9
Animating Game Graphics
in this chapter
• Creating animation cycles
• Making animations for game actions
• Adding score and level UI elements
• Animating the game timer
The game is now playable to the extent that the player can select and swap jewels. It can still use a lot of polish, though, and in this chapter, I show you how to spruce up the game display with some animated effects. First, you learn how to create a basic animation cycle using the animation timing API and its requestAnimationFrame() function.
With the basics in place, I show you how to implement animations in the canvas display module. Among others, you see animations for moving and removing jewels as well as refilling the jewel board.
In the latter part of the chapter, I show you how to implement some of the missing parts of the game as you add points and the game timer. This allows you to create the level up and game over events and their animations.
Making the Game React
So far, we’ve dealt only with the player’s actions. The game must, of course, also react to what the player does. Most importantly, the display needs to be updated so the player can make her next move. Although you are able to make all the changes instantly, the game is a lot more visually pleasing if the changes are animated so that jewels move smoothly around the board.
First, however, you can simplify the task of drawing on the canvas by scaling the coordinate space. If the coordinates are scaled to jewelSize on each axis, a cell on the jewel board has the dimensions 1x1, and the full board is cols units wide and rows units tall. Listing 9.1 shows the scaling added to the setup() function in display.canvas.js and the necessary changes to the drawJewel() and clearJewel() functions.
Listing 9.1 Simplifying the Canvas Coordinate Space
jewel.display = (function() {
...
function setup() {
...
canvas.width = cols * jewelSize;
canvas.height = rows * jewelSize;
ctx.scale(jewelSize, jewelSize);
...
}
function drawJewel(type, x, y) {
var image = jewel.images[“images/jewels” +
jewelSize + “.png”];
ctx.drawImage(image,
type * jewelSize, 0, jewelSize, jewelSize,
x, y, 1, 1
);
}
function clearJewel(x, y) {
ctx.clearRect(x, y, 1, 1);
}
...
})();
Working with the canvas is now simplified a great deal because you don’t have to multiply everything with the jewelSize variable.
Animation timing
The general idea when creating JavaScript-based animations is to set up a function so that it is called repeatedly at a fast enough rate that the movement looks smooth. In JavaScript, the easiest way to do this is to use the setInterval() function:
function updateAnimation() {
// update graphic elements
...
}
setInterval(updateAnimation, 1000 / 30);
This function calls the updateAnimation() function roughly 30 times per second. Alternatively, you can use the setTimeout() function to achieve the same result:
function updateAnimation() {
// update graphic elements
...
setTimeout(updateAnimation, 1000 / 30);
}
setTimeout(updateAnimation, 1000 / 30);
The setTimeout() function calls the specified function only once, so the updateAnimation() function needs to set up a new timer for the next animation frame.
A third option is currently being developed by the W3C. Because these timers are used for many other purposes than just animations, you’ll soon have access to timing functions designed specifically with animation in mind. The specification for the new animation timing API is available atwww.w3.org/TR/animation-timing/.
The API is already partially supported in a few desktop browsers (WebKit and Firefox) and should soon come to mobile devices also. The most important function is the requestAnimationFrame() function, which has the following syntax:
function updateAnimation(time) {
// update graphic elements
...
requestAnimationFrame(updateAnimation);
}
requestAnimationFrame(updateAnimation);
Looks an awful lot like the setTimeout() example, but notice that it doesn’t have a time argument for specifying when the update function needs to be called. Instead, the update function is called with an argument containing the current time. The requestAnimationFrame() function tells the browser to call the specified function whenever it decides is the best time. This means that the browser can use its own internal animation cycle and even make sure that CSS and JavaScript animations are synchronized. The use of this function also has implications in terms of resource use because the browser is now free to hold off rendering if the page is not visible. If the user is looking at another tab, there’s no need to spend precious processing time on updating animations. Not updating animations could mean a lot on mobile devices where both processing power and battery time are limited. Of course, it also means that you can’t be sure the update function is actually called, so you shouldn’t let any critical logic be handled by requestAnimationFrame() calls. The traditional setTimeout() and setInterval() timers are still the best fit for tasks that have side effects that need to happen at a specific time.
As mentioned previously, requestAnimationFrame() is not fully supported in all browsers yet. WebKit and Firefox have their own prefixed implementation that works on the desktop, but if the specification gains ground, Opera and Microsoft implementations are likely to follow. Until then, it’s relatively simple to simulate the behavior with a regular setTimeout() function for the browsers that lack support. Listing 9.2 shows a polyfill that creates a requestAnimationFrame() method on the window object if one doesn’t already exist. If no implementation is available at all, the functionality is simulated using a regular setTimeout() call.
Listing 9.2 Polyfill for requestAnimationFrame()
window.requestAnimationFrame = (function() {
return window.requestAnimationFrame
|| window.webkitRequestAnimationFrame
|| window.mozRequestAnimationFrame
|| window.oRequestAnimationFrame
|| window.msRequestAnimationFrame
|| function(callback, element) {
return window.setTimeout(
function() {
callback(Date.now());
}, 1000 / 60
);
};
})();
The setTimeout() and setInterval() functions return integer handles that can be used to remove the timers with clearTimeout() and clearInterval(). The new animation timing API borrows this behavior and provides a function for canceling a request, aptly namedcancelRequestAnimationFrame(). The polyfill for this function, shown in Listing 9.3, is again straightforward and ultimately falls back to clearTimeout().
Listing 9.3 Polyfill for cancelRequestAnimationFrame()
window.cancelRequestAnimationFrame = (function() {
return window.cancelRequestAnimationFrame
|| window.webkitCancelRequestAnimationFrame
|| window.mozCancelRequestAnimationFrame
|| window.oCancelRequestAnimationFrame
|| window.msCancelRequestAnimationFrame
|| window.clearTimeout;
})();
You can also find the polyfills in the file requestAnimationFrame.js from the code archive for this chapter. Add the file to loader.js in the first batch of files:
// loading stage 1
Modernizr.load([
{
load : [
“scripts/sizzle.js”,
“scripts/dom.js”,
“scripts/requestAnimationFrame.js”,
“scripts/game.js”
],
...
}
)]
Using requestAnimationFrame()
Let’s look at a few examples that show how to use requestAnimationFrame()to create animations. The first example, shown in Listing 9.4, uses a regular setTimeout() function to call the animate() function over and over.
Listing 9.4 A Simple Animation with setTimeout()
function animate() {
var element = document.getElementById(“anim”),
time = Date.now();
// element is assumed to have position:absolute
element.style.left = (50 + Math.cos(time / 500) * 25) + “%”;
element.style.top = (50 + Math.sin(time / 500) * 25) + “%”;
setTimeout(animate, 1000 / 30);
}
animate();
You can find the resulting animation in the file 01-settimeout.html, which shows a simple div moving around in circles. Now look at the example in Listing 9.5. Here, the timer is replaced with requestAnimationFrame().
Listing 9.5 A Simple Animation with requestAnimationFrame()
function animate(time) {
var element = document.getElementById(“anim”);
// element is assumed to have position:absolute
element.style.left = (50 + Math.cos(time / 500) * 25) + “%”;
element.style.top = (50 + Math.sin(time / 500) * 25) + “%”;
requestAnimationFrame(animate);
}
requestAnimationFrame(animate);
</script>
This example shows how easily you can replace the old setTimeout() calls. You even get the current time free as the first argument to the animate() function. The modified example is located in the file 02-requestanimationframe.html.
The Mozilla implementation of the requestAnimationFrame() function offers another way to use it. Instead of supplying a callback function, you can call requestAnimationFrame() without any parameters. Firefox then fires a special MozBeforePaint event on the window object when the callback function would have been called, had one been supplied. Instead of passing the current time to the handler function as a parameter, requestAnimationFrame() now makes it available via the timeStamp property on the event object. Listing 9.6 shows the example redone to use the Mozilla event.
Listing 9.6 A Simple Animation with Mozilla Events
function animate(event) {
var element = document.getElementById(“anim”),
time = event.timeStamp;
element.style.left = (50 + Math.cos(time / 500) * 25) + “%”;
element.style.top = (50 + Math.sin(time / 500) * 25) + “%”;
requestAnimationFrame();
}
window.addEventListener(“MozBeforePaint”, animate);
requestAnimationFrame();
This method might be useful in some situations, but because it is restricted to Firefox and is not part of the draft specification, it’s safer to stick to callback functions.
Creating the animation cycle
Now that you know how to use the timing API, you can use it to create a simple cycle in the display module. Listing 9.7 shows the new cycle() function and the necessary changes to setup().
Listing 9.7 The Animation Cycle
jewel.display = (function() {
var previousCycle,
...
function setup() {
...
previousCycle = Date.now();
requestAnimationFrame(cycle);
}
function cycle(time) {
previousCycle = time;
requestAnimationFrame(cycle);
}
...
})();
Creating an animation cycle is as simple as that. The cycle() function doesn’t do anything interesting yet; it simply schedules another cycle. The initial call in setup() starts the cycle. Note that it also keeps track of the time of the previous cycle. Tracking time is important because you need to know how much time has passed since the last time the animations were updated.
Animating the cursor
The cursor that you implemented in Chapter 8 is just a static border around the selected position. A small animation can make it more visually appealing. It doesn’t have to be anything advanced; something simple will do just fine. Here, I show you how to enhance the glowing appearance with a pulsating effect. Listing 9.8 shows the new renderCursor() function.
Listing 9.8 The Modified Cursor Rendering Function
jewel.display = (function() {
...
function renderCursor(time) {
if (!cursor) {
return;
}
var x = cursor.x,
y = cursor.y,
t1 = (Math.sin(time / 200) + 1) / 2,
t2 = (Math.sin(time / 400) + 1) / 2;
clearCursor();
if (cursor.selected) {
ctx.save();
ctx.globalCompositeOperation = “lighter”;
ctx.globalAlpha = 0.8 * t1;
drawJewel(jewels[x][y], x, y);
ctx.restore();
}
ctx.save();
ctx.lineWidth = 0.05;
ctx.strokeStyle =
“rgba(250,250,150,” + (0.5 + 0.5 * t2) + “)”;
ctx.strokeRect(x+0.05,y+0.05,0.9,0.9);
ctx.restore();
}
...
})();
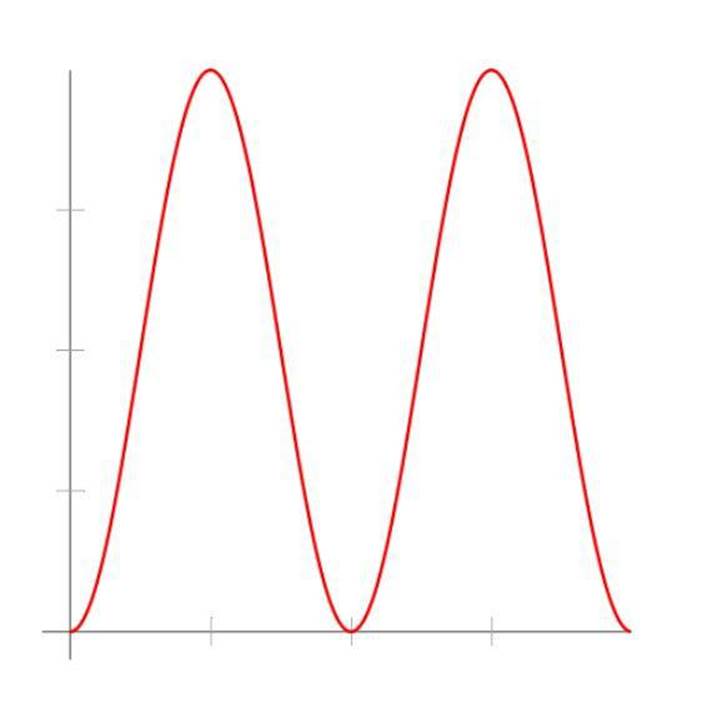
Note the use of Math.sin() to create the t1 and t2 factors. Sines and cosines are useful for many things when it comes to animations. Here, the Math.sin() function is used as an easy way to create values that vary over time, going smoothly from -1 to +1 and back, as shown in Figure 9-1. If you add 1 to the value and divide by 2, as renderCursor() does, the range is modified to [0, 1]. These factors are applied to the alpha values when compositing the jewel and when drawing the border rectangle. You can alter the period of the pulse by changing the argument passed to theMath.sin() calls.
Figure 9-1: The cursor pulse
Now you just need to add the renderCursor() function to the animation cycle:
function cycle(time) {
renderCursor(time);
previousCycle = time;
requestAnimationFrame(cycle);
}
The cursor is now automatically updated in each cycle. Remember to also remove the old renderCursor() call from the setCursor() function.
Animating game actions
Next, you must handle five different game animations:
• Moving jewels
• Removing jewels
• Refilling the board
• Advancing to the next level
• Ending the game
Because you haven’t implemented the game timer, the game has no “game over” state yet. Plus, you don’t keep track of the score, so there is no way to advance to the next level either. However, you can implement the other three animations right away.
The display module needs to keep track of all currently running animations so they can be rendered during each animation cycle. You use an array called animations for that. The animation cycle doesn’t actually need to know the specifics of each animation; it just needs a reference to a function that it can call in each frame. It also needs to know the amount of time the animation takes. That way, finished animations can automatically be removed from the list. Animations are added using the addAnimation() function shown in Listing 9.9.
Listing 9.9 Adding Animations
jewel.display = (function() {
var animations = [],
...
function addAnimation(runTime, fncs) {
var anim = {
runTime : runTime,
startTime : Date.now(),
pos : 0,
fncs : fncs
};
animations.push(anim);
}
...
})();
Each animation is added to the list as a simple object structure describing the start time, the time it takes to finish, and the fncs property, which holds references to three functions: fncs.before(), fncs.render(), and fncs.done(). These functions are called at various times when rendering the animation. The pos property is a value in the range [0, 1] indicating the current position of the animation, where 0 is at the beginning and 1 is when the animation is done. The rendering function in Listing 9.10 handles the calls to the fncs functions.
Listing 9.10 Rendering Animations
jewel.display = (function() {
...
function renderAnimations(time, lastTime) {
var anims = animations.slice(0), // copy list
n = anims.length,
animTime,
anim,
i;
// call before() function
for (i=0;i<n;i++) {
anim = anims[i];
if (anim.fncs.before) {
anim.fncs.before(anim.pos);
}
anim.lastPos = anim.pos;
animTime = (lastTime - anim.startTime);
anim.pos = animTime / anim.runTime;
anim.pos = Math.max(0, Math.min(1, anim.pos));
}
animations = []; // reset animation list
for (i=0;i<n;i++) {
anim = anims[i];
anim.fncs.render(anim.pos, anim.pos - anim.lastPos);
if (anim.pos == 1) {
if (anim.fncs.done) {
anim.fncs.done();
}
} else {
animations.push(anim);
}
}
}
function cycle(time) {
renderCursor(time);
renderAnimations(time, previousCycle);
previousCycle = time;
requestAnimationFrame(cycle);
}
...
})();
Each animation object has at least a render() function and optionally a before() function. The before() function is called in each cycle before the render() function. The idea is that the before() function can be used to prepare for the next frame and, if necessary, clean up after the previous frame. It’s important that all animations have their before() functions called before any render() calls. Otherwise, one animation’s before() function could interfere with the render() function of another.
Every time the animation timer calls renderAnimations(), the animations array is cleared and rebuilt in the rendering loop. This makes it easy to add only those animations that haven’t finished yet. If an animation is done — that is, if its position is at least 1 — its done() function is called; otherwise, it is added back into the list.
Moving jewels
When the user swaps jewels and the board is updated, the board module generates game events for each event, such as moving jewels, disappearing jewels, and so on. These events are handled by the playBoardEvents() function that you added to the game screen module earlier in this chapter. The code in screen.game.js for the move event looked something like this:
function playBoardEvents(events) {
...
switch (boardEvent.type) {
case “move” :
display.moveJewels(boardEvent.data, next);
break;
...
}
The board doesn’t generate move events if the attempted swap wasn’t valid, though. It would improve the visual feedback if the jewels swapped places and then moved back to their original positions if the swap was invalid. Let’s expand the swap() function in board.js so it generates these extra events. Listing 9.11 shows the new swap() function in board.js.
Listing 9.11 Generating Move Events for Invalid Swaps
jewel.board = (function() {
...
function swap(x1, y1, x2, y2, callback) {
var tmp, swap1, swap2,
events = [];
swap1 = {
type : “move”,
data : [{
type : getJewel(x1, y1),
fromX : x1, fromY : y1, toX : x2, toY : y2
},{
type : getJewel(x2, y2),
fromX : x2, fromY : y2, toX : x1, toY : y1
}]
};
swap2 = {
type : “move”,
data : [{
type : getJewel(x2, y2),
fromX : x1, fromY : y1, toX : x2, toY : y2
},{
type : getJewel(x1, y1),
fromX : x2, fromY : y2, toX : x1, toY : y1
}]
};
if (isAdjacent(x1, y1, x2, y2)) {
events.push(swap1);
if (canSwap(x1, y1, x2, y2)) {
tmp = getJewel(x1, y1);
jewels[x1][y1] = getJewel(x2, y2);
jewels[x2][y2] = tmp;
events = events.concat(check());
} else {
events.push(swap2, {type : “badswap”});
}
callback(events);
}
}
...
})();
The swap() function now adds a move event to the initial events array so the jewels switch places. If the canSwap() test fails, a second event is added to move the jewels back.
The moveJewels() function is passed an array of jewel objects describing the jewels that it must move. Each jewel object has the following properties:
• type
• fromX
• fromY
• toX
• toY
These properties describe the jewel type and the start and end positions. Now add the moveJewels() function in Listing 9.12 to the display module in display.canvas.js.
Listing 9.12 Animating Moving Jewels
jewel.display = (function() {
...
function moveJewels(movedJewels, callback) {
var n = movedJewels.length,
oldCursor = cursor;
cursor = null;
movedJewels.forEach(function(e) {
var x = e.fromX, y = e.fromY,
dx = e.toX - e.fromX,
dy = e.toY - e.fromY,
dist = Math.abs(dx) + Math.abs(dy);
addAnimation(200 * dist, {
before : function(pos) {
pos = Math.sin(pos * Math.PI / 2);
clearJewel(x + dx * pos, y + dy * pos);
},
render : function(pos) {
pos = Math.sin(pos * Math.PI / 2);
drawJewel(
e.type,
x + dx * pos, y + dy * pos
);
},
done : function() {
if (--n == 0) {
cursor = oldCursor;
callback();
}
}
});
});
}
...
})();
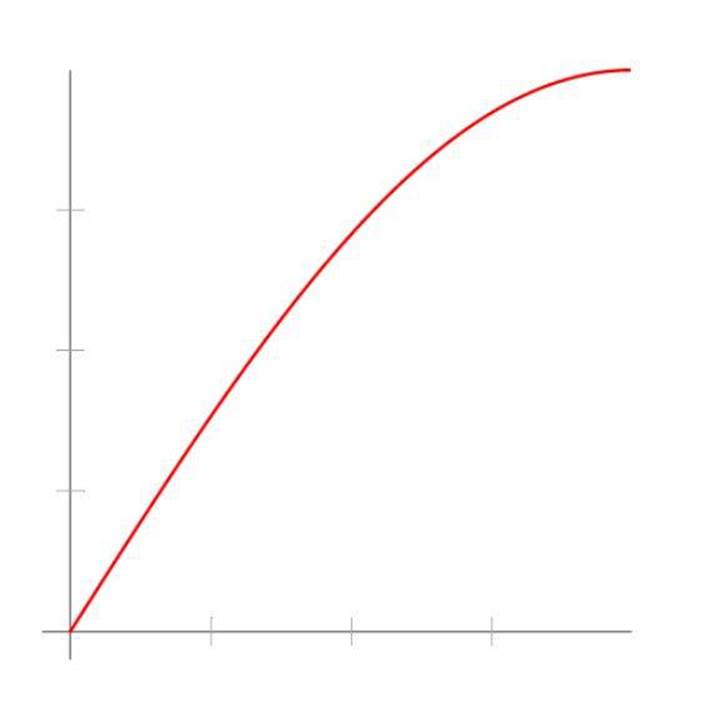
The main portion of the moveJewels() code iterates through all the specified jewels and sets up an animation for each one. The before method clears the area where the jewel was located in the last frame. The movement factor is calculated using the same Math.sin() trick that you also saw in the cursor rendering. The pos value that is passed to the before and render methods is in the range [0, 1], so the resulting motion eases out nicely at the end. The plot in Figure 9-2 shows a visual representation of the motion factor.
Removing jewels
The procedure for removing jewels is similar to the one in moveJewels(). The removeJewels() function is passed a list of objects that describe the jewels that need to disappear. Each object has these properties:
• type
• x
• y
Figure 9-2: The jewel motion
The animations are set up so the jewel is cleared before each frame and then redrawn in a scaled-down and rotated version using the canvas transformation methods. See Listing 9.13 for the complete removeJewels() function.
Listing 9.13 Removing Jewels
jewel.display = (function() {
...
function removeJewels(removedJewels, callback) {
var n = removedJewels.length;
removedJewels.forEach(function(e) {
addAnimation(400, {
before : function() {
clearJewel(e.x, e.y);
},
render : function(pos) {
ctx.save();
ctx.globalAlpha = 1 - pos;
drawJewel(
e.type, e.x, e.y,
1 - pos, pos * Math.PI * 2
);
ctx.restore();
},
done : function() {
if (--n == 0) {
callback();
}
}
});
});
}
...
})();
As you can see, the drawJewel() call in render() has new fourth and fifth arguments now. Those are the scale and rotation that you want to apply to the jewel before drawing it. Listing 9.14 shows the changes to the drawJewel() function in display.canvas.js.
Listing 9.14 Adding Scaling and Rotation to drawJewel()
jewel.display = (function() {
...
function drawJewel(type, x, y, scale, rot) {
var image = jewel.images[“images/jewels” +
jewelSize + “.png”];
ctx.save();
if (typeof scale !== “undefined” && scale > 0) {
ctx.beginPath();
ctx.rect(x,y,1,1);
ctx.clip();
ctx.translate(x + 0.5, y + 0.5);
ctx.scale(scale, scale);
if (rot) {
ctx.rotate(rot);
}
ctx.translate(-x - 0.5, -y - 0.5);
}
ctx.drawImage(image,
type * jewelSize, 0, jewelSize, jewelSize,
x, y, 1, 1
);
ctx.restore();
}
...
})();
If you paid attention in Chapter 6, the added transformations shouldn’t scare you. In the case of removeJewels(), the scale argument is passed as (1 - pos), which makes the value go from 1 to 0 as the animation progresses. The pos value is also used in the rot argument, only multiplied by 2 Pi to get a full 360 degrees of rotation.
![]()
Now that you can easily add a scaling factor when drawing jewels, try adding a scale value of 1.1 or so in the renderCursor() function. The result is a more glowing appearance.
Refilling the board
When the board module detects that no valid moves are left, it sends a refill event. The argument sent along with the event contains the jewels that make up the new board. For the refill animation, I used a mix of canvas animation and CSS 3D transforms. Look at the refill() function in Listing 9.15. As in the moveJewels() and removeJewels() functions, this example sets up an animation using addAnimation(). The render() function does two things: replaces all the old jewels with the new ones and rotates the board around the x axis.
Listing 9.15 Refilling the Board with Fresh Jewels
jewel.display = (function() {
...
function refill(newJewels, callback) {
var lastJewel = 0;
addAnimation(1000, {
render : function(pos) {
var thisJewel = Math.floor(pos * cols * rows),
i, x, y;
for (i = lastJewel; i < thisJewel; i++) {
x = i % cols;
y = Math.floor(i / cols);
clearJewel(x, y);
drawJewel(newJewels[x][y], x, y);
}
lastJewel = thisJewel;
canvas.style.webkitTransform =
“rotateX(“ + (360 * pos) + “deg)”;
},
done : function() {
canvas.style.webkitTransform = “”;
callback();
}
});
}
...
return {
...
refill : refill
}
})();
Note that the scale() transformation uses a negative value for the y axis. This actually flips the coordinate space upside down. The translation that follows moves it back to where it belongs but keeps the coordinates flipped. This means that the origin is now at the bottom-left corner with positive y values going up. When the new jewels are drawn in the loop, they are drawn upside down, but that orientation corrects itself as the canvas rotates 180 degrees around the x axis. You could also choose to do a full 360-degree rotation and skip the upside-down transformation.
The rotation is done with a 3D CSS transformation. The CSS rotateX(), rotateY(), and rotateZ() transformations all rotate the element a number of degrees around their axes. To get the right 3D effect, however, you need to add some depth to the rotation. You can do this by setting the -webkit-perspective property on a parent element. Simply add the following to the .game-board rule in main.css:
/* Game screen */
#game-screen .game-board {
...
-webkit-perspective : 16em;
}
You can play around with the value to alter the appearance of the 3D effect. Smaller values make it appear more flat, whereas a high value increases the effect.
![]()
The order of the CSS transformations is important. In this case, you want to apply the perspective before rotating the canvas. Otherwise, the rotation is performed without perspective and the desired effect is lost.
The refill animation finishes in the done() method by resetting the CSS transformation and calling the callback function to let the caller now that it is done. Figure 9-3 shows a frame from the refill animation.
Figure 9-3: Flipping the board
If you want to test the refill animation without having to play until a refill is automatically triggered, you trigger the animation manually by entering the following into the JavaScript console:
jewel.display.refill(jewel.board.getBoard(), function(){})
It doesn’t replace the jewels with new ones, but you can see the CSS rotation.
Adding Points and Time
The player can now swap jewels, and the board display reacts nicely. The game has no real goal, however. You still need to implement a timer that counts down and threatens to end the game early, and the player should also be awarded points to get a feeling of progression as he advances to higher levels. All this game data should be visible to the player and be constantly updated. The actual values are maintained in the game screen module in screen.game.js:
jewel.screens[“game-screen”] = (function() {
var gameState = {
// game state variables
},
...
}}();
This simple object contains the current level and score as well as a few properties for keeping track of the game timer. The values need to be reset every time a new game starts, so add a startGame() function to the game screen module and call it from the setup() and run() functions. ThestartGame() function should also take care of resetting the cursor and initializing the board and display modules. Listing 9.16 shows the function.
Listing 9.16 Initializing the Game Info and Starting the Game
jewel.screens[“game-screen”] = (function() {
var gameState,
...
function startGame() {
gameState = {
level : 0,
score : 0,
timer : 0, // setTimeout reference
startTime : 0, // time at start of level
endTime : 0 // time to game over
};
cursor = {
x : 0,
y : 0,
selected : false
};
board.initialize(function() {
display.initialize(function() {
display.redraw(board.getBoard(), function() {});
});
});
}
function run() {
if (firstRun) {
setup();
firstRun = false;
}
startGame();
}
...
})();
Creating the UI elements
Before you can start using the game info object, you need a few more DOM elements on the game screen. Listing 9.17 shows the modified HTML code for the game screen in index.html. The new elements include labels for the current level and score as well as a progress bar you use for the game timer.
Listing 9.17 Adding New Interface Elements on the Game Screen
<div id=”game”>
...
<div class=”screen” id=”game-screen”>
...
<div class=”game-info”>
<label class=”level”>Level: <span></span></label>
<label class=”score”>Score: <span></span></label>
</div>
<div class=”time”><div class=”indicator”></div></div>
</div>
</game>
In the future, when the new HTML5 elements are more universally supported, you’ll be able to use the more semantic output element instead of span in the label elements. You’ll also get the progress element, which simplifies implementing various kinds of progress bars. The CSS to go along with the new markup goes in main.css and is shown in Listing 9.18.
Listing 9.18 Styling the Game Info Elements
/* Game screen - Game state */
#game-screen .game-info {
width : 100%;
float : left;
}
#game-screen .game-info label {
display : inline-block;
height : 1.5em;
float : left;
font-size : 0.6em;
padding : 0.25em;
}
#game-screen .game-info .score {
float : right;
}
#game-screen .time {
height : 0.25em;
border-radius : 0.5em;
}
#game-screen .time .indicator {
width : 100%;
}
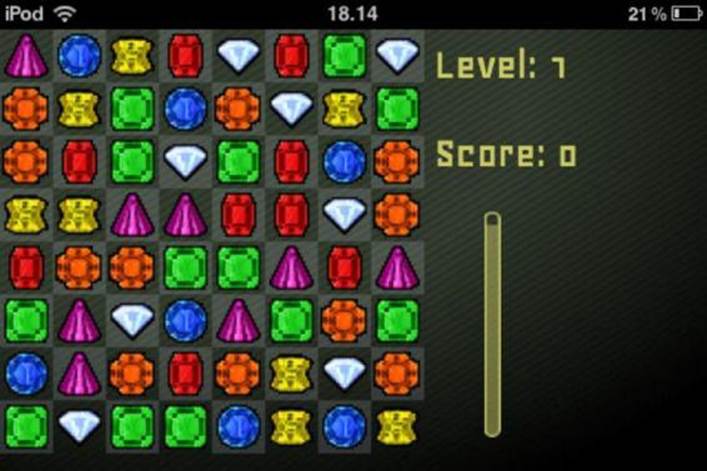
The new CSS rules aren’t particularly interesting. They simply arrange the elements below the game board and style the time bar to look a bit like the progress bar on the splash screen. Figure 9-4 shows the new elements.
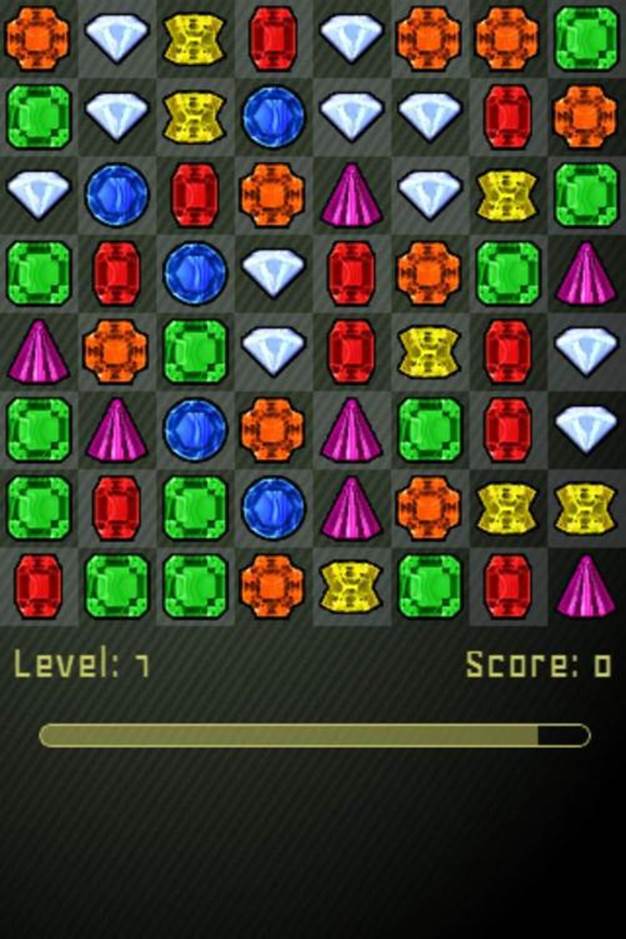
Figure 9-4: The new UI elements
This setup works well in the desktop browser or when you’re viewing the game in portrait mode on a mobile device. However, if you rotate the device to landscape mode, the layout isn’t ideal. You can use CSS media queries to target only landscape mode. Add the rules in Listing 9.19 tomobile.css to improve the looks of the landscape mode.
Listing 9.19 Adjusting the UI for Large Screens
@media (orientation: landscape) {
#game-screen .game-board {
float : left;
}
#game-screen .game-info {
width : auto;
height : 2em;
white-space : nowrap;
}
#game-screen .game-info label {
font-size : 0.5em;
}
#game-screen .game-info .score {
float : left;
clear : both;
}
#game-screen .time {
font-size : 0.5em;
margin : 0;
float : left;
width : 6.5em;
/* vendor specific transforms */
-webkit-transform : rotate(-90deg)
translate(-3em, -1.75em);
-moz-transform : rotate(-90deg)
translate(-3em, -1.75em);
-ms-transform : rotate(-90deg)
translate(-3em, -1.75em);
/* standard transform */
transform : rotate(-90deg)
translate(-3em, -1.75em);
}
}
The level and score labels now automatically move to the upper-right corner to take advantage of the extra horizontal space in landscape mode. The timer bar gets a special treatment because it is rotated 90 degrees. This allows it to maintain its full size even as it’s moved to the narrow space next to the board. Figure 9-5 shows the result in landscape mode on an iPod Touch.
Figure 9-5: The game UI elements in landscape mode
You can now update these elements with the current values. First, they should be updated at the beginning of the game, so create an updateGameInfo() function that updates the score and level elements as shown in Listing 9.20.
Listing 9.20 Updating the Game Info
jewel.screens[“game-screen”] = (function() {
var dom = jewel.dom,
$ = dom.$,
...
function startGame() {
...
updateGameInfo();
board.initialize(function() {
display.initialize(function() {
display.redraw(board.getBoard(), function() {});
});
});
}
function updateGameInfo() {
$(”#game-screen .score span”)[0].innerHTML
= gameState.score;
$(”#game-screen .level span”)[0].innerHTML
= gameState.level;
}
...
})();
The updateGameInfo() call in startGame() resets the display to the initial values when a new game starts.
Creating the game timer
Now you can move on to the game timer. When the game starts, the timer must slowly count down, and when it reaches the end, the game is over. Visually, this animation is represented by the timer progress bar going from full to empty. The only way for the player to stay alive is to score enough points to advance to the next level and make the timer reset. To make the game harder and harder, you need to speed up the timer as the game progresses. First, add a base time to the game settings in loader.js:
var jewel = {
screens : {},
settings : {
...,
baseLevelTimer : 60000
},
images : {}
}
This value is the time in milliseconds for the first level. As the level number increases, the amount of time decreases, but it is still based on this one base number.
When you need to update the timer progress bar, the timer value must be converted to a relative value. You can then use this relative value to adjust the width of the inner element using percentages. Listing 9.21 shows the timer update function in screen.game.js.
Listing 9.21 Checking and Updating the Game Timer
jewel.screens[“game-screen”] = (function() {
...
function setLevelTimer(reset) {
if (gameState.timer) {
clearTimeout(gameState.timer);
gameState.timer = 0;
}
if (reset) {
gameState.startTime = Date.now();
gameState.endTime =
settings.baseLevelTimer *
Math.pow(gameState.level,
-0.05 * gameState.level);
}
var delta = gameState.startTime +
gameState.endTime - Date.now(),
percent = (delta / gameState.endTime) * 100,
progress = $(“#game-screen .time .indicator”)[0];
if (delta < 0) {
gameOver();
} else {
progress.style.width = percent + “%”;
gameState.timer = setTimeout(setLevelTimer, 30);
}
}
function startGame() {
...
updateGameInfo();
setLevelTimer(true);
...
}
...
})();
If setLevelTimer() is called with the reset flag, it resets the timer based on the current level. The startTime value is simply the current time and is saved so later calls can calculate how much time has passed. The endTime value represents how much time the player is given at this particular level. Due to the negative exponent, the value of the Math.pow() expression decreases as the level number increases.
Regardless of the reset flag, the function then calculates how much time has passed since the timer was set. Dividing this number with the total time given for this level gives you a number from 0 to 1, which you can then use to set the CSS width of the inner element of the timer progress bar. If more time has passed than was allowed, the timer function then calls a gameOver() function to end the game. I show you the implementation of the game over function later in this chapter. If the player is still alive, a new setTimeout() call sets up the next timer check.
The reason you’re not using requestAnimationFrame() here instead of setTimeout() is that the timer functionality is a bit more critical than animations. Remember that the browser is free to decide not to update any of the animations if it decides to use its resources somewhere else.
Awarding points
When you implemented the jewel-swapping logic in Chapter 4, you made it register both jewel-related events as well as the points that are awarded. The score event needs to be handled by the playBoardEvents() function, so add a case for that event as well, as shown in Listing 9.22.
Listing 9.22 Awarding Points
jewel.screens[“game-screen”] = (function() {
...
function playBoardEvents(events) {
if (events.length > 0) {
var boardEvent = events.shift(),
next = function() {
playBoardEvents(events);
};
switch (boardEvent.type) {
case “move” :
display.moveJewels(boardEvent.data, next);
break;
case “remove” :
display.removeJewels(boardEvent.data, next);
break;
case “refill” :
display.refill(boardEvent.data, next);
break;
case “score” : // new score event
addScore(boardEvent.data);
next();
break;
default :
next();
break;
}
} else {
display.redraw(board.getBoard(), function() {
// good to go again
});
}
}
...
})();
Updating the UI score element is straightforward, as shown in Listing 9.23.
Listing 9.23 Updating the Score
jewel.screens[“game-screen”] = (function() {
...
function addScore(points) {
gameState.score += points;
updateGameInfo();
}
...
})();
Leveling up
The player should advance to the next level when she reaches certain numbers of points. For this, you need some more functionality in the addScore() function. Modify the function as shown in Listing 9.24.
Listing 9.24 Checking the Number of Points
jewel.screens[“game-screen”] = (function() {
...
function addScore(points) {
var nextLevelAt = Math.pow(
settings.baseLevelScore,
Math.pow(settings.baseLevelExp, gameState.level-1)
);
gameState.score += points;
if (gameState.score >= nextLevelAt) {
advanceLevel();
}
updateGameInfo();
}
...
})();
The modified addScore() function makes use of two new values that you must add to the settings in loader.js:
var jewel = {
settings : {
...
baseLevelScore : 1500,
baseLevelExp : 1.05
}
}
These values are used to calculate the number of points needed to advance to the next level. When you raise the base baseLevelScore to an exponent that increases with each level, the gap between levels becomes larger and larger, further adding to the difficulty of the game. The values I chose give limits of 1000, 1413, 2030, 2971, and 4431 points for the first five levels. Play around with the settings if you’d rather have another distribution.
The addScore() function calls an advanceLevel() function that must take care of incrementing the level value and setting up a new game timer. Add the advanceLevel() function shown in Listing 9.25 to screen.game.js, remove the setLevelTimer() call from startGame() and calladvanceLevel() when the display has been initialized.
Listing 9.25 Advancing to the Next Level
jewel.screens[“game-screen”] = (function() {
...
function startGame() {
...
updateGameInfo();
board.initialize(function() {
display.initialize(function() {
display.redraw(board.getBoard(), function() {
advanceLevel();
});
});
});
}
function advanceLevel() {
gameState.level++;
updateGameInfo();
gameState.startTime = Date.now();
gameState.endTime = settings.baseLevelTimer *
Math.pow(gameState.level, -0.05 * gameState.level);
setLevelTimer(true);
}
}
The level value on the gameInfo object is 0 at the beginning of the game. The player should advance to level 1 right away, so you should also add an initial advanceLevel() call to the startGame() function, as shown in Listing 9.25. This also takes care of setting off the game timer functionality.
The advanceLevel() function increments the level value and updates the UI elements. Advancing to the next level should, of course, also trigger some visual feedback. Listing 9.26 shows a new animation added to the display module in display.canvas.js.
Listing 9.26 Adding a Visual Effect When the Level Changes
jewel.display = (function() {
...
function levelUp(callback) {
addAnimation(1000, {
before : function(pos) {
var j = Math.floor(pos * rows * 2),
x, y;
for (y=0,x=j;y<rows;y++,x--) {
if (x >= 0 && x < cols) { // boundary check
clearJewel(x, y);
drawJewel(jewels[x][y], x, y);
}
}
},
render : function(pos) {
var j = Math.floor(pos * rows * 2),
x, y;
ctx.save(); // remember to save state
ctx.globalCompositeOperation = “lighter”;
for (y=0,x=j;y<rows;y++,x--) {
if (x >= 0 && x < cols) { // boundary check
drawJewel(jewels[x][y], x, y, 1.1);
}
}
ctx.restore();
},
done : callback
});
}
return {
...,
levelUp : levelUp
};
})();
Take a closer look at the loop that appears in both the before and render functions:
var j = Math.floor(pos * rows * 2),
x, y;
for (y=0,x=j;y<rows;y++,x--) {
...
}
Because pos goes from 0 to 1, j is an integer value that starts at 0 and ends at (2 * rows). The loop starts at y=0 and x=j. It then moves down the board, and at every row, it moves the x position one step to the left. The result is that the matching jewels form a diagonal row that moves down/across the board during the animation. The before function just clears and redraws the previous jewel, and the render function highlights the currently active jewels by drawing copies on top with the lighter composite operation.
Add the call to the display.levelUp() function in advanceLevel() in screen.game.js:
function advanceLevel() {
...
display.levelUp();
}
Announcing game events
Letting the player know that he’s moved on to a new level would probably be a good idea. The game info labels are not big enough that you can be sure the player notices the change. Add a new div element to the game screen for announcements and give it the class announcement. Listing 9.27 shows the modifications to index.html.
Listing 9.27 Adding the Announcement Container
<div id=”game”>
...
<div class=”screen” id=”game-screen”>
<div class=”game-board jewel-size”>
<div class=”announcement”></div>
</div>
...
</div>
</div>
Now you can add text in that div and make it appear in the middle of the game board so the player doesn’t miss it. Add the CSS in Listing 9.28 to main.css to style the announcements.
Listing 9.28 Styling the Announcements
/* Game screen - Announcement */
#game-screen .announcement {
position : absolute;
left: 0;
top : 50%;
margin-top : -0.5em;
width : 100%;
font-family : Slackey, sans-serif;
color : rgb(150,150,75);
text-shadow : 0.03em 0.03em 0.03em rgb(255,255,0),
-0.03em -0.03em 0.03em rgb(255,255,0),
0.1em 0.15em 0.15em rgb(0,0,0);
text-align : center;
white-space : nowrap;
z-index : 20; /* in front of everything else */
opacity : 0; /* start out transparent */
cursor : default;
}
.no-textshadow #game-screen .announcement {
filter: glow(color=#ffff00,strength=1),
dropshadow(color=#000000,offX=3,offY=3);
}
This code makes the announcements look nice, but you can do even better and add a zoom and fade animation using a bit of CSS. Listing 9.29 shows how.
Listing 9.29 Creating a Zoom and Fade CSS Animation
/* Announcement animation */
/* Keyframes for webkit */
@-webkit-keyframes zoomfade {
0% {
opacity : 1;
-webkit-transform : scale(0.5);
}
25% { /* stay at full opacity for a bit */
opacity : 1;
}
100% { /* and then fade to 0 */
opacity : 0;
-webkit-transform : scale(1.5);
}
}
/* Keyframes for webkit */
@-moz-keyframes zoomfade {
0% {
opacity : 1;
-moz-transform : scale(0.5);
}
25% { /* stay at full opacity for a bit */
opacity : 1;
}
100% { /* and then fade to 0 */
opacity : 0;
-moz-transform : scale(1.5);
}
}
/* zoom-fade animation class */
.zoomfade {
-webkit-animation-name : zoomfade;
-webkit-animation-duration : 2s;
-moz-animation-name : zoomfade;
-moz-animation-duration : 2s;
}
These rules declare a CSS animation called zoomfade with three keyframes at 0%, 25%, and 100%. Over the course of the entire animation, the element scales from 0.5 to 1.5. The opacity is also changed but only after the 25% keyframe. This gives the user a better chance of actually reading the text before it fades away. Finally, the CSS assigns the animation to a class called zoomfade and gives it a duration of two seconds. Now you need to attach the zoomfade class to the announcement element in screen.game.js as shown in Listing 9.30. To get the animation to play again the next time you need it, you can just remove the class and add it again. Be sure you use setTimeout() to add the class so the browser has time to register that it was removed.
Listing 9.30 Announcing Significant Events
jewel.screens[“game-screen”] = (function() {
...
function announce(str) {
var element = $(“#game-screen .announcement”)[0];
element.innerHTML = str;
if (Modernizr.cssanimations) {
dom.removeClass(element, “zoomfade”);
setTimeout(function() {
dom.addClass(element, “zoomfade”);
}, 1);
} else {
dom.addClass(element, “active”);
setTimeout(function() {
dom.removeClass(element, “active”);
}, 1000);
}
}
...
})();
Modernizr can tell you if CSS animations are supported or if you have to fall back to an alternative solution. The announce() function in Listing 9.31 uses the active class if CSS animations are not supported. The setTimeout() function removes the class again after one second. The CSS rules for the active class are shown in Listing 9.31. The fallback CSS simply toggles the visibility of the element.
Listing 9.31 Fallback Effect for Announcements
/* Fallback for browsers without CSS animations */
.no-cssanimations #game-screen .announcement {
display : none;
}
.no-cssanimations #game-screen .announcement.active {
opacity : 1;
display : block;
}
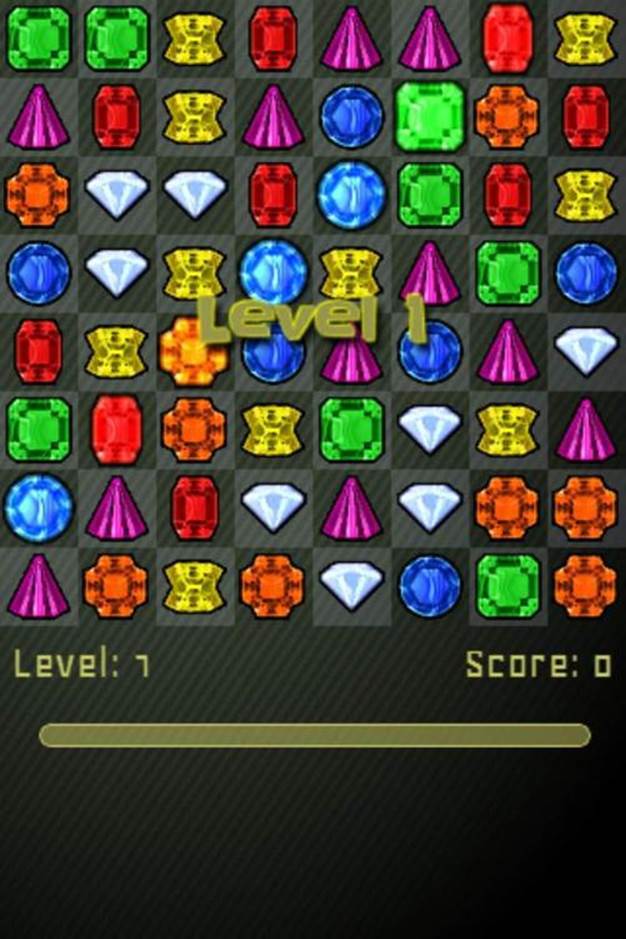
Now add an announcement to the advanceLevel() function in screen.game.js to let the player know that he’s advanced. Listing 9.32 shows where to add the call.
Listing 9.32 Announcing the Next Level
jewel.screens[“game-screen”] = (function() {
...
function advanceLevel() {
gameInfo.level++;
announce(“Level “ + gameState.level);
...
}
...
}
Figure 9-6 shows the level announcement.
Figure 9-6: Announcing the next level
While you’re at it, add an announcement when the game board is refilled. You can add the announce() call in playBoardEvents(), as shown in Listing 9.33.
Listing 9.33 Announcing the Refill Event
jewel.screens[“game-screen”] = (function() {
...
function playBoardEvents(events) {
...
switch (boardEvent.type) {
...
case “refill” :
announce(“No moves!”);
display.refill(boardEvent.data, next);
break;
...
}
}
...
})();
Game over
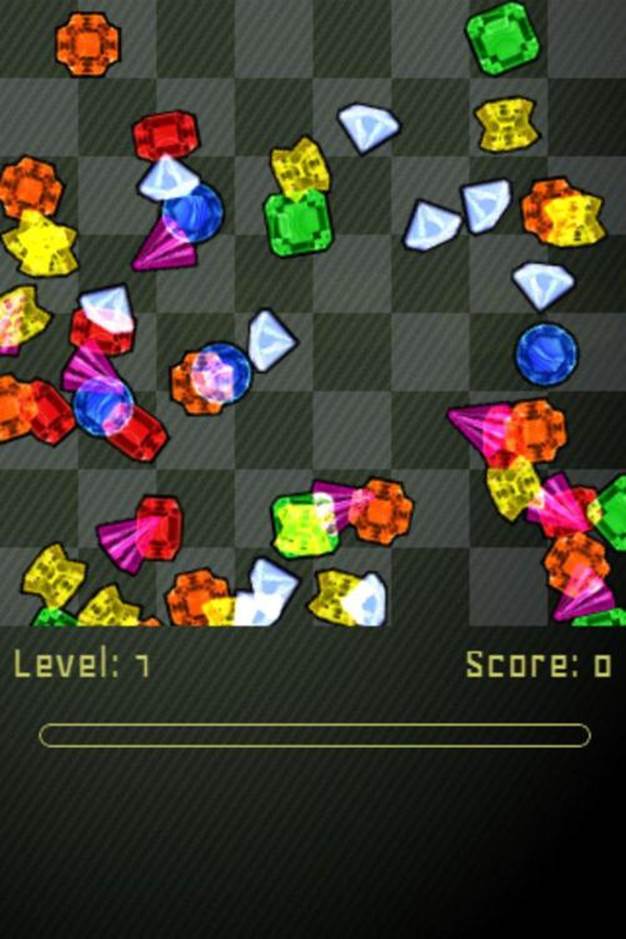
When the game ends, there should also be a nice animation. To that end, make the jewel board start shaking and the jewels blow apart in an explosion-like way. First, add the missing gameOver() function to screen.game.js:
jewel.screens[“game-screen”] = (function() {
...
function gameOver() {
display.gameOver(function() {
announce(“Game over”);
});
}
...
})();
This function tells the display module to play the game animation and then displays an announcement when the animation is done. Listing 9.34 shows the gameOver() function in display.canvas.js.
Listing 9.34 The Game Over Animation
jewel.display = (function() {
...
function gameOver(callback) {
addAnimation(1000, {
render : function(pos) {
canvas.style.left =
0.2 * pos * (Math.random() - 0.5) + “em”;
canvas.style.top =
0.2 * pos * (Math.random() - 0.5) + “em”;
},
done : function() {
canvas.style.left = “0”;
canvas.style.top = “0”;
explode(callback);
}
});
}
...
return {
...
gameOver : gameOver
}
})();
The render() function in this animation adjusts the position of the jewel board canvas by a small random amount. When you use the animation position as a multiplier, the intensity of the effect increases as the animation progresses. When the animation ends, it passes the callback function on to an explode() function, which sets up the explosion-like behavior.
Create the explosion effect by making all the jewels blow apart in random directions. To do that, you need a list of objects that represent the pieces. Each piece should contain information about its current position, its rotation speed, and its current velocity. The position is represented by simple x and y coordinates and starts at the jewel’s original position on the board. The rotation speed is a randomly picked number that represents the number of radians the jewel should rotate during the animation. The velocity is the direction in which the piece is moving and the speed at which it moves. This is also represented by a pair of x and y values. The explode() function is shown in Listing 9.35.
Listing 9.35 Setting Up the Explosion
jewel.display = (function() {
...
function explode(callback) {
var pieces = [],
piece,
x, y;
for (x=0;x<cols;x++) {
for (y=0;y<rows;y++) {
piece = {
type : jewels[x][y],
pos : {
x : x + 0.5,
y : y + 0.5
},
vel : {
x : (Math.random() - 0.5) * 20,
y : -Math.random() * 10
},
rot : (Math.random() - 0.5) * 3
}
pieces.push(piece);
}
}
addAnimation(2000, {
before : function(pos) {
ctx.clearRect(0,0,cols,rows);
},
render : function(pos, delta) {
explodePieces(pieces, pos, delta);
},
done : callback
});
}
...
})();
The explode() function iterates over the entire board and creates a list of pieces from all the jewels. It saves the jewel type and then sets up the initial position, rotation, and velocity values. Notice that the vel.y value is forced to be negative, whereas vel.x can be either positive or negative. This is so all the pieces are initially moving upward. The render function calls the explodePieces()function, which moves all the pieces and also applies a gravity effect to the pieces, forcing them to come down. The explodePieces() function needs both the pos and delta values to be able to move the pieces just the right amount. The before() function of the animation clears the entire canvas so it’s ready for the next frame. Listing 9.36 shows the explodePieces() function.
Listing 9.36 Animating the Falling Jewels
jewel.display = (function() {
...
function explodePieces(pieces, pos, delta) {
var piece, i;
for (i=0;i<pieces.length;i++) {
piece = pieces[i];
piece.vel.y += 50 * delta;
piece.pos.y += piece.vel.y * delta;
piece.pos.x += piece.vel.x * delta;
if (piece.pos.x < 0 || piece.pos.x > cols) {
piece.pos.x = Math.max(0, piece.pos.x);
piece.pos.x = Math.min(cols, piece.pos.x);
piece.vel.x *= -1;
}
ctx.save();
ctx.globalCompositeOperation = “lighter”;
ctx.translate(piece.pos.x, piece.pos.y);
ctx.rotate(piece.rot * pos * Math.PI * 4);
ctx.translate(-piece.pos.x, -piece.pos.y);
drawJewel(piece.type,
piece.pos.x - 0.5,
piece.pos.y - 0.5
);
ctx.restore();
}
}
...
})();
The explodePieces() function does two things. First, it alters the position and velocity of all the jewel pieces. It then renders each of them on the now-blank canvas.
The velocity is changed by adding a constant multiplied by the delta. This change in velocity simulates the effect of gravity. On Earth, for example, a falling object increases its velocity with roughly 9.8 meters per second toward the surface every second (if you ignore air resistance, at least). Play around with the constant to increase or decrease the gravity. The position is then altered by adding the velocity multiplied by delta. If the x value of the position is negative or if it exceeds the value of cols, the piece has reached the left or right edge of the board. You can choose to just let it continue moving out of view, or you can flip the x component of the velocity to make it bounce back, which is the option I chose.
It is now easy to render the jewel piece in the right spot. The rotation is done in the usual way by translating to the position of the jewel, rotating, and then translating back. Note that 0.5 is subtracted from the coordinates used in the drawJewel() call. The reason is that the pos.x and pos.yvalues represent the center of the jewel, but drawJewel() wants the upper-left corner. The lighter compositing operation gives the jewels a translucent appearance when they move over each other. Figure 9-7 shows a still image from the final animation.
Figure 9-7: The game over animation
Summary
The game experience of Jewel Warrior is immensely enhanced with the help of a few animated effects in the right places. In this chapter, you learned how to set up an animation cycle using the new animation timing API, and you used that to create a simple animation framework for the canvas display.
I showed you how to make a variety of animations for game actions such as swapping jewels and adding the game over animation. In addition, you added some key elements to the game, namely the game timer, as well as the ability to score points and advance in levels.
All materials on the site are licensed Creative Commons Attribution-Sharealike 3.0 Unported CC BY-SA 3.0 & GNU Free Documentation License (GFDL)
If you are the copyright holder of any material contained on our site and intend to remove it, please contact our site administrator for approval.
© 2016-2026 All site design rights belong to S.Y.A.