Build an HTML5 Game: A Developer’s Guide with CSS and JavaScript (2015)
Part I. Building a Game with HTML, CSS, and JavaScript
Chapter 3. Game Logic
At this point, we’ve created an intro screen with a New Game button and a single bubble that a player can fire off the screen. In this chapter, we’ll turn the Bubble Shooter into more of a game. You’ll learn how to draw the game board and display the level to the player, and then learn about collision detection.
Collisions are central to many games and happen when sprites touch. Once you can detect collisions, you can write code that makes the sprites react to them. In the Bubble Shooter, collisions occur when a fired bubble slams into a bubble in the game grid. We’ll implement two reactions: the fired bubble will stick to the board if it doesn’t form a color group of three or more bubbles, or it will cause a valid group to fall from the board.
But before we can calculate collisions, we need an object for a bubble to collide with. The first section of this chapter discusses drawing the initial board and setting up the game state. To do so, we’ll need to follow a process containing a number of steps, shown in Figure 3-1.
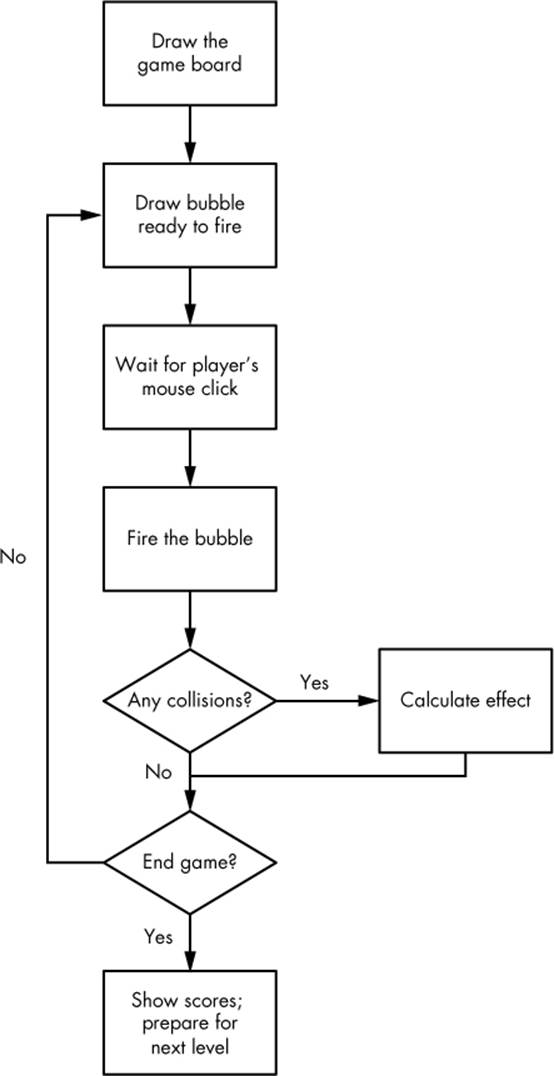
Figure 3-1. The game loop starts by drawing the board and ends by showing the score.
We’ll draw the game board first and then add collision detection to the bubble that’s been fired. In the next chapter, we’ll implement the mechanism to pop groups of bubbles based on matching color.
Let’s work through the steps and turn them into code.
Drawing the Game Board
The game board has a similar structure for every level, and each board contains rows of bubbles in four different colors. Alternate rows contain either an odd or even number of bubbles depending on whether the row is odd or even. We’ll store all this state information in a Board object and store the current board as a variable in the Game object.
The object structure you choose should vary depending on the game design, but the goals should be the same as when you’re deciding how to structure code in web applications: group objects that perform similar operations, and strike a balance with how much common functions are abstracted. Don’t define several classes that contain very little code, but don’t create too few classes with long code listings that will be difficult to read and understand. Game developers often base initial structural decisions on instinct and experience as well as on hard-and-fast rules. Always be prepared to refactor code if you think your original choices are no longer valid.
The rows that make up the board will be an array of Bubble objects. We’ll create this array when we instantiate the Board object. Later, we’ll transfer the drawing of the board elements to the DOM from within ui.js. Ending up with a large mass of code within a Game class is easy to do but undesirable; therefore, take the opportunity to hand off responsibilities to other classes whenever possible, especially when rendering objects to the screen.
In game.js, we need to create a variable to hold the board and a new instance of a Board object. The board is generated when the New Game button is clicked. Add the following new code to game.js:
game.js
var BubbleShoot = window.BubbleShoot || {};
BubbleShoot.Game = (function($){
var Game = function(){
var curBubble;
var board;
--snip--
var startGame = function(){
$(".but_start_game").unbind("click");
BubbleShoot.ui.hideDialog();
curBubble = getNextBubble();
board = new BubbleShoot.Board();
BubbleShoot.ui.drawBoard(board);
$("#game").bind("click",clickGameScreen);
};
--snip--
};
return Game;
})(jQuery);
Board is a new constructor that we need to make. Create a new file called board.js and add it to the list of files to load in Modernizr.load in index.html. Add the following code to the new file:
board.js
var BubbleShoot = window.BubbleShoot || {};
BubbleShoot.Board = (function($){
➊ var NUM_ROWS = 9;
➋ var NUM_COLS = 32;
var Board = function(){
var that = this;
➌ var rows = createLayout();
➍ this.getRows = function(){ return rows;};
return this;
};
var createLayout = function(){
var rows = [];
➎ for(var i=0;i<NUM_ROWS;i++){
var row = [];
➏ var startCol = i%2 == 0 ? 1 : 0;
for(var j=startCol;j<NUM_COLS;j+=2){
➐ var bubble = BubbleShoot.Bubble.create(i,j);
row[j] = bubble;
};
rows.push(row);
};
return rows;
};
return Board;
})(jQuery);
NUM_ROWS ➊ and NUM_COLS ➋ are constants that determine the number of rows and columns that make up the bubble board grid. The number of columns may seem high, since we certainly won’t have 32 bubbles in a row. The reason for such a large column value is that we’ll create a grid entry for every half bubble width, because odd and even rows are offset on the game board. This design decision results in a more visually appealing layout, making it look like bubbles are stacking on top of each other. It also creates more interesting angles for the player to fire at.
All the bubbles on the first row and every subsequent odd row will have odd y-coordinates, and those on even rows will have even y-coordinates. The rows increment in integer steps, but the array we’ll use starts with an index of zero: the first row will be at index 0, the second will be at index 1, and so on. Thus, the bubble coordinates (x,y), starting from the top-left corner of the bubble board, will be labeled as shown in Figure 3-2. Specifying coordinates this way and having a half-populated grid avoids having to work with half values and decimal points. In addition, we can store the layout of the board in arrays indexed by integers. Working with integers rather than decimals doesn’t change the process we’ll follow to calculate collisions, but it does make the code more readable.
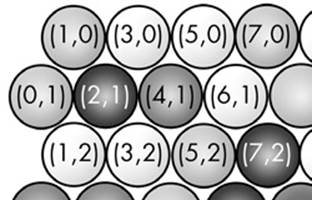
Figure 3-2. Coordinates of the bubbles in the game grid
In the code, we’ll now call the createLayout function ➌, which returns a two-dimensional array of rows and columns. We provide public access to this array in the next line ➍. Once we have a Board object, we can retrieve the bubble at any specific row and column position. For example, to access a bubble at coordinate (4,1) we would write:
var rows = board.getRows();
var row = rows[1];
var bubble = row[4];
Bubbles are accessed by row and then column number. First, we grab all the rows with board.getRows, and then we store the first row from the board as row. Next, we access the fourth bubble within row by its column number. Because the row array is only half populated, all odd entries in even-indexed rows (starting at zero) and all even entries in odd rows will be null.
The createLayout function contains a loop ➎. For each row we want to create, startCol ➏ calculates whether to start on column 1 or 0 depending on whether the row is odd or even, respectively. Then another loop increments to the maximum column number, creates a new Bubbleobject ➐, and adds it to the row array, which is returned on completion.
For this function to work, we need to adapt the Bubble class to accept row and column input coordinates, and we need to make a change to the Bubble.create method. Also, if a Bubble object knows its position in the grid by storing its coordinates, that information will be useful when we need to calculate groups to pop. When we know a bubble’s position, we can access that bubble, as it’s stored within the Board object. Then given a bubble, we can interrogate it to determine its position. Each bubble will have a type property, which corresponds to its color, and the property will be determined at creation time.
When you start coding your own game ideas, the decisions about where to store data and how to access it are critical. Your solution will depend on the type of game you’re building. In Bubble Shooter, we store a relatively small number of Bubbles within a Board object. To find out information about a particular bubble, we can access the data that the Board stores by retrieving data from the rows array.
Depending on how we need to use that bubble data, this method might not be the most elegant solution. For example, imagine we want to find all of the red bubbles in the game. Currently, we would have to loop over every space on the board, check whether the bubble is red, and then store the outcome. The game grid is small, so modern processors can perform this operation quickly. As long as we don’t run the color check too many times a second, the current code structure should work.
But now imagine thousands of bubbles on the screen. Looping over all the bubbles just to find red ones would consume too much processing power. Instead, we might want to store bubbles in multiple arrays—one for all the red bubbles, one for all the green bubbles, and so on—for instant access to all bubbles of each color. However, there would still be a tradeoff: to check whether a given space on the board is occupied by a bubble, regardless of color, we would have to look at multiple arrays.
When you have only a rough sense of how fast a processor can run an operation, it’s best to make your code clear and simple. If your game is playable and runs sufficiently fast, you won’t need to experiment with different ways to access data. Alternatively, if you identify bottlenecks, you’ll then have to refactor some sections to increase their speed. Game development is an iterative process; you’ll revisit existing lines of code as much as you write new ones.
How you design objects and where you store their data will vary from game to game. But remember this: if the Game object needs to use that data, one way or another you must allow the object to access it. Whether data is stored directly in a variable or in an array within Game, or is accessed through an intermediate object that Game has access to (such as the Board object in Bubble Shooter), the code will need to access that object’s state if it needs to make decisions about that object.
To support a bubble storing its position on the board and its color, amend bubble.js as follows:
bubble.js
var BubbleShoot = window.BubbleShoot || {};
BubbleShoot.Bubble = (function($){
var Bubble = function(➊row,col,type,sprite){
var that = this;
this.getType = function(){ return type;};
this.getSprite = function(){ return sprite;};
this.getCol = function(){ return col;};
this.getRow = function(){ return row;};
};
Bubble.create = function(➋rowNum,colNum,type){
➊ if(type === undefined){
➋ type = Math.floor(Math.random() * 4);
};
var sprite = $(document.createElement("div"));
sprite.addClass("bubble");
sprite.addClass("bubble_" + type);
var bubble = new Bubble(rowNum,colNum,type,sprite);
return bubble;
};
return Bubble;
})(jQuery);
Bubble now takes grid coordinates and a bubble type as well as the sprite object ➊, where type corresponds to colors that were specified in game.css. The Bubble.create method accepts the same parameters ➋; if type isn’t passed ➌, one of the four types (colors) is chosen at random ➍.
Now we have a Board object, plenty of bubbles, and their types and positions. But all this information is entirely in memory and is stored within the Board object’s rows property. Next, we’ll render the level using this information so players can see the game board.
Rendering the Level
Drawing the level is a perfect job for the ui class, because ui represents the game state but doesn’t affect that state.
Separating the code that calculates an object’s position from the code that renders that object to the screen is a principle you should apply in all of your game ideas. Not only does it separate rendering code from game logic, thereby improving readability, but it also allows you to more easily change how objects are rendered. For example, if the Bubble Shooter board was larger and didn’t fit on the screen but we wanted to implement a zoom or pan feature, we could change the code that renders the board to either offset the rendering position or to scale up or down to draw a different size board. The power of separating rendering from game logic will become apparent when we switch from DOM-based sprites to drawing onto the HTML canvas element in Chapter 6.
Because the creation of a bubble object involves creating a DOM sprite element, the rendering process needs to place this element in the document and position it correctly. These simple steps follow:
1. Loop over all the rows and columns and pull out each bubble object.
2. Write the bubble’s HTML into the DOM.
3. Position the bubble in the correct position.
The next piece of code you add will apply these steps. Open ui.js, add a new method (drawBoard) after fireBubble, and then add a new ROW_HEIGHT constant at the top:
ui.js
var BubbleShoot = window.BubbleShoot || {};
BubbleShoot.ui = (function($){
var ui = {
BUBBLE_DIMS : 44,
ROW_HEIGHT : 40,
init : function(){
},
fireBubble : function(bubble,coords,duration){
--snip--
},
drawBoard : function(board){
➊ var rows = board.getRows();
var gameArea = $("#board");
for(var i=0;i<rows.length;i++){
var row = rows[i];
➋ for(var j=0;j<row.length;j++){
var bubble = row[j];
➌ if(bubble){
➍ var sprite = bubble.getSprite();
➎ gameArea.append(sprite);
var left = j * ui.BUBBLE_DIMS/2;
var top = i * ui.ROW_HEIGHT;
➏ sprite.css({
left : left,
top : top
});
};
};
};
}
};
return ui;
})(jQuery);
The drawBoard method retrieves the board rows and columns ➊ and loops over them ➋. If there’s a bubble ➌ (recall that every other x-coordinate position is null due to the sparse grid system), drawBoard grabs the sprite object ➍, appends it to the board ➎, and calculates its coordinates before setting its position ➏.
To determine a bubble’s position, drawBoard first calculates the left coordinate, which is the bubble’s column number multiplied by half its width. To calculate the top coordinate, we’ll use a value slightly smaller than the BUBBLE_DIMS height. The odd and even rows are staggered, and we want the bubbles to look like they fit together. To create the stacking effect, the vertical separation will be slightly less than the horizontal distance. At the top of ui.js, ROW_HEIGHT has been set to 40, which is 4 pixels less than the height. This value was determined through trial and error rather than geometrical calculation: adjust the numbers until the bubble grid looks pleasing to you.
Reload and click New Game; you should see a nicely rendered board. You can even fire a bubble at the rest of the board; unfortunately, it should just go straight through without hitting anything and continue off the screen as before.
Because we have only one bubble, we need to refresh to retry the process. Before we begin working on collision detection, we’ll make sure we can keep firing one bubble after another.
The Bubble Queue
Although the player will have only a finite number of bubbles to fire, the game needs to provide those bubbles in a constant stream. Therefore, we’ll need to add a function that creates a new bubble, adds it to the DOM, and queues up the next bubble as soon as the user fires the first one.
In game.js, add the following variables and functions and change the initialization for curBubble to call a new getNextBubble function:
game.js
var BubbleShoot = window.BubbleShoot || {};
BubbleShoot.Game = (function($){
var Game = function(){
var curBubble;
var board;
➊ var numBubbles;
➋ var MAX_BUBBLES = 70;
this.init = function(){
$(".but_start_game").bind("click",startGame);
};
var startGame = function(){
$(".but_start_game").unbind("click");
➌ numBubbles = MAX_BUBBLES;
BubbleShoot.ui.hideDialog();
curBubble = getNextBubble();
board = new BubbleShoot.Board();
BubbleShoot.ui.drawBoard(board);
$("#game").bind("click",clickGameScreen);
};
var getNextBubble = function(){
var bubble = BubbleShoot.Bubble.create();
bubble.getSprite().addClass("cur_bubble");
$("#board").append(bubble.getSprite());
➍ BubbleShoot.ui.drawBubblesRemaining(numBubbles);
numBubbles--;
return bubble;
};
var clickGameScreen = function(e){
var angle = BubbleShoot.ui.getBubbleAngle(curBubble .getSprite(),e);
var duration = 750;
var distance = 1000;
var distX = Math.sin(angle) * distance;
var distY = Math.cos(angle) * distance;
var bubbleCoords = BubbleShoot.ui.getBubbleCoords(curBubble .getSprite());
var coords = {
x : bubbleCoords.left + distX,
y : bubbleCoords.top - distY
};
BubbleShoot.ui.fireBubble(curBubble,coords,duration);
➎ curBubble = getNextBubble();
};
return Game;
})(jQuery);
The new code first creates a variable ➊ to store the number of bubbles the player has fired. Because the number of fired bubbles is an integer—a basic data type—we’ll store it as a variable in Game. If, for example, we had a time limit that a level had to be completed within, we might create an object to store time remaining along with bubbles remaining rather than continuing to create variables in Game. As it is, the variable suits our purpose.
The code also sets a constant for the maximum number of bubbles ➋ the player can fire. When a level is started, it sets the number of bubbles remaining to the value of MAX_BUBBLES ➌ and calls a new function in ui.js to display the number of remaining bubbles on the screen ➍. Finally, the code calls getNextBubble ➎ each time a bubble is fired to prepare a new one.
We also want to show the player the number of remaining bubbles available to fire within a level, so create the drawBubblesRemaining method in ui.js, appending this new function to the ui object:
ui.js
var BubbleShoot = window.BubbleShoot || {};
BubbleShoot.ui = (function($){
var ui = {
BUBBLE_DIMS : 44,
ROW_HEIGHT : 40,
--snip--
drawBoard : function(board){
--snip--
},
drawBubblesRemaining : function(numBubbles){
$("#bubbles_remaining").text(numBubbles);
}
};
return ui;
})(jQuery);
Additionally, we need to display the number of remaining bubbles, so add a new element in index.html:
index.html
<div id="game">
<div id="board"></div>
<div id="bubbles_remaining"></div>
</div>
Add some styling for the bubbles_remaining div into main.css:
main.css
#bubbles_remaining
{
position: absolute;
left: 479px;
top: 520px;
width: 50px;
font-size: 26px;
font-weight: bold;
color: #000;
text-align: center;
}
Now refresh the game. You should be able to fire bubbles into the distance, get a new one as soon as the first is fired (until you’ve used 70 bubbles, or whatever value you used for MAX_BUBBLES), and be able to fire that new bubble immediately.
Often, you can break down a game into a repeating turn loop. The loop is usually initiated by a player action and then closed when that action has been resolved. In Bubble Shooter, the loop commences when the player clicks the screen to fire the button and completes when the next bubble is ready to fire. At this point we have the basic turn loop, but to create the game, we need to flesh out the middle part of the loop to calculate where to stop a bubble and whether to pop bubbles.
Detecting Collisions
Although you can now fire bubbles, they pass straight through the board without affecting the bubble grid. The game design calls for them to collide with the board and either become part of the board or cause groups of bubbles that are the same color to pop. The next task is to work out where collisions occur.
We can calculate collisions in two ways:
§ Move a sprite forward a few pixels for each frame and then try to detect any overlaps with other sprites. If there’s an overlap, we know we’ve hit another bubble.
§ Use geometry to calculate where the sprite might collide with another bubble before it even starts moving.
In fast-paced arcade games, you might choose the first option, as long as there’s no chance objects will pass through each other without a collision being detected. These pass-throughs can happen when objects move at high speeds, and collision checks occur after an object has moved numerous pixels since the previous check. For example, in a game in which you fire a bullet at a one-foot-thick wall, the bullet would only be guaranteed to collide with the wall if you check for collisions every foot. If you checked for collisions every two feet instead, you might check for a collision just before the bullet should hit and find no wall. Then two feet further along when you check again, the bullet would be past the wall, again resulting in no collision.
To work around the fast-moving-object problem, we could make sure the steps are always small enough that pass-throughs never happen; however, that requires more calculations, which may not be possible without significant computing power. This problem is more likely to surface in a browser environment: because we never know the specs of the end user’s computer, we can’t take processing power for granted.
The second option, using geometry, is more accurate if it’s feasible. Fortunately, our game design has fairly simplistic geometric properties. Unfortunately, this option isn’t possible in games in which sprites have more complex shapes. In that case, you’d have to check whether pixels overlap on a frame-by-frame basis and test thoroughly to ensure you don’t see any side effects. For Bubble Shooter, we’ll use a geometrical approach because we have the following advantages:
§ The game is on a regular grid.
§ All the objects (the bubbles) are identical.
§ We’re working in only two dimensions.
§ The player moves only one object.
§ All the objects are simple geometric shapes (circles), so the calculation of where edges meet is easy.
These conditions make geometric calculations for collisions relatively straightforward. Because game development often involves a lot of geometry, having a good grounding in trigonometry and vectors is essential. The next section discusses the geometry involved in this game. Then we’ll turn that geometry into code.
Collision Geometry
When you need to calculate collisions, draw the geometry on a piece of paper before you write the detection code. You’ll then be able to visualize the values you’ll need to calculate, as shown in Figure 3-3.
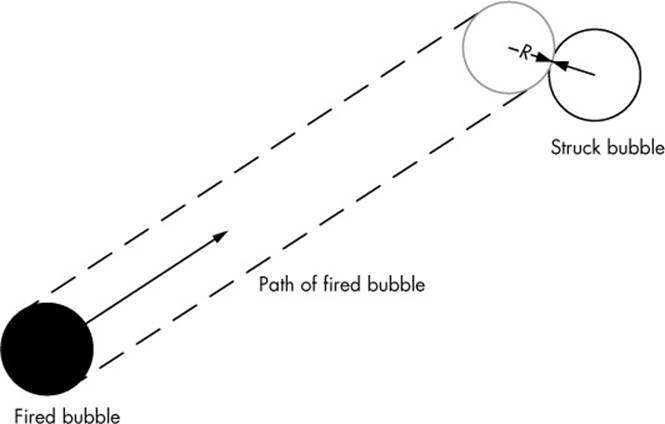
Figure 3-3. Visualizing the geometry behind a bubble collision
The bubble being fired should cause a collision when its center passes within 2R (where R is a bubble’s radius) of another bubble’s center, meaning that the two circumferences are touching. Because the intersection point will always be normal (at 90 degrees) to the colliding bubble’s edge and the edge of the bubble being hit, we need to check for a collision only if the path of the moving bubble’s center comes within 2R of another bubble’s center.
To determine where collisions occur, we need to check every other bubble on the board to determine whether the fired bubble’s path passes through it. If it overlaps with multiple bubbles, as it does in Figure 3-4, we need to make sure that the struck bubble we pick is the first collision that occurs, which will be the one in which the firing bubble has traveled the least distance.
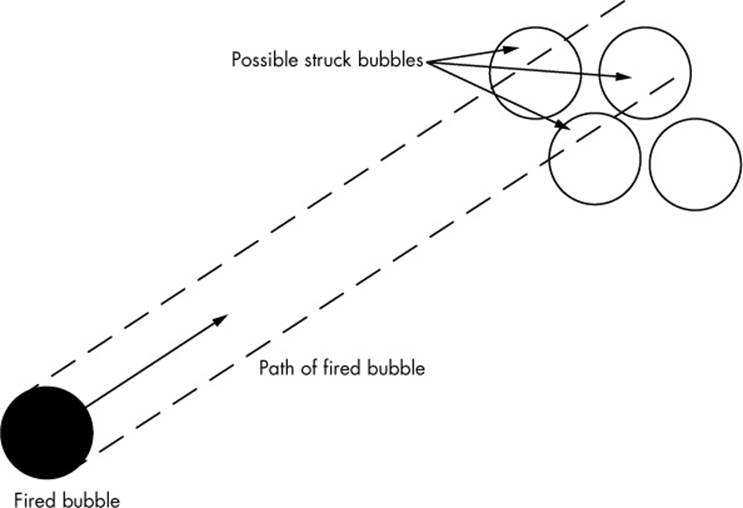
Figure 3-4. The fired bubble may be on a path to collide with multiple other bubbles.
Detecting a collision is equivalent to detecting when a vector drawn from the center line of the bubble we’re firing intersects with a circle with a radius double that of our bubbles. This will be known as a bubble’s hitbox. Figure 3-5 shows how we can redraw this concept to help us think about it in a way that’s easier to compute.
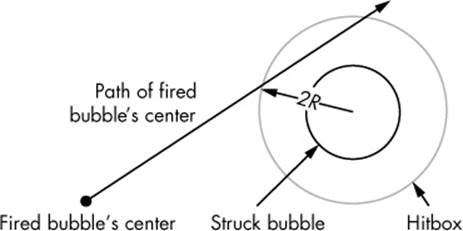
Figure 3-5. If the fired bubble’s travel path intersects a stationary bubble’s circular hitbox, a collision occurs.
In this diagram, the small filled circle marks the center of the bubble being fired. The bubble it will collide with is the inner circle, and the intersection with the bubble’s hitbox (the point marked with the arrow 2R, which is double a bubble’s radius) is where the bubble will stop.
Turning the diagram into a mathematical formula means using vectors. Rather than working through the math before showing any code, let’s go straight into the necessary JavaScript, which includes explanatory annotations.
SIMPLIFYING HITBOXES
Because we are working with circles, creating a hitbox is simpler than it might be if you were dealing with, for example, a figure that runs and jumps, as in a platform game. In that case, you might not want to detect collisions just by checking whether pixels overlap because of possible performance issues; instead, you could simplify the geometry of the main character and create a rectangular hitbox to check against. Not all games lend themselves to this approach. However, if you can reduce complex character outlines to simple geometrical shapes, you can detect collisions with much greater precision and less processing power than by checking whether pixels have overlapped. Always look for creative, efficient solutions to avoid brute-force techniques that monopolize resources.
The calculation is a large block of code with a specific function, so we’ll put it in its own file. Create a file called collision-detector.js and add it to the Modernizr.load call in index.html. Type in the following:
collision-detector.js
var BubbleShoot = window.BubbleShoot || {};
BubbleShoot.CollisionDetector = (function($){
var CollisionDetector = {
findIntersection : function(curBubble,board,angle){
var rows = board.getRows();
var collision = null;
var pos = curBubble.getSprite().position();
var start = {
left : pos.left + BubbleShoot.ui.BUBBLE_DIMS/2,
top : pos.top + BubbleShoot.ui.BUBBLE_DIMS/2
};
var dx = Math.sin(angle);
var dy = -Math.cos(angle);
for(var i=0;i<rows.length;i++){
var row = rows[i];
for(var j=0;j<row.length;j++){
var bubble = row[j];
if(bubble){
➊ var coords = bubble.getCoords();
var distToBubble = {
x : start.left - coords.left,
y : start.top - coords.top
};
var t = dx * distToBubble.x + dy * distToBubble.y;
var ex = -t * dx + start.left;
var ey = -t * dy + start.top;
var distEC = Math.sqrt((ex - coords.left) * (ex - coords.left) +
(ey - coords.top) * (ey - coords.top));
if(distEC<BubbleShoot.ui.BUBBLE_DIMS * .75){
var dt = Math.sqrt(BubbleShoot.ui.BUBBLE_DIMS * BubbleShoot.
ui.BUBBLE_DIMS - distEC * distEC);
var offset1 = {
x : (t - dt) * dx,
y : -(t - dt) * dy
};
var offset2 = {
x : (t + dt) * dx,
y : -(t + dt) * dy
};
var distToCollision1 = Math.sqrt(offset1.x * offset1.x +
offset1.y * offset1.y);
var distToCollision2 = Math.sqrt(offset2.x * offset2.x +
offset2.y * offset2.y);
if(distToCollision1 < distToCollision2){
var distToCollision = distToCollision1;
var dest = {
x : offset1.x + start.left,
y : offset1.y + start.top
};
}else{
var distToCollision = distToCollision2;
var dest = {
x : -offset2.x + start.left,
y : offset2.y + start.top
};
}
if(!collision || collision.distToCollision>distToCollision){
collision = {
bubble : bubble,
distToCollision : distToCollision,
coords : dest
};
};
};
};
};
};
return collision;
}
};
return CollisionDetector;
})(jQuery);
In a moment I’ll break down the code in collision-detector.js. But first, notice the call to a new method in bubble.js called getCoords ➊, which returns the center (x,y) coordinate of a bubble based on its position in the row/column hierarchy. You’ll need to amend the bubble class to add the new method:
bubble.js
var BubbleShoot = window.BubbleShoot || {};
BubbleShoot.Bubble = (function($){
var Bubble = function(row,col,type,sprite){
var that = this;
this.getType = function(){ return type;};
this.getSprite = function(){ return sprite;};
this.getCol = function(){ return col;};
this.getRow = function(){ return row;};
this.getCoords = function(){
var coords = {
left :➊that.getCol() * ➋BubbleShoot.ui.BUBBLE_DIMS/2 +
➎BubbleShoot.ui.BUBBLE_DIMS/2,
top :➌that.getRow() * ➍BubbleShoot.ui.ROW_HEIGHT +
➎BubbleShoot.ui.BUBBLE_DIMS/2
};
return coords;
}
};
Bubble.create = function(rowNum,colNum,type){
--snip--
};
return Bubble;
})(jQuery);
The game coordinates of a bubble are simple to calculate: you start by finding each top-left corner coordinate. The x-coordinate (left) is the column number ➊ multiplied by half the bubble sprite’s width ➋. The y-coordinate (top) is the row number ➌ multiplied by the row height ➍, which is slightly less than the bubble’s full height. To find the center of a bubble, just add half the bubble’s dimensions ➎ to both x and y.
When you’re developing game logic, the center coordinates of an object are more often the focus, whereas for rendering purposes, you’ll usually specify the top-left corner along with a width and a height. Building a handy method into the object that converts from one to the other will save you from writing out the math each time you need to switch.
Collision Detection Logic
Now let’s walk through the entire findIntersection routine in CollisionDetector.js block by block. If you don’t want to dig into the math right now, you can skip this breakdown—it’s purely the math of detecting collisions and doesn’t contain any new HTML5 or game development concepts. However, know that in almost every game you write, you’ll break down the complexities of how objects interact into a model that you can manipulate with relatively simple mathematics.
Starting Position and Direction Vector
The first part added to collision-detector.js is the standard library intro:
var BubbleShoot = window.BubbleShoot || {};
BubbleShoot.CollisionDetector = (function($){
var CollisionDetector = {
We’ve created an object called CollisionDetector. Now let’s look at the first method on that object:
findIntersection : function(curBubble,board,angle){
When you call CollisionDetector, you’ll use BubbleShoot.CollisionDetector.findIntersection. It accepts the parameters curBubble (an instance of the Bubble class), the board variable (an instance of Board), and the angle at which the bubble is being fired, giving the function everything it needs to know about the starting situation.
Now, examine the first variables within findIntersection:
var rows = board.getRows();
var collision = null;
We’ll loop over each row to check for collisions, so let’s grab the board rows into a local variable. Assuming there’s no collision by default, this will be the state returned by the function if no intersections occur. As a result, if the fired bubble doesn’t hit another bubble, it will keep moving forward.
The starting value of collision is null instead of false because if an intersection occurs, it will hold the bubble that’s been collided with, plus some other information, rather than a Boolean that indicates whether or not a collision has occurred. We need to know that a collision has occurred (which would be a “true” or “false” result), but more important, we need to send back information about what was collided with and where the collision occurred:
var pos = curBubble.getSprite().position();
var start = {
left : pos.left + BubbleShoot.ui.BUBBLE_DIMS/2,
top : pos.top + BubbleShoot.ui.BUBBLE_DIMS/2
};
The next pair of variables retrieves the bubble’s starting position (on the screen) as an object with top and left properties:
var dx = Math.sin(angle);
var dy = -Math.cos(angle);
Finally, dx and dy define how much a bubble moves left or right (dx) or up (dy) relative to the total distance the bubble will move. With those variables defined, we can loop through the rows and columns of the game board:
for(var i=0;i<rows.length;i++){
var row = rows[i];
for(var j=0;j<row.length;j++){
var bubble = row[j];
if(bubble){
We’ll start at the top left of the game board and work our way down and to the right. Because we only fire bubbles upward, we know that a bubble will never collide with another from the top of the game board. We also know that if multiple collision candidates are present along the bubble’s path, we want to grab the one where the bubble has traveled the least distance—that is, the collision that happened first. Remember that because columns are sparsely populated (every other entry is null), we also need to make sure we’re actually looking at a bubble before we try to do anything with it—hence the if(bubble) check.
Calculating Collisions
Next we need to use some geometry to check whether the fired bubble’s hitbox collided with another bubble. We’ll determine where the vector defined by (dx,dy), which begins at the center of the fired bubble, intersects with the circle drawn in Figure 3-4. Let’s start with the equation of a circle:
(x – cx)2 + (y – cy)2 = r2
Here, x and y are the points on the circle’s circumference, cx and cy are the center points of the circle, and r is the radius of the circle. We’ll need those points to find the distance to the starting bubble.
var coords = bubble.getCoords();
var distToBubble = {
x : start.left - coords.left,
y : start.top - coords.top
};
This part of the loop contains a bubble to check a collision against, so let’s get cx and cy, the center coordinates of the bubble (coords in the preceding code), and calculate the distance between this point and the fired bubble’s coordinates. We don’t yet know whether or not a collision will occur.
The bubble being fired follows a set of coordinates defined by the equations:
|
px = |
ex + tdx |
|
py = |
ey + tdy |
where px and py are points on the trajectory of the bubble’s center point. The calculation of px and py happens in jQuery’s animate method and is the standard equation for moving a point along a line. Next, we’ll calculate t at the closest point on this line to the center of the bubble that we’re checking against:
var t = dx * distToBubble.x + dy * distToBubble.y;
This line tells us at what proportion of the fired bubble’s total movement it will be closest to the candidate bubble’s center. From this, we can calculate the screen coordinates where this happens:
var ex = -t * dx + start.left;
var ey = -t * dy + start.top;
With these coordinates, we can find the distance of e (the closest point on the fired bubble’s center line to the center of the candidate bubble):
var distEC = Math.sqrt((ex - coords.left) * (ex - coords.left) + (ey -
coords.top) * (ey - coords.top));
If the distance distEC is less than double the candidate bubble’s radius, a collision occurs. If not, the fired bubble will not collide with this candidate bubble.
TRIAL AND ERROR VS. CALCULATION
Note that although BubbleShoot.ui.BUBBLE_DIMS gives the width and height of the sprite, we’re checking distEC against a bubble image that is actually slightly smaller. Multiplying the BUBBLE_DIMS value by 0 .75 (obtained from a bit of trial and error) gives a diameter for a bubble that works in the game.
We can arrive at a more precise value for distEC by measuring the width of the bubble, which is 44 pixels in the images in this book. Dividing by the BUBBLE_DIMS of 50 pixels, the result is a multiplier of 0 .88. Although this larger value might be more exact, it requires the player to be more accurate when trying to fire bubbles through gaps. Therefore, 0 .75 just feels better to the player, because it gives them more chances to make shots that they would find very difficult if the math were precise.
Often in game development, you’ll make decisions based on trial and error as much as by calculation. In this case, by using a slightly smaller value, you give the player the opportunity to fire bubbles through small gaps in the game board. Players won’t notice the lax enforcement of the laws of physics, and they’ll enjoy the game more.
If distEC is less than three-quarters of the bubble sprite width, we know that the fired bubble’s travel path intersects the candidate bubble’s hitbox at some point:
if(distEC < BubbleShoot.ui.BUBBLE_DIMS * .75){
Most likely, a second intersection point will occur where the line exits the bubble’s hitbox (see Figure 3-5, which shows the center line of the fired bubble passing through the hitbox at two points), but we only want the first. Two calculations will ensure that we have the correct intersection. Let’s look at the first calculation:
var dt = Math.sqrt(BubbleShoot.ui.BUBBLE_DIMS * BubbleShoot.ui.BUBBLE_DIMS
- distEC * distEC);
Here, we find the distance between the center of the struck bubble and the closest point on the fired bubble’s path. The second calculation follows:
var offset1 = {
x : (t - dt) * dx,
y : -(t - dt) * dy
};
var offset2 = {
x : (t + dt) * dx,
y : -(t + dt) * dy
};
The points on the line that cross the stationary bubble’s center are calculated here as offsets from the fired bubble’s path at point t.
Finding the Correct Collision Point
Now we want to choose which intersection we’ll encounter first—that is, which point is closest to where we’re firing curBubble from—so we need the distances to each potential collision point:
var distToCenter1 = Math.sqrt(offset1.x * offset1.x + offset1.y *
offset1.y);
var distToCenter2 = Math.sqrt(offset2.x * offset2.x + offset2.y *
offset2.y);
Next, we’ll choose the correct collision point and calculate where curBubble needs to stop by adding the starting coordinates back into the system:
if(distToCollision1 < distToCollision2){
var distToCollision = distToCollision1;
var dest = {
x : offset1.x + start.left,
y : offset1.y + start.top
};
}else{
var distToCollision = distToCollision2;
var dest = {
x : -offset2.x + start.left,
y : offset2.y + start.top
};
}
Most of the time, if the center of the bubble being fired collides with the edge of another bubble, it’ll cross twice: once on the way in and once on the way out. In the rare cases where it just brushes past and only a single collision point occurs, we’ll get two identical results, so it doesn’t matter which one we choose.
At this point, the function will loop over every bubble in the display and check for collisions; however, we don’t want to know about every collision—just the nearest one that occurs earliest in curBubble’s movement path.
To store the current best-match collision, we use the collision variable, which was set to null before the loop started. Then, each time we find a collision, we check to see if the new collision is closer than the previous best. If no previous collision happened, the first one we find will be the best. The collision object stores a reference to the stationary bubble that the fired bubble collides with, the distance to the collision, and the coordinates where it happened:
if(!collision || collision.distToCollision>distToCollision){
collision = {
bubble : bubble,
distToCollision : distToCollision,
coords : dest
};
};
};
}
}
};
return collision;
};
Now the findIntersection function will return an object with all the data we need if a collision is found or null if no collision occurs. All of these calculations happen before the bubble has even started moving.
Reacting to Collisions
We now need to use the collision coordinates we have in an amended version of clickGameScreen in game.js so we can fire and stop bubbles. We’ve written the first step in detecting a collision by resolving what the bubble has collided with (which may be nothing!). Now, Game needs to decide how to react to that information.
First, we check for a collision. If one occurs, we move the bubble to wherever the collision occurred. If one doesn’t occur, we fire the bubble off the screen. Change the existing clickGameScreen function in game.js to the following:
game.js
var clickGameScreen = function(e){
var angle = getBubbleAngle(e);
var bubble = $("#bubble");
var duration = 750;
var distance = 1000;
var collision = BubbleShoot.CollisionDetector.findIntersection(curBubble,
board,angle);
if(collision){
var coords = collision.coords;
➊ duration = Math.round(duration * collision.distToCollision / distance);
}else{
var distX = Math.sin(angle) * distance;
var distY = Math.cos(angle) * distance;
var bubbleCoords = BubbleShoot.ui.getBubbleCoords(curBubble.getSprite());
var coords = {
x : bubbleCoords.left + distX,
y : bubbleCoords.top - distY
};
};
BubbleShoot.ui.fireBubble(curBubble,coords,duration);
curBubble = getNextBubble();
};
If the distance the bubble moves has changed due to a collision, the time it needs to get there should also change, so all bubbles fire at the same velocity. We’ll use the collision data to recalculate that duration ➊.
Reload the game and fire a bubble. The bubble should stop when it hits the main group. But it still doesn’t look quite right. The bubble stops, but it doesn’t integrate itself into the board. It just sticks wherever it hits. Also, if you fire more bubbles, they just pile on top of each other; new bubbles won’t collide with previously fired bubbles. The problem is that the board state doesn’t change to synchronize with the display state, so we’ll correct this using two steps:
1. Add the fired bubble to the board state in the correct row and column.
2. When the fired bubble stops, lock it into a tidy grid position.
The second step will use information from the first.
Adding the bubble Object to the Board
The bubble object, curBubble, is in the DOM and should end up close to the correct position on the screen, so we can add it to the board’s row/column array when we know where it should fit.
To calculate the row number, we divide the y-coordinate by the height of rows and round down the result. Calculating the column number is similar, except we need to snap to either odd column numbers on even rows (including zero) or even column numbers on odd rows. Finally, we can add the bubble to the rows property of the Board object, because Board is where we’re storing positional information for all of the bubbles.
The function to add the fired bubble is trivial, so we’ll put that in board.js. Within the definition of the board class and after the getRows method, add the following:
board.js
var BubbleShoot = window.BubbleShoot || {};
BubbleShoot.Board = (function($){
var NUM_ROWS = 9;
var NUM_COLS = 32;
var Board = function(){
var that = this;
var rows = createLayout();
this.getRows = function(){ return rows;};
this.addBubble = function(bubble,coords){
var rowNum = Math.floor(coords.y / BubbleShoot.ui.ROW_HEIGHT);
var colNum = coords.x / BubbleShoot.ui.BUBBLE_DIMS * 2;
if(rowNum % 2 == 1)
colNum -= 1;
colNum = Math.round(colNum/2) * 2;
if(rowNum % 2 == 0)
colNum -= 1;
if(!rows[rowNum])
rows[rowNum] = [];
➊ rows[rowNum][colNum] = bubble;
➋ bubble.setRow(rowNum);
➌ bubble.setCol(colNum);
};
return this;
};
var createLayout = function(){
--snip--
};
return Board;
})(jQuery);
Note that as well as adding the bubble into the correct row-column position in rows[][] ➊, we’re also passing the calculated row ➋ and column ➌ numbers to the bubble object so it knows its location relative to the other bubbles. We don’t have those method calls yet, so let’s create them now in bubble.js in the Bubble class definition:
bubble.js
var Bubble = function(row,col,type,sprite){
var that = this;
this.getType = function(){ return type;};
this.getSprite = function(){ return sprite;};
this.getCol = function(){ return col;};
this.setCol = function(colIn){ col = colIn;};
this.getRow = function(){ return row;};
this.setRow = function(rowIn){ row = rowIn;};
this.getCoords = function(){
--snip--
}
};
Next, amend game.js to call this new method in clickGameScreen:
game.js
var clickGameScreen = function(e){
var angle = BubbleShoot.ui.getBubbleAngle(curBubble.getSprite(),e);
var duration = 750;
var distance = 1000;
var collision = BubbleShoot.CollisionDetector.findIntersection(curBubble,
board,angle);
if(collision){
var coords = collision.coords;
duration = Math.round(duration * collision.distToCollision / distance);
board.addBubble(curBubble,coords);
}else{
var distX = Math.sin(angle) * distance;
var distY = Math.cos(angle) * distance;
var bubbleCoords = BubbleShoot.ui.getBubbleCoords(curBubble.getSprite());
var coords = {
x : bubbleCoords.left + distX,
y : bubbleCoords.top - distY
};
};
BubbleShoot.ui.fireBubble(curBubble,coords,duration);
curBubble = getNextBubble();
};
Reload the game and shoot a few bubbles. They should start to pile up, although some may still overlap because they don’t quite settle properly into the grid. It’s progress, but we want the bubbles to line up nicely when they collide—that’s what we’ll do next.
Locking the bubble Object into the Grid
When the fired bubbles collide with the rest of the board, we want to lock them in place rather than just having them stop wherever they hit. The current movement works well, but we need to add another step that locks the bubble into position when it reaches its destination.
After board.addBubble has been run, the bubble object knows which row and column it’s located in; therefore, calling its getCoords method (which calculates based on row and column) will retrieve the coordinates where it should be rather than the coordinates where it actually stopped. To nudge it into place, we’ll add a complete function that can be set as part of a jQuery animate call and use the information the bubble already has. As a result, we can fire the bubble and forget about it rather than creating a process to tidy up bubbles as they land. jQuery’scomplete callback function is a useful place to put code that needs to run when an animation has finished. For example, in a game with an explosion effect, the frames of the animation could run, and when the animation finishes, the DOM elements that formed the explosion could be removed from the screen.
The complete property is called when the animation has ended. In ui.js amend fireBubble as follows:
ui.js
fireBubble : function(bubble,coords,duration){
bubble.getSprite().animate({
left : coords.x - ui.BUBBLE_DIMS/2,
top : coords.y - ui.BUBBLE_DIMS/2
},
{
duration : duration,
easing : "linear",
complete : function(){
➊ if(bubble.getRow() !== null){
bubble.getSprite().css({
left : bubble.getCoords().left - ui.BUBBLE_DIMS/2,
top : bubble.getCoords().top - ui.BUBBLE_DIMS/2
});
};
}
});
},
When you reload, the bubbles you fire should settle into the grid system. Note that we use getRow to check whether a collision has occurred ➊, because getRow should return null for a bubble that misses all other bubbles and moves off the screen.
Summary
Now that fired bubbles collide with the others on the board, Bubble Shooter is starting to act more like a game. We’ve moved sprites across the screen using jQuery, made the game react to the player’s input, and set up some of the basic game logic. However, currently there’s no way to pop bubbles, and it won’t be much of a game without that functionality. Popping logic and displaying an animation are the subjects of the next chapter.
Further Practice
1. Each row of the game board is offset to form a staggered pattern. Change the code in createLayout so the bubbles form a regular grid. How will this change the game?
2. Now that you can make createLayout build a different grid pattern, write code to generate an entirely new layout. For example, you could draw only every alternate column or build a more creative layout.
3. Bubble Shooter has a simple object structure that consists of a Game, a Board, and a set of Bubbles. What sort of objects would you need if you were building a game like Angry Birds, Bejeweled, or Candy Crush?
All materials on the site are licensed Creative Commons Attribution-Sharealike 3.0 Unported CC BY-SA 3.0 & GNU Free Documentation License (GFDL)
If you are the copyright holder of any material contained on our site and intend to remove it, please contact our site administrator for approval.
© 2016-2026 All site design rights belong to S.Y.A.