Build an HTML5 Game: A Developer’s Guide with CSS and JavaScript (2015)
Part II. Enhancements with HTML5 and the Canvas
Chapter 7. Levels, Sound, and More
In this chapter, we’ll add a few finishing touches to Bubble Shooter and cover a few more features of HTML5. Right now, the bubble grid could fill up the entire page in no time, giving players no room to fire bubbles. To prevent this from happening, we’ll make the game end if the player adds more than two rows to the bottom of the board. We’ll also implement multiple levels and high scores using the Local Storage API, smooth out animation with requestAnimationFrame, and add sound to the game with HTML5. Let’s start by adding multiple levels and high scores.
Multiple Levels and High Scores
It’s possible to complete a level by clearing out all of the bubbles, but thereafter, if you want to play again, you must refresh the browser. Obviously, this is not satisfactory for a game, and a few other game flow elements are missing:
§ A limited supply of bubbles (otherwise, the player can continue firing forever and cause the bubble counter to display negative numbers!)
§ A scoring system
§ End-of-level conditions
§ Further levels
The game will award points for each bubble popped, and those points will add up to the player’s score. We already have the information we need to limit the player’s bubble supply, because we count the bubbles, although our count can go into negative numbers. To add multiple levels that increase in difficulty, we’ll give the player fewer bubbles at each level.
New Game State Variables
The first steps we need to take are incorporating the bubble counter and creating other game state variables. We could create a new object to store all of the game state parameters, such as the player’s score, the number of bubbles remaining, the level number, and so on. Alternatively, we could store these as variables inside the Game object. I’ve opted for the latter because there are only three values to track. If you need to track more information or if the information to track is more complex, it’s best to store the data in its own object to keep game.js as small and readable as possible.
Let’s add a few new variables to the top of the Game class and give the player a different number of bubbles to complete the level based on the level number:
game.js
var BubbleShoot = window.BubbleShoot || {};
BubbleShoot.Game = (function($){
var Game = function(){
var curBubble;
var board;
var numBubbles;
var bubbles = [];
var MAX_BUBBLES = 70;
➊ var POINTS_PER_BUBBLE = 50;
➋ var level = 0;
➌ var score = 0;
➍ var highScore = 0;
var requestAnimationID;
this.init = function(){
--snip--
};
var startGame = function(){
$(".but_start_game").unbind("click");
BubbleShoot.ui.hideDialog();
➎ numBubbles = MAX_BUBBLES - level * 5;
board = new BubbleShoot.Board();
bubbles = board.getBubbles();
if(BubbleShoot.Renderer)
{
if(!requestAnimationID)
requestAnimationID = setTimeout(renderFrame,40);
}else{
BubbleShoot.ui.drawBoard(board);
};
curBubble = getNextBubble();
$("#game").bind("click",clickGameScreen);
};
--snip--
};
return Game;
})(jQuery);
We’ve created new variables for the number of points to award for each bubble ➊, the player’s current level ➋, their current score ➌, and a high score ➍. When the game starts, we reduce the number of bubbles by 5 for every level the player has completed ➎. At the first level, players are given 70 bubbles, at level 2, they have 65, and so on.
NOTE
You may notice a couple of problems with the way we are calculating the number of bubbles available. First, it’s impossible to complete level 14, because the number of bubbles the user would be given would be zero at this point. Second, the levels leading up to this will be extremely difficult. It’s hard to imagine being able to complete a level with 20 or 30 bubbles, let alone only 10 or 15! I’ll leave a solution to this problem as an exercise for the end of the chapter.
Display Level and Score
We don’t have anywhere to display the score yet, so we’ll add a DOM element to index.html for that, as well as somewhere to display the current level and high score. The bar at the top of the screen is a good place in the layout to display that information. The new elements are shown at the top of Figure 7-1.
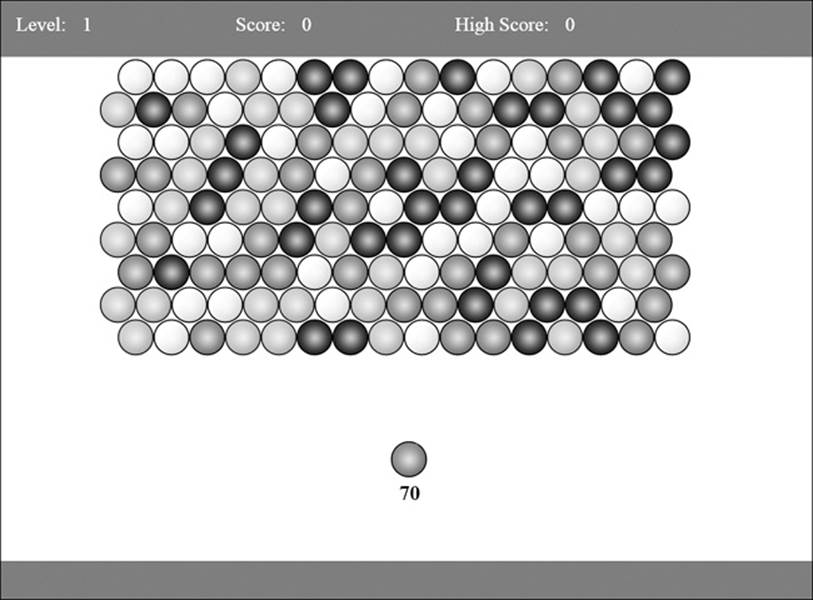
Figure 7-1. Screen layout showing level, score, and high score display
index.html
<!DOCTYPE HTML>
<html lang="en-US">
<head>
--snip--
</head>
<body>
<div id="page">
<div id="top_bar">
➊ <div id="top_level_box" class="top_bar_box">
<div id="top_level_label">Level:</div>
<div id="level">1</div>
</div>
➋ <div class="top_bar_box">
<div id="top_score_label">Score:</div>
<div id="score">0</div>
</div>
➌ <div class="top_bar_box">
<div id="top_score_label">High Score:</div>
<div id="high_score">0</div>
</div>
</div>
--snip--
</div>
</body>
</html>
Three new <div> elements were added: one each for the level number ➊, the current game score ➋, and the high score ➌. Each <div> has an element to display the label and then a value.
These also need style definitions in main.css:
main.css
body
{
margin: 0;
}
#page
{
position: absolute;
left: 0;
top: 0;
width: 1000px;
height: 738px;
}
#top_bar
{
position: absolute;
left: 0;
top: 0;
width: 1000px;
height: 70px;
background-color: #369;
color: #fff;
}
➊ .top_bar_box
{
font-size: 24px;
line-height: 60px;
float: left;
margin-left:20px;
width: 250px;
}
➋ .top_bar_box div
{
float: left;
margin-right: 20px;
}
--snip--
I haven’t styled each of the three elements individually; instead, I’ve given them a common class of top_bar_box ➊. The basic CSS styling gives each element a width of 250 pixels and floats it to the left, so the elements form a row at the top of the screen inside top_bar. The label and value displayed for each element is inside a <div>, so the styling for that is applied without creating a new CSS class ➋.
Now let’s award some points to the player and display their score and level. Points need to be awarded and displayed whenever bubbles are popped or orphaned, and score and level values should be displayed at the start of the game. First, we need functions in ui.js to draw the values to the screen. We’ll put them inside ui.js to continue to keep game.js free of display code:
ui.js
var BubbleShoot = window.BubbleShoot || {};
BubbleShoot.ui = (function($){
--snip--
var ui = {
--snip--
➊ drawScore : function(score){
$("#score").text(score);
},
➋ drawHighScore : function(highScore){
$("#high_score").text(highScore);
},
➌ drawLevel : function(level){
$("#level").text(level+1);
}
};
--snip--
return ui;
} )(jQuery);
drawScore ➊ and drawHighScore ➋ accept score values and draw them into the relevant <div>s on the screen. drawLevel writes the level number but adds 1 to it first, because the internal level state starts at zero ➌. Although all three of these functions contain only a single line of code, it’s a good idea to create separate functions for them and write, for example, ui.drawScore(score) rather than $("#score").text(score) each time you update the score value. Then, if you want to add visual effects to any of the elements when they change, you can do so in one function without tracking down every instance where the score is updated. If you want the score to flash, say, every time it increases, then you would only need to make the change in one place.
Now we add calls to these functions into game.js within startGame and clickScreen:
game.js
var BubbleShoot = window.BubbleShoot || {};
BubbleShoot.Game = (function($){
var Game = function(){
--snip--
var startGame = function(){
$(".but_start_game").unbind("click");
BubbleShoot.ui.hideDialog();
numBubbles = MAX_BUBBLES;
board = new BubbleShoot.Board();
bubbles = board.getBubbles();
if(BubbleShoot.Renderer)
{
if(!requestAnimationID)
requestAnimationID = setTimeout(renderFrame,40);
}else{
BubbleShoot.ui.drawBoard(board);
};
curBubble = getNextBubble();
$("#game").bind("click",clickGameScreen);
➊ BubbleShoot.ui.drawScore(score);
BubbleShoot.ui.drawLevel(level);
};
var clickGameScreen = function(e){
var angle = BubbleShoot.ui.getBubbleAngle(curBubble.getSprite(),e,board.
calculateTop());
var duration = 750;
var distance = 1000;
var collision = BubbleShoot.CollisionDetector.findIntersection(curBubble,
board,angle);
if(collision){
var coords = collision.coords;
duration = Math.round(duration * collision.distToCollision / distance);
board.addBubble(curBubble,coords);
var group = board.getGroup(curBubble,{});
if(group.list.length >= 3){
popBubbles(group.list,duration);
var orphans = board.findOrphans();
var delay = duration + 200 + 30 * group.list.length;
dropBubbles(orphans,delay);
➋ var popped = [].concat(group.list,orphans);
➌ var points = popped.length * POINTS_PER_BUBBLE;
➍ score += points;
➎ setTimeout(function(){
BubbleShoot.ui.drawScore(score);
},delay);
};
}else{
--snip--
};
--snip--
};
--snip--
};
return Game;
})(jQuery);
We draw the score and level at game start ➊. When bubbles are popped, we first want to make a set of all of the bubbles that are both popped and orphaned. This is done by concatenating two arrays—the popped list and orphaned list ➋—and then multiplying POINTS_PER_BUBBLE by the length of the new array ➌. We then increment the score internally ➍, but we only update the display once the bubble has finished firing at the end of delay ➎. If you reload and start the game, your score should now increment.
Next, we’ll check for the end game conditions. Two states could result in the end game being reached: the player could run out of bubbles to fire, or the player could pop all the bubbles in the game board. If the former, then we want to show players a final score and have them start a new game at the first level. If the latter, then we want to clear the board, increment the level number, and prompt to start the next level.
We know that game state only changes as a result of the player firing a bubble, so the only place we need to check for possible end game conditions is after we calculate the result of any collision. We’ll do this immediately after the bubble has been fired, which happens insideclickGameScreen inside Game. If the board is empty or the player has run out of bubbles, we’ll end the game; if not, we’ll give the player the next bubble to fire. Make the following change to game.js:
game.js
var BubbleShoot = window.BubbleShoot || {};
BubbleShoot.Game = (function($){
var Game = function(){
--snip--
var clickGameScreen = function(e){
--snip--
BubbleShoot.ui.fireBubble(curBubble,coords,duration);
➊ if(numBubbles == 0){
endGame(false);
➋ }else if(board.isEmpty()){
endGame(true);
➌ }else{
curBubble = getNextBubble(board);
}
};
--snip--
};
return Game;
})(jQuery);
We first check to see if the player has run out of bubbles ➊ and then check to see if the board is cleared of bubbles ➋. If neither is true, we retrieve the next bubble as usual➌. A new function called endGame uses a Boolean to determine whether the player has won or lost the level: falsemeans the player lost (by running out of bubbles), and true means the player won (by clearing the board).
Note the call to board.isEmpty, which is a method that we haven’t written yet. Let’s do that now by adding the following into the board.js class:
board.js
var BubbleShoot = window.BubbleShoot || {};
BubbleShoot.Board = (function($){
var NUM_ROWS = 9;
var NUM_COLS = 32;
var Board = function(){
var that = this;
--snip--
this.isEmpty = function(){
return this.getBubbles().length == 0;
};
return this;
};
--snip--
return Board;
})(jQuery);
The isEmpty function checks to see if a call to the getBubbles method returns any objects. If the array has a length of zero, all the bubbles have been popped.
The second possible end game condition is if the player adds more than two new rows to the bottom of the board. We already have a function, getRows, to return the array of rows, so we just need to check whether its length is greater than the maximum number of rows we’ll permit, which is 11.
game.js
var BubbleShoot = window.BubbleShoot || {};
BubbleShoot.Game = (function($){
var Game = function(){
var curBubble;
var board;
var numBubbles;
var bubbles = [];
var MAX_BUBBLES = 70;
var POINTS_PER_BUBBLE = 50;
➊ var MAX_ROWS = 11;
--snip--
var clickGameScreen = function(e){
--snip--
BubbleShoot.ui.fireBubble(curBubble,coords,duration);
➋ if(board.getRows().length > MAX_ROWS){
endGame(false);
}else if(numBubbles == 0){
endGame(false);
}else if(board.isEmpty()){
endGame(true);
}else{
curBubble = getNextBubble(board);
}
};
--snip--
};
return Game;
})(jQuery);
To make the code easy to read, we’ll store the maximum number of rows allowed in a variable called MAX_ROWS ➊ and then we’ll check to see whether the number of rows on the board is greater than this number ➋; if so, we’ll end the game.
We also need to display messages to the player indicating a win or loss, a score, and so on. If we have a large number of different messages to show, we might create some JavaScript code to dynamically create and display dialogs. But we only have a couple of variations, so we’ll hardcode them into the HTML. The dialog we’ll show will look the same as the one for starting the game but with more information, as shown in Figure 7-2.
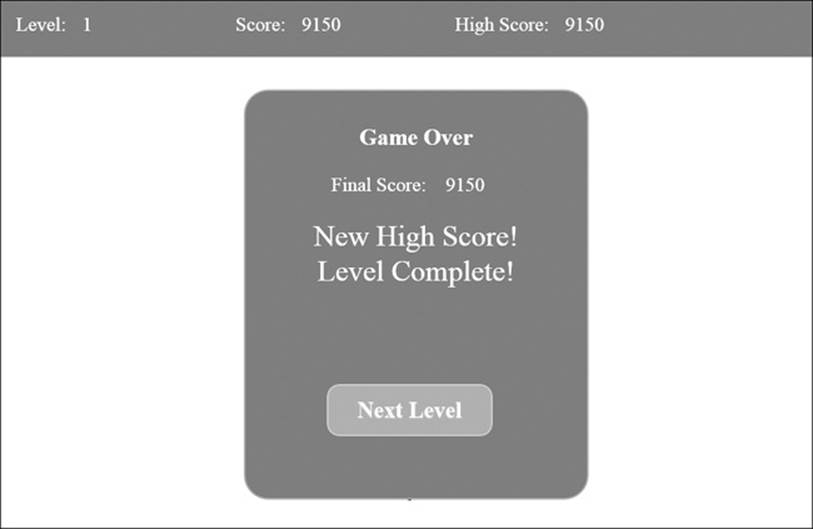
Figure 7-2. The end game dialog
Let’s add the structure for this to index.html now:
index.html
<!DOCTYPE HTML>
<html lang="en-US">
<head>
--snip--
</head>
<body>
<div id="page">
--snip--
<div id="start_game" class="dialog">
<div id="start_game_message">
<h2>Start a new game</h2>
</div>
<div class="but_start_game button">
New Game
</div>
</div>
➊ <div id="end_game" class="dialog">
<div id="end_game_message">
<h2>Game Over</h2>
➋ <div id="final_score">
<span>Final Score:</span>
<span id="final_score_value"></span>
</div>
➌ <div id="new_high_score">New High Score!</div>
➍ <div id="level_failed" class="level_failed">Level Failed!</div>
➎ <div id="level_complete" class="level_complete">Level Complete!</div>
</div>
➏ <div class="but_start_game button">
➐ <span class="level_complete">Next Level</span>
➑ <span class="level_failed">New Game</span>
</div>
</div>
</div>
</body>
</html>
Our game only ever shows one dialog ➊, which contains a message for the final score ➋, whether the level was completed or failed. If the player reaches a new high score, we’ll show that message ➌. The Level Failed! ➍ or Level Complete! ➎ messages will be shown depending on the situation. Finally, a single button will enable the next game to start ➏, which will lead to either the next level ➐ or a brand-new game ➑. We can determine after the button has been clicked whether the game is being restarted or continued, because we’ll know the current level number.
When we show the end_game dialog, we’ll show or hide the level_complete or level_failed classes, as appropriate, to display the correct messages. Notice that the level_complete class is attached to both the Level Complete! message ➎ and the Next Level button ➐, whereas thelevel_failed class is attached to the Level Failed! message ➍ and the New Game button ➑. This will enable us to, for example, hide all of the level_failed elements with a single jQuery call:
$(".level_failed").hide();
This is one of the advantages of using HTML and CSS for the user interface, and it’s possible because Bubble Shooter is a relatively simple game. But even if you had a much larger range of messages to show in a dialog, you could still use jQuery to create DOM elements and use CSS to style them.
The dialog will inherit some styling from the dialog class definition, but we need to add some more definitions to main.css:
main.css
#final_score
{
margin: 26px 0;
}
#end_game_message span
{
margin-right: 20px;
font-size: 24px;
}
#level_complete,#level_failed,#new_high_score
{
font-size: 36px;
color: #fff;
}
We now want to create the endGame function in game.js. This will display the end-of-game dialog with the appropriate win or lose message and then allow the player to either play the next level or start a new game:
game.js
var BubbleShoot = window.BubbleShoot || {};
BubbleShoot.Game = (function($){
var Game = function(){
--snip--
var renderFrame = function(){
--snip--
};
var endGame = function(hasWon){
➊ if(score > highScore){
➋ highScore = score;
➌ $("#new_high_score").show();
➍ BubbleShoot.ui.drawHighScore(highScore);
}else{
➎ $("#new_high_score").hide();
};
➏ if(hasWon){
level++;
➐ }else{
score = 0;
level = 0;
};
➑ $(".but_start_game").click("click",startGame);
➒ $("#board .bubble").remove();
BubbleShoot.ui.endGame(hasWon,score);
};
};
return Game;
})(jQuery);
First, we check to see if the player’s score is higher than the value of highScore, which starts at zero ➊. If so, highScore is updated ➋ and we show the new_high_score element inside the game completion dialog ➌. Then a call to ui.drawHighScore occurs, which we created when we updated the in-game scoring display ➍. If there isn’t a new high score, the message is hidden ➎.
The next branch checks if the player has won and, if so ➏, increments level by 1. If the player lost, score and level are reset to zero ➐. Then we need to enable the startGame button again by binding the click event to it ➑, clear the rest of the bubbles from the display ➒, and call a new method in ui.js that will display the game over dialog.
Note that it doesn’t matter whether the player is playing the first level or the fiftieth, because startGame just draws the current level and starts the game; therefore, we don’t need to create a new function to handle new levels.
But the display isn’t the only part of the game that should react to a game over. The player shouldn’t be able to shoot bubbles anymore either! Let’s also create a function called endGame in ui.js. Whereas endGame in game.js deals with the game logic aspects to finishing a level, the code inui.js will handle the visual aspects of ending the game, such as showing the dialog and populating it with the player’s score:
ui.js
var BubbleShoot = window.BubbleShoot || {};
BubbleShoot.ui = (function($){
--snip--
var ui = {
--snip--
endGame : function(hasWon,score){
➊ $("#game").unbind("click");
➋ BubbleShoot.ui.drawBubblesRemaining(0);
➌ if(hasWon){
$(".level_complete").show();
$(".level_failed").hide();
}else{
$(".level_complete").hide();
$(".level_failed").show();
};
➍ $("#end_game").fadeIn(500);
$("#final_score_value").text(score);
}
};
--snip--
return ui;
} )(jQuery);
When the game is finished, the endGame method ensures that clicks ➊ in the game area will no longer trigger the clickGameScreen function, because we don’t want the player to fire bubbles when the game is over. It also updates the bubbles remaining display to zero ➋ and shows the correct win/lose message inside the dialog ➌. Then we show the dialog with the messages for Level Complete! or Level Failed! inside ➍.
Ending Levels Efficiently
Currently, Bubble Shooter’s end game can be a bit tedious: the player is left firing bubbles until they form groups large enough to pop. This can also prove problematic if the bubbles don’t come out in the right color combinations. For example, if the only bubble on the board is blue and the randomizer generates only red bubbles, the player might fail a level through no fault of their own! Rather than expect the player to clear every bubble, we’ll give them a quick ending when they clear all but the last five bubbles in the top row. When that happens, the remaining top row bubbles will pop, and everything else will drop down as if it were an orphaned group (using the kaboom routine).
ANTICIPATE AND ALLEVIATE PLAYER FRUSTRATIONS
Always think ahead about how your game could become frustrating and solve the problem in advance. By doing so, you’ll improve the game and keep players coming back for more. In Bubble Shooter, a level could be impossible to complete because the bubbles didn’t appear in the correct order. This situation is a perfect example of what can happen when a possible outcome—in this case, asingle bubble being left on the board and not being poppable—isn’t considered during the original game design. Game programming is almost always iterative, and rarely will your first version be the final one.
After we calculate the current set to pop, we’ll check how many bubbles are left anytime the player pops bubbles. If five or fewer bubbles remain on the board after the player has finished firing bubbles, we’ll pop those for free and take the player straight to the game’s end.
The check to determine if the level is nearly complete will be inside clickGameScreen in game.js:
game.js
var BubbleShoot = window.BubbleShoot || {};
BubbleShoot.Game = (function($){
var Game = function(){
--snip--
var clickGameScreen = function(e){
--snip--
if(collision){
var coords = collision.coords;
duration = Math.round(duration * collision.distToCollision /
distance);
board.addBubble(curBubble,coords);
var group = board.getGroup(curBubble,{});
if(group.list.length >= 3){
popBubbles(group.list,duration);
➊ var topRow = board.getRows()[0];
➋ var topRowBubbles = [];
for(var i=0;i<topRow.length;i++){
if(topRow[i])
topRowBubbles.push(topRow[i]);
};
➌ if(topRowBubbles.length <= 5){
➍ popBubbles(topRowBubbles,duration);
➎ group.list.concat(topRowBubbles);
};
var orphans = board.findOrphans();
var delay = duration + 200 + 30 * group.list.length;
dropBubbles(orphans,delay);
➏ var popped = [].concat(group.list,orphans);
var points = popped.length * POINTS_PER_BUBBLE;
score += points;
setTimeout(function(){
BubbleShoot.ui.drawScore(score);
},delay);
};
}else{
--snip--
};
--snip--
};
--snip--
};
return Game;
})(jQuery);
First, we retrieve the top row ➊, and then we loop through it, counting the number of bubbles ➋. If five or fewer bubbles are present ➌, we pop all of the bubbles in the top row ➍ and add them to the list of popped bubbles ➎ so they contribute to the player’s score ➏.
You should now be able to play through an entire game level, clear the board, and see a prompt to start the next level. Congratulations! You just finished your first fully playable game.
But before you put Bubble Shooter in front of another player, let’s make the high score persist from one session to the next rather than resetting every time the browser window is closed. After all, what’s the point of a high score if you can’t come back to challenge it later?
High Score Persistence with Web Storage
Although Bubble Shooter has no server-side component to save high scores, we can use the Web Storage system that comes with HTML5 to save them to the local machine. Players who play again with the same browser will see the previous high score, which gives them a target to beat.
Bubble Shooter is a casual game: the user will open it, play a few levels until they fail, and then close the browser tab. Remembering the high score is a good idea, but we don’t need to retain any other data. Regardless, the principle of using Web Storage to persist data from one game session to the next is the same even if you’re storing a much larger amount of information.
Web Storage vs. Cookies
On the client side, Web Storage behaves in a similar way to cookies, but the implementation details (and advantages) are very different. Web Storage is easier to access than cookies are because data is stored in name/value pairs. Unlike with cookies, there is no server-side access to the contents of Web Storage, because data isn’t transmitted as part of an HTTP request. The contents of the store are restricted by domain, so different subdomains have different stores. We could store the high score in a cookie, but there’s no reason to do so, and the storage format as well as the overhead of transmitting data unnecessarily to the server on each request makes a cookie a worse option than Web Storage. Trying to store large amounts of data (such as the layout of the current board) in a cookie can also cause performance issues, because this data is transmitted to the server with each request. For example, when the browser tries to download an image file of only a few kilobytes, it could also have to send a large amount of extraneous data to the server.
Web Storage, on the other hand, gives you more space than cookies do, although the exact amount isn’t defined in the HTML specification and is set individually by the browser vendors. The current lowest common figure among the main web browsers is 5MB; that limit applies to all data stored within a domain. Google Chrome, Firefox, and Internet Explorer 9 on a desktop all provide up to 10MB, but the Android browser on phone and tablet devices provides as little as 2MB. Compare that with the maximum cookie storage—anything upwards of 300 cookies of 4KB each—and you can see that even at the lower limits, Web Storage provides much more storage.
Because browser limits can change regularly, if you plan to place large amounts of data into Web Storage, there’s no substitute for testing on specific devices; however, for small elements such as the high score in Bubble Shooter, the space limits are irrelevant.
Adding Data to Web Storage
Web Storage comes in two parts: Session Storage and Local Storage. We’ll only look at Local Storage, which is best for persisting data across sessions. The principles of storing and accessing data are largely the same for Session Storage, although the persistence and security differ slightly. As the name might imply, Session Storage only persists for the duration of the browser session. The data disappears when the user closes their browser window. This type of storage might be useful for a multipage web application where data needs to persist from one page to the next, but it’s obviously unsuited to storing a high score. Once you’re familiar with Local Storage, you’ll be able to adapt to working with Session Storage if you need to use it.
The format for adding a piece of data to localStorage is as follows:
localStorage.setItem(key,value);
The key is a string, such as "high_score", and value is also a string, or a number or other object that can be automatically converted to a string. Note that if you try to pass in a complex object, such as an array, the conversion to a string may result in the name of the object (that is, Array) rather than the data you want to store. So if in doubt, perform a conversion yourself. For more complex data, you can use JSON.stringify to save objects and JSON.parse to retrieve them.
To retrieve data, you just need the key:
var value = localStorage.getItem(key);
localStorage.getItem always returns values as strings, so you’ll need to use parseInt or parseFloat to convert them to numerical data.
If the game were more complex or took longer to play, you might want to save more data, such as the current level as well as the high score. In that case, we could just keep on adding strings:
localStorage.setItem("high_score",highScore);
localStorage.setItem("level",level);
Or we could create an object and JSON encode it:
var gameData = {high_score : highScore, level : level};
localStorage.setItem("bubbleshoot_data",JSON.stringify(gameData));
Then, when we want to retrieve the data, we would use this:
var gameData = JSON.parse(localStorage.getItem("bubbleshoot_data"));
The general principle is that if you can convert your data into a string and decode it from a string when you want to retrieve it, you can save it to Local Storage.
In Bubble Shooter, to save the high score, the Local Storage entry will be called high_score. At game initialization, we want to check whether an existing value is stored and, if so, use that in place of the zero that is currently hardcoded in. When the player has set a new record, we’ll set the Local Storage value to the new high score.
In game.js, we’ll make additions to init and endGame to retrieve and set the high score:
game.js
var BubbleShoot = window.BubbleShoot || {};
BubbleShoot.Game = (function($){
var Game = function(){
--snip--
this.init = function(){
if(BubbleShoot.Renderer){
BubbleShoot.Renderer.init(function(){
$(".but_start_game").click("click",startGame);
});
}else{
$(".but_start_game").click("click",startGame);
};
➊ if(window.localStorage && localStorage.getItem("high_score")){
➋ highScore = parseInt(localStorage.getItem("high_score"));
}
➌ BubbleShoot.ui.drawHighScore(highScore);
};
--snip--
var endGame = function(hasWon){
if(score > highScore){
highScore = score;
$("#new_high_score").show();
BubbleShoot.ui.drawHighScore(highScore);
➍ if(window.localStorage){
➎ localStorage.setItem("high_score",highScore);
}
}else{
$("#new_high_score").hide();
};
if(hasWon){
level++;
}else{
score = 0;
level = 0;
};
$(".but_start_game").click("click",startGame);
$("#board .bubble").remove();
BubbleShoot.ui.endGame(hasWon,score);
};
};
return Game;
})(jQuery);
First, we check whether localStorage is supported by the browser, by using another Modernizr detector, and whether a value for high_score exists ➊. If a high score exists, we set highScore to the contents in the store ➋. We make sure to wrap the value with a parseInt, because values in the store are returned as strings and we want to work with an integer. We then display the high score ➌. To save the score, we add a line to endGame to check whether localStorage is supported ➍ and then save to it ➎.
Reload the browser and play through a game. At first, any score you get should become the new high score. But if you close the browser and reload the game, the high score should be populated with your previous value.
You could also use Web Storage to save things like language preferences, player profiles, or game state progression. Just be mindful of what you store there, because the values inside the storage system are open to calls from the JavaScript console. That means there’s nothing to stop particularly tech-savvy players from updating data themselves! In the next chapter, we’ll briefly discuss security issues in HTML5 games, but for now we can rely on the fact that there’s really no incentive to set an impossibly high score to try to beat.
Smoothing Animations with requestAnimationFrame
We use setTimeout to time animations in jquery.kaboom.js and when we trigger frame updates in the canvas version of Bubble Shooter. setTimeout is cross-browser compatible and relatively simple: set the timeout value to 40 milliseconds, and you can expect 25 frames per second.
However, there are downsides to using setTimeout. The main problem is that if the browser is busy with something else, the next iteration may not be called for more than 40 milliseconds. In some cases, it might take a lot longer and the user will start to notice.
We could recode movement so that objects move a distance proportional to the time elapsed since the last update, effectively ignoring the 40 millisecond figure. But we’d still have to accept the fact that whatever value we set the timeout delay to will be too low for some setups and those displays won’t be able to keep up. On systems that can handle much faster updates, we could display much smoother animations, but if we set the timeout value to 10 milliseconds to handle those cases, slower systems will see an adverse effect.
Fortunately, HTML5 introduced requestAnimationFrame, an alternative to setTimeout that is better suited to animation. Rather than making the programmer guess what kind of frame rate might work, the browser calls the function passed to requestAnimationFrame whenever it is ready to draw a new update. The time between updates might be much faster (or slower!) than 40 milliseconds, but at least we know that we’re neither making a processing logjam worse nor having the system sit idle when we could spend extra cycles smoothing the animations.
A New Perspective on Frame Updates
We have to think differently about frame updates when switching to requestAnimationFrame. Currently, before setTimeout runs, we tell the browser how long to wait. We assume that the time elapsed is the time we expected to elapse. For example, in moveAll in jquery.kaboom.js, we set a timeout of 40 milliseconds:
setTimeout(moveAll,40);
We then update the position of the bubbles assuming that 40 milliseconds—1/25th of a second—has elapsed. However, with requestAnimationFrame, we don’t specify a frame rate. In the moveAll function in jquery.kaboom.js, if requestAnimationFrame did happen to run this routine every 40 milliseconds, we wouldn’t need to change anything. But if it ran every, say, 20 milliseconds, we couldn’t keep the same values of dx and dy, or our whole animation would run much faster—twice as fast, in fact, because it would add dx and dy twice as often.
Instead, we need to find out how many milliseconds have elapsed and then adjust our animation step size. We can even apply the same math techniques to setTimeout animations to get better results on older browsers that don’t support requestAnimationFrame. As shown in Figure 7-3, the less time that’s elapsed since the bubble was last drawn, the less distance we have to move it along its path.
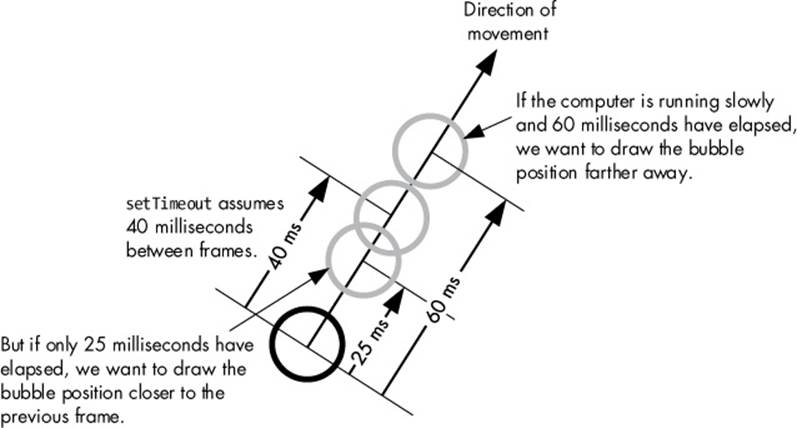
Figure 7-3. Bubble positions with different frame rates
Code Compatibility with Polyfills
Modernizr will help us build the setTimeout fallback. requestAnimationFrame is still regarded as prestandards by many browsers, so prefixed versions are available for Webkit, Mozilla, and so on, which Modernizr can fill in for us. Add the following to game.js:
game.js
var BubbleShoot = window.BubbleShoot || {};
BubbleShoot.Game = (function($){
var Game = function(){
--snip--
};
window.requestAnimationFrame = Modernizr.prefixed("requestAnimationFrame",
window) || function(callback){
window.setTimeout(function(){
callback();
}, 40);
};
return Game;
})(jQuery);
This single line of new code says that if requestAnimationFrame (vendor-prefixed if necessary) is defined, then set window.requestAnimationFrame to the contents of requestAnimationFrame. If requestAnimationFrame is not defined, then we create a new function that accepts a function as a parameter and calls that function after 40 milliseconds using setTimeout.
This technique is known as a polyfill. Polyfills attempt to mimic or patch in new functionality to a browser where it’s not supported natively, allowing you to use new technologies in your code without having to always worry about forking your code or providing fallbacks yourself. The name comes from the filling substance Polyfilla, because the technique involves filling in the cracks in browser support.
Polyfills are written to support all kinds of functionality in older browsers. For example, to store the player’s high score, we’re using the Local Storage API. This isn’t available in older browsers, but we could achieve the same effect by storing the data in a cookie. There are two ways to approach this: one way is to write an if/else statement every time we access Local Storage to check if it exists and, if not, branch to run some cookie code. Alternatively, we could create an object called localStorage and add methods for getItem and setItem that use cookies to save and retrieve data.
Polyfills are rarely perfect solutions: setTimeout and requestAnimationFrame may operate in very similar ways, but sometimes the differences may be important. In the Local Storage example, we might be able to use cookies in exactly the same way as Local Storage, but if we tried to store a lot of data, we’d run into problems. Polyfills can enhance browser compatibility without a lot of code, but it’s important to know the limitations of any polyfill you use.
Once we have the polyfill for requestAnimationFrame, as far as the rest of our code is concerned, requestAnimationFrame is supported, and we can use it regardless of the browser. We know that in truth, a setTimeout call is running behind the scenes and that sometimes the animation won’t run as smoothly as it would with the natively supported requestAnimationFrame method. But as far as the code that calls it is concerned, the function behaves in the same way.
Now that we have a working requestAnimationFrame polyfill, we can replace our calls to setTimeout in game.js with calls to the new function in startGame and renderFrame:
game.js
var BubbleShoot = window.BubbleShoot || {};
BubbleShoot.Game = (function($){
var Game = function(){
--snip--
var startGame = function(){
--snip--
if(BubbleShoot.Renderer)
{
if(!requestAnimationID)
requestAnimationID = requestAnimationFrame(renderFrame);
}else{
BubbleShoot.ui.drawBoard(board);
};
--snip--
};
--snip--
var renderFrame = function(){
$.each(bubbles,function(){
if(this.getSprite().updateFrame)
this.getSprite().updateFrame();
});
BubbleShoot.Renderer.render(bubbles,board.calculateTop());
requestAnimationID = requestAnimationFrame(renderFrame);
};
--snip--
};
--snip--
return Game;
})(jQuery);
We must make similar changes inside jquery.kaboom.js to use requestAnimationFrame rather than setTimeout. The kaboom function internally assumes that 40 milliseconds elapses between frames, giving a frame rate of 25 frames per second, but as we now know, withrequestAnimationFrame the elapsed time may vary. Again, we need to calculate how much time has elapsed and calculate movement proportionally:
jquery.kaboom.js
(function(jQuery){
var defaults = {
gravity : 1.3,
maxY : 800
};
var toMove = [];
➊ var prevTime;
var moveAll = function(){
➋ var newTime = Date.now();
➌ var elapsed = newTime - prevTime;
➍ var frameProportion = elapsed / 25;
➎ prevTime = newTime;
var stillToMove = [];
for(var i=0;i<toMove.length;i++){
var obj = toMove[i];
obj.x += obj.dx * frameProportion;
obj.y -= obj.dy * frameProportion;
obj.dy -= obj.config.gravity * frameProportion;
if(obj.y < obj.config.maxY){
obj.elm.css({
top : Math.round(obj.y),
left : Math.round(obj.x)
});
stillToMove.push(obj);
}else if(obj.config.callback){
obj.config.callback();
}
};
toMove = stillToMove;
if(toMove.length > 0)
➏ requestAnimationFrame(moveAll);
};
jQuery.fn.kaboom = function(settings)
{
var elm = this;
var config = $.extend({}, defaults, settings);
if(toMove.length == 0){
prevTime = Date.now();
➐ requestAnimationFrame(moveAll);
};
var dx = Math.round(Math.random() * 10) - 5;
var dy = Math.round(Math.random() * 5) + 5;
toMove.push({
elm : this,
dx : dx,
dy : dy,
x : this.position().left,
y : this.position().top,
config : config
});
};
})(jQuery);
First, we define an empty variable called prevTime ➊ to store the timestamp of the last rendered frame, which is null initially. Each time moveAll is called, we retrieve the current timestamp ➋ and calculate the time elapsed since the last frame ➌. Our initial calculations were based on 40 milliseconds having elapsed, so to calculate the correct position, we scale the proportion of the frame elapsed accordingly ➍. If only 8 milliseconds have elapsed, frameProportion will be 0.2, and the animation will update in smaller but more frequent steps. If 80 milliseconds have elapsed, frameProportion will be 2, and the animation will update in larger steps. The end effect is that the bubbles take the same time to drop off the screen regardless of the frame rate. To prepare for the next frame, we update prevTime to the current timestamp ➎.
Also, setTimeout is replaced with requestAnimationFrame in two places: once when the animation is started ➏ and once for each frame loop ➐.
Reload the game and run it again to make sure it works properly. You probably won’t see a difference in performance unless you have a particularly slow browser setup. However, now you can be confident that everyone who plays Bubble Shooter will see bubbles moving and falling at the same speeds, even if the frame update rates vary between devices.
Adding Sound with HTML5
A game never feels like a game without sound! HTML5 provides some increasingly powerful options for processing and playing back audio. I say increasingly powerful because browser support is being improved all the time. You can manipulate wave files byte by byte, record from the microphone, perform dynamic mixing, and take advantage of a whole host of features in addition to the woeful audio options that HTML offered not long ago. Let’s look at the basic features of HTML5 audio.
The HTML5 Audio API
Historically, HTML has implemented audio poorly, offering no reliable way to embed and control sounds within web pages. This changed with HTML5, and you can embed a sound directly into a page with a simple tag, such as this one:
<audio src="sounds.mp3" autoplay></autoplay>
On its own, this isn’t a lot of help for a game in which we want to programmatically start and stop sounds so they can react to events like bubbles popping. Fortunately, HTML5 also provides a way to play audio through a JavaScript API without using HTML tags at all.
The JavaScript equivalent of the preceding HTML fragment, which just embeds and plays a single file, is this:
var sound = new Audio("sounds.mp3");
sound.play();
You can try this with any MP3 file you have. The parameter passed into the new Audio call is the URL to the sound file. If you place it in the bubbleshoot folder and change the parameter to the file’s name, you can run the previous command in the JavaScript console and the sound should play.
The sound will stop naturally when it ends, and you can use the stop method to end a sound at any point during playback:
sound.stop()
Those are the only commands we need, but take time to look through the audio API specification to see the growing potential for sound delivery in browsers. As well as methods and properties that affect the basic playback of audio, such as changing the volume of a sound or skipping to a specific point in a file, there is functionality for recording from input devices, mixing sounds, changing stereo, and even 3D sound positioning, as well as ways to post-process sounds to add effects such as echo. These are increasingly being supported in mainstream browsers, such as Google Chrome and Firefox, with improvements arriving in each new version.
If you want to play multiple sounds simultaneously, you must create multiple Audio objects. For example:
var sound1 = new Audio("sounds.mp3");
var sound2 = new Audio("sounds.mp3");
sound1.play();
sound2.play();
To just play different sounds one after another, you could reuse an Audio object by changing the object’s src property. But to play multiple sounds at the same time, you need as many objects in existence as sounds that you plan to play simultaneously. As you’ll see in Bubble Shooter, this means that if we want to pop a group of 20 bubbles, we’ll need 20 sound objects to play the 20 popping sounds at the same time.
Popping Bubbles: Complete with Sound
We’ll add HTML5 sound support to Bubble Shooter using the audio API so a sound plays for each bubble popped. Grab the file pop.mp3 from http://www.buildanhtml5game.com/ and put it in a new folder called _mp3 inside the game folder.
First, create a class to play the sounds. We’ll wrap the HTML5 audio functionality in our own code, which will prevent an error from being thrown in browsers that don’t support HTML5 audio. Create a new file in the _js folder called sounds.js and then add the file to load in index.html. Sound processing, like rendering and the user interface, is another piece of functionality that’s best to keep separate from game logic wherever possible. By creating a separate file to handle playback, we can put all of our sound-handling code in one place.
We’ll reuse Audio objects, so we’ll create these as the code is initialized. Then, whenever a sound needs to play, we’ll pull out the next object in the queue, change the src to the file we want to play, and then play it. We’ll set a cap of 10 sounds that can play simultaneously, which is a low number, but even on the rare occasion when a player is popping more than 10 bubbles at a time, there’s no need to play more than 10 sounds.
sounds.js
var BubbleShoot = window.BubbleShoot || {};
BubbleShoot.Sounds = (function(){
➊ var soundObjects = [];
➋ for(var i=0;i<10;i++){
soundObjects.push(new Audio());
}
➌ var curSoundNum = 0;
➍ var Sounds = {
➎ play : function(url,volume){
if(Modernizr.audio){
➏ var sound = soundObjects[curSoundNum];
➐ sound.src = url;
➑ sound.volume = volume;
➒ sound.play();
➓ curSoundNum++
if(curSoundNum >= soundObjects.length){
curSoundNum = curSoundNum % soundObjects.length;
}
}
}
};
return Sounds;
})();
A new object called BubbleShoot.Sounds contains the array soundObjects ➊, which we’ll use to store the ten Audio objects. These are initialized as soon as the code is loaded ➋. We also keep track of which object to use with the variable curSoundNum ➌.
Next, we create the object to play the sound ➍, which contains a single method to play a sound ➎. It will accept two parameters: the URL of the sound file to play and the volume to play the sound at, which is a decimal number between 0 (silent) and 1 (full volume).
We use Modernizr to check whether or not HTML5 audio is supported, and if it is, we grab the current Audio object from the soundObjects array ➏, set its src property to the URL of the file to play ➐, set its volume ➑, and then play it ➒. If audio isn’t supported, the method will do nothing, but because of our check for Modernizr.audio, no error will be thrown.
Finally, we increment the value of curSoundNum ➓ so that next time play is called, we will grab the next object in the queue. Then, we make sure that the value of curSoundNum is never greater than the number of sound objects in the soundObjects array.
If we want to play more sounds, we could push more Audio objects into the soundObjects array. Currently, if we try to play more than 10 sounds at once, only the last 10 sounds will play.
Sound control will happen inside game.js with a call to the BubbleShoot.Sounds.play function:
game.js
var BubbleShoot = window.BubbleShoot || {};
BubbleShoot.Game = (function($){
var popBubbles = function(bubbles,delay){
$.each(bubbles,function(){
var bubble = this;
setTimeout(function(){
bubble.setState(BubbleShoot.BubbleState.POPPING);
bubble.animatePop();
setTimeout(function(){
bubble.setState(BubbleShoot.BubbleState.POPPED);
},200);
➊ BubbleShoot.Sounds.play("_mp3/pop.mp3"➋,Math.random()*.5 + .5➌);
},delay);
board.popBubbleAt(bubble.getRow(),bubble.getCol());
setTimeout(function(){
bubble.getSprite().remove();
},delay + 200);
delay += 60;
});
};
--snip--
};
--snip--
return Game;
})(jQuery);
We want to play as many sounds as there are bubbles to pop, and we also want to start the sound at the same time we start the animation ➊. We pass the play method of Sounds two parameters: a relative URL to the MP3 file to play ➋ and a volume, which will be a random number between .5 and 1 ➌.
INCREASE IMMERSION WITH VARIETY
Why do we pass a random volume level? Try passing in a value of 1 and popping some bubbles. Then compare this effect to that of the random value. It’s only a small change, but the variation in volume provides just enough differentiation between each sound to make it slightly less mechanical. We could do other things to make the effect even more natural, such as using a set of sounds rather than just one MP3 file so not every bubble sounds the same or changing the timing between pops so they aren’t evenly spaced. Experimenting to create the most immersive experience possible and doing it with minimum effort are tasks you’ll become more proficient at as you develop more games.
Summary
Now that we have a simple sound to add a bit of atmosphere, you’ve finished building Bubble Shooter! The game should play on older browsers, using CSS for positioning and animations, and it will work well on newer browsers that support the canvas element. We have persistent high scores and audio, and we’ve developed the animations in such a way that they should perform well regardless of the player’s system speed.
In the next chapter, we’ll explore some other parts of HTML5 that aren’t directly related to the game you just built. You’ll learn some pointers on how to deploy your game to Web and mobile environments, and you’ll see what the future holds for HTML5.
Further Practice
1. Toward the end of each level, the player can only have bubbles of one, two, or three colors left on the board. Giving them a bubble of a color that won’t match any of these causes the player to waste a shot and can make the game more difficult to complete. Change the bubble-generating algorithm so that it gives players only bubbles of a color that can potentially form a match. For example, if only red and blue bubbles remain, the firing bubble should be either red or blue. You will need to amend getNextBubble in game.js and choose a bubble type from one of the types that exist in the Board object.
2. As noted in Multiple Levels and High Scores, the game will become unplayable after a few levels because the number of bubbles allowed becomes too small. Instead of subtracting five bubbles per level, create an algorithm that makes levels progressively harder but makes it possible to complete a level. Perhaps the smallest number of fired bubbles a player can complete a level in is 30, and we want them to reach this level of difficulty on level 15. Before this point, the step from level 1 to 2 might be, say, five bubbles fewer, but the step from level 14 to 15 might be only one fewer. Write an equation or other method to decrease the number of bubbles allowed and increase the difficulty in this way.
3. Give players an incentive to repeat levels by awarding stars for a completion grade instead of the pass or fail condition that currently exists. You could award one star whenever the player clears the level, two stars if they clear with more than 25 percent of the level’s bubble allocation remaining, and three stars if they complete the level by firing only half the bubbles they were given. Add information to the level completion dialog to show the player how many stars they earned.
4. Once you’ve added the preceding star system, create a way to store the number of stars the player has obtained for each level. Then you can show them not only how many stars they’ve attained but also a message when they beat a previous best. Currently, we store the number of bubbles remaining, the player’s score, and current level number as variables inside Game. But now the best approach might be to create an object that stores each level and records the number of stars. Save this data to Local Storage for when the player returns to the game.
5. Write a polyfill to add Local Storage support to older browsers using cookies. You’ll need to create an object called window.localStorage, if one doesn’t already exist, and create getItem and setItem methods.
All materials on the site are licensed Creative Commons Attribution-Sharealike 3.0 Unported CC BY-SA 3.0 & GNU Free Documentation License (GFDL)
If you are the copyright holder of any material contained on our site and intend to remove it, please contact our site administrator for approval.
© 2016-2026 All site design rights belong to S.Y.A.