JUMP START HTML5 (2014)
Chapter 4 Basics: HTML5 Forms
HTML5 forms are a leap forward from those in previous versions of HTML. We now have a half dozen new input states or types, such as range and url; we have new attributes that let us require fields, or specify a particular format; we have an API that lets us constrain and validate input; and finally, we have new form elements, such as datalist, that let us create engaging user interfaces without heavy JavaScript libraries or plugins.
Unfortunately, not every browser supports all of these features just yet. For now we still need to use JavaScript libraries, and polyfills (downloadable code which provides facilities that are not built into a web browser) as fall back strategies.
The best way to understand HTML5 forms is to build one. Let’s try building a form that collects story suggestions for the HTML5 News-Press site from the previous chapter. We’ll need to gather the following information with our form:
· Name
· City of residence
· Email address
· A telephone number
· A URL where we can learn more (if there is one)
· The actual story idea
At the very least, we’ll want to require the user to provide a first name, email address, and their story idea.
Starting an HTML5 Form
To build our HTML form, we’ll need to start with an opening form element tag. Because we want to submit this form to a server-side processing script, we’ll need to include two attributes.
· action: the URL of the script
· method: the HTTP request method to use, sometimes GET, but usually POST
Since this could be a lengthy message, we’ll use POST rather than GET. GET is better suited to short key-value pairs, such as search boxes. Other HTTP methods, such as PUT, HEAD, or DELETE may also be used with forms, but most of the time you’ll use GET or POST.
It's worth noting here that application/x-www-form-urlencoded is the default content type value for form data. We could also explicitly set it using the enctype attribute, but we don’t have to.
We could also set our enctype attribute to multipart/form-data as shown below:
<form action="/script" method="post" enctype="multipart/form-data">
Either is fine for sending text. If we wanted to upload files, however, we would need to use enctype="multipart/form-data".
The input Element
The input element is the most commonly used element for creating form controls. An input tag typically includes the following attributes.
· name: the name of the field
· type: indicates what kind of input control to display
· id: a unique identifier for the field
· value: sets a default value for the field
Of these, only name is required in order for our form to send data. Each name attribute becomes a key or field name for our server-side script. That said, in most cases, you'll also want to set the type attribute.
There are about a dozen possible values for the type attribute, most of which we’ll cover in this chapter. Each type value corresponds to a different kind of user interface control and set of validation constraints. The most liberal value for the type attribute—and the default state of the inputelement—is text.
Collecting Names
People names and place names are usually a mix of alphanumeric characters, spaces, and punctuation marks. For this reason, we’ll use the text input state for those fields. Let’s add form fields for the letter writer’s name and city of residence. Since we want to require the user to provide a name, we’ll also add a required attribute.
<p>
<label for="your_name">Your name:</label>
<input type="text" name="your_name" id="your_name" required>
</p>
<p>
<label for="city">City of residence:</label>
<input type="text" name="city" id="city">
</p>
Note: id and name attributes
The id attribute may, but does not have to be, the same as the name attribute.
Using Form Labels
We’ve added an unfamiliar element here: label. The label element in an HTML form works just like the label on a paper form. It tells the user what to enter in the field. In order to associate a label with a form control, the label must have a for attribute that matches the id attribute of its form field. Or you could place the form control inside of the label element.
<label>Your name:
<input type="text" name="your_name" id="your_name" required>
</label>
Using the for and id attributes, however, offers a little more flexibility for page layouts.
Why not just use text without wrapping it in a label element? Using label increases the usability of the web for those with physical or cognitive challenges. Screen-reading software, for example, uses labels to help low-vision users in filling out forms. It’s an accessibility feature that’s baked into HTML.
Requiring Form Fields
One of the great improvements of HTML5 over previous versions is native form validation. By adding the required attribute, we are asking the browser to make sure this field has been filled out before submitting the form.
Note: Empty Attributes
The required attribute is an example of an empty attribute. Its presence or absence determines whether that value is set.
If the your_name field is empty when the user submits our form, Chrome, Opera, and Internet Explorer 10+ will prevent submission and alert the user, as shown in Figure 4.1. No DOM scripting is necessary.

Figure 4.1. A form submission error message in Chrome
Notice that I didn’t mention Safari. For better or worse, Safari versions 6.0.5 and older don't provide native user interface feedback. It does support HTML5 validation, but we’ll still need to use DOM scripting and CSS to alert the user about form submission. We’ll discuss one way to do this in the Validation API section.
Styling Required Forms
You may want to visually indicate which fields are required and which aren’t using CSS. There are two CSS selectors we can use to target required fields.
1. Using the attribute selector [required].
2. Using the :required pseudo-class.
The :required pseudo-class is a CSS Selectors, Level 4 selector, but support is available in the latest version of every major browser. CSS Level 4 selectors also adds an :optional pseudo-class that we could use instead to target the input fields that aren’t required.
To target older browsers that lack CSS4 selector support, use the attribute selector. For example, if we want to add a 1 pixel red border around our required fields, we could add the following to our CSS.
input[required], input:required
{
border: 1px solid #c00;
}
Collecting Email Addresses, Phone Numbers, and URLs
We’ll want to let our tipster know that we’ve received their input. That means our form needs fields for the email address and phone number. We also want to collect URLs where we can learn more information about this story idea, so our form will also need a field for the URL.
With previous versions of HTML, we'd use a text field for all of these and validate the data with JavaScript. HTML5, however, defines three new input types for this purpose: email, tel and url.
Let’s add an email field to our form. We’ll also make it required.
<p>
<label for="email">E-mail address</label>
<input type="email" name="email" id="email" required>
</p>
Using the email type tells the browser to check this field for a valid email address. It can’t, of course, tell whether the address can receive mail. But it will check that the input for this field is syntactically valid. If a user enters an invalid address, most browsers will alert the user when he or she submits the form.
You may also want to let the user provide multiple email addresses. In that case, use the multiple attribute. The user can then enter one or more e-mail addresses, each separated by a comma.
Any time you permit multiple values for one input field, it’s a good idea to indicate that it’s allowed with a label or explanatory text.
Note: On Validation
Although native data validation is a part of HTML5, you should still use server-side validation and escape any output that originates with the user. Not all browsers support HTML5, and not all input sent to your script will come from your form.
Phone numbers are another story. Email addresses adhere to a standard format, but telephone numbers do not. In the United Kingdom, phone numbers may be up to 11 digits long. In the United States, they are no more than 10 digits. Some countries have phone numbers that contain 13 digits. The formatting of phone numbers also varies by country. Inconsistent lengths and formats make native phone number validation difficult. As a result, the specification doesn’t define an algorithm for doing so.
Let’s add a telephone field to our form. To do that, we do need to add an input field and set the value of its type attribute to tel. We won’t make it required.
<p>
<label for="telephone">Telephone number:</label>
<input type="tel" name="telephone" id="telephone">
</p>
The big advantage of using tel instead of text is to trigger a telephone input screen in browsers that support it.

Figure 4.2. The tel input type in Firefox Mobile
Though tel doesn’t give us automatic validation, we can shape user input using two attributes:
· placeholder, which offers a 'hint' to the user about what format this field expects.
· pattern, which sets a regular expression pattern that the browser can use to validate input.
Our imaginary newspaper is based in the United States, and has a US-based audience. We’ll reflect that in our attribute values.
<p>
<label for="telephone">Telephone number:</label>
<input type="tel" name="telephone" id="telephone"
↵placeholder="(000) 000-0000"
↵pattern="\([2-9][0-9]{2}\) [0-9]{3}-[0-9]{4}">
</p>
For our placeholder attribute, we’ve just added text that reflects the expected format for this phone number.
Note: Placeholder Text
Placeholder text is not a replacement for the label element. Provide a label for each input field, even if you use the placeholder attribute
For pattern, we’ve used a regular expression. This attribute provides a format or pattern that the input must match before the form can be submitted. Almost any valid JavaScript regular expressions can be used with the pattern attribute. Unlike with JavaScript, you can’t set global or case-insensitive flags. To allow both upper and lower case letters, your pattern must use [a-zA-Z].The pattern attribute itself may be used with text, search, email, url and telephone input types.
Note: Regular Expressions
Regular expressions are a big, complex topic and, as such, they’re beyond the scope of this book. For a more complete reference, consult WebPlatform.org’s documentation.
The url input type works much the same way as email does. It validates user input against accepted URL patterns. Protocol prefixes such as ftp:// and gopher:// are permitted. In this case, we want to limit user input to domains using the http:// and https:// protocols. So we’ll add apattern attribute here as well.
<p>
<label for="url">
Please provide a web site where we can learn more (if
↵applicable):
</label>
<input type="url" name="current_site" id="current_site"
↵placeholder="http://www.example.com/"
↵pattern="http(|s)://[-0-9a-z]{1,253}\.[.a-z]{2,7}">
</p>
We’ve also added placeholder text as a cue to the user about what we’d like them to tell us. Altogether, your form should resemble the one below:
<form action="./script" method="POST">
<p>
<label for="your_name">Your name:</label>
<input type="text" name="your_name" id="your_name">
</p>
<p>
<label for="city">City of residence:</label>
<input type="text" name="city" id="city">
</p>
<p>
<label for="email">
E-mail address
(separate multiple e-mail addresses with a comma):
</label>
<input type="email" name="email" id="email"
↵placeholder="jane.doe@example.com" multiple >
</p>
<p>
<label for="tel">Telephone number:</label>
<input type="tel" name="phone_number" if="phone_number"
↵placeholder="(000) 000-0000"
↵pattern="\([2-9][0-9]{2}\) [0-9]{3}-[0-9]{4}">
</p>
<p>
<label for="url">
Please provide a web site where we can learn more (if
↵applicable):
</label>
<input type="url" name="current_site" id="current_site"
↵placeholder="http://www.example.com/"
↵pattern="http(|s)://[-0-9a-z]{1,253}\.[.a-z]{2,7}">
</p>
<p>
<label for="project">Tell us your story idea:</label>
<textarea name="story_idea" id="story_idea"
↵placeholder="Briefly tell us what we should write about and
↵why."
↵maxlength="2000"></textarea>
</p>
<p>
<button type="submit">Send it!</button>
</p>
</form>
Uploading Files
The file input type is not new to HTML. We’ve been able to upload files since HTML 3.2. What is new, however, is the multiple attribute, which lets us upload multiple files using one form field. In this section, we’ll build a form that lets users upload audio files.
First we’ll need to create a start tag for the form element.
<form action="/script" method="post" enctype="multipart/form-data">
As with our previous form, our start tag has action and method attributes. But note that the value of its enctype attribute is multipart/form-data. Again, when uploading binary data, we must use the multipart/form-data encoding type.
Next, we need to add an input tag, and set the value of its type attribute to file. We’ll name it upload, but you can choose almost any name you like. To permit multiple file uploads, we’ll need to add the multiple attribute.
<input type="file" name="upload" id="upload" multiple>
Note: PHP Form Keys
PHP requires form keys with multiple values to use square bracket array syntax. If you’re using PHP to handle your forms, append square brackets to the name (for example: name="upload" would become name="upload[]").
We can also restrict what files can be uploaded in the browser with the accept attribute. The value of accept may be any of the following:
· audio/*, video/*, image/*
· a valid MIME type such as image/png or text/plain
· a file extension that begins with '.'
You may include multiple accept values; separate them with a comma. Let’s update our form field to accept only MP3 and Ogg Vorbis files.
<input type="file" multiple name="upload" id="upload"
↵accept=".mp3,.ogv">
We’ll finish up our form with a submit button and closing form tag:
<form action="/script" method="post" enctype="multipart/form-data">
<p>
<label for="upload">Your file(s):</label>
<input type="file" multiple name="upload" id="upload"
↵accept=".mp3,.ogv">
</p>
<p>
<button type="submit">Upload!</button>
</p>
</form>
When submitted, our server-side script will save those files, and return a "thank you" message.
Warning: Take Appropriate Precautions
You can’t rely on browser-based validation or restrictions. Take appropriate precautions, and make sure that your file uploads are being placed in a directory that is not web-accessible.
The datalist Element
With the datalist element, we can add a predefined set of options to any form input control. Let’s take a look at how we go about this. First, we’ll create a datalist of destination options for a fictitious airline:
<datalist id="where_we_fly">
<option>Accra, Ghana</option>
<option>Paris, France</option>
<option>Melbourne, Australia</option>
<option>Lima, Peru</option>
<option>Los Angeles, United Sates</option>
<option>Kuala Lumpur, Malaysia</option>
</datalist>
Now we can associate it with an input field using the list attribute.
<p>
<label for="destination">Where would you like to go?</label>
<input type="text" name="destination" id="destination" value=""
↵list="where_we_fly">
</p>
In browsers that support the datalist element, the code above will associate a predefined list of options with the input element. When the user enters text, matching entries are displayed in the list below the field as shown in Figure 4.3.

Figure 4.3. datalist in IE
In browsers without support for datalist, the text input field will behave normally. Although data lists may, in theory, be associated with other input types, not all browsers support this.
Other Input Types
We’ve already discussed several input types in this chapter, but there are a few more that we’ll cover in this section.
· search
· range
· number
· color
· datetime and datetime-local
· date
· month
· week
· time
Aside from the range input type and search, support for these types varies wildly. Some browsers may have full support for one input type, complete with a user interface control, but lack another one entirely.
It’s possible to determine whether a browser supports a particular input type by testing the value returned by its type attribute. If a browser doesn’t support a particular type, the value of its type attribute will default to text. For example, consider the following range input:
<input type="range" value="" id="slider">
We could test for browser support using the following bit of JavaScript code.
var hasRange = function( elID ){
return document.getElementById( elID ).type == 'range';
}
In browsers that do not support range, the function above will return false. Otherwise, it will return true. Libraries such as Modernizr make it easier to check for support.
input type="search"
For the most part, search operates like the text input type. It merely provides a type that can be visually distinct from text boxes. For example, in Safari, Chrome, and Opera 15 on Mac OS X, search input fields have rounded corners.

Figure 4.4. The Search input type in Safari
input type="range"
The range input type presents the user with a slider control that’s well suited to approximate value inputs between an upper and lower boundary. By default, it’s a horizontal control, as shown in Figure 4.5. However with some CSS (transform: rotate(-90deg)), you can also display range inputs vertically.

Figure 4.5. The range input type
By default, the upper and lower boundaries of the range type are 0 and 100. Change this by setting the min and max attributes. You can also control the 'smoothness' and precision of the thumb position using the step attribute as shown below.
<input type="range" value="" min="0" max="100" step="10">
Every time the user moves the thumb on this range input control, the value of the range will increase or decrease by 10 between 0 and 100. You can also control precision by associating a datalist element with the range input. Each option will be rendered as a 'notch' along the width of the range in browsers that support it—to date, that’s Chrome and Opera 15.
Unfortunately, range isn’t supported in Internet Explorer 9 and older, or Firefox 22 and older. In those browsers, the form control will be a text box instead of a range element.
input type="number"
The number type is another form control type for numeric input values. According to the specification, any floating point number is a valid value. In practice, though, things are little more complicated.
By default, the number input type only accepts integers. Entering 4.2776, for example, will cause a validation error in conforming browsers, such as shown in Figure 4.6.
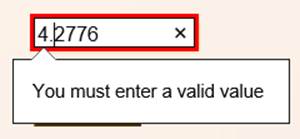
Figure 4.6. An error when entering a floating point number
In order to accept floating point values, we need to set the step attribute. In browsers with incremental arrow controls, such as shown in Figure 4.7, step controls how much the number is incremented or decremented with each press of the arrow button.
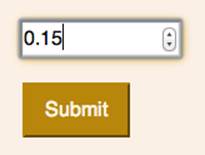
Figure 4.7. Decimal values with the step attribute
For example, when step="0.5", both 1.5 and 98 are valid values, but 88.1 is not. When step=".01", however, 88.1, 1.5, and 98 are all valid values, as is 3.14. In a way, you can use the step attribute to control the floating point precision of your numbers.
<!-- Increments number by 0.5 -->
<input type="number" name="num" id="num" value="" step=".05">
<!-- Increments number by .01; precision to the hundredth -->
<input type="number" name="num" id="num" value="" step=".01">
<!-- Increments number by 0.001; precision to the thousandth -->
<input type="number" name="num" id="num" value="" step=".001">
In order to make our 4.2776 value an accepted one, we would need to use set our step attribute to .0001. Unfortunately, this workaround does not work in Opera 12 and older versions.
Date and Time Inputs
Finally, let’s look at the date and time input types. There are six of them, listed below.
· datetime: Select a date and time as a global, forced-UTC string
· datetime-local: Select a date and time in the user’s local time zone
· date: Select a single date with a time component of midnight UTC
· month: Select a month and year
· week: Select a week and year
· time: Select a time in hours and minutes
Browsers that support these types will display a time picker widget (for the time type), a date picker widget (for date, month, and week), or both (datetime and datetime-local), as shown in Figure 4.8.
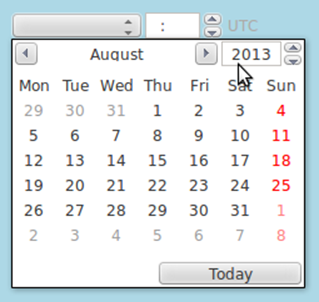
Figure 4.8. The time picker widget in Opera
The datetime and datetime-local input types are subtly different. The former treats all input as a UTC (coordinated, universal) date and time. Browsers may indicate to the user that this is a UTC time input—as Opera version 12 does—or it may display a localized user interface, and convert the time under the hood.
Chrome and Opera 15 support all but datetime. Safari as of version 6.0.5, Firefox as of version 25, and Internet Explorer as of version 10 do not support any of these types.
input type="color"
With the color input type, we can add a native color picker control to our applications. What the color picker looks like depends on the browser and operating system. However in all cases, only six-digit hexadecimal color values are valid. This means that you can’t specify a color with transparency as you can with CSS. The default value for the color type is #000000.
Unfortunately, the color input type is only supported by Chrome and Opera 11 and 12 (but not version 15.0). It’s not ready for prime time, but is mentioned here for completeness.
All materials on the site are licensed Creative Commons Attribution-Sharealike 3.0 Unported CC BY-SA 3.0 & GNU Free Documentation License (GFDL)
If you are the copyright holder of any material contained on our site and intend to remove it, please contact our site administrator for approval.
© 2016-2026 All site design rights belong to S.Y.A.