JUMP START HTML5 (2014)
Chapter 7 Multimedia: Using Native HTML5 Audio
In this chapter, we'll cover the audio element and its attributes. Though we're focusing on the audio element, keep in mind that most of these attributes also apply to video. In fact, it's possible to use the audio element to play video files and the video element to play audio files. The main difference is that the video element will display an image track if it is available; audio never will.
The audio Element
Adding audio to your web page is super simple. Use the <audio> tag. At a minimum, it requires a src attribute, which is the path to and name of the media file. Audio elements also require a closing </audio> tag. Using your text editor, create a new HTML file, and add the snippet below, changing the value of src to point to your media file. Save it as audio.html, then open it in your browser.
<audio src="/path/to/media.file"></audio>
You should see and hear absolutely nothing. By default, the audio and video elements lack controls and load in an idle state.
In order to expose a player interface to our users, we'll need to add the controls attribute.
<audio src="/path/to/media.file" controls></audio>
The controls attribute is an example of an empty attribute. For empty attributes, its presence or absence determines whether the attribute value is true or false. It's actually the equivalent of typing controls="" with an empty string for a value. If you're using HTML5's stricter XHTML syntax, you should use controls="" or controls="controls" instead of the empty attribute.
Adding the controls attribute will give us visible play/pause, volume, and thumb head controls. What those default controls look like depends on the browser, as does the ability to style them with CSS.
Note: With JavaScript Disabled
When the user has disabled JavaScript, the browser will expose a media controls user interface, regardless of the value of the controls attribute.
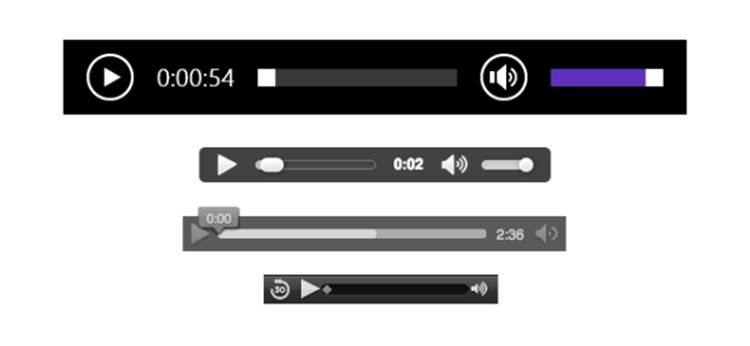
Figure 7.1. Default audio players in (from top to bottom) Internet Explorer 11, Chrome 30, Firefox 27, and Safari 6.0.5
Some browsers expose what's known as a "Shadow DOM," or a way of targeting specific components with CSS. Support for a Shadow DOM varies from browser to browser, so you'll need to consult each browser's documentation.
A more flexible approach is to build our own player. As we'll see later in this book, we can also control appearance by using the multimedia API, CSS, and JavaScript.
The autoplay Attribute
We can choose to play our media as soon as it loads by adding the autoplay attribute. Like controls, autoplay is an empty attribute.
<audio src="/path/to/media.file" autoplay></audio>
In your audio.html file, replace controls with autoplay and reload the page. Notice that our audio file starts playing right away, but also notice that there isn't a way to stop playback. If we want to allow the user to control this media, we'll need to include them both, as shown below.
<audio src="/path/to/media.file" autoplay controls></audio>
Be considerate of your users and think carefully before using the autoplay attribute. Auto-playing media consumes bandwidth both for you and your users. Media files can "clog the pipes," so to speak, for users with limited bandwidth. For users who also have metered bandwidth, auto-playing media literally costs money. And many users just find it plain annoying. In most cases, user-initiated media is the better way to go.
Looping Media
Perhaps you want to use some atmospheric audio to set a mood for your web site. In that case, you may want your media to repeat automatically, without intervention from the user. This is where the loop attribute comes in handy. When present, the media will "rewind" itself at the end, and play from the beginning.
<audio src="/path/to/media.file" autoplay controls loop></audio>
Muting Media
HTML5 offers the ability to silence the audio output of a media file with the muted attribute. The media file will still be downloaded. The progress bar and time will continue to update. But the browser will not output any sound.
<audio src="/path/to/media.file" controls muted></audio>
Though perhaps nonsensical for audio files, it makes a bit more sense for video. For example, a video ad can still capture the user's attention visually, without the added disruptiveness of sound. Note again that muted is an empty attribute. For XHTML syntax, you'll need to use muted="" ormuted="muted" instead.
We can also control audio output with scripting and the volume property.
Buffer Hinting with the preload Attribute
Multimedia uses a lot of bandwidth—both for your servers and your users. Audio and video data takes a lot of bytes. As the document loads, the browser will request and download a snippet of the media file. Usually this snippet is just long enough to determine the file's duration or dimensions. In the case of video, it may also download a frame or two. When playback begins, the browser will make another request—sometimes multiple requests—for the rest of the media file.
Each of these requests places an additional demand on the server. And partial requests happen whether or not the user listens to the audio or watches the video file. The good news is that we can shape this behavior with the preload attribute, as shown below.
<audio src="/path/to/media.file" controls muted preload="auto">
</audio>
The preload attribute accepts three possible values.
· none tells the browser not to download anything until the user requests it, but it may download the entire video upon playback.
· metadata hints to the browser that it's okay to download a portion of this media file, and that it should throttle the download during playback.
· auto tells the browser that it's okay to download as much of the video as it wants.
preload="auto"
Using auto is the most demanding of these. A value of auto tells the browser that it is okay to download as much of the file as it wants, up to the entire resource. Playback is often more consistent, because more of the video is already in the browser's buffer. This is great for the user, but it may not be so great for your bandwidth usage. As you can see in Figure 7.2, Firefox made three requests for our media file, Pontification.ogg.
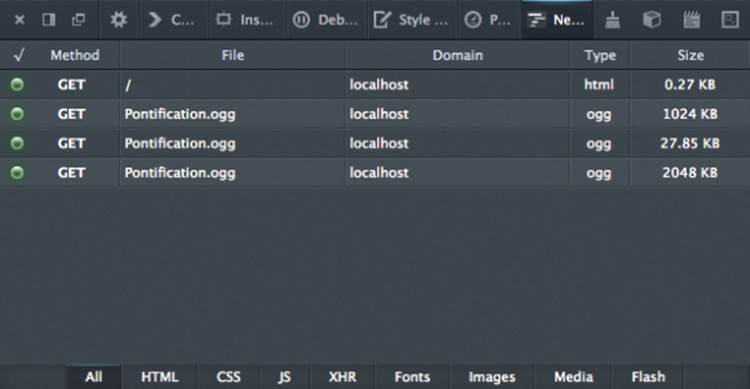
Figure 7.2. Requests for Pontification.ogg when preload="auto" as shown in Firefox's developer tools
preload="none"
A preload value of none tells the browser, "Don't you dare download a single byte until the user tries to play this file!" On the plus side, preload="none" will reduce the number of requests, thereby reducing bandwidth consumption. In Figure 7.3, below, we can see that the browser makes a request for our HTML document, but not our media file.
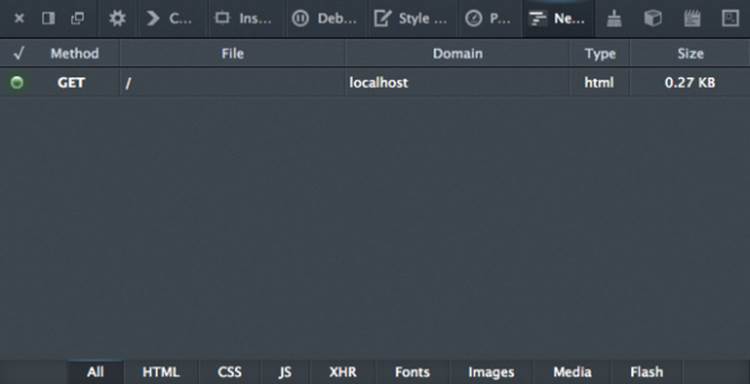
Figure 7.3. Requests for Pontification.ogg when preload="none" as shown in Firefox's developer tools
On the minus side, preload="none" means that playback will be less responsive. The user may experience may be several seconds of lag time between when he or she clicks 'play,' and when the media actually begins playing. Once playback starts, however, the browser may aggressively download the file.
preload="metadata"
Think of metadata as a nice compromise between the two. When the preload attribute is set to metadata, the browser will make one request, and only download a portion of the file.
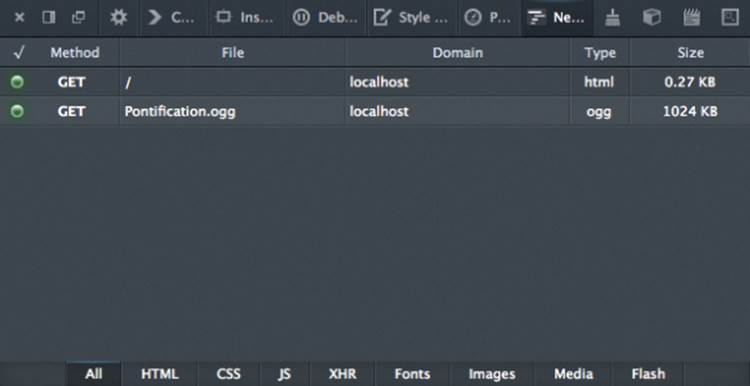
Figure 7.4. Requests for Pontification.ogg when preload="metadata" as shown in Firefox's developer tools
Using the metadata value also suggests to the browser that it should throttle the download once playback begins. Neither preload="none" nor preload="auto" prevent the browser from downloading an entire resource. However, preload="metadata" hints to the browser that it should download the file at the slowest possible rate that still allows consistent play.
Here's where things get interesting: we can use JavaScript to change the value of preload once playback begins. We may, for example, want to start with preload="none", so that no additional data will be downloaded. Then once the user begins playback we can switch to preload="metadata"and reap the benefits of download throttling. There's an example of how to do this in Chapter 6.
Fallback Content
Notice here that we're using both start and end tags for the audio element, but there isn't anything in between. If a user visits our page using a browser that doesn't support audio, they won't see any indication that the player is missing (unless other content on the page tells them it is).
We can fix this issue by adding fallback content between the <audio> and </audio> tags as shown below.
<audio src="/path/to/media.file" controls>
Oh no! Your browser doesn't support HTML5 audio.
Try upgrading your browser if you can.
</audio>
You could also use an image as your alternative content, or embed a Flash-based player between the tags. As we'll see in Chapters 8 and 9, our <source> and <track> tags also sit between our opening and closing tags.
Remember: everything we've discussed so far also applies to the video element. But the video element has a few more attributes that make sense for a visual medium. We'll discuss those in the next chapter.
All materials on the site are licensed Creative Commons Attribution-Sharealike 3.0 Unported CC BY-SA 3.0 & GNU Free Documentation License (GFDL)
If you are the copyright holder of any material contained on our site and intend to remove it, please contact our site administrator for approval.
© 2016-2026 All site design rights belong to S.Y.A.